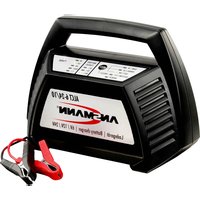
ALCT6-24/10 - Battery charger ANSMANN - Free user manual and instructions
Find the device manual for free ALCT6-24/10 ANSMANN in PDF.


| Product Type | Automatic battery charger for lead-acid batteries |
| Brand | ANSMANN |
| Model | ALCT6-24/10 |
| Input Voltage | 230 V AC / 50 Hz |
| Protection Class | II |
| Protection Rating | IP20 |
| Charging Voltages | 6 V (7.25 V) / 12 V (14.5 V) / 24 V (29.0 V); in cold mode: 6 V (7.45 V) / 12 V (14.9 V) / 24 V (29.8 V) |
| Adjustable Charging Currents | 1 A / 5 A / 10 A |
| Compatible Battery Capacity | 4.5 Ah to 240 Ah |
| Safety Functions | Overload, short-circuit and reverse polarity protection; audible signal and red LED in case of reversal |
| Regeneration Mode (REFRESH) | Automatic for deeply discharged batteries (voltage below 5 V / 10 V / 20 V) |
| Cold Temperature Mode (COLD TEMP.) | Selectable for temperatures below 5 °C; increases charging voltage |
| Charge Indicator | 3 LEDs (35%, 70%, 100%) indicating charge level |
| Maintenance Charge | Automatic for long-term charge maintenance (winter storage) |
| Automatic Engine Start | Detection and start assistance with high current |
| Maintenance and Cleaning | Disconnect the charger from the mains; clean with a dry cloth |
| Safety of Use | Do not use outdoors or in damp conditions; do not charge frozen or damaged battery; avoid flames and sparks |
| Warranty | 3 years (excl. damages due to misuse) |
| Intended Use | Charging of 6 V, 12 V and 24 V lead-acid batteries for vehicles, motorcycles, etc. |
Frequently Asked Questions - ALCT6-24/10 ANSMANN
User questions about ALCT6-24/10 ANSMANN
0 question about this device. Answer the ones you know or ask your own.
Ask a new question about this device
Download the instructions for your Battery charger in PDF format for free! Find your manual ALCT6-24/10 - ANSMANN and take your electronic device back in hand. On this page are published all the documents necessary for the use of your device. ALCT6-24/10 by ANSMANN.
USER MANUAL ALCT6-24/10 ANSMANN
Thank you for purchasing the ANSMANN charger ALCT 6-24/10. These operating instructions will help you to use all features of your ALCT 6-24/10. We hope you will be happy with your new charger.
Your Team ANSMANN
SAFETY INSTRUCTIONS
Keep your charger in a dry place (indoor use only). There must be adequate ventilation - a window partly open for example.
Do not use the device if there are signs of any damage to the housing, mains plug or cables. Please contact an authorized dealer!
The charger should not be covered during use.
Use the device only as intended (according to the charger specifications and instructions).
In order to avoid the risk of fire and / or electrical shock, the charger must be protected against high humidity and water.
Do not use this charger near flammable gases or liquids at any time.
Never attempt to open the charger.
Never charge a frozen or damaged battery.
When the charger is not in use - disconnect it from the mains supply.
Improper use of the battery charger may result in danger to the user.
Keep away from children! Children should be supervised to ensure that they do not play with the charger.
This device is not to be used by children or persons with reduced physical, sensory or mental capabilities, or lack of experience and knowledge, unless they are given adequate supervision and specific instructions!
If the safety instructions are not followed, this may cause damage to the device or serious injury to the user.
For non-maintenance free batteries, please check the acid level and top-up if necessary.
Do not recharge non-rechargeable batteries
The battery terminal not connected to the chassis has to be connected first. The other connection is to be made to the chassis, remote from the battery and fuel line. The battery charger is then to be connected to the supply mains.
After charging, disconnect the battery charger from the supply mains. Then remove the chassis connection and then the battery connection.
This appliance can be used by children aged from 8 years and above and persons with reduced physical, sensory or mental capabilities or lack of experience and knowledge if they have been given supervision or instruction concerning use of the appliance in a safe way and understand the hazards involved. Children shall not play with the appliance. Cleaning and user maintenance shall not be made by children without supervision.
If the supply cord is damaged, it must be replaced by the manufacturer, its service agent or similarly qualified persons in order to avoid a hazard.
WARNING
Charging lead acid batteries can generate explosive gases. Please ensure sufficient ventilation and avoid fire or naked flames and smoking. Due to emerging explosive gases it is important to ensure that the battery terminals are connected or disconnected when the charger is disconnected from the mains to avoid sparks.
Battery acid is corrosive. If battery acid gets in your eyes or on your skin, wash immediately with plenty of water and seek urgent medical attention.
Make sure that the battery terminals are contacted with the correct polarity (red to the positive pole terminal, black to the negative pole terminal).
A Spark can arise if the charger is connected to the battery whilst connected to the mains. Please ensure it is disconnected from the mains before connecting or disconnecting the red and black charging leads to or from the battery.
CARE & MAINTENANCE
Carry out repairs only through authorized dealers.
Carry out cleaning and maintenance work to be done only when the mains plug is disconnected.
Cleaning only with a dry cloth.
OVERVIEW FUNCTIONS
Automatic lead acid charger for 6V/12V/24V batteries.
Overcharge protection.
Protection against short-circuit and wrong polarity.
Automatic start of recharge.
3-step charging status indicator.
Automatic „REFRESH“ mode.
Selectable „COLD TEMP.“ mode.
Automatic start functionAdjustable charging current (1A/5A/10A) dependent on battery nominal voltage.
COMMISSIONING
1. Connect charger to the battery with the correct polarity
First connect the charger to the battery to be charged. Connect the red pole terminal to the positive pole (+) of the battery, then the black pole terminal to the negative (-) pole of the battery. Make sure that the battery terminals are connected correctly. If the battery is installed in the vehicle and the battery terminals are not accessible, please consult the vehicle manual for advice.
If the clamps are accidentally attached to the poles the wrong way around, the LED lights red (see fig.1a) and in addition an audible warning signal sounds. Reconnect the terminals with the correct polarity immediately.
2. Connect the device to the mains supply
Insert the mains plug of the charger into the socket. The „POWER“ LED (see fig.1b) will light red.
3. Automatic Voltage Identification/Autosensing
The LEDs 6V/12V/24V (see fig.1C) flash for a few seconds until the device has detected the battery voltage. The corresponding LED lights up permanently. The selected battery will now be charged with the default charging current of 1A. Please check that the detected voltage matches with the voltage of the battery to be charged. If this is not the case, the battery is probably defective. We therefore recommend that the battery should be checked and replaced if necessary.
4. Setting the charge current using the „Mode“ button
Depending on the battery voltage, various charging currents (see fig.2) can be chosen using the MODE button (see fig.1d). If you make no manual adjustment it will charge with the default setting of 1A. We recommend smaller batteries whose capacity is below 20Ah to be charged with 1A. Batteries with more than 20Ah, but less than 40Ah capacity, should be charged with 5A and above 40Ah with 10A.
5. At temperatures below 5 °C (41 °F) we recommend the "COLD TEMPERATURE" mode. To activate, press the „MODE" button for about 3 seconds.
Due to cold temperatures the voltage level of the battery will change, so the battery connected for normal charging process cannot be fully charged to 100%. Therefore, we recommend the „COLD TEMP.“ Mode (see fig.1E), through this, the battery will be fully charged to 100% despite the cold.
- "REFRESH" will automatically start when the battery is fully exhausted.
If the battery is completely discharged, i.e. the voltage is much lower than the nominal battery voltage such as: below 5V for a 6V battery, below 10V for 12V battery and below 20V for a 24V battery, the charger automatically switches to refresh mode (see fig.1f) and charges the battery by pulse charging until a sufficient voltage for the normal charging process has been reached. The charging current for further charging after the completion of the refresh mode can be further selected.
- "FAULT" will be displayed when the battery is deemed defective
In the case of a defective battery the „FAULT“ LED (see fig.1g) is on. The charging stops. Unplug the power cord and disconnect the battery. We recommend that you check the battery and replace as required.
- „BATTERY STATUS“ displays the charge status (see fig.1h)
Using the 3 LEDs (35%, 70%, 100%) you can see the current charge level of the battery:
35% LED flashes battery charge level is between 0% and 35%
35% LED lights, 70% LED flashes battery charge level is between 36% and 70%
35% and 70% LEDs light, 100% LED flashes battery charge level is between 71% and 100%
35%, 70% and 100% LEDs all light battery is fully charged
- Battery fully charged
Once the battery is fully charged, unplug the mains cord and afterwards remove the battery terminals of the battery, first the black terminal (-) and then the red (+) terminal.
- Trickle charge
Alternatively, the battery can be left connected for an extended period (e.g. for the winter). The charger detects any loss of capacity and recharges automatically.
- Automatic start function support
The charger detects during charging that you are trying to start the engine it will automatically supply the highest current available for the selected 6V, 12V or 24V battery. This requires that the charger should be connected to the mains supply and the battery terminals are connected to the battery correctly.
SPECIFICATIONS
Input Voltage: 230V AC / 50Hz
Protection class: II
Protection: IP20
Charge voltage: 6V: 7,25V / 12V: 14,5V / 24V: 29,0V
Charge voltage COLD TEMP.: 6V: 7,45V / 12V: 14,9V / 24V: 29,8V
Adjustable charging currents: 1A / 5A / 10A
Battery capacity: 4,5Ah - 240Ah
DISCLAIMERS
The information in this manual may be amended without notice. ANSMANN assumes no liability for any direct, indirect, incidental or consequential damages or any other damages caused by improper handling or disregard of the information contained in this manual.
WARRANTY INFORMATION
ANSMANN offers a 3 year warranty on this device. No guarantee will be given on damage to the charger due to non-compliance with these instructions.
INFORMATIONS DE GARANTIE
Adjustable charging currents 1A / 5A / 10A
Battery capacity 4,5Ah - 240Ah
ΑΠΟΠΟΙΗΣΕΙΣ
Adjustable charging currents 1A / 5A / 10A
Battery capacity 4,5Ah - 240Ah
FRISKRIVNING AV ANSVAR



- SAFETY INSTRUCTIONS
- WARNING
- CARE & MAINTENANCE
- OVERVIEW FUNCTIONS
- COMMISSIONING
- CONNECT CHARGER TO THE BATTERY WITH THE CORRECT POLARITY
- CONNECT THE DEVICE TO THE MAINS SUPPLY
- AUTOMATIC VOLTAGE IDENTIFICATION/AUTOSENSING
- SETTING THE CHARGE CURRENT USING THE „MODE“ BUTTON
- AT TEMPERATURES BELOW 5 °C (41 °F) WE RECOMMEND THE "COLD TEMPERATURE" MODE. TO ACTIVATE, PRESS THE „MODE" BUTTON FOR ABOUT 3 SECONDS
- INFORMATIONS DE GARANTIE
- ΑΠΟΠΟΙΗΣΕΙΣ
- FRISKRIVNING AV ANSVAR
Brand : ANSMANN
Model : ALCT6-24/10
Category : Battery charger