MaCave A192D - Wine cellar DOMETIC - Free user manual and instructions
Find the device manual for free MaCave A192D DOMETIC in PDF.

| Product type | Ageing cellar (ageing cabinet) |
| Brand | Dometic |
| Model | MaCave A192D |
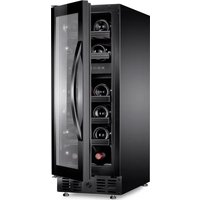
| Bottle capacity | 192 standard Bordeaux-type bottles |
| Total capacity | 386 liters |
| Usable capacity | 356 liters |
| Dimensions (W × D × H with handle) | 595 × 750 × 1745 mm |
| Weight | 84.5 kg |
| Adjustable temperature range | +8 °C to +18 °C (46 °F to 64 °F) |
| Climate class | N |
| Energy efficiency class | G |
| Annual power consumption | 220 kWh/year |
| Power supply | 220-240 V, 50/60 Hz |
| Cooling technology | Absorption technology, vibration-free and silent |
| Functions | Adjustable cooling and heating (in steps of 1 °C or 1 °F), digital temperature display, key lock, pull-out shelves |
| Activated carbon filter | Yes, replaceable every 2 years |
| Shelves | Removable shelves (3) and storage grilles (2) + bottom shelf |
| Lock | Yes, with key provided |
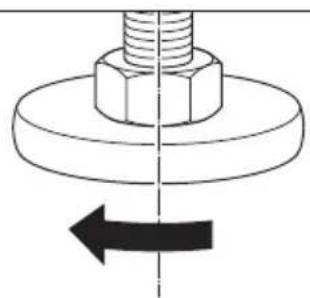
| Adjustable feet | Yes, for leveling |
| Maintenance and cleaning | Unplug before cleaning; interior: warm water with yeast solution (2 tbsp yeast per ½ L water); exterior: warm water and mild detergent |
| Safety | Child lock by key, detailed safety instructions in the manual |
| Spare parts and repairability | Parts available from Dometic after-sales service; repairs by qualified personnel only |
| Delivery contents | Ageing cabinet, key, user manual |
Frequently Asked Questions - MaCave A192D DOMETIC
User questions about MaCave A192D DOMETIC
0 question about this device. Answer the ones you know or ask your own.
Ask a new question about this device
Download the instructions for your Wine cellar in PDF format for free! Find your manual MaCave A192D - DOMETIC and take your electronic device back in hand. On this page are published all the documents necessary for the use of your device. MaCave A192D by DOMETIC.
USER MANUAL MaCave A192D DOMETIC
natural_image
Three technical line drawings of rectangular storage cabinets or refrigerators, shown from different angles (no text or symbols)MaCave
A25G, A192G, A192D
PL
Piwnica na wino
4
natural_image
Technical diagram of a bolt and nut assembly with a directional arrow indicating rotation (no text or labels)5
6
natural_image
Technical illustration of a mechanical assembly with a magnified inset showing a rotating component (no text or symbols present)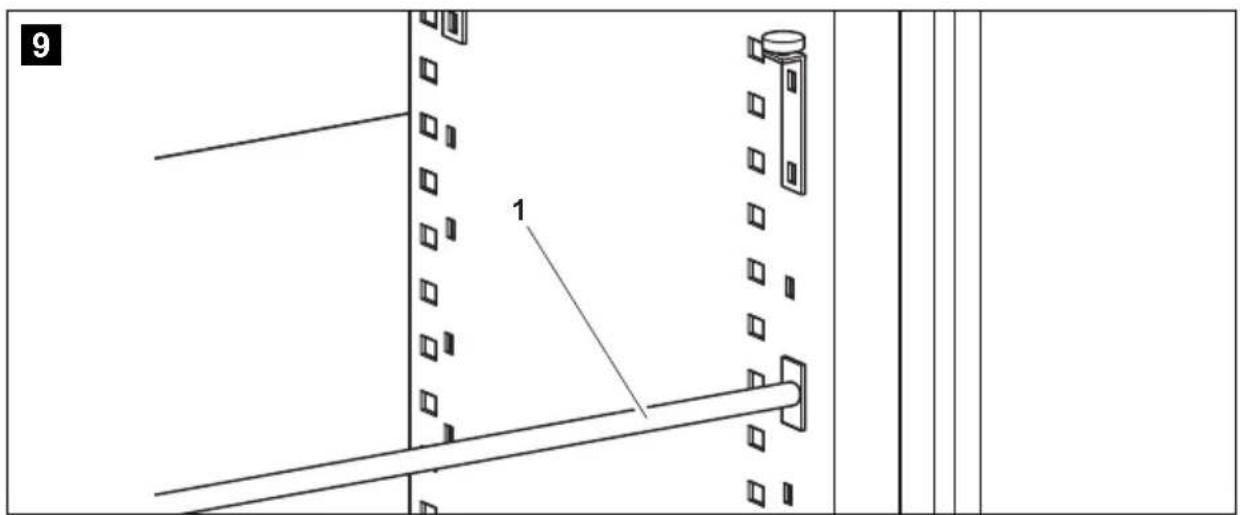
natural_image
Technical line drawing of a server rack with a labeled component (no text or symbols present)10
A25G
natural_image
Line drawing of a multi-tiered cylindrical appliance cabinet with no visible text or symbols11
A192G/A192D
natural_image
Diagram of a multi-tiered storage unit with circular compartments and control panel (no text or symbols)12
natural_image
Diagram showing concentric circular patterns on a railing with an arrow pointing to a cluster of circles (no text or symbols)Please read this instruction manual carefully before first use, and store it in a safe place. If you pass on the product to another person, hand over this instruction manual along with it.
Table of contents
1 Explanation of symbols 25
2 Safety instructions 25
3 Scope of delivery 27
4 Accessories 27
5 Intended use 28
6 Technical description 28
7 Setting up and connecting the appliance ..... 29
8 Using the device 31
9 Troubleshooting....34
10 Maintaining and cleaning the device 35
11 Warranty 36
12 Disposal 36
13 Technical data 37
1 Explanation of symbols

WARNING!
Safety instruction: Failure to observe this instruction can cause fatal or serious injury.

CAUTION!
Safety instruction: Failure to observe this instruction can lead to injury.

NOTICE!
Failure to observe this instruction can cause material damage and impair the function of the product.

NOTE
Supplementary information for operating the product.
▶ Action: This symbol indicates that action is required on your part. The required action is described step-by-step.
√This symbol describes the result of an action.
Fig. 1 5, page 3: This refers to an element in an illustration. In this case, item 5 in figure 1 on page 3.
2 Safety instructions
The manufacturer accepts no liability for damage in the following cases:
● Faulty assembly or connection
● Damage to the product resulting from mechanical influences and excess voltage
- Alterations to the product without express permission from the manufacturer
● Use for purposes other than those described in the operating manual
2.1 General safety

WARNING!
- Before you use the device for the first time, check that the operating voltage matches the mains voltage (see type plate).
- Do not operate the appliance if it is visibly damaged.
- This device may only be repaired by qualified personnel. Inadequate repairs may cause serious hazards.
Should your appliance need to be repaired, please contact customer service.
- This appliance can be used by children aged 8 years or over, as well as by persons with diminished physical, sensory or mental capacities or a lack of experience and knowledge, providing they are supervised, or have been taught how to use the appliance safely and are aware of the resulting risks.
● Electrical appliances are not toys.
Always keep the device out of the reach of children.
● Children must be supervised to ensure that they do not play with the device.
- Keep the keys out of the reach of children.
- If this device's power cable is damaged, it must be replaced by the manufacturer, customer service or a similarly qualified person in order to prevent safety hazards.
- Do not store any explosive substances, such as spray cans with propellants, in the device.

CAUTION!
- Disconnect the appliance from the mains:
- Before cleaning and maintenance - If you will not need to use it for some time
● The appliance should be moved and set up by at least two people. Otherwise this could lead to back or other injuries.
- Do not place the device in direct sunlight or in the vicinity of strong heat sources (heating appliances, ovens, etc.).

NOTICE!
- Never pull the plug out of the socket by the connection cable.
- Do not use accessories that have not been recommended by the manufacturer. This can lead to injury and damage to material.
2.2 Operating the appliance safely

WARNING!
- Never use the device in rooms where flammable materials are stored or flammable gases have built up. Sparks from the motor could ignite them.

CAUTION!
- Do not use the device with wet hands.

NOTICE!
- Only use the device indoors, never outside.
● Never expose the device to moisture. - Keep children and animals at a safe distance when operating the device.
- Do not place any electrical devices inside the cooler.
3 Scope of delivery
- Wine chamber
Key - Operating manual
4 Accessories
Available as accessories (not included in the scope of delivery):
Designation Item number
A192D/
A192G
A25G
Storage shelves 9105305644 –
Pull-out shelves 9105305643 –
Active carbon filter 9105305799 9105305799
5 Intended use
The device is a wine refrigerator. It is only intended for storing wine.
6 Technical description
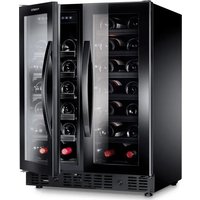
The wine refrigerator comes in three models:
● A25G: with capacity for 25 standard Bordeaux bottles
● A192G: with capacity for 192 standard Bordeaux bottles
● A192D: with capacity for 192 standard Bordeaux bottles
You can find information on storage of bottles in chapter "Storing bottles" on page 31.
The temperature can be set in 1 °C or 1 °F increments using sensor buttons.
The appliance has:
● Vibration-free and noiseless operation with absorption technology
● A lockable door, that cannot be penetrated by UV light (A25G/A192G only)
● an active carbon filter for improving the inner climate
● A pull-out shelf for storing the bottles (A192G/A192D only)
Device overview
| No. in fig. 1, Designation page 3 |
| 1 Height-adjustable feet |
| 2 L o c k |
| 3 Ventilation slots (on the top, not visible) |
| 4 Control panel |
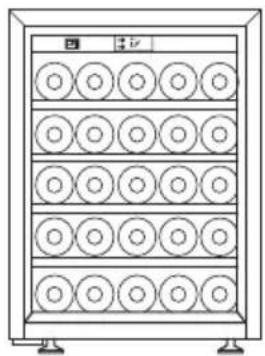
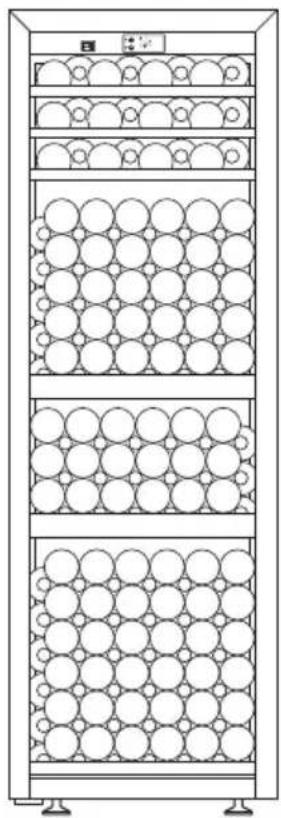
| 5 Mesh shelves (A25G) or pull out shelves (A192G/A192D) |
| 6 Storage shelf (A192G/A192D only) |
Control elements
Symbol Description
1 I/O On/off switch
2 Lowers the set temperature by 1 °C or 1 °C
3 Increases the set temperature by 1 °C or 1 °C
4 Cooling mode
5 Heating mode (A192G/A192D)
6 - Display, indicates the current temperature
7 Setting up and connecting the appliance
7.1 Notes on setting up the appliance
The wine refrigerators can be set us as free-standing installations.
When selecting the location, observe the following instructions:
- The ambient temperature should lie within the range of the climate class. Otherwise, it could mean that the inner temperature you set cannot be reached or maintained. This could also be the case if there are extreme fluctuations in the ambient temperature.
- The appliance should stand in the coldest part of the room, away from heat sources (ovens, heating devices or radiators).
● The location must not be damp or wet. - The appliance must not be exposed to direct sunlight. This can damage the acrylic coating and lead to higher power consumption.
- The ground must be level and sufficiently stable to bear the wine cellar at full capacity.
-
The appliance must be sufficiently ventilated. Set up the device so that minimum distances of 50 mm from the side walls and 100 mm from the rear walls are adhered to (fig. 3, page 4). The ventilation slots on the top of the device must not be obstructed.
-
Note the information on the electrical connection, see chapter “Notes on the electrical connections” on page 30.
- Remove all the inner and outer packaging material before setting up.
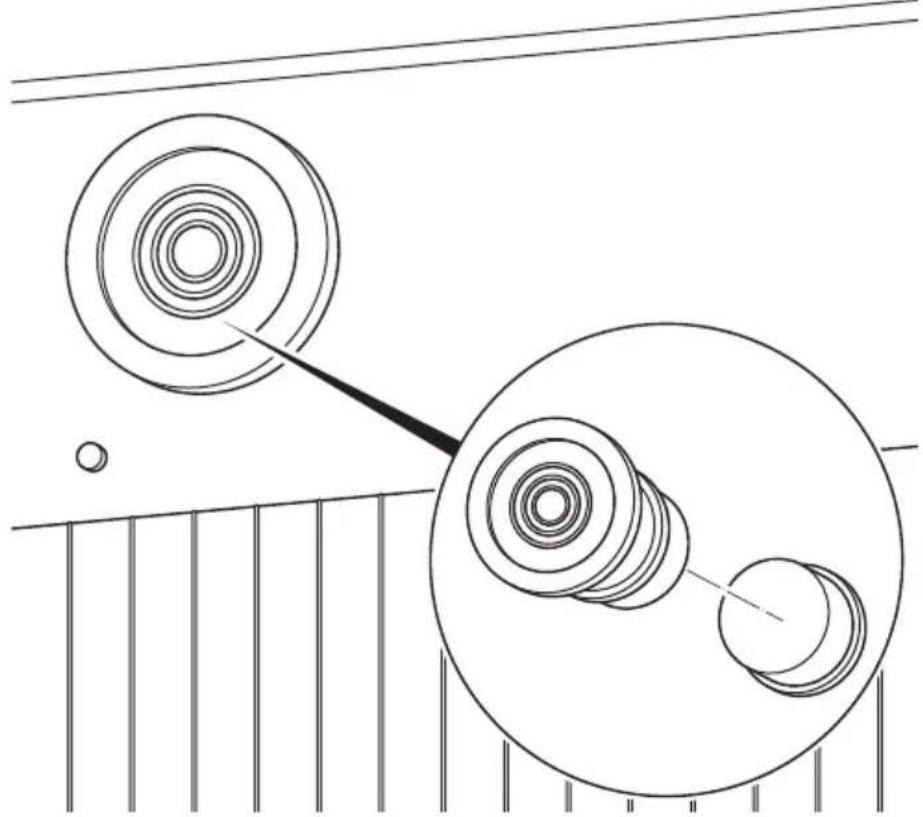
- Using the height-adjustable feet, adjust the device until it is level and there is a distance of 30 mm between the bottom of the device and the floor (fig. 4, page 4).
7.2 Notes on the electrical connections

NOTICE!
Leave the appliance to stand upright for about 2 hours after transporting, before you connect it to the power supply.
Otherwise this could cause faults in the cooling system.
Observe the following when connecting the appliance:
- Check that the voltage specification on the type plate is the same as that of the power supply.
- If you use an extension cable, this must be approved for the same values as the device, see (chapter “Technical data” on page 37).
- Do not use an extension cable or a multiple power socket that can be switched off with just one switch.
- The cable must rest securely behind the appliance and not be allowed to lie or hang unprotected. No hot or sharp components may come into contact with the device.
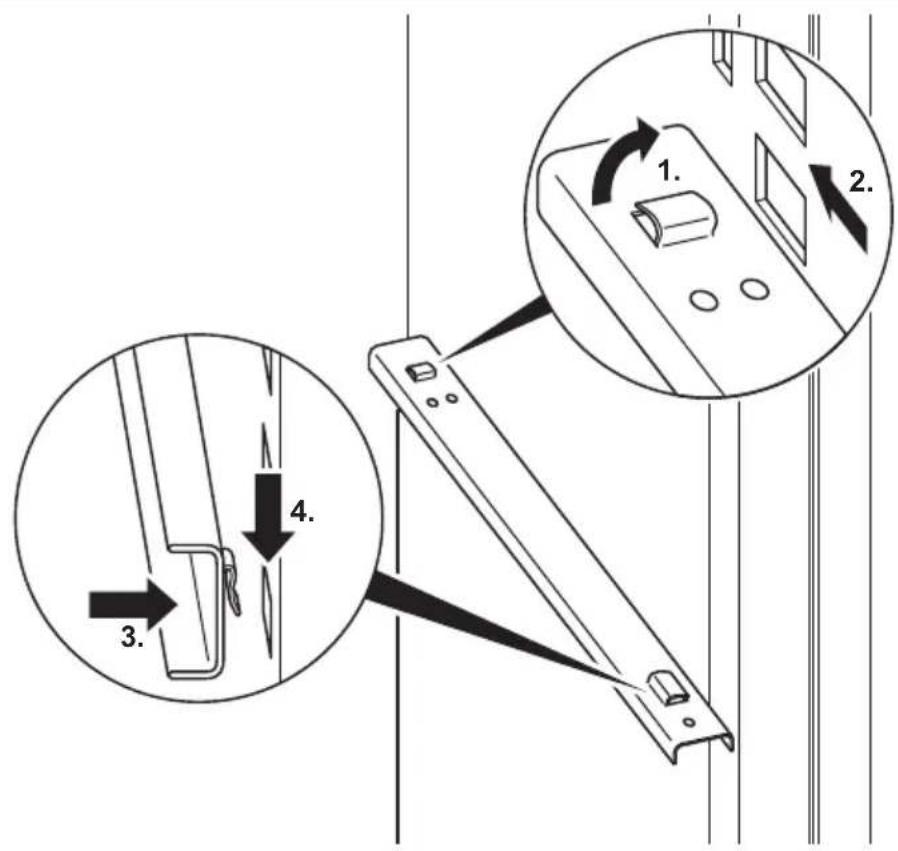
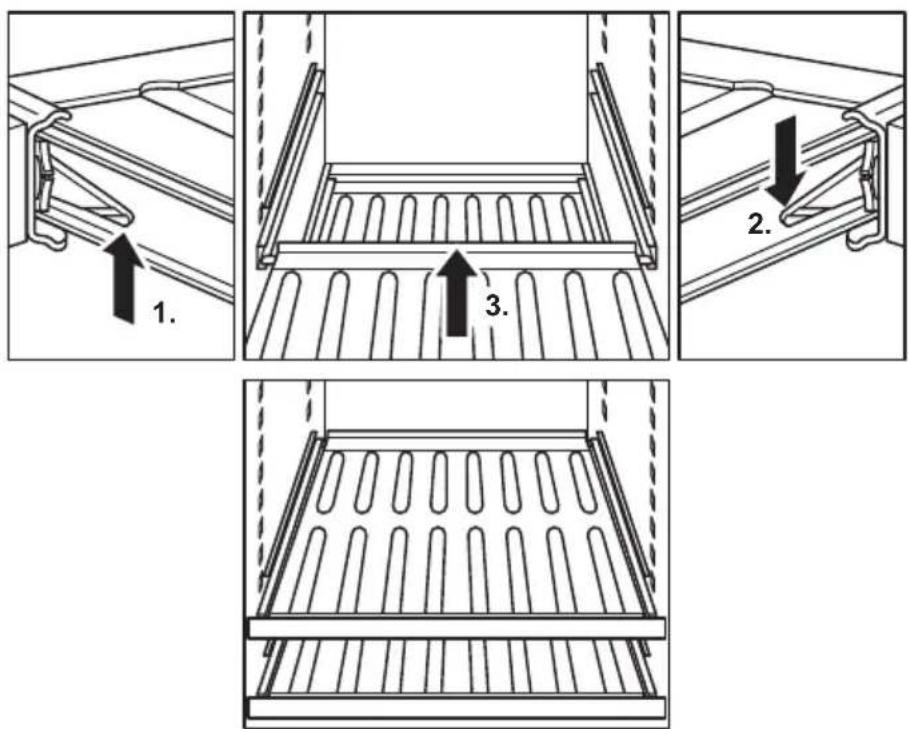
7.3 Inserting shelves
Mounting pull-out shelves (A192G/A192D)
The guide rails for the right and left side can only be mounted on the intended side.
▶Insert the hooks as shown in the rear and front holders on the side of the cupboard (fig. 5, page 5).
▶ Insert the pull-out shelf and lock it in place (fig. 6, page 5).
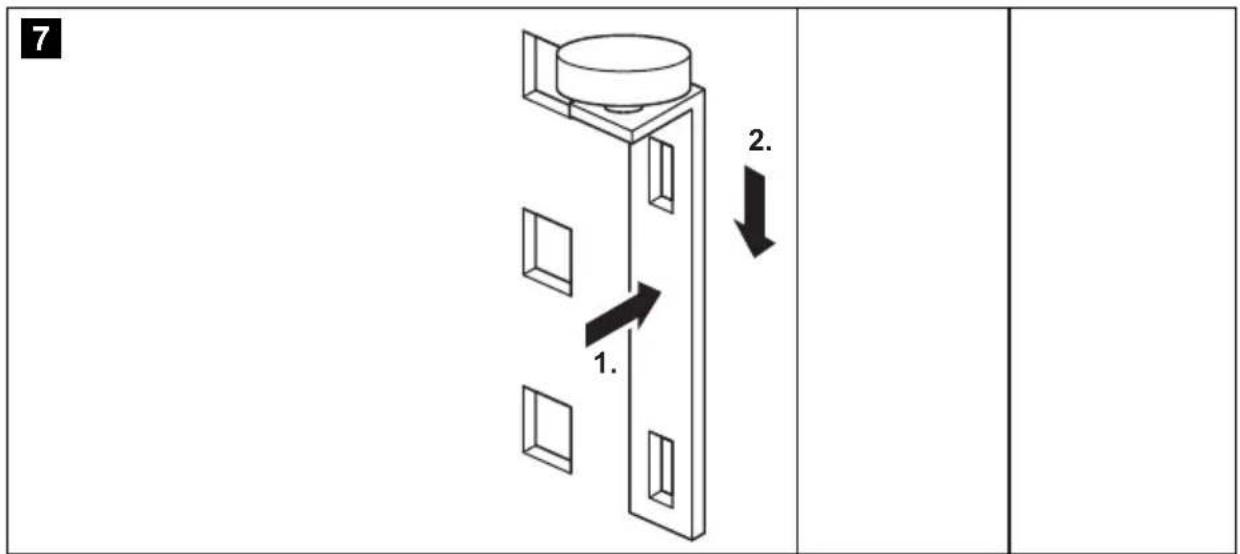
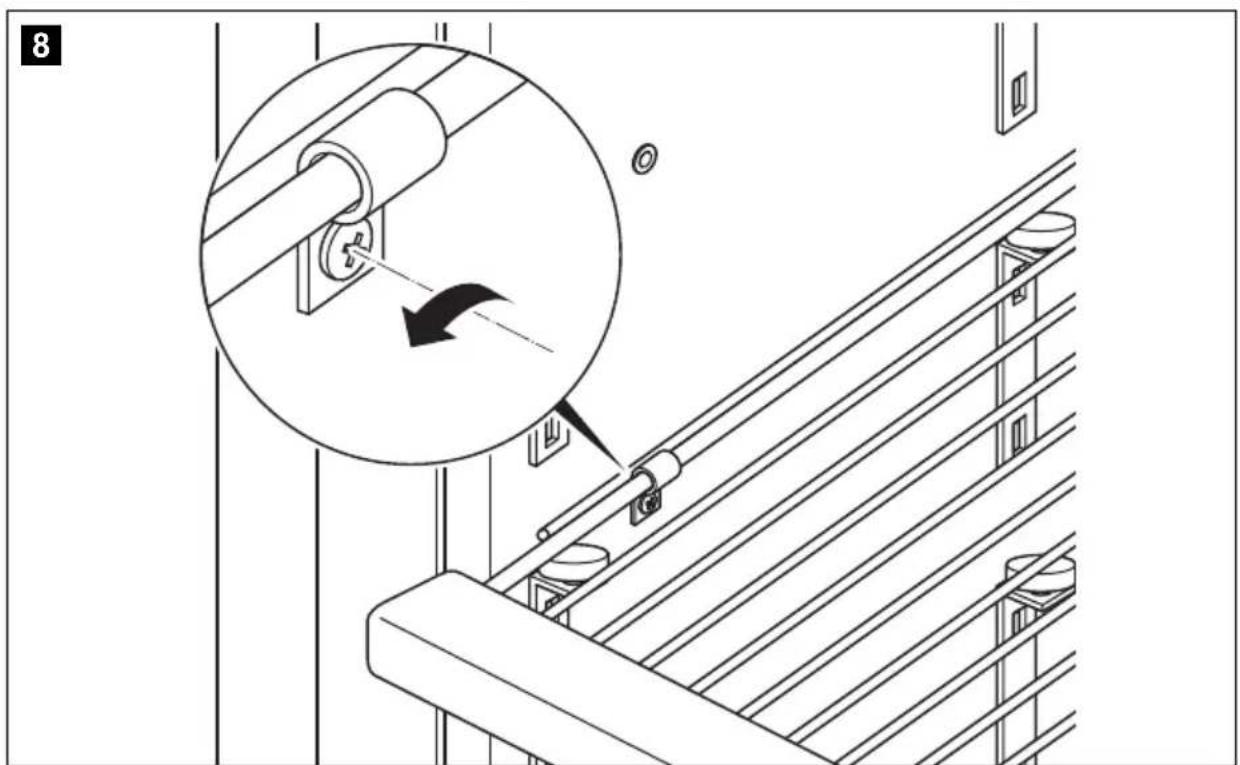
Mounting or moving the storage shelf

NOTE
A25G only: On delivery, the shelves are secured to the side of the wine refrigerator with a shelf lock. They can be removed with a screwdriver (fig. 8, page 6).
▶ Insert the hooks in the holes at the desired height (fig. 7, page 6).
▶Insert the shelf.
▶ A25G only: Secure the shelf with the shelf lock (fig. 8, page 6).

CAUTION!
For safety reasons, the reinforcement rod fig. 9 1 page 6) may not be removed.
8 Using the device
8.1 Storing bottles
Please note the following:
- Only store wine in unopened bottles.
- Do not overload the device.
- Do not cover the bottom with aluminium foil or any other objects, as this obstructs the air circulation.
- If the device has been empty for a long time, disconnect it from the power supply and clean it thoroughly. Leave the door open slightly to allow the air to circulate and prevent condensation, mould or odours from building up.
● After a power cut or if the appliance has been switched off, wait 3 to 5 minutes before switching on the appliance again.
The following variants are possible:
● A25G (fig. 10, page 7): 5 storage surfaces:
- 4 mesh shelves
- 1 base shelf
● A192G/A192D (fig. 11, page 7): 6 storage surfaces
- 3 pull-out shelves
- 2 storage shelves
- 1 base shelf
8.2 Energy saving tips
- Do not open the device more often than necessary.
- Do not leave the door open for longer than necessary.
● Clean dust and dirt from the condenser at regular intervals.
8.3 Using the device
Brief instructions
| Function Press buttons | |
| Switch the device on I/O | |
| Switch off the device I/O | |
| Unlock the keypad | ▲ or ▼5 s |
| Display the set temperature | ▲ or ▼1 s |
| Raise temperature by 1 °C or 1 °F | ▲ < 1 s |
| Lower temperature by 1 °C or 1 °F | ▼ < 1 s |
Setting the temperature
The temperature on the interior can be set between 8 °C and 18 °C (46 °F and 64 °F).
▶Hold down the corresponding buttons ▲ or ▼ until the display flashes.
▶Press the corresponding buttons ▲ or ▼ to set the temperature.
√The display flashes while you make the setting.
√The set value is saved after 6 seconds without a button being pressed.
√Once you have set the temperature, the display shows the current temperature of the interior.

NOTE
When using the appliance for the first time or if it has not been used for a long time, the inner temperature could differ from the one you have set.
The temperature display flashes as long as this is the case.
Once the set temperature has been reached, the temperature display glows constantly.
Pull-out shelves
The shelves can be pulled out by a third so that you can reach the wine bottles easily. The shelves have a limit stop to prevent them from being pulled out too far.
▶Make sure that the door is fully open when you pull out the shelves on roller-bearings. Otherwise the door seal can be damaged.
8.4 Procedure in the event of a power failure or if absent

NOTE
In the event of an interruption to the power supply (power failure, switch over) the unit saves the previous temperature settings.
Power failure
A short circuit will not unduly affect the inner temperature as long as you do not open the door too frequently.
If the power is off for a long time, carry out the appropriate action to protect the contents of your wine refrigerator.
Short periods of absence
▶Leave the device operating if you are absent for less than 3 weeks.
Long periods of absence
▶if you leave the appliance unused for several months, remove the contents.
▶Switch off the unit and disconnect it from the power supply.
▶Clean and dry the insides thoroughly.
▶Leave the door ajar to prevent odours and mould from forming.
8.5 Moving the device
▶Remove the contents.
▶Tape down all the shelves.
▶Turn the adjustable feet right back so that they are not damaged when moving.
▶Tape the door closed.
▶Only carry the appliance in an upright position.
Avoid tipping the device.
Protect the exterior of the device with a blanket or something similar.
9 Troubleshooting
If you are unable to solve a problem yourself, get in touch with customer services (see address list overleaf)
| Problem Possible cause Remedy | ||
| Appliance does not work | Appliance is not connected to a power supply | Connect the device |
| The device is switched off Switch the device on | ||
| Circuit breaker or fuse has blown | Switch on the circuit breaker; switch on or replace the fuse. | |
Problem Possible cause Remedy
| Appliance is not cold enough | Temperature is not set properly Check the set temperature | |
| The ambient temperature could require a higher temperature setting | Set a higher temperature | |
| Door was opened frequently Do not open the door more often than necessary | ||
| Door was not closed properly Close door properly | ||
| Door is not hermetically-sealed Check the door seal and clean or replace | ||
| The door does not close properly | The appliance is not properly level | Level out the appliance with the adjustable feet |
| The door seal is dirty Clean the door seal | ||
| The shelves are not fitted correctly | Check the shelves and refit correctly | |
10 Maintaining and cleaning the device

CAUTION!
Always disconnect the plug before you clean and service the appliance.
Cleaning the appliance

NOTICE!
- Never clean the appliance under running water. Do not use abrasive cleaning agents or hard objects during cleaning as these can damage the appliance.
- Make sure that the air inlet and outlet vents on the unit are free of any dirt, so that heat from the interior can be released and the unit is not damaged.
▶Switch off the appliance and disconnect the plug.
▶Wash the inside with a solution of warm water and baking powder. This should be about 2 tablespoons of baking powder to half a litre of water.
▶Clean the shelves with mild detergent.
▶Wipe the control panel with a slightly damp cloth.
▶Wash the outside of the device with warm water and a mild detergent. Then wipe it down with clean water and dry the surface with a cloth.
Checking the condensation level and plastic pipes
Condensation is collected in a small container on the back of the device. It is equipped with a sponge that helps the evaporation of the water.
▶Check the plastic pipes that conduct the water from the interior of the device to the container. Make sure that they are not blocked by dust or dirt.
▶Empty the container and clean it.
Replacing the active charcoal filter
Replace the active charcoal filter with a new one every two years.
▶ Pull out the filter (fig. 12 1, page 8) and take off the filter insert.
▶Insert a new filter.
11 Warranty
The statutory warranty period applies. If the product is defective, please contact your retailer or the manufacturer's branch in your country (see the back of the instruction manual for the addresses).
For repair and guarantee processing, please include the following documents when you send in the device:
● A copy of the receipt with purchasing date
● A reason for the claim or description of the fault
12 Disposal
▶Place the packaging material in the appropriate recycling waste bins wherever possible.
If you wish to finally dispose of the product, ask your local recycling centre or specialist dealer for details about how to do this in accordance with the applicable disposal regulations.
13 Technical data
| A25G A192G | A192D | ||
| Temperature range: +8 °C to +18 °C | |||
| Gross capacity: 91 | 386 | | 386 | | ||
| Capacity: 78 | 356 | 356 | | |||
| Category: 2 | |||
| Energy efficiency class: G | G G | ||
| Power consumption: | 135 kWh per year | 220 kWh per year | 220 kWh per year |
| Climatic class: | N | ||
| Dimensions W x D x H in mm (including handle): | 530 x 600 x 724 | 593 x 750 x 1745 | 595 x 750 x 1745 |
| Capacity (standard Bordeaux type bottles): | 25 | 192 | 192 |
| Weight: | 45 kg | 102.5 kg | 84.5 kg |
6 Description technique
● A192G/A192D (fig. 11, page 7) : 6 surfaces de support
● A192G/A192D (fig. 11, side 7): 6 oppbevaringshyller
7.3 Colocar as prateleiras
Montar as prateleiras removíveis (A192G/A192D)
Vyt'ahovatel'né police
Dometic Australia Pty. Ltd.
1 John Duncan Court
Varsity Lakes QLD 4227
1800 212121
+61 7 55076001
Mail: sales@dometic-waeco.com.au
AUSTRIA
Dometic Austria GmbH
The Gateway · 25 Canton Road,
Tsim Sha Tsui · Kowloon
+852 24611386
+852 24665553
Mail: info@dometic-waeco.com.hk
HUNGARY
Dometic Plc. Sales Office
Kerékgyártó u. 5.
H-1147 Budapest
+36 1 468 4400
昌 +36 1 468 4401
Dometic Italy S.r.l.
Via Virgilio, 3
I-47100 Forli
+39 0543 754901
+39 0543 756631
Mail: info@dometic.it
NORWAY
Dometic Norway AS
Skolmar 24
N-3232 Sandefjord
+47 33428450
吕 +47 33428459
Mail: firmapost@waeco.no
POLAND
Dometic Poland Sp. z o.o.
Ul. Puławska 435A
02-801 Warszawa
+48 22 414 32 00
+48 22 414 32 01
Mail: info@dometic.pl
RUSSIA
Dometic RUS LLC
Komsomolskaya square 6-1
107140 Moscow
+7 495 780 79 39
+7 495 916 56 53
Mail: info@dometic.ru
SLOVAKIA
Dometic Slovakia Sales Office Bratislava
Nádražná 34/A
SK-900 28 Ivanka pri Dunaji
+421 2 45 529 680
Mail: bratislava@dometic.com
SPAIN
Dometic Spain S.L.
Avda. Sierra del Guadarrama, 16
E-28691 Villanueva de la Cañada
Madrid
+34 902 111 042
+34 900 100 245
Mail: info@dometic.es
SWEDEN
Dometic Scandinavia AB
Gustaf Melins gata 7
Dometic Switzerland AG
Riedackerstrasse 7a
CH-8153 Rümlang (Zürich)
+41 44 8187171
吕 +41 44 8187191
Mail: info@dometic-waeco.ch
TAIWAN
WAECO Impex Ltd.
Taipei Office
9F.-10, No. 1180, Zhongzheng Rd.,
Zhonghe Dist., New Taipei City 23586
+886 2 22237225
昌 +886 2 81926742
Mail: marketing@waeco.com.tw
UNITED KINGDOM
Dometic UK Ltd.
Dometic House · The Brewery
Blandford St. Mary
Dorset DT11 9LS
+44 844 626 0133
昌 +44 844 626 0143
Mail: sales@dometic.co.uk
UNITED ARAB EMIRATES
Dometic Middle East FZCO
P. O. Box 17860
S-D 6, Jebel Ali Freezone
Dubai
+971 4 883 3858
+971 4 883 3868
Mail: info@dometic.ae
UNITED STATES OF AMERICA
Dometic Marine Division
2000 N. Andrews Ave. Extension
Pompano Beach, FL 33069 USA
+1 954 973 2477
+1 954 979 4414
Mail: marinesales@dometicusa.com