
MO-131762.1 - Oven Emerio - Free user manual and instructions
Find the device manual for free MO-131762.1 Emerio in PDF.

| Product type | Multifunction oven |
| Brand | Emerio |
| Model | MO-131762.1 |
| Supply voltage | 220-240 V ~ 50/60 Hz |
| Power | 1400 W |
| Display | Digital with temperature, time and menu indicators |
| Control panel | Touch |
| Heating types | Upper element (Up-heat), Lower element (Low-heat), Upper and lower elements combined (All-heat) |
| Automatic programs | Defrost/Fermentation, Bread/Cake, Cookies/Pie, Meat/Potatoes |
| Temperature range | 25 °C to 230 °C depending on function |
| Timer range | 1 minute to 24 hours (preset function) / 1 minute to 2 hours (cooking) |
| Preset function | Yes, with delay start setting |
| Included accessories | Rack, baking tray, handle |
| Door | Glass with handle |
| Cleaning | Body: damp cloth; rack and tray: dishwasher safe |
| Safety | Automatic stop at end of program, hot surfaces, do not immerse |
| Safety distance | 20 cm above, 10 cm on sides |
| Use | Indoor, household |
| Warranty | 2 years |
Frequently Asked Questions - MO-131762.1 Emerio
User questions about MO-131762.1 Emerio
0 question about this device. Answer the ones you know or ask your own.
Ask a new question about this device
Download the instructions for your Oven in PDF format for free! Find your manual MO-131762.1 - Emerio and take your electronic device back in hand. On this page are published all the documents necessary for the use of your device. MO-131762.1 by Emerio.
USER MANUAL MO-131762.1 Emerio
natural_image
Black electric oven with digital display and control buttons (no visible text or symbols)Multi Oven (EN)
Multi-Backofen (DE)
Instruction manual – English
SAFETY INSTRUCTIONS
Before use make sure to read all of the below instructions in order to avoid injury or damage, and to get the best results from the appliance. Make sure to keep this manual in a safe place. If you give or transfer this appliance to someone else make sure to also include this manual.
In case of damage caused by user failing to follow the instructions in this manual the warranty will be void. The manufacturer/importer accepts no liability for damages caused by failure to follow the manual, a negligent use or use not in accordance with the requirements of this manual.
- This appliance can be used by children aged from 8 years and above and persons with reduced physical, sensory or mental capabilities or lack of experience and knowledge if they have been given supervision or instruction concerning use of the appliance in a safe way and understand the hazards involved.
- Children shall not play with the appliance.
- Cleaning and user maintenance shall not be made by children unless they are aged from 8 years and supervised.
- Keep the appliance and its cord out of reach of children less than 8 years.
- If the supply cord is damaged, it must be replaced by the manufacturer, its service agent or similarly qualified persons in order to avoid a hazard.
- This appliance is intended to be used in household and similar application such as: staff kitchen areas in shops, offices and other working environments; farm houses; by clients in hotels, motels and other residential type environments; bed and breakfast type environments.
- This appliance is not intended to be operated by means of an external timer or separate remote-control system.
- Before inserting the plug into the mains socket, please check that the voltage and frequency comply with the specifications on the rating label.
- Always plug the appliance into an earthed plug socket.
- If an extension cord is used it must be suited to the power consumption of the appliance, otherwise overheating of the extension cord and/or plug may occur. There is a potential risk of injuries from tripping over the extension cord. Be careful to avoid dangerous situations.
- Disconnect the mains plug from the socket when the appliance is not in use and before cleaning.
- Ensure that the mains cable is not hung over sharp edges and keep it away from hot objects and open flames.
- Do not immerse the appliance or the mains plug in water or other liquids. There is danger to life due to electric shock!
- To remove the plug from the plug socket, pull the plug. Do not pull the power cord.
- Do not touch the appliance if it falls into water. Remove the plug from its socket, turn off the appliance and send it to an authorized service center for repair.
- Do not plug or unplug the appliance from the electrical outlet with a wet hand.
- Never attempt to open the housing of the appliance, or to repair the appliance yourself. This could cause electric shock.
- Never leave the appliance unattended during use.
- This appliance is not designed for commercial use. This appliance is for household use only.
- Do not use the appliance for other than intended use.
- Do not wind the cord around the appliance and do not bend it.
-
The oven must be placed against a wall. Regarding the information pertaining to the cleaning of the appliance, please refer to the below paragraph of the manual.
-
Caution, hot surface
WARNING!! Please do not touch surface while in use. The temperature of accessible surfaces may be high when the appliance is operating.
- Do not operate the appliance with a damaged mains power cable or plug or after the appliance or any attachment has been damaged. Seek qualified technicians for assistance.
- To reduce the risk of fire, electric shock or product damage, do not expose this appliance to rain, moisture, dripping or splashing. No objects filled with liquids, such as vases, should be placed on the appliance.
- To prevent the risk of electric shock or fire hazard due to overheating, ensure that curtains and other materials do not obstruct the ventilation vents.
- The clearance above the appliance should be at least 20 cm and at least 10 cm at the sides.
- During use the appliance becomes hot. Care should be taken to avoid touching the heating elements inside the appliance.
- The use of accessory attachments not recommended by the appliance manufacturer may cause hazard or injury.
- Do not place the appliance on or near heat sources such as a gas or electric burner.
- Caution must be taking hard when putting in or removing food out from the appliance.
- Do not cover any part of the oven with metal foil. This may cause overheating of the oven.
- Do not clean the inside of the appliance with metal scouring pads as pieces can break off the pad and touch electrical parts, creating a risk of electric shock.
- Over-sized food or metal utensils must not be put into the appliance as they may create a fire or electric risk.
- Do not position or operate the appliance close to or underneath any wall-cupboards or hanging objects such as curtains or any inflammable materials, and do not position any objects on top of the appliance.
- Place the appliance on a stable, level surface from which it cannot fall off.
- While using the oven, do not apply water to the glass door, otherwise the door may get broken.
- Warning: When in use, the oven is hot! Never touch the hot surfaces and the glass door.
- The appliance should be stood on a level, stable and clean surface while it is in use.
- Do not place any of the following materials in the oven: cardboard, plastic, paper, or anything similar. Do not store any materials, other than manufacturer's recommended accessories, in this oven when not in use.
PARTS DESCRIPTION
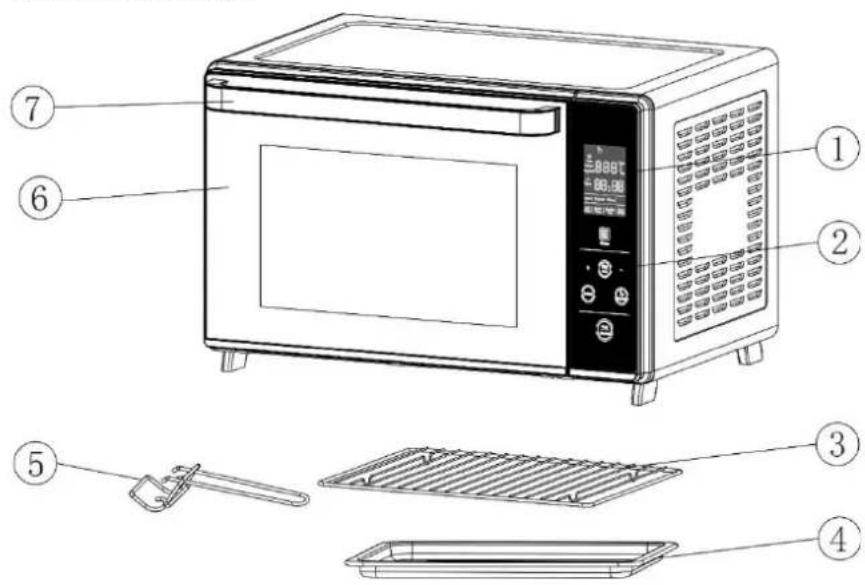
- Digital display
- Touch control panel
- Wire rack
- Baking tray
- Tray handle
- Glass door
- Door handle
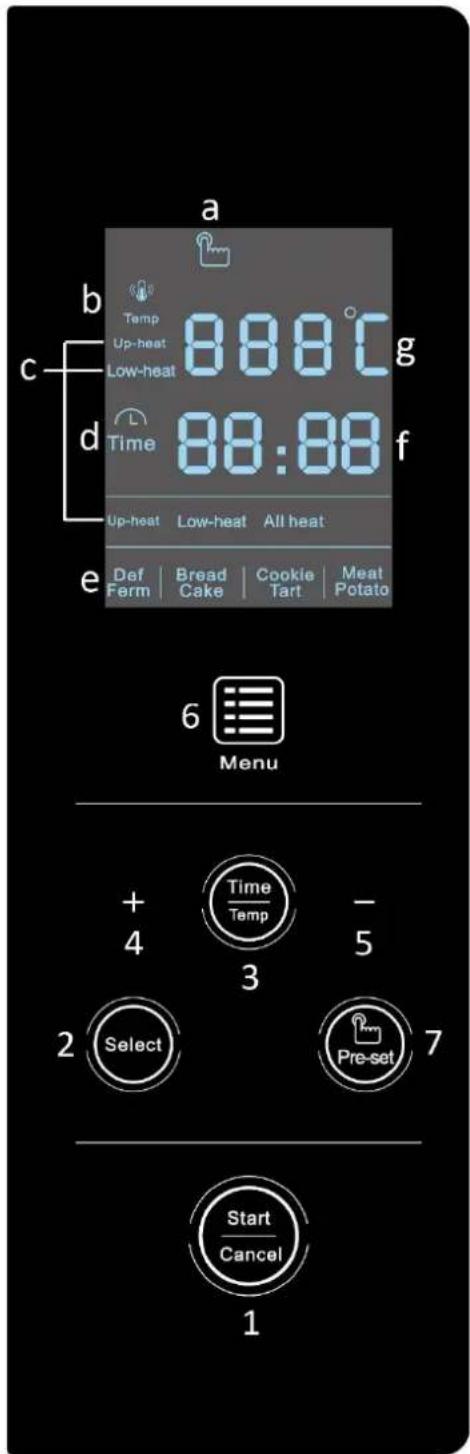
Digital display
a. Preset indicator
b. Temperature indicator
c. Heating element indicators
d. Timer indicator
e. Menu indicators
f. Time value
g. Temperature value
Touch control panel
- Start/cancel button
- Heating element selection button
- Temperature / time setting button
- Temperature / time increase button
- Temperature / time decrease button
- Menu button
- Preset button
BEFORE USE
- Remove all packaging materials from the appliance. Clean the appliance according to the section "How to clean" below.
• Make sure the appliance is unplugged. - Before initial use, it is recommended that you run the oven at the highest temperature (230°C) with the function "All-heat" for approximately 15 minutes to eliminate the remaining packing residue and odor.
OPERATION
- Place the appliance on a flat and heat resistant surface. Make sure that there is enough ventilation around the appliance.
-
Slide the wire rack with food into the slot of the appliance. And then slide the baking tray under the wire rack to collect the dripping oils. You can also directly put food on the baking tray itself. Choose your desired rack position according to the food height and type.
-
Close the oven door.
- Plug in the appliance. A beep sound will be heard. Press the buttons on the control panel to choose your desired functions.
- Press the button "Select" to set your desired working element "Up-heat" (The upper heating element will heat.), "Low-heat" (The lower heating element will heat.) or "All-heat" (Both upper and lower heating elements heat simultaneously.). Press the button "+" / "-" to set your desired cooking time. Press the button "Time/Temp" once and then the button "+" / "-" to set your desired cooking temperature. Long press for rapid adjustment. After setting, press the button "Start/Cancel"; the machine begins to work.
- Alternatively, press the button "Menu" to directly choose the cooking function "Def Ferm" (Defrost / Fermentation), "Bread Cake" (Bread / Cake), "Cookie Tart" (Cookie / Tart) or "Meat Potato" (Meat / Potato). The corresponding menu indicator will flash; the heating element will be set by default, no need to select. If you wish to adjust the time or temperature a little, press the button "+" / "-" to make adjustment. After setting, press the button "Start/Cancel"; the machine begins to work.
- When the cooking is finished, beep sounds will be heard. You can also switch off the appliance manually by pressing the button "Start/Cancel" again.
Note:
- The temperature and time cannot be adjusted during operation. If you want to change the temperature or time, switch off the appliance first and then restart.
- This appliance is equipped with a preset function. Once plugged in, press the button "Pre-set" first; the digital display will show the default preset time in which the appliance will start automatically. If you would like to adjust the time, press the button "+" / "-" to set your desired preset time. Continue to set your desired cooking functions in step 5 or 6 as mentioned above, and then press the button "Start/Cancel".
- Once the appliance turns to standby state (only the start/cancel button illuminates), press any button to activate the control panel first, and then press the buttons to choose your desired functions.
WARNING: To avoid risk of injury or burns, do not touch hot surfaces when the appliance is in use. Always use oven mitts.
Reference table of cooking functions by default
| Function | Time Range | Default Time | Temp. Range | Default Temp. | Upper Heat | Lower Heat |
| Pre-set | 00:01-24:00 | 00:10 | /// | /// | /// | /// |
| Up-heat | 00:01-02:00 | 00:45 | 80°C-200°C | 180°C | YES | /// |
| Low-heat | 00:01-02:00 | 01:00 | 80°C-200°C | 160°C | /// | YES |
| All heat | 00:01-02:00 | 00:20 | 80°C-230°C | 220°C | YES | YES |
| Def / Ferm | 00:01-10:00 | 00:40 | 25°C-80°C | 30°C | /// | YES |
| Bread / Cake | 00:01-02:00 | 00:20 | 140°C-170°C | 160°C | YES | YES |
| Cookie / Tart | 00:01-02:00 | 00:25 | 160°C-190°C | 180°C | YES | YES |
| Meat / Potato | 00:01-02:00 | 01:00 | 180°C-230°C | 200°C | YES | YES |
Note:
Try to place the food on the backing tray/wire rack evenly.
Caution: Always use extreme care when removing baking tray, wire rack or any hot container from a hot oven.
Always use an oven mitt when removing hot items from the oven.
HOW TO CLEAN
- It is important that clean the appliance after each use to prevent an accumulation of grease and avoid unpleasant odors.
- Unplug the supply cord from the power outlet.
- Let the appliance cool down completely.
- Clean the housing with a damp, lint-free cloth. DO NOT IMMERSE THIS APPLIANCE INTO WATER.
- Clean the door, the inside walls with wet and dry cloth. Do not use abrasive detergents.
- Wash the wire rack, tray handle and backing tray in hot soapy water. Rinse and dry. They can be put into the dishwasher for cleaning.
- Do not use steel wool scouring pads or abrasive cleaners on any parts of the appliance. Do not scrape the walls with metal utensils.
- Let all parts and surfaces dry thoroughly prior to plugging the appliance in and using.
SPECIFICATIONS
Supply Voltage: 220-240V\~50-60Hz
Power consumption: 1400W
GUARANTEE AND CUSTOMER SERVICE
Before delivery our devices are subjected to rigorous quality control. If, despite all care, damage has occurred during production or transportation, please return the device to your dealer.
For the purchased device we provide 2 years guarantee, commencing from the day of sale. If you have a defective product, you can directly go back to the point of purchase.
Defects which arise due to improper handling of the device and malfunctions due to interventions and repairs by third parties or the fitting of non-original parts are not covered by this guarantee. Always keep your receipt, without the receipt you can't claim any form of warranty. Damage caused by not following the instruction manual, will lead to a void of warranty, if this results in consequential damages then we will not be liable. Neither can we hold responsible for material damage or personal injury caused by improper use if the instruction manual is not properly executed. Damage to accessories does not mean free replacement of the whole appliance. In such case please contact our service department. Broken glass or breakage of plastic parts is always subject to a charge.
Defects to consumables or parts subjected to wearing, as well as cleaning, maintenance or the replacement of said parts are not covered by the warranty and are to be paid.
The crossed out wheelie bin symbol means that this product shall not be disposed of with normal household waste. Electronic and Electrical Equipment not included in the selective sorting process are potentially dangerous for the environment and human health due to the presence of hazardous substances. Please dispose of responsibly at an approved waste or recycling facility.
Manufactured by: Emerio B.V.
Oudeweg 115, 2031 CC Haarlem, The Netherlands
VOR DEM GEBRAUCH
- Attention, surface chaude
AVANT L'UTILISATION
VOOR INGEBRUIKNAME
PRZED UŻYCIEM

Brand : Emerio
Model : MO-131762.1
Category : Oven