
AFO-130393 - Oven Emerio - Free user manual and instructions
Find the device manual for free AFO-130393 Emerio in PDF.


| Product Type | Countertop Oven |
| Brand | Emerio |
| Model | AFO-130393 |
| Dimensions (W x D x H) | 45 cm x 35 cm x 32 cm |
| Weight | 6.5 kg |
| Power Supply | 220-240 V, 50/60 Hz, 1300 W |
| Oven Capacity | 40 Liters |
| Temperature Range | 100°C to 230°C |
| Timer | 0-60 minutes with automatic shut-off |
| Functions | Bake, Grill, Convection, Defrost |
| Heating Elements | Top and bottom quartz elements |
| Interior Light | Yes |
| Control Type | Rotary knobs |
| Door Type | Drop-down with cool-touch handle |
| Shelves | 2 removable wire shelves |
| Included Accessories | Baking tray, crumb tray, wire rack |
| Material | Stainless steel housing, glass door |
| Cleaning | Easy-clean interior coating, removable crumb tray |
| Safety Features | Automatic shut-off, overheat protection |
| Energy Consumption | 1.3 kWh (approximate) |
| Repairability | Spare parts available via Emerio service network |
Frequently Asked Questions - AFO-130393 Emerio
User questions about AFO-130393 Emerio
0 question about this device. Answer the ones you know or ask your own.
Ask a new question about this device
Download the instructions for your Oven in PDF format for free! Find your manual AFO-130393 - Emerio and take your electronic device back in hand. On this page are published all the documents necessary for the use of your device. AFO-130393 by Emerio.
USER MANUAL AFO-130393 Emerio
natural_image
Black rectangular food appliance with a square top and two side grilles, no visible text or symbols.Smart Fryer Multi Oven (EN)
Smart multiugn med fritös (SE)
Instruction manual – English
SAFETY INSTRUCTIONS
Before use make sure to read all of the below instructions in order to avoid injury or damage, and to get the best results from the appliance. Make sure to keep this manual in a safe place. If you give or transfer this appliance to someone else make sure to also include this manual.
In case of damage caused by user failing to follow the instructions in this manual the warranty will be void. The manufacturer/importer accepts no liability for damages caused by failure to follow the manual, a negligent use or use not in accordance with the requirements of this manual.
-
This appliance can be used by children aged from 8 years and above and persons with reduced physical, sensory or mental capabilities or lack of experience and knowledge if they have been given supervision or instruction concerning use of the appliance in a safe way and understand the hazards involved.
-
Children shall not play with the appliance.
-
Cleaning and user maintenance shall not be made by children unless they are older than 8 and supervised.
-
Keep the appliance and its cord out of reach of children less than 8 years.
-
If the supply cord is damaged, it must be replaced by the manufacturer, its service agent or similarly qualified persons in order to avoid a hazard.
-
Regarding the instructions for cleaning the surfaces which come in contact with food or oil, please refer to the paragraph "cleaning and maintenance" of the manual.
-
This appliance is not intended to be operated by means of an external timer or separate remote-control system.
-
Before inserting the plug into the mains socket, please check that the voltage and frequency comply with the specifications on the rating label.
-
Disconnect the mains plug from the socket when the appliance is not in use and before cleaning.
-
If an extension cord is used it must be suited to the power consumption of the appliance, otherwise overheating of the extension cord and/or plug may occur. There is a potential risk of injuries from tripping over the extension cord. Be careful to avoid dangerous situations.
-
Ensure that the mains cable is not hung over sharp edges and keep it away from hot objects and open flames.
-
Do not immerse the appliance or the mains plug in water or other liquids. There is danger to life due to electric shock!
-
To remove the plug from the plug socket, pull the plug. Do not pull the power cord.
-
Do not touch the appliance if it falls into water. Remove the plug from its socket and send it to an authorized service center for repair.
-
Do not plug or unplug the appliance from the electrical outlet with a wet hand.
-
Never attempt to open the housing of the appliance, or to repair the appliance yourself. This could cause electric shock.
-
Never leave the appliance unattended during use.
-
This appliance is not designed for commercial use.
-
Do not use the appliance for other than intended use.
-
Do not wind the cord around the appliance and do not bend it.
-
Place the appliance on a stable, level surface from which it cannot fall off.
-
Please prevent the product to be exposed to excessive dirt and humidity.
-
Do not operate the machine without supervision, if you should leave the workplace, always switch the machine off or remove the plug from socket (pull the plug itself, not the lead).
-
Do not place the appliance against a wall or against another appliance. Leave at least 10 cm free space on the back and sides and above the appliance. Do not place anything on top of the appliance.
-
During cooking, hot steam is released through the air outlet openings. Keep your hands and face at a safe distance from the steam and from the air outlet openings. Also be careful of hot steam and air when you remove the baking tray from the appliance.
-
Immediately unplug the appliance if you see dark smoke coming out of the appliance. Wait for the smoke emission to stop before you remove the baking tray from the appliance.
-
Make sure before each use of the appliance that the heating element and surroundings are clean and clear from any food remainders in order to ensure a flawless function.

- Caution, not surface.
WARNING!! Please do not touch surface while in use. The temperature of accessible surfaces may be high when the appliance is operating.
- Hot air comes out of the air vent at the back side of the appliance. Be sure to keep sufficient distance to materials, like glass, that are sensitive to heat.
- Do not insert anything into the ventilation openings of the device and make sure that these do not become clogged.
- Make sure that foodstuffs containing oil and fats are not overheated. Do not place any vessels filled with oil or other liquids into the device.
- Do not cover the device during operation in order to prevent it from catching fire.
- Never touch the inside of the appliance while it is operating.
- Do not place the appliance on or near combustible materials such as a tablecloth or curtains.
- Let the appliance cool down for approx. 30 minutes before you handle or clean it.
- Remove burnt remnants.
PARTS DESCRIPTION
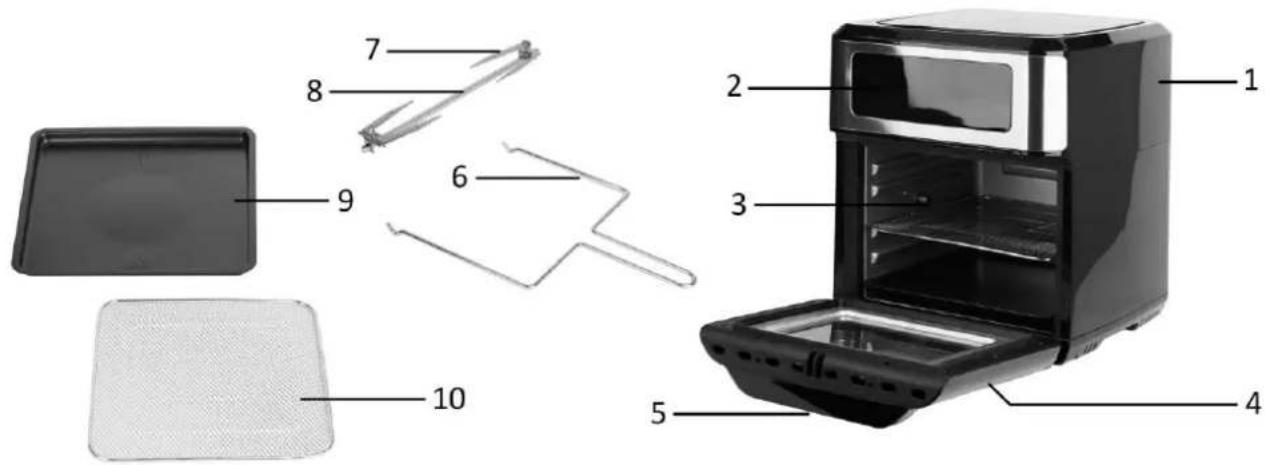
- Main unit
- Control panel
- Cooking chamber
- Door
-
Door handle
-
Handle for rotisserie spit rod
- Rotisserie fork
- Rotisserie spit rod
- Baking tray
- Baking rack
Control panel
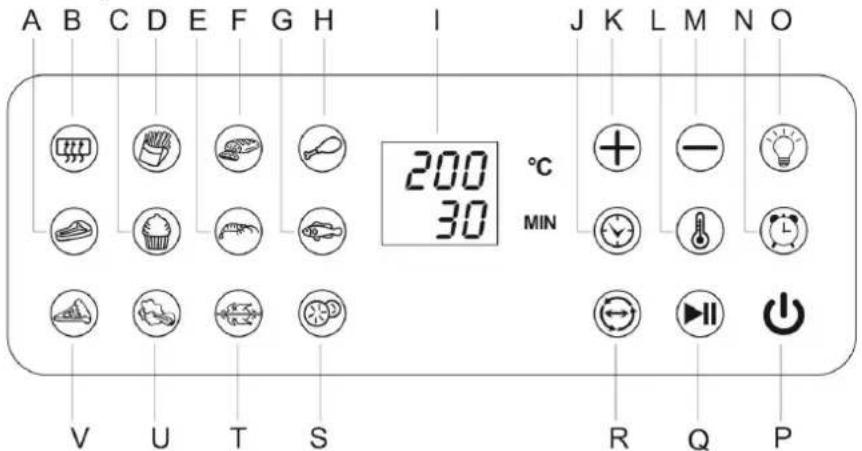
A. Menu button (Steak)
B. Menu button (Preheat)
C. Menu button (Cake)
D. Menu button (French fries)
E. Menu button (Shrimp)
F. Menu button (Ham)
G. Menu button (Fish)
H. Menu button (Drumstick)
I. Temperature / Time display
J. Time setting button
K. Time / Temperature increase button
L. Temperature setting button
M. Time / Temperature decrease button
N. Preset button
O. Cooking chamber lamp
P. On/off button
Q. Pause/start button
R. Rotisserie button
S. Menu button (Dry fruit)
T. Menu button (Rotisserie chicken)
U. Menu button (Vegetable)
V. Menu button (Pizza)
BEFORE USE
First read all instructions before use and retain the manual for later reference. Only plug this appliance into an earthed socket. Before first use, remove the packing materials. Clean the appliance according to the section "cleaning and maintenance". Wipe inside and outside of the appliance with a soft cloth. Make sure that the electrical parts remain dry.
The appliance uses hot air, in combination with high-speed air circulation, and a top grill to prepare your dishes quickly and easily. The ingredients are heated from all sides, at once, and there is no need to add oil in most cases.
Operate the appliance before first use for approximately 10 minutes in order to burn off production residues. Make sure there is good ventilation. The appliance may emit some smoke and a characteristic smell when you switch it on for the first time. This is normal and will stop soon.
USE
-
Place the appliance on a dry, stable and heat-resistant surface. Since the appliance becomes hot during use, make sure that it is not too close to other objects.
-
Open the cooking chamber by the door handle and put in the food to be cooked.
Notice: The heating element is located at the top. In the upper position, the food will be cooked faster and crispy. The middle position can be selected to achieve uniform heating from all sides. The bottom position is suitable for gentle cooking. Insert the baking rack with food into the cooking chamber and then place the baking tray under the baking rack to collect the dripping oils. You can also directly put food on the baking tray itself. Choose your desired cooking position according to the food height and type.
To cook large pieces of meat, you can use rotisserie spit rod with forks: Have the rotisserie spit rod across the centre of the food you are going to prepare. Fix food with the forks; secure with the screws. Plug one end of the rotisserie spit rod into the round holder on the left-hand side of the cooking chamber, and then hang the other end of the rotisserie spit rod into the support on the right-hand side of the
cooking chamber. Remember to press the button “☐” to turn on the rotating function when the rotisserie spit rod is used. Press the button again, the rotating will stop.
-
Close the cooking chamber and plug in. The buzzer sends out a beep sound. The digital display and control panel flash once while the indicator light of the button “💡” keeps on. The appliance enters into standby mode. Under standby mode, only the button “💡” is operable; others are not.
-
Press the button “⏻” under standby mode, the buzzer sends out a beep sound. The appliance enters into setting mode. All the indicator lights on the control panel illuminate. The digital display shows the default working temperature (180°C) and the default working time (15 minutes). Under setting mode, all the buttons are operable.
-
Press the buttons on the menu list to choose your desired food type to be cooked. The working temperature and working time are in default. You can also press the button “💡” and then “+” / “-” to set your own working temperature (adjusted from 50 - 200°C); press the button “💡” and then “+” / “-” to set your own working time (adjusted from 1 - 60 minutes).
-
After the setting is finished, press the button “▶” to start the appliance. The appliance enters into working mode. The digital display shows the set working temperature and the remaining working time. If you would like to check the food condition during cooking process, press the button “◀” to turn on the lamp inside the cooking chamber. Press the button again, the lamp will be turned off.
-
During working, the digital display shows the countdown time till "00" and then the appliance turns into shutdown mode. For example: 08→07→...→01→00 (shutdown mode). When the appliance enters into shutdown mode, the unit sends out 10 beep sounds, the heating element stops working immediately and the fan keeps on running for approx. 60 seconds. After that, the appliance enters into standby mode. You can also press the button "⏻" to shut down the appliance manually, the unit will directly turn to standby mode.
-
Open the cooking chamber to take out the food. Check if the ingredients are ready. If not, set the working time to a few extra minutes. Then press the button “▶” to start the appliance again. You can also open the cooking chamber to check the ingredients during cooking process. The appliance will stop working immediately. Close the cooking chamber and the unit will continue to work with the setting. If you would like to adjust the temperature and time during cooking process, press the button “◀”/“◀” first and then press the button “+” / “-” to adjust the working temperature/time as needed.
-
After use, remove the mains plug from the wall socket. Always use the oven gloves and the handle (for rotisserie spit rod) to take the food out of the appliance.
Preset function
The cooking process can be preset to start in 30 minutes to 8 hours. To activate this function, firstly set your desired cooking temperature and time (following step 5 mentioned above). Secondly, press the button “L”; the default preset time (3 hours) flashes on the digital display. Press the button “+” / “-” to adjust the time within 3 seconds (After three seconds, the program is locked and cannot be changed). Lastly, press the button

the digital display will start countdown of the preset time. Once the preset time has passed, the set cooking process starts automatically.
Memory Function
When the appliance is working and the power is cut off accidentally or you unplug the appliance for some reason, the appliance will stop working completely. While the power is back on or you plug in the appliance again, the appliance will continue to work with the selected settings.
Tips:
- Flipping or turning smaller sized foods halfway through the cooking process ensures that all the pieces are evenly cooked.
- Place a baking tin or oven dish in the appliance when baking a cake or quiche. A tin or dish is also suggested when cooking fragile foods.
Warning!
- During the cooking process, the accessories will become very hot. When you remove it to check on the progress, make sure you have a trivet or a heat-resistant surface nearby to set it down on. NEVER place accessories directly on a countertop or table.
- Cooking accessories will get hot during the cooking process. Wear oven mitts and handle with care to AVOID INJURY.
- Never cook or reheat liquids in the appliance.
Menu list for reference
| Menu | Default temperature (°C) | Default time (min) |
| Preheat | 180 | 3 |
| French Fries | 200 | 15 |
| Ham | 200 | 12 |
| Drumstick | 200 | 20 |
| Steak | 180 | 12 |
| Cake | 160 | 25 |
| Shrimp | 180 | 8 |
| Fish | 180 | 10 |
| Pizza | 180 | 20 |
| Vegetable | 160 | 10 |
| Rotisserie chicken(with automatic rotating function) | 200 | 30 |
| Dry fruit | 60 | 360 |
Note: The default working temperature and time for drying fruit is 60^ C and 360 minutes; the set temperature range is 30-80^ C and the set time range is 30-720 minutes.
CAUTION:
- Do not immerse the housing in water or rinse it under the tap.
- Avoid any liquid entering the appliance to prevent from electric shock or short circuit.
- Do not cover the air inlet and the outlet when the appliance is working.
- Do not touch the inside of the appliance when it is in operation.
- During operation, hot steam is released through the air outlet. Keep your hands and face at a safe distance from the steam and the air outlet.
- Before handling or cleaning the appliance, let it cool down for approximately 30 minutes.
CLEANING AND MAINTENANCE
- Remove the mains plug from the wall socket and let the appliance cool down completely. Note: open the door to let the appliance cool down more quickly.
- Clean the outside and inside of the appliance with a damp cloth and dry with a soft, clean cloth. Clean the heating element with a cleaning brush to remove any food residues.
- Never use abrasive cleaners or sponges.
- Rinse all the used accessories with dish soap and warm water. Clean thoroughly and dry well before use. In the case of stubborn dirt, we recommend soaking the accessories in warm water and detergent beforehand. All the accessories are dishwasher safe.
- Do not immerse the main unit in water or other liquids! Do not place it in the dishwasher!
- Clean the main unit and the used accessories after each use to prevent germ formation and burning of food residues. Do not allow food residues to dry on.
TROUBLESHOOTING
If the device does not work properly, first check whether you are able to rectify the problem yourself. If the problem cannot be solved with the following steps, contact the customer service department.
| Problem | Possible cause | Solution |
| The device does not work. | The door is not closed properly. | Close the door. |
| The mains plug is not inserted correctly in the plug socket. | Push the mains plug into the plug socket as far as it will go. | |
| The plug socket is defective. | Try another plug socket. | |
| The food has not been cooked evenly. | Different items of food with different cooking times have been prepared at the same time. | Place food with a longer cooking time in the device first, and then add ingredients with a shorter cooking time later. |
| Items of food which require different cooking temperatures have been prepared at the same time. | Prepare items of food with defferent cooking temperatures one after another. | |
| The set cooking time was too short or the temperature was too low. | Increase the cooking time or temperature. | |
| The baking tray or baking rack is overfilled. | Reduce the amount of food. | |
| The items of food are piled on top of one after another. | Spread the food and mix it around from time to time. | |
| The food is slightly burnt. | The selected temperature is too high or the cooking time is too long. | Reduce the temperature or cooking time. |
| Chips made from fresh potatoes are not crispy. | The potatoes contain too much water. | Cut the potatoes into narrow pieces. Dab the potato pieces dry with some kitchen towel and then trickle a little cooking oil over them. |
| During use, an unpleasant smell or smoke is detected. | The device is dirty. | Follow the instructions in the section “cleaning and maintenance”. |
| Too much oil or grease. | Remove excessive oil or grease. | |
| Error message E1 or E2 | The sensor is defective. | Contact the customer service department. |
| Error message E3 | Overheating occurs. | Wait until the machine resumes work normally; the error message will be eliminated automatically. Contact the customer service department if the error message shows up repeatedly. |
TECHNICAL DATA
Operating voltage: 220-240V\~ 50/60Hz
Power: 1600-1800W
GUARANTEE AND CUSTOMER SERVICE
Before delivery our devices are subjected to rigorous quality control. If, despite all care, damage has occurred during production or transportation, please return the device to your dealer.
For the purchased device we provide 2 years guarantee, commencing from the day of sale. If you have a defective product, you can directly go back to the point of purchase.
Defects which arise due to improper handling of the device and malfunctions due to interventions and repairs by third parties or the fitting of non-original parts are not covered by this guarantee. Always keep your receipt, without the receipt you can't claim any form of warranty. Damage caused by not following the instruction manual, will lead to a void of warranty, if this results in consequential damages then we will not be liable.
Neither can we hold responsible for material damage or personal injury caused by improper use if the instruction manual is not properly executed. Damage to accessories does not mean free replacement of the whole appliance. In such case please contact our service department. Broken glass or breakage of plastic parts is always subject to a charge. Defects to consumables or parts subjected to wearing, as well as cleaning, maintenance or the replacement of said parts are not covered by the warranty and are to be paid.
The crossed out wheelie bin symbol means that this product shall not be disposed of with normal household waste. Electronic and Electrical Equipment not included in the selective sorting process are potentially dangerous for the environment and human health due to the presence of hazardous substances. Please dispose of responsibly at an approved waste or recycling facility.
Bruksanvisning – Swedish
SÄKERHETSANVISNINGAR
A. Menyknapp (stek)
A. Valikkopainike (Pihvi)
B. Valikkopainike (Esilämmitys)
C. Valikkopainike (Kakku)
E. Valikkopainike (Katkaravut)
V. Valikkopainike (Pizza)
ENNEN KÄYTTÖ Ä
Brukermanual – Norwegian
SIKKERHETSINSTRUKSER
Før bruk må du lese alle instruksene nedenfor så du unngår skader på personer eller gjenstander, og slik at resultatet blir best mulig. Oppbevar håndboken på et trygt sted. Hvis du gir eller overlater apparatet til andre, må du sørge for at de også får håndboken.
A. Menyknapp (biff)
B. Menyknapp (forvarm)
C. Menyknapp (kake)
D. Menyknapp (pommes frites)
E. Menyknapp (reker)
F. Menyknapp (skinke)
G. Menyknapp (fisk)
Q. Pause/start-knapp
R. Spiddspyd-knapp
A. Menuknap (bøf)
B. Menuknap (forvarmning)
C. Menuknap (kage)
D. Menuknap (pommes frites)
E. Menuknap (rejer)
F. Menuknap (skinke)
G. Menuknap (fisk)
H. Menuknap (kyllingelår)
- Instruction manual – English
- SAFETY INSTRUCTIONS
- PARTS DESCRIPTION
- Control panel
- BEFORE USE
- USE
- Preset function
- Memory Function
- Tips:
- Warning!
- CAUTION:
- CLEANING AND MAINTENANCE
- TROUBLESHOOTING
- TECHNICAL DATA
- GUARANTEE AND CUSTOMER SERVICE
- Bruksanvisning – Swedish
- SÄKERHETSANVISNINGAR
- ENNEN KÄYTTÖ Ä
- Brukermanual – Norwegian
- SIKKERHETSINSTRUKSER
Brand : Emerio
Model : AFO-130393
Category : Oven