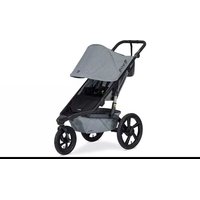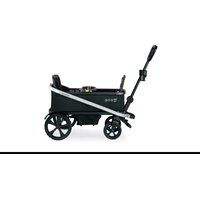
Renegade - Camera BOB Gear - Free user manual and instructions
Find the device manual for free Renegade BOB Gear in PDF.


User questions about Renegade BOB Gear
0 question about this device. Answer the ones you know or ask your own.
Ask a new question about this device
Download the instructions for your Camera in PDF format for free! Find your manual Renegade - BOB Gear and take your electronic device back in hand. On this page are published all the documents necessary for the use of your device. Renegade by BOB Gear.
USER MANUAL Renegade BOB Gear
natural_image
Illustration of a two-wheeled toy car with handle and wheels (no text or symbols)RENEGADE™
USER GUIDE
GUIDE DE L'UTILISATEUR
GUÍA DEL USUARIO
IMPORTANT
THIS USER GUIDE CONTAINS A MANDATORY ARBITRATION CLAUSE AND CLASS ACTION WAIVER ("ARBITRATION AGREEMENT") THAT AFFECTS YOUR LEGAL RIGHTS, REQUIRES YOU TO ARBITRATE DISPUTES, AND LIMITS THE MANNER IN WHICH YOU CAN SEEK RELIEF.
IMPORTANT
LE PRÉSENT GUIDE D'UTILISATION CONTIENT UNE CLAUSE D'ARBITRAGE OBLIGATOIRE ET UNE RENONCIATION AU RECOURS COLLECTIF (« CONVENTION D'ARBITRAGE ») QUI A UNE INCIDENCE SUR VOS DROITS LÉGAUX, VOUS OBLIGE À ARBITRER LES LITIGES ET LIMITE LA FAÇON DONT VOUS POUVEZ DEMANDER UN REDRESSEMENT.
IMPORTANTE
BOB ^® , BOB Gear ^® , BRITAX ^® , Renegade ^™ , XtraMile ^™ , SafeAssist ^™ , and SteerSteady ^™ are trademarks owned by Britax. ©2022 All Rights Reserved. Printed in China. This product and its components are subject to change without notice.
natural_image
Abstract shield-shaped logo with mountain and river design (no text or symbols)WELCOME TO BOB GEAR
BOB Gear ^® recommends that you register your stroller at bobgear.com/registration. This will allow us to notify you directly if there are any product recalls.
For updates to this user guide, warranty and other recent product notifications, please visit bobgear.com periodically or any time before making approved changes or adding approved equipment to your stroller.
Safety Information......2
Notes 3
What's In the Box?......4
Wagon Overview......5
Wagon Assembly......6
Unpacking the Wagon....6
Rear Fenders 6
Rear Axle 6
XtraMileTMRear Wheels....7
XtraMile™ Front Wheels 7
Footwell 7
Wagon Disassembly 8
XtraMile™ rear and Front Wheels....8
Wagon Operation 8
Unfolding and Folding......8
Setting the Parking Brake....10
Securing the Child in the Seat....10
Adjusting SteerSteady™ Handle Position ....12
Wagon Accessories....12
Cup Holders....12
Canopy (Select Models)....12
Snack Tray 13
Care and Maintenance....15
Cleaning....15
Regular Inspections ....15
Wagon Accessories....15
Warranty 15
Arbitration Agreement....16
Notes 19
WARNING!
Failure to follow all warnings and instructions could result in SERIOUS INJURY or DEATH.
Read these instructions carefully before using this product. To ensure proper use, store this user guide in a convenient place so it can be consulted often.
- Never leave child unattended.
- Avoid serious injury from falling or sliding out. Always use wagon harness.
- Avoid finger entrapment or injury. Always ensure any child occupants or bystanders are away from the wagon while folding or unfolding.
- Do NOT use wagon with an infant that does not have sufficient head and neck control. Wagon is only for occupants who can sit unassisted.
- The maximum weight capacity of the wagon (child plus luggage weight) is 165 lbs (75 kg). 55 lbs (25 kg) per seat. Maximum child height is 44 inches (112 cm). Do not exceed the maximum weight or height, as wagon may become unstable and tip resulting in serious injury.
- DO NOT overload cup holder and snack tray. Maximum weight for cup holder is 16 ounces (0.5 kg) and for snack tray is 2.2 lb (1 kg). Overloading may cause wagon to become unstable and tip over.
- Do not attach parcels, bags, or other items to the handlebar or frame of wagon except those recommended by Britax, as wagon can become unstable and tip over.
- Assembly of this wagon must be performed only by an adult.
- Ensure seats are fully locked before placing child in wagon.
- Do not park on inclines. The parking brake is intended to park the wagon on flat surfaces only. Parking on inclines may result in tip over or runaway wagon.
- The parking brake is not designed as a stopping brake. The parking brake should not be used to slow or stop the wagon because doing so could cause the wagon to stop abruptly, resulting in loss of control.
- Always set the parking brake when wagon is not moving and when taking children in or out of the wagon.
- Use extreme caution when using wagon on uneven and/or unpaved, wet, or slick surfaces, as these conditions create
additional hazards and can lead to a loss of stability, resulting in serious injury.
- Do not use wagon on stairs, escalators, moving vehicles, or steep inclines. Wagon can tip over.
- Wagon is intended for walking speed only. Do not use while jogging, skating, or any activity other than walking.
- Never allow more than 3 children to ride in the wagon at a time.
- Never allow child to stand in wagon.
- Children should always remain seated with arms and legs inside the wagon at all times when riding.
- Do not allow children to climb on or play with the wagon.
- Do not attempt to transport children when wagon is folded.
- Do not open or close the wagon while children are on board.
- Do not place sharp objects in any seat pocket. Leaning against sharp objects in pockets can result in injury to occupant.
- Do not modify the wagon or any labels. Doing so voids the warranty and could lead to a dangerous condition.
- Failure to regularly inspect this product and its components to make sure they are in good condition and good working order can result in injury. Discontinue use of wagon if damaged or any parts are missing.
- Do not allow children to sit on the SteerSteady ^TM handle as it may cause wagon to become unstable and tip over.
NOTES
- Before and during use, always make sure the child's hands and feet are away from wheels.
- Hot liquids can result in spills that could cause injury and burns to you or the wagon occupant.
- Protect wagon when transporting or shipping to prevent damage to wagon and wagon components. Check closely for damage after transporting or shipping.
- Discontinue using wagon if damaged or if any parts are missing.
- Store your wagon indoors when it is not in use. Extended exposure to rain or the sun's ultraviolet rays can fade and damage the fabric, tires, and plastic parts.
- Ensure fenders are installed prior to use. Do not step on fenders.
What's In the Box?
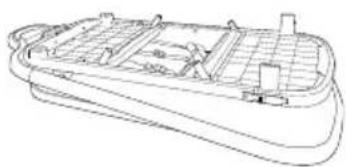
natural_image
Line drawing of a rectangular container with internal compartments and structural supports (no text or symbols)Wagon
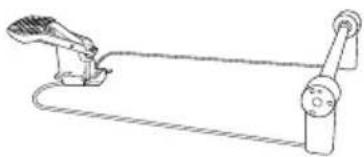
natural_image
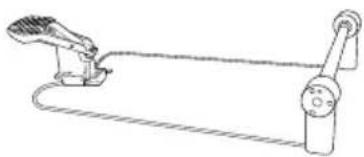
Simple line drawing of a manual pulley system with a handle and cord (no text or symbols)
natural_image
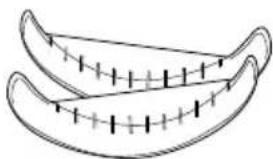
Simple line drawing of two curved banana-shaped objects with internal dashed lines (no text or symbols)Fenders (2)Rear Wheel A
natural_image
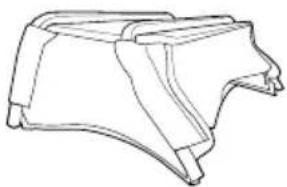
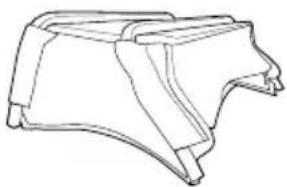
Line drawing of a mechanical component or bracket (no text or symbols)Footwell
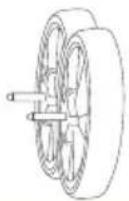
XtraMile™ Rear Wheels (2)

XtraMile™ Front Wheels (2)
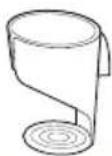
Cup Holders (2)
natural_image
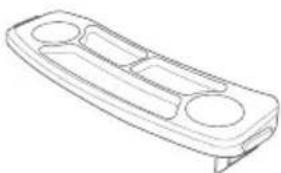
Line drawing of a rectangular electronic device with two circular ports and a base (no text or symbols)Snack Tray
natural_image
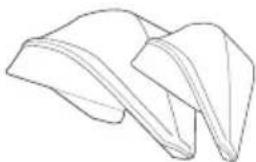
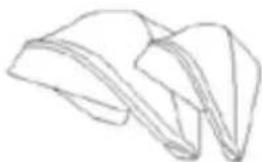
Line drawing of two folded paper sheets (no text or symbols)Canopy (2) Select Models
Wagon Overview
text_image
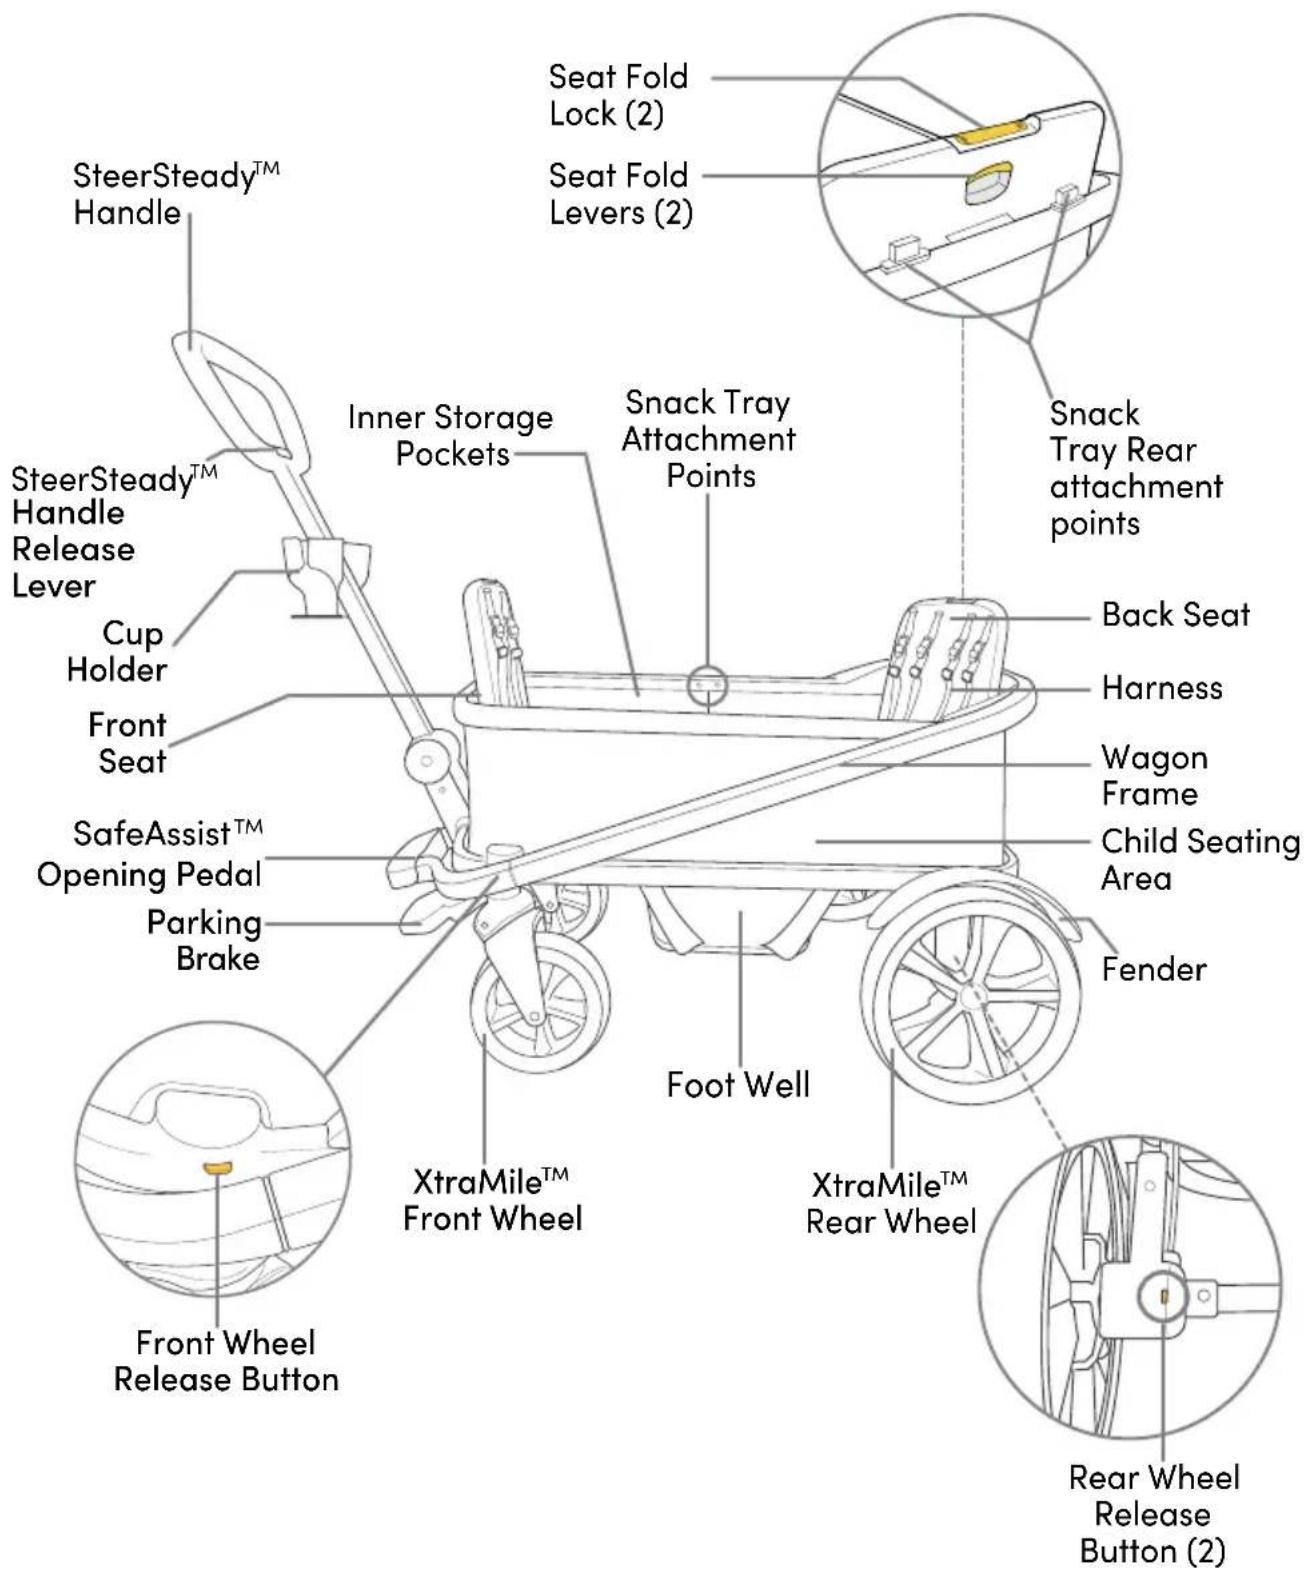
SteerSteady™ Handle SteerSteady™ Handle Release Lever Cup Holder Front Seat SafeAssist™ Opening Pedal Parking Brake Foot Well XtraMile™ Front Wheel Front Wheel Release Button Snack Tray Attachment Points Inner Storage Pockets Seat Fold Lock (2) Seat Fold Levers (2) Snack Tray Rear attachment points Back Seat Harness Wagon Frame Child Seating Area Fender XtraMile™ Rear Wheel Rear Wheel Release Button (2)Wagon Assembly
UNPACKING THE WAGON
WARNING!
Remove all packaging materials and discard to avoid choking and suffocation hazards.
NOTE: Wagon should be upside down for assembly.
REAR FENDERS
REAR FENDER INSTALLATION
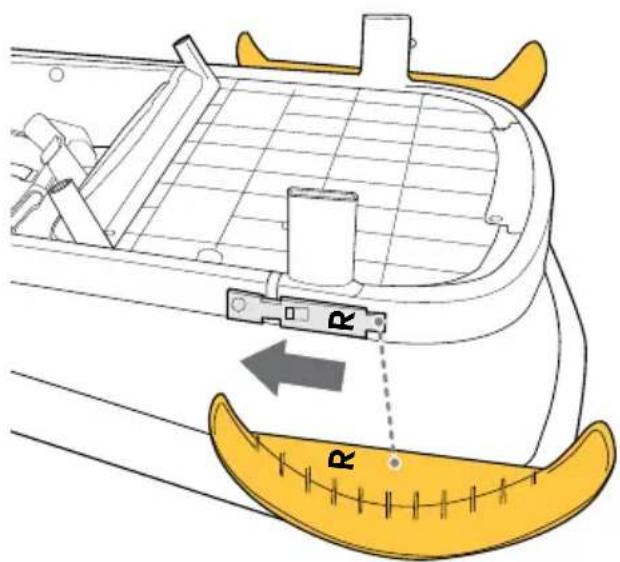
1. Install the Fenders
Align fender to attachment point and slide on to secure. Repeat for the other side.
NOTE: Fenders and fender mounts are marked L and R for corresponding side.
text_image
Technical diagram showing a mechanical component with labeled parts R and directional arrows indicating movement or assembly.REAR AXLE
REAR AXLE INSTALLATION
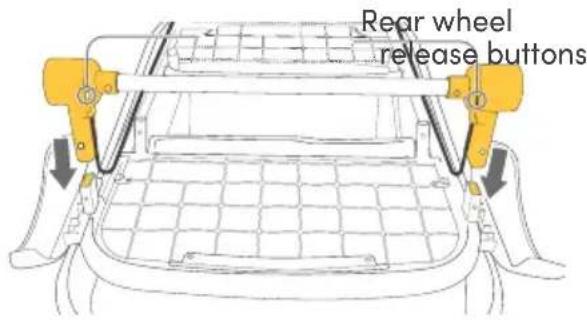
1. Install the Rear Wheel Axle
Align rear wheel axle onto attachment tubes and push until a click is heard. Ensure the rear wheel release buttons face the rear.
NOTE: Ensure parking brake cables are facing inward.
text_image
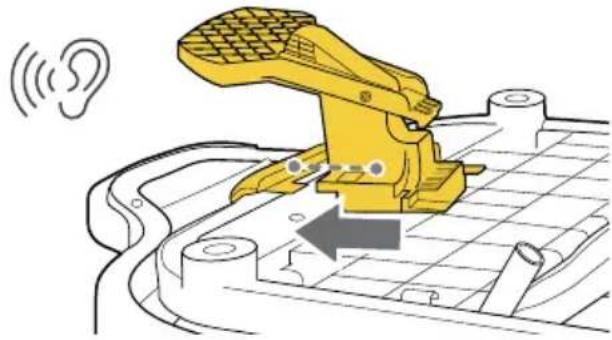
Rear wheel release buttons2. Install the Brake
Align and slide the brake to snap into the brake attachment location at the front of the wagon until a click is heard.
natural_image
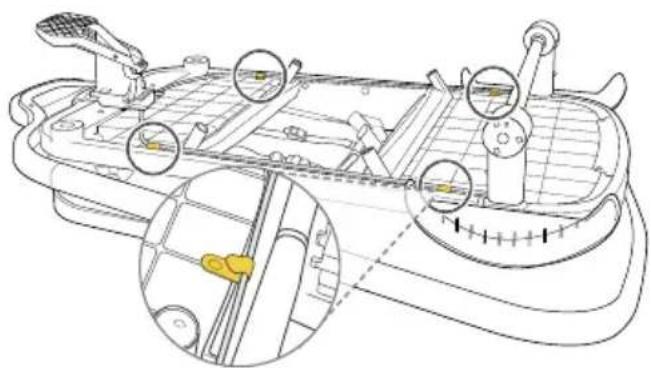
Illustration of a yellow robotic device interacting with a car, showing sound waves and a gear icon (no text or symbols)3. Secure the Brake Cables
Tuck the brake cable under the four (4) snaps underneath the wagon.
natural_image
Technical line drawing of a vehicle chassis with structural components and highlighted parts (no text or symbols)XTRAMILE™REAR WHEELS
REAR WHEEL INSTALLATION
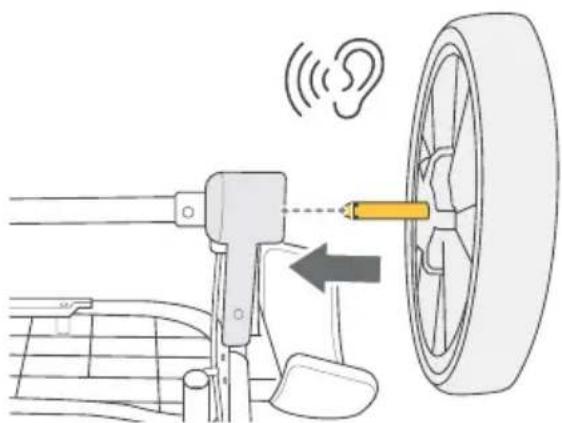
1. Install the Rear Wheels
Push the rear wheels into place until a click is heard. Repeat for the other side.
text_image
Diagram illustrating ear disturbance measurement with labeled components and directional arrow2. Confirm Rear Wheels Attachment
Pull on the rear wheels to confirm attachment.
XTRAMILE™ FRONT WHEELS
FRONT WHEEL INSTALLATION
1. Install the Front Wheels
Push the front wheels into place until a click is heard. Repeat for the other side.

text_image
Diagram illustrating ear health monitoring with hands using ring sensors and a separate ear device, showing signal attenuation.2. Confirm Front Wheels Attachment
Pull on the front wheels to confirm attachment.
FOOTWELL
FOOTWELL INSTALLATION
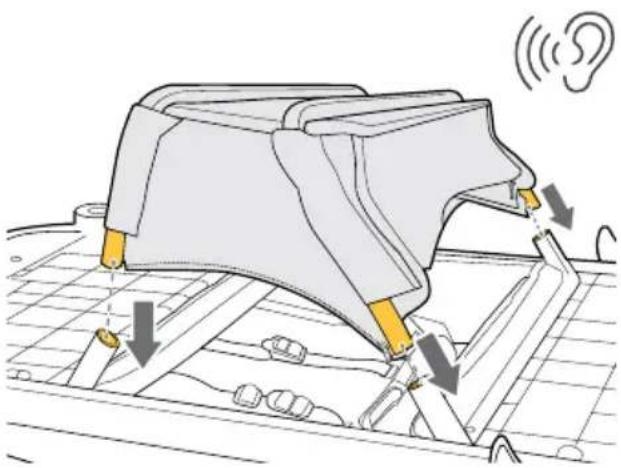
1. Install the Footwell
Align the footwell tubes and push until a click is heard.
NOTE: Ensure the zippers on the footwell are aligned correctly.
natural_image
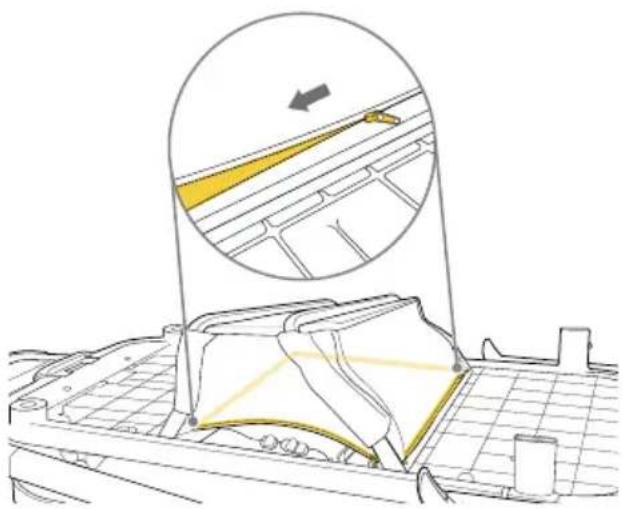
Diagram of a car seatbelt mechanism with arrows indicating clockwise motion and sound waves (no text or symbols)2. Zip the Footwell
Zip up the four (4) zippers on each side of the footwell.
natural_image
Technical line drawing of a mechanical assembly with a magnified inset showing a yellow component (no text or symbols)Wagon Disassembly
XTRAMILE™ REAR AND FRONT WHEELS
REAR WHEEL REMOVAL
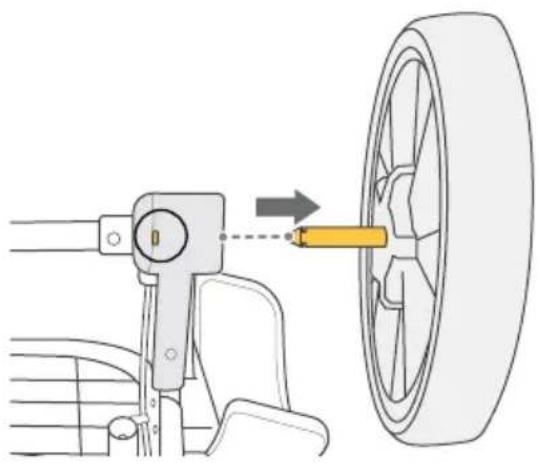
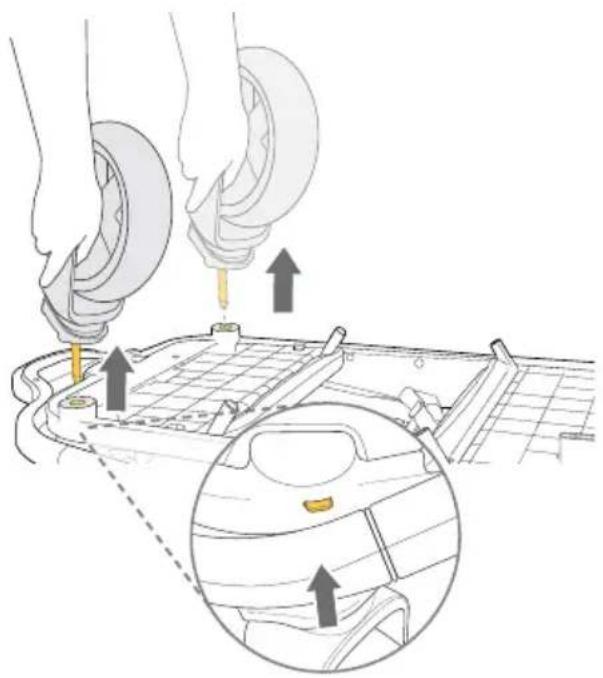
1. Remove the Rear Wheels
Press the rear wheel release button and pull to remove the wheel. Repeat for the other side.
natural_image
Diagram of a car steering wheel assembly with a yellow tool inserted, showing no text or symbolsFRONT WHEEL REMOVAL
1. Remove the Front Wheels
Press the front wheel release button and pull to remove the wheel. Repeat for the other side.
natural_image
Diagram showing hands performing tire maintenance on a vehicle chassis, with an inset close-up of the engine compartment (no text or symbols)Wagon Operation
UNFOLDING AND FOLDING
UNFOLDING THE WAGON
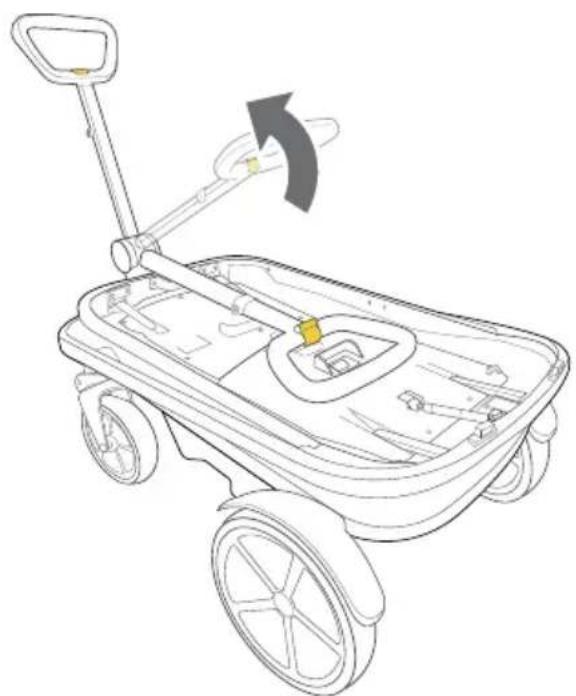
1. Unfold the SteerSteady ^TM Handle
Lift the handle release lever and unfold the handle until it locks into position.
natural_image
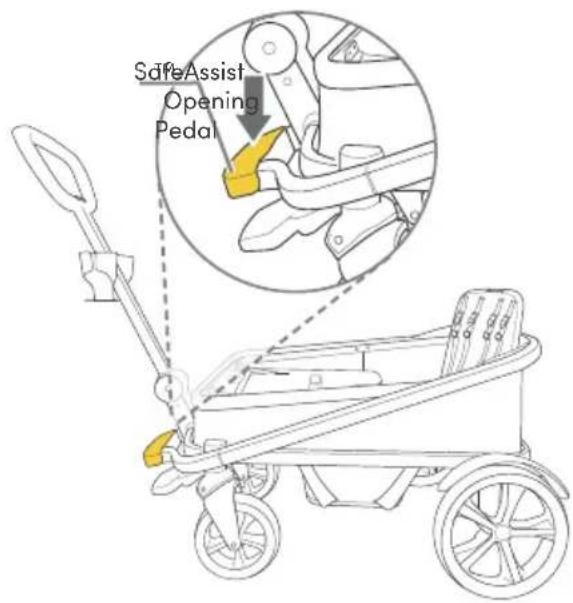
Line drawing of a toy car with wheels and handle, showing a right-hand rule (no text or symbols)2. Open Wagon Frame
Press on the SafeAssist™ opening pedal using a foot until the rear seat opens.
text_image
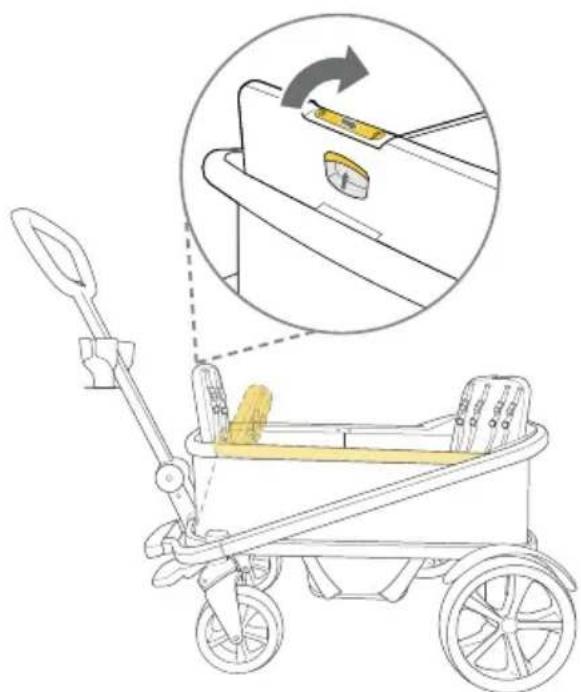
Safe Assist Opening Pedal3. Open Front Seat
Lift the front seat until a click is heard.

natural_image
Line drawing of a baby stroller with an ear icon and sound waves, no text or symbols presentFOLDING THE WAGON
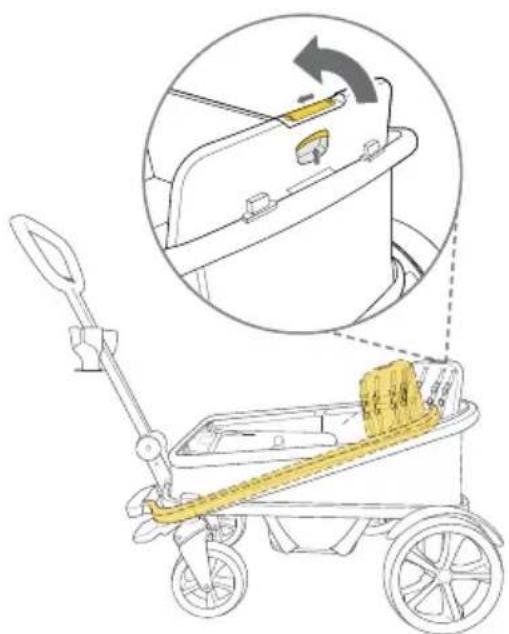
NOTE: Fold order should be followed in order for SafeAssisi™ opening pedal to work properly.
1. Fold the Front Seat
Slide the lock and squeeze the folding lever on the back of the seat and lower into base of the wagon.
text_image
Diagram showing a toy car with a handrail and a magnified view of the door handle mechanism, including Chinese text labels.2. Fold the Rear Seat
Slide the lock and squeeze the folding lever on the back of the seat and lower into base of the wagon.
text_image
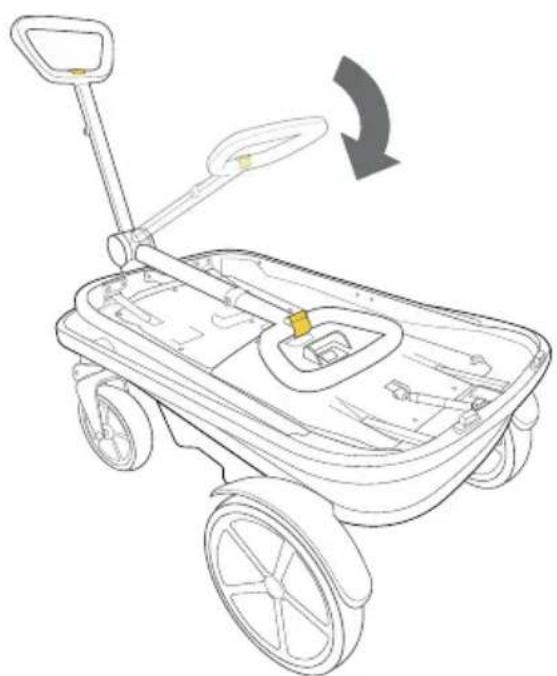
Diagram showing a car tricycle with a yellow cargo box and directional arrow, alongside an inset view of the vehicle's handle.3. Fold the SteerSteady ™ Handle
Lift the handle release lever and fold the handle until it locks into position.
natural_image
Line drawing of a two-wheeled toy car with wheels and handle, showing a curved arrow indicating rotation (no text or symbols)The parking brake prevents the wagon from moving while loading and unloading. The parking brake is not designed as a stopping brake.
Locked Position
To set the parking brake, press down on the foot pedal until a click is heard.
NOTE: Pressing the brake locks both rear wheels.
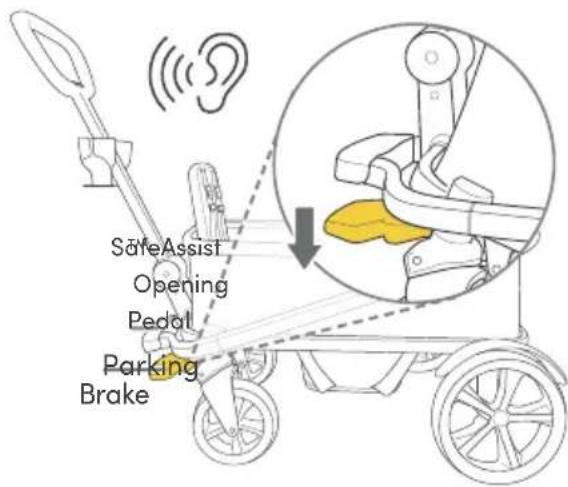
text_image
Safe Assist Opening Pedal Parking BrakeNOTE: To ensure the brake is set properly, attempt to roll the wagon forward and backward after setting the brake. If the wagon will not roll, the brake is set properly.
Unlocked Position
To release the parking brake, lift up on the foot pedal with your foot until a click is heard.
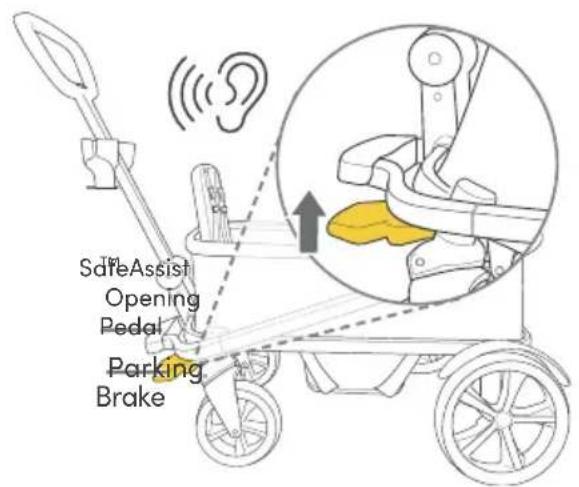
text_image
Safe Assist Opening Pedal Parking BrakeSECURING THE CHILD IN THE SEAT
1. Set Parking Brake
Press parking brake down into locked position.
NOTE: Rear wheels should not rotate when parking brake is set.
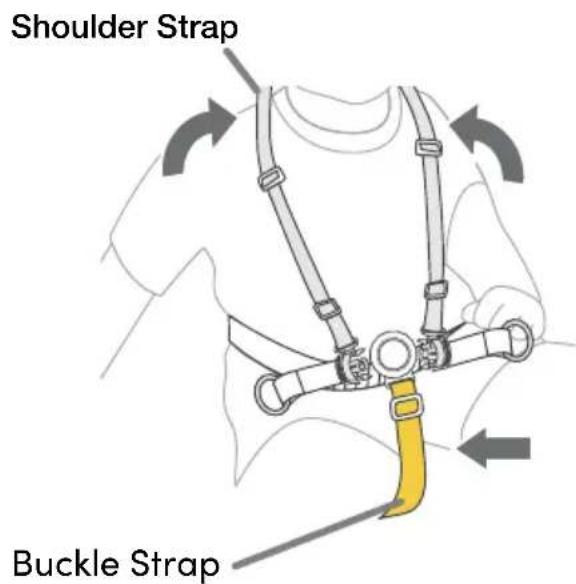
2. Place Child In Seat
Slip one shoulder strap over each shoulder. Position buckle strap between legs.
text_image
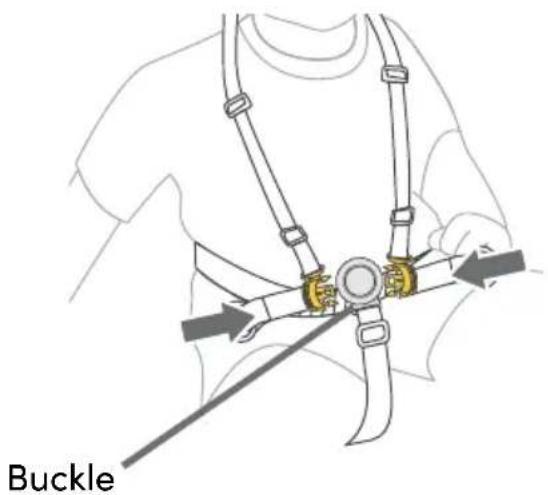
Shoulder Strap Buckle Strap3. Fasten Shoulder Straps
Insert both shoulder strap tongues into the buckle.
text_image
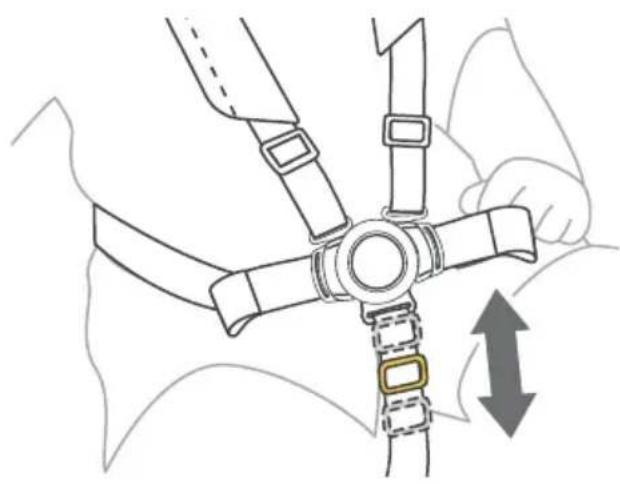
Buckle4. Adjust the Buckle
Slide the buckle adjuster up to lengthen or down to shorten.
NOTE: Buckle Strap should be adjusted to have a snug fit.
natural_image
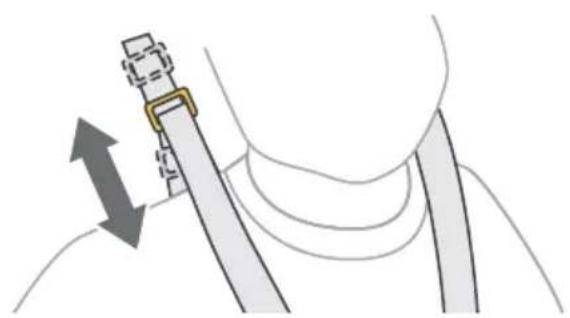
Diagram of a hand holding a seatbelt with five arms, showing a directional arrow (no text or symbols)5. Adjust Shoulder Strap Height
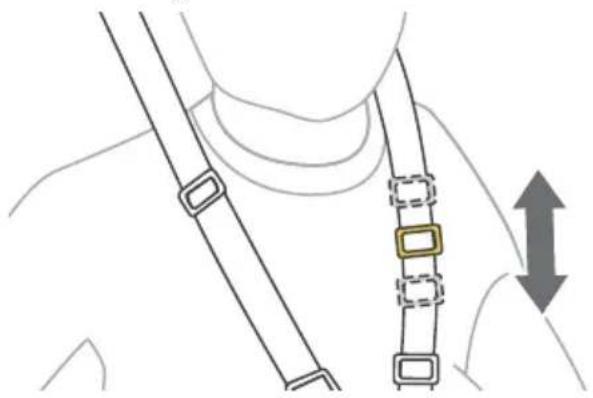
Adjust shoulder strap height in the position closest to child's shoulder.
natural_image
Diagram showing a mechanical assembly with a belt and directional arrow (no text or symbols)6. Adjust Shoulder Straps
Slide the adjuster up or down to adjust straps. Seat harness should fit snug and be comfortable.
natural_image
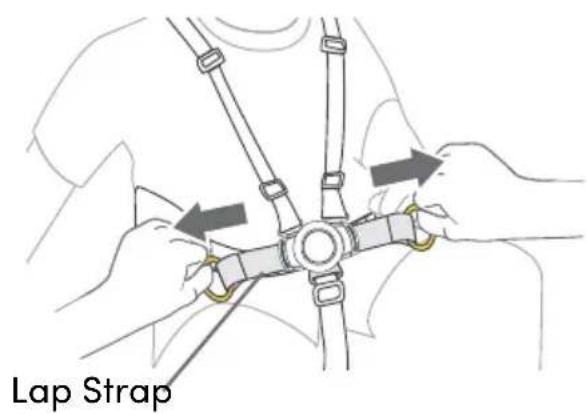
Diagram of a neck and shoulder with a highlighted connector and directional arrow (no text or symbols)7. Tighten Lap Strap
Adjust lap strap to fit snug and be comfortable.
text_image
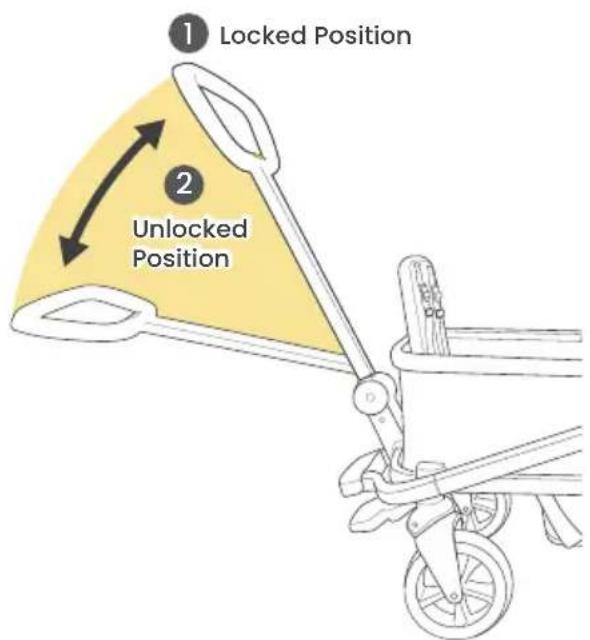
Lap StrapADJUSTING STEERSTEADY™ HANDLE POSITION
To adjust the handle position, lift the handle release lever while raising or lowering the handle to a locked position or an unlocked position.
text_image
1 Locked Position 2 Unlocked PositionWagon Accessories
CUP HOLDERS
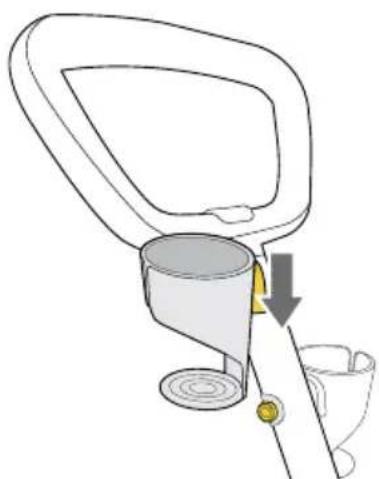
CUP HOLDER INSTALLATION
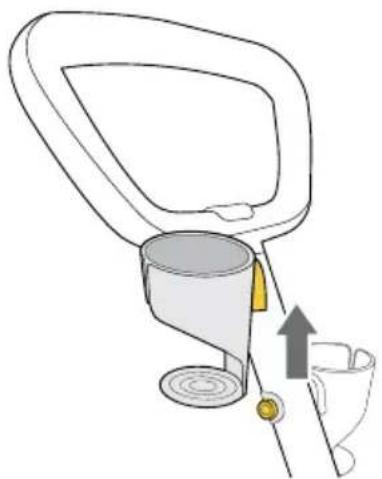
1. Attach Cup Holder
Snap cup holder onto attachment point on SteerSteady™ handle.
natural_image
Diagram of a hand holding a cup and a tray, with a yellow arrow indicating the process (no text or symbols present)CUP HOLDER REMOVAL
1. Remove Cup Holder
Pull up on cup holder to remove from attachment point on wagon SteerSteady™ handle.
natural_image
Line drawing of a medical device with a cup, handle, and cup holder (no text or symbols)CANOPY (SELECT MODELS)
CANOPY INSTALLATION
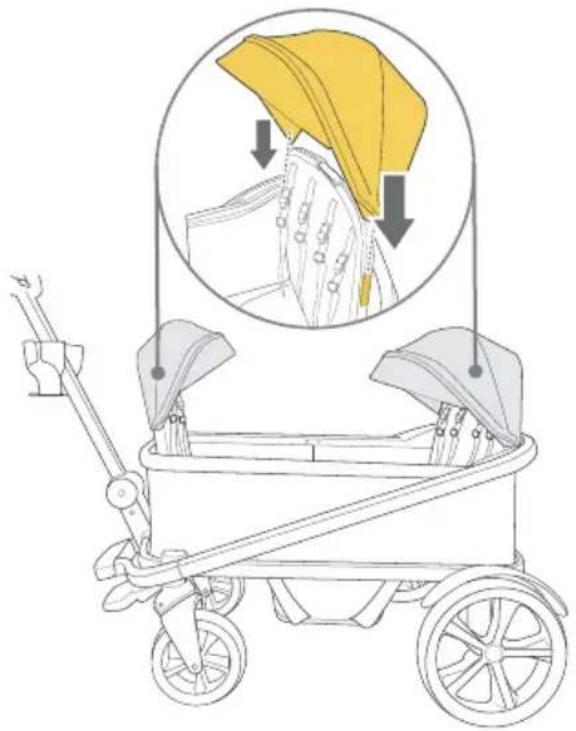
1. Attach Canopy
Slide the canopy onto the canopy mounts at each side of the wagon seat until it locks in place.
natural_image
Illustration of a stroller with a yellow hat and arrow indicating fabric application (no text or symbols)CANOPY REMOVAL
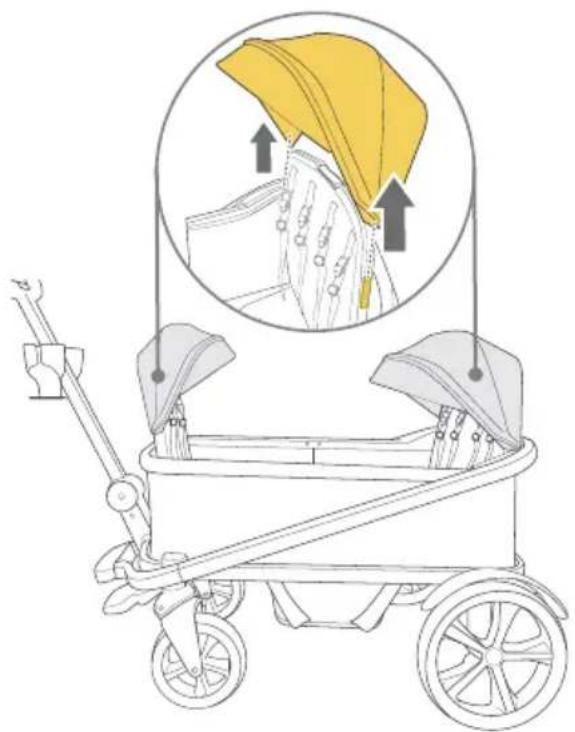
1. Remove Canopy
Pull up on canopy to remove from the canopy mounts.
natural_image
Line drawing of a baby stroller with a yellow canopy cover, showing front and side views (no text or symbols)SNACK TRAY
The snack tray may be used in either the center of the wagon or at the rear of the wagon.
SNACK TRAY CENTER POSITION INSTALLATION
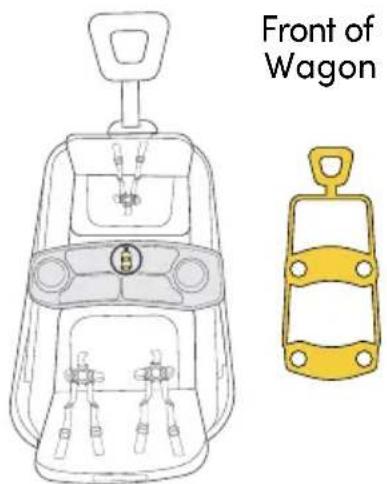
1. Position the Snack Tray
Align the handle in the icon on the snack tray to face the front of the wagon.
text_image
Front of Wagon2. Attach Snack Tray
Snap snack tray onto attachment points on inside of wagon.
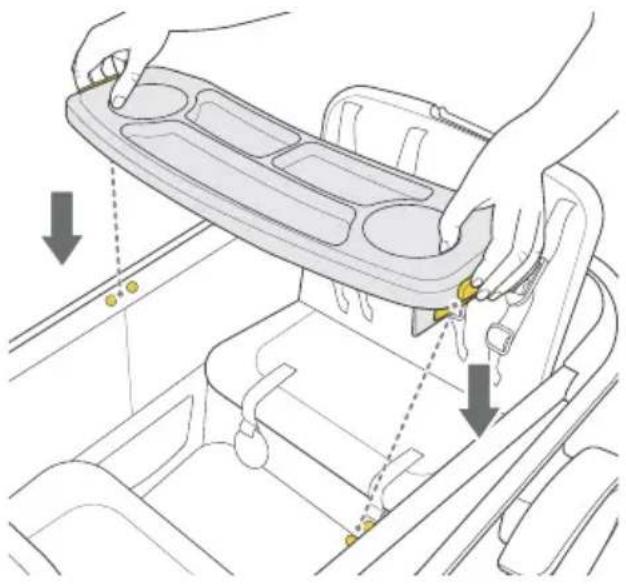
natural_image
Diagram of a car interior showing hand positioning and adjustment of a tray with arrows indicating movement (no text or symbols)SNACK TRAY CENTER POSITION REMOVAL
1. Remove Snack Tray
Press release buttons and lift snack tray to remove.
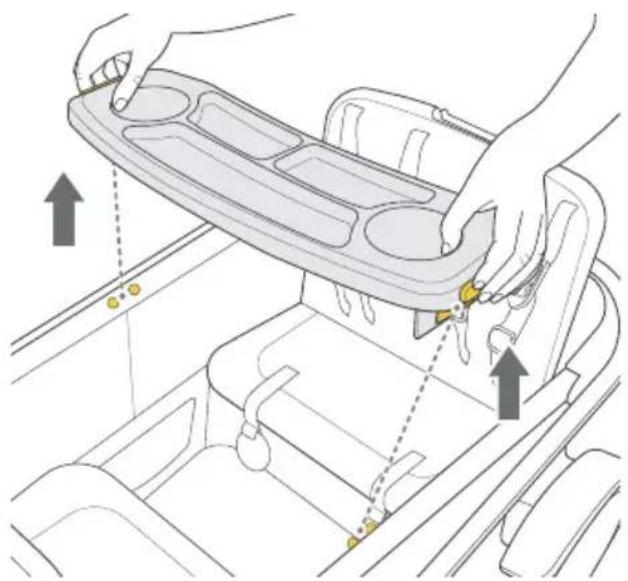
natural_image
Illustration of a car interior with hands adjusting a tray and lock mechanism (no text or symbols)SNACK TRAY REAR POSTION INSTALLATION
1. Position the Snack Tray
Align the handle in the icon on the snack tray to face the rear of the wagon.
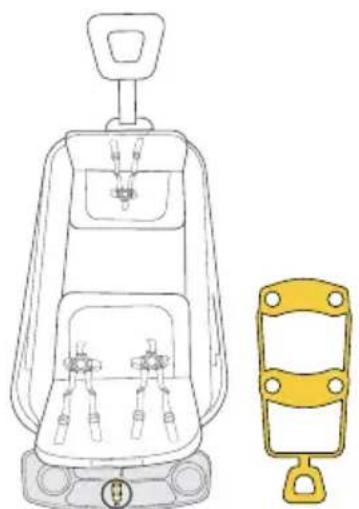
natural_image
Line drawing of a mechanical device with two internal compartments and a separate yellow component (no text or symbols)Rear of Wagon
SNACK TRAY REAR POSITON REMOVAL
1. Remove Snack Tray
Press release buttons and lift snack tray to remove.
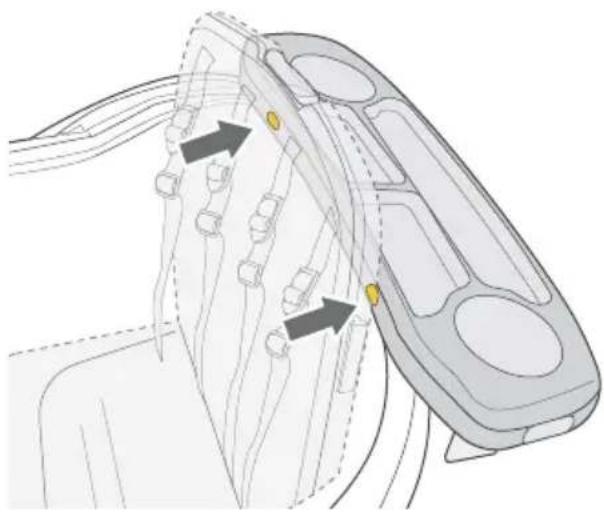
natural_image
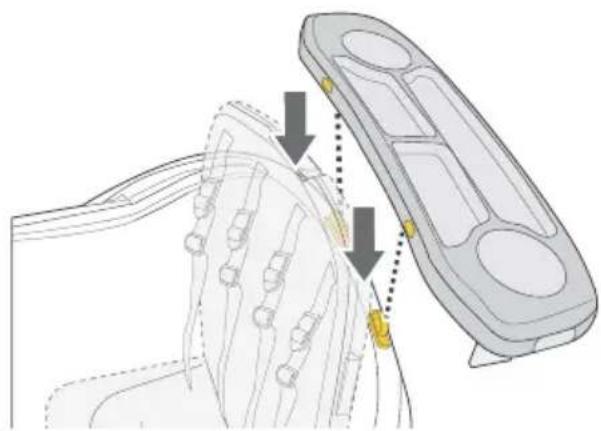
Diagram of a car interior showing steering wheel, dashboard, and steering wheel (no text or labels)2. Attach Snack Tray
Align and snap snack tray onto attachment points on outside of wagon.
natural_image
Technical diagram of a mechanical component with arrows indicating assembly or alignment (no text or symbols present)Care and Maintenance
CLEANING
- Use a sponge with a solution of mild soap and cold water (maximum temperature of 100^ / 38^ ).
- Rinse thoroughly with clean water to remove soap, then air dry.
- Do not use detergent or abrasive cleansers.
- Do not pressure wash.
REGULAR INSPECTIONS
We recommend inspecting your wagon before every use.
- Verify all screws, attachment points and fasteners are tight.
- Check all wheels to be sure they are securely attached.
- Check for tears or excessive fading wear in the fabric.
Wagon Accessories
BOB Gear® offers a complete line of accessories for your wagon. Visit our website bobgear.com for full details.
Warranty
This child restraint was manufactured by Britax Child Safety, Inc. ("Britax"). To the extent allowed by law, Britax warrants this product to the original retail purchaser as follows:
LIMITED WARRANTY
The frame is warranted for five (5) years. Components and fabric are warranted for one (1) year. Warranties are only valid from date of original purchase. Proof of purchase is required for any warranty claims. Your exclusive remedy for this warranty is that Britax will, at its option, provide repair or replacement components to the original purchaser of this product. Britax reserves the right to discontinue or change fabrics, parts, models or products, or to make substitutions.
This warranty does not cover damages that arise from negligence, misuse or use not in accordance with the product instruction. Additionally, Britax products purchased from unauthorized retailers, online auction sites, or as second hand items are not covered under this warranty.
The use of non-Britax covers, inserts, toys, accessories, or tightening devices is not approved by Britax. Their use could cause this stroller to fail safety standards. Their use also may void the Britax warranty.
To make a claim under this warranty, you must contact Britax Consumer Services at 1-888-427-4829 or 1-704-409-1699, or write to us using the address on the back cover of this User Guide.
DISCLAIMER OF WARRANTIES
The following disclaimer shall apply to you to the maximum extent permitted by applicable law. THE LIMITED WARRANTY SET FORTH ABOVE IS THE EXCLUSIVE WARRANTY MADE BY BRITAX. ALL OTHER WARRANTIES, WHETHER
EXPRESS, IMPLIED, OR STATUTORY, INCLUDING WITHOUT LIMITATION THE IMPLIED WARRANTIES OF MERCHANTABILITY AND FITNESS FOR A PARTICULAR PURPOSE, ARE DISCLAIMED. Some states do not allow certain exclusions or limitations on warranties, so the above may not apply to you. This warranty gives you specific legal rights, and you may have other rights, which vary from state to state. Neither Britax, nor the retailer selling this product, authorizes any person to create for it any other warranty, obligation, or liability in connection with this product.
LIMITATION OF DAMAGES
The following limitation of damages shall apply to you to the maximum extent permitted by applicable law. THE REMEDIES CONTAINED IN THE LIMITED WARRANTY SET FORTH ABOVE ARE THE EXCLUSIVE REMEDIES PROVIDED BY BRITAX. IN NO EVENT SHALL BRITAX BE LIABLE TO YOU FOR ANY INCIDENTAL, SPECIAL, PUNITIVE, EXEMPLARY, OR CONSEQUENTIAL DAMAGESARISING OUT OF OR RELATING IN ANY WAY TO THE RELATIONSHIP BETWEEN YOU AND BRITAX (INCLUDING DISPUTES RELATED TO THE MARKETING OR SALE OF BRITAX PRODUCTS), ANY PROVISIONS IN THIS USER GUIDE, AND/OR YOUR PURCHASE OR USE OF ANY PRODUCTS DESIGNED, MANUFACTURED, DISTRIBUTED, MARKETED, OR SOLD BY BRITAX.
PLEASE COMPLETE AND MAIL THE OWNER REGISTRATION CARD WITHIN (30) DAYS OF PURCHASE
You may also register online at bobgear.com/registration.
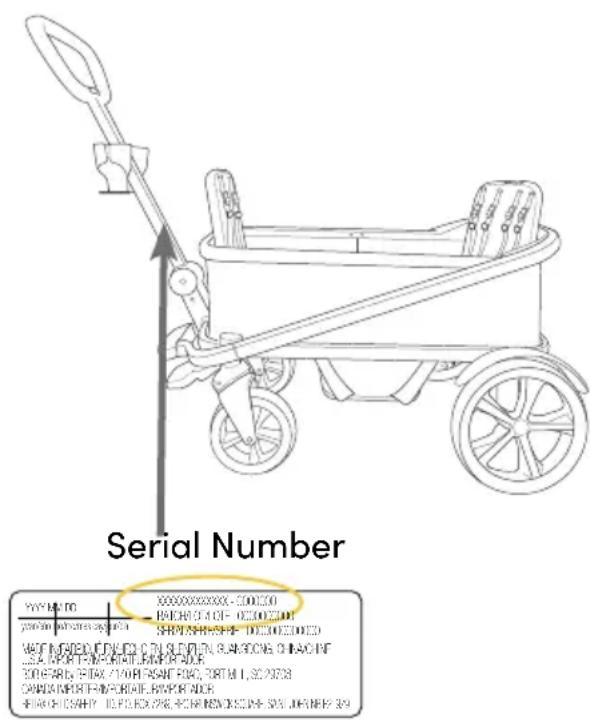
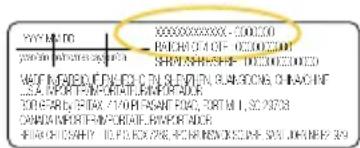
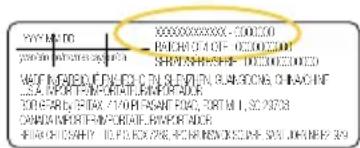
SERIAL NUMBER
Unfold the wagon handle. Look on the top of the wagon handle tube.
text_image
Serial Number YYYY-NO XXXXXXX - 001300 BACKOUT OF A DIF - 002000001 SCHINNASH-SHE - 002000002 WAT MURGER FID TO CNTLEPTAL SUNSOON, CHINNASH USA AIRPORT-MURGER, LIMFORANDER COTARY, FIDAY / 1/08 FASANT FORC, TORTILLA, SC 70738 GARMA MURGER-MURGER, RAVFORANDER SHAW OR SHAWY / 10 P.O. BOX, BOX BROWN, BOXE - 50% JUNNEY 39Arbitration Agreement
MANDATORY ARBITRATION & CLASS ACTION WAIVER ("ARBITRATION AGREEMENT")
PLEASE READ THIS SECTION CAREFULLY BECAUSE IT AFFECTS YOUR LEGAL RIGHTS, REQUIRES YOU TO ARBITRATE DISPUTES, AND LIMITS THE MANNER IN WHICH YOU CAN SEEK RELIEF.
Arbitration is a process in which persons with a dispute waive their rights to file a lawsuit and proceed in court and to have a jury trial to resolve their disputes and, instead, agree to submit their disputes to a neutral third person (an "arbitrator") for a decision. Each party to the dispute has an opportunity to present some evidence to the arbitrator. Pre-arbitration discovery may be limited. Arbitration proceedings are private and less formal than court trials. The arbitrator will issue a
final and binding decision resolving the dispute, which may be enforced as a court judgment. A court rarely overturns an arbitrator's decision.
YOU AND BRITAX AGREE THAT ANY DISPUTE BETWEEN US, WHETHER BASED IN CONTRACT, TORT, STATUTE OR OTHERWISE, SHALL BE RESOLVED IN BINDING INDIVIDUAL ARBITRATION. For purposes of this Arbitration Agreement, the word "dispute" and "disputes" are given the broadest possible meaning and include, without limitation, all claims, disputes, and/or controversies arising out of or relating in any way to the relationship between you and Britax (including disputes related to the marketing or sale of Britax products), any provisions in this User Guide or this Arbitration Agreement (including the interpretation and scope of this Arbitration Agreement and the arbitrability of any dispute), and/or your purchase or use of any products designed, manufactured, distributed, marketed, or sold by Britax. The Federal Arbitration Act ("FAA") and federal arbitration law apply to this Arbitration Agreement. Notwithstanding the foregoing, you and Britax each agree that you and Britax shall retain the rights to bring an individual suit in small claims court for disputes within the scope of such court's jurisdiction and/or to bring an individual suit in court to enjoin infringement or other misuse of intellectual property rights. In no way shall the foregoing sentence allow for an action to be brought on a class or collective basis.
YOU HAVE THE RIGHT TO OPT OUT OF THIS ARBITRATION AGREEMENT, BUT YOU MUST EXERCISE THIS RIGHT WITHIN THIRTY (30) DAYS OF YOUR PURCHASE OF A BRITAX PRODUCT. If you do not wish to be bound by this Arbitration Agreement, you must notify Britax by mailing or e-mailing a written opt-out notice, postmarked or electronically delivered within thirty (30) days of your purchase of a Britax product, to: ATTN: Legal Department, 4140 Pleasant Road, Fort Mill, South Carolina 29708. Your opt-out notice must include your full name, address and/or e-mail address, the model and serial numbers of the purchased product, a copy of your proof of purchase, and a statement that you intend to opt out of this Arbitration Agreement. If you do not opt out within thirty (30) days of your purchase, then this Arbitration Agreement will apply and you understand and agree that you are waiving your right to maintain other available resolution processes, such as a court action or administrative proceeding, to resolve your dispute with Britax.
The arbitration will be conducted confidentially by a single arbitrator and administered by the American Arbitration Association ("AAA") under its Consumer Arbitration Rules most recently in effect to the extent such rules and procedures do not contradict the express terms of this Arbitration Agreement. To learn more about the rules and how to begin an arbitration, you may call any AAA office or go to www.adr.org. If you demand arbitration, then at your request Britax will advance your portion of the expenses associated with the arbitration, including the filing, administrative, hearing and arbitrator's fees ("Arbitration Fees") to the extent such Arbitration Fees exceed \200. If Britax demands arbitration, then at your request Britax will advance your portion of the Arbitration Fees. For claims of \10,000 or less, you can choose whether you would like the arbitration carried out based only on documents submitted to the arbitrator or by a hearing in person or by telephone. The arbitration hearing will be conducted in the county of your residence, within 30 miles of such county, or in such place as shall be ordered by the arbitrator. Throughout the arbitration, each party shall bear his, her or its own attorneys' fees and expenses, including any witness and
expert witness fees. The arbitrator shall apply applicable substantive law consistent with the FAA, shall apply statutes of limitation, and shall honor claims of privilege recognized at law. The arbitrator shall decide, with or without a hearing, any motion that is substantially similar to a motion to dismiss for failure to state a claim or a motion for summary judgment. In conducting the arbitration proceeding, the arbitrator shall not apply any federal or state rules of civil procedure or evidence. The arbitrator shall not consolidate the claims of multiple parties unless you and Britax agree to do so. At the timely request of any party, the arbitrator shall provide a written explanation for the award. The arbitrator's award may be filed with any court having jurisdiction.
THIS ARBITRATION AGREEMENT DOES NOT ALLOW CLASS OR COLLECTIVE ARBITRATIONS EVEN IF THE AAA RULES OR PROCEDURES WOULD. IN OTHER WORDS, YOU AND BRITAX EACH AGREE THAT ALL DISPUTES SHALL BE ARBITRATED ON AN INDIVIDUAL BASIS AND WAIVE ANY RIGHT TO PROCEED IN A CLASS, CONSOLIDATED, OR REPRESENTATIVE FASHION. THE ARBITRATOR MAY AWARD MONEY OR INJUNCTIVE RELIEF ONLY IN FAVOR OF THE INDIVIDUAL PARTY SEEKING RELIEF AND ONLY TO THE EXTENT NECESSARY TO PROVIDE RELIEF WARRANTED BY THAT PARTY'S INDIVIDUAL CLAIM. NO CLASS, REPRESENTATIVE OR PRIVATE ATTORNEY GENERAL OR GENERAL INJUNCTIVE RELIEF THEORIES OF LIABILITY OR PRAYERS FOR RELIEF MAY BE MAINTAINED IN ANY ARBITRATION CONDUCTED PURSUANT TO THIS ARBITRATION AGREEMENT.
If the foregoing class action waiver and prohibition against class arbitration is determined to be invalid or unenforceable for any reason, then this entire Arbitration Agreement shall be void. If any
portion of this Arbitration Agreement other than the class action waiver and prohibition against class arbitration is deemed to be invalid or unenforceable for any reason, it shall not invalidate the remaining portions of this Arbitration Agreement. If for any reason a dispute proceeds in court rather than in arbitration, you and Britax each waive any right to a jury trial.
Notes

natural_image
Abstract shield-shaped logo with mountain and river design (no text or symbols)BIENVENUE CHEZ BOB® GEAR
natural_image
Line drawing of a rectangular container with internal compartments and storage tanks (no text or symbols)Chariot
natural_image
Line drawing of a manual pulley system with a handle and cord (no text or symbols)natural_image
Simple line drawing of two banana-shaped objects with dashed internal lines (no text or symbols)Garde-boue (2)
natural_image
Line drawing of a mechanical component or bracket (no text or symbols)Nacelle
natural_image
Line drawing of a rectangular electronic device with two circular ports and a handle (no text or symbols)Plateau de collation
natural_image
Line drawing of two folded paper sheets (no text or symbols)text_image
Technical diagram showing a mechanical component with labeled parts R and directional arrows indicating movement or assembly.ESSIEU ARRIÈRE
INSTALLATION DE L'ESSIEU ARRIÈRE
natural_image
Illustration of a yellow mechanical device interacting with a car, showing a sensor emitting sound waves (no text or symbols present)natural_image
Technical line drawing of a vehicle chassis with structural components and highlighted parts (no text or symbols)ROUES ARRIÈRE XTRAMILE™
INSTALLATION DES ROUES ARRIÈRE
text_image
Diagram illustrating ear disturbance measurement with labeled components and directional arrowtext_image
Diagram illustrating ear health monitoring with hands performing ring cleaning and ear signal stimulationnatural_image
Diagram of a car seat assembly with arrows indicating parts of the seat (no text or labels present)natural_image
Technical line drawing of a mechanical assembly with a magnified inset showing a yellow component (no text or symbols)natural_image
Diagram of a car steering wheel assembly with a yellow tool inserted, showing no text or symbolsRETRAIT DES ROUES AVANT
natural_image
Diagram showing hands performing tire maintenance on a vehicle chassis, with an inset close-up of the engine compartment (no text or symbols)natural_image
Line drawing of a toy car with wheels and handle, showing a directional arrow (no text or symbols)natural_image
Line drawing of a baby stroller with an ear icon and sound waves, no text or symbols presentPLIER LE CHARIOT
natural_image
Line drawing of a toy car with a handrail and wheels, showing a zoomed-in view of the handle (no text or symbols)text_image
Diagram showing a car tricycle with a yellow cargo box and directional arrow, alongside an inset image of the vehicle's handle.3. Plier la poignée STEERSTEADY ™
natural_image
Line drawing of a two-wheeled toy car with wheels and handle, showing a curved arrow indicating rotation (no text or symbols)ACTIVER LE FREIN DE STATIONNEMENT
natural_image
Diagram of a hand holding a seatbelt with arrows indicating upward and downward motion (no text or symbols)natural_image
Diagram showing a mechanical assembly with a lever and directional arrow (no text or symbols)natural_image
Diagram of a neck and shoulder with a belt buckle, showing alignment and movement arrows (no text or symbols)natural_image
Illustration of hands connecting a cable to a seatbelt, showing mechanical components and directional arrows (no text or symbols)natural_image
Line drawing of a hand tool interacting with a cup and stand (no text or symbols)RETRAIT DU PORTE-GOBELET
1. Retirer le porte-gobelet
natural_image
Line drawing of a hand holding a cup with an arrow indicating upward motion (no text or symbols)CAPOTE (CERTAINS MODÈLES)
INSTALLATION DE LA CAPOTE
1. Fixer la capote
natural_image
Illustration of a stroller with a yellow hat and arrow indicating down, showing the handle and seat (no text or symbols)RETRAIT DE LA CAPOTE
1. Retirer la capote
natural_image
Illustration of a baby stroller with a yellow hat and arrow indicating fabric application (no text or symbols)PLATEAU DE COLLATION
INSTALLATION DU PLATEAU DE COLLATION AU CENTRE
natural_image
Diagram of a car interior showing hand positioning and adjustment of a tray with buttons (no text or symbols)RETRAIT DU PLATEAU DE COLLATION SITUE AU CENTRE
1. Retirer le plateau de collation
natural_image
Diagram of a car interior showing hand positioning and adjustment of a tray with arrows indicating movement (no text or symbols)INSTALLATION DU PLATEAU DE COLLATION À L'ARRIERE
natural_image
Line drawing of a mechanical device with a separate view showing internal components and a handle (no text or symbols)Arrière du chariot
RETRAIT DU PLATEAU DE COLLATION SITUE À L'ARRIÈRE
1. Retirer le plateau de collation
natural_image
Technical diagram of a mechanical component with arrows indicating directional movement (no text or symbols)natural_image
Diagram of a mechanical component with arrows indicating assembly or movement, no visible text or symbolsSoin et entretien
NETTOYAGE
natural_image
Line drawing of a two-wheeled toy car with handle and wheels (no text or symbols)Numéro de série
text_image
XXXXXX-20070 XXXXXX-20070 - 20070 XXXXXX-20070 - 20070 XXXXXX-20070 - 20070 XXXXXX-20070 - 20070 XXXXXX-20070 - 20070 XXXXXX-20070 - 20070 XXXXXX-20070 - 20069 XXXXXX-20070 - 20069 XXXXXX-20070 - 20069 XXXXXX-20070 - 20069 XXXXXX-20070 - 20069 XXXXXX-20070 - 20069 XXXXXX-20070 - 20069 XXXXXXX-20070 - 20069 XXXXXXX-20070 - 20069 XXXXXXX-20070 - 20069 XXXXXXX-20070 - 20069 XXXXXXX-20070 - 20069 XXXXXXX-20070 - 20069Convention d'arbitrage
CLAUSE D'ARBITRAGE OBLIGATOIRE ET RENONCIATION AU RECOURS COLLECTIF (« CONVENTION D'ARBITRAGE »)
VEUILLEZ LIRE ATTENTIVEMENT CETTE SECTION, CAR ELLE A UNE INCIDENCE SUR VOS DROITS LÉGAUX, VOUS OBLIGE À ARBITRER LES LITIGES ET LIMITE LA FAÇON DONT VOUS POUVEZ DEMANDER UN REDRESSEMENT.
natural_image
Abstract shield-shaped logo with mountain and river design (no text or symbols)BIENVENIDOS A BOB® GEAR
natural_image
Line drawing of a rectangular container with internal compartments and storage tanks (no text or symbols)Vagón
natural_image
Line drawing of a manual pump connected to a motor (no text or symbols)natural_image
Simple line drawing of two banana-shaped objects with dashed internal lines (no text or symbols)Guardabarros (2)
natural_image
Line drawing of a mechanical component or bracket (no text or symbols)natural_image
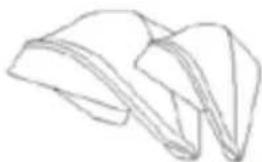
Line drawing of a rectangular electronic device with two circular ports and a base (no text or symbols)Bandeja para aperitivos
natural_image
Line drawing of two folded paper sheets (no text or symbols)text_image
Technical diagram showing a mechanical component with labeled parts R and an arrow indicating direction or movement.EJE TRASERO
natural_image
Illustration of a yellow mechanical device interacting with a car, showing a sensor emitting sound waves (no text or symbols present)natural_image
Technical line drawing of a vehicle chassis with structural components and highlighted parts (no text or symbols)RUEDAS TRASERAS XTRAMILE™
natural_image
Diagram showing a car steering wheel with an ear and a yellow pencil inserted, illustrating the wheel's mechanical operation (no text or symbols present)text_image
Diagram illustrating ear ear repair process with hands using ring and earbell components, showing signal attenuationnatural_image
Diagram of a car interior with ear and seat, showing mechanical components and directional arrows (no text or symbols)natural_image
Technical line drawing of a mechanical assembly with a highlighted section showing a yellow component and an arrow indicating direction (no text or symbols present)Desarmar el Vagón
RUEDAS TRASERAS Y DELANTERAS XTRAMILE™
RETIRAR LA RUEDA TRASERA
natural_image
Diagram of a car steering wheel assembly with a yellow tool inserted, showing mechanical components and motion direction (no text or symbols)DESMONTAR LA RUEDA DELANTERA
natural_image
Diagram showing hands operating a car tire with arrows indicating motion, including a zoomed-in inset of the engine compartment (no text or symbols present)natural_image
Line drawing of a toy car with wheels and handle, showing a right-hand rule (no text or symbols)natural_image
Line drawing of a baby stroller with an ear icon and sound waves, no text or symbols presentPLEGAR EL VAGÓN
natural_image
Line drawing of a baby stroller with handrails and a magnified inset showing the lever mechanism (no text or symbols)text_image
Diagram showing a car tricycle with a yellow cargo cart and a magnified view of the handle mechanism.natural_image
Line drawing of a toy car with wheels and handle, showing a curved arrow indicating rotation (no text or symbols)AJUSTAR EL FRENO DE ESTA- CIONAMIENTO
natural_image
Diagram of a hand holding a seatbelt with arrows indicating seat movement (no text or symbols)natural_image
Diagram of a medical or surgical procedure showing a tool inserted into a component, with an arrow indicating direction (no text or symbols present)natural_image
Diagram of a neck and shoulder with two hanging clips and directional arrows indicating movement (no text or symbols)natural_image
Diagram of a hand tool interacting with a cup and stand, showing a yellow arrow indicating motion (no text or symbols present)RETIRAR EL PORTAVASO
natural_image
Line drawing of a toilet with a cup and handle, showing a directional arrow (no text or symbols)natural_image
Illustration of a stroller with a yellow cover and arrow indicating fabric application (no text or symbols)RETIRAR LA CAPOTA
1. Retire la capota
natural_image
Illustration of a baby stroller with a yellow hat and arrow indicators (no text or symbols)natural_image
Illustration of a car interior with hands adjusting a tray and lock mechanism (no text or symbols)natural_image
Illustration of a car interior with hand positioning and directional arrows indicating movement (no text or symbols)natural_image
Line drawing of a mechanical device with two views: top shows internal components, bottom shows a yellow bracket (no text or symbols)natural_image
Diagram of a medical device with arrows indicating movement or force, showing internal components and a separate device (no text or symbols present)QUITAR LA BANDEJA PARA APERITIVOS DE LA PARTE TRASERA
natural_image
Technical diagram of a mechanical component with arrows indicating directional movement (no text or symbols)natural_image
Line drawing of a two-wheeled toy car with handle and wheels (no text or symbols)Número de serie
text_image
Scanned document fragment showing a date, time, and technical specifications in Chinesecontour
| X | Y | Intensity | |---|---|---------| | 0.0 | 0.0 | Low | | 0.1 | 0.1 | Medium | | 0.2 | 0.2 | High | | 0.3 | 0.3 | Medium | | 0.4 | 0.4 | Low | | 0.5 | 0.5 | Medium | | 0.6 | 0.6 | High | | 0.7 | 0.7 | Medium | | 0.8 | 0.8 | Low | | 0.9 | 0.9 | Medium | | 1.0 | 1.0 | High | | 1.1 | 1.1 | Medium | | 1.2 | 1.2 | Low | | 1.3 | 1.3 | Medium | | 1.4 | 1.4 | High | | 1.5 | 1.5 | Medium | | 1.6 | 1.6 | Low | | 1.7 | 1.7 | Medium | | 1.8 | 1.8 | High | | 1.9 | 1.9 | Medium | | 2.0 | 2.0 | Low | | 2.1 | 2.1 | Medium | | 2.2 | 2.2 | High | | 2.3 | 2.3 | Medium | | 2.4 | 2.4 | Low | | 2.5 | 2.5 | Medium | | 2.6 | 2.6 | High | | 2.7 | 2.7 | Medium | | 2.8 | 2.8 | Low | | 2.9 | 2.9 | Medium | | 3.0 | 3.0 | High | | 3.1 | 3.1 | Medium | | 3.2 | 3.2 | Low | | 3.3 | 3.3 | Medium | | 3.4 | 3.4 | High | | 3.5 | 3.5 | Medium | | 3.6 | 3.6 | Low | | 3.7 | 3.7 | Medium | | 3.8 | 3.8 | High | | 3.9 | 3.9 | Medium | | 4.0 | 4.0 | Low | | 4.1 | 4.1 | Medium | | 4.2 | 4.2 | High | | 4.3 | 4.3 | Medium | | 4.4 | 4.4 | Low | | 4.5 | 4.5 | Medium | | 4.6 | 4.6 | High | | 4.7 | 4.7 | Medium | | 4.8 | 4.8 | Low | | 4.9 | 4.9 | Medium | | 5.0 | 5.0 | High | | 5.1 | 5.1 | Medium | | 5.2 | 5.2 | Low | | 5.3 | 5.3 | Medium | | 5.4 | 5.4 | High | | 5.5 | 5.5 | Medium | | 5.6 | 5.6 | Low | | 5.7 | 5.7 | Medium | | 5.8 | 5.8 | High | | 5.9 | 5.9 | Medium | | 6.0 | 6.0 | Low | | 6.1 | 6.1 | Medium | | 6.2 | 6.2 | High | | 6.3 | 6.3 | Medium | | 6.4 | 6.4 | Low | | 6.5 | 6.5 | Medium | | 6.6 | 6.6 | High | | 6.7 | 6.7 | Medium | | 6.8 | 6.8 | Low | | 6.9 | 6.9 | Medium | | 7.0 | 7.0 | High | | 7.1 | 7.1 | Medium | | 7.2 | 7.2 | Low | | 7.3 | 7.3 | Medium | | 7.4 | 7.4 | High | | 7.5 | 7.5 | Medium | | 7.6 | 7.6 | Low | | 7.7 | 7.7 | Medium | | 7.8 | 7.8 | High | | 7.9 | 7.9 | Medium | | 8.0 | 8.0 | Low | | 8.1 | 8.1 | Medium | | 8.2 | 8.2 | High | | 8.3 | 8.3 | Medium | | 8.4 | 8.4 | Low | | 8.5 | 8.5 | Medium | | 8.6 | 8.6 | High | | 8.7 | 8.7 | Medium | | 8.8 | 8.8 | Low | | 8.9 | 8.9 | Medium | | 9.0 | 9.0 | High | | ... (repeated) for all contours to display the same data as a line chart.
B·O·B
GEAR
BOB Gear® by Britax © 2022 Britax Child Safety, Inc.

(888) 427-4829

(704) 409-1699

bobgear.com

4140 Pleasant Rd, Fort Mill, South Carolina 29708
All rights reserved. Printed in China. This product and its components are subject to change without notice.