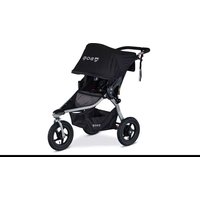
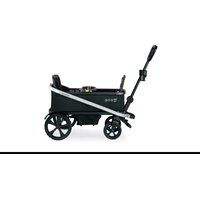
Alterrain Pro - Stroller BOB Gear - Free user manual and instructions
Find the device manual for free Alterrain Pro BOB Gear in PDF.

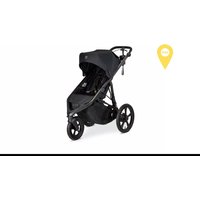
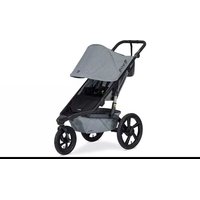
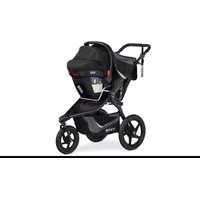
| Product Type | All-terrain jogging stroller |
| Brand | BOB Gear |
| Model | All-terrain Pro |
| Maximum child weight | 34 kg (75 lb) |
| Maximum child height | 112 cm (44 in) |
| Recommended age (stroll) | 0–5 years (with infant car seat up to 8 weeks) |
| Recommended age (jogging/off-road) | 8 months – 5 years |
| Storage basket capacity | 4.5 kg (10 lb) |
| Seat back pocket capacity | 1 kg (2 lb) |
| Canopy pocket capacity | 0.45 kg (1 lb) |
| Maximum tire pressure | 30 psi |
| Stroller weight | approximately 13.5 kg (30 lb) |
| Suspension | Yes |
| Hand brake | Yes, rear drum brake |
| Parking brake | Yes, pedal |
| Front wheel | Swiveling (stroll) or locked (jogging) |
| Harness | 5-point, height-adjustable |
| Seat recline | Adjustable |
| Canopy | Removable, with pocket |
| Handlebar | Height-adjustable, foldable |
| Wrist strap | Included |
| Frame warranty | 5 years |
| Component and fabric warranty | 1 year |
Frequently Asked Questions - Alterrain Pro BOB Gear
User questions about Alterrain Pro BOB Gear
0 question about this device. Answer the ones you know or ask your own.
Ask a new question about this device
Download the instructions for your Stroller in PDF format for free! Find your manual Alterrain Pro - BOB Gear and take your electronic device back in hand. On this page are published all the documents necessary for the use of your device. Alterrain Pro by BOB Gear.
USER MANUAL Alterrain Pro BOB Gear
natural_image
Illustration of a stroller with front wheel, backrest seat, and rear seats (no text or symbols)ALTERRAIN™ PRO
USER GUIDE
GUIDE DE L'UTILISATEUR
GUÍA DEL USUARIO
IMPORTANT
THIS USER GUIDE CONTAINS A MANDATORY ARBITRATION CLAUSE AND CLASS ACTION WAIVER (“ARBITRATION AGREEMENT”) THAT AFFECTS YOUR LEGAL RIGHTS, REQUIRES YOU TO ARBITRATE DISPUTES, AND LIMITS THE MANNER IN WHICH YOU CAN SEEK RELIEF.
IMPORTANT
LE PRÉSENT GUIDE D'UTILISATION CONTIENT UNE CLAUSE D'ARBITRAGE OBLIGATOIRE ET UNE RENONCIATION AU RECOURS COLLECTIF (« CONVENTION D'ARBITRAGE ») QUI A UNE INCIDENCE SUR VOS DROITS LÉGAUX, VOUS OBLIGE À ARBITRER LES LITIGES ET LIMITE LA FAÇON DONT VOUS POUVEZ DEMANDER UN REDRESSEMENT.
IMPORTANTE
BOB®, BOB Gear®, BRITAX®, REVOLUTION® and Altertain™ are trademarks owned by Britax. ©2024 All Rights Reserved. This product and its components are subject to change without notice.
natural_image
Abstract shield-shaped logo with mountain and river design (no text or symbols)WELCOME TO BOB GEAR
BOB Gear ^® recommends that you register your stroller.
Residents of the United States can register online at bobgear.com/registration
For updates to this user guide, warranty and other recent product notifications, please visit bobgear.com periodically or any time before making approved changes or adding approved equipment to your stroller.
Residents of Canada can register online at britax.ca/registration/stroller.
This will allow us to notify you directly if there are any product recalls.
Contents
Safety Information....2
Warnings....2
Notes....3
Stroller Features....4
Age Guidelines....5
Stroller Assembly ....5
Unpacking the Stroller....5
Stroller Wheels....5
Stroller Operation......8
Unfolding and Folding......8
Walk or Jog Mode....10
Checking Tire Pressure....10
Adjusting the Tracking....10
Setting the Parking Brake....12
Securing the Child in the Seat....12
Using the Wrist Strap....13
Reclining the Seat....14
Positioning the Canopy....14
Adjusting Handle Position....14
Using the Hand Brake....15
Care and Maintenance....15
Cleaning....15
Regular Inspections....15
Stroller Accessories....15
Warranty 16
Arbitration Agreement ....17
Safety Information
WARNING!
Failure to follow all warnings and instructions could result in SERIOUS INJURY or DEATH.
Read these instructions carefully before using this product. To ensure proper use, store this user guide in a convenient place so it can be consulted often.
- Never leave child unattended.
- The maximum weight capacity of the stroller (child plus luggage weight) is 75 lbs (34 kg). Maximum child height is 44 inches (112 cm). Do not exceed the maximum weight or height, as stroller will become unstable and tip resulting in serious injury.
- Avoid serious injury from falling or sliding out. Always use seat harness.
- DO NOT attach parcels or bags to the handlebar or frame of stroller except those recommended by BOB Gear by Britax, as stroller can become unstable and tip over.
- Child may slip into leg openings and strangle. Never use in reclined position unless child is harnessed.
- DO NOT overload the seat back pocket. Maximum weight is 2 lbs (1 kg). Overloading the seat back pocket may cause the stroller to become unstable.
- FALL HAZARD - Wheel can detach and cause tip over. Pull on the wheel to assure it is securely attached.
- DO NOT overload the low boy cargo basket. Maximum weight is 10 lbs (4.5 kg).
- FALL HAZARD from tip over - Before running, jogging, or walking fast, LOCK the front wheel from swiveling.
- Do not overload the canopy pocket. Maximum weight is 1 lb (0.45 kg). Overloading the canopy pocket may cause the stroller to become unstable and tip over.
- Avoid finger entrapment or injury. Always ensure any child occupants or bystanders are away from the stroller while folding or unfolding.
- DO NOT park on inclines. The parking brake is intended to park the stroller on flat surfaces only. Parking on inclines may result in tip over or runaway stroller.
- The parking brake is not designed as a stopping brake. The parking brake should not be used to slow or stop the stroller because doing so could cause the stroller to stop abruptly, resulting in loss of control.
• Always set the parking brake when stroller is not moving.
- Never load or unload the stroller without the parking brake set.
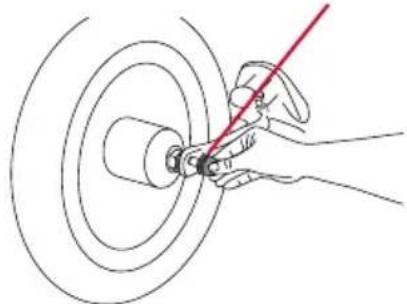
- Check the quick release lever before each use of the stroller to ensure the front wheel is properly secured. Failure to secure the quick release can cause the wheel to vibrate, wobble, or become detached from the stroller.
- Never use with low tire pressure or deflated tires as this could result in loss of control. Inflating tires above the maximum inflation pressure embossed on the tire can damage the rim and/or tire, resulting in loss of control and injury.
- Use extreme caution when using stroller on uneven and/or unpaved, wet, or slick surfaces, as these conditions create additional hazards and can lead to a loss of stability, resulting in serious injury.
- DO NOT use stroller on stairs, escalators, moving vehicles, or steep inclines. Stroller can tip over.
- DO NOT wear roller skates or inline skates while pushing stroller.
- Always jog with the stroller seat in the fully upright position. Jogging with the seat in reclined positions may result in a loss of stability.
- When seat is fully reclined, backward tip-over is more likely, and may result in injury to stroller occupant.
• Always use wrist strap to prevent being separated from stroller.
- Never allow child to stand in stroller.
- DO NOT modify the stroller or any labels. Doing so voids the warranty and could lead to a dangerous condition.
- DO NOT place sharp objects in any seat pocket. Leaning against sharp objects in pockets can result in injury to occupant.
NOTES
- Before and during use, always make sure the child's hands and feet are away from wheels.
- Never pull stroller backward up stairs. Doing so could damage the suspension system, leading to frame failure.
- Protect stroller when transporting or shipping to prevent damage to stroller and stroller components. Check closely for damage after transporting or shipping.
- Discontinue using stroller if damaged or if any parts are missing.
- It is best to store your stroller indoors when it is not in use. Extended exposure to rain or the sun's ultraviolet rays can fade and damage the fabric, tires, and plastic parts.
Stroller Features
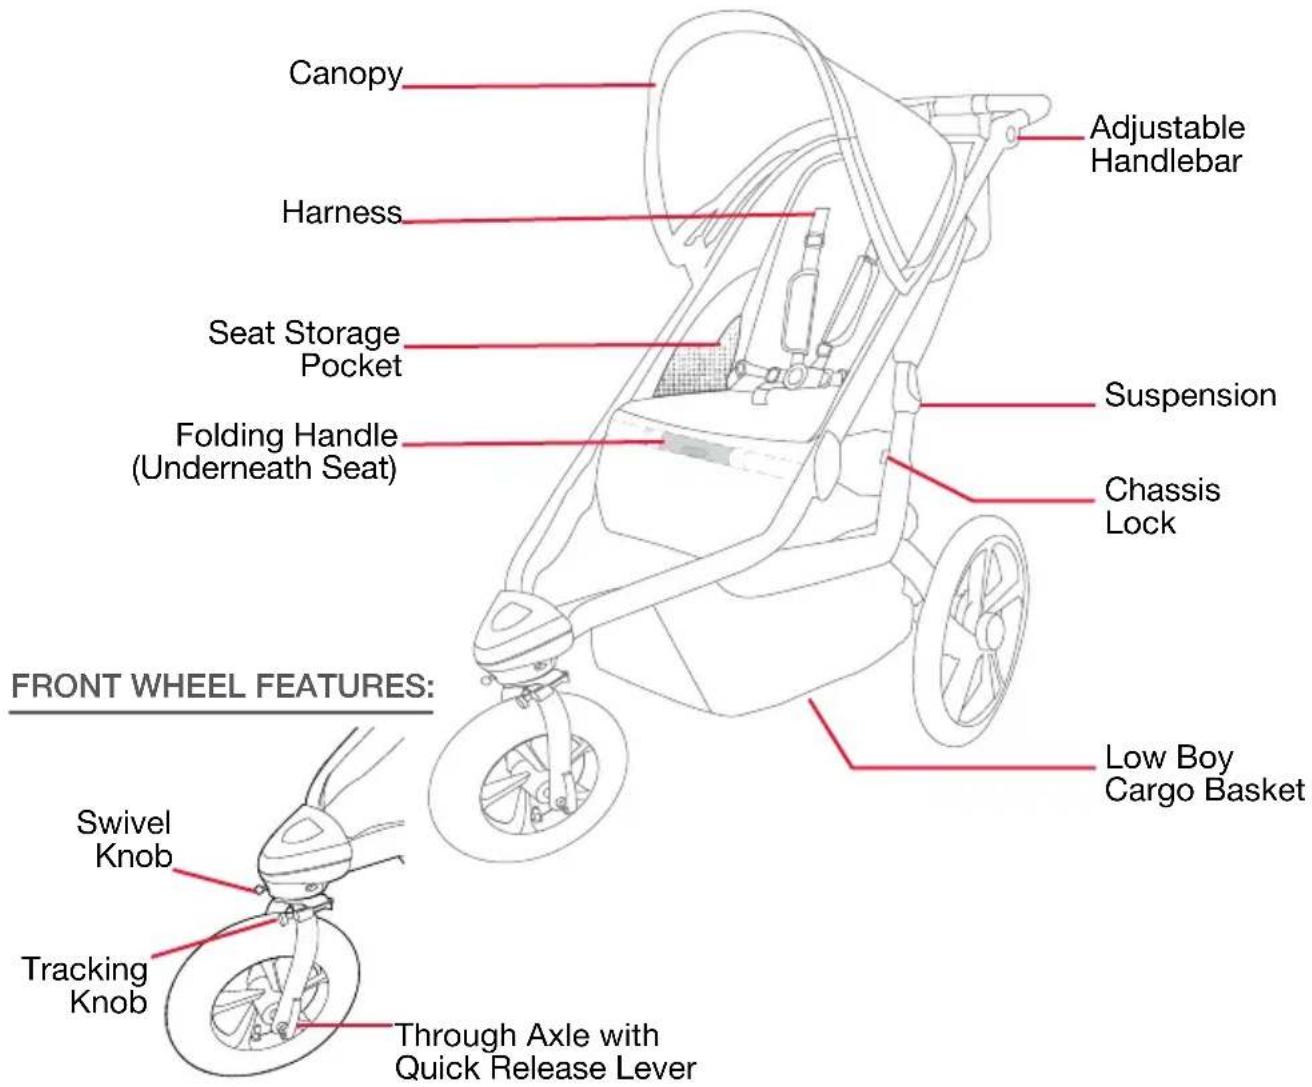
text_image
Canopy Adjustable Handlebar Harness Seat Storage Pocket Suspension Folding Handle (Underneath Seat) Chassis Lock FRONT WHEEL FEATURES: Swivel Knob Low Boy Cargo Basket Tracking Knob Through Axle with Quick Release Lever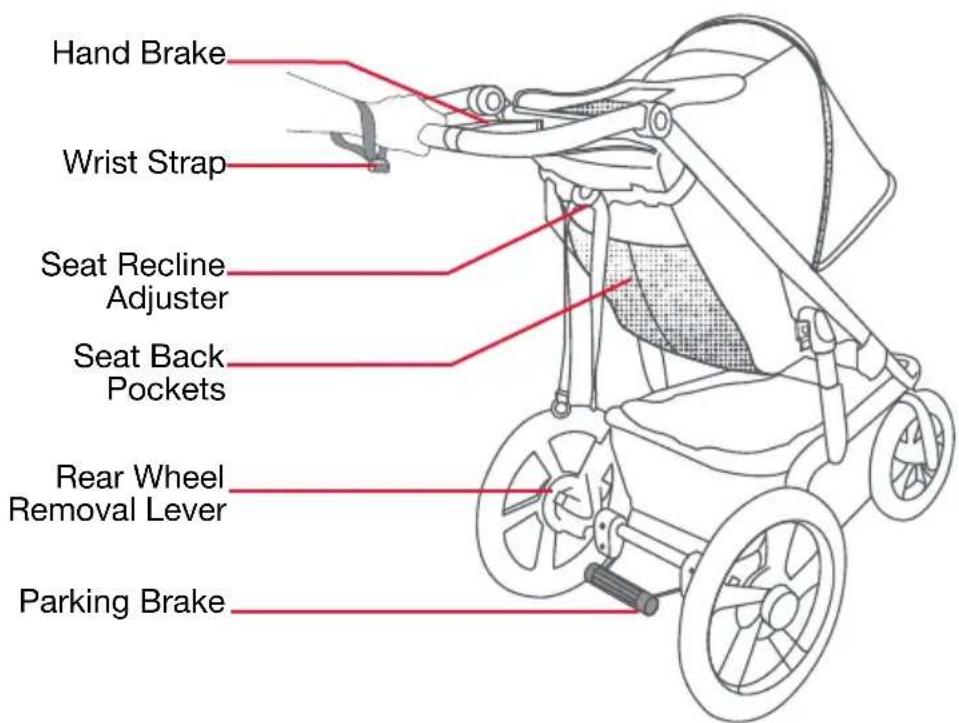
text_image
Hand Brake Wrist Strap Seat Recline Adjuster Seat Back Pockets Rear Wheel Removal Lever Parking BrakeActual product may vary from images
Age Guidelines
Prior to first use, consult with your pediatrician regarding suitability of stroller use with your child.
Infants incapable of holding their head up must have additional head and neck support to ride safely and comfortably. From 0-8 weeks, or as recommended by your pediatrician, the use of an infant car seat and adapter is encouraged.
Children are unique and develop at different rates. Most may not have the neck strength for jogging or off-road motion until 8 months of age. For jogging or off-road stroller use, BOB Gear by Britax recommends you limit use of this stroller to children over the age of 8 months.
Please refer to the below table for age/use guidelines:
RECOMMENDED STROLLER USE
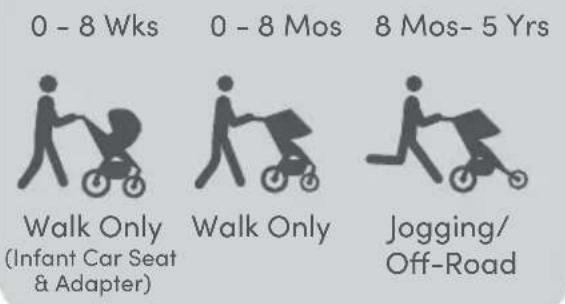
text_image
0 - 8 Wks 0 - 8 Mos 8 Mos- 5 Yrs Walk Only (Infant Car Seat & Adapter) Walk Only Jogging/ Off-RoadStroller Assembly
Unpacking the Stroller
WARNING!
Remove all packaging materials and discard to avoid choking and suffocation hazards.
Stroller Wheels
Rear Wheel Installation
1. Unlock Parking Brake
Prior to installing the rear wheels, position the parking brake in the unlocked position.
natural_image
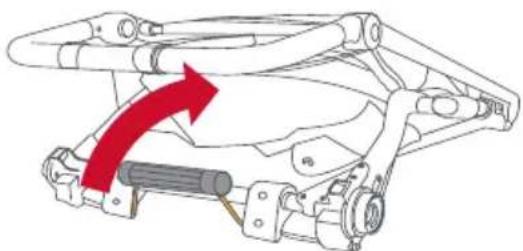
Mechanical assembly diagram showing a red arrow pointing to a component, no text or symbols present2. Insert Rear Wheel Stub Axle
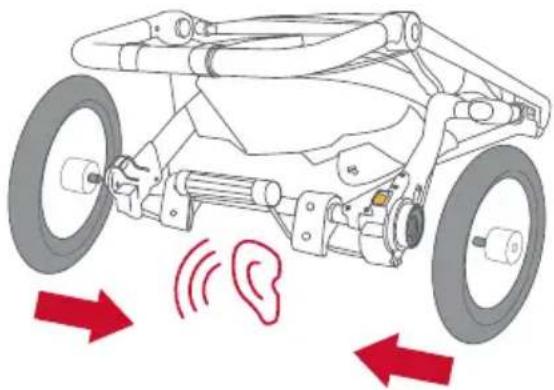
Insert the rear wheel's stub axle into the hole in the rear dropout until a "click" is heard. Repeat for other side.
natural_image
Diagram of a wheeled vehicle with red arrows indicating sound waves around the ear (no text or symbols present)NOTE: If no click is heard, the wheel may not be secure in the attachment bracket and may detach during operation. Pull on wheel to ensure proper installation.
Rear Wheel Removal
1. Unlock Parking Brake
Prior to removing the rear wheels, position the parking brake in the unlocked position.
2. Remove Wheel
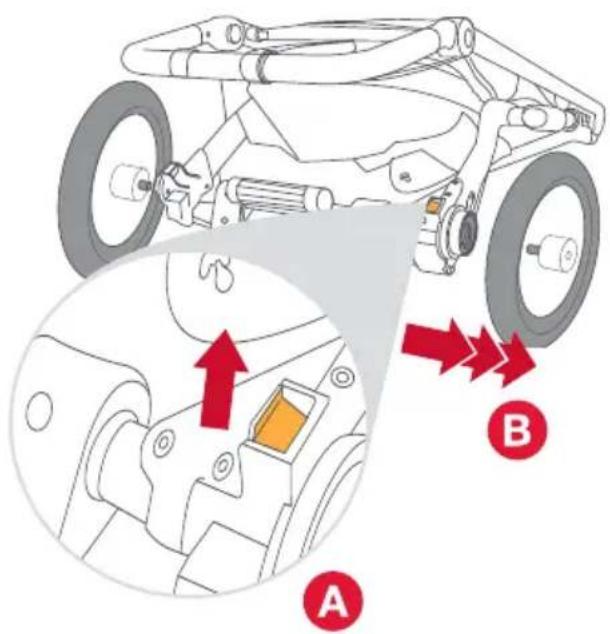
Raise the wheel a few inches off the ground, (A)pull the release lever, and (B)pull the wheel out of the rear wheel attachment bracket. Repeat for the other side.
text_image
Diagram of a vehicle's mechanical assembly with labeled parts A and B, showing structural components and directional arrows.Front Wheel Installation
1. Remove Through Axle From Front Wheel
Unscrew the tension adjusting nut from the through axle from the front wheel.
Tension Adjusting Nut
natural_image
Hand using a red tool to cut or mark a circular component (no text or symbols visible)2. Rotate Front Fork Into Jog Mode
Rotate the front fork until it locks into jog mode. See page 10.
3. Insert Front Wheel
When facing the front of the stroller, insert the wheel between the fork and align the wheel hub with holes in the fork blades.
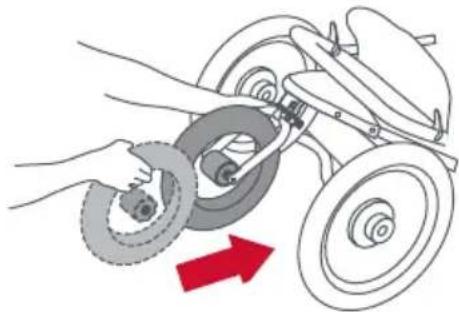
natural_image
Illustration of a hand using a tire to lift a vehicle, with a red arrow indicating motion direction (no text or symbols)4. Insert Through Axle
Insert the through axle into the fork and through the wheel hub, then install the tension adjusting nut to the opposite side.
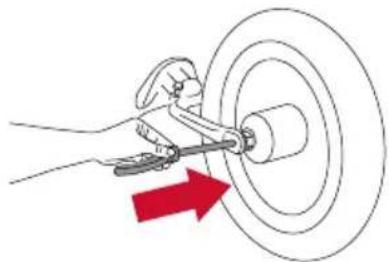
natural_image
Illustration of a hand using a tool to cut a circular object with a red arrow indicating direction (no text or symbols)5. Tighten Tension Adjusting Nut
With the quick release lever in the FULLY OPEN position, hand tighten the tension adjusting nut until secure.
Tension Adjusting Nut
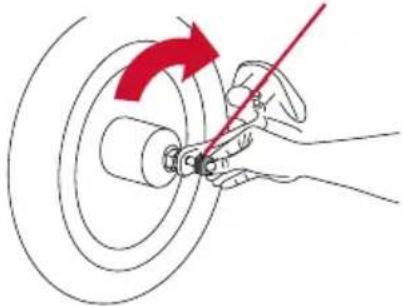
natural_image
Illustration of a hand using a tool to adjust or install a car wheel (no text or symbols present)6. Close Quick Release Lever
Lift up on the quick release lever to lock into the FULLY CLOSED position. When properly closed, the quick release lever will be parallel to the fork blade and pointing up.
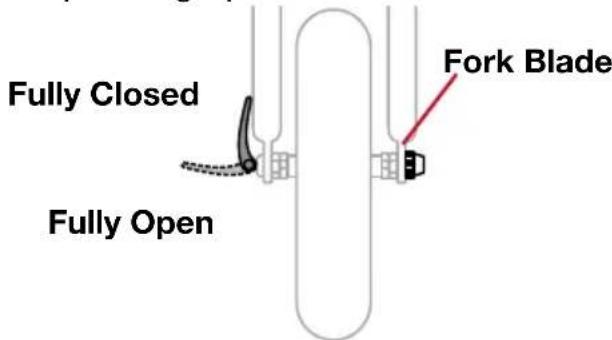
text_image
Fully Closed Fully Open Fork BladeNOTE: It takes considerable force to securely close the quick release lever. If you are able to completely close the quick release lever without wrapping your fingers around the fork blade and the quick release lever does not leave a visible imprint in the palm of your hand, or the quick release lever spins freely on the through axle, the tension is not adequate. Return the lever to the FULLY OPEN position and turn the tension adjusting nut a quarter turn clockwise, then repeat the closing process.
If the quick release lever will not lift into the FULLY CLOSED position, return the lever to the FULLY OPEN position and turn the tension adjusting nut a quarter turn counterclockwise. Repeat the closing process.
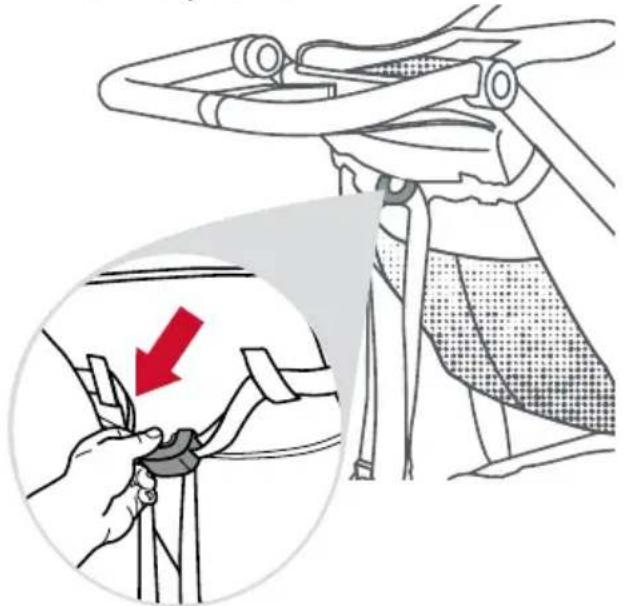
Front Wheel Removal
1. Open Quick Release Lever
Move the wheel's quick release lever from the locked or FULLY CLOSED position to the FULLY OPEN position.
2. Remove Through Axle
Loosen the tension adjusting nut and remove the through axle from the front wheel and fork.
3. Remove Front Wheel
Raise the front wheel a few inches off ground and tap the top of the wheel with the palm of your hand to knock the wheel out of the front fork.
natural_image
Diagram showing mechanical components with a red downward arrow indicating rotation or clearance (no text or symbols present)Canopy Installation
1. Open Canopy Lock
Slide lock open on each side of the canopy.
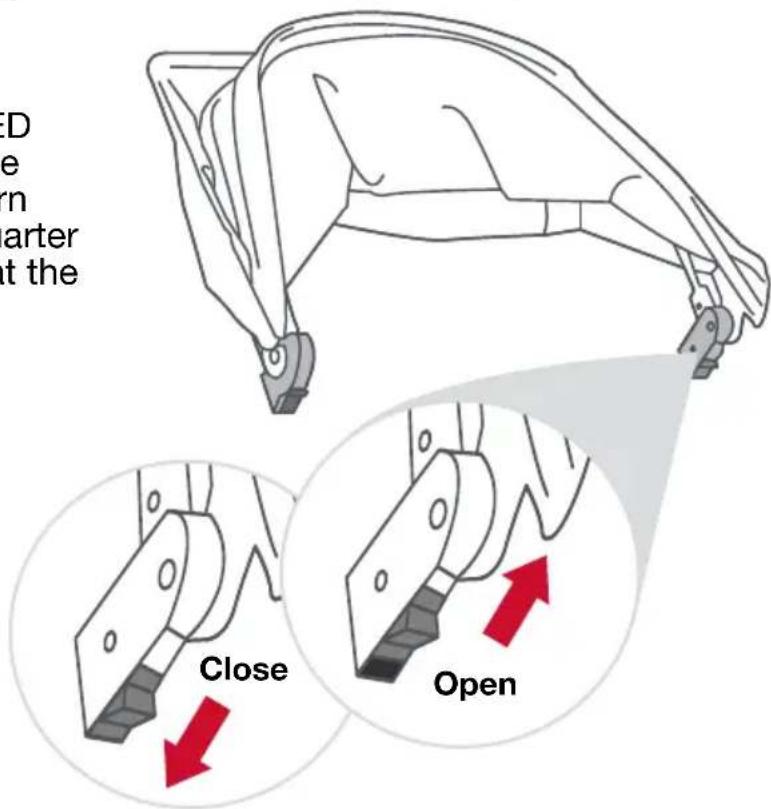
text_image
D e rn arter t the Close Open2. Connect Canopy to Stroller Frame
Slide canopy connectors onto the stroller frame mount, then close canopy connectors.
natural_image
Diagram of a person using a medical device with red arrows indicating force or pressure points (no text or symbols present)3. Attach Canopy Flap
Connect the zipper under the canopy flap to the stroller frame.

natural_image
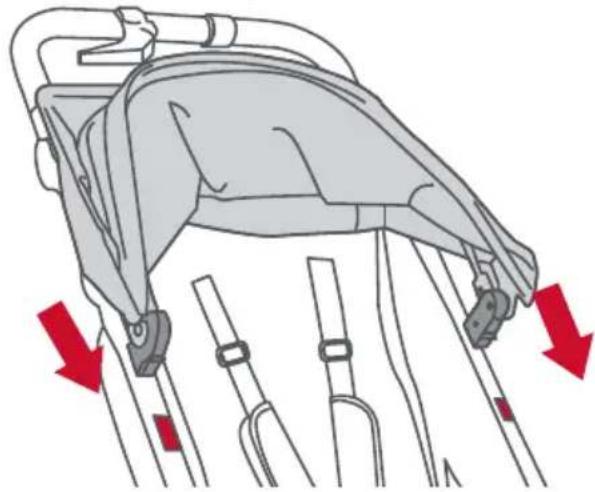
Diagram of a car seatbelt device with a red arrow indicating the seatbelt component (no text or symbols present)Canopy Removal
1. Detach Canopy Flap
Locate zipper under canopy flap between stroller handlebars, then unzip.
natural_image
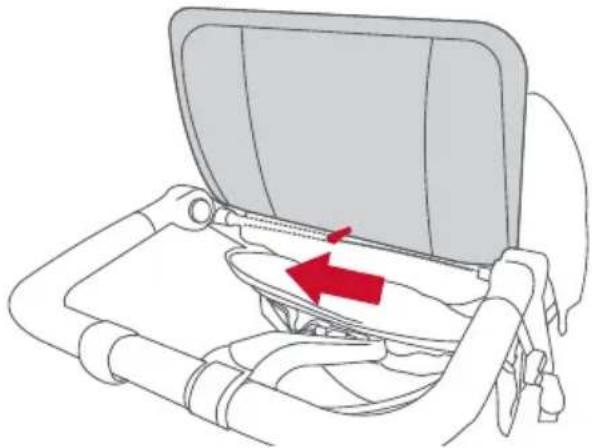
Diagram of a car seatbelt device with a red arrow indicating the cable or seatbelt component (no text or symbols present)2. Unlock Canopy
From Stroller Frame
Open canopy connectors on both sides of the stroller frame, then slide canopy upwards off frame.
natural_image
Diagram of a vehicle seatbelt mechanism with red arrows indicating movement or force direction (no text or symbols present)Stroller Operation
Unfolding and Folding
Unfolding the Stroller
1. Unlock Chassis Lock Lever
Push frame together and pull tab to separate chassis lock.
natural_image
Line drawing of a hand using a tool to adjust or install a bicycle frame (no text or symbols present)2. Open Stroller Frame
Pull apart top and bottom of the frame until it opens into locked position.
Folding the Stroller
1. Lock Parking Brake
Set parking brake in locked position.
2. Empty Stroller
Remove child and all contents from low boy cargo basket and pockets.
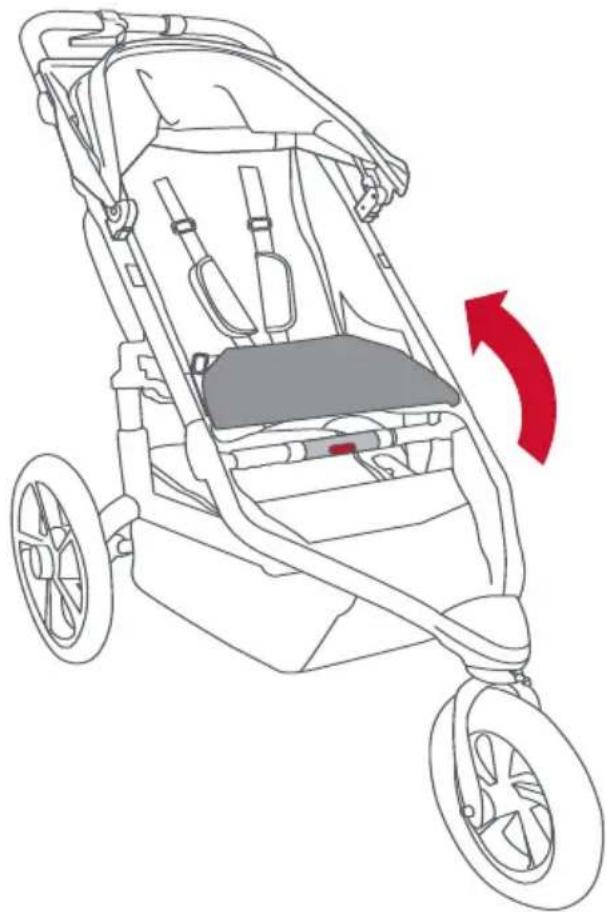
3. Rotate Handlebar
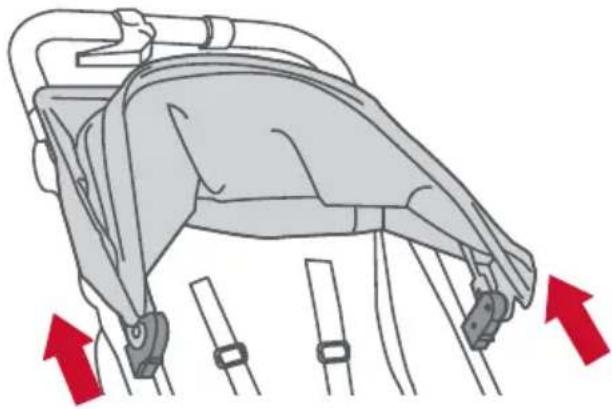
Squeeze both handlebar release buttons simultaneously. Rotate handlebar and position so that it is inline with stroller frame. This will allow stroller to stand on its own when folded.
natural_image
Line drawing of a baby stroller with a red arrow indicating rotation (no text or symbols)4. Pull the Leg Rest Flap Up
This will reveal the folding handle.
natural_image
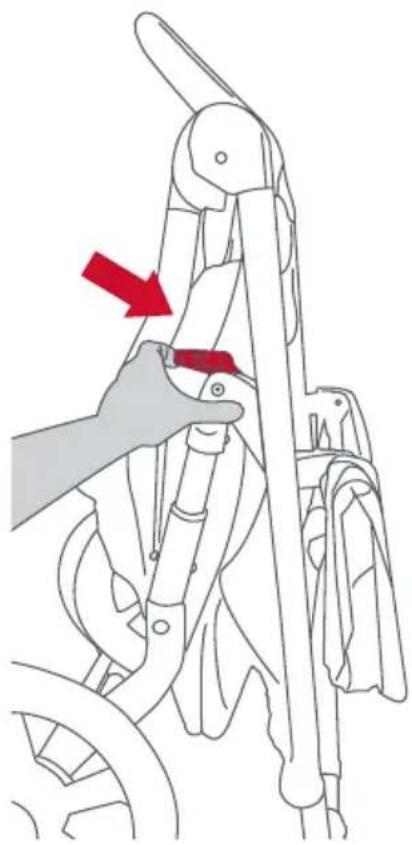
Line drawing of a stroller with wheels and seat, showing a red directional arrow indicating motion (no text or symbols)5. Activate Folding Handle
Push yellow button with palm of hand and twist while pulling stroller up.
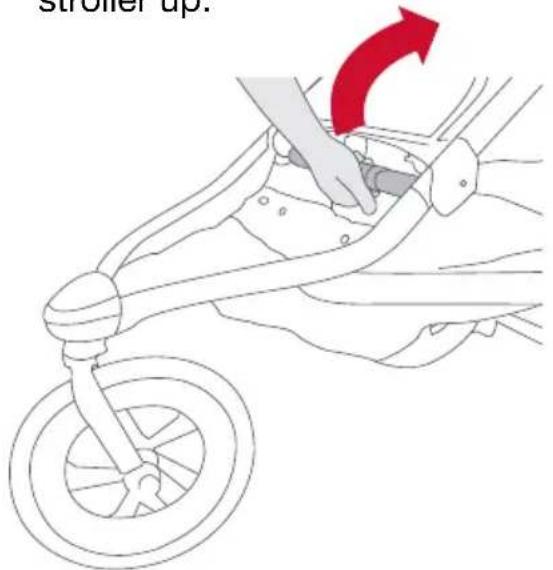
text_image
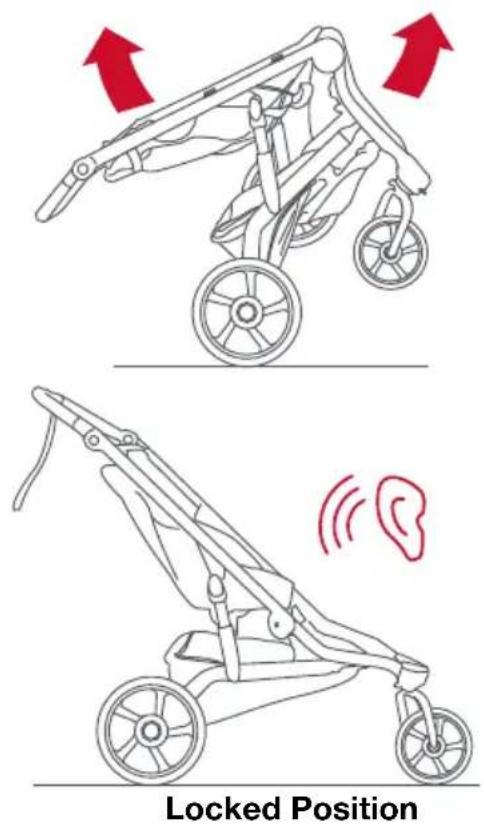
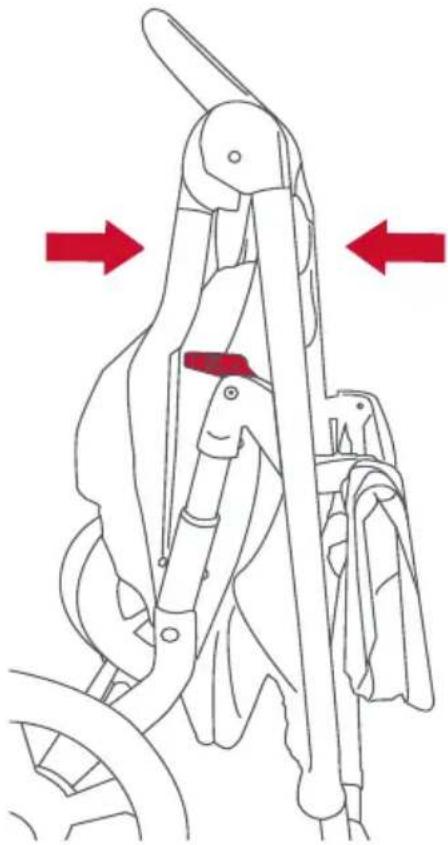
stroller up.6. Lock Stroller In Folded Position
Push frame together allowing chassis lock lever to engage with chassis lock knob.
natural_image
Mechanical device diagram showing a lever mechanism with red arrows indicating direction (no text or symbols)NOTE: Stroller should be freestanding on handlebar bumpers and wheels.
Walk or Jog Mode
Walk Mode Jog Mode

natural_image
Two identical cartoon mushroom-shaped objects with arrows indicating motion or movement, no text or symbols present.Walk Mode
Slide swivel knob up and to the left. Fork will now rotate 360 degrees.
NOTE: Stroller is shipped in walk mode.
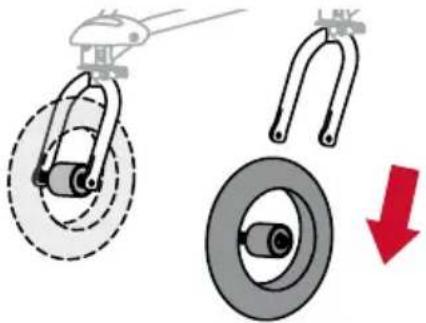
Jog Mode (Jogging/Off-Road)
Slide swivel knob upward and to the right. Knob will slide into downward position. Rotate fork/wheel until it snaps into forward position.
If the front fork is in jog mode, it will be locked and will not swivel left or right as it does in walk mode.
WARNING!
FALL HAZARD from tip over - Before running, jogging, or walking fast, LOCK the front wheel from swiveling.
Checking Tire Pressure
Plastic wheels are rated to a maximum tire inflation pressure of 30 pounds per square inch (psi). The maximum inflation pressure is embossed on the wheel next to the valve stem.
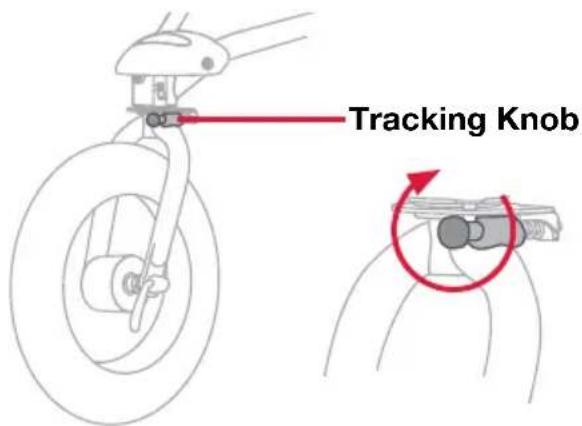
Adjusting the Tracking
If stroller pulls left or right when the front wheel is in jog mode and stroller is on flat terrain, adjust tracking as outlined in the following steps.
! WARNING!
Do not roll test with a child or any occupant in the stroller.
1. Empty Stroller
Remove child and all contents from low boy cargo basket and pockets.
2. Check Tire Pressure
3. Set Stroller to Jog Mode
Slide swivel knob to right. Knob will slide into downward position. Rotate fork/wheel until it snaps into forward position. See Choosing Walk or Jog Mode on page 10.
4. Place Stroller On Level Ground
Find a stretch of level ground about 16 feet (4.9 m) long.

text_image
16 ft (4.9 m)5. Align Rear Wheel Axles
Align stroller so rear wheel axles are perpendicular to a straight line.
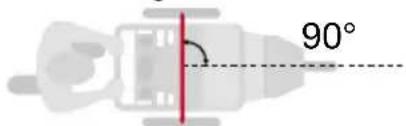
text_image
90°6. Test Alignment
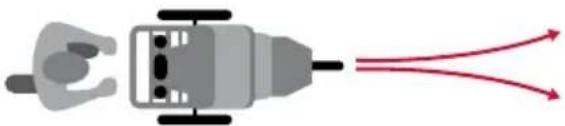
Push stroller straight forward and release to see if stroller veers right or left. Repeat push test several times.
natural_image
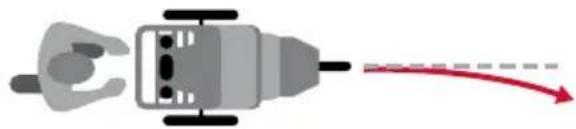
Diagram of a plug with internal components and two red arrows indicating flow or connection (no text or symbols)If stroller consistently pulls to left or right, see Fine Tuning the Tracking.
Fine Tuning the Tracking
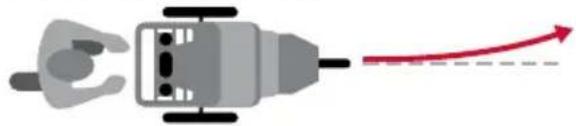
If Stroller Pulls LEFT
natural_image
Diagram of a plug with internal components and a red arrow indicating direction (no text or symbols)If your stroller pulls LEFT, turn tracking knob counterclockwise up to one half turn.
text_image
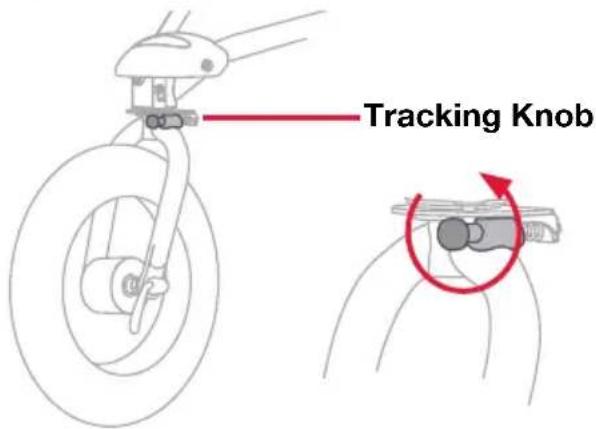
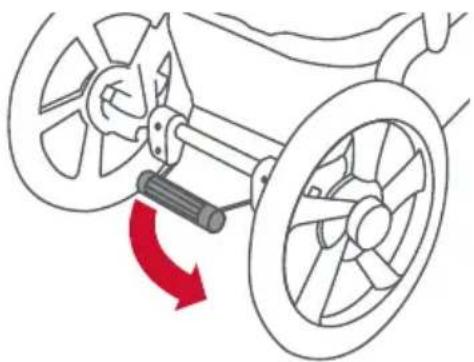
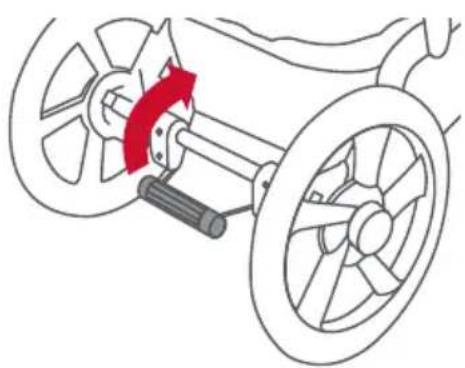
Tracking KnobIf Stroller Pulls RIGHT
natural_image
Diagram of a human figure interacting with a device, showing motion direction (no text or symbols)If your stroller pulls RIGHT, turn tracking knob clockwise up to one half turn.
text_image
Tracking KnobREPEAT roll test and adjust as needed until stroller rolls straight.
Setting the Parking Brake
The parking brake prevents the stroller from moving while loading and unloading. The parking brake is not designed as a stopping brake.
Locked Position
To set the parking brake, press down on the foot pedal – making sure the locking pin fully engages the locking disk.
natural_image
Diagram of a vehicle's steering wheel assembly with a red directional arrow indicating rotation (no text or symbols)NOTE: To ensure the brake is set properly, attempt to roll the stroller forward and backward after setting the brake. If the stroller will not roll, the brake is set properly.
Unlocked Position
To release the parking brake, lift up on the foot pedal with your foot until the brake bar springs up into the fully unlocked position.
natural_image
Diagram of a vehicle steering wheel assembly with a red directional arrow indicating rotation (no text or labels)Securing the Child in the Seat
1. Set Parking Brake
Rotate parking brake down into locked position.
NOTE: Rear wheels should not rotate when parking brake is set.
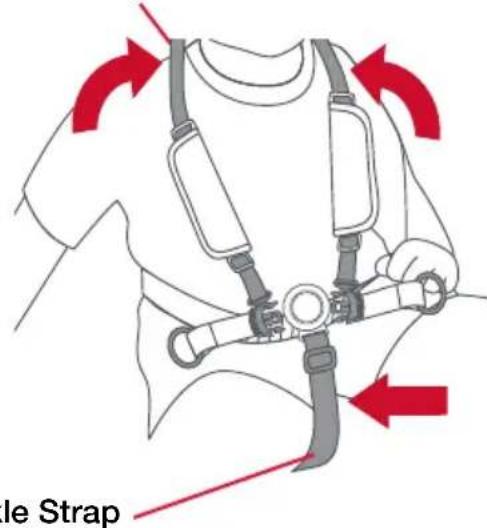
2. Place Child In Seat
Slip one shoulder strap over each shoulder. Position buckle strap between legs.
Shoulder Strap
text_image
le StrapBuckle Strap
- Fasten Shoulder Straps
Insert both shoulder strap
tongues into the buckle.
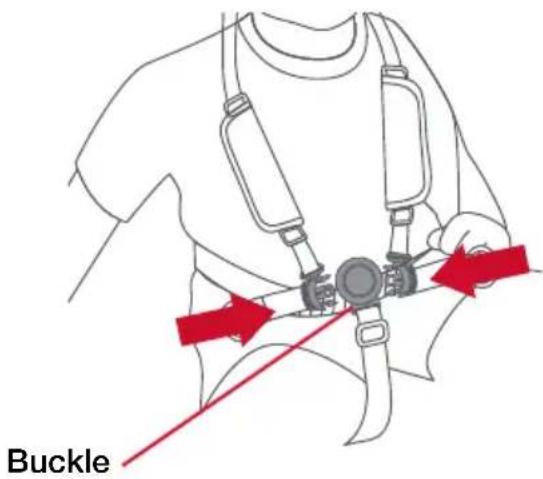
text_image
BuckleNOTE: Buckle Strap should be adjusted to have a snug fit.
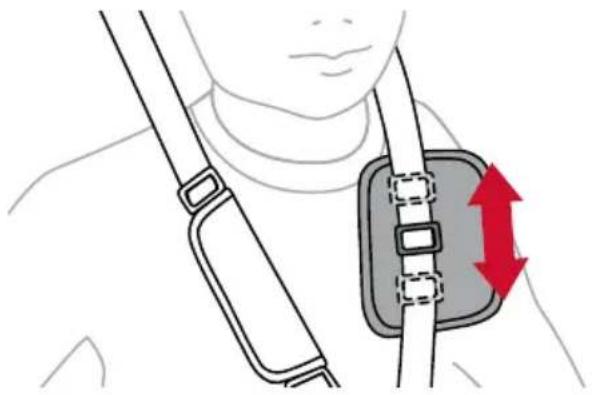
4. Adjust Shoulder Strap Height
Adjust height of shoulder strap to fit just above child shoulder height.

natural_image
Illustration of a person holding a medical device with red directional arrows indicating movement (no text or symbols)5. Adjust Shoulder Straps
Open pads with hook and loop fasteners. Slide buckle up or down to adjust straps. Seat harness should fit snug and be comfortable.
natural_image
Illustration of a person wearing a neck and belt with a red directional arrow indicating movement or pressure (no text or symbols)6. Tighten Lap Strap
Adjust lap strap to fit snug and be comfortable.
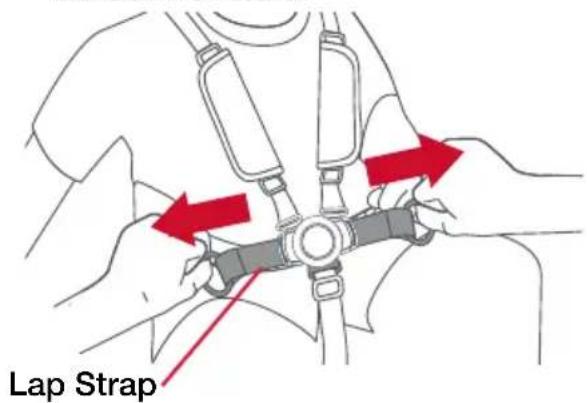
text_image
Lap StrapUsing the Wrist Strap
Slip Loop of Strap Securely Onto Wrist
The wrist strap is designed to help prevent the stroller from rolling away should you lose your grip on the stroller. When using the stroller, make sure the strap is securely looped over your wrist.
natural_image
Line drawing of a stroller with wheels and handle, no text or symbols presentReclining the Seat
WARNING!
When seat is fully reclined, backward tip-over is more likely, and may result in injury to stroller occupant.
NOTE: Set parking brake before making any seat adjustments.
1. Recline Seat
Squeeze the recline button and pull the seat back down into the desired position.
natural_image
Illustration of a person adjusting a seatbelt, showing a magnified view of the seatbelt being adjusted (no text or symbols present)2. Return To Upright Position
Grab the rings on either side of the recline button and pull the straps out to the sides to raise the seat.

natural_image
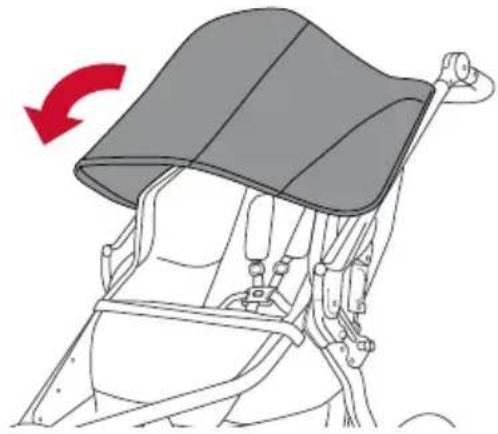
Diagram of a bicycle seatbelt mechanism with red arrows indicating force directions (no text or symbols present)Positioning the Canopy
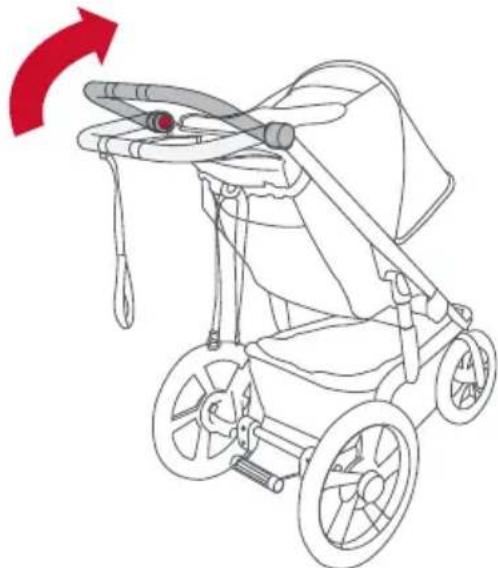
1. Extend Canopy
Rotate canopy away from handlebar for additional shade.
natural_image
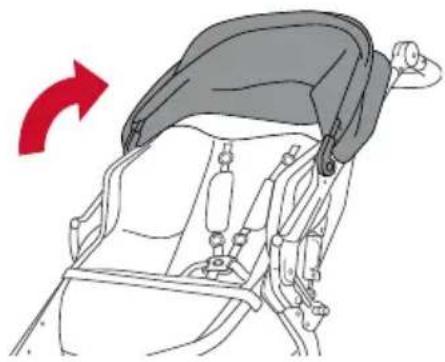
Diagram of a car seatbelt with a red arrow indicating clockwise motion (no text or symbols)2. Retract Canopy
Push canopy toward handlebar.
natural_image
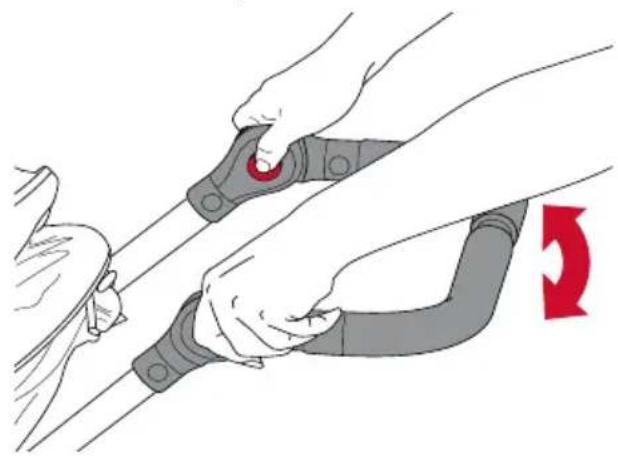
Diagram of a child's seatbelt device with a red arrow indicating rotation (no text or symbols)Adjusting Handle Position
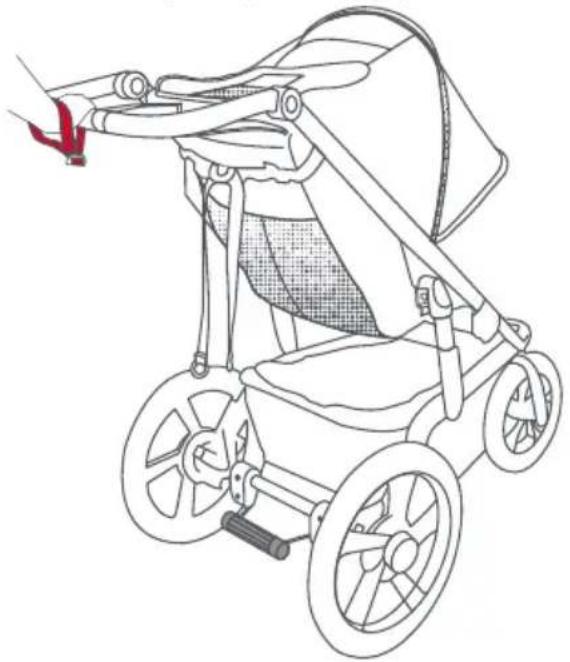
To adjust the handle position, depress and hold the two release buttons on the inside of the handle assembly while raising or lowering the handle to one of the individual positions.
natural_image
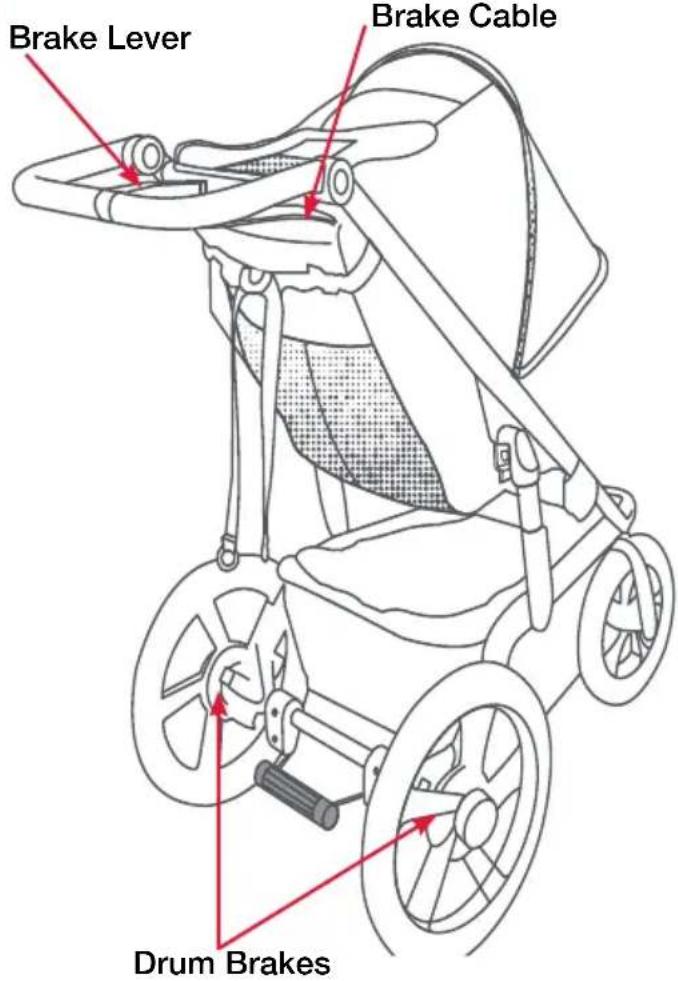
Illustration of hands adjusting a cable buckle with a red belt, showing mechanical adjustment (no text or symbols)Using the Hand Brake
- The hand brake system is connected to drum brakes in the rear wheels and may be used to help slow the stroller. The hand brake system is not a parking brake.
- To use the hand brake system, depress the hand brake lever. Apply pressure to decelerate the stroller.
text_image
Brake Lever Brake Cable Drum BrakesCare and Maintenance
WARNING!
Check tire pressure before every use.
Cleaning
The fabric has a stain resistant treatment that makes most cleanups easy.
- Use a sponge with a solution of mild soap and cold water (maximum temperature of 100^ F / 38^ C).
- Rinse thoroughly with clean water to remove soap, then air dry.
- Do not use detergent or abrasive cleansers.
- Do not pressure wash.
Regular Inspections
We recommend inspecting your stroller before every use.
- Verify tire pressure.
- Verify all screws, attachment points and fasteners are tight.
- Check all wheels to be sure they are securely clamped.
- Check for tears or excessive wear in the fabric.
Stroller Accessories
BOB Gear® offers a complete line of accessories for your stroller. Visit our website bobgear.com for full details.
Warranty
This child restraint was manufactured by Britax Child Safety, Inc. ("Britax"). To the extent allowed by law, Britax warrants this product to the original retail purchaser as follows:
LIMITED WARRANTY
The frame is warranted for five years. Components and fabric are warranted for one year. Tires and tubes are NOT covered under this limited warranty. Warranties are only valid from date of original purchase. Proof of purchase is required for any warranty claims. Your exclusive remedy for this warranty is that Britax will, at its option, provide repair or replacement components to the original purchaser of this product. Britax reserves the right to discontinue or change fabrics, parts, models or products, or to make substitutions.
This warranty does not cover damages that arise from negligence, misuse or use not in accordance with the product instruction. Additionally, Britax products purchased from unauthorized retailers, online auction sites, or as second hand items are not covered under this warranty.
The use of non-Britax covers, inserts, toys, accessories, or tightening devices is not approved by Britax. Their use could cause this stroller to fail safety standards. Their use also may void the Britax warranty.
To make a claim under this warranty, you must contact Britax Consumer Services at 1-888-427-4829 or 1-704-409-1699, or write to us using the address on the back cover of this User Guide.
DISCLAIMER OF WARRANTIES
The following disclaimer shall apply to you to the maximum extent permitted by applicable law. THE LIMITED WARRANTY SET FORTH ABOVE IS THE EXCLUSIVE WARRANTY MADE BY BRITAX. ALL OTHER WARRANTIES, WHETHER EXPRESS, IMPLIED, OR STATUTORY, INCLUDING WITHOUT LIMITATION THE IMPLIED WARRANTIES OF MERCHANTABILITY AND FITNESS FOR A PARTICULAR PURPOSE, ARE DISCLAIMED. Some states do not allow certain exclusions or limitations on warranties, so the above may not apply to you. This warranty gives you specific legal rights, and you may have other rights, which vary from state to state. Neither Britax, nor the retailer selling this product, authorizes any person to create for it any other warranty, obligation, or liability in connection with this product.
LIMITATION OF DAMAGES
The following limitation of damages shall apply to you to the maximum extent permitted by applicable law. THE REMEDIES CONTAINED IN THE LIMITED WARRANTY SET FORTH ABOVE ARE THE EXCLUSIVE REMEDIES PROVIDED BY BRITAX. IN NO EVENT SHALL BRITAX BE LIABLE TO YOU FOR ANY INCIDENTAL, SPECIAL, PUNITIVE, EXEMPLARY, OR CONSEQUENTIAL DAMAGESARISING OUT OF OR RELATING IN ANY WAY TO THE RELATIONSHIP BETWEEN YOU AND BRITAX (INCLUDING DISPUTES RELATED TO THE MARKETING OR SALE OF BRITAX PRODUCTS), ANY PROVISIONS IN THIS USER GUIDE, AND/OR YOUR PURCHASE OR USE OF ANY PRODUCTS DESIGNED, MANUFACTURED, DISTRIBUTED, MARKETED, OR SOLD BY BRITAX.
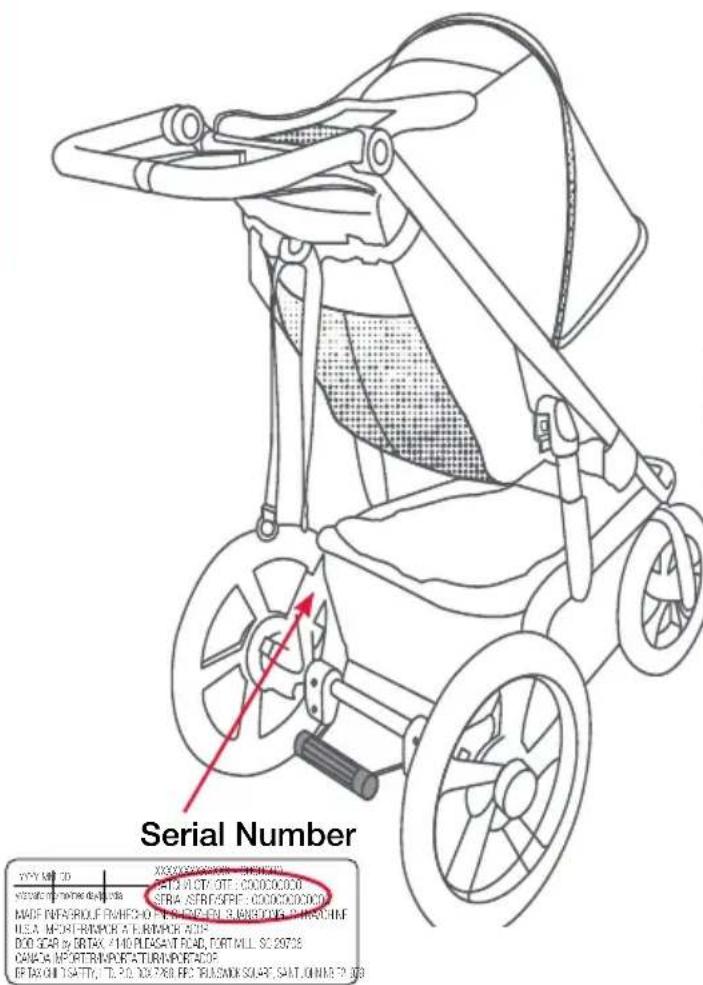
Serial Number
Open the stroller. From the back of stroller, look on the inside of the right swing arm.
text_image
Serial Number PYY MPT 3D X00000000000 - 198400 VY20070-750000000 AET3 ALOT OTT - CODOCOOO STRA STRIGSPF - CODOCOOO MADE PABSORUF RWHFD 2016-11-2018 3 BANEOCKS CHASCHIEF U.S.A. MOHTRUMOR A FURIMOR AOS DOO SCAR BY DRTAX 210 PLUGSAT ROAD, TORTILL SC 20728 CANCA NEATTRUNSPORTATION IMPORTAGE EF TAXON ISATY, TL 2016 DX 768 BE PLUGSKI SCART, SAIT ONIME 7 2028Arbitration Agreement
MANDATORY ARBITRATION & CLASS ACTION WAIVER ("ARBITRATION AGREEMENT")
PLEASE READ THIS SECTION CAREFULLY BECAUSE IT AFFECTS YOUR LEGAL RIGHTS, REQUIRES YOU TO ARBITRATE DISPUTES, AND LIMITS THE MANNER IN WHICH YOU CAN SEEK RELIEF.
Arbitration is a process in which persons with a dispute waive their rights to file a lawsuit and proceed in court and to have a jury trial to
resolve their disputes and, instead, agree to submit their disputes to a neutral third person (an "arbitrator") for a decision. Each party to the dispute has an opportunity to present some evidence to the arbitrator. Pre-arbitration discovery may be limited. Arbitration proceedings are private and less formal than court trials. The arbitrator will issue a final and binding decision resolving the dispute, which may be enforced as a court judgment. A court rarely overturns an arbitrator's decision.
YOU AND BRITAX AGREE THAT ANY DISPUTE BETWEEN US, WHETHER BASED IN CONTRACT, TORT, STATUTE OR OTHERWISE, SHALL BE RESOLVED IN BINDING INDIVIDUAL ARBITRATION. For purposes of this Arbitration Agreement, the word "dispute" and "disputes" are given the broadest possible meaning and include, without limitation, all claims, disputes, and/or controversies arising out of or relating in any way to the relationship between you and Britax (including disputes related to the marketing or sale of Britax products), any provisions in this User Guide or this Arbitration Agreement (including the interpretation and scope of this Arbitration Agreement and the arbitrability of any dispute), and/or your purchase or use of any products designed, manufactured, distributed, marketed, or sold by Britax. The Federal Arbitration Act ("FAA") and federal arbitration law apply to this Arbitration Agreement. Notwithstanding the foregoing, you and Britax each agree that you and Britax shall retain the rights to bring an individual suit in small claims court for disputes within the scope of such court's jurisdiction and/or to bring an individual suit in court to enjoin infringement or other misuse of intellectual property rights. In no way shall the foregoing sentence allow for an action to be brought on a class or collective basis.
YOU HAVE THE RIGHT TO OPT OUT OF THIS ARBITRATION AGREEMENT, BUT YOU MUST EXERCISE THIS RIGHT WITHIN THIRTY (30) DAYS OF YOUR PURCHASE OF A BRITAX PRODUCT. If you do not wish to be bound by this Arbitration Agreement, you must notify Britax by mailing or e-mailing a written opt-out notice, postmarked or electronically delivered within thirty (30) days of your purchase of a Britax product, to: ATTN: Legal Department, 4140 Pleasant Road, Fort Mill, South Carolina 29708. Your opt-out notice must include your full name, address and/or e-mail address, the model and serial numbers of the purchased product, a copy of your proof of purchase, and a statement that you intend to opt out of this Arbitration Agreement. If you do not opt out within thirty (30) days of your purchase, then this Arbitration Agreement will apply and you understand and agree that you are waiving your right to maintain other available resolution processes, such as a court action or administrative proceeding, to resolve your dispute with Britax.
The arbitration will be conducted confidentially by a single arbitrator and administered by the American Arbitration Association ("AAA") under its Consumer Arbitration Rules most recently in effect to the extent such rules and procedures do not contradict the express terms of this Arbitration Agreement. To learn more about the rules and how to begin an arbitration, you may call any AAA office or go to www.adr.org. If you demand arbitration, then at your request Britax will advance your portion of the expenses associated with the arbitration, including the filing, administrative, hearing and arbitrator's fees ("Arbitration Fees") to the extent such Arbitration Fees exceed \200. If Britax demands arbitration, then at your request Britax will advance your portion of the Arbitration Fees. For claims of \10,000 or less, you can choose whether you would like the arbitration carried out based only on documents submitted to the arbitrator or by a hearing in person or by telephone. The arbitration hearing will be conducted in the county of your residence, within 30 miles of such county, or in such place as shall be ordered by the arbitrator. Throughout the arbitration, each party shall bear his, her or its own attorneys' fees and expenses, including any witness and expert witness fees. The arbitrator shall apply applicable substantive law consistent with the FAA, shall apply statutes of limitation, and shall honor claims of privilege recognized at law. The arbitrator shall decide, with or without a hearing, any motion that is substantially similar to a motion to dismiss for failure to state a claim or a motion for summary judgment. In conducting the arbitration proceeding, the arbitrator shall not apply any federal or state rules of civil procedure or evidence. The arbitrator shall not consolidate the claims of multiple parties unless you and Britax agree to do so. At the timely request of any party, the arbitrator shall provide a written explanation for the award. The arbitrator's award may be filed with any court having jurisdiction.
THIS ARBITRATION AGREEMENT DOES NOT ALLOW CLASS OR COLLECTIVE ARBITRATIONS EVEN IF THE AAA RULES OR PROCEDURES WOULD. IN OTHER WORDS, YOU AND BRITAX EACH AGREE THAT ALL DISPUTES SHALL BE ARBITRATED ON AN INDIVIDUAL BASIS AND WAIVE ANY RIGHT TO PROCEED IN A CLASS, CONSOLIDATED, OR REPRESENTATIVE FASHION. THE ARBITRATOR MAY AWARD MONEY OR INJUNCTIVE RELIEF ONLY IN FAVOR OF THE INDIVIDUAL PARTY SEEKING RELIEF AND ONLY TO THE EXTENT NECESSARY TO PROVIDE RELIEF WARRANTED BY THAT PARTY'S INDIVIDUAL CLAIM. NO CLASS, REPRESENTATIVE OR PRIVATE ATTORNEY GENERAL OR GENERAL INJUNCTIVE RELIEF THEORIES OF LIABILITY OR PRAYERS FOR RELIEF MAY BE MAINTAINED IN ANY ARBITRATION CONDUCTED PURSUANT TO THIS ARBITRATION AGREEMENT.
If the foregoing class action waiver and prohibition against class arbitration is determined to be invalid or unenforceable for any reason, then this entire Arbitration Agreement shall be void. If any portion of this Arbitration Agreement other than the class action waiver and prohibition against class arbitration is deemed to be invalid or unenforceable for any reason, it shall not invalidate the remaining portions of this Arbitration Agreement. If for any reason a dispute proceeds in court rather than in arbitration, you and Britax each waive any right to a jury trial.

natural_image
Abstract shield-shaped logo with mountain and river design (no text or symbols)BIENVENUE CHEZ BOB® GEAR
natural_image
Mechanical assembly diagram showing a lever mechanism with red directional arrow (no text or symbols)natural_image
Diagram of a vehicle's lower body with visible sensor and ear components, no text or symbols presenttext_image
Diagram of a vehicle's internal components with labeled parts A and B, showing mechanical assembly and directional arrows.natural_image
Hand using a red tool to cut or mark a circular component (no text or symbols visible)natural_image
Illustration of a hand using a tire to lift a car, with a red arrow indicating the motion direction (no text or symbols present)natural_image
Illustration of a hand using a tool to cut a circular object with concentric rings, marked by a red arrow (no text or symbols present)natural_image
Hand holding a mechanical component with a red arrow indicating rotation (no text or symbols)natural_image
Diagram showing mechanical components with a red downward arrow indicating rotation or disassembly (no text or symbols present)natural_image
Illustration of a person using a lift device with red arrows indicating force or movement (no text or symbols present)natural_image
Diagram of a car seatbelt device with a red arrow indicating the seatbelt component (no text or symbols present)Enlever l'auvent
natural_image
Diagram of a car seatbelt device with a red arrow indicating the seatbelt component (no text or symbols present)natural_image
Diagram of a person wearing a stroller with red arrows indicating movement or force direction (no text or symbols present)natural_image
Line drawing of a hand using a tool to adjust or install a mechanical component, with no visible text or symbols.natural_image
Illustration of a two-step stroller with red arrows indicating motion, showing body positioning and ear rotation (no text or symbols)Position verrouillée
natural_image
Line drawing of a baby stroller with a red arrow indicating rotation (no text or symbols)natural_image
Line drawing of a stroller with wheels and seat, showing a red directional arrow indicating motion (no text or symbols)natural_image
Line drawing of a bicycle's wheel and suspension mechanism, showing hand placement and red arrow indicating rotation (no text or symbols)natural_image
Mechanical device diagram showing a lever mechanism with red arrows indicating direction (no text or symbols)natural_image
Two cartoon mushroom-shaped objects with arrows indicating movement or force (no text or symbols)Mode marche
text_image
5m (16 pied)natural_image
Diagram of a plug with internal components and red arrows indicating flow or direction (no text or symbols)natural_image
Diagram of a plug with internal components and a red arrow indicating direction (no text or symbols)natural_image
Diagram of a plug with internal components and a red arrow indicating direction (no text or symbols)natural_image
Diagram of a car steering wheel assembly with a red directional arrow indicating rotation (no text or symbols)natural_image
Diagram of a bicycle steering wheel assembly with a red directional arrow indicating rotation (no text or labels)natural_image
Illustration of a person holding a medical device with red directional arrows indicating movement (no text or symbols)natural_image
Illustration of a person wearing a neck and belt with a red directional arrow indicating movement or pressure (no text or symbols)natural_image
Illustration of hands adjusting a seatbelt with red arrows indicating movement (no text or symbols)natural_image
Line drawing of a stroller with wheels and handle, no text or symbols presentIncliner le siège
MISE EN GARDE!
natural_image
Illustration of a car seatbelt being adjusted for a seatbelt, showing a red arrow indicating the adjustment (no text or symbols present)2. Replacer en position verticale
natural_image
Diagram of a bicycle seatbelt mechanism with red arrows indicating direction (no text or symbols present)Déplacer l'auvent
1. Étendre l'auvent
natural_image
Line drawing of a bicycle seat with a curved roof and seatbelt, showing a red arrow indicating rotation (no text or symbols)2. Replier l'auvent
natural_image
Diagram of a car seatbelt with a red arrow indicating rotation (no text or symbols)natural_image
Illustration of a person adjusting a cable with a red belt, showing mechanical assembly (no text or symbols)natural_image
Abstract shield-shaped logo with mountain and river design (no text or symbols)BIENVENIDOS A BOB GEAR
natural_image
Mechanical assembly diagram showing a red arrow indicating rotational motion (no text or symbols present)natural_image
Diagram of a wheeled vehicle with red arrows indicating sound waves or sound effects (no text or symbols present)text_image
Diagram of a vehicle's mechanical assembly with labeled parts A and B, showing structural components and directional arrows.natural_image
Hand using a tool to adjust or install a mechanical component (no text or symbols visible)natural_image
Illustration of a hand using a tire to lift a car wheel, with a red arrow indicating the motion direction (no text or symbols present)natural_image
Illustration of a hand using a tool to cut a circular target, with a red arrow indicating the direction (no text or symbols present)natural_image
Hand holding a car tire with a red arrow indicating clockwise motion (no text or symbols)natural_image
Diagram showing two mechanical components with curved arms and a red downward arrow indicating motion or change (no text or symbols)natural_image
Illustration of a person using a medical device with red arrows indicating force or pressure points (no text or symbols present)natural_image
Diagram of a car seatbelt device with a red arrow indicating the seatbelt component (no text or symbols present)Retire la capota
natural_image
Diagram of a car seatbelt with a red arrow indicating the seatbelt handle (no text or symbols present)natural_image
Diagram of a baby stroller with red arrows indicating force or movement (no text or symbols)natural_image
Line drawing of a hand using a tool to adjust or install a mechanical component, with no visible text or symbols.natural_image
Illustration of a stroller with red directional arrows indicating motion, and a close-up of the stroller emitting sound waves (no text or symbols)Posición de bloqueo
natural_image
Line drawing of a baby stroller with a red arrow indicating rotation (no text or symbols)natural_image
Line drawing of a stroller with wheels and seat, showing a red directional arrow indicating motion (no text or symbols)5. Accione la manija de plegado
natural_image
Line drawing of a bicycle's wheel and suspension mechanism, showing hand placement and red arrow indicating rotation (no text or symbols)natural_image
Mechanical assembly diagram showing a lever mechanism with red arrows indicating direction (no text or symbols present)natural_image
Two identical cartoon mushroom-shaped objects with arrows indicating movement or force (no text or symbols)Modo para caminar
text_image
4,9 m (16 pies)natural_image
Diagram of a plug with internal components and red arrows indicating flow or direction (no text or symbols)natural_image
Diagram of a plug with internal components and a red arrow indicating direction (no text or symbols)natural_image
Diagram of a mechanical device with a red arrow indicating direction (no text or symbols)natural_image
Diagram of a car's steering wheel assembly with a red directional arrow indicating rotation (no text or symbols)natural_image
Diagram of a vehicle's steering wheel assembly with a red directional arrow indicating rotation (no text or labels)natural_image
Illustration of a person holding a medical device with a red arrow indicating direction (no text or symbols)natural_image
Illustration of a person wearing a neck and belt with a red directional arrow indicating movement or pressure (no text or symbols present)natural_image
Illustration of a person's seatbelt buckle being adjusted, with red arrows indicating force direction (no text or symbols)Correa de la hebilla
Uso de la muñequera
natural_image
Line drawing of a stroller with wheels and handle, no text or symbols presentReclinar el asiento
ADVERTENCIA!
natural_image
Illustration of a car seatbelt being adjusted for a seatbelt, showing a red arrow indicating the adjustment (no text or symbols present)natural_image
Diagram of a bicycle seatbelt mechanism with red arrows indicating direction (no text or symbols present)natural_image
Line drawing of a bicycle seat with a curved roof and seatbelt, showing a red arrow indicating rotation (no text or symbols)natural_image
Diagram of a car seatbelt device with a red arrow indicating rotation (no text or symbols)Ajuste de la manija
natural_image
Illustration of hands adjusting a cable buckle with a red circular button, no text or symbols presentcontour
| X | Y | Intensity | |---|---|---------| | 0.0 | 0.0 | Low | | 0.1 | 0.1 | Medium | | 0.2 | 0.2 | High | | 0.3 | 0.3 | Very Low| | 0.4 | 0.4 | Medium | | 0.5 | 0.5 | High | | 0.6 | 0.6 | Very Low| | 0.7 | 0.7 | Medium | | 0.8 | 0.8 | High | | 0.9 | 0.9 | Very Low| | 1.0 | 1.0 | Low |
B·O·B
GEAR
BOB Gear® by Britax © 2019 Britax Child Safety, Inc.
(888) 427-4829 (704) 409-1699 bobgear.com
All rights reserved. Printed in China. This product and its components are subject to change without notice.