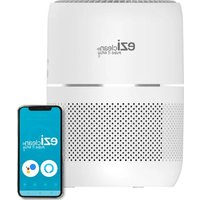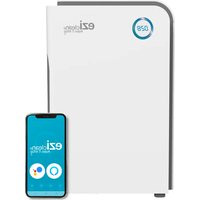
Air pure 500i - Air purifier EZICLEAN - Free user manual and instructions
Find the device manual for free Air pure 500i EZICLEAN in PDF.


| Brand | EZIclean |
| Model | Air pure 500i |
| Product type | Air purifier |
| Filtration system | 6 stages: pre-filter, HEPA filter, activated carbon filter, photocatalysis filter, ionization, UV lamps |
| Operating modes | Auto, Night, 4 fan speeds, Timer (1h/4h/8h), UV, Ionization |
| Air quality indicator | Light halo: Blue (perfect), Green (good), Purple (average), Red (poor) |
| Dust sensor | Yes, with cleaning recommended every 2 months |
| Pre-filter maintenance | Vacuum cleaning every 2 months |
| Replacement of carbon and HEPA filters | Every 1 year |
| Photocatalysis filter replacement | Every 3 years, expose to sunlight for 2 hours every 6 months |
| UV lamp replacement | Every 3 years |
| Filter replacement indicator | Flashing LED after 1600 hours of operation |
| Power supply | Mains, standard plug |
| Safety instructions | Unplug before maintenance; do not immerse; keep out of reach of children under 8 years; do not block air inlets/outlets |
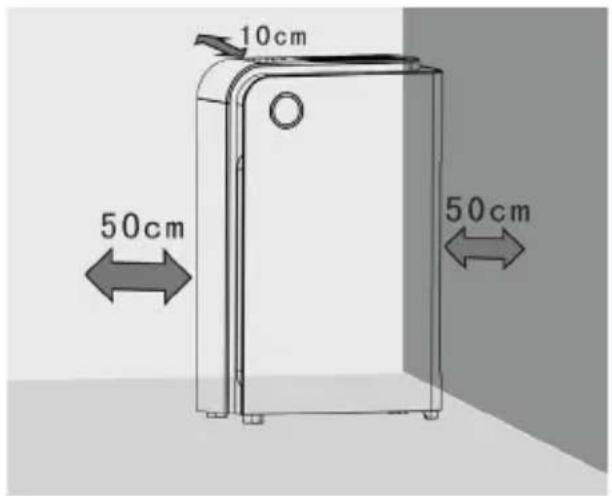
| Usage | Indoor only; minimum distance 10 cm from wall, 50 cm from sides, 1 m from electronic devices |
| Weight and dimensions | Not specified in the manual |
Frequently Asked Questions - Air pure 500i EZICLEAN
User questions about Air pure 500i EZICLEAN
0 question about this device. Answer the ones you know or ask your own.
Ask a new question about this device
Download the instructions for your Air purifier in PDF format for free! Find your manual Air pure 500i - EZICLEAN and take your electronic device back in hand. On this page are published all the documents necessary for the use of your device. Air pure 500i by EZICLEAN.
USER MANUAL Air pure 500i EZICLEAN
Download the multilingual instructions for your device directly in your customer area on www.eziclean.com.
To do this, register your product by clicking on the following link:
text_image
QR code image containing encoded data, no visible human-readable textnatural_image
Diagram showing two views of a device with hands holding the lid and internal components, no text or symbols present.natural_image
Exploded view diagram of a portable air conditioner unit showing internal components (no text or labels)natural_image
Diagram showing a vertical cylindrical component being converted into a grid-like structure, with an arrow indicating the transformation (no text or symbols present)natural_image
Diagram showing a mechanical device with a lever and a magnified inset of a component (no text or symbols)natural_image
Technical line drawing of a portable air conditioner unit with control panel and front panel (no text or symbols)natural_image
Illustration of hands installing or adjusting a door panel into a refrigerator (no text or symbols visible)text_image
Diagram illustrating four stages of solar panel manufacturing: initial state, processing, drying, and final state with waste particles.1. PRÉ-FILTRE
natural_image
Illustration of a wall socket connected to a plug with a black arrow pointing to it (no text or symbols present)text_image
Function W Power 88 Time 48 19 Reset M Auto Model Effect Rt Rt Powertext_image
Function UV AI 48 46 1b New Reset AI AI Speed PowerMODE SILENCE
text_image
Function. OFF Action M Auto Drive B4 Time 4h 5h Reset M SpeedAJUSTEMENT DE LA PUISSANCE D'ASPIRATION
text_image
Pattern of symbols including squares, circles, and various line styles arranged in rows and columnsNiveau 4
text_image
Function Time Reset M Start Sound Powertext_image
Features OK Add C B Line Do M Reset Select Speed Power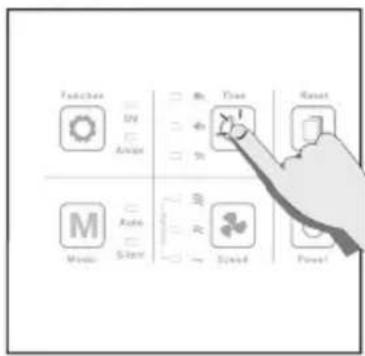
text_image
Functions UV Axis Time Reset M Music Auto Silent 30 25 Stand PowerTIMER
text_image
Pack/Lock UV Action OK Time Reset M Model Action Speed PowerFONCTION RESET
natural_image
Illustration of a hand holding a device with a grid of rectangular panels, no text or symbols presentnatural_image
Hand holding a small electronic component with a triangular housing (no text or symbols visible)natural_image
Pure electrical circuit lines without any symbolsnatural_image
Illustration of hands installing or opening a device into a front panel (no text or symbols visible)natural_image
3D rendering of a mechanical component with grid and lever mechanism (no text or symbols)text_image
Function UV Anion 8h Time 4h 1h Reset M Auto Silent High Speed ≈ ≈ ~ Speed PowerD. REMPLACEMENT DES FILTRES UV
Please read all instructions before using the device.
. This appliance is a domestic appliance. . Do not use the appliance if the cord or plug is damaged.
. To avoid the risk of explosion or electric shock, be sure to turn off the appliance and unplug it before changing the filter or cleaning it.
. Do not use outdoors.
. Keep the appliance away from heated surfaces and flames.
. Do not attempt to repair or adjust the electrical or mechanical functions of this appliance. This will void your warranty.
. There are no user-serviceable parts inside the appliance. All maintenance must be carried out by qualified personnel.
. To protect against electrical hazards, do not immerse the unit in water or other liquids.
. Do not use near water.
Always unplug the appliance after use.
. Always unplug the air purifier before moving or cleaning it, changing the filter and whenever the appliance is not in use.
. When unplugging the unit, be sure to pull the plug, not the cord.
. Never block the air inlets/outlets or place the appliance on a soft surface such as a bed or sofa, as this may cause the appliance to tip over, blocking the air intake.
.Do not place anything on top of the unit.
. Filters should be replaced regularly.
. In general, replace the first filter every three months; replace the rear filter every six months.
CAUTION!
. This appliance may be used by children aged 8 years and over and by persons with reduced physical, sensory or mental capabilities or lack of experience and knowledge, provided that they have been given supervision or instructions concerning the safe use of the appliance and that they understand the hazards involved.
. Children must not play with the appliance. Cleaning and maintenance by the user should not be carried out by children unless they are over 8 years of age and are supervised.
. Children must be supervised to ensure that they do not play with the appliance.
. Keep the appliance and its cord out of the reach of children under 8 years of age.
. If the power cord is damaged, it must be replaced by the distributor, its service department or a similarly qualified person to avoid any danger.
. The appliance must be installed in accordance with the regulations for electrical installations.
Contact the authorised technical service for repair or maintenance of this appliance.
DANGER :
. To reduce the risk of electric shock, spontaneous combustion, fire and other personal injury or property damage, follow these instructions: After finishing using the air purifier, the user must turn off the unit.
. If the appliance gets into water, unplug it immediately.
Do not use your hands to remove it from the water.
Please read the following information carefully before using your air purifier or its accessories. Do not disassemble the appliance or attempt to repair it yourself. In case of malfunction, please contact your dealer for professional advice.
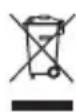
The symbol on this device indicates that it cannot be disposed of with household waste. You must dispose of it at a recycling centre for electrical and electronic waste. Disposal must be carried out in accordance with local waste regulations. For further information on the treatment, recovery and recycling of this appliance, please contact your local municipality, your local waste disposal service or the dealer of the appliance.

Your device
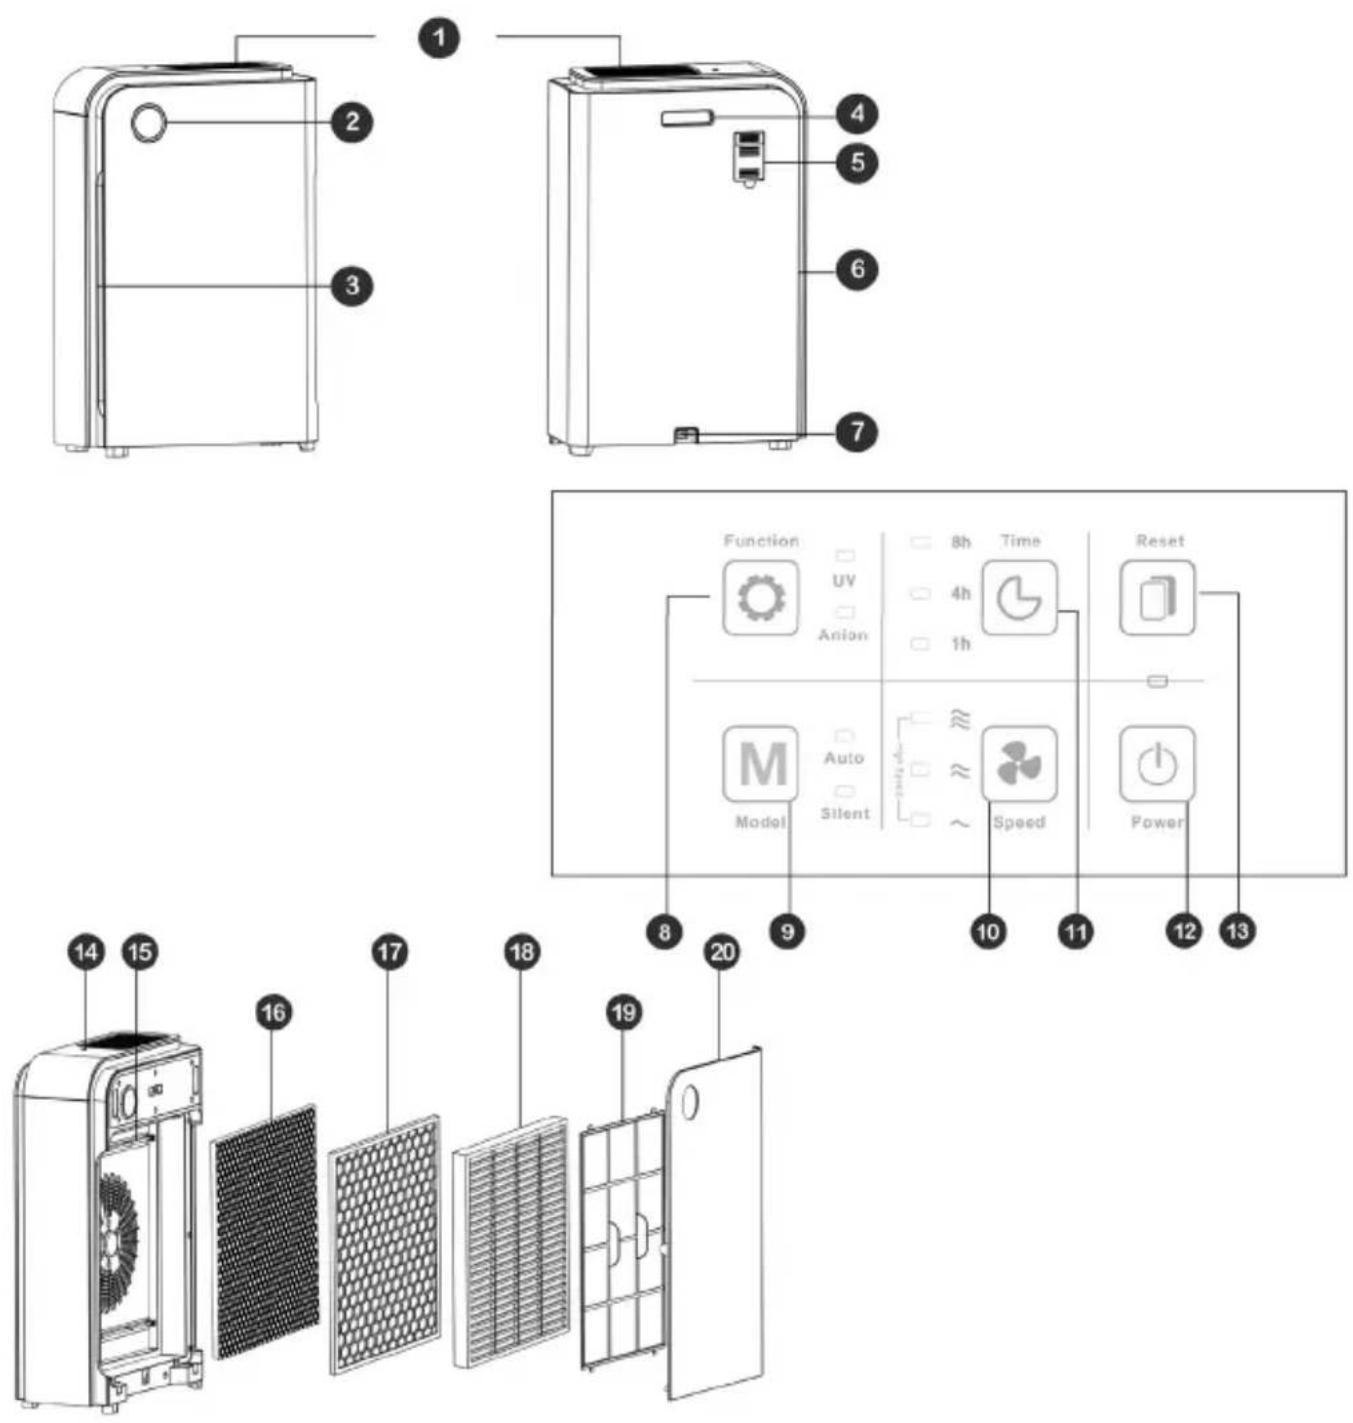
- Air outlet
- Air quality indicator
- Air inlet
- Handle
- Air quality sensor
-
Rear panel
-
Power supply input
- Functions
- Modes
- Suction speed
adjustment -
Timer setting
-
ON/OFF SWITCH
- Reset
- Photoresistance
- UV tube (x2)
- Photocatalysis filter
-
Activated Carbon Filter
-
HEPA filter
- Pre-filter
- Front panel
8+9.5 secondes = WIFI
Air quality indicator
Blue: Perfect
Green: Good
Purple: Average
Red: Poor


The air quality indicator is calculated on the basis of PM (Particulate Matter). It measures the quantity of particles in the air smaller than 2.5 microns. About 1/30th of the width of a hair, i.e. the critical size of particles said to be hazardous to breathing because they are more difficult to retain and eliminate by the respiratory tract: micro-dust particles, smoke, allergens, pollutants etc.
To switch the air quality indicator light off and on again, press the RESET button on the control panel.
For better air quality :
. The carbon and HEPA filter should be replaced once a year.
. The photocatalytic filter should be replaced every 3 years. Photocatalysis is based on the principle of activating a semi-conductor using the energy provided by light, so it is necessary to expose your photocatalysis filter to the sun every 6 months for about 2 hours.
Before first use
Do not connect the appliance until the plastic wrapping of the filters has been removed. Never operate the appliance without a filter.
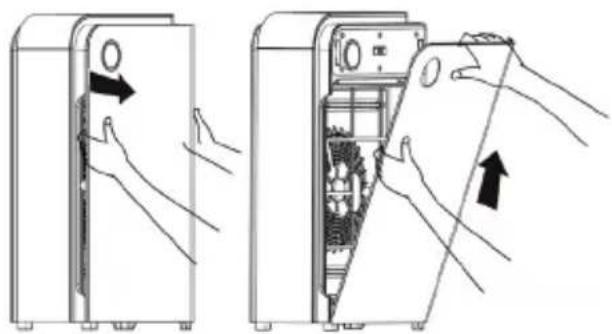
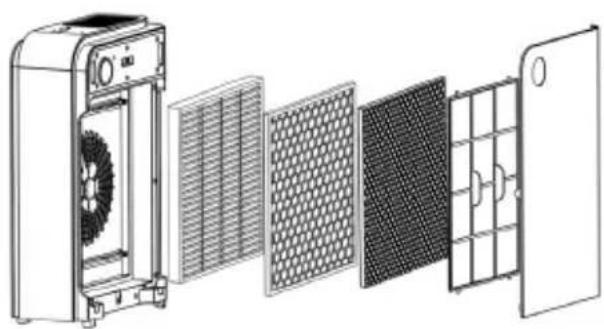
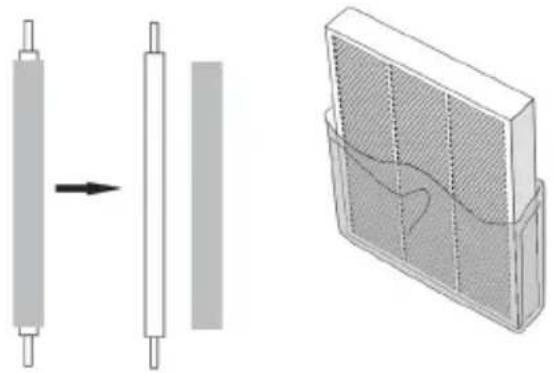
Follow the steps below in order to install the filters:
natural_image
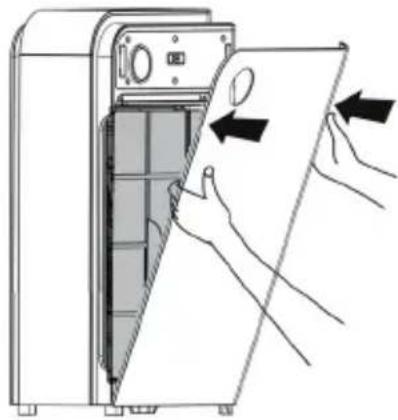
Two-step diagram showing hand positioning of a device into a closed panel, with arrows indicating movement direction (no text or symbols present)Remove the front panel of the unit. It is held in place by a magnet system.
natural_image
Exploded view diagram of a portable air conditioner unit showing internal components (no text or labels)Remove each of the filter compartments and take the UV lamps supplied in the box.
natural_image
Diagram showing a vertical cylindrical component being converted into a grid-like structure, with an arrow indicating the transformation (no text or symbols present)Remove the protective plastic wrapping from the filters.

natural_image
Diagram of a mechanical device with a lever and inset showing a component being inserted (no text or symbols present)Carefully install the UV lamps. If necessary, use a flathead screwdriver to help insert the lamp ends into the side ends of the lamp into the side slots.
natural_image
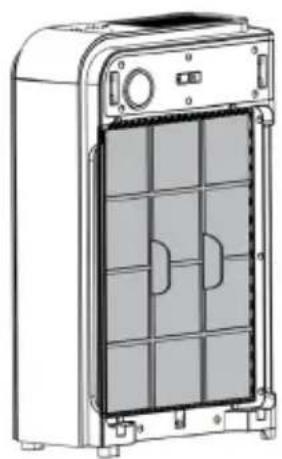
Technical line drawing of a portable air conditioner unit with control panel and front panel (no text or symbols)Replace the filters one by one in the required order.
natural_image
Illustration of hands installing or adjusting a door panel inside a device (no text or symbols visible)Close the unit by replacing the front panel.
Positioning your device
text_image
10cm 50cm 50cm. In order to ensure optimal performance of your air purifier, do not position the unit against a wall and respect the distances indicated in the diagram on the left.
. Do not place the unit within 1 meter of electronic devices (television, radio, speakers etc.).
. Do not connect the mains plug of the air purifier to the same socket as another appliance.
. Do not place any objects, fabrics etc. on the air outlet of the unit.
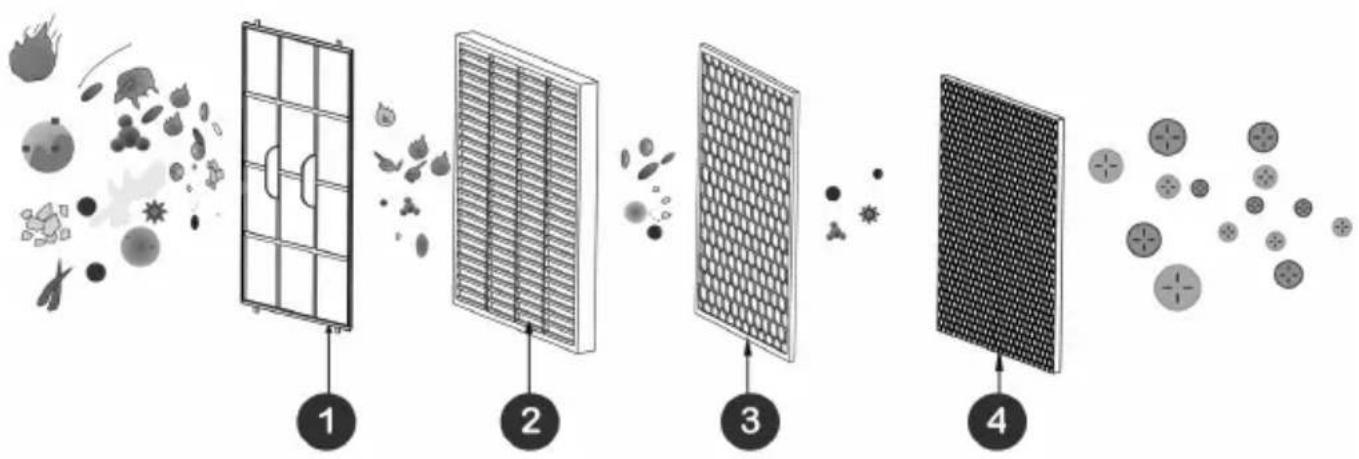
EZIclean® Air pure 500i is an air purifier that automatically adjusts its airflow to the needs of the room. Its major innovation lies in its photocatalytic air treatment process which, unlike other devices on the market, eliminates germs and bacteria present in the air. Its unique 6-stage filtration system promises to destroy over 99.95% of household pollutants.
text_image
Diagram illustrating four types of solar panels with labeled components and visual effects of particles like scissors, leaves, and dots.1. PRE-FILTER
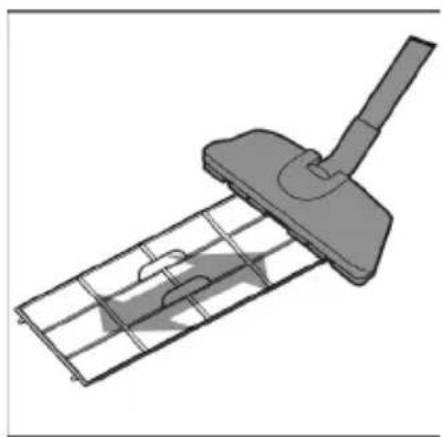
The pre-filter is 99.9% efficient in removing dust, animal hair etc. with a size of 2.5mm or less. It can be easily cleaned by dusting with a hoover.
2. HEPA FILTER
Absorbs biological pollutants that do not exceed 0.3 microns, such as fine particles carrying allergens (pollen etc.), bacteria, viruses, spores etc. Also pollutants contained in smoke.
3. COAL
Retains other Volatile Organic Compounds (VOCs) and odours: cooking, pet hair, tobacco, chimney smoke etc.
4. PHOTOCATALYSIS FILTER
Under the combined action of UV lamps, the photocatalysis filter destroys the tougher biological and chemical elements such as carbon monoxide, acetone, ammonia or formaldehyde that are found in some furniture materials.
IONS
Ionisation is a natural sterilisation process that provides extra filtration by effectively removing microscopic pollutants down to 0.01 microns.
THE UV LAMPS
Essential to the active principle of the Photocatalytic Filter, the UV lamps used in EZIclean® Air pure 500i also have a direct action on the destruction of micro-organisms contained in the air such as moulds, fungi and other harmful spores.
The functions
START-UP
natural_image
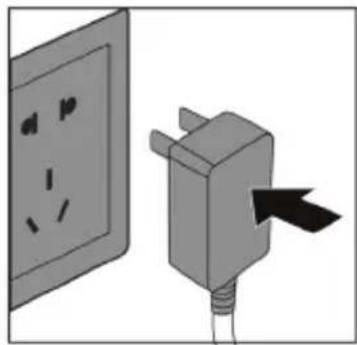
Illustration of a wall socket connected to a plug with a black arrow pointing to it (no text or symbols present)Plug the device. The control panel flashes 3 times. The unit goes into Standby mode.
text_image
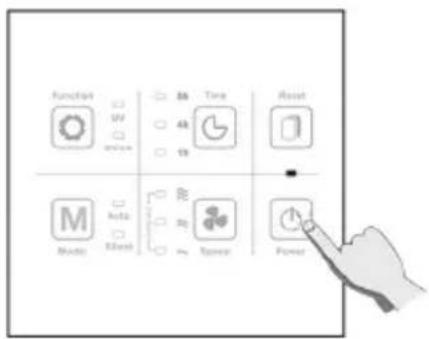
Function W Time Reset M Auto Power M PowerPress the POWER button. The unit goes into Automatic Mode.
To switch the air quality indicator halo light off and on again, press the RESET button on the control panel.
AUTOMATIC MODE
Press the MODE > Auto selection button to start the Automatic mode. After a 30 second warm-up, EZIclean® Air will automatically adjust its suction power according to the air quality.
NIGHT MODE
EZIclean® Air pure 500i is equipped with a light sensor. When the light in your room is off, the unit immediately switches to Night Mode. It reduces the brightness of the air quality indicator halo and minimises the noise level. The Night Mode is only activated when the unit is previously set to Automatic Mode.
text_image
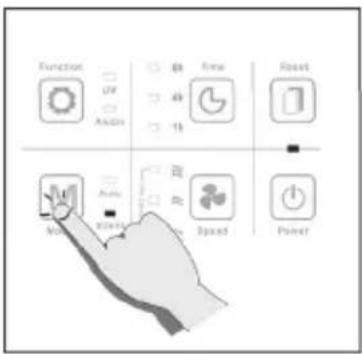
Function UV AI 6h 4h 1h New Reset AI Speed PowerQUIET MODE
EZIclean® Air pure 500i is equipped with a light sensor. When the light in your room is off, the unit immediately switches to Night Mode. It reduces the brightness of the air quality indicator halo and minimises the noise level. The Night Mode is only activated when the unit is previously set to Automatic Mode.
text_image
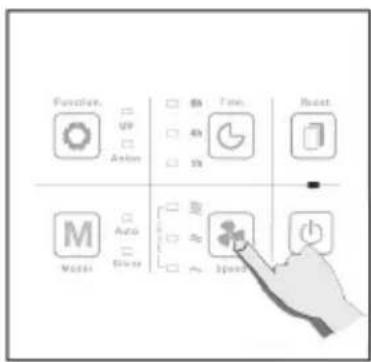
Function UI Action 84 Time 4h 5h Reset M Auto Speed 20 30 100000SUCTION POWER ADJUSTMENT
4 levels of suction power are available. Press the Speed button to scroll through the different speeds:
text_image
Pattern of symbols including squares, circles, and various line styles arranged in rows and columnsNiveau 4
text_image
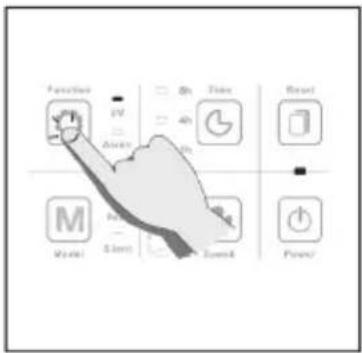
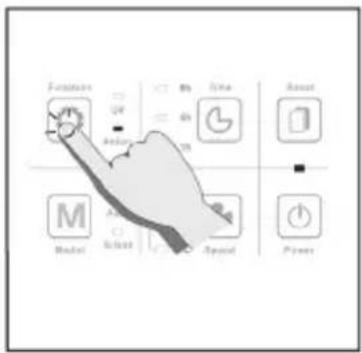
Function Time Reset M Start Sound PowerIONS AND ULTRAVIOLET
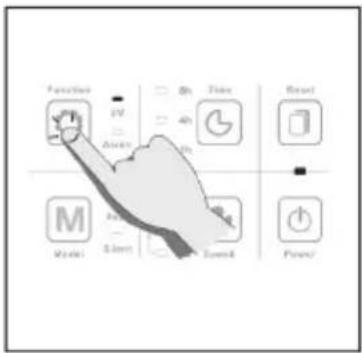
Press the Function button once to activate the UV function.
Press the Function button a second time to activate the Ionisation function.
text_image
Function Reset M Model Select Speed Power On On On On On On On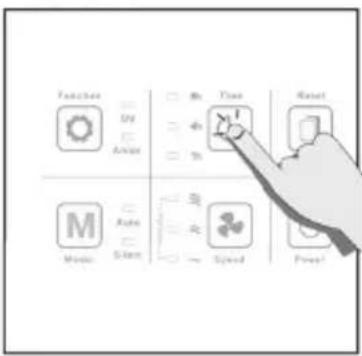
text_image
Function UV Analog Time Reset M Audio Speed PressTIMER
Press the Time button to activate the Timer function. The Timer allows you to switch off your appliance after a period of 1h - 4h - 8h. Scroll through the time selection by pressing the Time button. This function can be useful to clean a room quickly, by activating the maximum suction power of the appliance - level 4 - for a short time (1 hour).
text_image
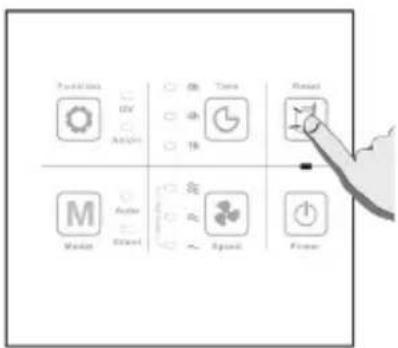
Position UV Action Time Reset M Order Speed Speed PowerRESET FUNCTION
The RESET button has 2 functions:
. Press the RESET button once to activate / deactivate the Halo light of the air quality indicator.
. Press the RESET button for about 5 seconds after a filter change / cleaning procedure.
Maintenance of your appliance
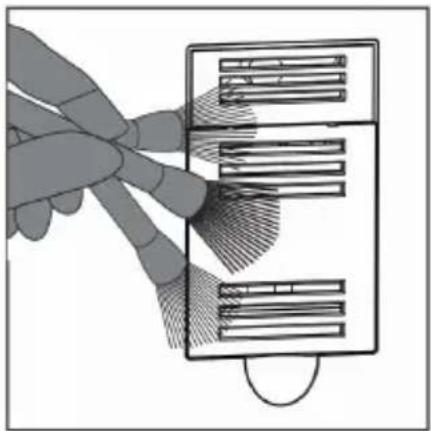
A. CLEANING THE DUST COLLECTOR
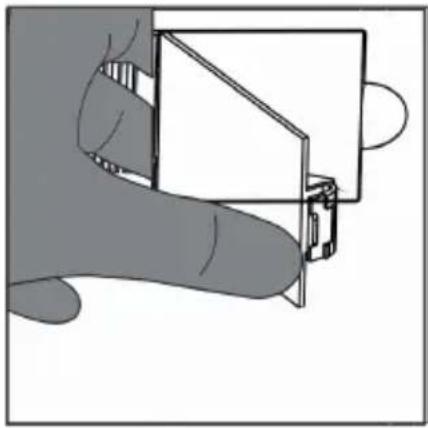
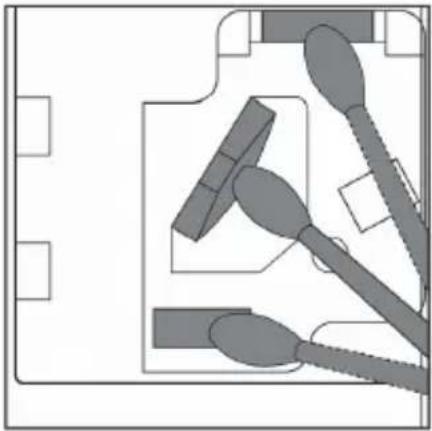
Regular maintenance of the dust collector is essential to ensure the proper functioning of your unit. It is recommended to clean it every 2 months or so.
If the environment in your room is particularly humid, it is possible that micro-droplets of condensation may interfere with the air quality indicator; your appliance may then switch to maximum power unexpectedly. Clean the sensor so that it works properly again.
natural_image
Illustration of a hand holding a device with a grid of horizontal bars, no text or symbols presentClean the dust collector grille with a brush.
natural_image
Illustration of a hand holding a small electronic component (no text or symbols visible)Open the access flap to the dust collector.
natural_image
Pure electrical circuit lines without any symbolsClean the sensor with a dry cloth or cotton swab.
B. CLEANING THE PRE-FILTER
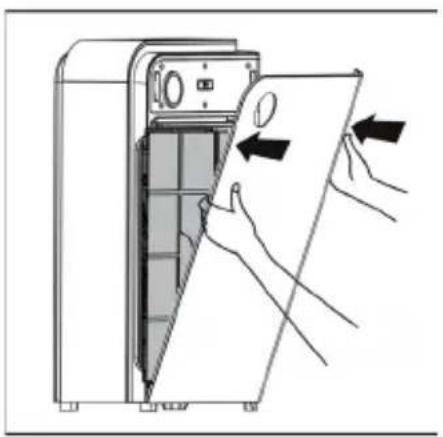
In order to maintain optimum performance - and based on a usage of the appliance of 8 hours / week - it is recommended to clean the pre-filter every 2 months.
natural_image
Illustration of hands installing or opening a device into a front panel (no text or symbols visible)Remove the front panel of the appliance and remove the pre-filter.
natural_image
3D rendering of a mechanical component with grid and handle (no text or symbols)Clean the entire surface with a vacuum cleaner with a hoover.
text_image
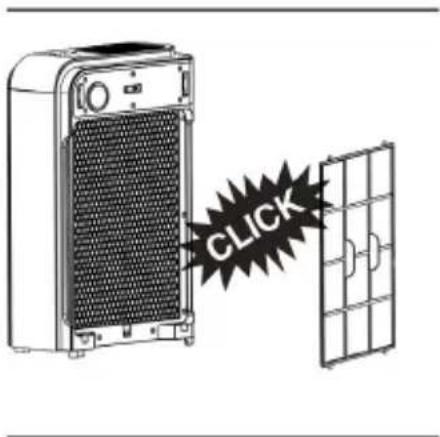
CLICKReplace the pre-filter firmly and replace the front panel.
C. REPLACEMENT OF OTHER FILTERS
In addition to the maintenance of the pre-filter, the following is a reminder of the average life of the other filters used in EZIclean® Air pure 500i:
. The Charcoal and HEPA filter should be replaced once a year.
. The Photocatalysis filter should be replaced every 3 years. Photocatalysis is based on the principle of activating a semi-conductor using the energy provided by light, so it is necessary to expose your Photocatalysis Filter to the sun every 6 months for about 2 hours.
text_image
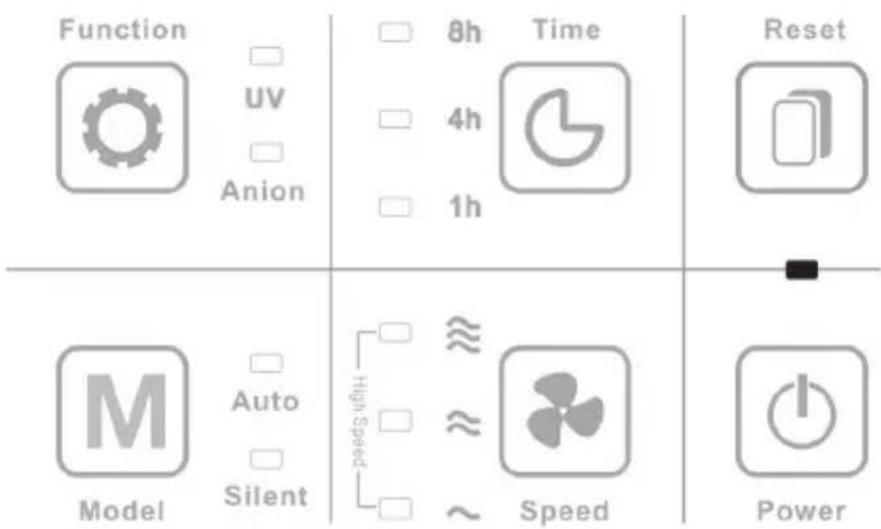
Function UV Anion 8h Time 4h 1h Reset M Auto Silent High Speed ≈ ≈ ~ Speed PowerYour machine is also equipped with a filter replacement indicator.
This is activated after 1600 hours of operation following the last renewal of your consumables. An LED located between the RESET and POWER button indicates the status of your filters in real time:
- Blue LED: Unit in operation. Nothing to report.
- Red LED: Unit off. Nothing to report.
- Flashing LED : Change of Filters required.
To change the Filters, refer to section 5.A - Installation of Filters.
Once done, press the Reset button - section 71 - Reset Button.
D. REPLACING UV FILTERS
After 1000 hours of use, UV lamps can lose up to 70% of their direct sterilisation capacity. However, they will continue to be effective in destroying certain pollutants such as formaldehydes and other VOCs. In order to benefit from maximum efficiency, it is recommended to change them every 3 years, together with the Photocatalysis Filter.
Below you will find a summary of the possible sources of malfunction, as well as the troubleshooting procedure to follow:
| Problems Possibilities Solutions | ||
| The appliance does not start. | The front panel The front panel is not properly engaged. | Remove and replace the front panel correctly. |
| The mains plug is not correctly connected. | Check that the plug is working properly. | |
| Suction does not work. | The mains plug is not correctly connected. | Check that the plug is working properly. |
| The appliance is not placed on a flat floor. | Reposition the unit on a flat surface. | |
| The plastic wrapping of the filters not removed. | Remove all the plastic films that protect the filters. | |
| Lack of filtration performance. | The filters are saturated. | Check the condition of the Filters and clean or change them. |
| The dust collector is saturated. | ||
| Thoroughly clean the dust collector. |
natural_image
Diagram showing two views of a device with hands operating the interior panel (no text or symbols present)natural_image
Exploded view diagram of a portable air conditioner unit showing internal components (no text or labels)natural_image
Diagram showing a vertical cylindrical component being converted into a grid-like structure with a mesh pattern (no text or symbols)natural_image
Diagram showing a mechanical device with a lever and a magnified inset of a component (no text or symbols)natural_image
Technical line drawing of a portable air conditioner unit with control panel and front panel (no text or symbols)natural_image
Illustration of hands installing or adjusting a door panel inside a refrigerator (no text or symbols visible)text_image
Diagram illustrating four stages of solar panel installation with labeled components and material illustrations1. VORFILTER
natural_image
Diagram showing a wall socket connected to a plug with a black arrow pointing to it (no text or symbols present)text_image
Function W Time Reset M Auto Power M Powertext_image
Function UV AIDS 48 49 10 New Reset OK Power Speed PowerSILENCE MODE
text_image
Pattern of symbols including squares, circles, and various line styles arranged in rows and columns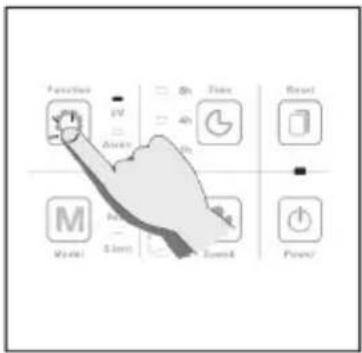
text_image
Function Time Reset M Start Sound PowerIONEN UND ULTRAVIOLETT
text_image
Features OK Add C B Time Do M Reset Select C Speed Power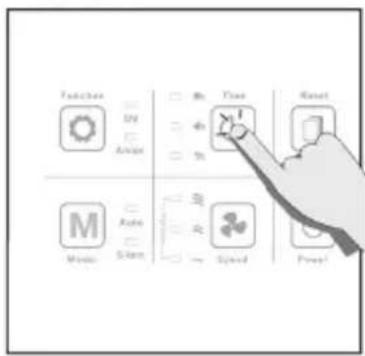
text_image
Tension UV Airplane M Speed Time Reset Speed Speed SpeedTIMER
natural_image
Illustration of a hand holding a device with a grid of rectangular panels, no text or symbols presentnatural_image
Hand holding a small electronic component with a screen and connector (no text or symbols visible)natural_image
Pure electrical circuit lines without any symbolsnatural_image
Illustration of hands installing or opening a door panel into a refrigerator (no text or symbols visible)natural_image
3D rendering of a mechanical component with grid and handle (no text or symbols)text_image
Function UV Anion 8h Time 4h 1h Reset M Auto Silent High Speed ≈ ≈ ~ Speed Powernatural_image
Diagram showing two views of a device with hands holding the lid and internal components, no text or symbols present.natural_image
Exploded view diagram of a portable air conditioner unit showing internal components (no text or labels)natural_image
Diagram showing a vertical cylindrical component being converted into a grid-like structure with a mesh pattern (no text or symbols)natural_image
Diagram of a mechanical device with a lever and inset showing a component being inserted (no text or symbols present)natural_image
Technical line drawing of a portable air conditioner unit with control panel and front panel (no text or symbols)natural_image
Illustration of hands installing or opening a refrigerator panel into a door (no text or symbols visible)text_image
Diagram illustrating four stages of solar panel manufacturing: initial processing, drying, drying with particles, and final assembly.1. PRE-FILTRO
natural_image
Diagram showing a wall socket connected to a plug with a black arrow pointing to it (no text or symbols present)text_image
Function W Time Reset M Auto Power M Powertext_image
Function UV AI 6h 4h 1h New Reset AI Speed PowerMODO SILENCIOSO
text_image
Function UP Action M Mode Auto Drive 84 Time 4h 5h Speed Resettext_image
Pattern of symbols including squares, circles, and various line styles arranged in rows
text_image
Function Time Reset M Start Sound PowerIONES Y ULTRAVIOLETA
text_image
Features OK Add C B Line Do M Reset Select Speed Power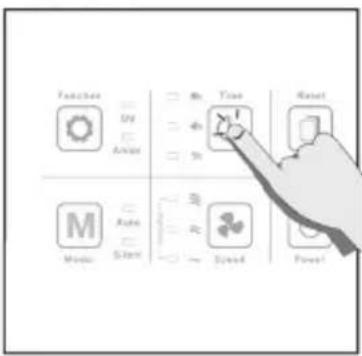
text_image
Teaching UV Analog Time Reset Music Audio Stand Stand PowerTEMPORIZADOR
text_image
Pack/Lock UV Action OK Time Reset M Model Action Speed PowerFUNCIÓN RESET
natural_image
Illustration of a hand holding a device with a grid of rectangular panels, no text or symbols presentnatural_image
Hand holding a small electronic component with a screen and connector (no text or symbols visible)natural_image
Pure electrical circuit lines without any symbolsnatural_image
Illustration of hands installing or opening a device into a front panel (no text or symbols visible)natural_image
3D rendering of a mechanical component with grid and handle (no text or symbols)text_image
Function UV Anion 8h Time 4h 1h Reset M Auto Silent High Speed ≈ ≈ ~ Speed Powernatural_image
Diagram showing two views of a device with hands holding the lid and internal components, no text or symbols present.natural_image
Exploded view diagram of a portable air conditioner unit showing internal components (no text or labels)natural_image
Diagram showing a vertical cylindrical component being converted into a grid-like structure with a mesh pattern (no text or symbols)natural_image
Diagram of a mechanical device with a lever and inset showing a component being inserted (no text or symbols present)natural_image
Technical line drawing of a portable air conditioner unit with control panel and front panel (no text or symbols)natural_image
Illustration of hands installing or adjusting a door panel into a refrigerator (no text or symbols visible)text_image
Diagram illustrating four stages of solar panel manufacturing: initial processing, drying, drying with particles, and final assembly.1. PRE-FILTRO
natural_image
Diagram showing a wall socket connected to a plug with a black arrow pointing to it (no text or symbols present)text_image
Function W Time Reset M Auto Power M Powertext_image
Function UV AI 6h 4h 1h New Reset AI Speed PowerMODO SILENZIOSO
text_image
Function UP Action M Mode Auto Drive 84 Time 4h 5h Speed Resettext_image
Pattern of symbols including squares, circles, and various line styles arranged in rows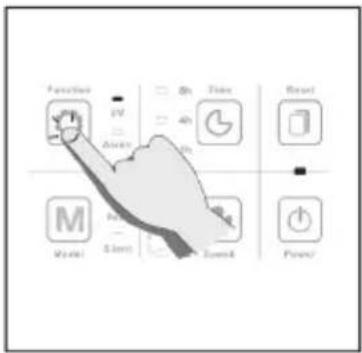
text_image
Function Time Reset M Start Sound PowerIONI E ULTRAVIOLETTI
text_image
Features OK Add C B Time Do M Reset Select C Speed Power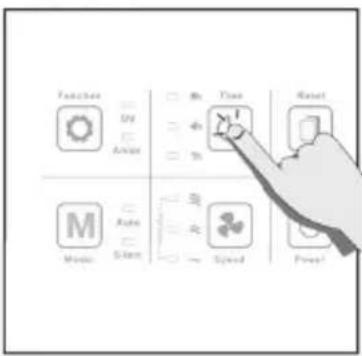
text_image
Function UV Analog Time Reset M Audio Speed PressTIMER
text_image
Position UV Action Time Reset M Order Speed Speed PowerFUNZIONE DI RESET
natural_image
Illustration of a hand holding a device with a grid of rectangular panels, no text or symbols presentnatural_image
Hand holding a small electronic component with a screen and connector (no text or symbols visible)natural_image
Pure electrical circuit lines without any symbolsnatural_image
Illustration of hands installing or opening a device into a refrigerator (no text or symbols visible)natural_image
3D rendering of a mechanical component with grid and lever mechanism (no text or symbols)text_image
Function UV Anion 8h Time 4h 1h Reset M Auto Silent High Speed ≈ ≈ ~ Speed Powernatural_image
Diagram showing two views of a device with hands holding a panel, one open and one closed, both with arrows indicating direction (no text or symbols present)natural_image
Exploded view diagram of a portable air conditioner unit showing internal components (no text or labels)natural_image
Diagram showing a vertical cylindrical component being converted into a grid-like structure with a mesh pattern (no text or symbols)natural_image
Diagram of a mechanical device with a lever and inset showing a component being inserted (no text or symbols present)natural_image
Technical line drawing of a portable air conditioner unit with control panel and front panel (no text or symbols)natural_image
Illustration of hands installing or adjusting a door panel into a refrigerator (no text or symbols visible)text_image
Diagram illustrating four types of solar panels with labeled components and visual effects of particles like scissors, leaves, and dots.1. PRE-FILTER
text_image
Features OK Add C B Line Do M Reset Select Speed Power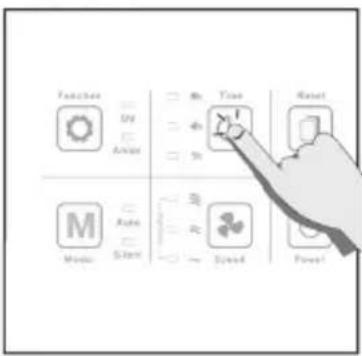
text_image
Teaching UV Analog Time Reset Music Audio Stand Stand PowerTIMER
text_image
Pack/Lock UV Action OK Time Reset M Model Action Speed PowerRESET FUNCTIE
natural_image
Illustration of a hand holding a device with a grid of rectangular panels, no text or symbols presentnatural_image
Hand holding a small electronic component with a screen and connector (no text or symbols visible)natural_image
Pure electrical circuit lines without any symbolsnatural_image
Illustration of hands installing or opening a door panel into a refrigerator (no text or symbols visible)natural_image
3D rendering of a mechanical component with a grid base and lever handle (no text or symbols)text_image
Function UV Anion 8h Time 4h 1h Reset M Auto Silent High Speed ≈ ≈ ~ Speed PowerDownload the multilingual instructions for your device directly in your customer area on www.eziclean.com.
To do this, register your product by clicking on the following link:
text_image
QR code image containing encoded data, no visible human-readable textezi clean® make it easy
EZIclean® is a trademark of E.ZICOM® company
46/48, rue Gay Lussac
94430 Chennevières-sur-Marne
www.eziclean.com