
DL10 - Surveillance Camera AVer - Free user manual and instructions
Find the device manual for free DL10 AVer in PDF.

| Product type | PTZ surveillance camera with AI auto-tracking |
| Brand | AVer |
| Model | DL10 |
| Sensor | CMOS 1/2.8" 2 megapixels |
| Maximum resolution | 1080p at 60 fps (USB and RTSP) |
| Optical zoom | 3x |
| Digital zoom | 2x |
| Diagonal viewing angle | 90° (wide-angle) to 35.8° (telephoto) |
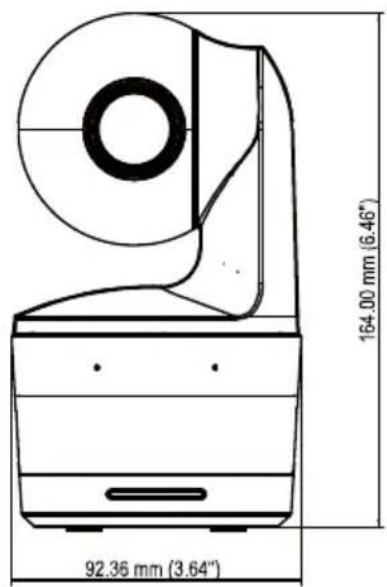
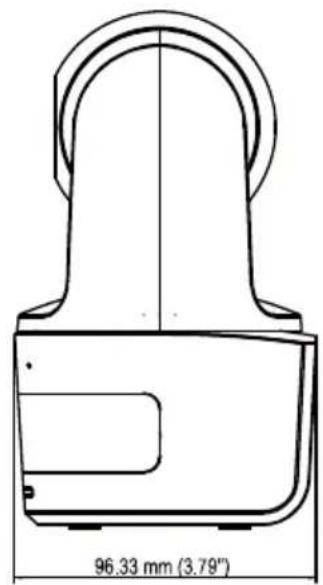
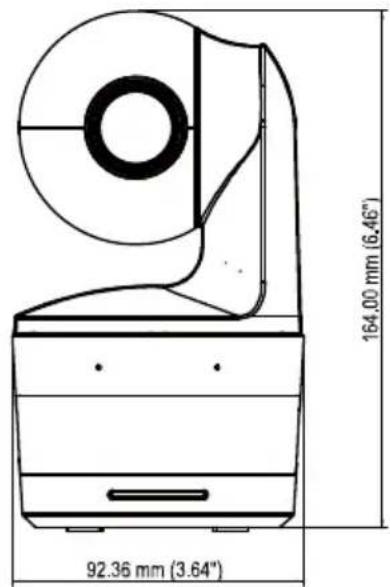
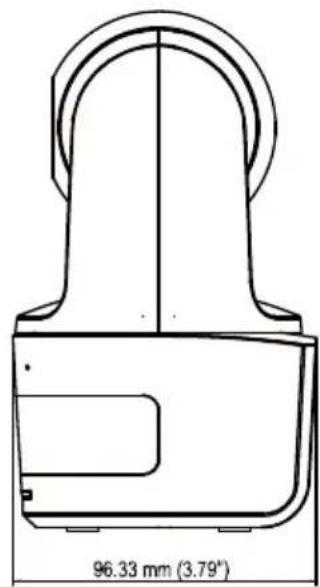
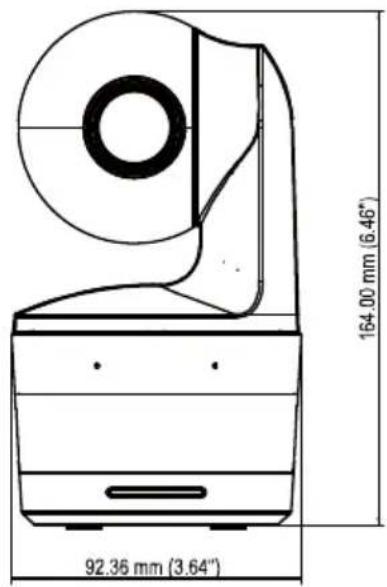
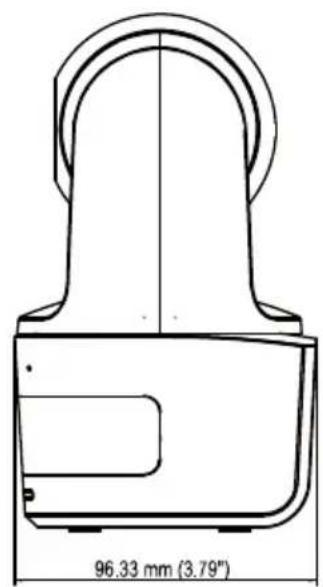
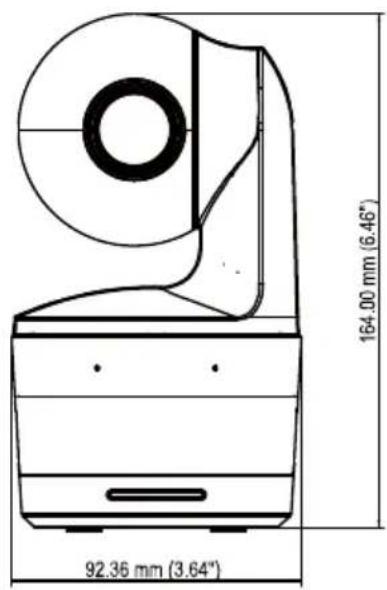
| Dimensions (L x D x H) | 92.39 mm x 94.44 mm x 164.00 mm |
| Net weight | 745 g |
| Power supply | AC 100-240V to DC 12V 2A power adapter, consumption 11W |
| Tracking functions | Presenter, Zone, and Hybrid modes with auto-detection and tracking |
| Gesture control | Yes (enable/disable tracking, change framing upper body/full body) |
| Built-in microphone | 2 omnidirectional microphones with noise suppression |
| External audio inputs | Line input (1 Vrms max) and microphone input (50 mVrms max) |
| Connectivity | USB 3.1 Type B (backward compatible with USB 2.0), Ethernet 10/100 Base-T |
| Network protocols | IPv4/IPv6, TCP, UDP, HTTP, DHCP, RTSP, RTMP, VISCA over IP |
| Video compression | H.264, H.265, MJPEG |
| Remote control | Infrared with PTZ, tracking, presets, and mode functions |
| Security | Kensington lock, privacy mode, resettable admin password |
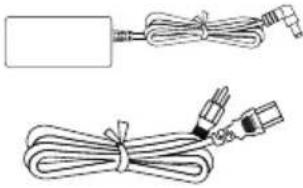
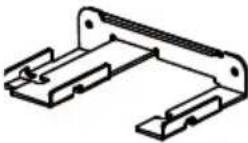
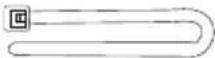
| Package contents | Camera module, power adapter, power cord, mounting plate, cable ties, remote control, quick installation guide |
| Warranty | Camera 3 years, accessories 1 year |
| Operating conditions | Temperature 0°C to +40°C, humidity 20% to 80% |
| Compliance | Class A (NMB-003 Canada), FCC warnings |
Frequently Asked Questions - DL10 AVer
User questions about DL10 AVer
0 question about this device. Answer the ones you know or ask your own.
Ask a new question about this device
Download the instructions for your Surveillance Camera in PDF format for free! Find your manual DL10 - AVer and take your electronic device back in hand. On this page are published all the documents necessary for the use of your device. DL10 by AVer.
USER MANUAL DL10 AVer
natural_image
Line drawing of a handheld device with a circular lens and base mount (no text or symbols)DL10
User Manual
Federal Communications Commission Statement
NOTE: This equipment has been tested and found to comply with the limits for a Class A digital device, pursuant to part 15 of the FCC Rules. These limits are designed to provide reasonable protection against harmful interference when the equipment is operated in a commercial environment. This equipment generates, uses, and can radiate radiofrequency energy and, if not installed and used in accordance with the instruction manual, may cause harmful interference to radio communications. Operation of this equipment in a residential area is likely to cause harmful interference in which case the user will be required to correct the interference at his own expense.
FCC Caution: Any changes or modifications not expressly approved by the party responsible for compliance could void the user's authority to operate this equipment.
This device complies with part 15 of the FCC Rules.
Operation is subject to the following two conditions:
(1) This device may not cause harmful interference, and
(2) this device must accept any interference received, including interference that may cause undesired operation.
Warning - This is a class A product. In a domestic environment, this product may cause radio interference in which case the user may be required to take adequate measures.
This Class A digital apparatus complies with Canadian ICES-003.
Risk of explosion if battery is replaced by an incorrect type.
Dispose of used batteries in a safe and proper manner.
Remote Control Battery Safety Information
- Store batteries in a cool and dry place.
- Do not throw away used batteries in the trash. Properly dispose of used batteries through specially approved disposal methods.
- Remove the batteries if they are not in use for long periods of time. Battery leakage and corrosion can damage the remote control. Dispose of batteries safely and through approved disposal methods.
- Do not use old batteries with new batteries.
- Do not mix and use different types of batteries: alkaline, standard (carbon-zinc) or rechargeable (nickel-cadmium).
- Do not dispose of batteries in a fire.
- Do not attempt to short-circuit the battery terminals.
DISCLAIMER
No warranty or representation, either expressed or implied, is made with respect to the contents of this documentation, its quality, performance, merchantability, or fitness for a particular purpose. Information presented in this documentation has been carefully checked for reliability; however, no responsibility is assumed for inaccuracies. The information contained in this documentation is subject to change without notice.
In no event will AVer Information Inc. be liable for direct, indirect, special, incidental, or consequential damages arising out of the use or inability to use this product or documentation, even if advised of the possibility of such damages.
TRADEMARKS
“AVer” is a trademark owned by AVer Information Inc. Other trademarks used herein for description purpose only belong to each of their companies.
COPYRIGHT
© 2021 AVer Information Inc. All rights reserved.
All rights of this object belong to AVer Information Inc. Reproduced or transmitted in any form or by any means without the prior written permission of AVer Information Inc. is prohibited. All information or specifications are subject to change without prior notice.
NOTICE
SPECIFICATIONS ARE SUBJECT TO CHANGE WITHOUT PRIOR NOTICE. THE INFORMATION CONTAINED HEREIN IS TO BE CONSIDERED FOR REFERENCE ONLY.
WARNING
■ To reduce the risk of fire or electric shock, do not expose this appliance to rain or moisture. Warranty will be void if any unauthorized modifications are done to the product.
■ Do not drop the camera or subject it to physical shock.
■ Use the correct power supply voltage to avoid the damaging camera.
■ Do not place the camera where the cord can be stepped on as this may result in fraying or damage to the lead or the plug.
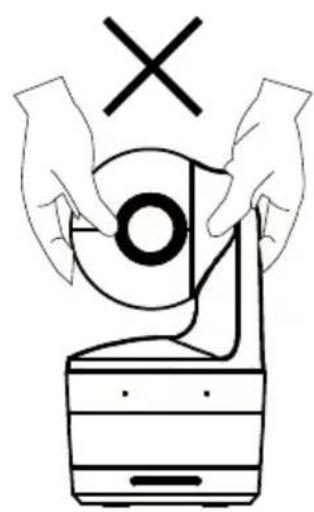
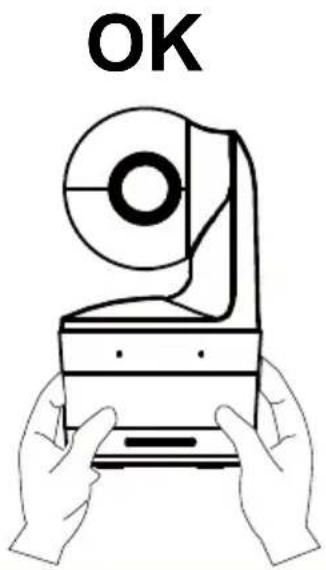
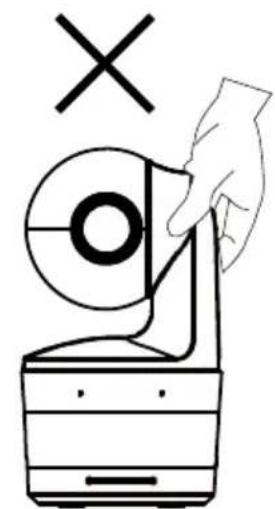
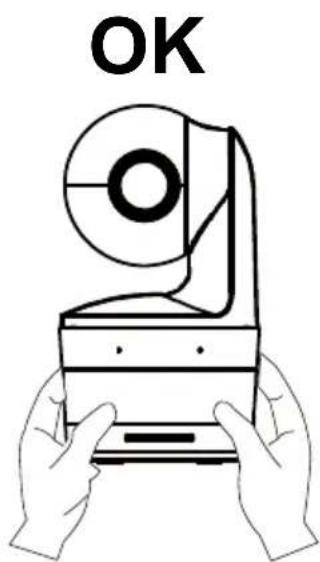
■ Hold the bottom of the camera with both hands to move the camera. Do not grab the lens or lens holder to move the camera.
natural_image
Illustration of hands operating a CD or DVD device with a cross symbol above (no text or labels)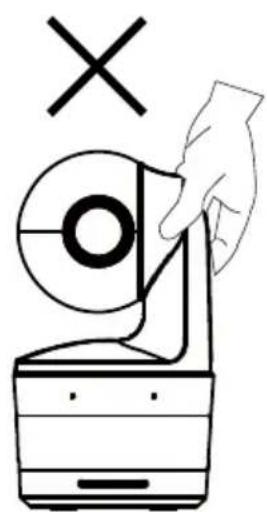
natural_image
Illustration of a hand holding a circular device with a cross symbol above it, no text or symbols present.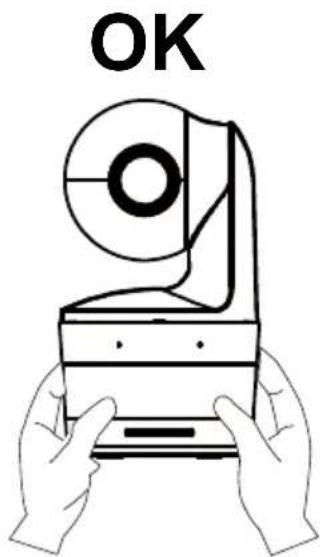
More Help
For FAQs, technical support, software and user manual download, please visit:
Headquarters
Download Center: https://www.aver.com/download-center
Technical Support: https://www.aver.com/technical-support
USA Branch office
Download Center: https://www.averusa.com/education/support
Technical Support: https://averusa.force.com/support/s/contactsupport
Europe Branch office
Download Center: https://www.avereurope.com/download-center
Technical Support: https://www.avereurope.com/technical-support
Contact Information
Headquarters
AVer Information Inc.
https://www.aver.com
8F, No.157, Da-An Rd., Tucheng Dist., New Taipei City 23673, Taiwan
Tel: +886 (2) 2269 8535
Europe Branch office
AVer Information Europe B.V.
https://www.avereurope.com
Westblaak 134, 3012 KM, Rotterdam, The Netherlands
Tel: +31 (0) 10 7600 550
Technical support: eu.rma@aver.com
USA Branch office
AVer Information Inc., Americas
https://www.averusa.com
668 Mission Ct., Fremont, CA 94539, USA
Tel: +1 (408) 263 3828
Toll-free: +1 (877) 528 7824
Technical support: support.usa@aver.com
Japan Branch Office
アバー・インフォメーション株式会社
https://jp.aver.com
Vietnam Branch Office
Công ty TNHH AVer Information (Việt Nam)
Camera Mount Suggestions (Optional Accessories)....1
Product Introduction....2
Overview....2
LED Indicator 2
Pan and Tilt Angle....3
Dimension....3
Cable Fixing Plate Installation ....4
Device Connection....5
Connections....6
Audio Input Connection .... 7
Ceiling Mount Installation (Optional)......8
Wall Mount Installation (Optional)....9
Tracking Setup Recommendations 11
Remote Control....12
Hot Key 13
Set Up the Camera 13
Set Up IP Address of the Camera 13
If there is DHCP environment 13
Or if you want to configure by yourself 13
Web Setup 14
Use the AVer IPCam Utility to Find the Camera 14
Make a Connection to the Camera via Browser 15
Live View....16
Snapshot 16
Pan-Tilt-Zoom Control.... 17
Manual Pan-Tilt Speed Adjustment.... 17
Focus 18
Preset Position....18
Tracking Control....19
Settings....20
Tracking Settings 20
Tracking Control....20
Presenter....21
Zone 23
Hybrid 25
Camera Settings 27
Camera Control....27
Preset....28
Exposure 29
Image Process 29
System 32
FAQ 35
Specification** 37
Package Contents
| Camera Unit | Power Adapter(1.2 m/3.93 ft)Power Cord(1.83 m/6.00 ft) | Cable Fixing Plate | Cable Ties (x3) | |
 |  |  |  | |
| M2 x 4mm Screws(x2) | Quick Start Guide | Remote Control | USB Cable(1.5 m/4.92 ft) | |
 |  or or |  | 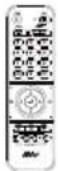 | 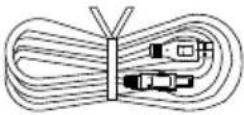 |
| 1/4”-20, L=7.5mm Screw | User Manual* Warranty Card* | |||
 |  |  | ||
*Only for Japan
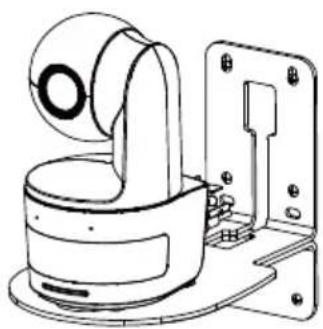
Camera Mount Suggestions (Optional Accessories)
For details on optional accessories, consult your local dealer.
Wall mount
USA: Part#PTMLTWM01
Other countries: Part#60S5000000AB
Ceiling mount
USA: Part#PTMLTCM02
Other countries: Part#60S5000000AC
natural_image
Technical line drawing of a mechanical device with mounting bracket and housing (no text or symbols)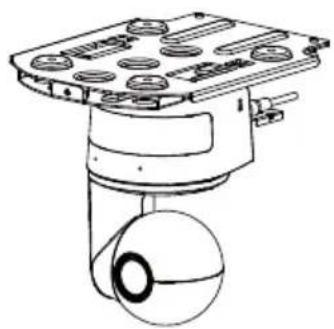
natural_image
Technical line drawing of a mechanical device with a spherical component and mounting base (no text or symbols)Product Introduction
Overview
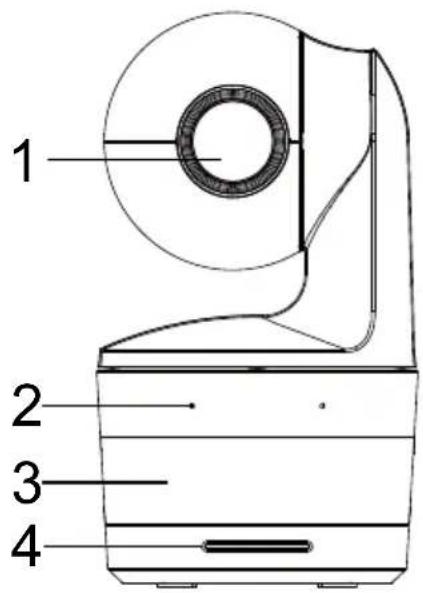
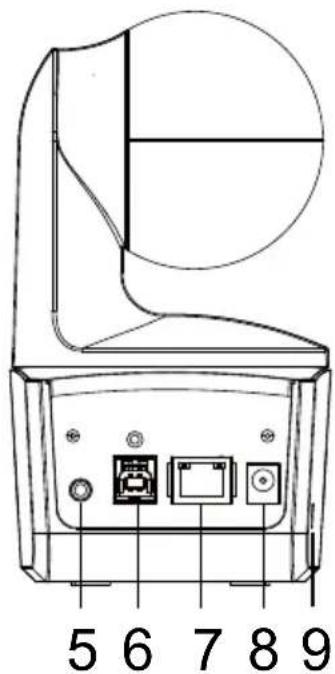
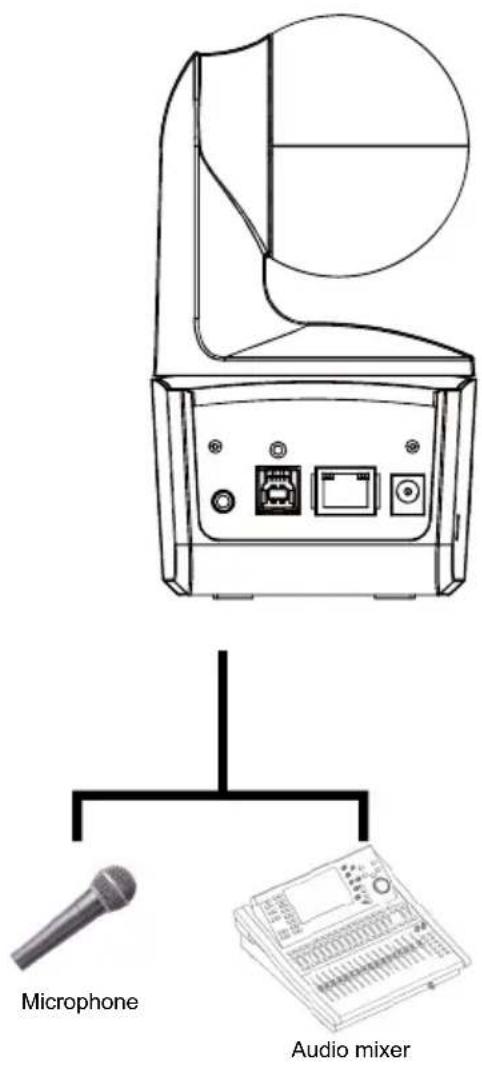
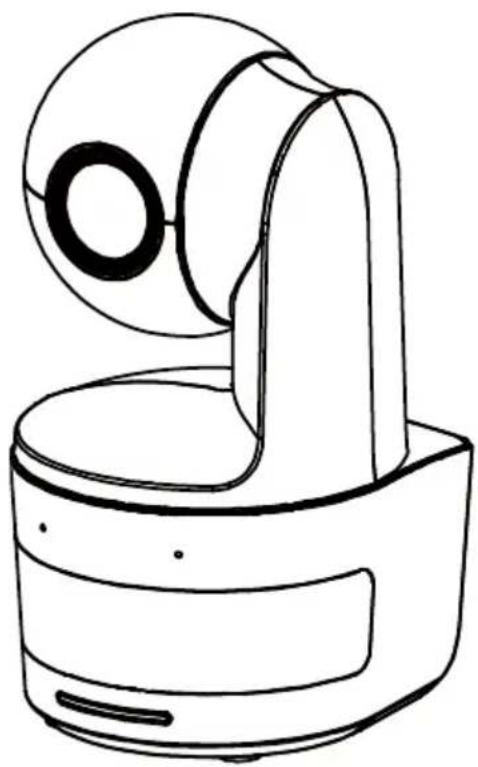
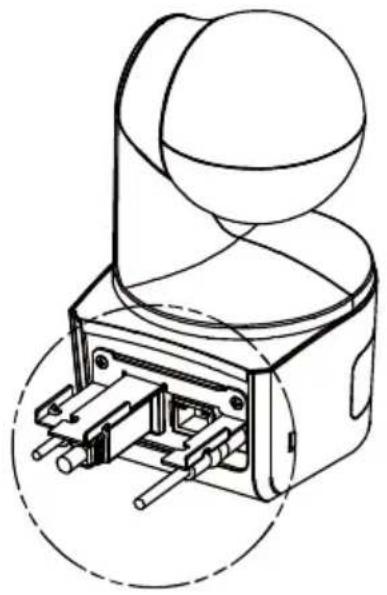
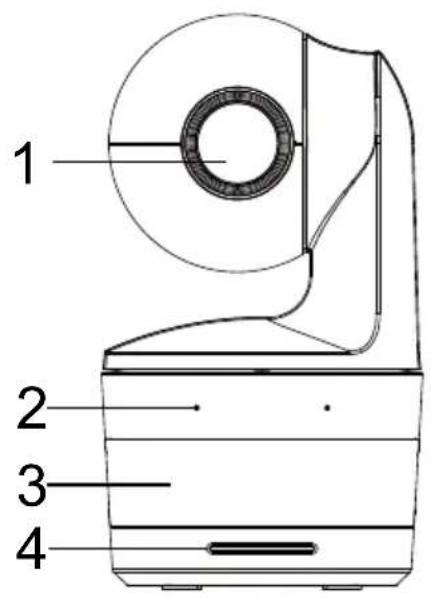
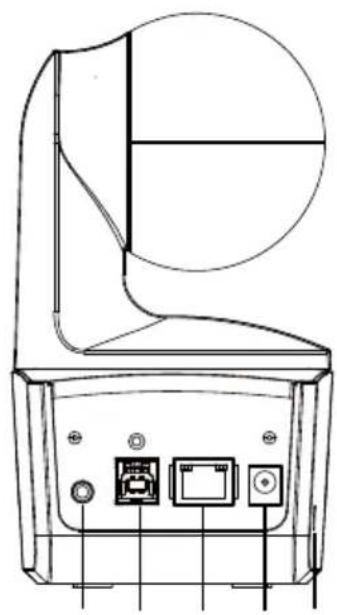
| (1) Camera Lens | (4) LED Indicator | (7) Ethernet Port |
| (2) Built-in Microphones | (5) Audio In* | (8) DC Power Jack |
| (3) IR Sensor | (6) USB Port | (9) Kensington Lock |
*Line input level: 1Vrms (max)
*Mic input level: 50mVrms (max); Supplied voltage: 3.3V
LED Indicator
| LED Status | |
| Blue (Blinking every 2 seconds) | Tracking On |
| Blue (Solid) Normal Operation and Tracking Off | |
| Orange (Blinking) | Camera Initialization |
| Orange (Solid) Standby Mode | |
| Red (Blinking) Firmware Update | |
| Purple (Blinking for 3 times) | RTMP being switched on or off |
| Green (Blinking) | Gesture control command received |
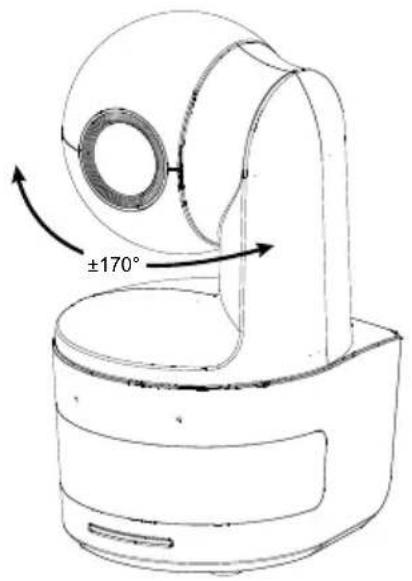
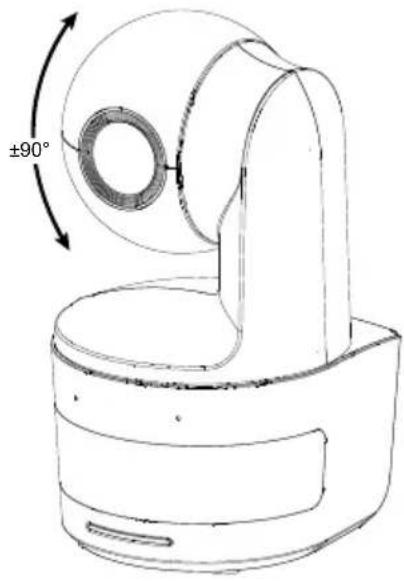
Pan and Tilt Angle
natural_image
Technical line drawing of a mechanical component with a 90-degree angle标注 (no text or symbols beyond the angle marker)Dimension
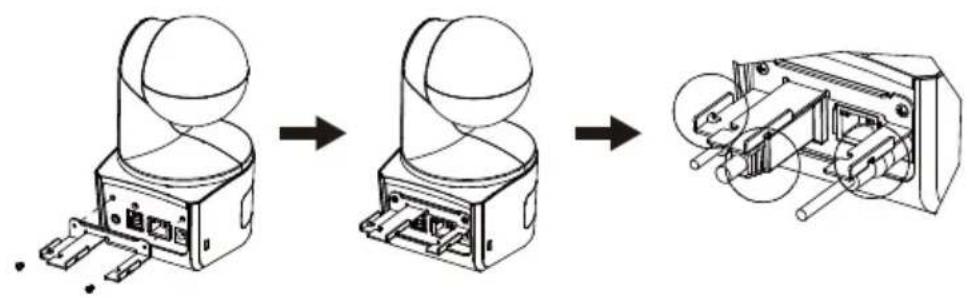
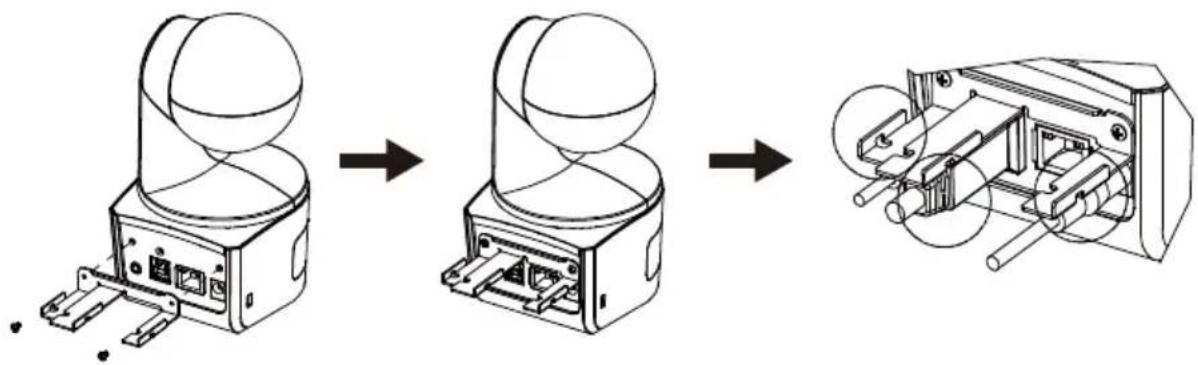
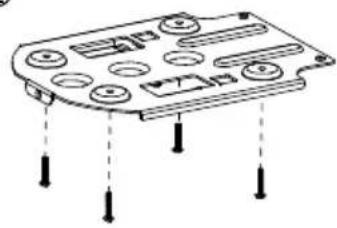
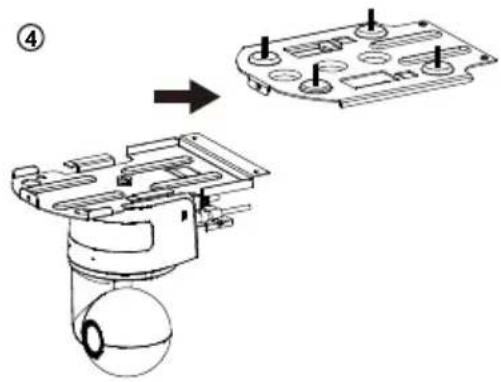
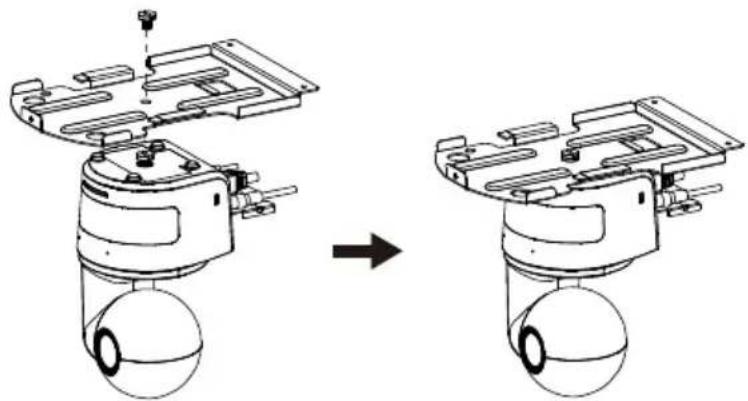
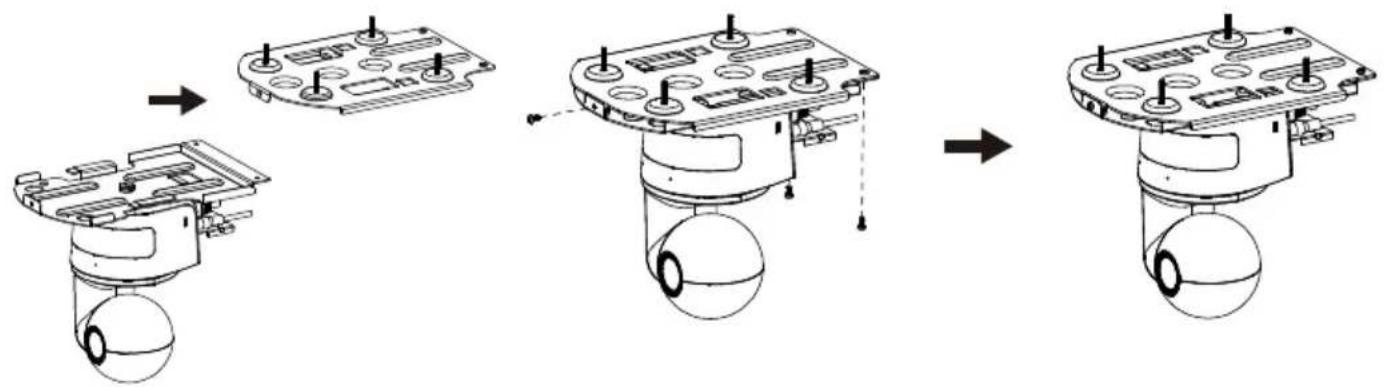
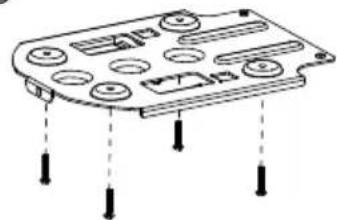
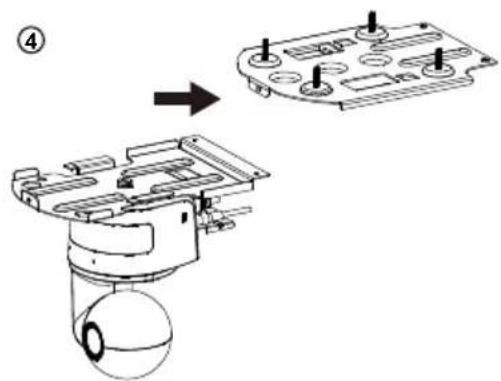
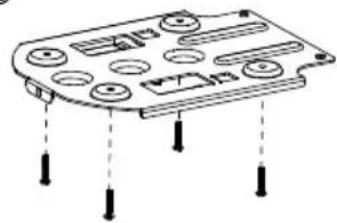
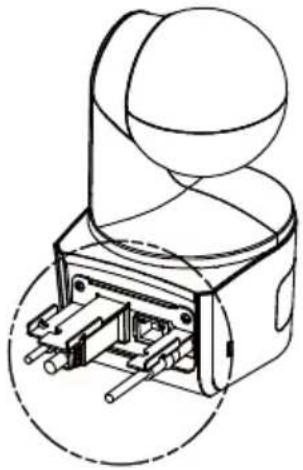
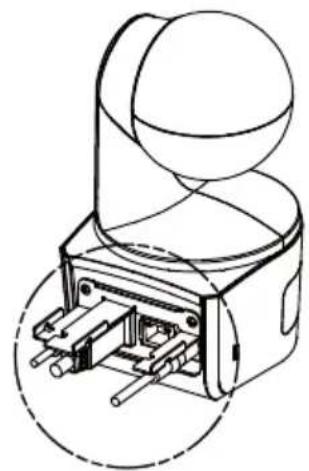
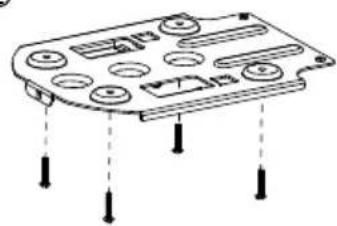
Cable Fixing Plate Installation
- Secure the cable fixing plate to the camera with two M2 x 4 mm screws in the package.

natural_image
Diagram showing a device before and after transformation, with no visible text or symbols- Plug in cables.

natural_image
Technical line drawing of a mechanical component with no visible text or symbols- Use 3 cable ties in the package to secure the cables and cable fixing plate.
natural_image
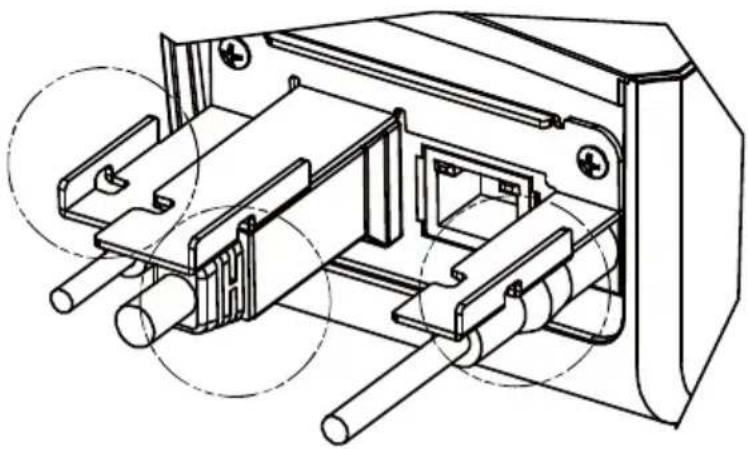
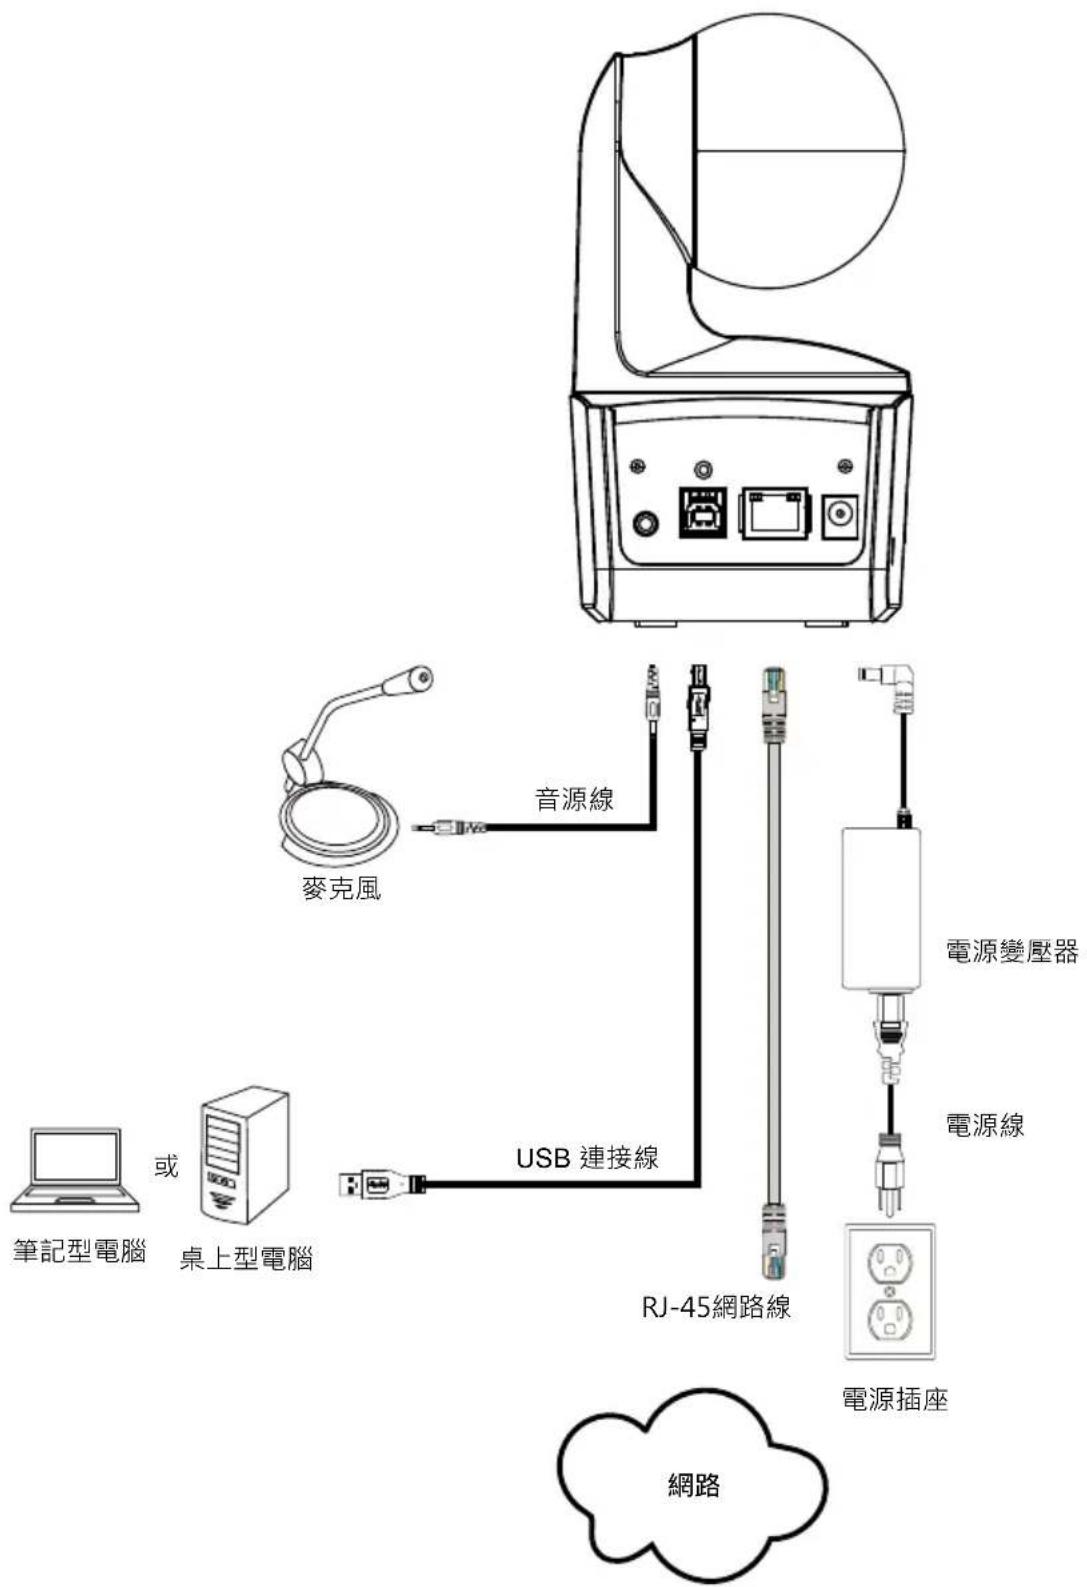
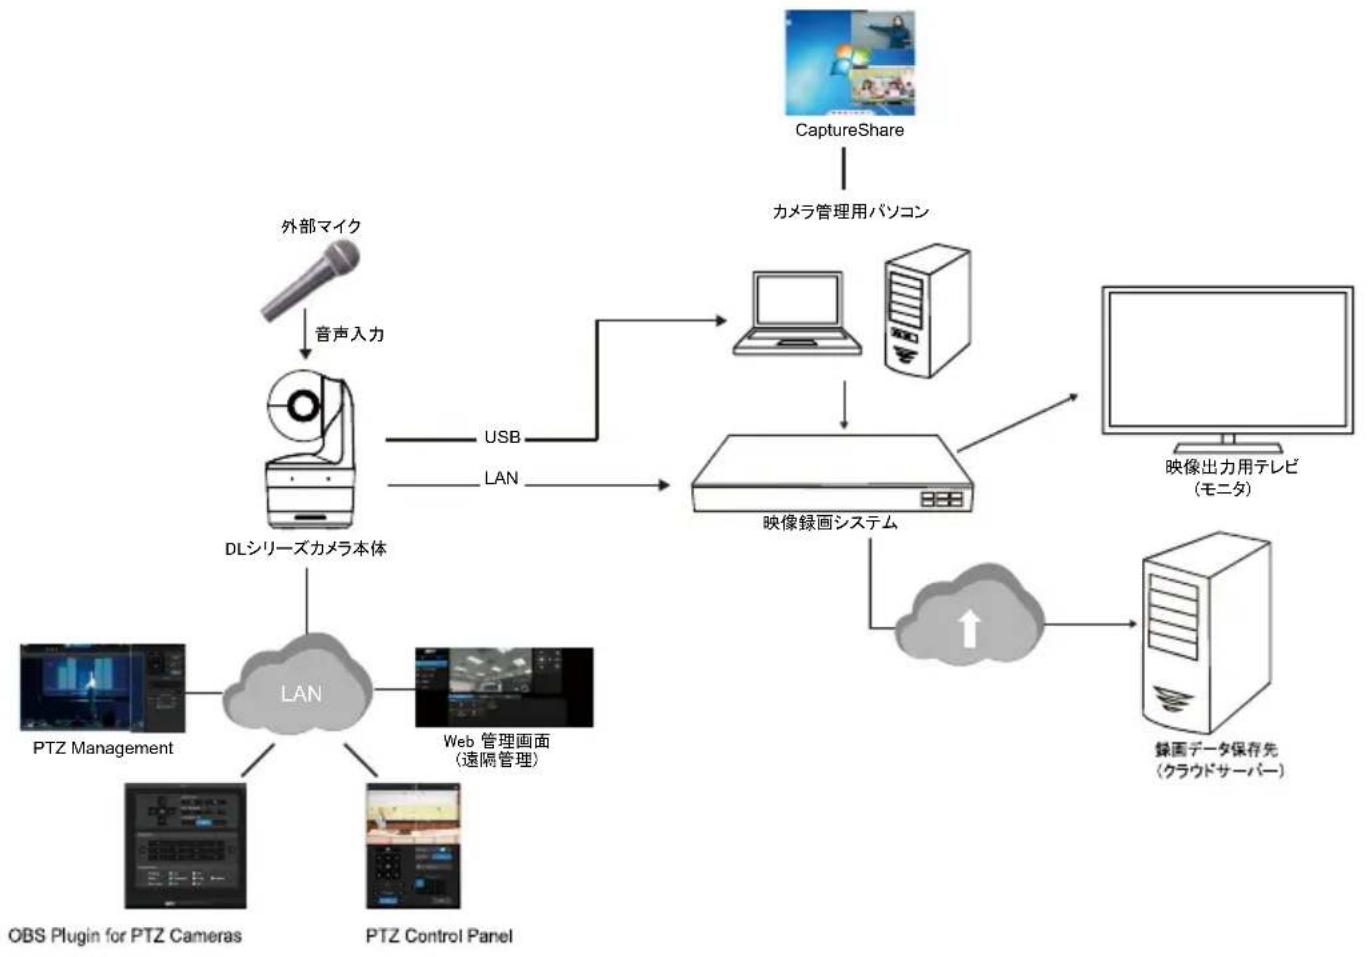
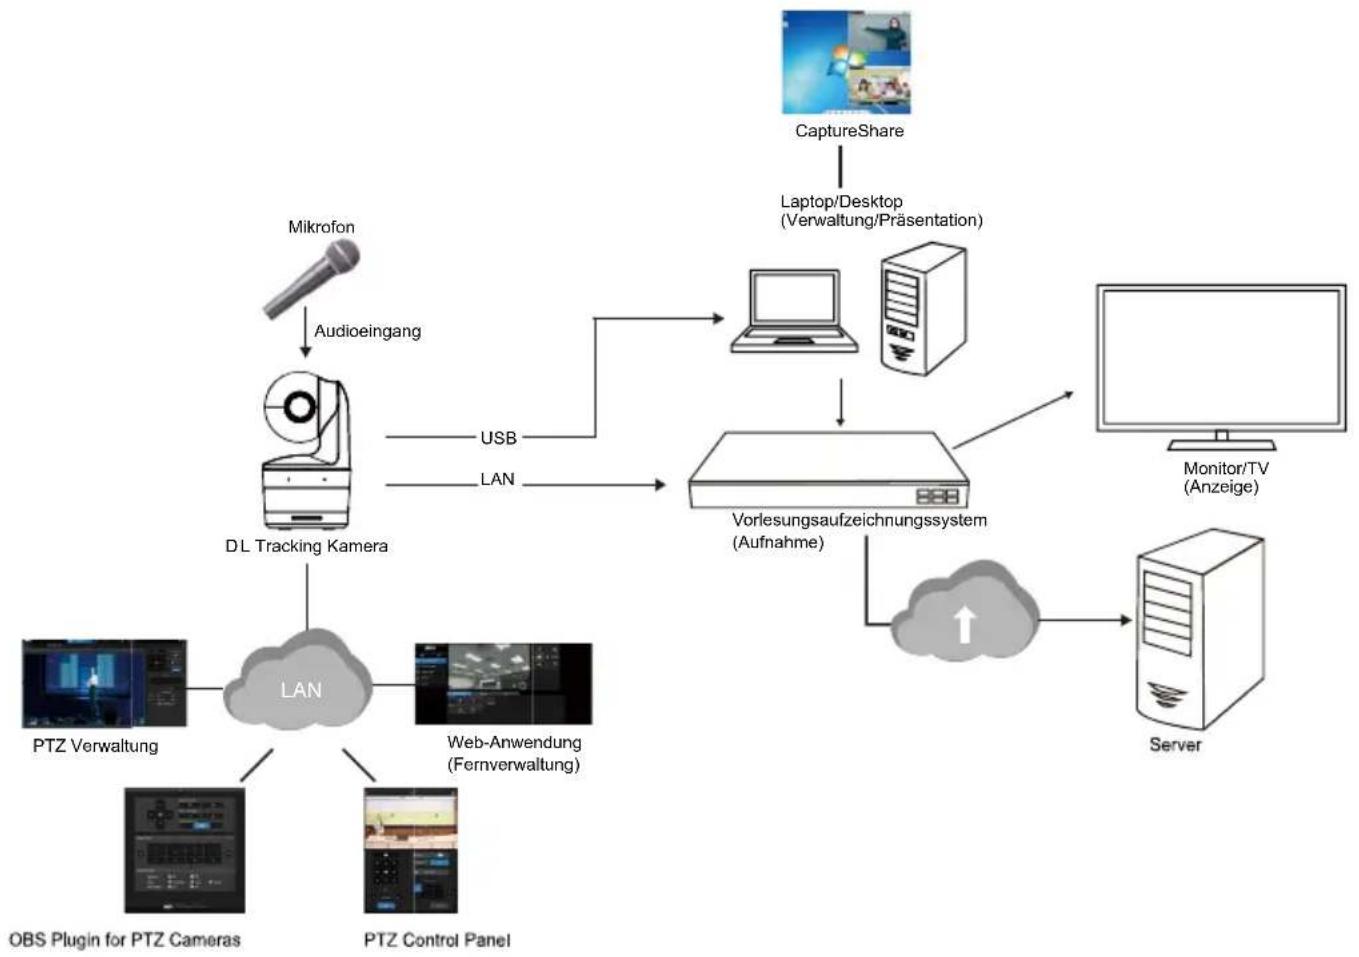
Technical line drawing of a mechanical assembly with multiple cylindrical components and mounting holes (no text or symbols)Device Connection
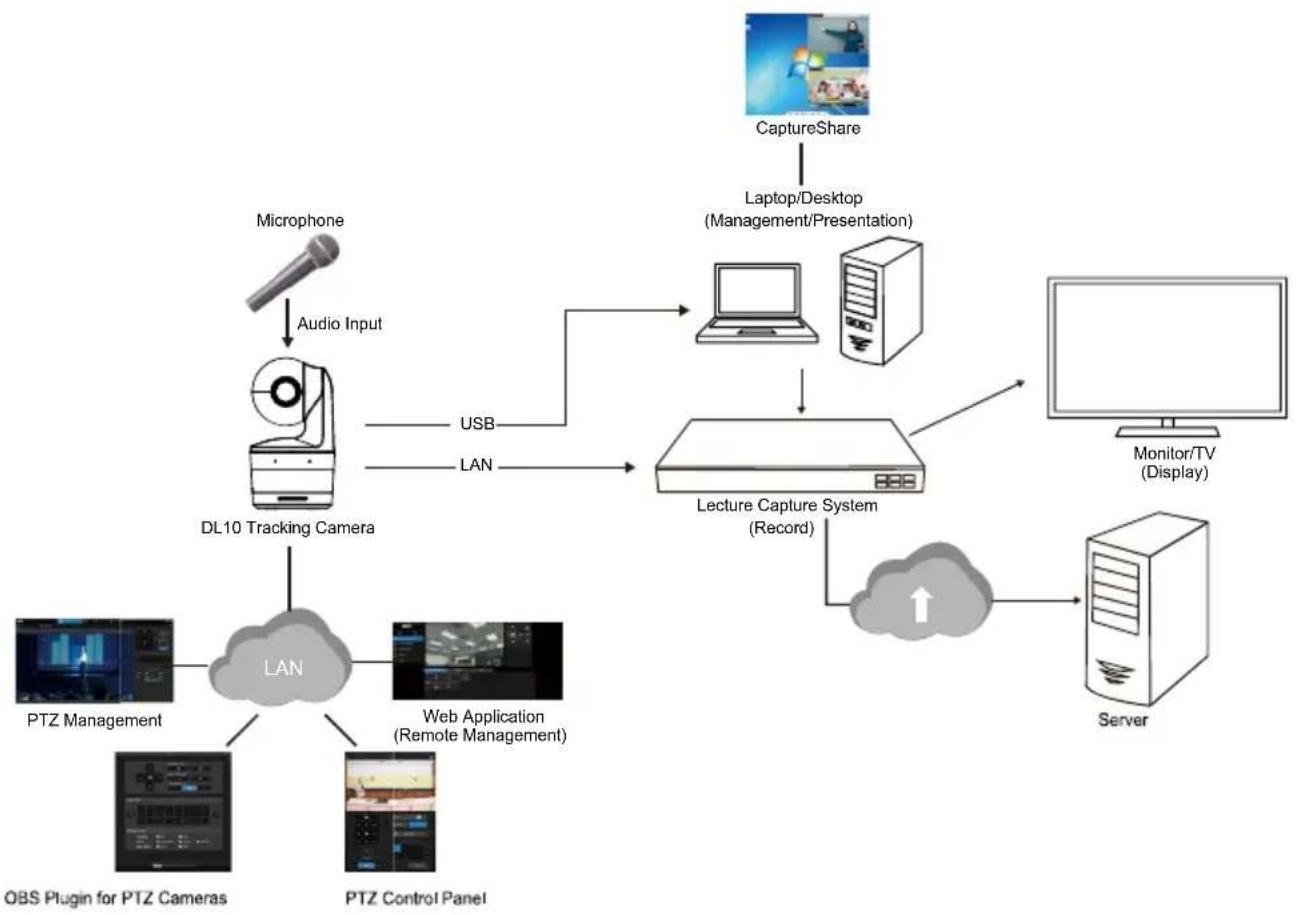
flowchart
graph TD
    A["Microphone"] -->|Audio Input| B["DL10 Tracking Camera"]
    B -->|USB LAN| C["Lecture Capture System (Record)"]
    C --> D["Server"]
    D --> E["Monitor/TV (Display)"]
    C --> F["CaptureShare"]
    F --> G["Laptop/Desktop (Management/Presentation)"]
    B --> H["PTZ Management"]
    B --> I["Web Application (Remote Management)"]
    B --> J["PTS Control Panel"]
    B --> K["PTS Management for PTZ Cameras"]
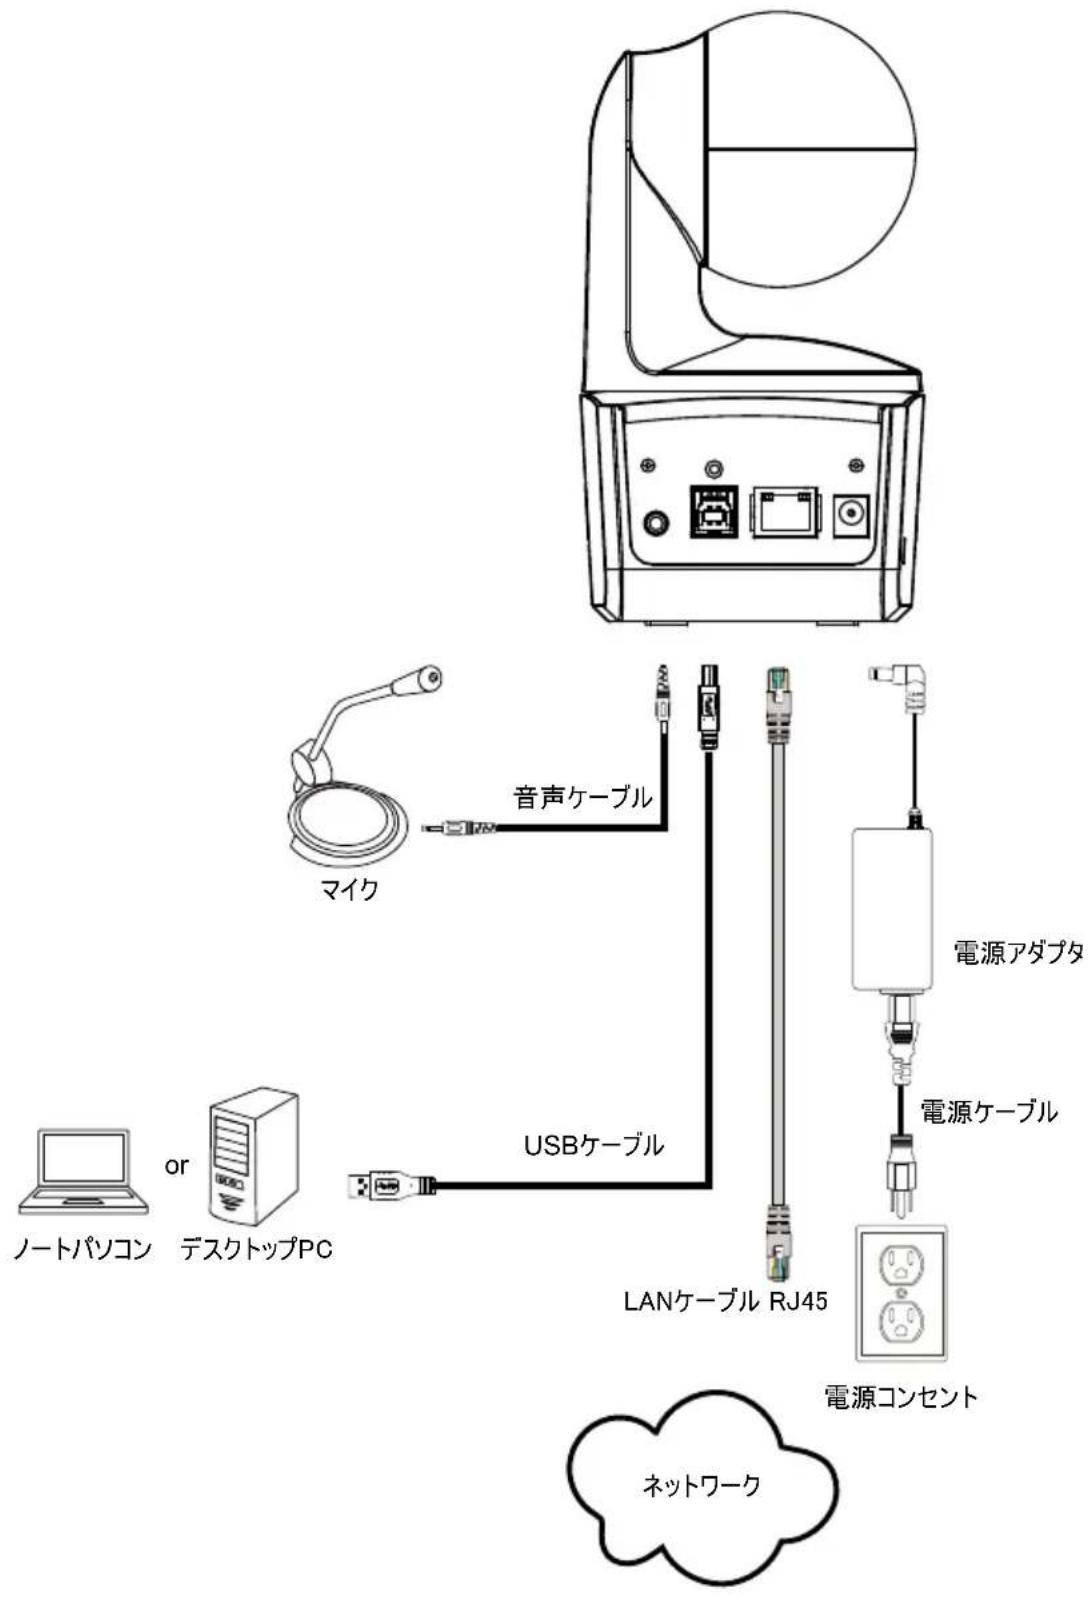
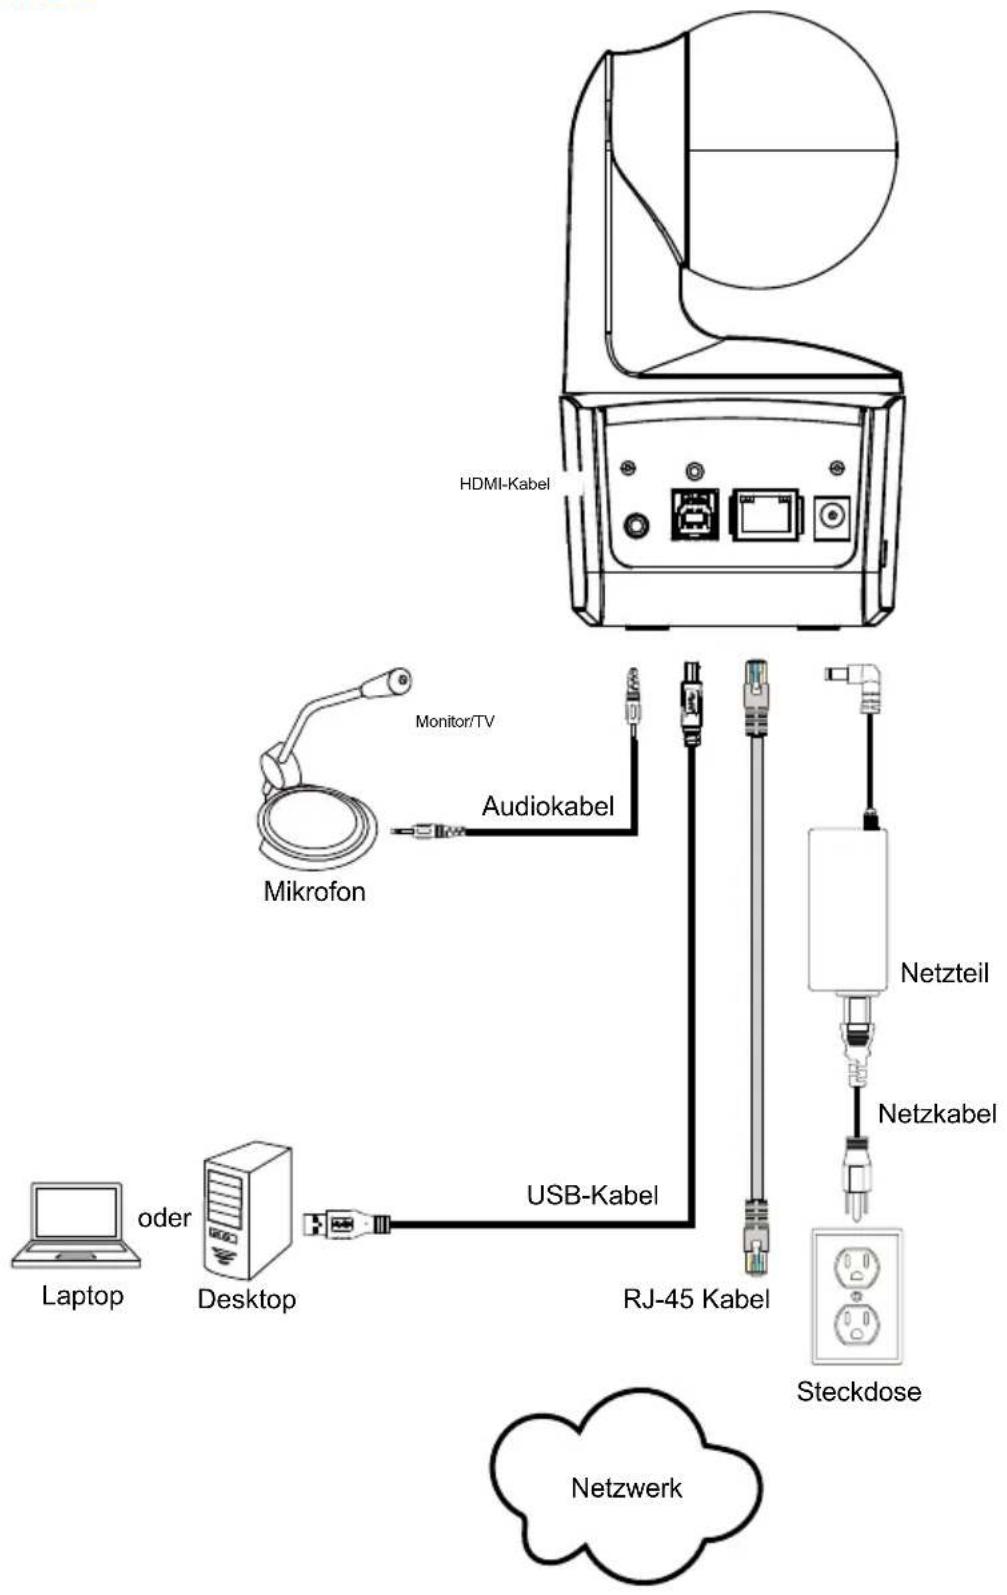
Connections

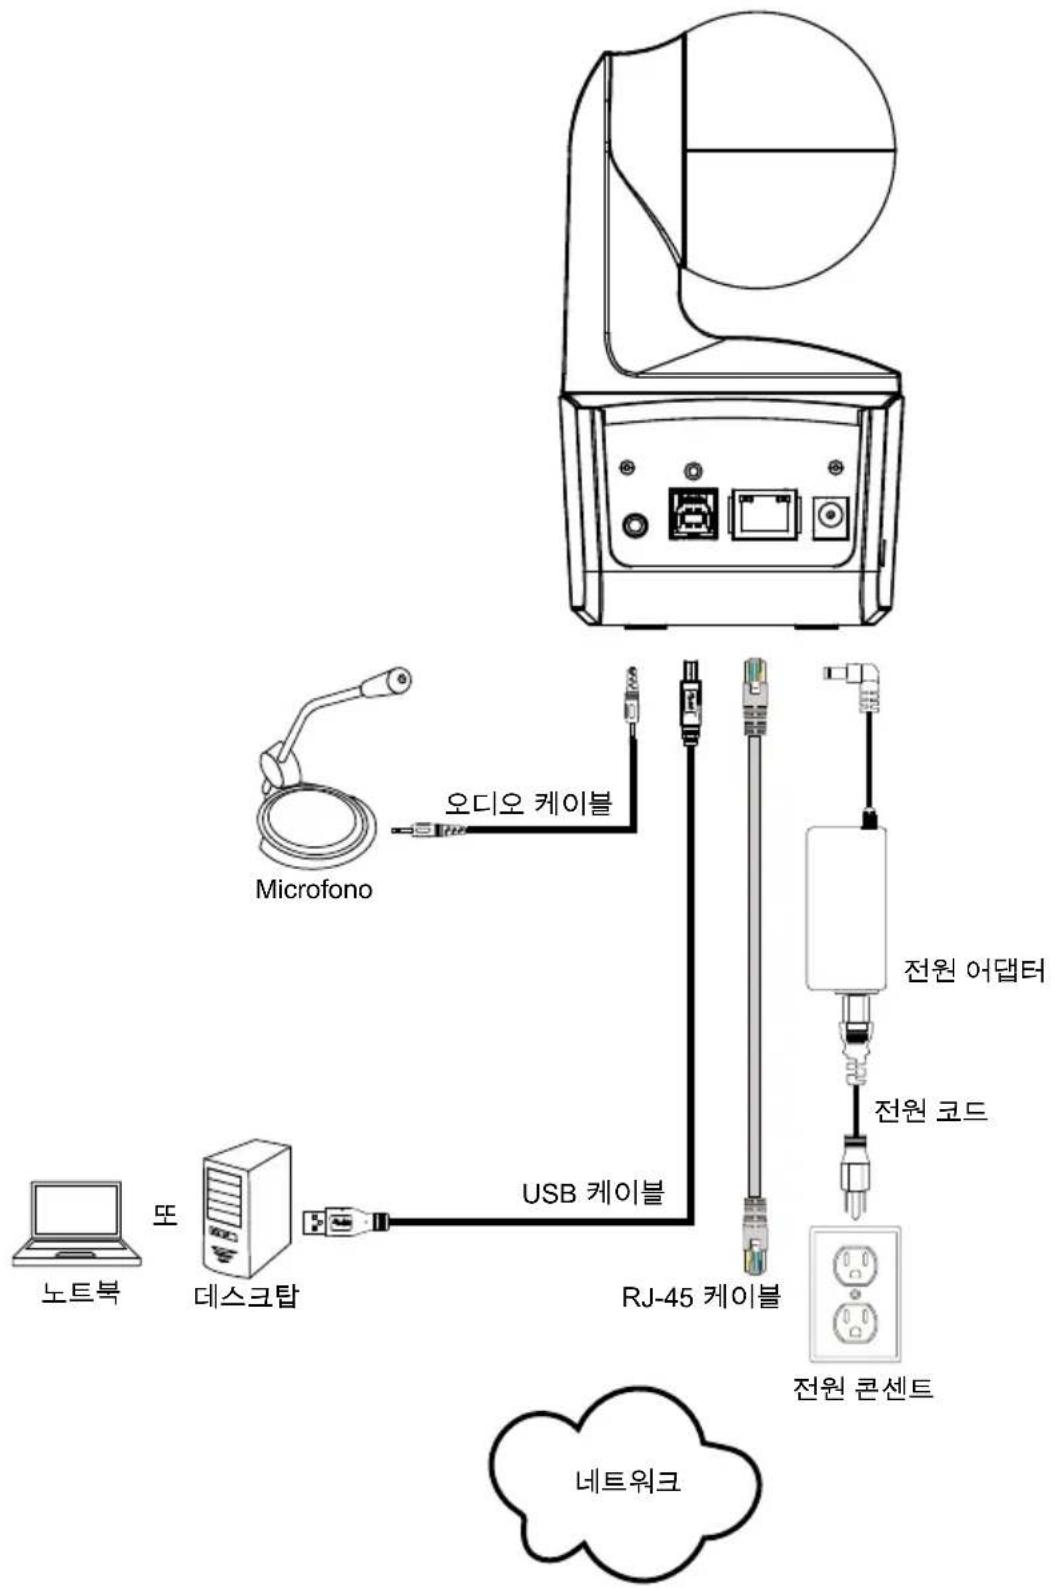
Audio Input Connection
Connect the audio device for audio receiving.
[Note]
- Line input level: 1Vrms (max)
- Mic input level: 50mVrms (max); Supplied voltage: 3.3V
- Because video conferencing software such as Google Hangouts (Windows), Skype (Mac), or Teams (Windows and Mac) can automatically adjust volume, the user might experience randomly unstable volume while using the camera.
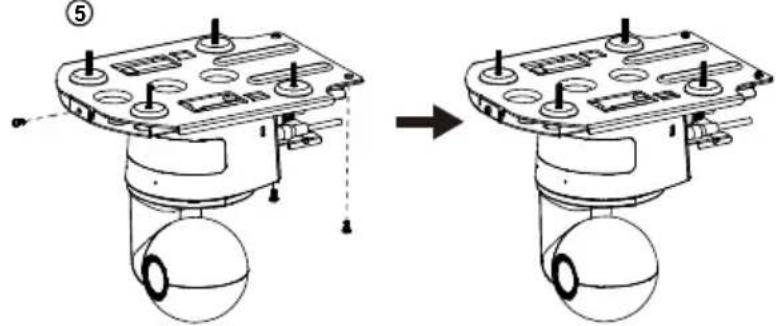
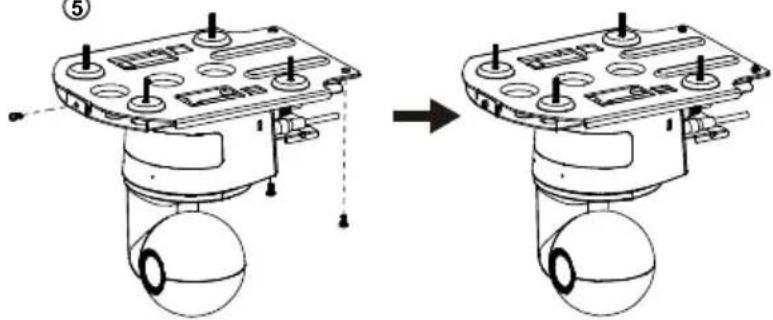
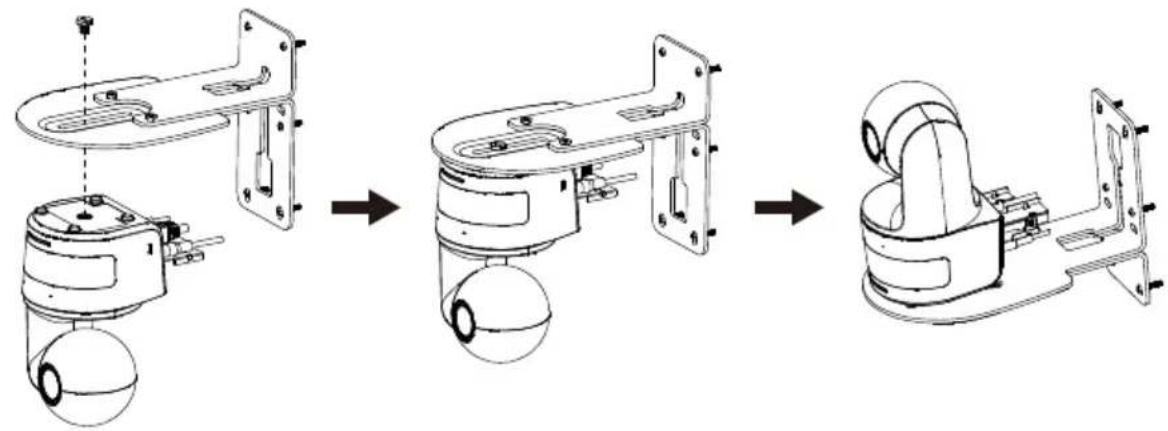
Ceiling Mount Installation (Optional)
- Use two M2 x 4mm screws (in the DL camera package) to secure the cable fixing plate (in the DL camera package) to the camera. Plug in cables. Use 3 cable ties (in the DL camera package) to secure the cables and cable fixing plate.
- Use four M4 (L≥10mm) screws (not supplied) to secure the mount bracket on the ceiling.
- Use one 1/4"-20, L=7.5mm screw (in the ceiling mount kit) to install another mount bracket on the camera.
- Slide the mount bracket with the camera into the mount bracket secured on the ceiling.
- Use three M3 x 6mm screws (in the ceiling mount kit) to secure the camera.
①
②

natural_image
Diagram of a device casing with multiple circular components and four downward-pointing arrows indicating force or adjustment (no text or symbols)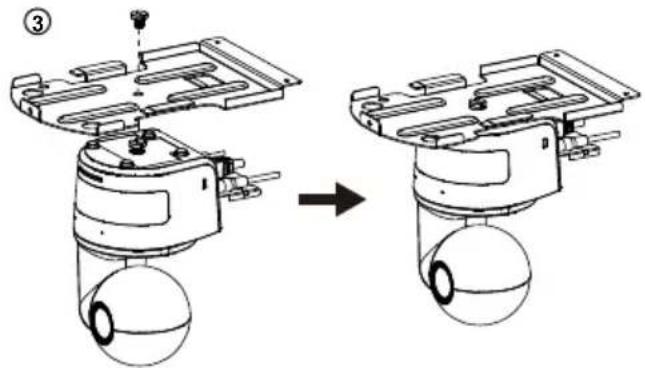
natural_image
Diagram showing a mechanical assembly before and after transformation, with no visible text or symbols.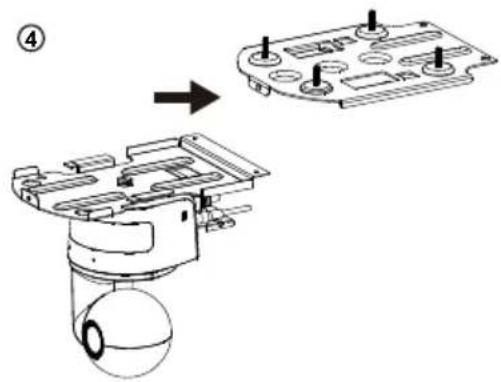
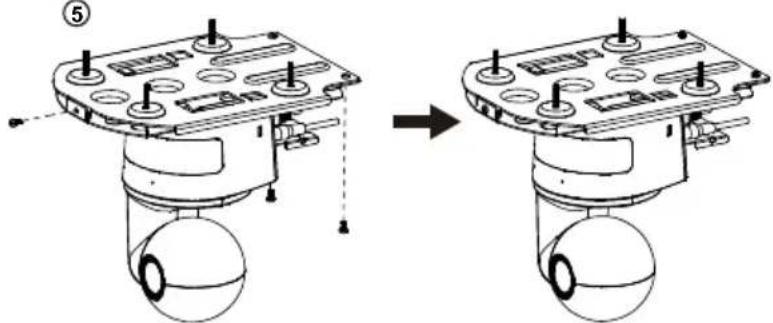
⑤

natural_image
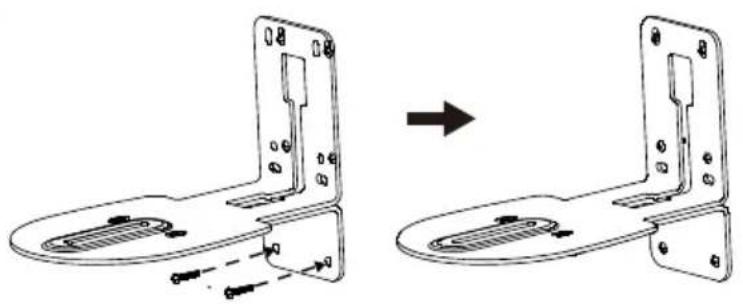
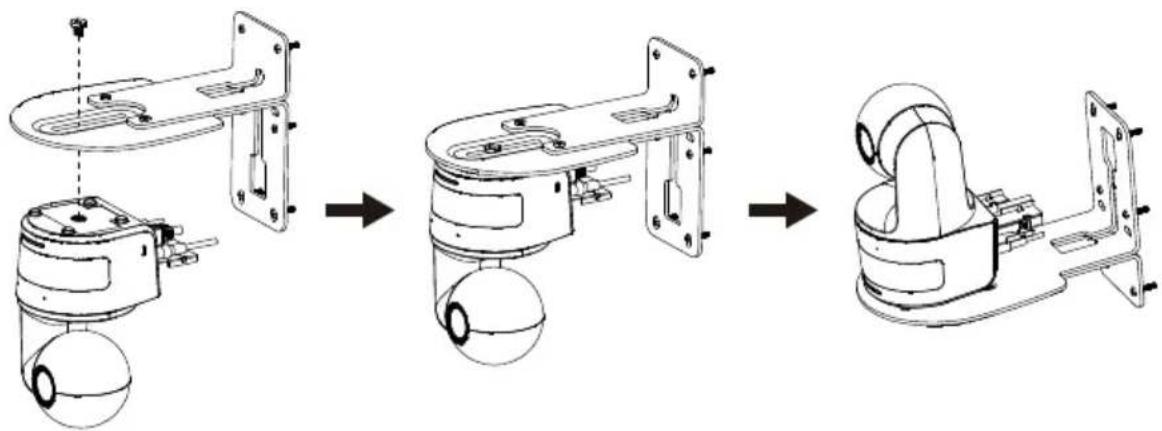
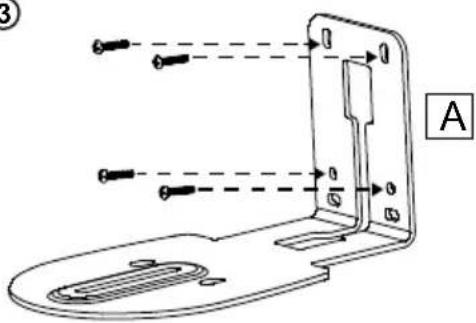
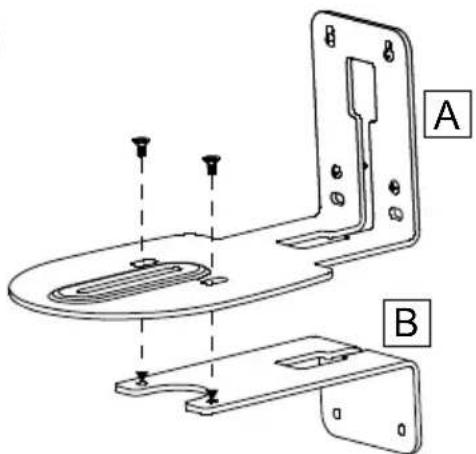
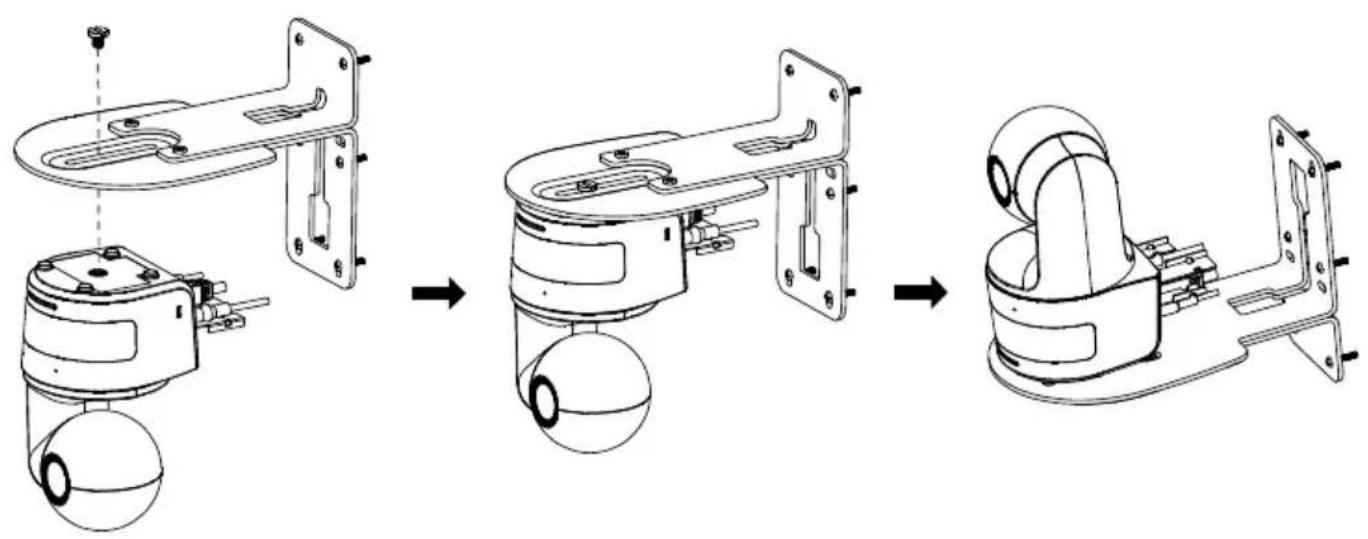
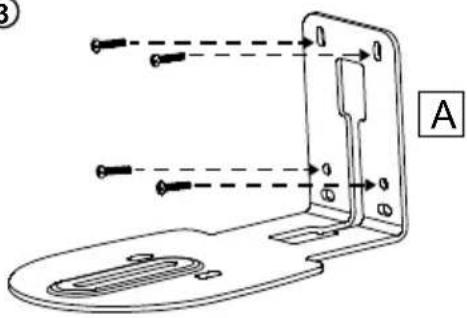
Diagram showing two mechanical assembly states: one with a component mounted on a base, the other with a housing and a sphere (no text or symbols present)Wall Mount Installation (Optional)
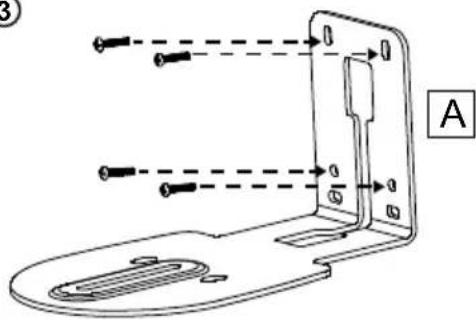
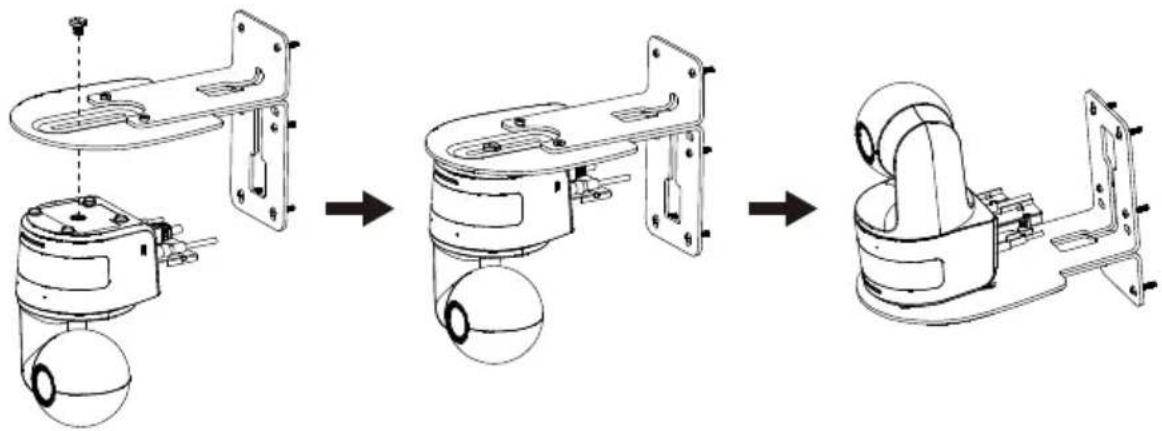
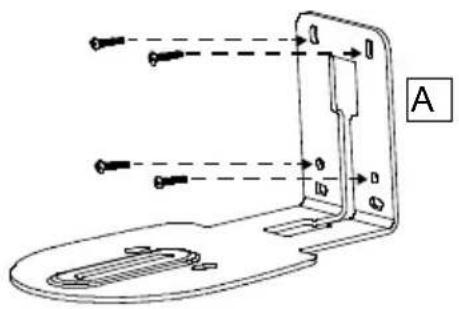
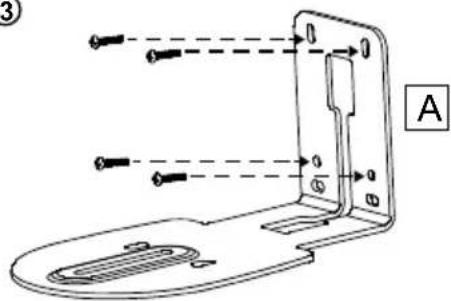
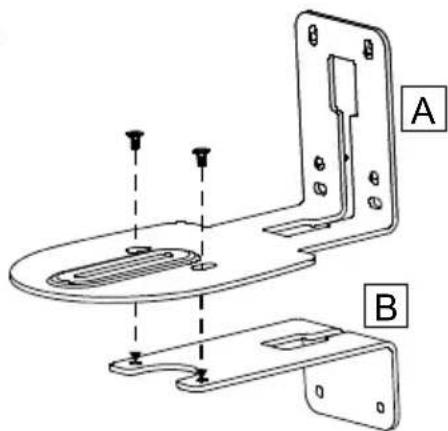
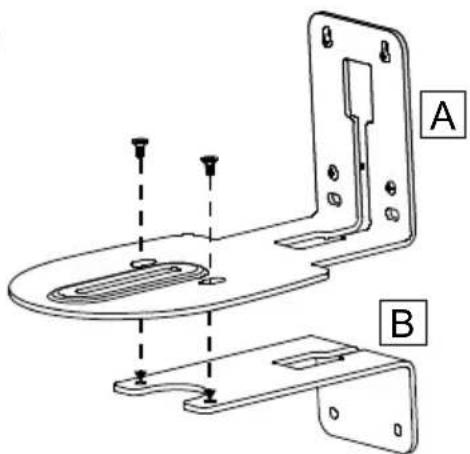
- Use two M2 x 4mm screws (in the DL camera package) to secure the cable fixing plate (in the DL camera package) to the camera. Plug in cables. Use 3 cable ties (in the DL camera package) to secure the cables and cable fixing plate.
- Use the drilling paper included in the package to drill the holes in the wall where the user wants to mount the camera.
- Use the screws specified below (not included) to secure the L-mount bracket onto the wall.
[Note] For cement wall: M4 x 20mm self-tapping screws (x4) + plastic conical anchor
For wooden wall: M4 x 20mm self-tapping screws (x4)
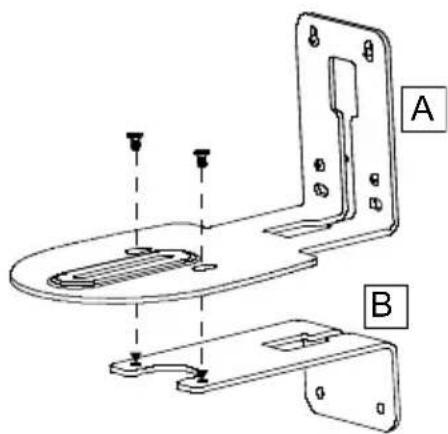
- Then, assemble the L-mount brackets + with 2 screws (M4 x 8mm, included in the package).
①
flowchart
graph LR
    A["Antenna with spherical sensor"] --> B["Internal component with circular sensor"]
    B --> C["Internal structure with cylindrical components"]
②
![46.00[1.61] Ø5.50[Ø0.22] 51.00[2.01]](/content/2026/04/691264/images/e1eb88e2218b206f5a1456bff657fbef76f4be724c8a7d3cdf322448d5cce6c3.jpg)
③
④

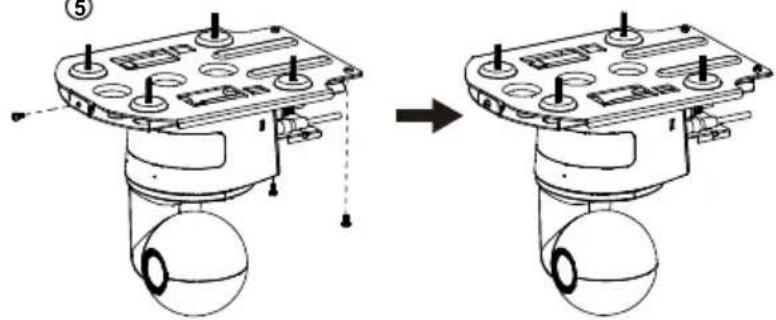
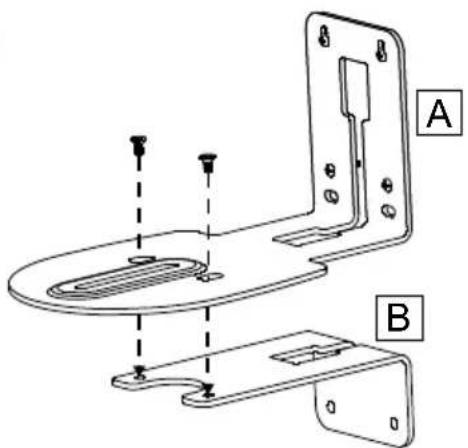
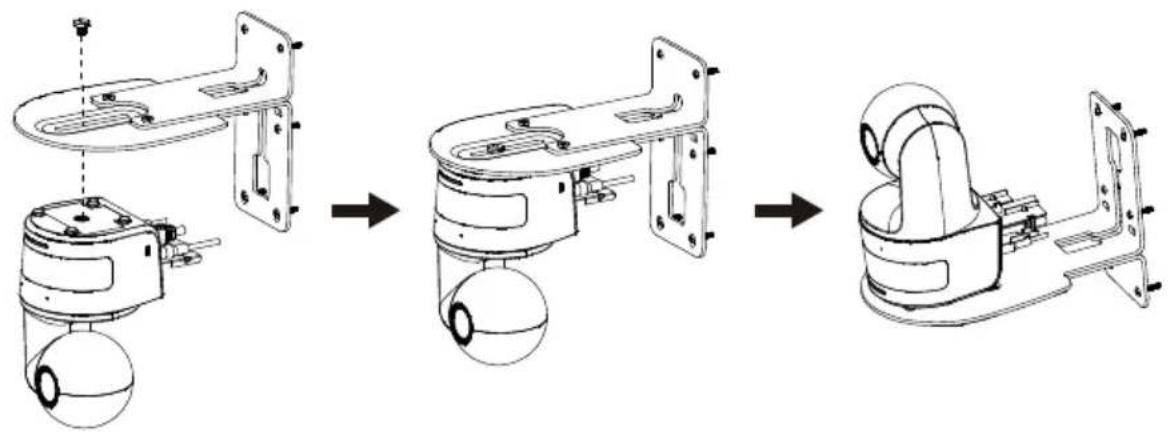
- After assembling the L-mount brackets, use the screws specified below (not included) to secure the lower part of L-mount brackets onto the wall.
[Note] For cement wall: M4 x 20mm self-tapping screws (x2) + plastic conical anchor For wooden wall: M4 x 20mm self-tapping screws (x2)
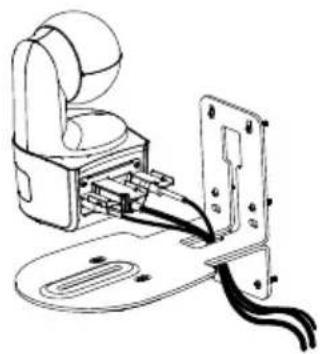
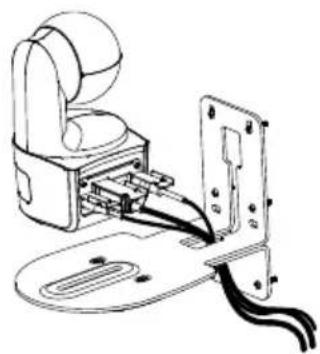
- Pass the cables through the hole on the L-mount brackets and connect the cables to their corresponding connection ports.
- Use the remaining screw (1/4"-20, L=7.5mm, included in the package) to secure the camera on the L-mount brackets.
⑤
natural_image
Technical line drawing of a mechanical bracket assembly before and after modification (no text or symbols)⑥
natural_image
Technical line drawing of a mechanical device with wires and connectors (no text or symbols)⑦
natural_image
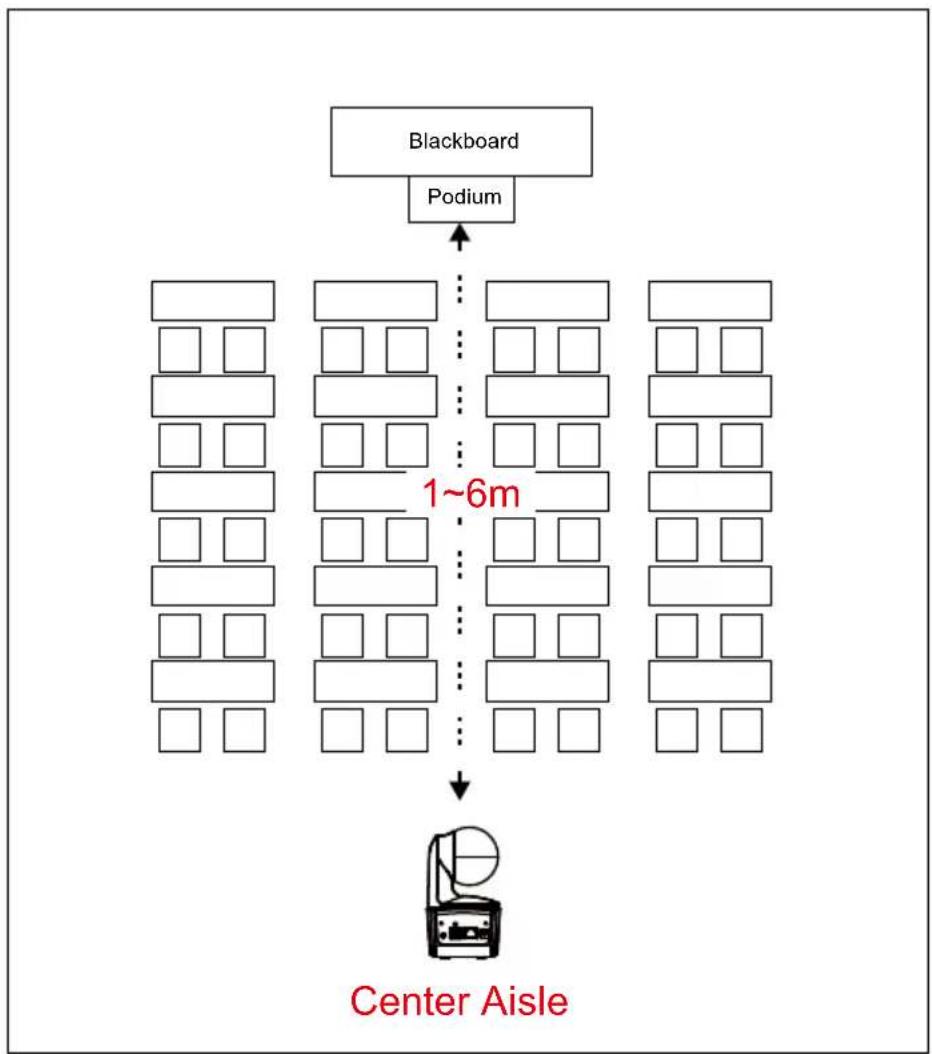
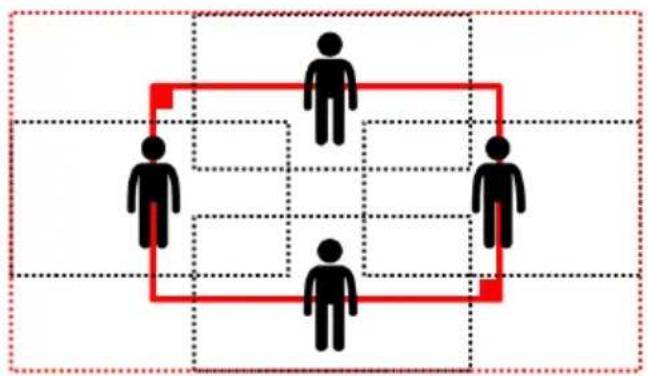
Technical line drawing of a mechanical device assembly (no text or symbols present)Tracking Setup Recommendations
- Distance range to podium: 1\~6m is suggested.
- Tracking distance for upper body: 1\~3m; tracking distance for full body: 1\~6m.
• Suggested setup position: center aisle of the classroom
• Installation height range (from floor): 2\~3m; 2.4 m is suggested. - No human outline on poster/screen/monitor/TV in the background.
- No more than three people in a single camera view.
flowchart
graph TD
    A["Blackboard"] --> B["Podium"]
    B --> C["Center Aisle"]
    style A fill:#f9f,stroke:#333
    style B fill:#ccf,stroke:#333
    style C fill:#cfc,stroke:#333
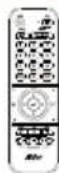
Remote Control
The remote control requires two "AAA" size batteries. Make sure batteries are installed properly before use.
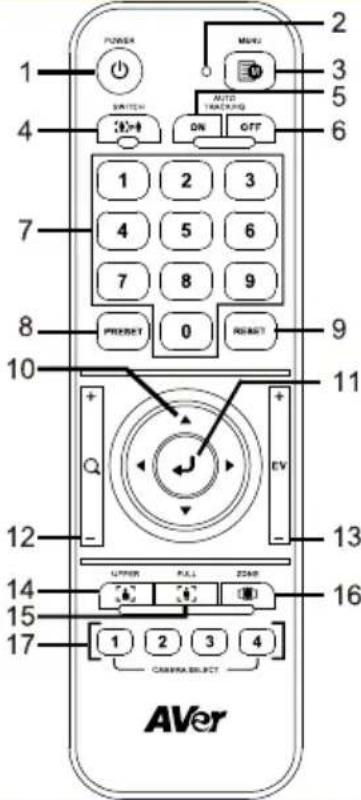 | Name | Function | |
| (1) Power | Turn the unit on/standby/privacy:■ Press once to turn on privacy mode. Press again to turn off privacy mode.■ Long press for 3 seconds to turn on standby mode. Short press again to turn off standby mode. | ||
| (2) Remote Control LED | It will be on when pressing other buttons. | ||
| (3) Menu | Open and exit the OSD menu.[Note] DL10 does not support OSD menu. | ||
| (4) Switch | Switch from presenter to another presenter. | ||
| (5) Auto Tracking On | Turn on auto tracking. | ||
| (6) Auto Tracking Off | Turn off auto tracking. | ||
| (7) Number buttons | Use for setting the preset position 0~9. | ||
| (8) Preset | To set a preset position:Press “Preset” and then press “Number button (0~9)”.Remote control LED and camera button LED will not light when pressing Preset button alone. | ||
| (9) Reset | To cancel a pre-configured preset position:Press “Reset” and then press “Number button (0~9)”.Remote control LED and camera button LED will not light when pressing Reset button alone. | ||
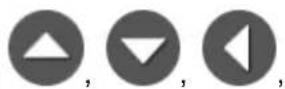
| (10) ▲,▼,◀, & ▶ | Pan and tilt the camera. Pan/Tilt speed by remote control is fixed. You may change pan/tilt speed by using web browser. For setting details of web browser, please refer to Set Up the Camera section. | ||
| (11) Enter | Use the Enter button to send the camera to the Home position. | ||
| (12) Zoom In/Out | Zoom in/out. Zoom in/out speed by remote control is fixed. You may change zoom in/out speed by using web browser. For setting details of web browser, please refer to Set Up the Camera section. | ||
| (13) EV +/- | EV level adjustment.*Press EV+ for three seconds to switch on RTMP.*Press EV- for three seconds to switch off RTMP. | ||
| (14) Upper Body | Tracking mode switches to Presenter Mode when pressing Upper Body button, and presenter's size on screen is upper body. | ||
| (15) Full Body | Tracking mode switches to Presenter Mode when also pressing Full Body button, and presenter's size on screen is full body.Upper Body focuses on the presenter from his/her knees to the top of the head whereas the Full Body captures the whole outline of the presenter from his/her feet to the top of the head. | ||
| (16) Zone | Tracking mode switches to Zone Mode when pressing Zone button. | ||
| (17) Camera Select | CAM1 to CAM4 buttons. Select a camera to operate. Once a camera is selected, the CAM button LED will be on when pressing other buttons. If only one AVer camera is connected, then the default is CAM1. | ||
Hot Key
Press certain button on remote control to perform hot key function.
| Button | Action | Function |
| 5 Press five times (55555) | Turn on DHCP. | |
| 8 | Press eight times (88888888) | Set DL camera's IP address as default IP (192.168.1.168). |
| 9 Press nine times (999999999) | Password reset mechanism:When the hot key takes effect, the password of entering Web UI will go back to the default “admin”. | |
Set Up the Camera
Set Up IP Address of the Camera
DL camera's default setting is DHCP on.
If there is DHCP environment
- Connect your camera to the internet and wait for your camera to get IP address.
- From your server, you can find your new camera IP address.
- If necessary, modify the IP address.
Or if you want to configure by yourself
- Use the remote control and press the button "8" eight times to switch to Static IP mode.
- The default IP for the camera would be set to 192.168.1.168.
- Set up your computer with static IP 192.168.1.x and then type in 192.168.1.168 in your web browser to access the camera.
Web Setup
Connect the camera from a remote site through the Internet.
Use the AVer IPCam Utility to Find the Camera
To find the IP address of your cameras, you can execute the IPCam Utility installer. Follow the below steps to find the IP address of the camera.
- Download the IPCam Utility from
Global: https://www.aver.com/download-center
USA: https://www.averusa.com/education/support
Europe: https://www.avereurope.com/download-center
- Run the IPCam Utility.
- Click Search, and all available devices will be listed on the screen.
- Select a camera from the list.
- The corresponding fields of IP address will display.
- Double-click on the IP address of the camera from the list to connect to the camera through the browser.
[Note] If IPCam utility cannot find the camera, please check following:
- Please make sure the Ethernet connection of camera is well connected.
- The camera and PC (IPCam utility) are in the same LAN segment.
![AVer IPCam Utility v2.7.1029.34 Network Device Realtek PCIe GbE Family Controller Search Login User ID Password Network Setting Date/Time Setting Maintenance Import/Export Config Search Result Select AI No. Status Progress Model Name Device Name FW version IPv4 Address MAC Address IPv6 A □ 1 Working DL30 DL30 7.0.0022.26 10.100.90.16:80 00:30:1b:ba:02:db [fe80: □ 2 Working DL10 DL10 0.0.1000.60 10.100.90.15:80 00:18:1a:6e:51:27 []:80 < Settings Device Name: Start IP Address: . End IP Address: . DHCP Subnet Mask: . Static IP Gateway: . *Auto search will start after settings changed! Primary DNS: . Don't start auto search this time! Secondary DNS: . Apply](/content/2026/04/691264/images/656edd6e0229b3229159ad495e1068e30208dc046d1e4e83b67c607bf9e8c40a.jpg)
Make a Connection to the Camera via Browser
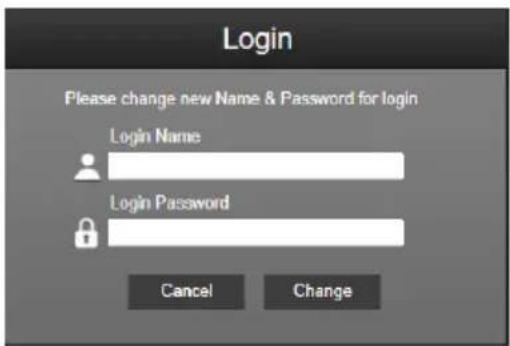
Open the browser and enter the IP address of the camera. The PC/laptop requires an internet access. After connecting to the camera, enter the user account and password (default is admin/admin) to log in Web.
[Note]
■ User will be asked to set a new account and password after first login. Please use the new account and password to log in later.
If you forget the login account or password that you previously set for the webpage, you may press number 9 nine times (999999999) on your remote control, then the camera webpage login account and password will go back to the default "admin".
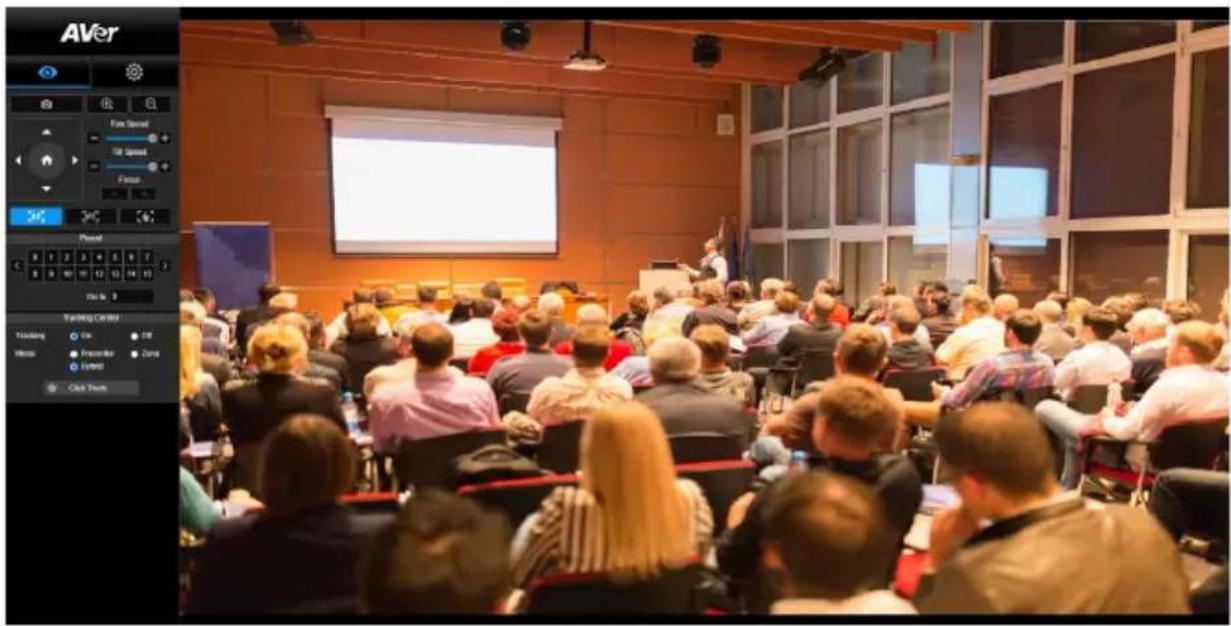
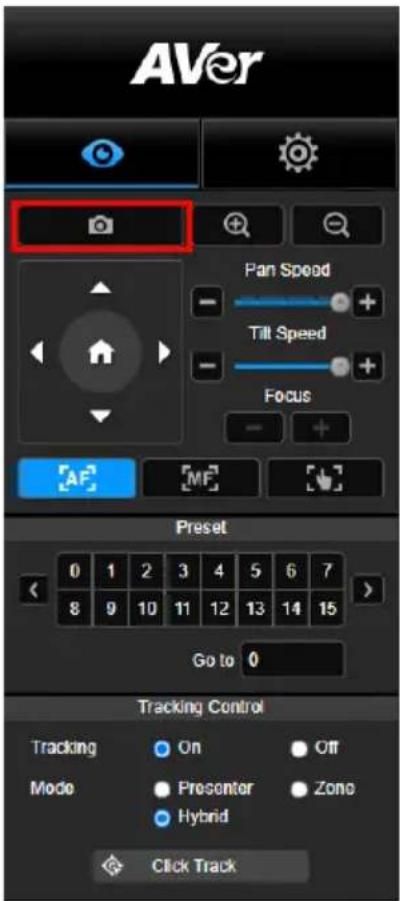
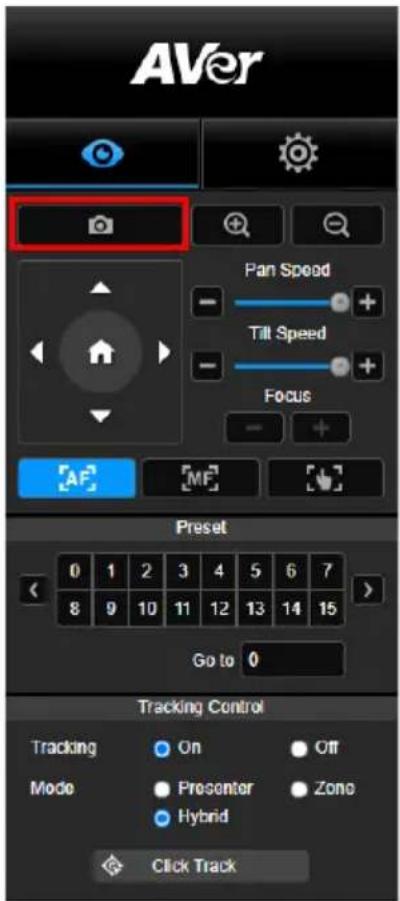
Live View
In live view, the user can make a snapshot, set up camera control (zoom in/out, camera direction control, pan/tilt speed, focus), view preset, and tracking control (on, off, tracking mode).

Snapshot

Select the camera button to make a snapshot and download the file to local storage.
Pan-Tilt-Zoom Control
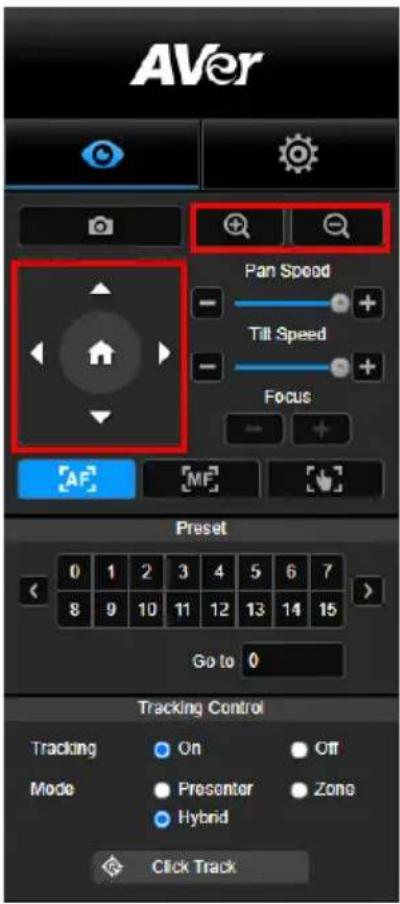
To operate the PTZ Camera motion, use

Manual Pan-Tilt Speed Adjustment
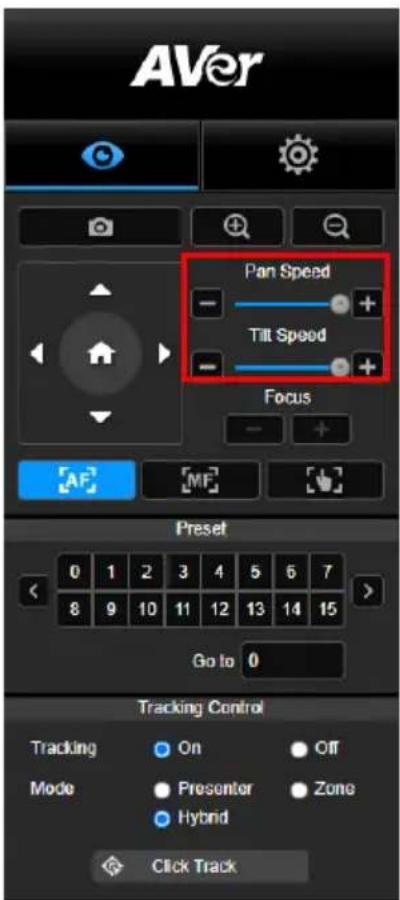
Adjust the speed of manual Pan-Tilt.
[Note] The max manual pan speed is 100^/sec . The max manual tilt speed is 100^/sec .
Focus
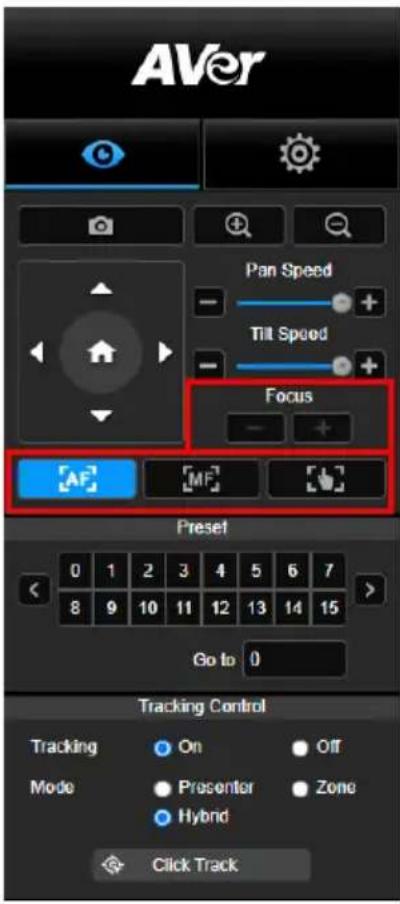
Switch to auto (AF) or manual (MF) focus. The manual focus use "+" and "-" to adjust focus. Select "+" to adjust focus to the far end and focusing on a far subject; select "-" to adjust focus to near end and focusing on a near subject.
One push focus: By clicking the button to adjust Lens focus automatically once.
Preset Position
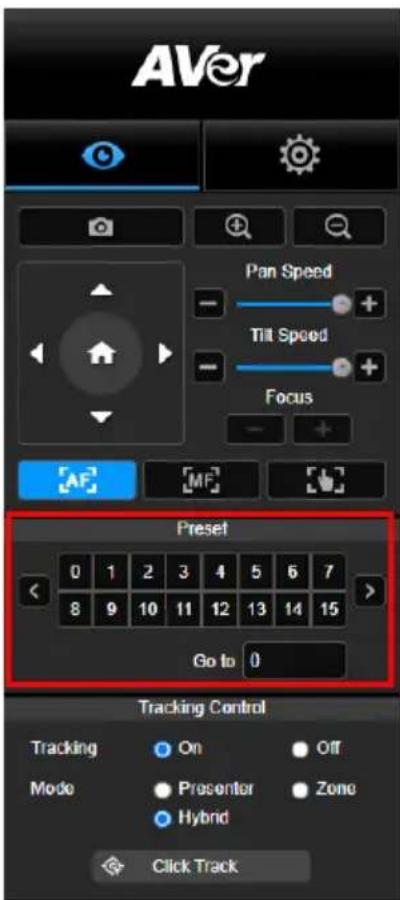
Select the number to view preset positions. User can also enter preset position number (0\~255) in "Go to" column directly for a quickly calling section.
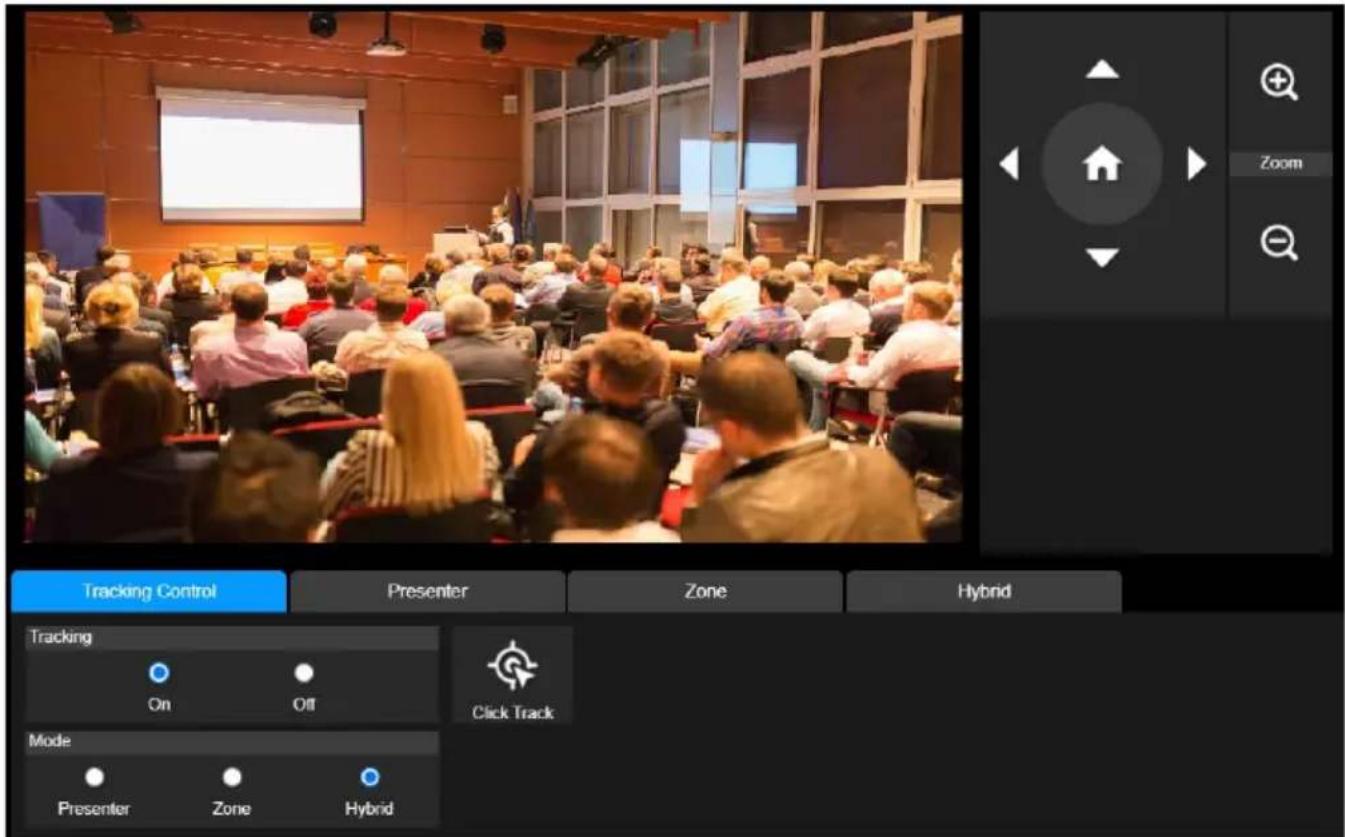
Tracking Control
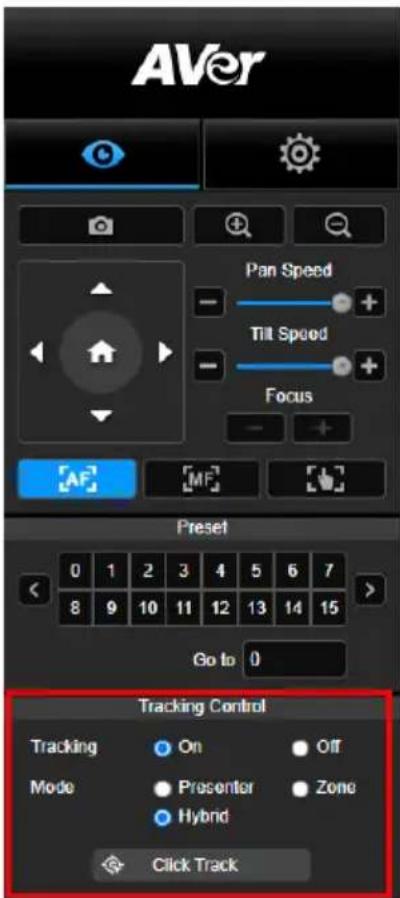
Enable/disable tracking function, select tracking mode, and operate one-click tracking function.
■ Tracking mode (refer to Tracking Settings section for setup)
➢ Presenter: Camera will start tracking when object enters the tracking point.
[Note] Tracking point under presenter mode: default set is preset 1. When preset 1 is not set, tracking point is home position.
Zone: Camera will start tracking when object is moving between the preset tracking block area.
Hybrid: With the advantages of both the Presenter Mode and Zone Mode, the camera tracks and captures the presenter's movement. As the presenter enters the previously configured preset point zone, the camera steers to focus on the content of the zone, such as the whiteboard and the projector screen.
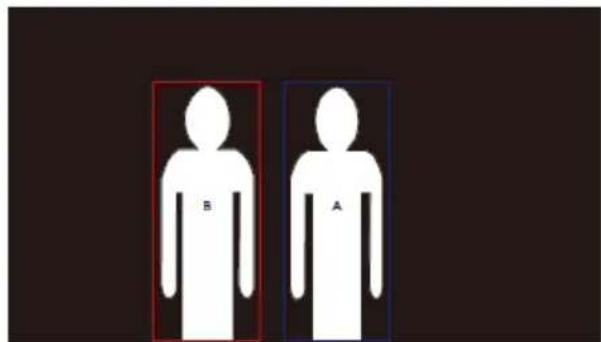
- Click Track: This function allows user to change tracking object while auto tracking.
- Select Click Track button. A red frame is targeted on the tracking object and blue frames are targeted on other objects on the live screen.
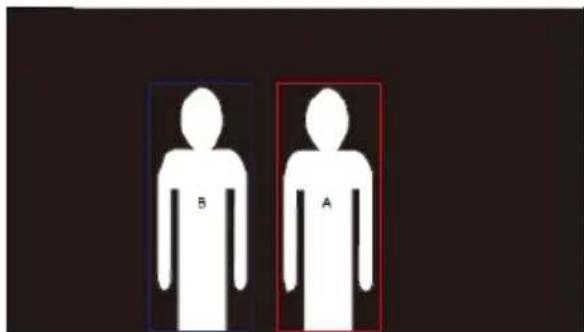
- To select a new target, just simply click the object on the live screen.
Settings
Tracking Settings
Enable/disable tracking function, set up tracking mode, operate one-click tracking function and pan/tilt/zoom the camera.
[Note] Tracking will be off when activating pan/tilt/zoom or go to preset point.
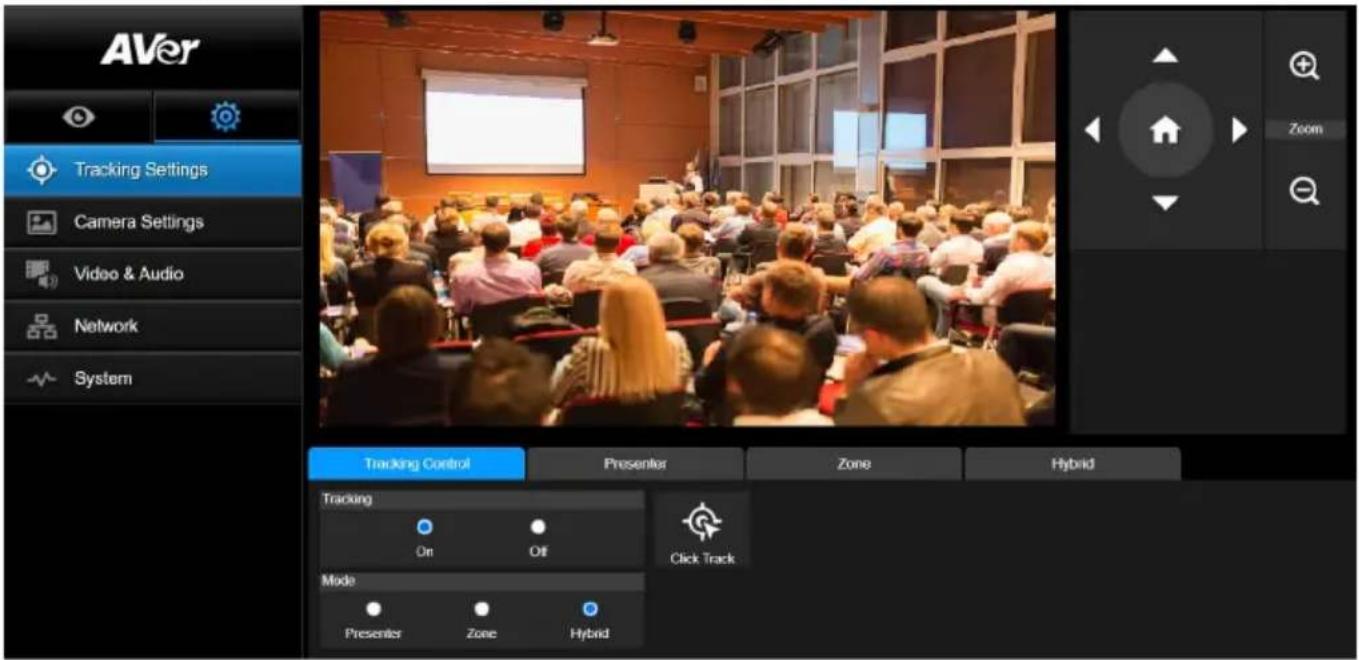
Tracking Control
Enable/disable tracking function, select tracking mode, operate one-click tracking function (refer to Tracking Control section), and pan/tilt/zoom the camera.
Presenter
Select the "Presenter" tab in Tracking Settings interface.
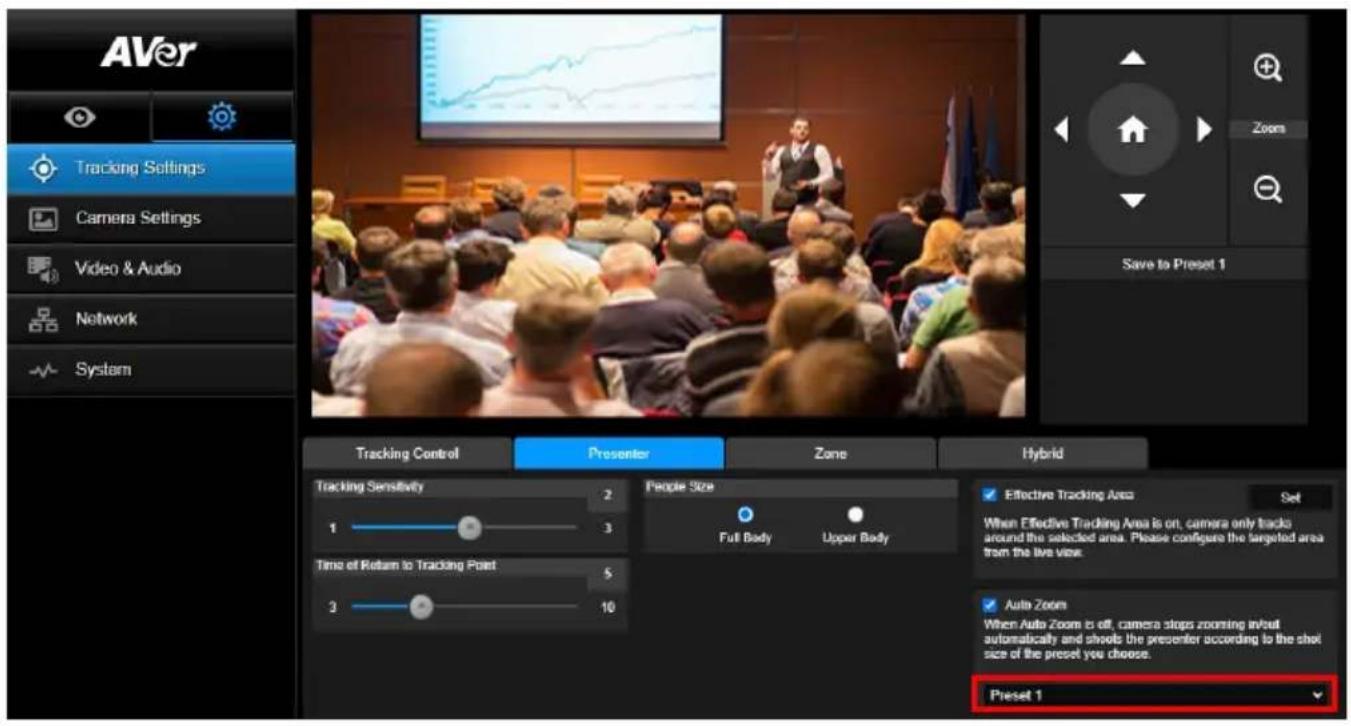
Camera will start tracking when object enters the tracking point.
- Use


o adjust the camera to tracking point.
- Then, select Save to Preset 1 to save the tracking point.
- Tracking Sensitivity: sets the sensitive level of tracking. Move bar to set the value. The current value is displayed at upper right corner.
- Time of Return to Tracking Point: sets the idle time for camera return to tracking point. Move bar to set the value. The current value is displayed at upper right corner.
- People Size: selects the people in full or upper body while tracking.
[Note] Tracking point under presenter mode: default set is preset 1. When preset 1 is not set, tracking point is home position.
- Effective Tracking Area: When Effective Tracking Area function is on, camera only tracks around the selected area. Check the box to turn on the Effective Tracking Area function then click Set to configure the targeted area in the live view. Move the upper left corner and the lower right corner of the red solid frame to define the targeted area.
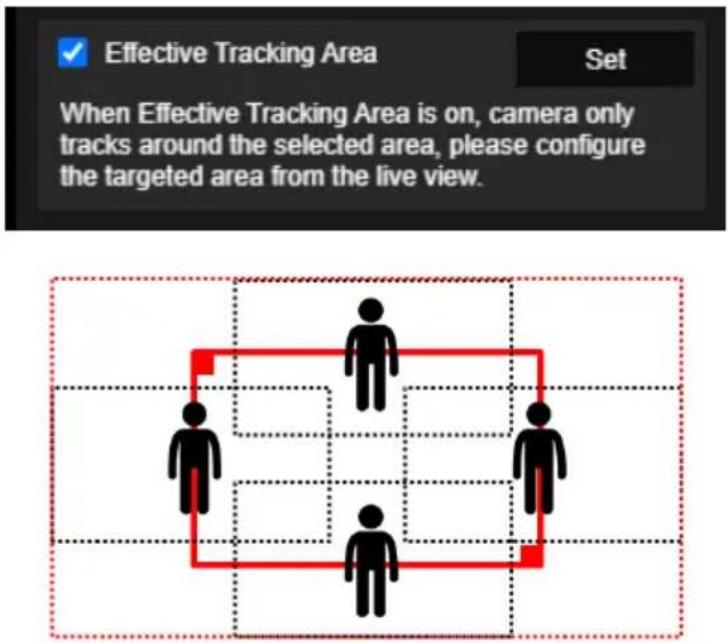
[Note] The position of the red solid frame corresponds to the central position of the presenter. The black dotted frames represent the tracking areas for different positions of the presenter. Therefore, the red dotted frame is the actual effective tracking area of the red solid frame.
- Auto Zoom: When Auto Zoom is off, camera stops zooming in/out automatically and shoots the presenter according to the shot size of the Preset you choose. Choose a Preset point in the drop-down list.
Zone
Select the "Zone" tab in Tracking Settings interface.
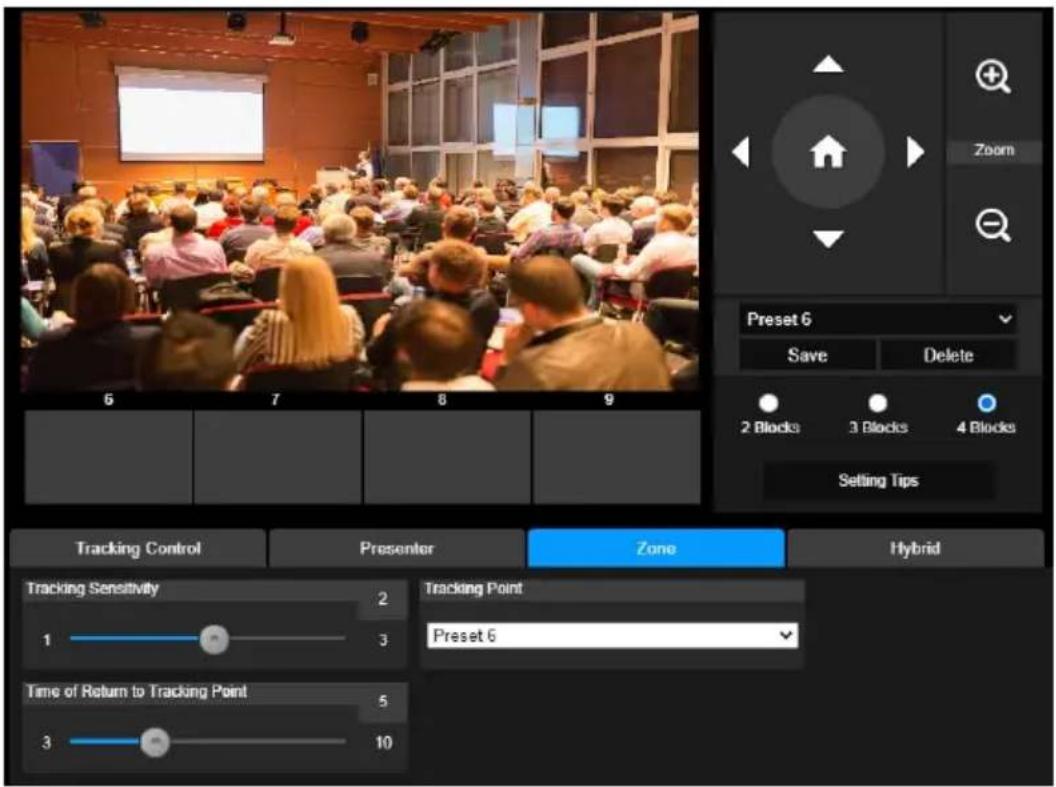
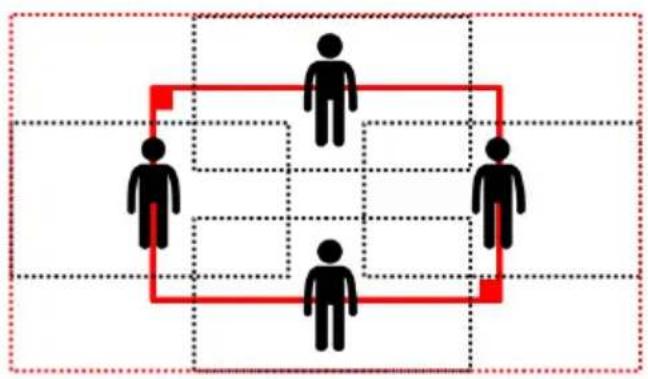
Set up 2 to 4 block areas for the camera. Each block is corresponding to one preset position. Camera will switch between preset positions when the presenter enters different blocks.
- Select the "Number of block" (2, 3, or 4).
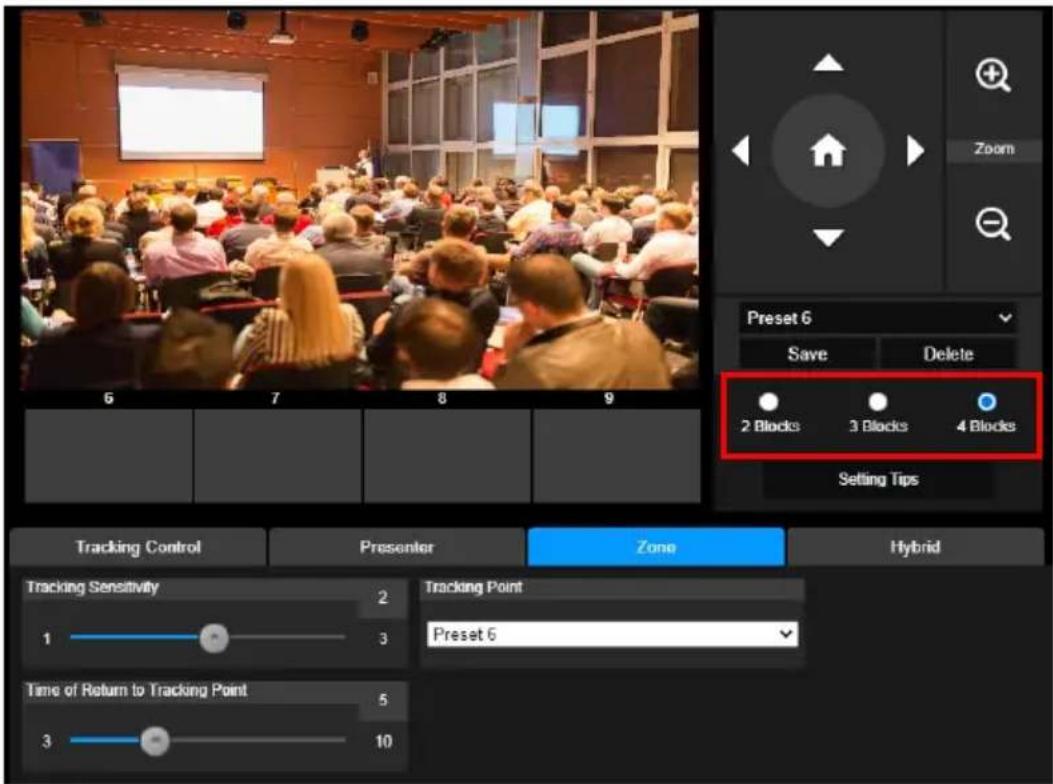
- Select the block and set the preset positions in order (preset 6 to preset 9). Use


to move the camera to desired position and select "Save" to save the preset position. And, a snapshot of the preset image will show at corresponding image display box. Repeat the steps to set another preset position.
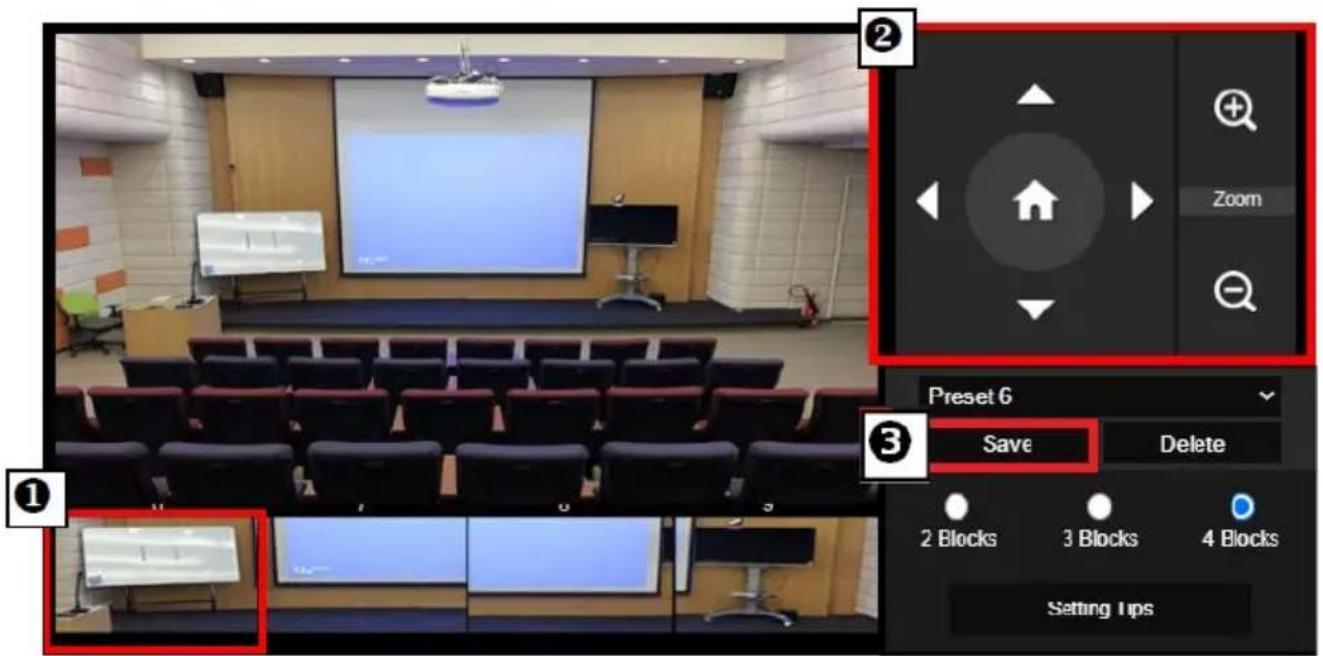
[Notes]
■ Set each preset overlapping with the next one (one man width).
■ Set the preset view to clearly see at least 60% upper body of the presenter to ensure tracking accuracy. Make sure no other human-outline poster/TV/monitor in the background.
- Tracking Sensitivity: sets the sensitive level of tracking. Move bar to set the value. The current value is displayed at upper right corner.
- Time of Return to Tracking Point: sets the idle time for camera return to tracking point. Move bar to set the value. The current value is displayed at upper right corner.
Hybrid
Under Tracking Settings, select Hybrid.
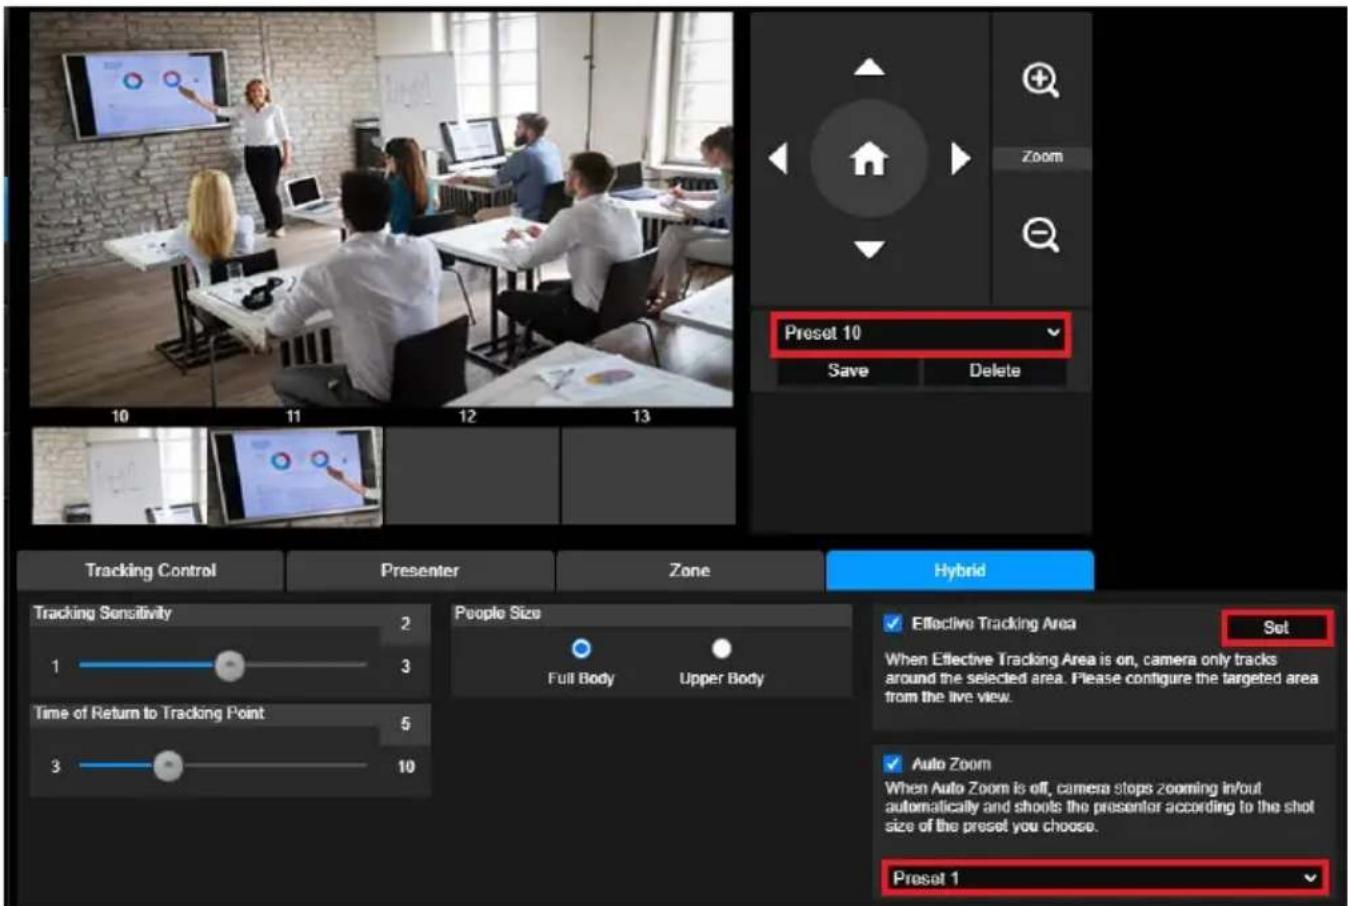
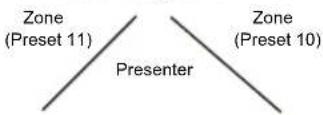
Hybrid benefits you with the advantages of both the Presenter Mode and Zone Mode. Under Hybrid Mode, the camera tracks and captures the presenter's movement. As the presenter enters the previously configured preset point zone, the camera steers to focus on the content shown on the teaching gadget in the zone, such as the whiteboard and the projector screen.
Firstly, configure Preset 10-13 to define the preset point zone.
-
Select Preset 10 from the drop-down menu.
-
Use ▲, ▼, ◀, ▶, + and - to adjust the camera to the desired angle.
- Select Save to save Preset 10.
- Select Delete to remove Preset 10. You can proceed to reconfigure Preset 10.
- Repeat the steps above to configure Preset 11-13. Leave some space between Preset 10 to 13, as each preset point zone is meant to center on the content of the teaching gadget, such as the whiteboard and the projector screen.

DL10 Tracking Camera
Secondly, determine how the camera tracks the presenter.
■ Tracking Sensitivity: sets the sensitivity level of tracking. Move bar to set the value. The current value is displayed at upper right corner.
Time of Return to Tracking Point: sets the idle time for camera return to tracking point. Move bar to set the value. The current value is displayed at upper right corner.
■ People Size: selects the people in full or upper body while tracking.
[Note] Tracking point under presenter mode: default set is preset 1. When preset 1 is not set, tracking point is home position.
Once the Effective Tracking Area is enabled, the camera tracks the presenter only when he/she is within the specified Effective Tracking Area. When configuring the Effective
Tracking Area, include Preset 10-13 in the Effective Tracking Area so that the camera tracks to focus on the content of the preset point zone. For instance, in the case where Preset 10 is excluded from the Effective Tracking Area, even if the presenter walks to the flat TV in Preset 10, the camera will not go to Preset 10 and will not show the content of the flat TV.
■ Auto Zoom: When auto zoom is off, the camera stops zooming in/out automatically and shoots the presenter according to the shot size of the Preset you choose. Choose a Preset point in the drop-down list.
Camera Settings
Camera Control
Select Settings ( ) > Camera Settings > Camera Control.
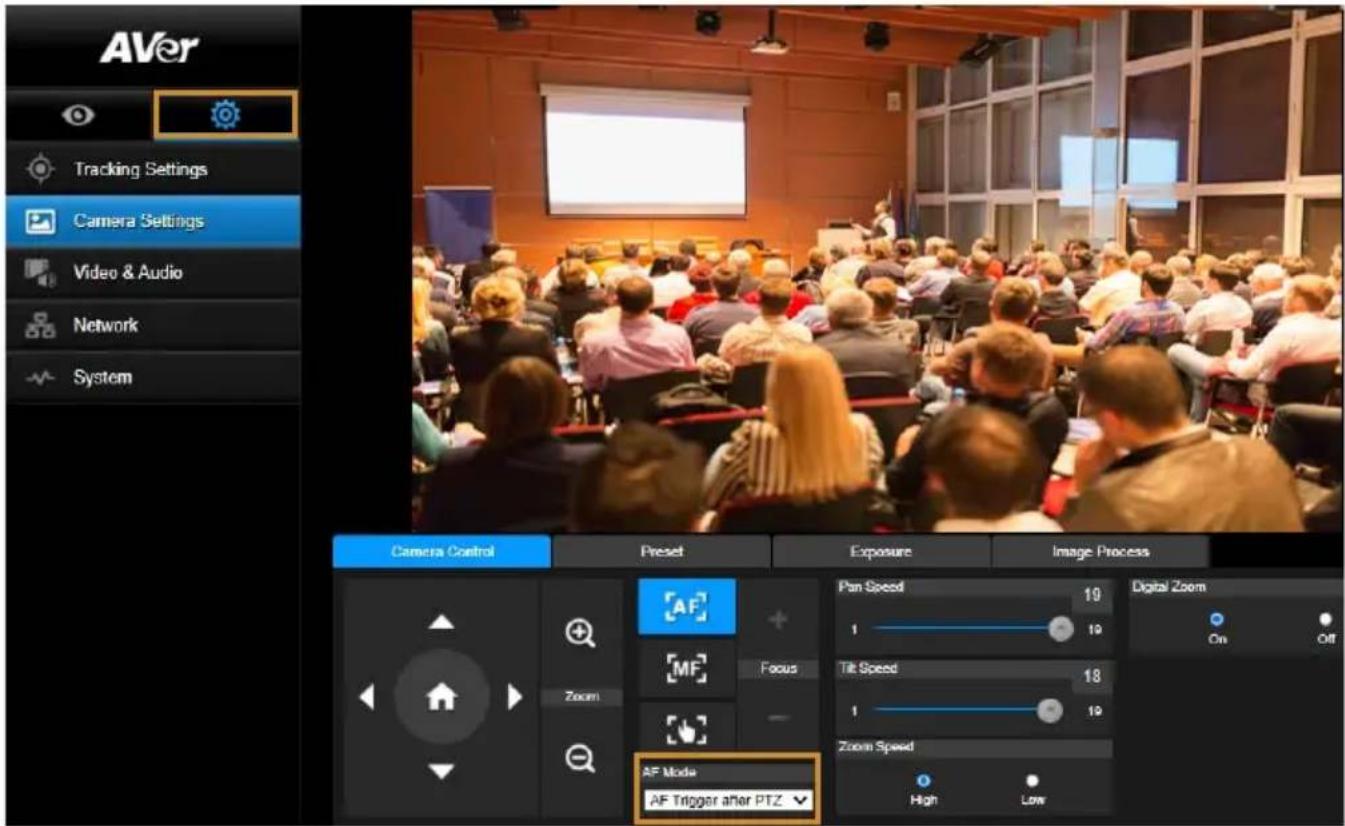
You can navigate the camera to the desired angle with its PTZ function.
Auto Focus Modes:
Select AF. Find the two modes below in the AF Mode drop-down list.
AF Trigger after PTZ (Default): After the camera pans, tilts, or zooms in/out, the auto focus will be triggered once. This mode is suitable for scenarios where the presenter uses gestures and body language but walks around only occasionally. The camera will auto focus on the presenter only once after he/she stops walking, thus stabilizing the footage.
Continuous AF: The camera automatically maintains its focus on the presenter whenever it detects any movement. This mode is widely used in cases where the presenter strolls around the room, for it can firmly keep focus on the presenter optimally.
■ Select MF to switch to the manual focus. Click the minus sign to focus near and plus sign to focus far.
One push focus: By clicking the button to adjust Lens focus automatically once.
You can adjust the Pan Speed of the camera with the slider.
You can adjust the Tilt Speed of the camera with the slider.
■ You can select High or Low for Zoom Speed.
■ You can select On or Off for Digital Zoom.
Preset
Set up preset position and view preset position.
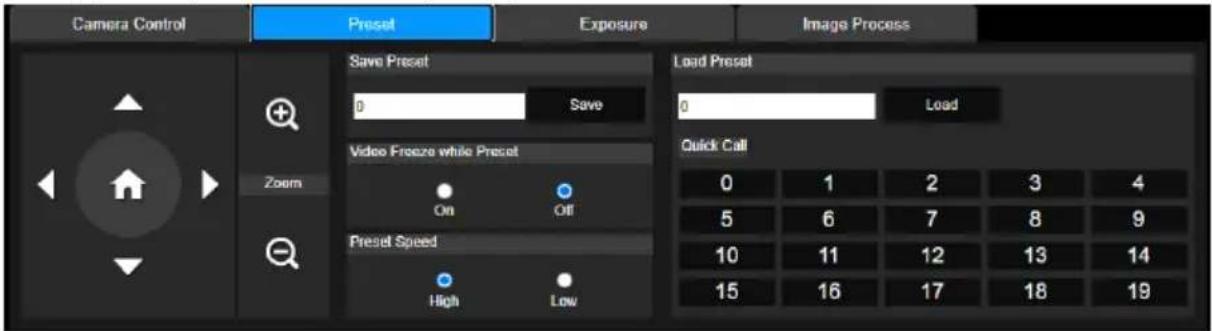
- Select the "Preset" tab in Camera Settings interface.
- Use △, ▽, ◀, and ▶ to adjust camera view position.
- Enter preset position number (0\~255) in Save Preset column and select "Save" to save the position.
- To call the preset position, enter a preset number (0\~255) in Load Preset column or select the preset number (0\~19) from Quick Call section.
- Video Freeze while Preset: turns on/off the screen view freeze function. When "Video Freeze while Preset" is on, during the preset operation, the screen will freeze until the operation is done.
- Preset Speed: selects the preset speed.
[Note] Preset point value includes: pan/tilt/zoom, exposure, shutter, ev, brightness, gain, slow shutter, white balance, focus, focus position, digital zoom, and R&B gain.
Exposure
Select the "Exposure" tab in camera settings interface.
Set up the exposure type - Full Auto or Manual and relevant settings.
[Note]: Iris Level configuration is not supported on DL10.
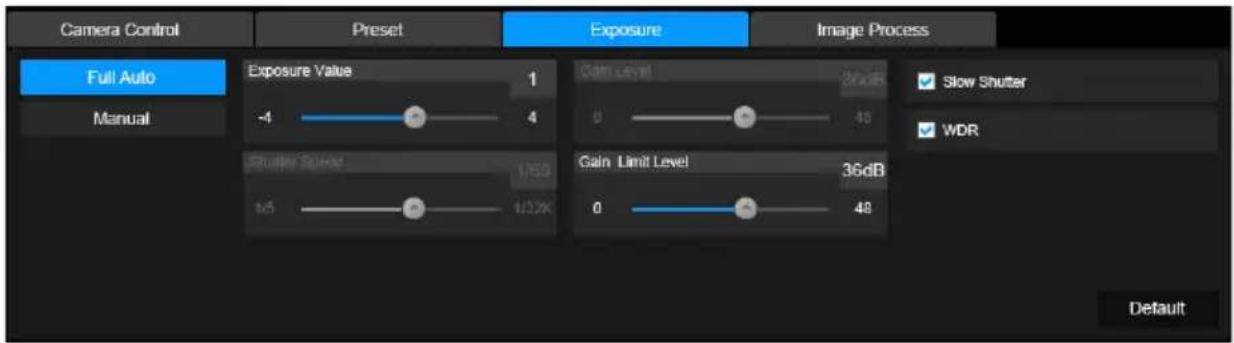
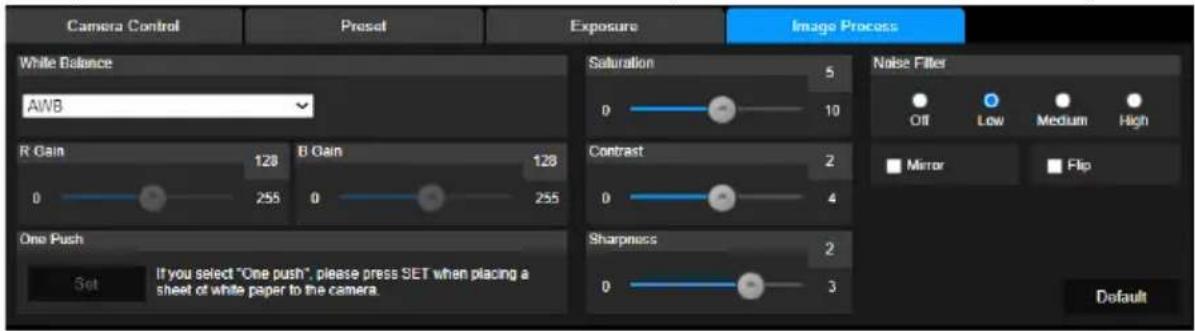
Image Process
Select the "Image Process" tab in camera settings interface.
Set up the white balance, saturation, contrast, sharpness, noise filter, mirror, and flip.
Video & Audio
The user can set up Power Frequency, Video Mode, Stream Video Output, Bitrate, Encoding Type, Framerate, I-VOP Interval (S), Rate Control, Noise Suppression, External Audio Input, Audio Volume, and Sampling Rate.
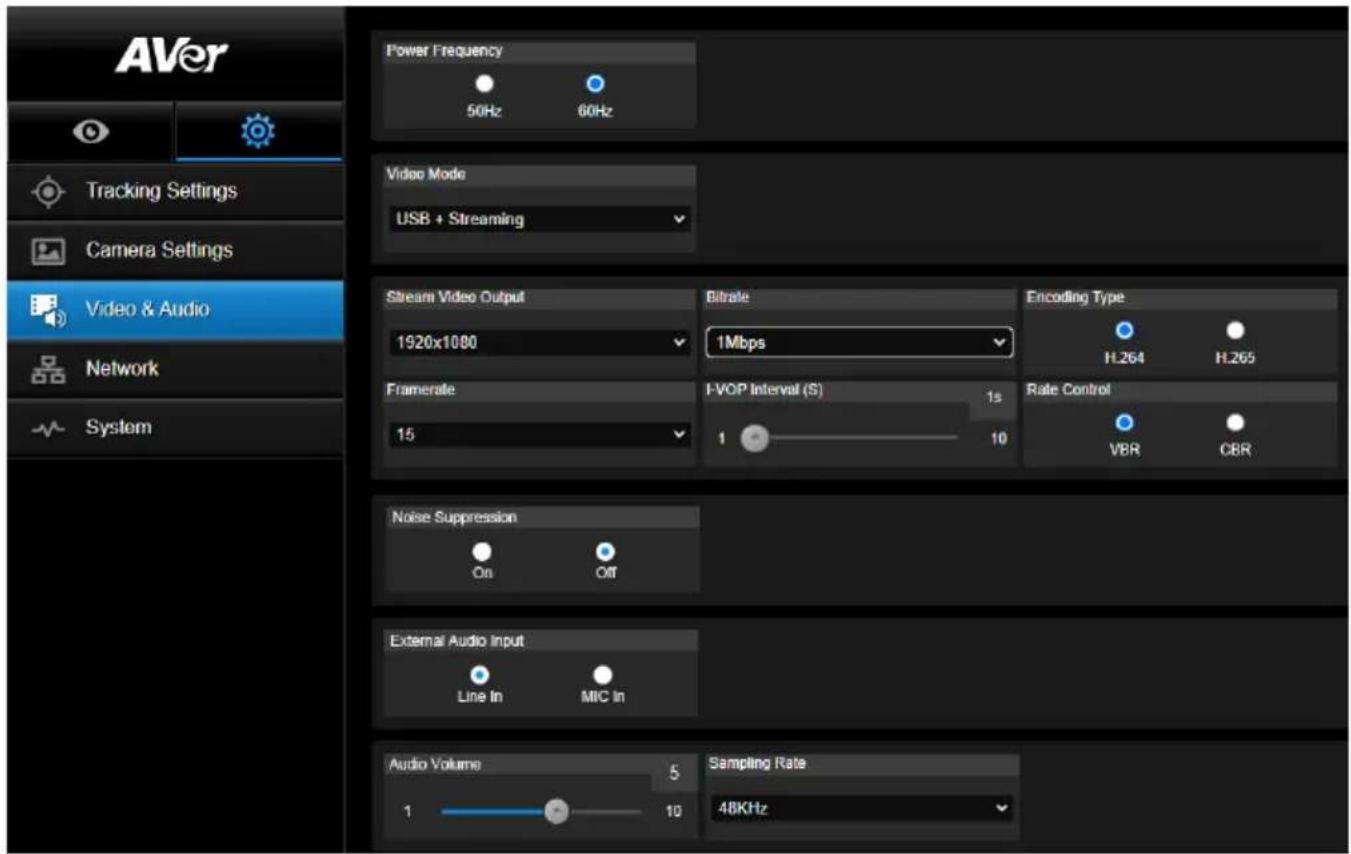
3 types of video modes can be selected and each one only supports single function,
Stream Only: Supports RTSP/RTMP only.
USB Only (factory default): Supports USB port output only; not compatible with AVer PTZ Management and PTZ Control Panel. Please switch to the other two modes if necessary.
USB + Streaming: Supports both RTSP/RTMP and USB output at the same time.
[Note] If Video mode is in "Stream Only", the frame rate is up to 60fps; in "USB + Streaming" mode, the frame rate is up to 30fps.
■ Noise Suppression: For the built-in microphone, you can enable Noise Suppression. The built-in microphone will then suppress all background sounds that isn't speech.
■ External Audio Input: You can select Line In or MIC In.
Network
Set up IP address of camera – DHCP or static IP, Hostname, Netmask, Gateway, and DNS. After setting, select "Confirm" to apply settings.
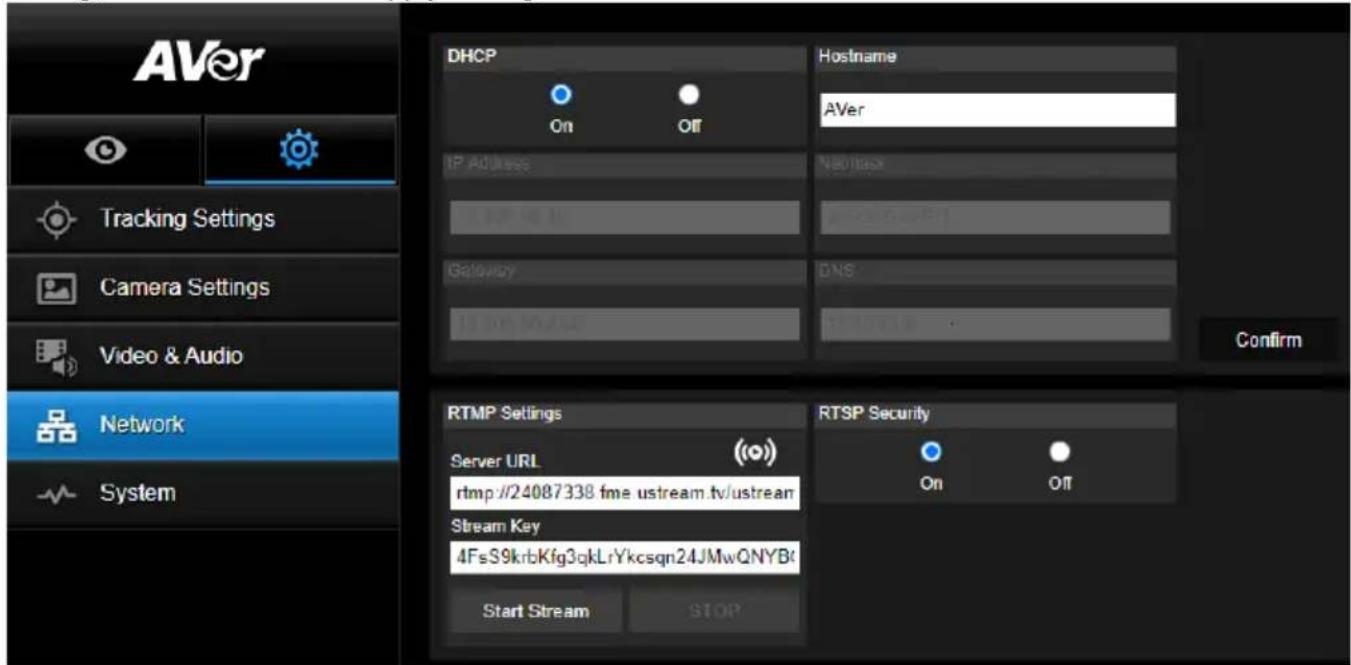
RTMP Settings
Follow below steps to set up RTMP:
- Get the RTMP server URL and stream key from the broadcasting platform and enter in "Server URL" and "Stream Key" column.
- Select "Start Stream" to begin uploading the live video of the camera to the broadcasting platform.
- Select "STOP" to stop uploading the video.
[Note] To get the RTMP server URL and stream key, please refer to the instruction of broadcasting. RTSP Security for user to set a security key number for streaming.
Connecting to DL10 via RTSP
On your media applications such as VLC, PotPlayer, or QuickTime, you can connect to DL10 by entering the following RTSP URL:
"rtsp://IP address of DL10/live_st1".
For Example: rtsp://192.168.1.168/live_st1
You can enable/disable RTSP Security function.
(When RTSP Security is On, the RTSP stream ID and Password will be synchronized with those of DL10 Web user interface.)
System
The system information of camera is displayed in this page, including Model Name, IP Address, Serial Number, MAC Address, and Firmware Version.
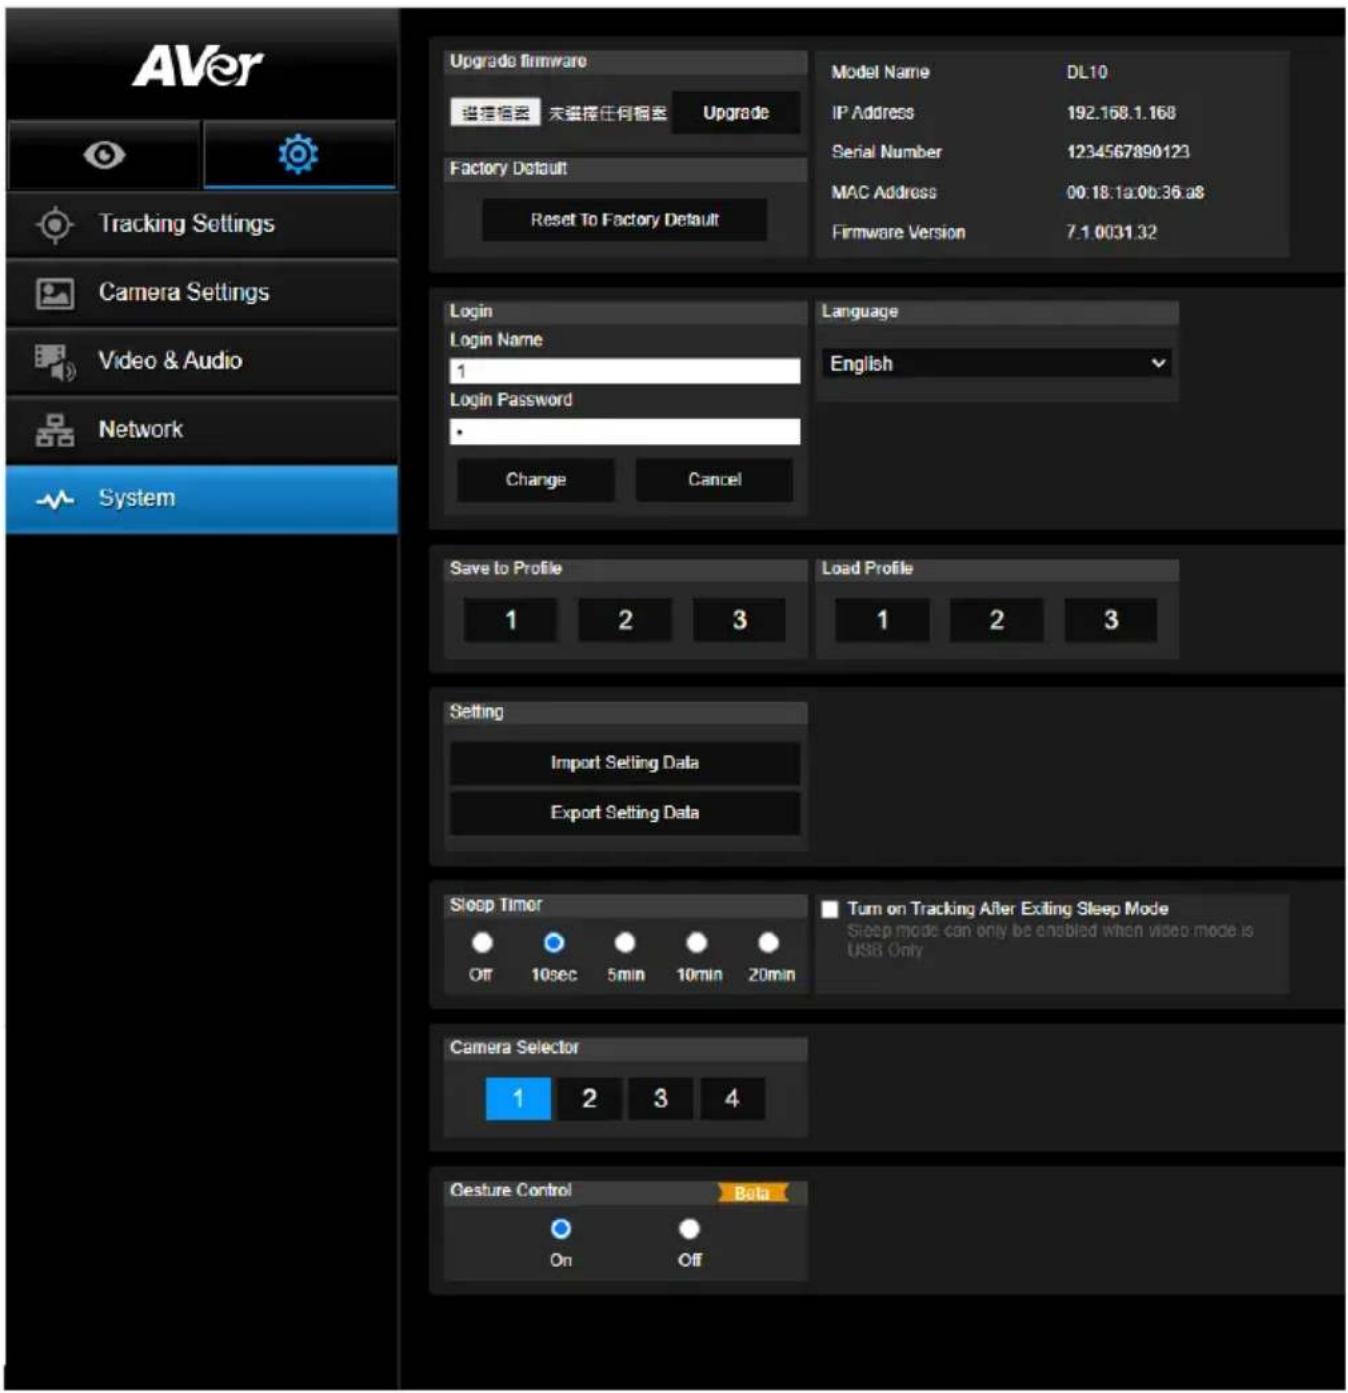
■ Upgrade firmware: follows below steps to upgrade the firmware.
- Download the newest firmware from:
Global: https://www.aver.com/download-center
USA: https://www.averusa.com/education/support
Europe: https://www.avereurope.com/download-center
- Connect to the camera through the browser.
- Select System > Upgrade firmware > Choose File.
- Select the firmware and select the "Upgrade" button.
- It takes about 5 minutes to finish update. After update, log in the web page again.
■ Factory Default: clears all values and resets the camera back to factory default values.
- Login: the default login name and password are admin/admin. To change the login name and password, enter the new login name and password and select the "Change" button.
■ Language: changes the Web UI language.
■ Save to Profile: saves up to 3 different settings including preset settings values, tracking mode, and tracking setting values of camera.
[Note] The settings of profiles will be cleared after factory reset.
- Load Profile: loads up to 3 different settings of camera. After selecting Load Profile, camera will go back to Home position.
■ Setting: You can select Import Setting Data or Export Setting Data.
[Note]
- Importing the setting data with this procedure will overwrite all current data include camera password, IP address, value saved in Profile, etc.
- Camera will restart once the setting data is complete.
■ Sleep Timer: sets the duration of the sleep timer. When there is no UVC connection and timer is up, the camera will enter the sleep mode. You can select Off to disable the sleep mode.
Check the box labeled Tracking After Exiting Sleep Mode, then camera tracking will be turned on automatically after exiting sleep mode regardless of previous tracking status.
[Note]: Before configuring the sleep mode, make sure you access Video & Audio > Video Mode and select USB Only.
■ Camera Selector: selects a camera to operate.
■ Gesture Control: By default, Gesture Control is Off. Click On and raise your hand up beside your face to show 0, 5, or 4 to control camera tracking. It is essential that the distance between you and the camera is within 5 meters and you gesture the number right beside your face for 3 to 4 seconds. Make sure your hand is clearly distinguished from a plain background with few objects and little furniture so that the camera can get a clear read of your hand.
![AVer DL10 - [Note] - 1](/content/2026/04/691264/images/3b672a6cfa13b2dc0fdf00d13743ce1e39eb319f1130cbd77f992e55ba5ba723.jpg)
natural_image
Simple line drawing of a human figure with raised fist (no text or symbols)Showing 0 turns off camera tracking.
![AVer DL10 - [Note] - 2](/content/2026/04/691264/images/cc898b3dad3d9dfaf9854cbe728cbf066ee66d92d9b592b1c2dcd4009cdcd8ba.jpg)
natural_image
Simple line drawing of a human hand waving, no text or symbols presentShowing 5 turns on camera tracking.
![AVer DL10 - [Note] - 3](/content/2026/04/691264/images/a5be342c4587054262f10f7c5dad0d4ce9b156f3e702706c1fda4b11687ab145.jpg)
natural_image
Simple line drawing of a human hand gesture (no text or symbols)Showing 4 switches the camera's shooting angle between the presenter's Full Body and Upper Body.
FAQ
- Can I pan, tilt, zoom, and set preset point when tracking is on?
●Yes, but tracking will be off when activating pan/tilt/zoom or go to preset point.
- Any value will be auto saved and shifted when going to the preset point?
●Yes, preset point value: PTZ, exposure, shutter, ev, brightness, gain, slow shutter, white balance, focus, focus position, digital zoom, R&B gain.
- What value will be saved in profile?
●Profile saving value: 1) preset setting values, 2) tracking mode, and 3) tracking setting values.
- How to switch from Zone mode to Presenter mode?
- You may switch to Presenter mode by simply pressing Upper or Full button on your remote control.
- Where can I configure the Hybrid Mode?
- You can access the camera Web user interface to configure the Hybrid Mode. The Hybrid Mode is not supported by the remote control.
- What should I pay attention to when configuring the Effective Tracking Area under the Hybrid Mode?
●Effective Tracking Area defines where the presenter is tracked. When configuring the Effective Tracking Area, include the preset point zone (Preset 10-13) as well.
- Why can't I access the camera live view?
Instead of the camera live view, you might be seeing one of the following 2 pictures:
This picture indicates that the camera is in the privacy mode and you can exit the privacy mode by lightly pressing the power button on the remote control.
This picture indicates that the camera is in the sleep mode and you can wake the camera up by reconnecting to the UVC image of the camera. Or, you can go to Video & Audio < Video Mode and select Stream Only or USB + Streaming to wake the camera up.
- How do I upgrade my firmware and what tools do you support?
●You will find the latest firmware version from the AVer official website:
- Headquarters: https://www.aver.com/download-ceter
- USA Branch office: https://www.averusa.com/education/support
- Europe Branch office: https://www.avereurope.com/download-center
You can launch and upgrade the camera firmware via the camera webpage. In addition, we also provide an automatic and manual firmware update via AVer software, including AVer PTZ Management and AVer CaptureShare.
Specification\*\*
Camera
*For further controls and configurations of the software mentioned above, please refer to the specific software and its user manual on our Download Center (non-USA) or Support site (USA).
| Image Sensor | 1/2.8" CMOS |
| Effective Picture Elements | 2 Megapixels |
| Output Resolutions | USB: 1080P60 (max)RTSP: 1080P60 (max) |
| Minimum Illumination | 0.5 Lux (IRE50, F2.0, 30 FPS) |
| S/N Ratio >50dB | |
| Gain Auto, Manual | |
| TV Line | 800 (Center/Wide) |
| Shutter Speed | 1/4 s to 1/10,000 s (60Hz)1/3 s to 1/10,000 s (50Hz) |
| Exposure Control | Full Auto, Manual, WDR |
| White Balance Auto, Manual | |
| Optical Zoom 3X | |
| Digital Zoom 2X | |
| Viewing Angles | DFOV: 90° (Wide) to 35.8° (Tele) |
| HFOV: 82° (Wide) to 31.7° (Tele) | |
| VFOV: 51° (Wide) to 17.9° (Tele) | |
| Focal Length | f = 3.3 mm (Wide) to 9.7 mm (Tele) |
| Aperture (Iris) | F = 2.0 (Wide) to 3.7 (Tele) |
| Minimum Working Distance | 0.5 m (Wide), 1.0 m (Tele) |
| Pan/Tilt Angles | Pan: ±170°, Tilt: ±90° |
| Pan/Tilt Speed (Manual) | Pan: 1° to 100°/sec, Tilt: 10.789° to 100°/sec |
| Preset Speed (Maximum) | Pan: 200°/sec, Tilt: 200°/sec |
| Preset Positions | 10 (IR), 256 (IP & USB) |
| Camera Control - Interface | IP, USB |
| Camera Control - Protocol | VISCA (IP), CGI (IP), USB |
| Noise Reduction 2D/3D NR | |
| Image Effect | Noise Reduction (2D/3D), Flip, Mirror, WDR |
| WDR Yes | |
| Power Frequency | 50 Hz, 60 Hz |
| Noise Suppression Yes | |
| AI Auto Tracking Functions | |
| Tracking Modes Presenter Mode, Zone Mode, Hybrid Mode | |
| Gesture Control Yes (Tracking On/Off, Full/Upper Body) | |
| Privacy Protection Mechanisms | |
| Protection Modes Privacy Mode, Sleep Mode | |
| Sleep Mode | |
| Sleep Mode Yes (Control by Web Page and CaptureShare) | |
| Audio | |
| Channel | 2ch, Mic in/Line in (Stereo), Built-in microphone (Mono) |
| Codec | AAC-LC (48/32/16/8K), PCM (48K) |
| Sample Rate | 48/32/16/8 kHz |
| Interface | |
| Video Outputs | IP, USB |
| Audio Outputs | IP, USB |
| Audio Inputs | Mic in, Line in |
| Built-in Microphone | Yes |
| Built-in Microphone | |
| Built-in Microphone | 2 (omnidirectional) |
| Noise Suppression Yes | |
| Pick-up Range | 5 meter |
| Sensitivity | -33 dBFS |
| Frequency Response | 30 Hz to 20,000 Hz |
| Maximum SPL 129 dB SPL at 0.5 meter | |
| General | |
| Power Requirement | AC100 - 240V to DC12V 2A or above |
| Power Consumption 11W | |
| PoE+ NA (LAN) | |
| Dimensions (W x D x H) | 92.39 mm x 94.44 mm x 164.00 mm |
| Net Weight 745 g | |
| Application Indoor | |
| Tally NA | |
| Security Kensington lock | |
| Operating Conditions | Temperature: 0°C to +40°CHumidity: 20% to 80% |
| Storage Conditions | Temperature: -20°C to +60°CHumidity: 20% to 95% |
| IP Streaming | |
| Resolution 1080P (60FPS) | |
| Video Compression | H.264, MJPEG |
| Audio Compression | AAC |
| Maximum Frame Rate 60FPS | |
| Bit-rate Control Modes | VBR/CBR |
| Range of Bit-rate Setting | 512 Kbps to 32 Mbps |
| Network Interface | 10/100 Base-T |
| Multi-stream Capability | 2 |
| (RTSP/Web Page), 1080P60FPS (max) | |
| (Web Page/UVC), 1080P60FPS (max) | |
| 3 | |
| (RTSP/Web Page/UVC), 1080P30FPS (max) | |
| Network Protocols | IPv6, IPv4, TCP, UDP, ARP, ICMP, IGMP, HTTP, DHCP,RTP/RTCP, RTSP, RTMP, VISCA over IP |
| NDI®| HX Capability NA | |
| USB | |
| Connector | USB 3.1 Gen 1 Type-B, backward compatible with USB 2.0 |
| Video Format MJPG/YUY2 | |
| Maximum Video Resolution 1080P60 | |
| USB Video Class (UVC) UVC 1.1 | |
| USB Audio Class (UAC) UAC 1.0 | |
| Web UI | |
| Live Video Preview Yes | |
| Camera PTZ Control Pan, Tilt, Zoom, Focus, Preset Control | |
| Camera/Image Adjustment | Exposure/White Balance/Picture |
| Network Configuration | DHCP, IP Address, Gateway, Subnet mask, DNS |
| Software Tools | |
| Single Camera Control | AVer CaptureShare (via USB, via IP with virtual camera)AVer PTZ Control Panel (via IP)AVer OBS Plugin for PTZ Cameras (via IP) |
| Multi-Camera Control andConfiguration | AVer PTZ Management (via IP) |
| Device IP Searching | AVer CaptureShare/InformationAVer PTZ Control Panel/Auto SearchAVer PTZ Management/Setup/Device/Add/Auto Search |
| Warranty | |
| Camera 3 Years | |
| Accessories 1 Year | |
**Specifications are subject to change without prior notice.
natural_image
Line drawing of a handheld device with a circular lens and base mount (no text or symbols)DL10
使用手册
警告使用者
natural_image
Illustration of hands holding a CD inside a device (no text or symbols)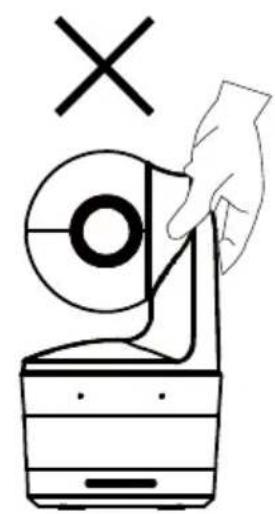
natural_image
Simple line drawing of a hand holding a circular object with a cross symbol above, next to a battery-like device (no text or symbols)
https://www.aver.com
natural_image
Technical line drawing of a mechanical device with mounting bracket and housing (no text or symbols)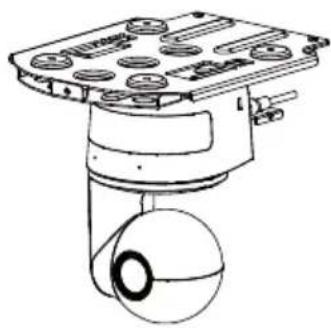
natural_image
Technical line drawing of a mechanical device with a spherical component and mounting base (no text or symbols)產品介紹
natural_image
Technical line drawing of a device rear panel with labeled ports and connectors (no text or symbols)56789
natural_image
Technical line drawing of a mechanical component with a 90-degree angle标注 (no text or symbols beyond the angle marker)尺寸


電線固定板安裝
natural_image
Diagram showing a device with a spherical sensor or antenna connected to its base, before and after transformation (no text or symbols present)- 連接連接線。
natural_image
Technical line drawing of a mechanical component with no visible text or symbolsnatural_image
Technical line drawing of a mechanical assembly with multiple components and mounting holes (no text or symbols)連接設備
flowchart
graph TD
    A["麦克風"] -->|音源输入| B["DL10 追蹤攝影機"]
    B -->|USB LAN| C["Lecture Capture System (錄影)"]
    C --> D["電視器"]
    D --> E["CTC"]
    F["CaptureShare"] --> G["筆電/桌機 (管理/電報)"]
    G --> C
    C --> H["CTC"]
    I["PTZ Management"] --> J["區域網路"]
    K["網頁應用程式 (遠端系統管理)"] --> J
    L["PTS Management"] --> J
    M["PTS Control Panel"] --> J
    N["OBS Plugin for PTZ Cameras"] --> J
設備連接
②
natural_image
Technical line drawing of a mechanical component with mounting holes and dashed lines indicating assembly or alignment (no text or symbols)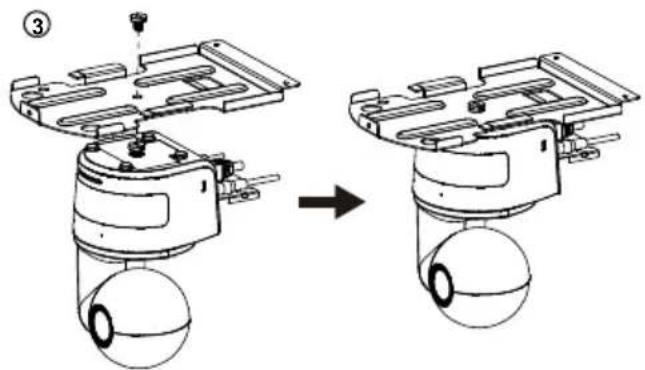
5
natural_image
Mechanical assembly diagram showing a device before and after assembly, with no visible text or symbols.安裝壁掛支架(選配)
flowchart
graph LR
    A["Device with sensor and antenna"] --> B["Sensor or Radar Component"]
    B --> C["Internal Component with external sensors and wiring"]
②
![46.00[1.61] Ø5.50[Ø0.22] 31.00[2.01] PN: 300X840.02R](/content/2026/04/691264/images/381aaca52b0fb5f0e426e79b4be5334940fa7fa590909d7f46215f894555aec7.jpg)
③
④
natural_image
Technical line drawing of a mechanical bracket assembly before and after modification (no text or symbols)⑥

natural_image
Technical line drawing of a mechanical device with wires and components (no text or symbols)⑦
flowchart
graph LR
    A["Sensor with spherical head"] --> B["Internal component with curved arm"]
    B --> C["Motor assembly with circular base and housing"]
設定追蹤模式安裝建議
透過瀏覽器連接攝影機
拍攝快照
點選攝影機鈕可以拍攝快照並儲存於本機。
PTZ 控制
控制攝影機水平、垂直、縮放等動作。
追蹤控制
講者
在追蹤設定介面上選擇「講者」。
[註]
視訊與音訊
natural_image
Line drawing of a handheld device with a circular lens and base mount (no text or symbols)DL10
ユーザーマニュアル
©2021 AVer Information Inc. All rights reserved.
注意
natural_image
Illustration of hands holding a CD to open a device (no text or symbols)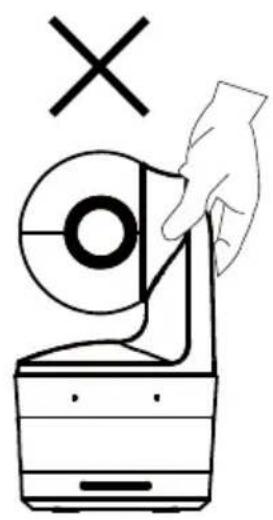
その他のヘルプ
natural_image
Technical line drawing of a mechanical device with mounting bracket and housing (no text or symbols)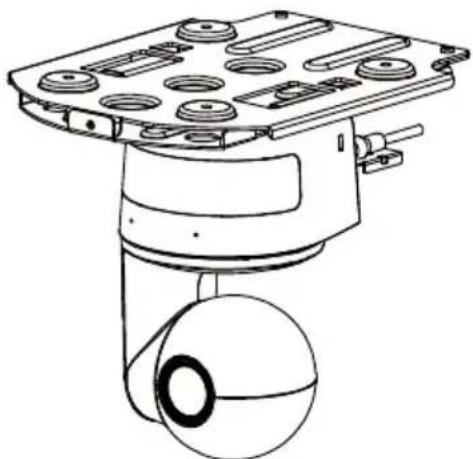
natural_image
Technical line drawing of a mechanical device with mounting brackets and a spherical component (no text or symbols)製品紹介
製品概要

natural_image
Technical line drawing of a mechanical device with a 90-degree angle标注 (no text or symbols beyond the angle marker)本体寸法
ケーブル固定プレートの取付
natural_image
Diagram showing a device before and after transformation, with no visible text or symbols2.各ケーブルをカメラに接続します。
natural_image
Technical line drawing of a mechanical component with no visible text or symbolsnatural_image
Technical line drawing of a mechanical assembly with no visible text or symbols周辺機器との接続
flowchart
graph TD
    A["外部マイク"] -->|音声入力| B["DLシリーズカメラ本体"]
    B -->|USB LAN| C["映像録画システム"]
    C --> D["CaptureShare"]
    D --> E["カメラ管理用パソコン"]
    C --> F["映像出力用テレビ (モニタ)"]
    C --> G["録画データ保存先 (クラウドサーバー)"]
    H["PTZ Management"] --> I["LAN"]
    J["OBS Plugin for PTZ Cameras"] --> I
    K["PTZ Control Panel"] --> I
    I --> L["Web 管理画面 (遠隔管理)"]
機器との接続
natural_image
Technical line drawing of a mechanical component with multiple circular features and mounting holes (no text or symbols)③
natural_image
Technical line drawing of a mechanical assembly before and after modification, showing a component with a spherical base and housing (no text or symbols)④
flowchart
graph TD
    A["Device with circular base"] --> B["Component with bolt holes"]
    B --> C["Assembly step with dashed lines indicating motion"]
    C --> D["Final assembly with spherical parts"]
⑤
壁設置用マウント(オプション)の取付
③
④
natural_image
Technical line drawing showing three stages of a mechanical assembly: mounting bracket, side panel, and internal component with cable (no text or symbols)⑦
flowchart
graph TD
    A["Initial Sensor Mount"] --> B["Assembly Step 1"]
    B --> C["Assembly Step 2"]
    C --> D["Final Assembly Unit"]
追尾セットアップ時の注意ポイント
https://jp.aver.com/download-center
natural_image
Line drawing of a handheld electronic device with a circular lens and base (no text or symbols)DL10
Bedienungsanleitung
Download Center: https://www.avereurope.com/download-center
Technischer Support: https://www.avereurope.com/technical-support
natural_image
Line drawing of a mechanical device with a circular component and base plate (no text or symbols)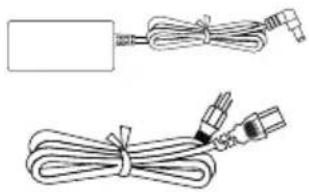
natural_image
Two types of cable connectors shown in line drawings: one with a rectangular connector and the other with three connected wires (no text or symbols)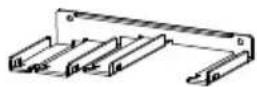
USB-Kabel (1,5 m/4,92 ft)
natural_image
Technical line drawing of a mechanical device with mounting bracket and housing (no text or symbols)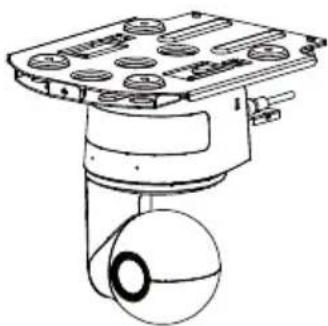
natural_image
Technical line drawing of a mechanical device with a spherical component and mounting base (no text or symbols)Produktvorstellung
Übersicht

natural_image
Line drawing of a mechanical device with a central circular component and an angular annotation of ±170° (no text or symbols beyond the angle marker)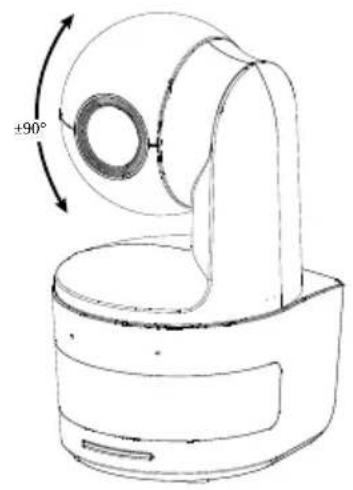
natural_image
Technical line drawing of a mechanical device with a 90-degree angle标注 (no text or symbols beyond the angle marker)Abmessungen
natural_image
Diagram showing a device before and after transformation, with no visible text or symbolsnatural_image
Technical line drawing of a mechanical component with no visible text or symbolsnatural_image
Technical line drawing of a mechanical assembly with multiple cylindrical components and mounting brackets (no text or symbols)Geräteverbindung
flowchart
graph TD
    A["Mikrofon"] -->|Audioingang| B["DL Tracking Kamera"]
    B --> C["LAN"]
    C --> D["PTZ Verwaltung"]
    C --> E["Web-Anwendung (Fernverwaltung)"]
    C --> F["PTS Control Panel"]
    G["CaptureShare"] --> H["Laptop/Desktop (Verwaltung/Präsentation)"]
    H --> I["Vorlesungsaufzeichnungssystem (Aufnahme)"]
    I --> J["Monitor/TV (Anzeige)"]
    I --> K["Server"]
    L["USB"] --> I
    M["LAN"] --> I
    N["OBS Plugin for PTZ Cameras"] --> C
Anschlüsse
flowchart
graph TD
    A["HDMI-Kabel"] --> B["Mikrofon"]
    B --> C["Audiokabel"]
    C --> D["Monitor/TV"]
    D --> E["USB-Kabel"]
    E --> F["RJ-45 Kabel"]
    F --> G["Steckdose"]
    G --> H["Netzkabel"]
    H --> I["Netzteil"]
    I --> J["Laptop"]
    J --> K["oder"]
    K --> L["Desktop"]
    L --> M["User Interface"]
    M --> N["User Interface"]
    N --> O["User Interface"]
    O --> P["User Interface"]
    P --> Q["User Interface"]
    Q --> R["User Interface"]
    R --> S["User Interface"]
    S --> T["User Interface"]
    T --> U["User Interface"]
    U --> V["User Interface"]
    V --> W["User Interface"]
    W --> X["User Interface"]
    X --> Y["User Interface"]
    Y --> Z["User Interface"]
②
natural_image
Technical diagram of a mechanical component with multiple circular features and four downward-pointing arrows indicating assembly or alignment (no text or symbols present)
5
natural_image
Mechanical assembly diagram showing a device before and after assembly, with no visible text or symbolsWandmontage (Optional)
flowchart
graph LR
    A["Device with sensor component"] --> B["Sensor component"]
    B --> C["Internal components with wiring"]
    C --> D["Device with internal wiring"]
②
![46.00[1.61] Ø5.55[Ø22] 51.00[2.01]](/content/2026/04/691264/images/6b0cd89a6c4c4d1f70ee9d0f6a92e683298df9f25b126dc384d2d0346fe21660.jpg)
③

④

[Hinweis]
Snapshot

Vortragender

flowchart
graph TD
    A["Top Human"] --> B["Bottom Human"]
    C["Top Human"] --> D["Bottom Human"]
    E["Bottom Human"] --> F["Bottom Human"]
    G["Top Human"] --> H["Bottom Human"]
    I["Top Human"] --> J["Bottom Human"]
[Hinweise]
Video & Audio
natural_image
Line drawing of a handheld electronic device with a circular lens and base (no text or symbols)DL10
Mode d'emploi
Avertissement
natural_image
Illustration of hands operating a CD or DVD device with a cross symbol above (no text or labels)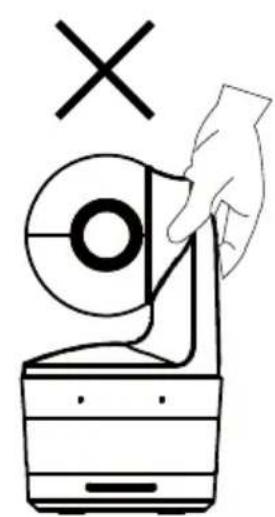
natural_image
Simple line drawing of a hand holding a circular object with a cross mark above, next to a container (no text or symbols)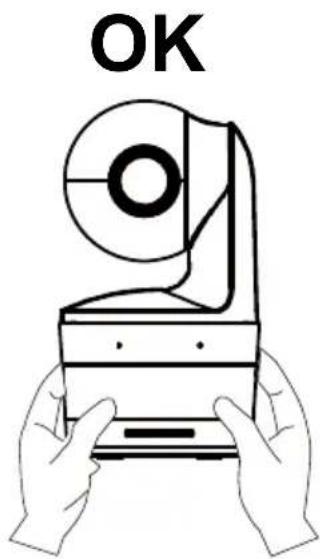
Aide Supplémentaire
Assistance Technique: https://www.avereurope.com/technical-support
natural_image
Simple line drawing of a mechanical device with a circular component and base (no text or symbols)
natural_image
Two types of cable tied with wires, one rectangular and one with connectors (no text or symbols)

Vis M2 x 4 mm (x2)
Câble USB (1.5 m/4.92 ft)

ou


Vis 1/4" - 20, L = 7.5 mm
natural_image
Technical line drawing of a mechanical device with mounting bracket and housing (no text or symbols)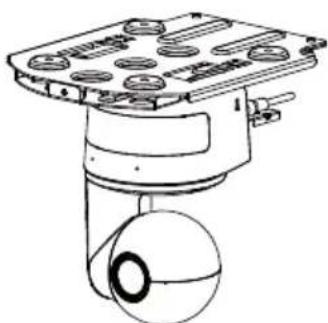
natural_image
Technical line drawing of a mechanical device with a spherical component and mounting plate (no text or symbols)natural_image
Line drawing of a mechanical device with a 90-degree angle标注 (no text or symbols beyond the angle marker)Dimensions

natural_image
Diagram showing a device before and after transformation, with no visible text or symbolsnatural_image
Technical line drawing of a mechanical component with no visible text or symbolsnatural_image
Technical line drawing of a mechanical assembly with multiple cylindrical components and mounting holes (no text or symbols)②
natural_image
Diagram of a device casing with multiple circular components and four vertical supports (no text or symbols)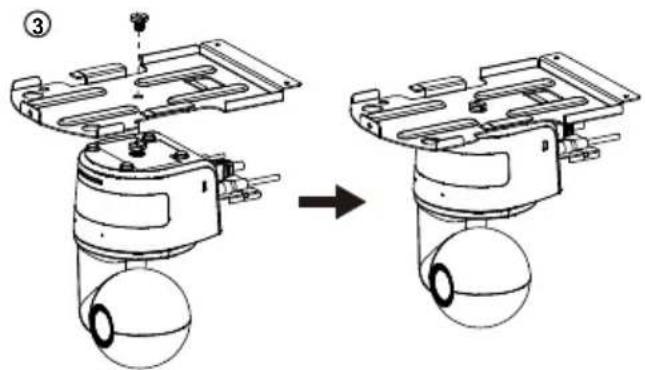
natural_image
Diagram showing a mechanical assembly before and after transformation, with no visible text or symbols.
⑤
natural_image
Mechanical assembly diagram showing a device with rotating components before and after assembly (no text or symbols)②
![46.00[1.61] Ø5.50[Ø0.22] 51.00[2.01] TN: 335AL245-AG25](/content/2026/04/691264/images/22a6d2af786479466c5befdd29cddd976aa14fbbb0a7c065ae906bade56bfc4d.jpg)
③
④
Instantané
Contrôle du suivi
Intervenant
[Remarques]
Vidéo & Audio
natural_image
Line drawing of a handheld electronic device with a circular lens and base (no text or symbols)DL10
Manual del usuario
Ayuda Adicional
Westblaak 134, 3012 KM, Rotterdam, The Netherlands
Tel: +31 (0) 10 7600 550
natural_image
Technical line drawing of a mechanical device with mounting bracket and housing (no text or symbols)
natural_image
Technical line drawing of a mechanical device with a spherical component and mounting base (no text or symbols)natural_image
Technical line drawing of a mechanical device with a 90-degree angle标注 (no text or symbols beyond the angle marker)Dimensiones

natural_image
Diagram showing a device before and after transformation, with no visible text or symbols- Conecte los cables.
natural_image
Technical line drawing of a mechanical component with no visible text or symbolsnatural_image
Technical line drawing of a mechanical assembly with multiple cylindrical components and mounting holes (no text or symbols)②

natural_image
Technical line drawing of a mechanical component with mounting holes and internal features (no text or symbols)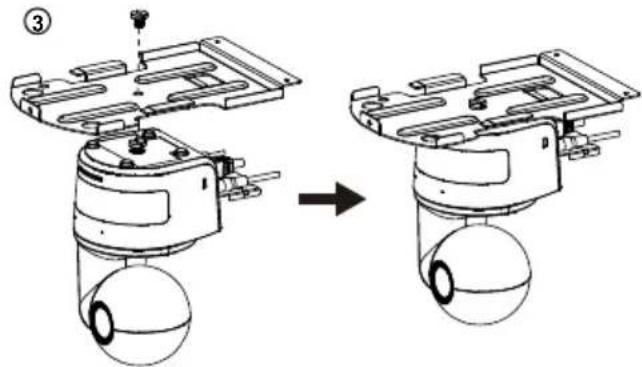
natural_image
Mechanical assembly diagram showing a piston-cylinder assembly before and after assembly, with no visible text or symbols.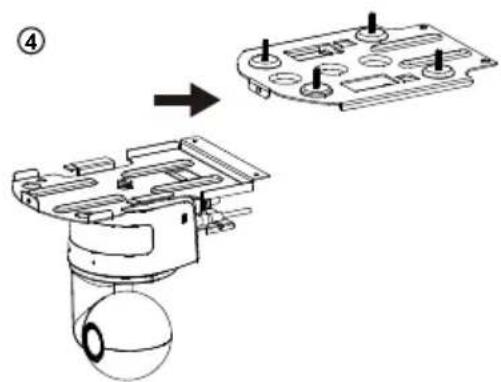
⑤

natural_image
Mechanical assembly diagram showing two stages of a device with rotating components and mounting holes (no text or symbols)natural_image
Diagram showing three-step assembly of a sensor device with no visible text or symbols②
![48.00[1.61] Ø5.50[Ø0.22] 51.00[2.01] TN: 9350-245-A625](/content/2026/04/691264/images/927ac1de4e937359d5be89ff85eae1256ef6b07c95cd0ed530947d96bfc6dee1.jpg)
③

④

natural_image
Technical line drawing of a mechanical bracket assembly before and after modification (no text or symbols)⑥
natural_image
Technical line drawing of a mechanical device with wires and components (no text or symbols)⑦
flowchart
graph TD
    A["Sensor with spherical head"] --> B["Component with spherical bulb"]
    B --> C["Motor with attached frame"]
    C --> D["Component with attached frame"]
[Nota]
Captura de pantalla
Presentador

flowchart
graph TD
    A["Top Human"] --> B["Bottom Human"]
    C["Top Human"] --> D["Bottom Human"]
    E["Bottom Human"] --> F["Bottom Human"]
    G["Top Human"] --> H["Bottom Human"]
    I["Top Human"] --> J["Bottom Human"]
    K["Bottom Human"] --> L["Bottom Human"]
    M["Bottom Human"] --> N["Bottom Human"]
    O["Bottom Human"] --> P["Bottom Human"]
    Q["Bottom Human"] --> R["Bottom Human"]
    S["Bottom Human"] --> T["Bottom Human"]
    U["Bottom Human"] --> V["Bottom Human"]
    W["Bottom Human"] --> X["Bottom Human"]
    Y["Bottom Human"] --> Z["Bottom Human"]
    AA["Bottom Human"] --> AB["Bottom Human"]
    AC["Bottom Human"] --> AD["Bottom Human"]
    AE["Bottom Human"] --> AF["Bottom Human"]
    AG["Bottom Human"] --> AH["Bottom Human"]
    AI["Bottom Human"] --> AJ["Bottom Human"]
    AK["Bottom Human"] --> AL["Bottom Human"]
    AM["Bottom Human"] --> AN["Bottom Human"]
    AO["Bottom Human"] --> AP["Bottom Human"]
    AQ["Bottom Human"] --> AR["Bottom Human"]
    AS["Bottom Human"] --> AT["Bottom Human"]
    AU["Bottom Human"] --> AV["Bottom Human"]
    AW["Bottom Human"] --> AX["Bottom Human"]
[Notas]
Vídeo y Audio
natural_image
Line drawing of a handheld electronic device with a circular lens and base (no text or symbols)DL10
Manuale dell'utente

Altro Aiuto
Centro download: https://www.avereurope.com/download-center
Assistenza tecnica: https://www.avereurope.com/technical-support
Controllo telecamera....27
Preimpostazione 28
Esposizione....29
natural_image
Technical line drawing of a mechanical device with mounting bracket and housing (no text or symbols)
natural_image
Technical line drawing of a mechanical device with a spherical component and mounting base (no text or symbols)natural_image
Technical line drawing of a mechanical device with a 90-degree angle标注 (no text or symbols beyond the angle marker)Dimensioni

natural_image
Diagram showing a device before and after transformation, with no visible text or symbols- Collegare i cavi.
natural_image
Technical line drawing of a mechanical component with no visible text or symbolsnatural_image
Technical line drawing of a mechanical assembly with multiple cylindrical components and mounting holes (no text or symbols)②

natural_image
Diagram of a device casing with multiple circular components and four vertical supports (no text or symbols)
natural_image
Mechanical assembly diagram showing a piston-cylinder assembly before and after assembly, with no visible text or symbols.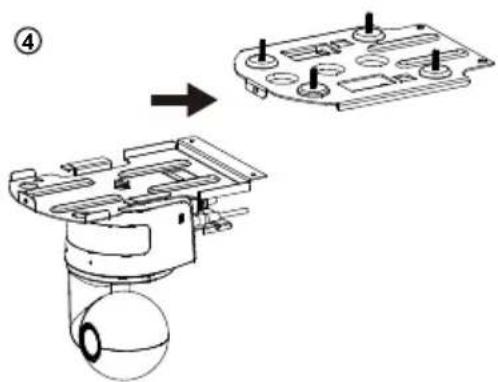
⑤
natural_image
Mechanical assembly diagram showing two stages of a device with rotating components and mounting holes (no text or symbols)natural_image
Technical line drawing of a device assembly process showing transformation from a dome-shaped component to an open electrical enclosure (no text or symbols)②
![46.00[1.81] Ø5.50[Ø0.22] 51.00[2.01] TN: 323A42N0-ADR](/content/2026/04/691264/images/e90ba6de2f077daa9ad4e1aea842858b2603553cae852f36ac5c22e94cbc35fc.jpg)
③
④
natural_image
Technical line drawing of a mechanical bracket assembly before and after modification (no text or symbols)⑥
natural_image
Technical line drawing of an electrical component with wires and wiring (no text or symbols)7
flowchart
graph LR
    A["Sensor with spherical head"] --> B["Internal sensor with spherical body"]
    B --> C["Internal sensor with attached frame"]
    C --> D["Internal sensor with motor housing"]
Presentatore
flowchart
graph TD
    A["Top Human"] --> B["Bottom Human"]
    C["Top Human"] --> D["Bottom Human"]
    E["Bottom Human"] --> F["Bottom Human"]
    G["Top Human"] --> H["Bottom Human"]
    I["Top Human"] --> J["Bottom Human"]
    K["Bottom Human"] --> L["Bottom Human"]
    M["Bottom Human"] --> N["Bottom Human"]
[Nota]
Controllo telecamera
Video e audio
natural_image
Line drawing of a mechanical device with a circular component and curved arm (no text or symbols)DL10
사용 설명서
natural_image
Illustration of hands holding a circular object with a cross mark above, next to a battery (no text or symbols)

도움이 더 필요하실 경우
글로벌: https://www.aver.com/download-center
연락처 정보
AVer Information Inc.
https://www.aver.com
8F, No.157, Da-An Rd., Tucheng Dist., New Taipei City
23673, Taiwan
전화: +886 (2) 2269 8535
내용물
패키지 내용물 1
제품 소개 2
개요 2
LED 표시등 2
팬 및 틸트 각도 3
치수 3
케이블 고정 플레이트 설치 4
장치 연결 5
연결 6
오디오 입력 연결 7
천장 마운트 설치(옵션) 8
벽면 마운트 설치(옵션) 9
추적 설정 권장사항 11
리모컨 12
핫 키 13
카메라 설정 13
카메라 IP 주소 설정 13
웹 설정 14
natural_image
Technical line drawing of a mechanical device with mounting bracket and housing (no text or symbols)natural_image
Technical line drawing of a mechanical device with a spherical component and mounting base (no text or symbols)제품 소개
개요
natural_image
Technical line drawing of a device rear panel with ports and connectors (no text or symbols)56789
natural_image
Technical line drawing of a mechanical device with a 90-degree angle标注 (no text or symbols beyond the angle marker)치수
케이블 고정 플레이트 설치
natural_image
Diagram showing a device with a spherical component before and after transformation, no text or symbols present.- 케이블을 연결합니다.
natural_image
Technical line drawing of a mechanical component with no visible text or symbolsnatural_image
Technical line drawing of a mechanical assembly with multiple cylindrical components and mounting holes (no text or symbols)장치 연결
flowchart
graph TD
    A["마이크"] -->|오디오 입력| B["DL10 후적 카메라"]
    B -->|USB| C["강의 캡처 시스템 (기록)"]
    B -->|LAN| C
    C --> D["CaptureShare"]
    D --> E["노트북/데스크탑 (관리/발표)"]
    C --> F["PC"]
    F --> G["모니터/TV (디스플레이)"]
    C --> H["서버"]
    H --> I["Cloud"]
    I --> J["PTZ Management"]
    I --> K["Web Management"]
    I --> L["Remote Management"]
    I --> M["PTZ Control Panel"]
    I --> N["PTS Management"]
    I --> O["PTS Plugin for PTZ Cameras"]
②
natural_image
Diagram of a device casing with multiple circular components and four vertical supports (no text or symbols)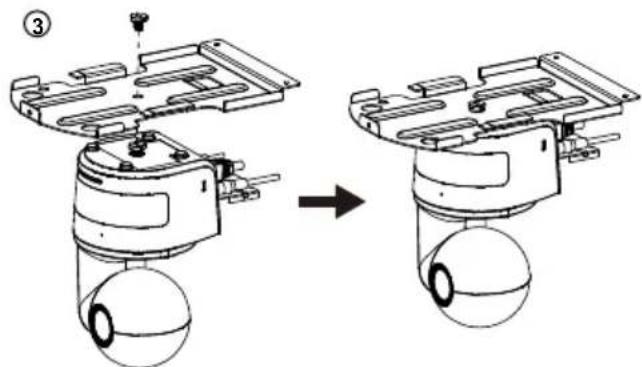
natural_image
Mechanical assembly diagram showing a piston-cylinder assembly before and after disassembly (no text or labels)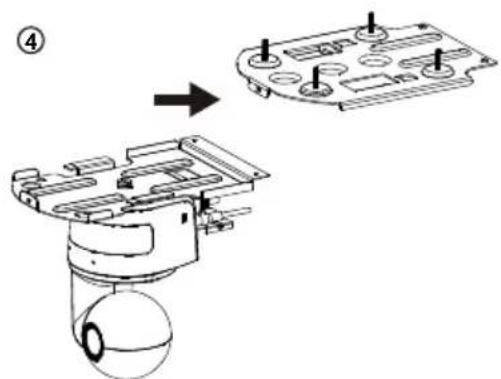
⑤

natural_image
Diagram showing a mechanical assembly before and after transformation, with no visible text or symbols.벽면 마운트 설치(옵션)
②
![46.00[1.81] 25.50[00.22] 51.00[2.01] PYL 33A0346 AGR](/content/2026/04/691264/images/bd6dc0b48ce4a3804f4936fdc40c84b8cb7be509ec5d4d2a173b9b349f0e5370.jpg)
③

④
natural_image
Technical line drawing of a mechanical bracket assembly before and after modification (no text or symbols)⑥

natural_image
Technical line drawing of a mechanical device with attached wires and components (no text or symbols)⑦
natural_image
Technical line drawing of a mechanical device assembly (no text or symbols present)추적 설정 권장사항
브라우저를 통해 카메라에 연결합니다
[참고]
스납샷
추적 제어
발표자
flowchart
graph TD
    A["Human 1"] --> B["Human 2"]
    C["Human 3"] --> D["Human 4"]
    E["Human 5"] --> F["Human 6"]
    G["Human 7"] --> H["Human 8"]
    I["Human 9"] --> J["Human 10"]
    K["Human 11"] --> L["Human 12"]
    M["Human 13"] --> N["Human 14"]
    O["Human 15"] --> P["Human 16"]
    Q["Human 17"] --> R["Human 18"]
    S["Human 19"] --> T["Human 20"]
    U["Human 21"] --> V["Human 22"]
    W["Human 23"] --> X["Human 24"]
    Y["Human 25"] --> Z["Human 26"]
    AA["Human 27"] --> AB["Human 28"]
    AC["Human 29"] --> AD["Human 30"]
    AE["Human 31"] --> AF["Human 32"]
    AG["Human 33"] --> AH["Human 34"]
    AI["Human 35"] --> AJ["Human 36"]
    AK["Human 37"] --> AL["Human 38"]
    AM["Human 39"] --> AN["Human 40"]
    AO["Human 41"] --> AP["Human 42"]
    AQ["Human 43"] --> AR["Human 44"]
    AS["Human 45"] --> AT["Human 46"]
    AU["Human 47"] --> AV["Human 48"]
    AW["Human 49"] --> AX["Human 50"]
[참고]
비디오 및 오디오
- User Manual
- Federal Communications Commission Statement
- Remote Control Battery Safety Information
- DISCLAIMER
- TRADEMARKS
- COPYRIGHT
- NOTICE
- WARNING
- More Help
- Headquarters
- USA Branch office
- Europe Branch office
- Contact Information
- Japan Branch Office
- Vietnam Branch Office
- Product Introduction....2
- Set Up the Camera 13
- Package Contents
- Camera Mount Suggestions (Optional Accessories)
- Product Introduction
- Overview
- LED Indicator
- Cable Fixing Plate Installation
- Device Connection
- Connections
- Audio Input Connection
- [Note]
- Ceiling Mount Installation (Optional)
- Wall Mount Installation (Optional)
- Tracking Setup Recommendations
- Remote Control
- Hot Key
- Set Up the Camera
- Set Up IP Address of the Camera
- If there is DHCP environment
- Or if you want to configure by yourself
- Web Setup
- Use the AVer IPCam Utility to Find the Camera
- Make a Connection to the Camera via Browser
- Live View
- Snapshot
- Pan-Tilt-Zoom Control
- Manual Pan-Tilt Speed Adjustment
- Focus
- Preset Position
- Tracking Control
- Settings
- Tracking Settings
- Presenter
- Zone
- [Notes]
- Hybrid
- Camera Settings
- Camera Control
- Preset
- Exposure
- Image Process
- Video & Audio
- Network
- RTMP Settings
- Connecting to DL10 via RTSP
- System
- FAQ
- Specification\*\*
- 警告使用者
- 產品介紹
- 電線固定板安裝
- 安裝壁掛支架(選配)
- 設定追蹤模式安裝建議
- 透過瀏覽器連接攝影機
- 拍攝快照
- PTZ 控制
- 追蹤控制
- 講者
- [註]
- 視訊與音訊
- ユーザーマニュアル
- 注意
- その他のヘルプ
- 製品紹介
- ケーブル固定プレートの取付
- 周辺機器との接続
- 機器との接続
- 壁設置用マウント(オプション)の取付
- 追尾セットアップ時の注意ポイント
- Bedienungsanleitung
- Produktvorstellung
- Übersicht
- Abmessungen
- Anschlüsse
- Wandmontage (Optional)
- [Hinweis]
- Vortragender
- [Hinweise]
- Mode d'emploi
- Avertissement
- Aide Supplémentaire
- Dimensions
- Contrôle du suivi
- Intervenant
- [Remarques]
- Vidéo & Audio
- DL10
- Ayuda Adicional
- Dimensiones
- [Nota]
- Presentador
- [Notas]
- Vídeo y Audio
- Altro Aiuto
- Dimensioni
- Presentatore
- Controllo telecamera
- Video e audio
- 내용물
- 제품 소개
- 개요
- 케이블 고정 플레이트 설치
- 장치 연결
- 벽면 마운트 설치(옵션)
- 추적 설정 권장사항
- 브라우저를 통해 카메라에 연결합니다
- [참고]
- 스납샷
- 추적 제어
- 발표자
- 비디오 및 오디오
Brand : AVer
Model : DL10
Category : Surveillance Camera