D51856 - Stapler DEWALT - Free user manual and instructions
Find the device manual for free D51856 DEWALT in PDF.

User questions about D51856 DEWALT
0 question about this device. Answer the ones you know or ask your own.
Ask a new question about this device
Download the instructions for your Stapler in PDF format for free! Find your manual D51856 - DEWALT and take your electronic device back in hand. On this page are published all the documents necessary for the use of your device. D51856 by DEWALT.
USER MANUAL D51856 DEWALT
English (original instructions)
Figure 4
PNEUMATISK S∅MPISTOL TIL S∅M MED REDUCERET HOVED D51856
Tillykke!
You have chosen a DEWALT tool. Years of experience, thorough product development and innovation make DEWALT one of the most reliable partners for professional power tool users.
Technical Data
| D51856 | ||
| Type 1 | ||
| Recommended operating pressure bar 4.6 – 8.4 | ||
| Max. operating pressure bar 8.4 | ||
| Air consumption per shot | 2.04 (at 6.9 bar) | ||
| Actuating mode contact actuating | ||
| Magazine angle 31° | ||
| Fasteners | ||
| type | clipped head | |
| length | mm | 57 – 100 |
| shank diameter | mm | 2.9 – 3.3 |
| angle | 31° – 34° | |
| Weight | kg | 3.8 |
| L_PA | (sound pressure) | dB(A) | 96.3 | |
| K_PA | (sound pressure uncertainty K) | dB(A) | 1.5 | |
| L_WA | (sound power) | dB(A) | 104 | |
| K_WA | (sound power uncertainty K) | dB(A) | 1.5 |
| Weighted RMS | ||
| acceleration value | m/s2 | 4.71 |
| Uncertainty K | m/s2 | 1.5 |
1 This value is a tool-related characteristic value and does not represent the influence to the hand-arm system when using the tool. The influence to the hand-arm system when using the tool will for example depend on the gripping force, the contact pressure force, the working direction, the adjustment of energy supply, the workpiece and the work piece support
Definitions: Safety Guidelines
The definitions below describe the level of severity for each signal word. Please read the manual and pay attention to these symbols.

DANGER: Indicates an imminently hazardous situation which, if not avoided, will result in death or serious injury.

WARNING: Indicates a potentially hazardous situation which, if not avoided, could result in death or serious injury.

CAUTION: Indicates a potentially hazardous situation which, if not avoided, may result in minor or moderate injury.
CAUTION: Used without the safety alert symbol indicates a potentially hazardous situation which, if not avoided, may result in property damage.

Denotes risk of fire.
EC-Declaration of Conformity
MACHINERY DIRECTIVE

D51856
DEWALT declares that these products described under "technical data" have been designed in compliance with: 2006/42/EC, EN 792-13, EN 12549, ISO 8662-11.
For more information, please contact DEWALT at the following address or refer to the back of the manual. The undersigned is responsible for compilation of the technical file and makes this declaration on behalf of DEWALT.

Horst Grossmann
Vice President Engineering and Product
Development
D-65510, Idstein, Germany
31.12.2009
Safety Instructions
When using tools, always observe the safety regulations applicable in your country to reduce the risk of personal injury. Read the following safety instructions before attempting to operate this product.
Keep these instructions in a safe place!

READ ALL SAFETY WARNINGS AND ALL INSTRUCTIONS.
General
- Keep work area clean.
Cluttered areas and benches can cause accidents.
- Consider work area environment.
Do not expose tools to humidity. Keep work area well lit. Do not use tools in the presence of flammable liquids or gases.
- Keep children away.
Do not let children or visitors come into contact with the tool. Supervision is required for those under 16 years of age.
- Store idle tools.
When not in use, tools must be stored in a dry place and locked up securely, out of reach of children.
- Dress properly.
Do not wear loose clothing or jewellery. They can be caught in moving parts. Preferably wear rubber gloves and non-slip safety footwear. Wear protective hair covering to keep long hair out of the way.
- Do not overreach.
Keep proper footing and balance at all times.
- Stay alert.
Watch what you are doing. Use common sense. Do not operate the tool when you are tired.
- Use appropriate tool.
The intended use is described in this instruction manual. Do not force small tools or attachments to do the job of a heavy-duty tool. The tool will do the job better and safer at the rate for which it was intended.
⚠ WARNING! The use of any accessory or attachment or performance of any operation with this tool, other than those recommended in this instruction manual may present a risk of personal injury.
- Maintain tools with care.
Keep the tools in good condition and clean for better and safer performance. Follow the instructions for maintenance and changing accessories. Keep all controls dry, clean and free from oil and grease.
- Check for damaged parts.
Before using the tool, carefully check it for damage to ensure that it will operate properly and perform its intended function. Check for misalignment and seizure of moving parts, breakage of parts and any other conditions that may affect its operation. Have damaged guards or other defective parts repaired or replaced as instructed.
- Have your tool repaired by an authorized DEWALT repair agent.
This tool is in accordance with the relevant safety regulations. To avoid danger, tools must only be repaired by qualified technicians.
Additional Safety Instructions for Pneumatic Nailers
• ALWAYS wear safety glasses.
• ALWAYS wear ear protection.
- Only use fasteners of the type specified in the manual.
- Do not use any stands for mounting the tool to a support.
- NEVER use the tool for any other purpose than specified in this manual.
- NEVER use this tool on scaffolds, stairs, ladders or similar workplaces.
- Don't use the tool to close cases or crates.
- Don't use the tool for attaching transportation safety devices e.g. on vehicles and carriages.
- Before use check proper function of contact trip. Never use this tool when either trigger switch or contact trip is damaged.
- Use quick-action couplings for connection to the compressed air system. The non-sealable nipple must be fitted to the tool in such a way that no compressed air remains in the tool after disconnection.
ENGLISH
- ALWAYS use clean, dry compressed air. Do not use oxygen or combustible gases as an energy source for this tool.
- The maximum allowable air pressure of the tool shall NEVER be exceeded.
- Only connect this tool to an air supply where the maximum allowable pressure of the tool cannot be exceeded by more than 10%. In case of higher pressures, a pressure reducing valve including a downstream safety valve shall be built into the compressed air supply.
- Only use hoses with a rating exceeding the maximum operating pressure of the tool.
- To prevent an unnecessarily high noise level, increased wear and resulting failures, the nailer should be operated with the lowest pressure required for the work process.
- DO NOT use oxygen, combustible gases or any other reactive gases for operating compressed air. Danger of explosion and/or serious personal injury may result.
- Before transporting the tool, disconnect it from the compressed air system, especially where ladders are used or where unusual physical posture is adopted while moving.
- Disconnect the tool from the air supply when it is not in use.
- Avoid weakening or damaging the tool, for example by:
- punching or engraving
– modifications not authorised by the manufacturer
– guiding against templates made of hard material such as steel
- dropping or pushing across the floor
– applying excessive force of any kind - Do not use the equipment as a hammer.
WARNING! Keep the nailer, loaded or unloaded, pointed away from yourself and others. Serious personal injury may result.
- While working, hold the tool in such a way that no injuries can be caused to the head or to the body in the event of a possible recoil due to a disruption in the energy supply or hard areas within the workpiece.
- NEVER actuate the fastener driving tool into free space.
-
In the work area, carry the tool at the workplace using only one handle, and NEVER with the trigger actuated.
-
Consider the conditions in the work area. Fasteners can penetrate thin workpieces or slip off corners and edges of the workpiece, and thus put people at risk. The length of the nails used should be no longer than the thickness of the workpieces. If the nails are longer than the workpiece thickness this could cause a rebound of the nails if the workpiece is placed on a hard surface e.g., concrete, steel.
- Do not drive fasteners close to the edge of the workpiece. ALWAYS keep a distance of at least 25 mm from the edge of the workpiece so nails will not destroy the workpiece.
- Do not drive fasteners on top of other fasteners.
- Only use spare parts specified by the manufacturer or his authorised agents.
- Have repairs carried out only by the manufacturer or authorised agents having due regard to the information given in the manual and using the appropriate tools and equipment.
- Replacement of contact trip spring is recommended every 3-4 years to ensure personal safety.
- Do not disassemble or block any parts of the fastener driving tool such as the safety yoke.
- Have the tool serviced properly and at regular intervals.
- ALWAYS wear safety gloves to reduce the risk of personal injuries.
Residual Risks
- The following risks are inherent to the use of these machines:
– Injuries caused by improper handling of the tool.
- Loss of control due to not gripping tool firmly.
- Muscle strain of arms and hands, especially when working overhead. Always take regular breaks when working for long periods of time.
- Do not use the tool while you are tired or under influence of drugs, alcohol or medication. A moment of inattention while operating may result in serious personal injury.
- In spite of the application of the relevant safety regulations and the implementation of safety devices, certain residual risks cannot be avoided.
These are:
Impairment of hearing. Under some conditions and duration of use, noise from this product may contribute to hearing loss.
- Loss of control caused by recoil.
- Risk of injury caused by pinch points, sharp edges and improper handling of workpiece.
- Risk of injury caused by sharp edges when changing nails or inserting nail sticks.
- Discomfort to hand and arms. Vibration caused by the operating action of this tool may cause permanent injury to fingers, hands, and arms. Use gloves to provide extra cushion, take frequent rest periods, and limit daily time of use.
Markings on Tool
The following pictograms are shown on the tool:

Pneumatic tool with safety yoke.

Do not use on scaffoldings and ladders.

Read instruction manual before use.

ALWAYS wear safety glasses.

ALWAYS wear ear protection.

Compatible nail angles.

Maximum number of nails in magazine.

Nail diameter.

Nail length.

Max. operating pressure.

Nail type: clipped head.
DATE CODE POSITION
Date Code (n), which also includes the year of manufacture, is printed into the housing surface above the trigger switch.
Example:
2010 XX XX
Year of Manufacture
Package Contents
The package contains:
1 Nailer
1 Sequential action trigger
1 Instruction manual
1 Exploded drawing
- Check for damage to the tool, parts or accessories which may have occurred during transport.
• Take the time to thoroughly read and understand this manual prior to operation.
Description (fi g. 1)

WARNING: NEVER modify the power tool or any part of it. Damage or personal injury could result.
INTENDED USE
The D51856 nailers have been designed for driving fasteners into wooden workpieces.
DO NOT use under humid conditions or in presence of flammable liquids or gases.
These nailers are professional power tools. DO
NOT let children come into contact with the tool. Supervision is required when inexperienced operators use this tool.
a. trigger switch
b. air fitting
c. magazine
d. contact trip
e. removable protective cover
f. depth adjustment wheel
g. top cap
ENGLISH
ASSEMBLY
Hanger (fi g. 1)
A recessed threaded hole (M8 x 15 mm) is provided in the top cap (g) to accommodate a holder.
Remove the hole cover (h) to access the hanger hole (i) which enables the nailer to hang from a belt or from a rafter hook.

WARNING: Prior to assembly and adjustment, ALWAYS unplug the tool.
Air Fitting (fi g. 1)
These tools have a standard 3/8" pipe thread for the air fitting (b). The tool is assembled with a 3/8" to 1/4" adapter installed in the end cap.
- Wrap the male end of the fitting with Teflon tape to prevent air leaks.
- To install a 1/4" fitting, screw the fitting into the 3/8" to 1/4" adapter in the end cap and tighten firmly.
- To install a 3/8" fitting, remove the 3/8" to 1/4" adapter, if present. Screw the fitting into the end cap and tighten firmly.
OPERATION
Instructions for Use

NING: ALWAYS observe the safety instructions and applicable regulations. Place workpiece safely.
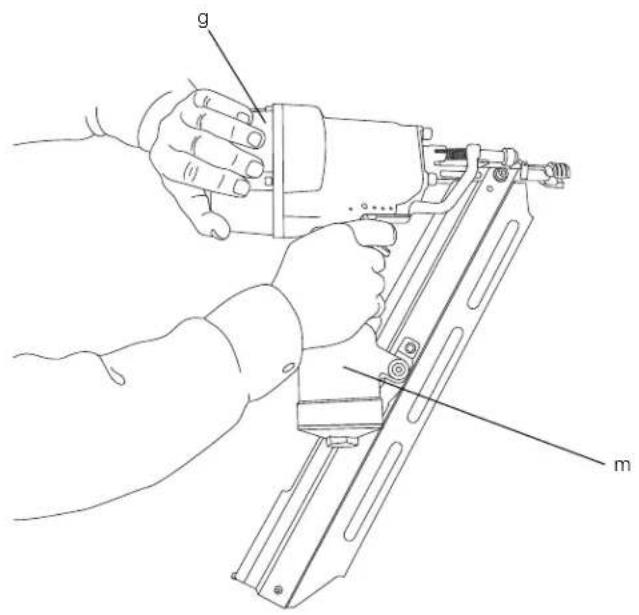
Proper Hand Position (fi g. 4)

NG: To reduce the risk of serious personal injury, ALWAYS use proper hand position as shown.

NG: To reduce the risk of serious personal injury, ALWAYS hold securely in anticipation of a sudden reaction.
Proper hand position requires one hand on the main handle (m), with the other hand on the top cap (g).
Preparing the Tool (fi g. 2)
- Drain all condensation from the air compressor tanks and hoses.
- Lubricate the tool. See Maintenance.
- Remove all nails from the magazine.
- Lock the nail pusher (j) in the back position.
- Check if the contact trip (d) and nail pusher (j) can move freely.

WARNING: Do not use the tool if the contact trip or nail pusher cannot move freely.

NING: Avoid the same work position or stance for long periods of time, e.g., over head. Avoid long work periods without enough rest time.
- Check that the pressure of the air supply is below the maximum recommended operating pressure.
- Connect the air hose to the fitting on the tool.
- Check for audible leaks around valves and gaskets.
- Set the air pressure to the minimum recommended operating pressure.

WARNING: NEVER use a tool that leaks or has damaged parts.

NING: DO NOT connect to air supply unless the tool preparation is completed.
Cold Weather Operation
When operating tools at temperatures below freezing:
- Keep the tool as warm as possible before use.
- Disconnect the airline from the tool.
- Put 10 to 15 drops of DEWALT pneumatic tool oil (or winter-weight pneumatic oil containing ethylene glycol) into the air inlet.
- Set the air pressure to a maximum of 5.5 bar.
- Connect the air hose to the fitting on the tool.
- Load nails into the magazine as described below.
- Actuate the tool 5 or 6 times into scrap lumber to lubricate the o-rings.
- Increase the air pressure to the normal operating level.
- Use the tool in the normal manner.
Hot Weather Operation
The tool should operate normally. Avoid the heat of direct sunlight to avoid damage to the bumpers, o-rings, and other rubber parts.
Loading the Tool (fi g. 2)

NING: ALWAYS disconnect the tool from the air supply before loading fasteners.
ENGLISH
- Lock the nail pusher (j) in the back position.
- Select appropriate collated nail sticks. See Technical data.
- Insert collated nail sticks into the loading slot on top of the magazine.
- Unlatch the nail pusher by pulling rearward and carefully slide the nail pusher forward to press against the nails.
Actuating the Tool (fi g. 1)
The nailer operates in sequential action mode.
SEQUENTIAL ACTION MODE
The sequential action mode is used for intermittent nailing when very careful and accurate placement of the nail is desired.
- Push the contact trip (d) against the work surface.
- Pull the trigger (a) to actuate the tool. Each trigger pull with the contact trip pushed against the work surface will drive one nail.
WARNING: To reduce the risk of serious injury, DO NOT depress trigger when the tool is not in use. ALWAYS place the tool on a 90° angle to the workpiece surface.
The removable protective cover (e) protects the workpiece from damage when working.
Depth Setting (fi g. 1)

WARNING: To reduce risk of serious injury from accidental actuation when attempting to adjust depth, ALWAYS:
- Disconnect air supply.
- Avoid contact with trigger during adjustments.
The depth that the nails are driven can be adjusted using the depth adjustment on the nosepiece of the tool.
To reduce the depth, turn the depth adjustment wheel (f) clockwise (tool pointed away from you).
To increase the depth, turn the depth adjustment wheel (f) counterclockwise (tool pointed away from you).
Clearing a Jammed Nail (fi g. 3)
If a nail becomes jammed in the nosepiece, follow these instructions to remove the nail:
- Disconnect the airline from the tool.
- Remove magazine from nailer body.
- Remove the magazine bolts (k) from both sides of the magazine.
- Remove the bracket bolt (l).
- Remove the bent nail, using pliers if necessary.
- Reattach magazine.
- Connect the air hose to the fitting on the tool.
- Load nails into the magazine. See Loading the tool.
WARNING: If nails become jammed in the nosepiece frequently, have the tool serviced by an authorised DEWALT service centre.
MAINTENANCE
Your DEWALT power tool has been designed to operate over a long period of time with a minimum of maintenance. Continuous satisfactory operation depends upon proper tool care and regular cleaning.

NING: To reduce the risk of injury, turn unit off and disconnect machine from air supply before installing and removing accessories, before adjusting or changing set-ups or when making repairs. An accidental start-up can cause injury.
Perform the following maintenance operations every day:

Lubrication
Lubricate tool with 10-15 drops of DEWALT pneumatic tool oil
Insert drops into the air fitting on the end cap of the tool.
Drain all condensation from the air compressor tanks and hoses
- Open petcocks or other drain valves on the compressor tanks.
- Allow any accumulated water to drain from hoses.
ENGLISH

Cleaning
CLEAN MAGAZINE, PUSHER, AND CONTACT TRIP MECHANISM

WARNING: Blow dirt and dust out of the main housing with dry air as often as dirt is seen collecting in and around the air vents. Wear proper eye protection when performing this procedure.

ING: When cleaning, use only mild soap and a damp cloth on plastic parts. Many household cleaners contain chemicals which could seriously damage plastic. Also, do not use gasoline, turpentine, lacquer or paint thinner, dry cleaning fluids or similar products which may seriously damage plastic parts. NEVER let any liquid get inside the tool; NEVER immerse any part of the tool into a liquid.
Ensure that all fasteners on the tool are tight and undamaged
Tighten loose fasteners using the appropriate tool.
TROUBLESHOOTING
If your tool seems not to operate properly, follow the instructions below. If this does not solve the problem, please contact your repair agent.
Tool does not work
- Check the air supply.
- If the temperature is low, warm the tool up.
Tool has insufficient power
- Check the air supply.
- Check if the air exhaust is clear.
- Lubricate the tool.
Tool cap leaks air
- Tighten the cap screws.
Tool skips nails
- Check the air supply.
-
Lubricate the tool.
-
Clean the magazine and nosepiece.
- Check that the magazine latch is holding the magazine firmly.
Fasteners jam in tool
- Make sure only to use fasteners of the type specified.
- Check that the magazine latch is holding the magazine firmly.
- Tighten the nosepiece screws.
Optional Accessories

WARNING: Since accessories, other than those offered by DEWALT, have not been tested with this product, use of such accessories with this tool could be hazardous. To reduce the risk of injury, only DEWALT, recommended accessories should be used with this product.
Consult your dealer for further information on the appropriate accessories.
Protecting the Environment

Separate collection. This product must not be disposed of with normal household waste.
Should you find one day that your DEWALT product needs replacement, or if it is of no further use to you, do not dispose of it with household waste. Make this product available for separate collection.

Separate collection of used products and packaging allows materials to be recycled and used again. Re-use of recycled materials helps prevent environmental pollution and reduces the demand for raw materials.
Local regulations may provide for separate collection of electrical products from the household, at municipal waste sites or by the retailer when you purchase a new product.
DEWALT provides a facility for the collection and recycling of DEWALT products once they have reached the end of their working life. To take advantage of this service please return your product to any authorised repair agent who will collect them on our behalf.
You can check the location of your nearest authorised repair agent by contacting your local DEWALT office at the address indicated in this manual. Alternatively, a list of authorised DEWALT repair agents and full details of our after-sales service and contacts are available on the Internet at: www.2helpU.com.
GUARANTEE
DEWALT is confident of the quality of its products and offers an outstanding guarantee for professional users of the product. This guarantee statement is in addition to and in no way prejudices your contractual rights as a professional user or your statutory rights as a private non-professional user. The guarantee is valid within the territories of the Member States of the European Union and the European Free Trade Area.
• 30 DAY NO RISK SATISFACTION GUARANTEE •
If you are not completely satisfied with the performance of your DEWALT tool, simply return it within 30 days, complete with all original components, as purchased, to the point of purchase, for a full refund or exchange. The product must have been subject to fair wear and tear and proof of purchase must be produced.
• ONE YEAR FREE SERVICE CONTRACT •
If you need maintenance or service for your DEWALT tool, in the 12 months following purchase, you are entitled to one service free of charge. It will be undertaken free of charge at an authorised DEWALT repair agent. Proof of purchase must be produced. Includes labour. Excludes accessories and spare parts unless failed under warranty.
• ONE YEAR FULL WARRANTY •
If your DEWALT product becomes defective due to faulty materials or workmanship within 12 months from the date of purchase, DEWALT guarantees to replace all defective parts free of charge or – at our discretion – replace the unit free of charge provided that:
• The product has not been misused;
- The product has been subject to fair wear and tear;
• Repairs have not been attempted by unauthorised persons;
• Proof of purchase is produced.
- The product is returned complete with all original components
If you wish to make a claim, contact your seller or check the location of your nearest authorised DEWALT repair agent in the DEWALT catalogue or contact your DEWALT office at the address indicated in this manual. A list of authorised DEWALT repair agents and full details of our after-sales service is available on the Internet at: www.2helpU.com