
426100 - Television LG - Free user manual and instructions
Find the device manual for free 426100 LG in PDF.

| Product type | LCD TV |
| Brand | LG |
| Model | 426100 |
| Available sizes | 32", 37", 42", 47" |
| Weight (with stand) | From 14.4 kg (32") to 32.8 kg (47") |
| Power supply | Alternating current (AC) - voltage per specifications |
| Power consumption | Not specified |
| Connectivity | HDMI (x4), USB, Component, SCART (x2), RGB, RS-232C, RF Antenna, Optical digital audio output |
| Main functions | Digital and analog tuner, teletext, parental control, sleep timer, Home/Store mode, TruMotion (on some models) |
| Supported file formats | JPEG (photo), MP3 (audio) |
| Maintenance | Clean the screen with a soft slightly damp cloth (warm water + fabric softener); cabinet with a dry lint-free cloth |
| Safety | Grounding mandatory; do not expose to water; ventilate; mount on wall to prevent tip-over |
| Included accessories | Stand base, screws, remote control, batteries, CD-ROM with complete user manual |
| Wall mounting | Compatible with standard wall mount; use a recommended LG mount |
| General information | Manual available in 20+ languages; 408 pages; downloadable PDF file |
Frequently Asked Questions - 426100 LG
User questions about 426100 LG
0 question about this device. Answer the ones you know or ask your own.
Ask a new question about this device
Download the instructions for your Television in PDF format for free! Find your manual 426100 - LG and take your electronic device back in hand. On this page are published all the documents necessary for the use of your device. 426100 by LG.
USER MANUAL 426100 LG
User's Guide Specification
- Model Description
| MODEL | 32/37/42/47LG6000-ZA | BRAND | LG | Part No. | MFL41425803(0804- REVO3) |
| SUFFIX | EU | Product Name | 32/37/42/47LG6000-ZA |
2. Printing Specification
- Trim Size (Format) : 185mm x 260 mm
- Printing Colors
• Cover : 1 COLOR (BLACK)
- Inside : 1 COLOR (BLACK)
3. Stock (Paper)
• Cover : Coated paper, S/W 150 g/
- Inside : Uncoated paper, 60 g/
4. Printing Method : Off-set
5. Bindery : Perfect bind
6. Language : EN/GE/FR/IT/SP/PO/NE/GR/HU/PL/CZ/SK/RO/BU/SW/NO/DA/FI/ES/LAT/LITH /SV/SER/CRO/TUR (25)
7. Number of pages : 404
NOTES
"This part contain Eco-hazardous substances (Pb, Cd, Hg, Cr6+, PBB, PBDE, etc.) within LG standard level, Details should be followed Eco-SCM management standard[LG(56)-A-2524].
Especially, Part should be followed and controlled the following specification.
(1) Eco-hazardous substances test report should be submitted when Part certification test and First Mass Production.
(2) Especially, Don't use or contain lead(Pb) and cadmium(Cd) in ink.
3. Special Instructions
(1) Origin Notification
* LGEIN : Printed in Indonesia * LGEWA : Printed in U.K.
* LGESP : Printed in Brazil * LGEMX : Printed in Mexico
* LGEND : Printed in China * LGEIL : Printed in India
* LGEMA : Printed in Poland
- Changes
| 10 | ||||
| 9 | ||||
| 8 | ||||
| 7 | ||||
| 6 | ||||
| 5 | ||||
| 4 | ||||
| 3 | Apr.11.08 | Jeon Mi Jeong | S8-16567 | 1. Added the Language(SER,CRO,TUR).2. Changed the bolts for stand assembly |
| 2 | Feb.29.08 | Jeon Mi Jeong | S8-11666 | Added the contents of “Schemi elettrici e norme di taratura disponibili nel CD ROM” on Italy cover . |
| 1 | Feb.14.08 | Jeon Mi Jeong | S8-09690 | Updated the contents of “Select mode”. |
| REV.NO. | MM/DD/YY | SIGNATURE | CHANGE NO. | CHANGE CONTENTS |
Pagination sheet
 |  |  |  |  |
 |  |  |  |  |
 |  |  |  |  |
 |  |  |  |  |
 |  |  |  |  |
 |  |  |  |  |
 |  |  |  |  |
 |  |  |  |  |
 |  |  |  |  |
 |  |  |  |  |
Pagination sheet
| Front cover |
| <CZ> |
| 2 | ...... |
| ...... | ...... |
| ...... | 15 |
| Back cover |
| Front cover |
| <SK> |
| 2 | ...... |
| ...... | ...... |
| ...... | 15 |
| Back cover |
| Front cover |
| <RO> |
| 2 | ...... |
| ...... | ...... |
| ...... | 15 |
| Back cover |
| Front cover |
| <BU> |
| 2 | ...... |
| ...... | ...... |
| ...... | 15 |
| Back cover |
| Front cover |
| <SW> |
| 2 | ...... |
| ...... | ...... |
| ...... | 15 |
| Back cover |
| Front cover |
| <NO> |
| 2 | ...... |
| ...... | ...... |
| ...... | 15 |
| Back cover |
| Front cover |
| <DA> |
| 2 | ...... |
| ...... | ...... |
| ...... | 15 |
| Back cover |
| Front cover |
| <FI> |
| 2 | ...... |
| ...... | ...... |
| ...... | 15 |
| Back cover |
| Front cover<EST> |
| 2 | ...... |
| ...... | ...... |
| ...... | 15 |
| Back cover |
| Front cover |
| <LITH> |
| 2 | ...... |
| ...... | ...... |
| ...... | 15 |
| Back cover |
Pagination sheet
| Front cover <LA> | 2 | ...... | ...... | ...... | ...... | 15 | Back cover |
| Front cover <SV> | 2 | ...... | ...... | ...... | ...... | 15 | Back cover |
| Front cover <SER> | 2 | ...... | ...... | ...... | ...... | 15 | Back cover |
| Front cover <CRO> | 2 | ...... | ...... | ...... | ...... | 15 | Back cover |
| Front cover <TUR> | 2 | ...... | ...... | ...... | ...... | ...... | |
| ---- | 17 | Back cover | |||||
LCD TV
OWNER'S MANUAL
LCD TV MODELS
32LG60**
37LG60**
42LG60**
42LG61**
47LG60**
DVB®
Digital Video
Broadcasting
Trade Mark of the DVB Digital Video
Broadcasting Project (1991 to 1996)
ID Number(s): 5102: 32LG6000
5103: 37LG6000
5104: 42LG6000
5484: 42LG6100
5105: 47LG6000
Please read this manual carefully before operating your TV.
Retain it for future reference.
Record model number and serial number of the TV. Refer to the label on the back cover and quote this information.
To your dealer when requiring service.
An extended Owner's Manual that contains information on the advanced features of these LG TV sets is located on the CD-ROM provided in an electronic version.
To read these files, you will need to use a Personal Computer (PC) equipped with a CD-ROM drive.
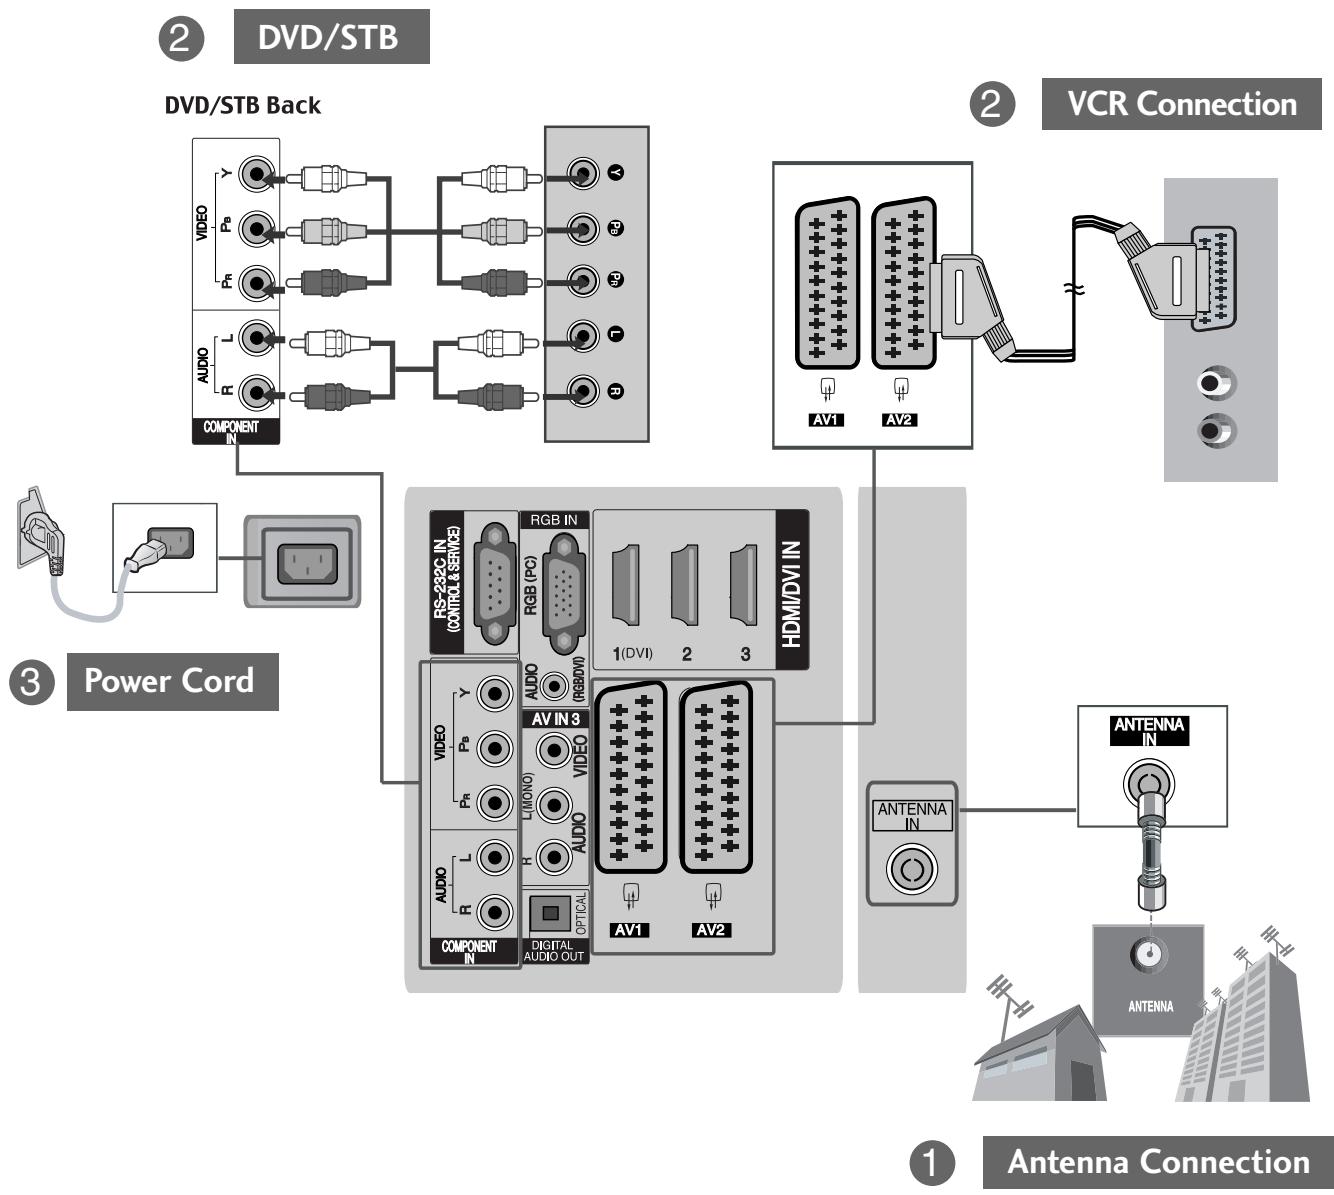
Connecting your Unit
■ Here shown may be somewhat different from your set.
flowchart
graph TD
    A["Component IN"] --> B["RS-232C IN (CONTROL & SERVICE)"]
    A --> C["RGB IN (PC)"]
    A --> D["AV IN3"]
    A --> E["AUDIO OUT"]
    A --> F["VIDEO"]
    A --> G["L(MON)"]
    A --> H["AUDIO"]
    A --> I["COMPONENT IN"]
    J["DVD/STB Back"] --> K["Component IN"]
    L["VCR Connection"] --> M["Component IN"]
    N["Antenna Connection"] --> O["Antenna IN"]
    P["Power Cord"] --> Q["Component IN"]
    R["Antenna In"] --> S["Antenna"]
* To connect an additional equipment, see the External equipment Setup section in CD Manual.
SAFETY INSTRUCTIONS
- Please read these safety precautions carefully before using the product.
- In this manual, the illustration may be somewhat different from your product because it is just example to help the instruction.

WARNING If you ignore the warning message, you may be seriously injured or there is a possibility of accident or death.

CAUTION If you ignore the caution message, you may be slightly injured or the product may be damaged.
Precaution in Installing the Product

WARNING

Keep away from heat sources like electrical heaters.
- Electrical shock, fire, malfunction or deformation may occur.

Do not use the product in damp place such as a bathroom or any place where it is likely to get wet.
- This may cause a fire or could give an electric shock.

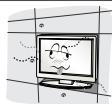
If you can smell smoke or other odors or hear a strange sound unplug the power cord and contact the service center.
- If you continue to use without taking proper measures, electrical shock or fire can occur.

CAUTION

Install the product on a flat and stable place that has no risk of dropping the product.
- If the product is dropped, you may be injured or the product may be broken.

Keep the product away from direct sunlight.
- The product can be damaged.
Do not place the product in a built-in installation such as bookcase or rack.
- Ventilation required.
Electrical Power Related Precautions

WARNING
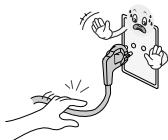
Make sure to connect the power cable to the grounded current.
- You may be electrocuted or injured.

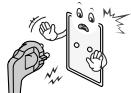
Do not touch the power plug with wet hands. Additionally, it the cord pin is wet or covered with dust, dry the power plug completely or wipe dust off.
- You may be electrocuted due to excess moisture.

During a thunder or lightning storm, unplug the power cable or signal cable.
- You may be electrocuted or a fire can break out.

CAUTION
Protect the power cord from physical or mechanical abuse, such as being twisted, kinked, pinched, closed in a door, or walked upon. Pay particular attention to plugs, wall outlets, and the point where the cord exits the appliance.
Precautions in Moving the Product

WARNING
Make sure to turn off the product.
Make sure to remove all cables before moving the product.
- You may be electrocuted or the product can be damaged.


CAUTION
Do not shock the product when moving it.
- You may be electrocuted or the product can be damaged.
Make the panel face forward and hold it with both hands to move.
- If you drop the product, the damaged product can cause electric shock or fire. Contact with the service center for repair.

Precautions in Using the Product

WARNING
Do not disassemble, repair or modify the product at your own discretion.
- Fire or electric shock accident can occur.
- Contact the service center for check, calibration or repair.

To reduce the risk of fire or electric shock, do not expose this apparatus to rain or moisture.
Apparatus shall not be exposed to dripping or splashing and no objects filled with liquids, such as vases, shall be placed on the apparatus.


CAUTION
Refer all servicing to qualified service personnel. Servicing is required when the apparatus has been damaged in any way, such as power supply cord or plug is damaged, liquid has been spilled or objects have fallen into the apparatus, the apparatus has been exposed to rain or moisture, does not operate normally, or has been dropped.

Do not keep a still image on the screen for an extended period (e.g. by pausing a video) as the fixed image may remain visible on the screen. This is known as image burn. Image burn is not covered under the manufacturer's warranty.

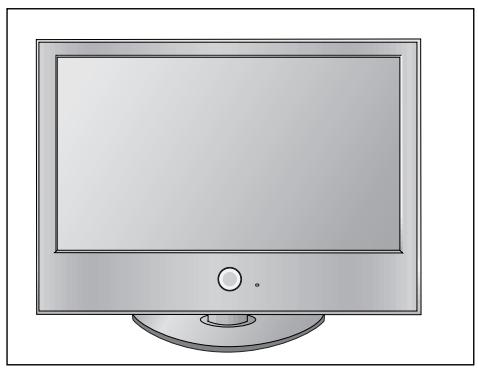
FRONT PANEL CONTROLS
■ Image shown may differ from your TV
If your TV has a protection film attached, remove the film and then wipe the product with a polishing cloth.

NOT USING THE DESK-TYPE STAND
■ Image shown may differ from your TV. When installing the wall-mounted unit, use the protection cover for desk-type stand installation.
natural_image
Illustration of a computer monitor with a magnified inset showing a mouse inside the screen (no text or symbols)After removing the protection paper from the protection cover, adhere it to the TV as shown.
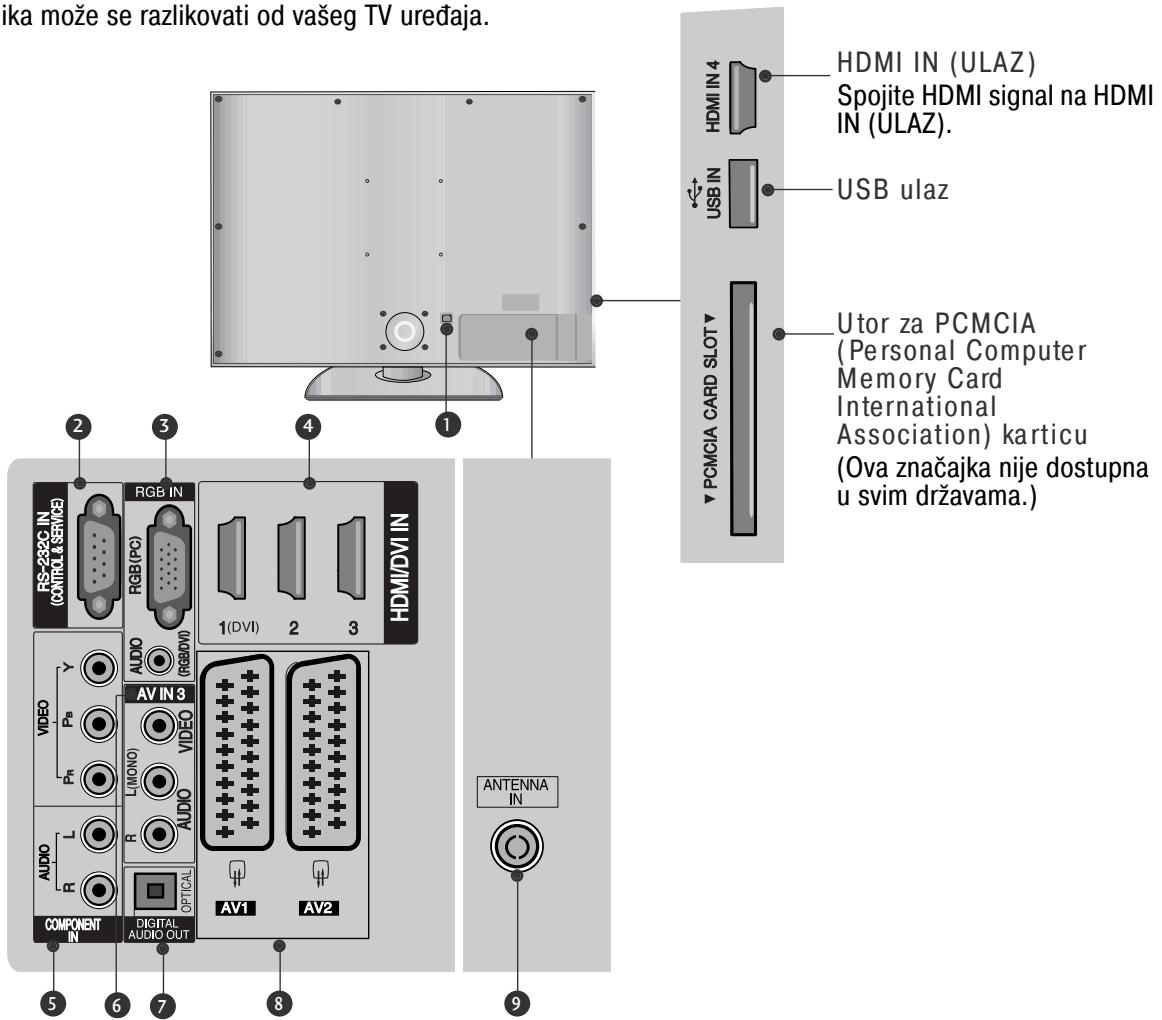
BACK PANEL INFORMATION
■ Image shown may differ from your TV.

① Power Cord Socket
This TV operates on an AC power. The voltage is indicated on the Specifications page. Never attempt to operate the TV on DC power.
② RS-232C IN (CONTROL & SERVICE) PORT
Connect to the RS-232C port on a PC.
3 RGB Input
Connect the output from a PC.
RGB/DVI Audio Input
Connect the audio from a PC or DTV.
4 HDMI Input
Connect a HDMI signal to HDMI IN.
Or DVI(VIDEO)signal to HDMI/DVI port with DVI to HDMI cable.
5 Component Input
Connect a component video/audio device to these jacks.
6 Audio/Video Input
Connect audio/video output from an external device to these jacks.
⑦ OPTICAL DIGITAL AUDIO OUT
Connect digital audio from various types of equipment.
Note: In standby mode, these ports do not work.
⑧ Euro Scart Socket (AV1/AV2)
Connect scart socket input or output from an external device to these jacks
9 Antenna Input
Connect RF antenna to this jack.
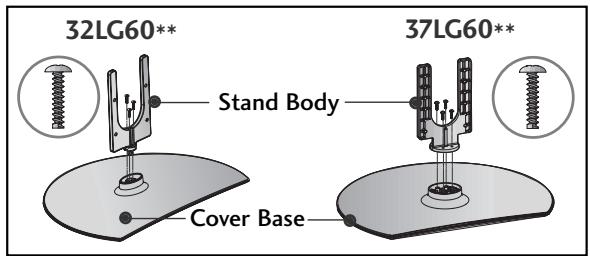
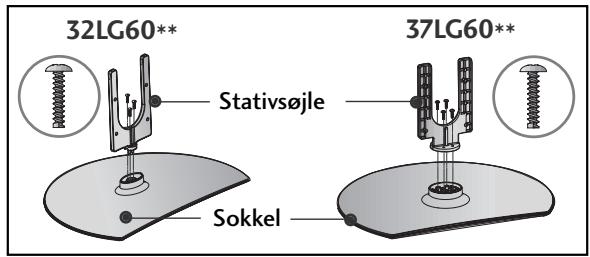
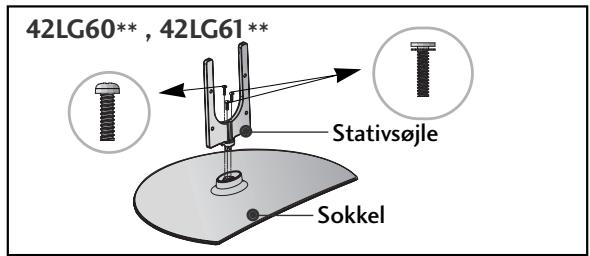
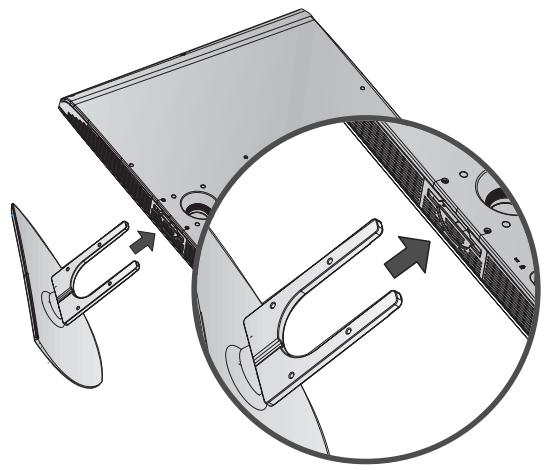
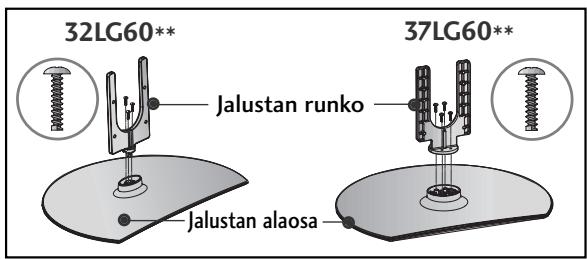
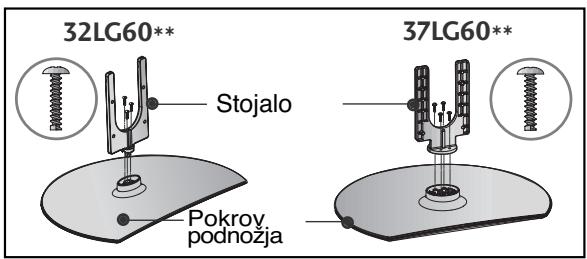
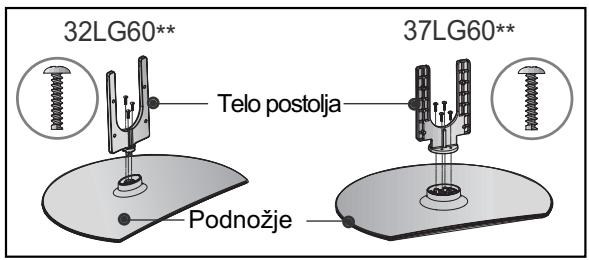
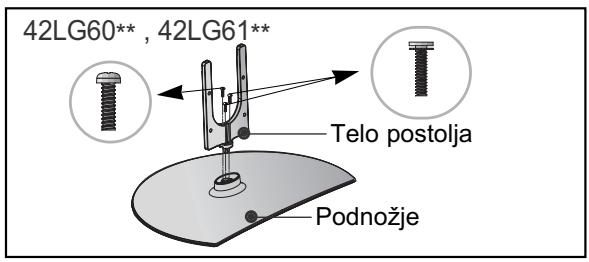
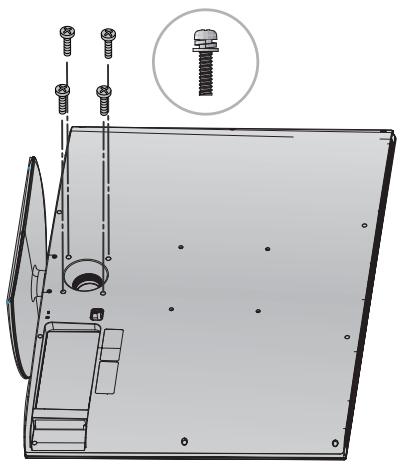
STAND INSTALLATION (32/37/42LG60\*\*, 42LG61\*\* Only)
■ Image shown may differ from your TV
When assembling the desk type stand, check whether the bolt is fully tightened. (If not tightened fully, the product can tilt forward after the product installation.) If you tighten the bolt with excessive force, the bolt can deviate from abrasion of the tightening part of the bolt.
1 Carefully place the TV screen side down on a cushioned surface to protect the screen from damage.
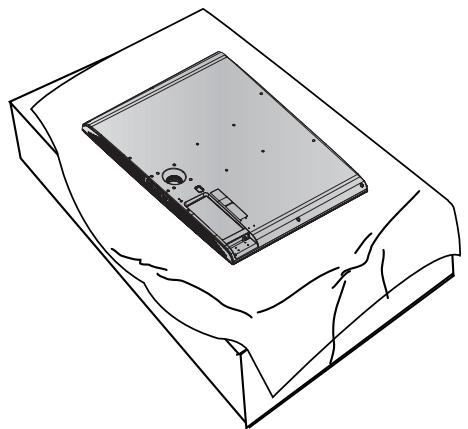
natural_image
Isometric line drawing of a rectangular electronic device with mounting holes and a central hub, placed on a textured surface (no text or symbols)2 Assemble the parts of the Stand Body with Cover Base of the TV.

3 Assemble the TV as shown.
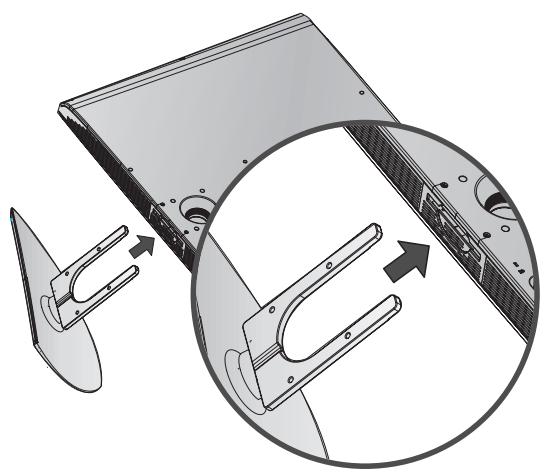
natural_image
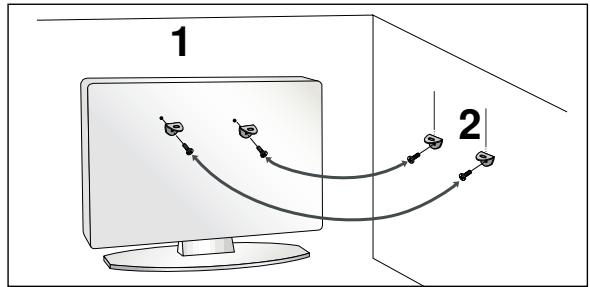
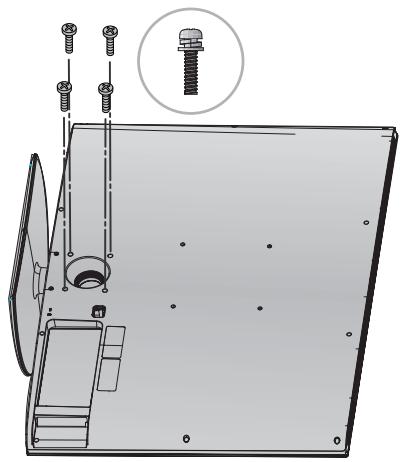
Diagram showing a mechanical component with an arrow indicating assembly or transformation, no text or symbols present.4 Fix the 4 bolts securely using the holes in the back of the TV.

natural_image
Technical line drawing of a mechanical assembly with bolted components and a magnified inset showing a threaded component (no text or symbols present)PLEASE SET IT UP CAREFULLY SO THE PRODUCT DOESN'T FALL OVER.
- You should purchase necessary components to fix the TV to the wall on the market.
■ Position the TV close to the wall to avoid the possibility of it falling when pushed.
The instructions shown below are a safer way to set up the TV, which is to fix it to the wall, avoiding the possibility of it falling forwards if pulled. This will prevent the TV from falling forward and causing injury. This will also prevent the TV from damage. Ensure that children do not climb or hang from the TV.
flowchart
graph TD
    A["Start"] --> B["Path 1"]
    B --> C["Target"]
    C --> D["Path 2"]
1 Use the eye-bolts or TV brackets/bolts to fix the product to the wall as shown in the picture.
(If your TV has bolts in the eyebolts, loosen then bolts.)
* Insert the eye-bolts or TV brackets/bolts and tighten them securely in the upper holes.
2 Secure the wall brackets with the bolts on the wall. Match the height of the bracket that is mounted on the wall.
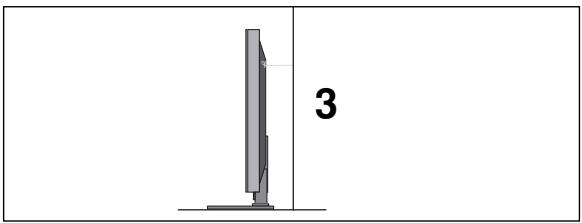
natural_image
Diagram of a computer monitor with a stand and a vertical line labeled '3' (no text or symbols on the device itself)3 Use a sturdy rope to tie the product. It is safer to tie the rope so it becomes horizontal between the wall and the product.
NOTE
▶ When moving the TV undo the cords first.
▶ Use a platform or cabinet strong and large enough to support the size and weight of the TV.
▶ To use the TV safely make sure that the height of the bracket on the wall and on the TV is the same.
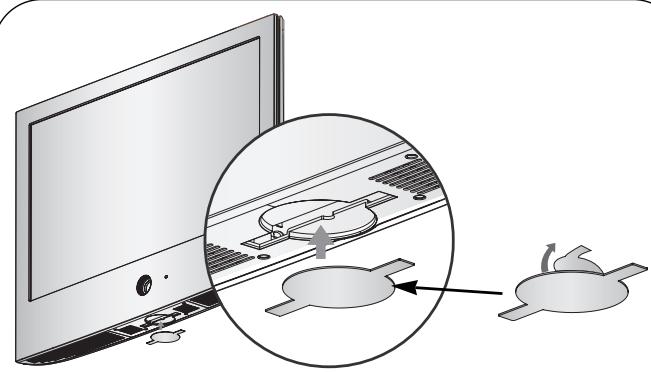
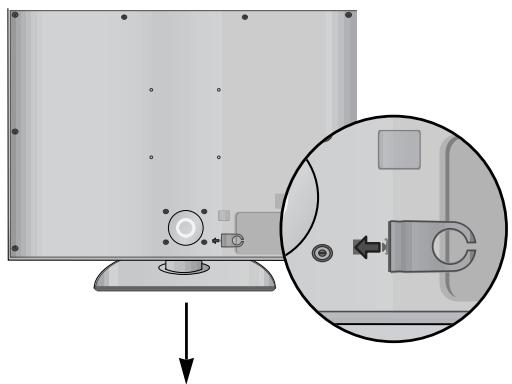
BACK COVER FOR WIRE ARRANGEMENT
■ Image shown may differ from your TV.
1 Align the hole with the tab on the CABLE MANAGEMENT CLIP.
Turn the CABLE MANAGEMENT CLIP as shown. Note that excessive force might cause damage to the product when using Cable Management clip.
natural_image
Diagram showing a computer monitor with an inset close-up of its internal components (no text or symbols present)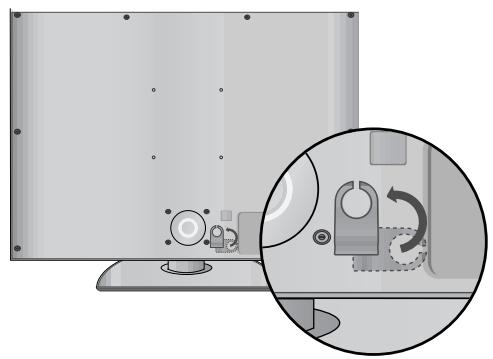
natural_image
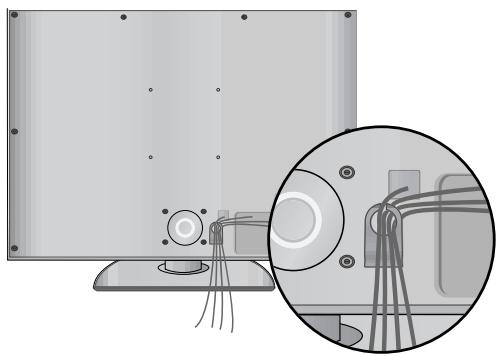
Diagram showing a device with a magnified inset highlighting a mechanical or fluidic component (no text or symbols present)2 Connect the cables as necessary.
To connect additional equipment, see the External equipment Setup section.
natural_image
Diagram showing a monitor mounted on a base with an inset close-up of its internal components (no text or symbols present)■ The TV can be installed in various ways such as on a wall, or on a desktop etc.
■ The TV is designed to be mounted horizontally.
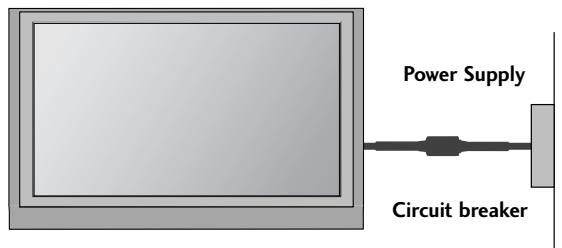
EARTHING
Ensure that you connect the earth wire to prevent possible electric shock. If grounding methods are not possible, have a qualified electrician install a separate circuit breaker.
Do not try to earth the TV by connecting it to telephone wires, lightening rods or gas pipes (comma incorrect).
DESKTOP PEDESTAL INSTALLATION
For adequate ventilation allow a clearance of 4" (10cm) all around the TV.
natural_image
Illustration of a flat-screen computer monitor with a circular base and control knob (no text or symbols)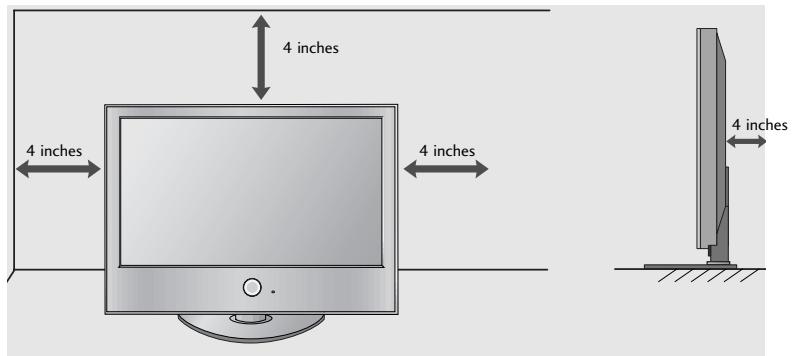
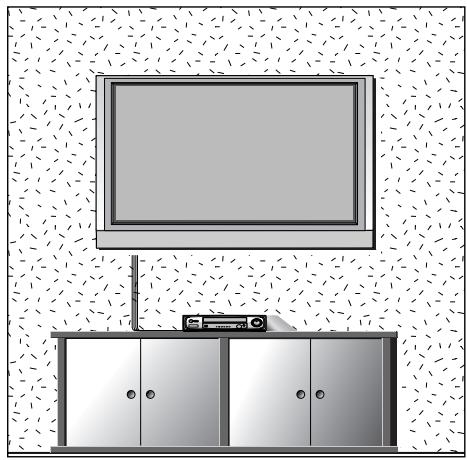
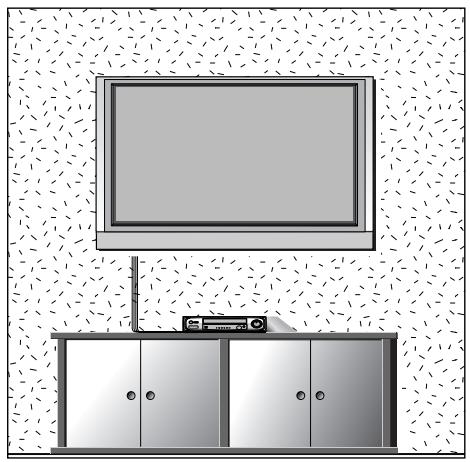
WALL MOUNT: HORIZONTAL INSTALLATION
For adequate ventilation allow a clearance of 4" (10cm) all around the TV. We recommend that you use a wall mounting bracket of LG brand when mounting the TV to a wall.

natural_image
Illustration of a TV setup with a mounted monitor and cabinet, set against a patterned wall (no text or symbols)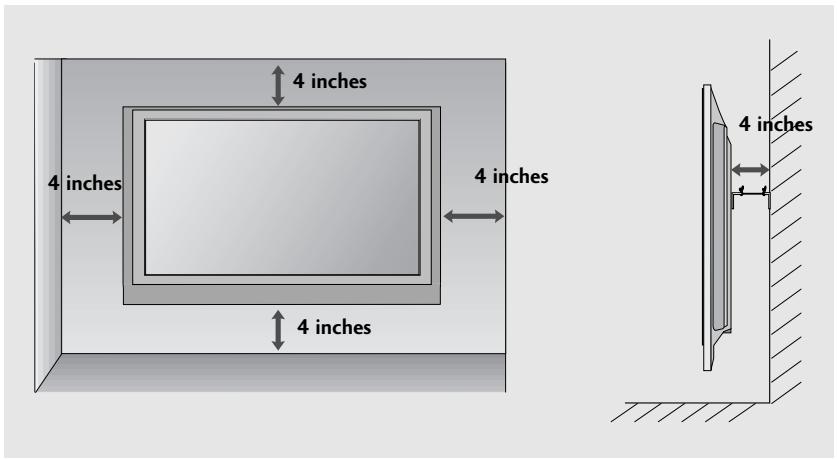
■ To prevent damage do not connect to the mains outlet until all connections are made between the devices.
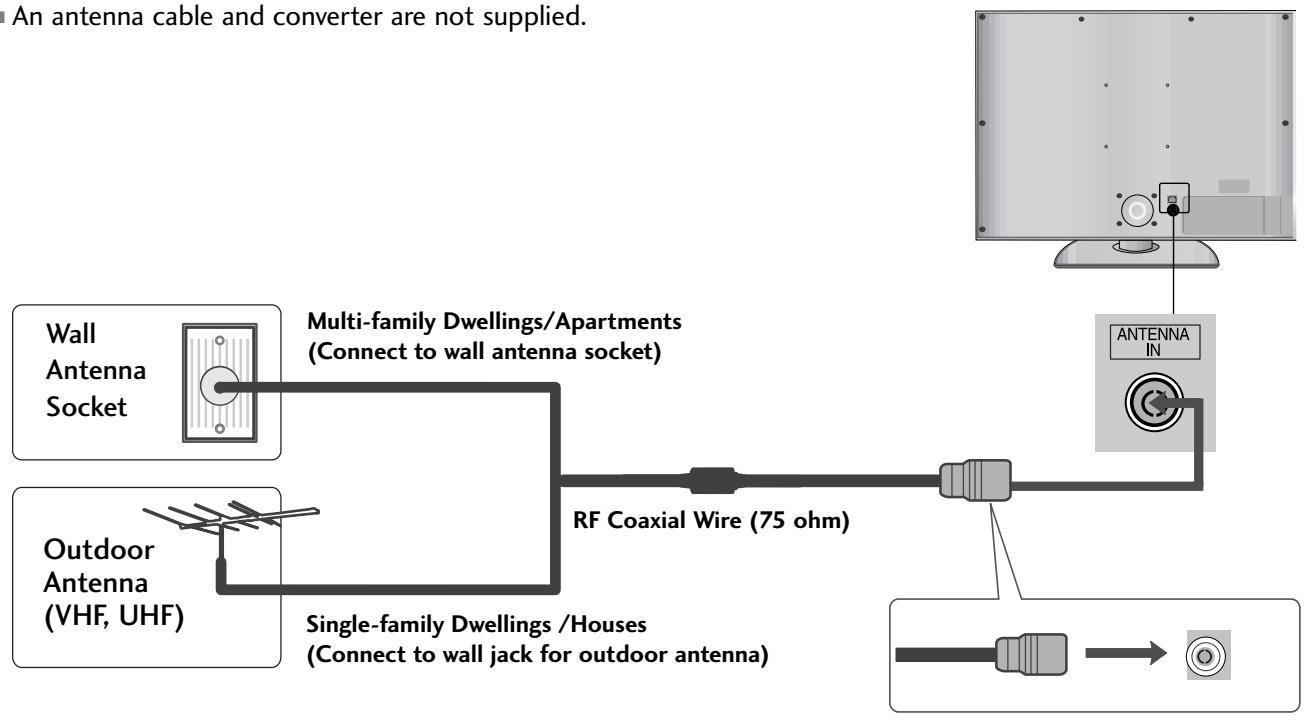
ANTENNA CONNECTION
■ For optimum picture quality, adjust antenna direction.
■ An antenna cable and converter are not supplied.
flowchart
graph LR
    A["Wall Antenna Socket"] --> B["Multi-family Dwellings/Apartments (Connect to wall antenna socket)"]
    C["Outdoor Antenna (VHF, UHF)"] --> D["Single-family Dwellings/Houses (Connect to wall jack for outdoor antenna)"]
    B --> E["RF Coaxial Wire (75 ohm)"]
    D --> E
    E --> F["Antenna IN"]
    F --> G["Output"]

flowchart
graph LR
    A["Antenna"] --> B["UHF"]
    A --> C["VHF"]
    B --> D["Signal Amplifier"]
    C --> D
    D --> E["Antenna IN"]
In poor signal areas, to achieve better picture quality it may be necessary to install a signal amplifier to the antenna as shown above.
■ If signal needs to be split for two TVs, use an antenna signal splitter for connection.
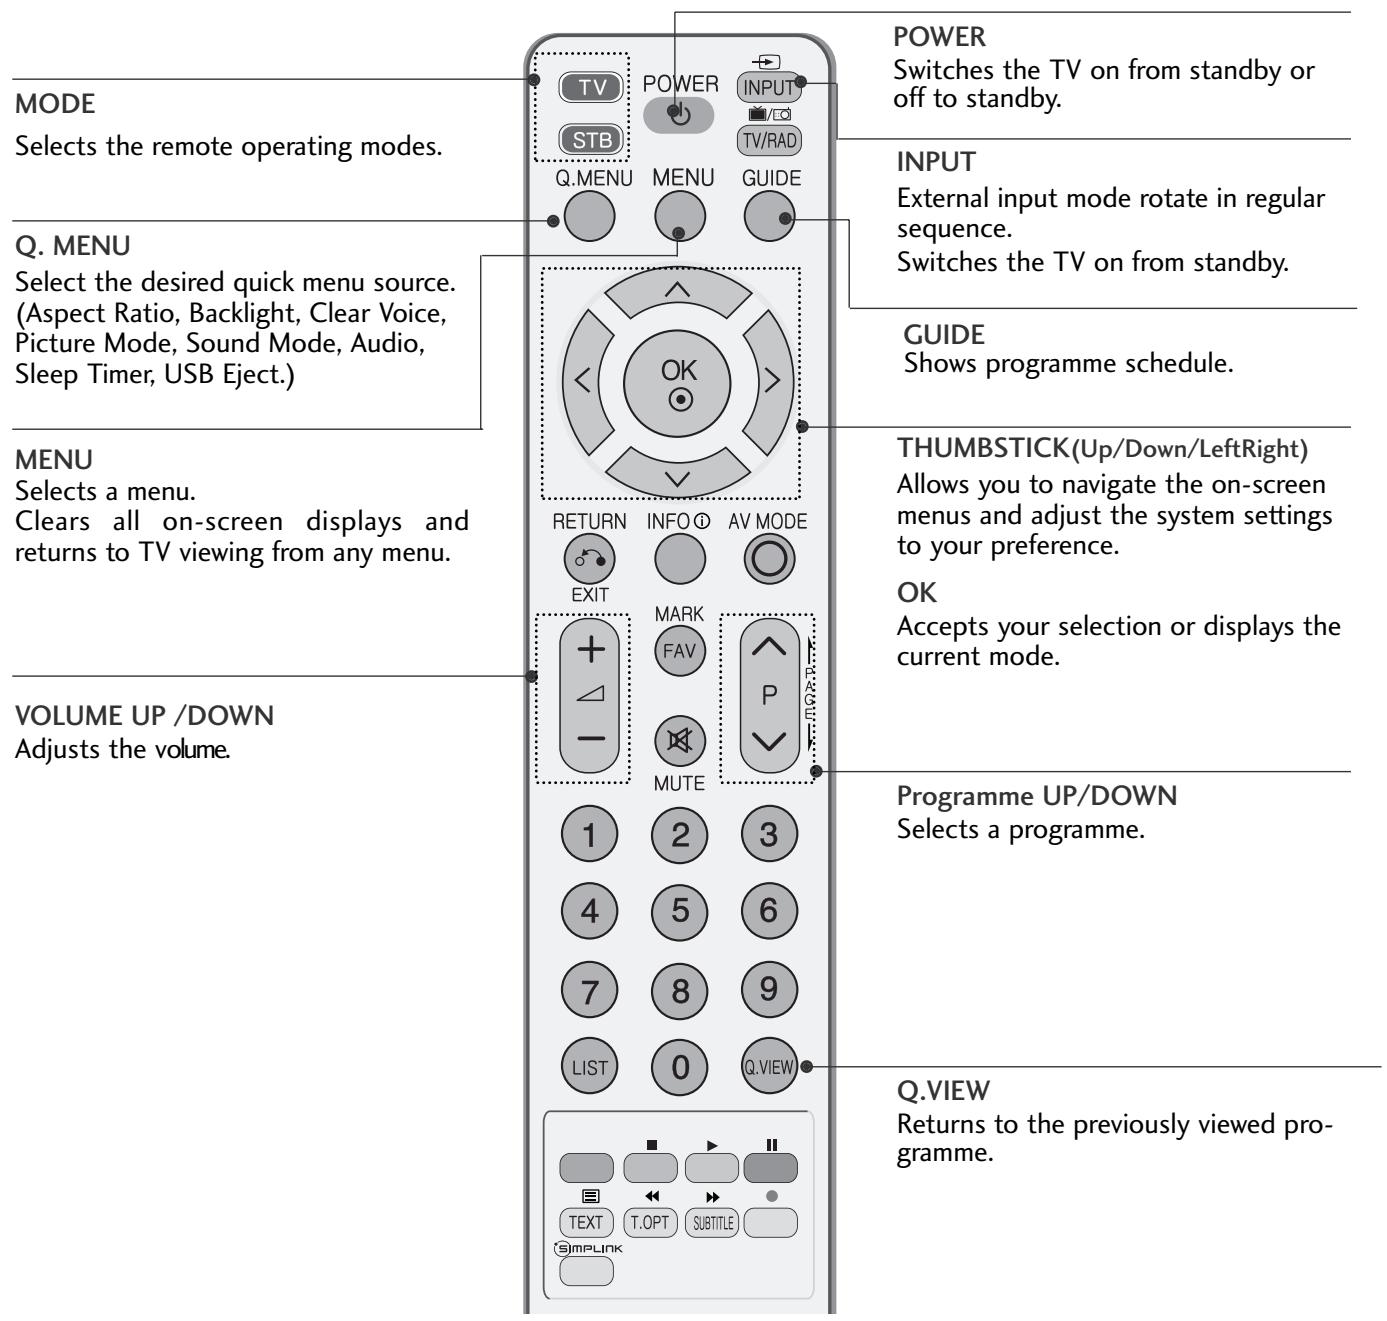
REMOTE CONTROL KEY FUNCTIONS
When using the remote control, aim it at the remote control sensor on the TV.
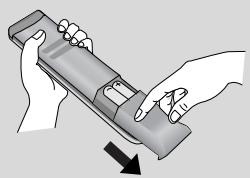
Installing Batteries
natural_image
Illustration of two hands holding a device with a downward arrow indicating motion (no text or symbols)- Open the battery compartment cover on the back and install the batteries matching correct polarity (+with +,-with -).
■ Install two 1.5V AAA batteries. Do not mix old or used batteries with new ones. - Close cover.
TURNING ON THE TV
- When your TV is turned on, you will be able to use its features.
1 Firstly, connect the power cord correctly.
At this stage, the TV switches to standby mode.
2 In standby mode to turn TV on, press the ⏻ / I, INPUT or P ▲ ▼ (or P ∧ ∨) button on the TV or press the POWER, INPUT, P ∧ ∨ or NUMBER button on the remote control and the TV will switch on.
Initializing setup
If the OSD (On Screen Display) is displayed on the screen after turning on the TV, you can adjust the Language, Select Mode, Country, Time Zone, Auto programme tuning.
Note:
a. It will automatically disappear after approx. 40 seconds unless a button is pressed.
b. Press the RETURN button to change the current OSD to the previous OSD.
c. For those countries without confirmed DTV broadcasting standards, some DTV features might not work, depending on the DTV broadcasting environment.
d "Home" mode is the optimal setting for home environments, and is the TV's default mode.
e. "In Store" mode is the optimal setting for store environments. If a user modifies image quality data, "In Store" mode initializes the product to the image quality set by us after a certain period of time.
f. The mode (Home, In Store) can be changed by executing Factory Reset in the OPTION menu.
ON-SCREEN MENU LANGUAGE / COUNTRY SELECTION
The installation guide menu appears on the TV screen when it is switched on for the first time.
Select your desired language.
Select your country.
* If you want to change Language/ Country selection
Select OPTION.
Select your desired language or country.
Select Menu Language or Country.
Save.
NOTE
If you do not finish the set-up Installation Guide by pressing RETURN or if you time out on the OSD (On Screen Display) the installation menu will continuously appear until the set up is completed whenever the TV is switched on
▶ If you select the wrong local country, teletext may not appear correctly on the screen and some problems may occur during teletext operation.
The CI (Common Interface) function may not be applied based on country broadcasting circumstances.
▶ DTV mode control buttons may not function based on country broadcasting circumstances.
In country that Digital broadcasting regulation isn't fixed, some DTV function may not work depending on digital broadcasting circumstances.
ON SCREEN MENUS SELECTION AND ADJUSTMENT
Your TV's OSD (On Screen Display) may differ slightly from that shown in this manual.
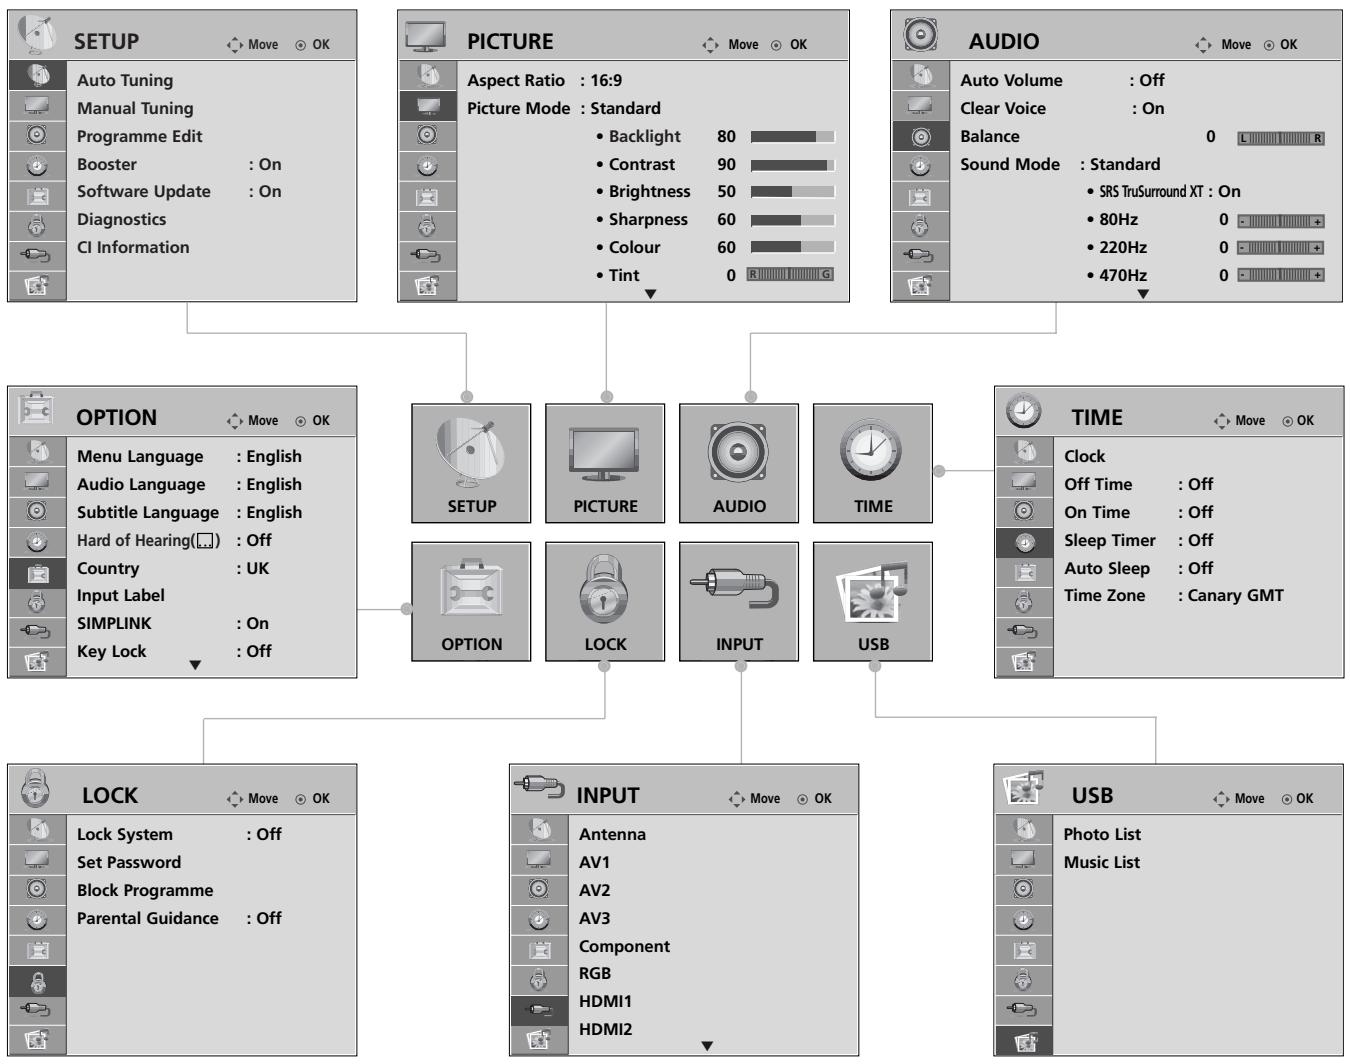
flowchart
graph TD
    A["SETUP"] --> B["Auto Tuning"]
    A --> C["Manual Tuning"]
    A --> D["Programme Edit"]
    A --> E["Booster : On"]
    A --> F["Software Update : On"]
    A --> G["Diagnostics"]
    A --> H["CI Information"]
    I["PICTURE"] --> J["Aspect Ratio : 16:9"]
    I --> K["Picture Mode : Standard"]
    L["AUDIO"] --> M["Auto Volume : Off"]
    L --> N["Clear Voice : On"]
    L --> O["Balance 0 L R"]
    L --> P["Sound Mode : Standard"]
    Q["OPTION"] --> R["Menu Language : English"]
    Q --> S["Audio Language : English"]
    Q --> T["Subtitle Language : English"]
    Q --> U["Hard of Hearing(□) : Off"]
    Q --> V["Country : UK"]
    Q --> W["Input Label"]
    Q --> X["SIMPLINK : On"]
    Q --> Y["Key Lock : Off"]
    Z["INPUT"] --> AA["Antenna AV1 AV2 AV3 Component RGB HDMI1 HDMI2"]
    AB["USB"] --> AC["Photo List Music List"]


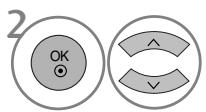
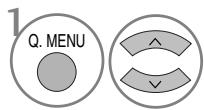
Display each menu.
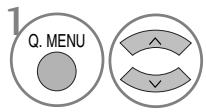
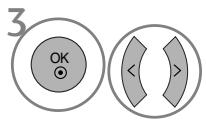
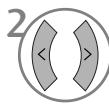
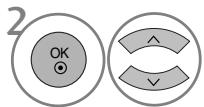
Select a menu item.
Move to the pop up menu.
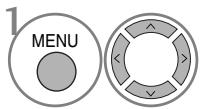
- Press the MENU button to return to normal TV viewing.
- Press the RETURN button to move to the previous menu screen.

NOTE
▶ It is possible to use TruMotion, TruMotion Demo in 42/47LG60**, 42LG61** models only.
▶ It is not possible to use CI Information and Booster in Analogue mode.
AUTO PROGRAMME TUNING
Use this to automatically find and store all available programmes.
When you start auto programming, all previously stored service information will be deleted.

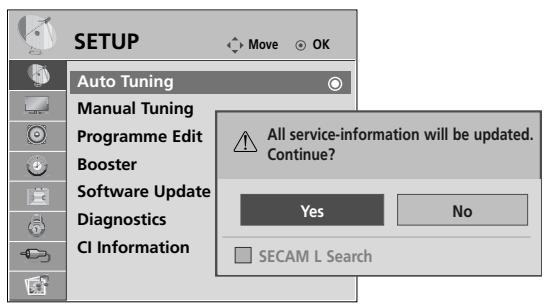
Select SETUP.
Select Auto Tuning.
Select Yes.
Run Auto tuning.
- Use NUMBER buttons to input a 4-digit password in Lock System 'On'.
- If you wish to keep on auto tuning select YES using the < > button. Then, press the OK button. Otherwise select NO.
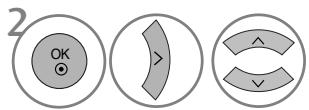
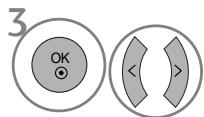
WHEN CONNECTING THE USB DEVICE
When you connect a USB device, this screen is displayed, automatically.
In USB device, you can not add a new folder or delete the existing folder.
1 Connect the USB device to the USB IN jacks on the side of TV.
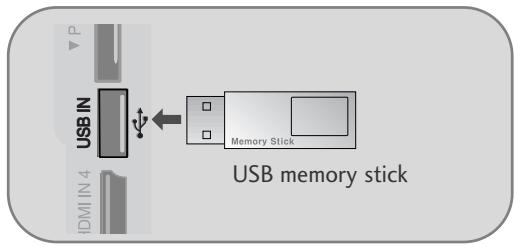
- It doesn’t support USB HDD
• This TV Supports on JPEG and MP3.
When removing the USB device
Select the USB EJECT menu before removing the USB device.
Select USB Eject.
MAINTENANCE
Early malfunctions can be prevented. Careful and regular cleaning can prolong the life of your new TV.
Caution: Be sure to switch the power off and unplug the power cord before you begin any cleaning.
Cleaning the Screen
1 A good way to keep the dust off your screen for a while is to wet a soft cloth in a mixture of lukewarm water and a little fabric softener or dish washing detergent. Wring the cloth until it is almost dry, and then use it to wipe the screen.
2 Ensure there is no excess water on the screen. Allow any water or dampness to evaporate before switching on.
Cleaning the Cabinet
■ To remove dirt or dust, wipe the cabinet with a soft, dry, lint-free cloth.
■ Do not to use a wet cloth.
Extended Absence
CAUTION
If you expect to leave your TV dormant for prolonged periods (such as a holiday), unplug the power cord to protect against possible damage from lightning or power surges.
TO VIEW THE USER'S GUIDE ON THE CD-ROM
To view the User's guide on the CD-ROM, Adobe Acrobat Reader must be installed on your PC.
The "ACRORD" folder on the CD-ROM contains the installation program for Acrobat Reader.
If you want to install Acrobat Reader, Open "My Computer"→Open the folder "LG"→Open the folder "ACRORD"
→ double-click your language.
To view the User's guide
The User's guide files are included in the supplied CD-ROM.
Load the supplied CD-ROM into the CD-ROM drive of your PC.
After a while, the web page of the CD-ROM will open automatically.(Windows users only)
If the web page does not appear automatically, open the User's guide file directly.
Open "My computer" → Open the folder "LG" → Double click the "index.htm" file.
WEIGHT
| MODELS | 32LG60** | 37LG60** | 42LG60** | ||
| 32LG6000-ZA | 37LG6000-ZA | 42LG6000-ZA | |||
| Weight | with stand | 14.4 kg / 31.7 lbs | 21.2 kg / 46.3 lbs | 24.1 kg / 53.1 lbs | |
| without stand | 12.2 kg / 26.9 lbs | 18.1 kg / 39.9 lbs | 20.4 kg / 44.9 lbs | ||
| MODELS | 42LG61** | 47LG60** | |||
| 42LG6100-ZB | 47LG6000-ZA | ||||
| Weight | with stand | 21.3 kg / 47 lbs | 32.8 kg / 73.3 lbs | ||
| without stand | 18 kg / 39.7 lbs | 27.2 kg / 59.9 lbs | |||
■ The specifications shown above may be changed without prior notice for quality improvement.
TROUBLESHOOTING
The TV does not operate properly.
| The remote control does not work | Check to see if there is any object between the TV and the remote control causing an obstruction. Ensure you are pointing the remote control directly at the TV.Ensure that the batteries are installed with correct polarity (+ to +, - to -).Ensure that the correct remote operating mode is set : TV, STB etc.Install new batteries. |
| Power is suddenly turned off | Is the sleep timer set?Check the power control settings. Has the Power supply been interrupted.Is Auto sleep activated on this station? |
The video function does not work.
| No picture & No sound | Check whether the TV is switched on.Try another channel. The problem may be with the broadcast.Is the power cord inserted correctly into the mains?Check your antenna direction and/or location.Test the mains outlet by plugging another TV into the same outlet. |
| Picture appears slowly after switching on | This is normal, the image is muted during the TV startup process. Please contact your service centre, if the picture has not appeared after five minutes. |
| No or poor colour or poor picture | Adjust Colour in menu option.Allow a sufficient distance between the TV and the VCR.Try another channel. The problem may be with the broadcast.Are the video cables installed properly?Activate any function to restore the brightness of the picture. |
| Horizontal/vertical bars or picture shaking | Check for local interference such as an electrical appliance or power tool. |
| Poor reception on some channels | Station or cable channel experiencing problems, tune to another station.Station signal is weak, reposition the antenna to receive weaker stations.Check for sources of possible interference. |
| Lines or streaks in pictures | Check antenna (Change the position of the antenna). |
| No picture when connecting HDMI | Check HDMI cable over version 1.3.If the HDMI cables don’t support HDMI version 1.3, it can cause flickers or no screen display. In this case use the latest cables that support HDMI version 1.3. |
The audio function does not work.
| Picture OK & No sound | Press the △ + or - button.Sound muted? Press MUTE button.Try another channel. The problem may be with the broadcast.Are the audio cables installed properly? |
| No output from one of the speakers | Adjust Balance in menu option. |
| Unusual sound from inside the TV | A change in ambient humidity or temperature may result in an unusual noise when the TV is switched on or off and does not indicate a fault with the TV. |
| No sound when connecting HDMI or USB | Check HDMI cable over version 1.3.Check USB cable over version 2.0.*This feature is not available for all models. |
There is a problem in PC mode. (Only PC mode applied)
| The signal is out of range (Invalid format) | ■ Adjust resolution, horizontal frequency, or vertical frequency. |
| ■ Check the input source. | |
| Vertical bar or stripe on background & Horizontal Noise & Incorrect position | Use Auto configure or adjust clock, phase, or H/V position. (Option) |
| Screen colour is unstable or single colour | Check the signal cable. |
| ■ Reinstall the PC video card. |
(UK only)
Keep this important information about how to re-tune your TV during the digital TV switchover
Keep this leaflet and your instruction manual safe – you'll need them
natural_image
Black-and-white image of a flat-screen computer monitor (no text or symbols visible)
natural_image
Cartoon robot character with large eyes and a small 'V' on its body, standing with one arm extended (no text or symbols)get set for digital √
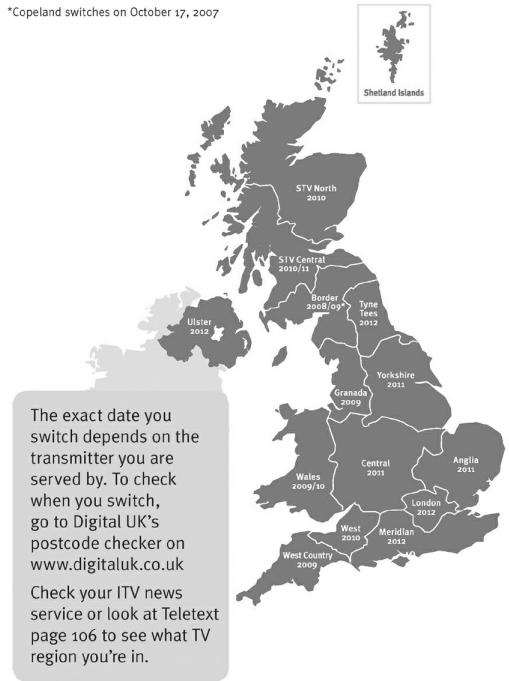
Television in the UK is going digital, bringing us all more choice and new services. Starting in late 2007 and ending in 2012, television services in the UK will go completely digital, TV region by TV region.
Please see overleaf to find out when your area switches to digital.
Digital UK is the independent, non-profit organisation leading the process of digital TV switchover in the UK. Digital UK provides impartial information on what people need to do to prepare for the move to digital, and when they need to do it.
How the switchover affects your TV equipment:
Your new TV has a digital tuner built in, which means it is ready to receive the Freeview signal by simply plugging it into your aerial socket (check if you can get digital TV through your aerial now, or whether you'll have to wait until switchover, at www.digitaluk.co.uk).
When the TV switchover happens in your area, there are at least two occasions when you will need to re-tune your TV in order to continue receiving your existing TV channels, and also to pick up new ones. Digital UK, the body leading the digital TV switchover, will advise you when you need to re-tune during the switchover.
If you choose to connect your TV to satellite or cable with a digital box then it will not be affected by switchover, and you won't need to re-tune.
When does switchover happen?
*Copeland switches on October 17, 2007
Visit us at digitaluk.co.uk call us on 0845 6 50 50 50 ^†
^ Calls charged at BT rate of 3p per minute daytime and 1p per minute evenings and weekends. Rates may vary for calls from non-BT lines.
How to re-tune:
To find out how to re-tune your TV, check your manufacturer's instructions for details. Or see below for a typical sequence:
- With your TV in digital TV mode, press 'Menu' on your remote control. (Some TVs will ask you for a code. If you have not already changed it, the default code is usually 0000, or check your instruction book.)
- From the Menu options on screen, select 'SETUP'. Select 'Auto Tuning'* to re-tune your digital TV (not 'add channels'). You may have to wait a couple of minutes for the re-tune to complete.
*Also sometimes referred to as 'Update', 'Rescan', 'Replace', 'Auto-Tuning', 'Channel Search', 'First Time Install', or 'Store Channels'.
- If you do not re-tune your channels when advised to do so by Digital UK, you may lose some or all of your channels until you do re-tune. You should re-tune your TV every few months to check for any new channels.
If you are missing any channels, it may be that they are not available in your area, or that your aerial needs upgrading.
If you have any questions, please contact your equipment supplier or call Digital UK on 0845 6 50 50 50 or visit www.digitaluk.co.uk
LG Electronics Inc.
LCD TV
Bedienungsanleitung
LCD TV-MODELLE
32LG60**
37LG60**
42LG60**
42LG61**
47LG60**
natural_image
Illustration of a computer monitor with an inset showing a close-up of a device component (no text or symbols present)natural_image
Isometric line drawing of a rectangular electronic device with mounting holes and a central hub, placed on a textured base (no text or symbols)natural_image
Technical illustration of a mechanical component with an inset showing internal structure (no text or symbols)natural_image
Technical line drawing of a mechanical assembly with bolted components and a magnified inset showing a threaded component (no text or symbols)DAS GERÄT MUSS SICHER MON- TIERT WERDEN, SO DASS ES NICHT UMFALLEN KANN.
flowchart
graph TD
    A["1"] --> B["Target"]
    C["2"] --> B["Target"]
natural_image
Diagram of a computer monitor with a vertical line and label '3' (no text or symbols on the device itself)■ Image shown may differ from your TV.
natural_image
Diagram showing a monitor with a circular inset highlighting a key inserted into a device (no text or symbols present)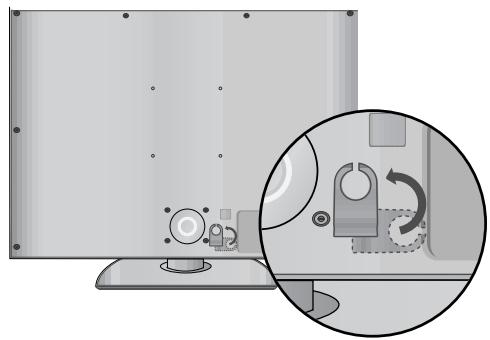
natural_image
Diagram showing a computer monitor with a close-up inset illustrating the internal mechanism of a device (no text or symbols present)natural_image
Illustration of a flat-screen monitor with an inset close-up showing internal components (no text or symbols)natural_image
Illustration of a flat-screen computer monitor with a circular base and control knob (no text or symbols)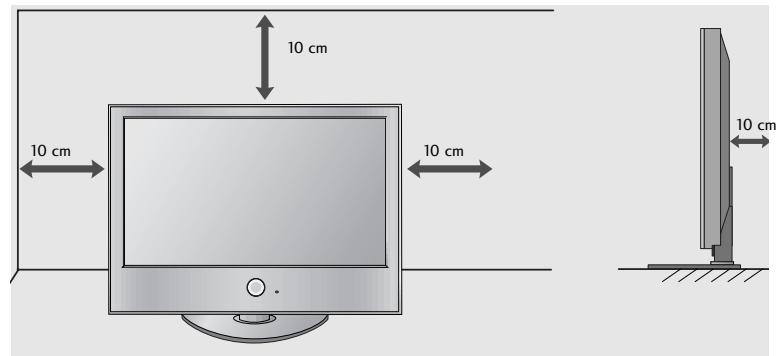
WANDMONTAGE: HORIZONTALE LAGE
natural_image
Illustration of a TV setup with a mounted monitor and cabinet, set against a patterned wall (no text or symbols)
natural_image
Illustration of two hands holding a cylindrical device with an arrow indicating motion (no text or symbols)natural_image
Simple diagram with concentric circles and a small circle connected by a line (no text or symbols)MARCHE/ARRET
VOYANT DE MISE SOUS TENSION/STANDBY (VEILLE)
SI VOUS N'UTILISEZ PAS LE PIED A POSER
natural_image
Illustration of a computer monitor with an inset showing a close-up of a device component (no text or symbols present)natural_image
Technical line drawing of a mechanical component with mounting holes and a base plate (no text or symbols)natural_image
Technical illustration of a mechanical component with curved blades and a circular inset showing internal structure (no text or symbols)natural_image
Technical line drawing of a mechanical assembly with bolts and a magnified inset showing a bolt detail (no text or symbols)VEUILLEZ INSTALLER LA TELEVISION AVEC PRECAUTION POUR EVITER QU'ELLE NE TOMBE.
natural_image
Diagram of a monitor with a stand and a vertical line labeled '3' (no text or symbols on the monitor itself)natural_image
Illustration of a monitor with cable routing and a magnified inset showing internal components (no text or symbols)natural_image
Illustration of a flat-screen computer monitor with a circular base and control knob (no text or symbols)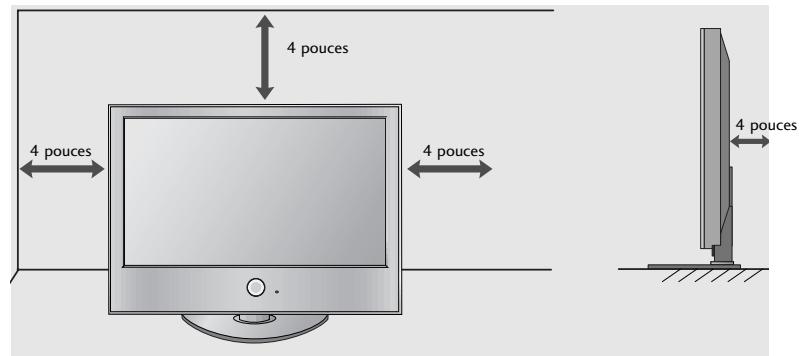
MONTAGE AU MUR : INSTALLATION HORIZONTALE
natural_image
Illustration of a TV setup with a mounted console and cabinet, set against a patterned wall (no text or symbols)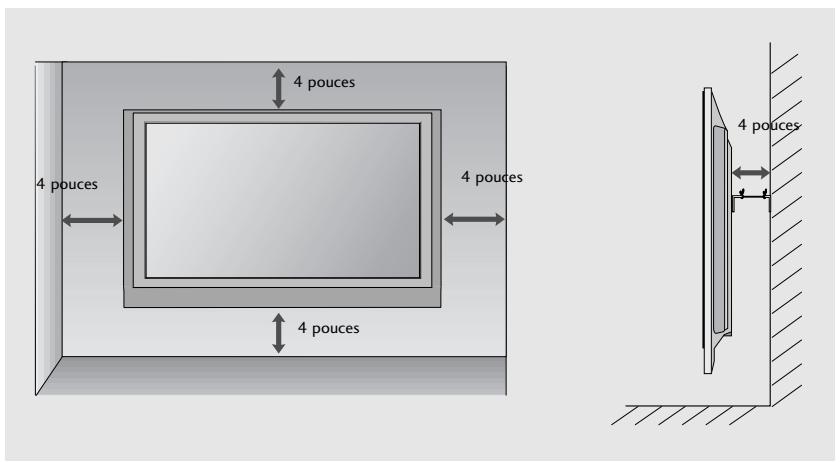
natural_image
Illustration of hands holding a device with a scroll, no text or symbols present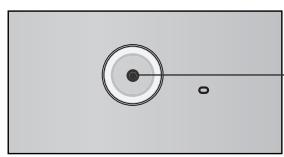
natural_image
Simple diagram with concentric circles and a small circle connected by a line (no text or symbols)natural_image
Illustration of a computer monitor with an inset showing a close-up of a device component (no text or symbols present)natural_image
Isometric line drawing of a rectangular electronic device with mounting holes and a base plate (no text or symbols)natural_image
Diagram showing a mechanical component with an arrow indicating direction, no text or symbols presentnatural_image
Technical line drawing of a mechanical assembly with bolted components and a magnified inset showing a threaded component (no text or symbols)INSTALLARE CON ATTENZIUONE IN MODO CHE IL PRODOTTO NON SI RIBALTI.
natural_image
Diagram of a computer monitor with a stand and a vertical line labeled '3' (no text or symbols on the monitor itself)natural_image
Diagram showing a computer monitor with an inset close-up of its internal components (no text or symbols present)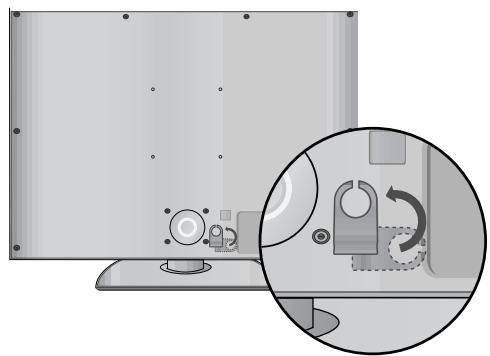
natural_image
Diagram showing a computer monitor with a close-up inset illustrating the internal components of a device (no text or symbols present)natural_image
Illustration of a monitor with an inset close-up showing internal components (no text or symbols)natural_image
Illustration of a flat-screen computer monitor with a circular base and control knob (no text or symbols)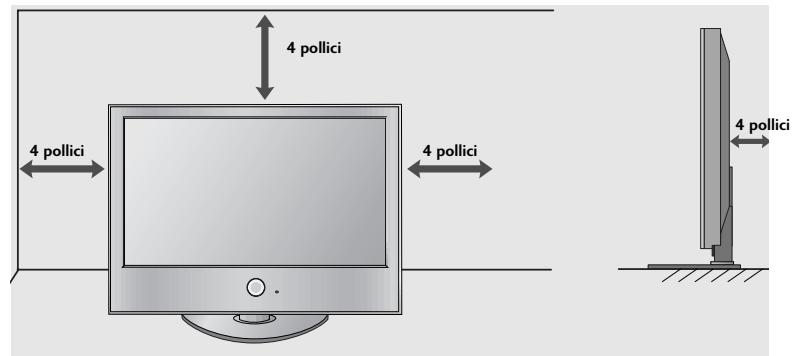
natural_image
Illustration of a TV setup with a mounted console and cabinet, set against a patterned wall (no text or symbols)
natural_image
Illustration of hands holding a device with an arrow indicating motion (no text or symbols)natural_image
Simple diagram with concentric circles and a small o mark, no text or symbols presentnatural_image
Illustration of a computer monitor with an inset showing a close-up of a device inside, and a mouse on its side (no text or symbols present)natural_image
Line drawing of a mechanical component with mounting holes and a rectangular base (no text or symbols)natural_image
Diagram showing a mechanical component with curved blades and a circular inset view of internal components (no text or symbols)natural_image
Technical diagram of a mechanical assembly with bolts and a magnified inset showing a bolt detail (no text or symbols present)POR FAVOR, INSTALE EL PRODUCTO CON CUIDADO PARA EVITAR QUE SE CAIGA.
natural_image
Diagram of a computer monitor with a stand and a vertical line labeled '3' (no text or symbols on the monitor itself)natural_image
Diagram showing a mechanical assembly process with three steps: before, after, and after assembly (no text or symbols present)natural_image
Illustration of a monitor mounted on a base with an inset close-up showing internal components (no text or symbols)natural_image
Illustration of a flat-screen computer monitor with a circular base and control knob (no text or symbols)
natural_image
Illustration of a TV set with a mounted device and cabinet, no text or symbols present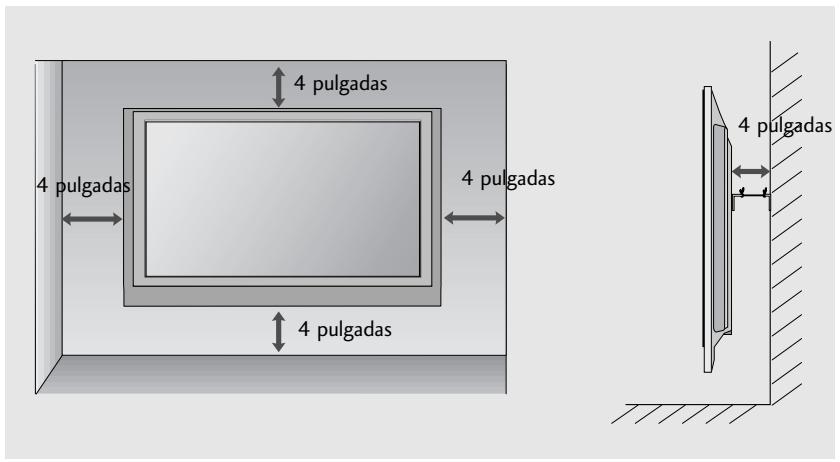
natural_image
Illustration of two hands holding a cylindrical device with a downward arrow indicating motion (no text or symbols)MANUAL DE INSTRUÇÕES
MODELOS DE TV LCD
32LG60**
37LG60**
42LG60**
42LG61**
47LG60**
natural_image
Simple diagram with concentric circles and a small circle connected by a line (no text or symbols)Ligar/Desligar
Sensor do Controlo Remoto Indicador de Modo Ligado/Espera
natural_image
Illustration of a computer monitor with an inset showing a close-up of a device component (no text or symbols present)natural_image
Line drawing of a mechanical component with mounting holes and a rectangular base (no text or symbols)natural_image
Technical illustration of a computer monitor with an open lid and internal components, showing structural assembly (no text or symbols)natural_image
Technical line drawing of a mechanical assembly with bolts and a magnified inset showing a bolt detail (no text or symbols)POR FAVOR, INSTALE-O CUIDADOSAMENTE, PARA QUE O PRODUTO NÃO CAIA.
flowchart
graph TD
    A["1"] --> B["Target"]
    C["2"] --> B["Target"]
natural_image
Diagram of a computer monitor with a stand and a vertical line labeled '3' (no text or symbols on the monitor itself)natural_image
Illustration of a monitor with an inset close-up showing internal components (no text or symbols)natural_image
Illustration of a flat-screen computer monitor with a circular base and control knob (no text or symbols)
natural_image
Illustration of a TV setup with a mounted monitor and cabinet, set against a patterned wall (no text or symbols)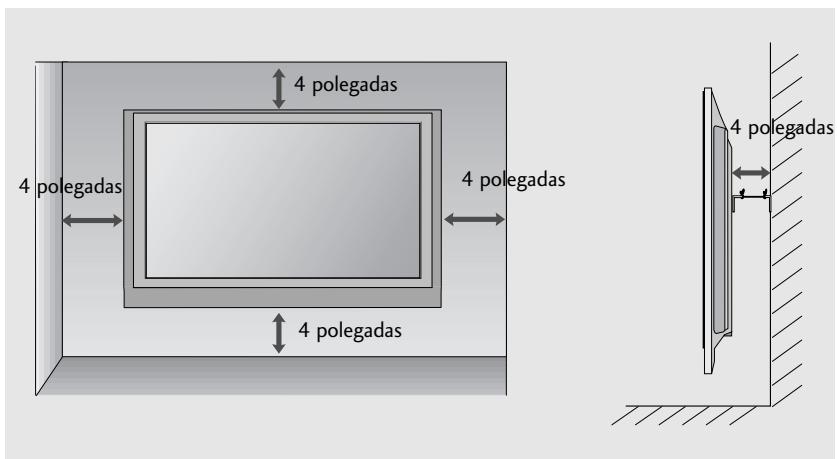
natural_image
Illustration of two hands holding a cylindrical device with a downward arrow indicating motion (no text or symbols)natural_image
Illustration of a computer monitor with an inset showing a close-up of a device component (no text or symbols present)natural_image
Isometric line drawing of a rectangular electronic device with mounting holes and a base plate (no text or symbols)natural_image
Technical illustration of a mechanical component with an arrow indicating assembly or transformation (no text or symbols present)natural_image
Technical line drawing of a mechanical assembly with bolted components and an inset showing a bolt detail (no text or symbols)ZET ALLES MET ZORG IN ELKAAR ZODAT DE TV NIET KAN OMVALLEN.
flowchart
graph TD
    A["1"] --> B["Target"]
    C["2"] --> B["Target"]
natural_image
Diagram of a computer monitor with a stand and a vertical line labeled '3' (no text or symbols on the monitor itself)natural_image
Diagram showing a computer monitor with an inset close-up of its internal components (no text or symbols present)
natural_image
Diagram showing a device with a circular inset highlighting a mechanical component (no text or symbols present)natural_image
Illustration of a flat-screen monitor with an inset close-up showing internal components (no text or symbols)natural_image
Illustration of a flat-screen computer monitor with a circular base and control knob (no text or symbols)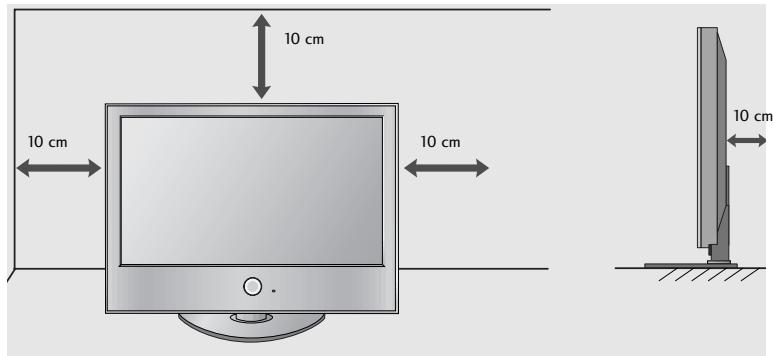
WANDMONTAGE: HORIZONTALE INSTALLATIE
natural_image
Illustration of a TV setup with a mounted monitor and cabinet, set against a patterned wall (no text or symbols)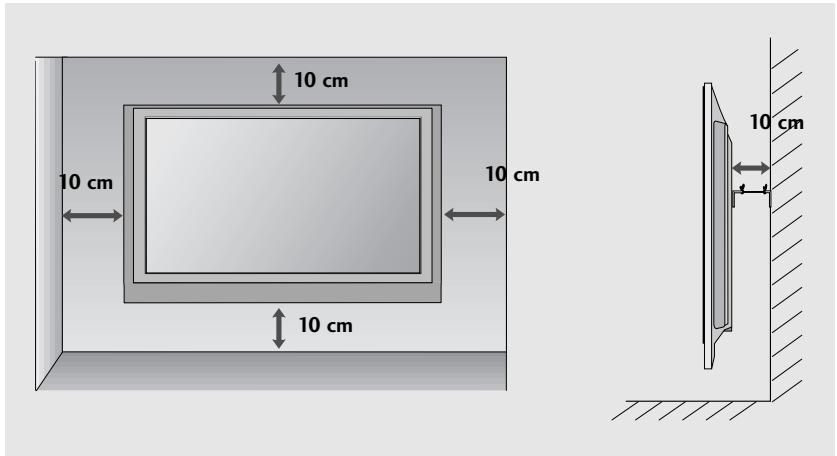
natural_image
Illustration of two hands holding a cylindrical device with a downward arrow indicating motion (no text or symbols)
natural_image
Illustration of a computer monitor with an inset showing a mouse inside a tray (no text or symbols present)natural_image
Isometric line drawing of a rectangular electronic device with internal components, placed on a textured base (no text or symbols)natural_image
Technical illustration of a mechanical component with an arrow indicating assembly or transformation (no text or symbols present)natural_image
Technical line drawing of a mechanical assembly with bolted components and a magnified inset showing a threaded component (no text or symbols)natural_image
Diagram of a computer monitor with a stand and a vertical line labeled '3' (no text or symbols on the device itself)natural_image
Illustration of a flat-screen monitor with an inset close-up showing internal components (no text or symbols)natural_image
Illustration of a flat-screen computer monitor with a circular base and control knob (no text or symbols)
natural_image
Illustration of a TV set with a mounted monitor and cabinet, set against a patterned wall (no text or symbols)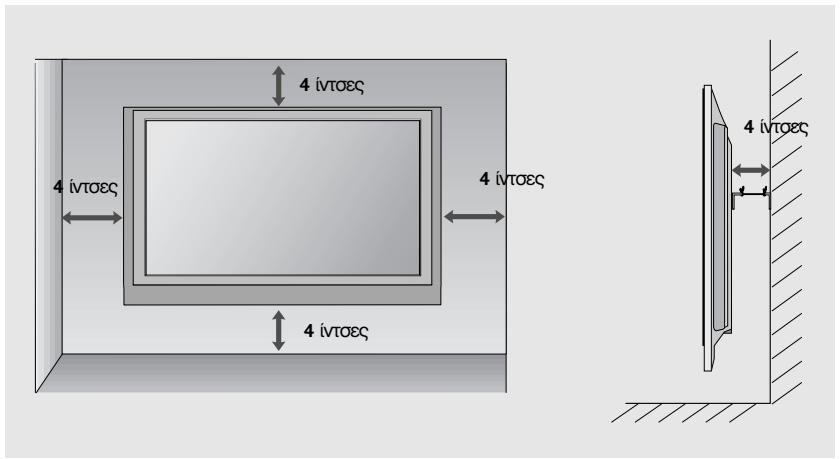
natural_image
Illustration of two hands holding a cylindrical device with a downward arrow indicating motion (no text or symbols)natural_image
Illustration of a computer monitor with an inset showing a close-up of a device component (no text or symbols present)natural_image
Isometric line drawing of a rectangular electronic device with mounting holes and a base plate (no text or symbols)natural_image
Technical illustration of a mechanical component with curved blades and a circular inset showing internal structure (no text or symbols)natural_image
Technical line drawing of a mechanical assembly with bolted components and a magnified inset showing a threaded component (no text or symbols)KÉRJÜK, GONDOSAN SZERELJE FEL, HOGY A KÉSZÜLÉK NE BORULHASSON FEL.
flowchart
graph TD
    A["1"] --> B["Target"]
    C["2"] --> B["Target"]
natural_image
Diagram of a computer monitor with a stand and a vertical line labeled '3' (no text or symbols on the device itself)natural_image
Illustration of a flat-screen monitor with an inset close-up showing internal components (no text or symbols)natural_image
Illustration of a flat-screen computer monitor with a circular base and control knob (no text or symbols)
FALRA SZERELÉS: VÍZSZINTES FELSZERELÉS
natural_image
Illustration of a TV setup with a mounted monitor and cabinet, set against a patterned wall (no text or symbols)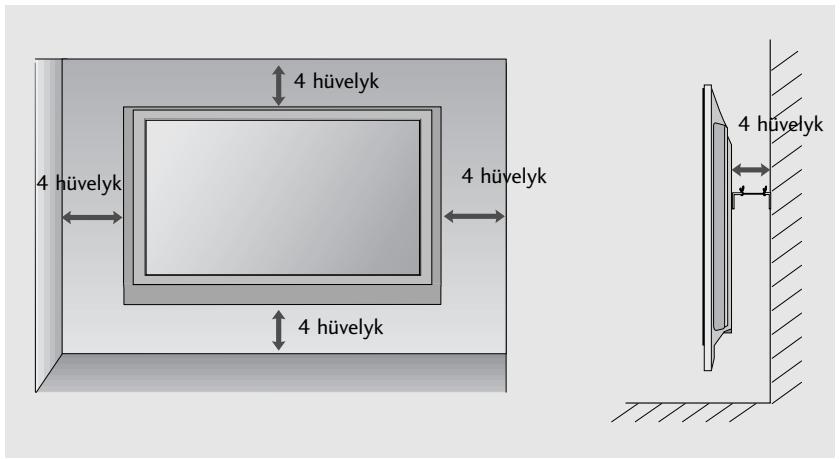
natural_image
Illustration of hands holding a device with a scroll, showing a right-hand rule (no text or symbols present)natural_image
Simple diagram with concentric circles and a small circle connected by a line (no text or symbols)natural_image
Illustration of a computer monitor with an inset showing a close-up of its internal components (no text or symbols present)natural_image
Isometric line drawing of a rectangular electronic device with mounting holes and a base plate (no text or symbols)natural_image
Diagram showing a mechanical component with an arrow indicating direction, no text or symbols presentnatural_image
Technical line drawing of a mechanical assembly with bolts and a magnified inset showing a bolt detail (no text or symbols)MONTAŻ NALEŻY WYKONAĆ OSTROŻNIE, ABY NIE PRZEWRÓCIĆ PRODUKTU.
flowchart
graph TD
    A["1"] --> B["Target"]
    C["2"] --> B["Target"]
natural_image
Diagram of a computer monitor with a stand and a vertical line labeled '3' (no text or symbols on the device itself)natural_image
Diagram showing a monitor with a circular component and an inset close-up of the lock mechanism (no text or symbols present)
natural_image
Diagram showing a monitor with a close-up inset of its internal components, no text or symbols present.natural_image
Illustration of a monitor mounted on a base with an inset close-up showing internal components (no text or symbols)natural_image
Illustration of a flat-screen computer monitor with a circular base and control knob (no text or symbols)
natural_image
Illustration of a TV setup with a mounted monitor and cabinet, set against a patterned wall (no text or symbols)
natural_image
Illustration of two hands holding a cylindrical device with a downward arrow indicating motion (no text or symbols)natural_image
Illustration of a computer monitor with a magnified inset showing internal components (no text or symbols)natural_image
Technical line drawing of a mechanical component with mounting holes and a central housing (no text or symbols)natural_image
Technical illustration of a mechanical component with curved blades and a circular inset showing internal structure (no text or symbols)natural_image
Technical line drawing of a mechanical assembly with bolted components and a magnified inset showing a threaded component (no text or symbols)SEŠTAVTE TELEVIZOR PEČLIVE, ABY SE NEMOHL PREVRHNOUT.
flowchart
graph TD
    A["1"] --> B["Target"]
    C["2"] --> B["Target"]
natural_image
Diagram of a computer monitor with a stand and a vertical line labeled '3' (no text or symbols on the device itself)natural_image
Illustration of a monitor with cable routing and a magnified inset showing internal components (no text or symbols)natural_image
Illustration of a flat-screen computer monitor with a circular base and control knob (no text or symbols)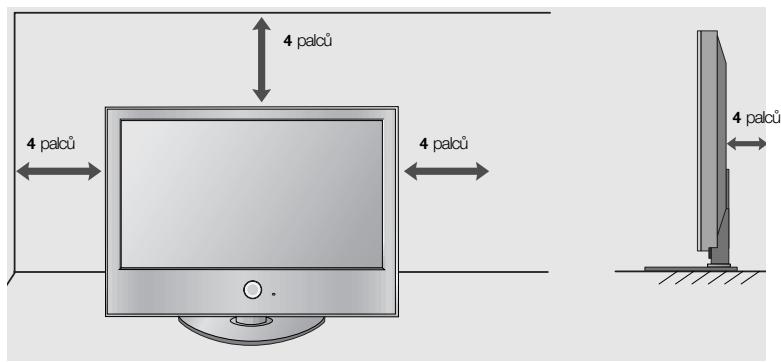
natural_image
Illustration of a TV setup with a mounted monitor and cabinet, set against a patterned wall (no text or symbols)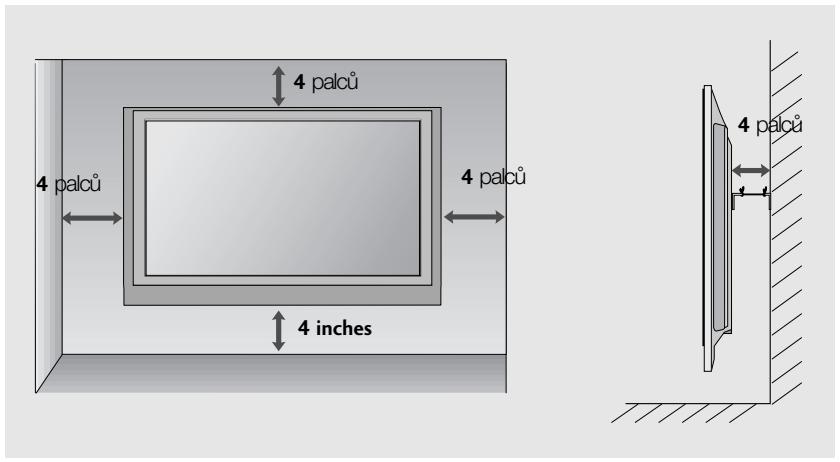
natural_image
Illustration of two hands holding a cylindrical device with a downward arrow indicating motion (no text or symbols)natural_image
Illustration of a computer monitor with an inset showing a close-up of a device component (no text or symbols present)natural_image
Line drawing of a mechanical component with mounting holes and a rectangular base (no text or symbols)natural_image
Technical illustration of a mechanical component with curved blades and a circular inset showing internal structure (no text or symbols)natural_image
Technical line drawing of a mechanical assembly with bolts and a magnified inset showing a bolt detail (no text or symbols)TELEVÍZOR UMIESTNITE BEZPECNE, ABY SA NEPREVRÁTIL.
flowchart
graph TD
    A["1"] --> B["Target"]
    C["2"] --> B["Target"]
natural_image
Diagram of a computer monitor with a stand and a vertical line labeled '3' (no text or symbols on the monitor itself)natural_image
Illustration of a flat-screen monitor with an inset close-up showing internal components (no text or symbols)natural_image
Illustration of a flat-screen computer monitor with a circular base and control knob (no text or symbols)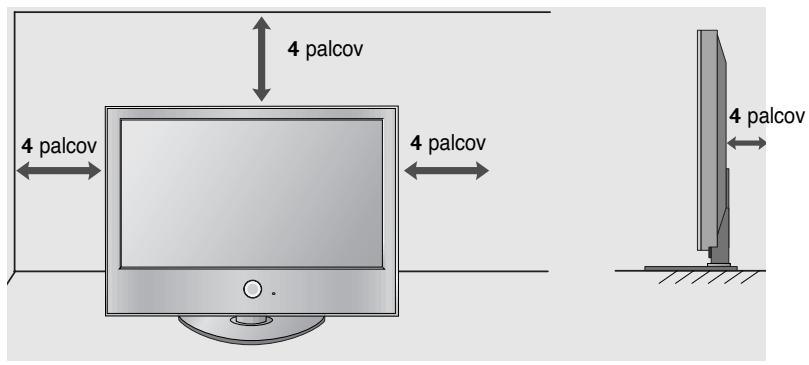
MONTÁŽ NA STENU: HORIZONTÁLNE UCHYTENIE
natural_image
Illustration of a TV setup with a mounted monitor and cabinet, set against a patterned wall (no text or symbols)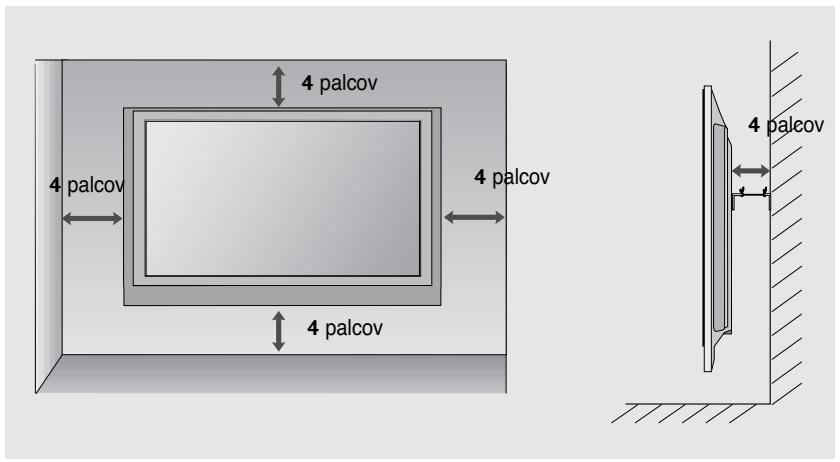
natural_image
Illustration of hands holding a cylindrical device with an arrow indicating motion (no text or symbols)■ Na zadnej strane otvorte kryt priehradky na batérie.
Vložte dve 1,5 V batérie typu AAA a správne nasmerujte pólty (+ na +, - na -). Nekombinujte staré alebo použité batérie s novými.
■ Zatvorte kryt.
SLEDOVANIE TELEVÍZIE/OVLÁDANIE PROGRAMOV
ZAPNUTIE TV
NASTAVENIE TELEVÍZNYCH STANÍC
natural_image
Simple diagram with concentric circles and a small circle connected by a line (no text or symbols)POWER
FĂRĂ A UTILIZA STANDUL TIP BIROU
natural_image
Illustration of a computer monitor with an inset showing a close-up of a device inside, no text or symbols present.natural_image
Line drawing of a mechanical component with mounting holes and a rectangular base (no text or symbols)natural_image
Diagram showing a mechanical component with curved blades and a circular inset view of internal components (no text or symbols)natural_image
Technical line drawing of a mechanical assembly with bolt holes and a magnified inset showing a threaded component (no text or symbols)AVETI GRIJĂ LA MONTARE ASTFEL ÎNCÂT PRODUSUL SĂ NU CADĂ.
natural_image
Diagram of a computer monitor with a stand and a vertical line labeled '3' (no text or symbols on the device itself)natural_image
Diagram showing a mechanical assembly process with three steps: before, after, and after assembly (no text or symbols present)natural_image
Illustration of a monitor mounted on a base with an inset close-up showing internal components (no text or symbols)natural_image
Illustration of a flat-screen computer monitor with a circular base and control knob (no text or symbols)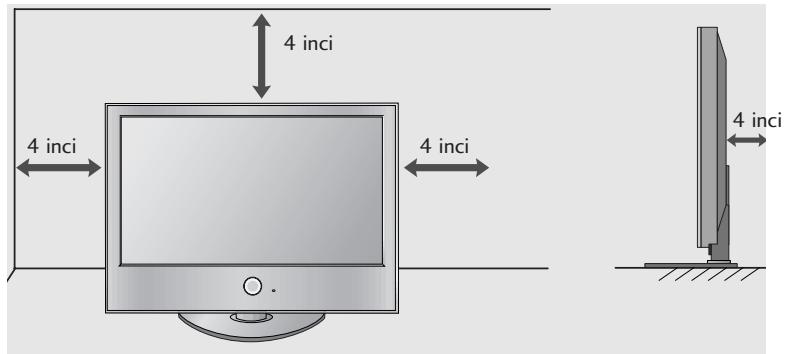
MONTAREA PE PERETE. INSTALAREA PE ORIZONTALă
natural_image
Illustration of a TV setup with a mounted monitor and cabinet, set against a patterned wall (no text or symbols)
natural_image
Illustration of two hands holding a cylindrical device with an arrow indicating motion (no text or symbols)natural_image
Simple diagram with concentric circles and a small circle connected by a line (no text or symbols)POWER(ЕЛЕКТРОЗАХРАНВАНЕ)
natural_image
Illustration of a computer monitor with an inset showing a close-up of a device component (no text or symbols present)natural_image
Line drawing of a rectangular electronic device with mounting holes and a base plate, placed on a textured surface (no text or symbols)natural_image
Diagram showing a mechanical component with a curved blade and a circular inset view of internal components (no text or symbols)natural_image
Technical line drawing of a mechanical assembly with bolts and a magnified inset showing a bolt detail (no text or symbols)flowchart
graph TD
    A["1"] --> B["Target"]
    C["2"] --> B["Target"]
natural_image
Diagram of a computer monitor with a stand and a vertical line labeled '3' (no text or symbols on the monitor itself)natural_image
Diagram showing a mechanical assembly process with three views of a device (no text or symbols present)natural_image
Illustration of a flat-screen monitor with an inset close-up showing internal components (no text or symbols)natural_image
Illustration of a flat-screen computer monitor with a circular base and control knob (no text or symbols)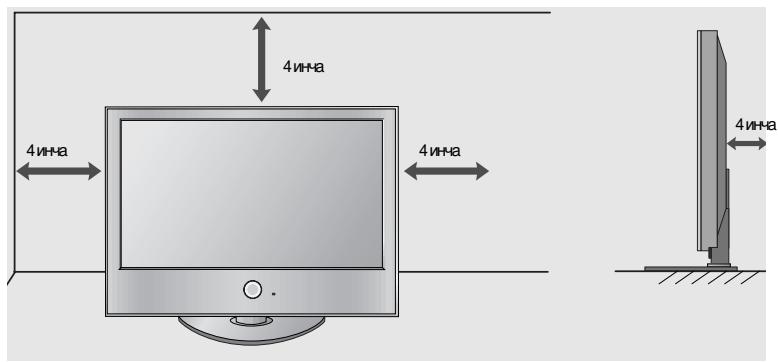
natural_image
Illustration of a TV setup with a mounted monitor and cabinet, set against a patterned wall (no text or symbols)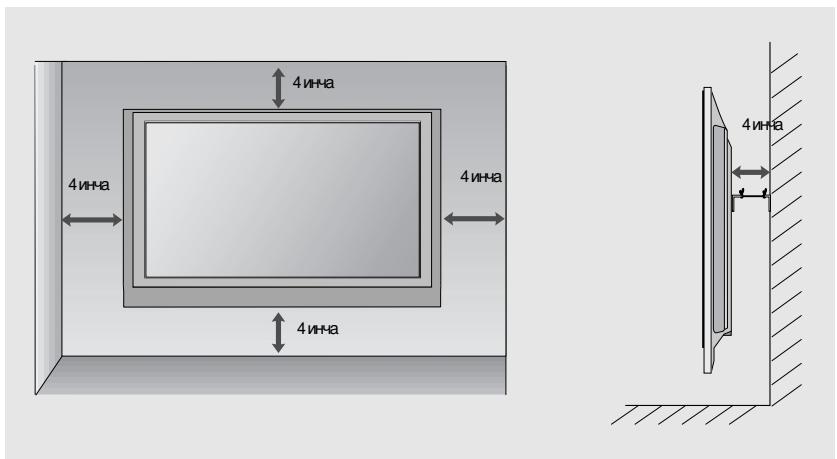
natural_image
Illustration of two hands holding a cylindrical device with an arrow indicating motion (no text or symbols)natural_image
Simple diagram with concentric circles and a small circle connected by a line (no text or symbols)natural_image
Illustration of a computer monitor with a magnified inset showing internal components (no text or symbols)natural_image
Line drawing of a mechanical component with mounting holes and a central housing, placed on a textured surface (no text or symbols)natural_image
Diagram showing a mechanical assembly with a fan blade and internal components, no text or symbols present.natural_image
Technical diagram of a mechanical assembly with bolts and a magnified inset showing a bolt detail (no text or symbols present)MONTERA PRODUKTEN ORDENTLIGT SÅ ATT DEN INTE VÄLTER.
flowchart
graph TD
    A["1"] --> B["Target"]
    C["2"] --> B["Target"]
natural_image
Diagram of a computer monitor with a stand and a vertical line labeled '3' (no text or symbols on the monitor itself)natural_image
Diagram showing a computer monitor with an inset close-up of its internal components (no text or symbols present)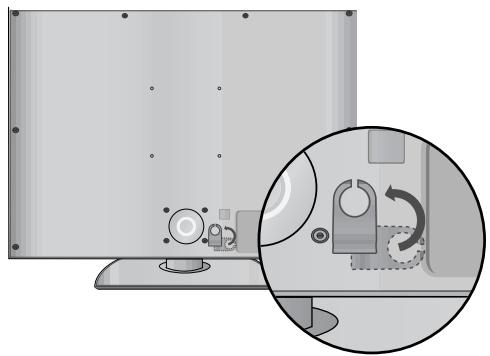
natural_image
Illustration of a monitor with a magnified inset showing a mechanical component (no text or symbols)natural_image
Illustration of a monitor mounted on a base with an inset close-up showing internal components (no text or symbols)natural_image
Illustration of a flat-screen computer monitor with a circular base and control knob (no text or symbols)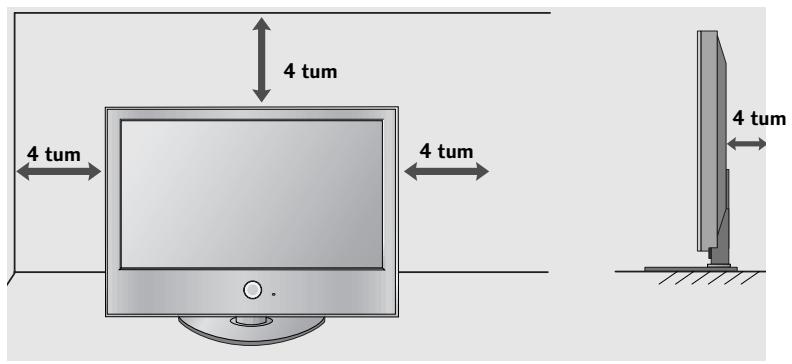
VÄGGMONTERING: HORISONTELL INSTALLATION
natural_image
Illustration of a TV setup with a mounted monitor and cabinet, set against a patterned wall (no text or symbols)
natural_image
Illustration of hands holding a device with a scroll, no text or symbols presentnatural_image
Simple diagram with concentric circles and a small circle connected by a line (no text or symbols)STR∅M Fjernkontroll-sensor Indikator for strøm på/standby • Lyser rødt i standby-modus. • Lyser hvitt när TV-en blir slått på. Merk: Du kan justere strømindikatoren på menyen ALT. (Alternativ).
UTEN BRUK AV BENKTYPESTATIV
natural_image
Illustration of a computer monitor with an inset showing a close-up of a device component (no text or symbols present)natural_image
Line drawing of a rectangular electronic device with mounting holes and a base plate, placed on a textured surface (no text or symbols)natural_image
Technical illustration of a mechanical component with an arrow indicating assembly or transformation (no text or symbols present)natural_image
Technical line drawing of a mechanical assembly with bolted components and a magnified inset showing a threaded component (no text or symbols)SETT DEN OPP FORSIKTIG SLIK AT PRODUKTET IKKE VELTER.
natural_image
Simple line drawing of a monitor with a stand and a vertical line labeled '3' (no text or symbols on the device itself)natural_image
Diagram showing a computer monitor with an inset close-up of its internal components (no text or symbols present)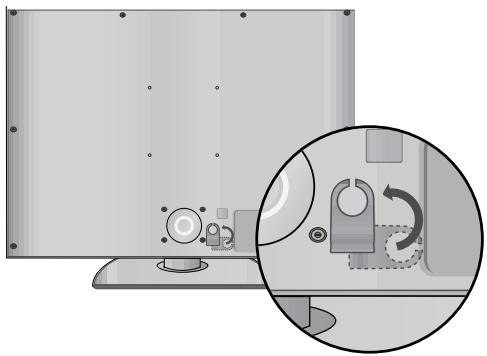
natural_image
Illustration of a flat-screen monitor with a magnified inset showing a mechanical switch mechanism (no text or symbols)natural_image
Illustration of a flat-screen monitor with an inset close-up showing internal components (no text or symbols)natural_image
Illustration of a flat-screen computer monitor with a circular base and control knob (no text or symbols)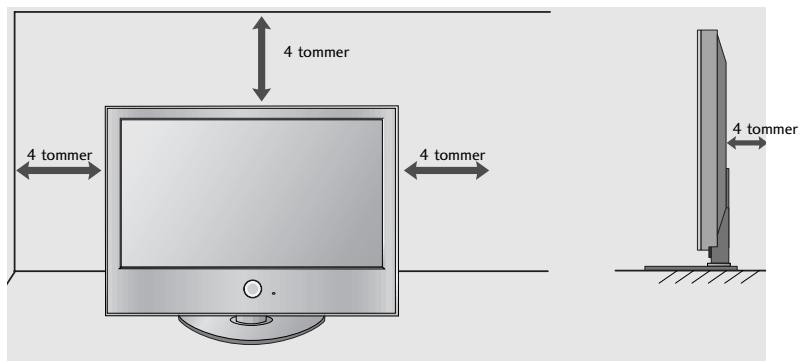
Veggmontering: Loddrett installering
Av hensyn til riktig ventilasjon må det være 10 cm avstand mel-lom vegg og sidene på enheten. Vi anbefaler at du bruker en veggmonteringsbrakett av LG-merke når du skal montere TV-en på en vegg.
natural_image
Illustration of a TV setup with a mounted monitor and cabinet, set against a patterned wall (no text or symbols)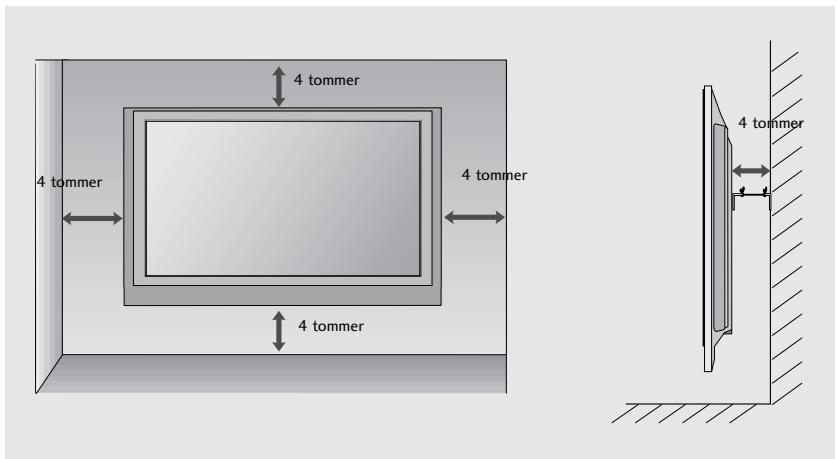
natural_image
Illustration of two hands holding a cylindrical device with a downward arrow indicating motion (no text or symbols)Kjør Aut. innstilling.
natural_image
Simple diagram with concentric circles and a small dot, no text or symbols presentnatural_image
Illustration of a computer monitor with a magnified inset showing internal components (no text or symbols)natural_image
Line drawing of a mechanical component with mounting holes and a central housing, enclosed in a rectangular frame (no text or symbols)2 Monter stativsøjlens dele i stativsoklen på tv'et.
3 Monter tv-apparatet som vist.
natural_image
Technical illustration of a mechanical component with an arrow indicating assembly or transformation (no text or symbols present)natural_image
Technical line drawing of a mechanical assembly with bolts and a magnified inset showing a bolt detail (no text or symbols)PLACER APPARATET OMHYGGELIGT, SÅ DET IKKE RISIKERER AT VÄLTE.
flowchart
graph TD
    A["1"] --> B["Target"]
    C["2"] --> B["Target"]
natural_image
Diagram of a computer monitor with a stand and a vertical line labeled '3' (no text or symbols on the device itself)natural_image
Diagram showing a computer monitor with an inset close-up of its internal components (no text or symbols present)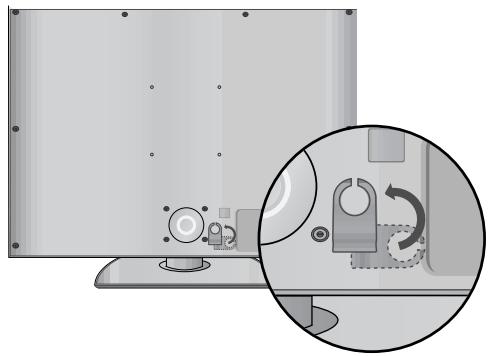
natural_image
Illustration of a computer monitor with a close-up inset showing a mechanical device (no text or symbols)natural_image
Illustration of a flat-screen monitor with cable routing and a magnified inset showing internal components (no text or symbols)natural_image
Illustration of a flat-screen computer monitor with a circular base and control knob (no text or symbols)
Vægmontering: Vandret installation
natural_image
Illustration of a TV setup with a monitor, tower, and cabinet (no text or symbols)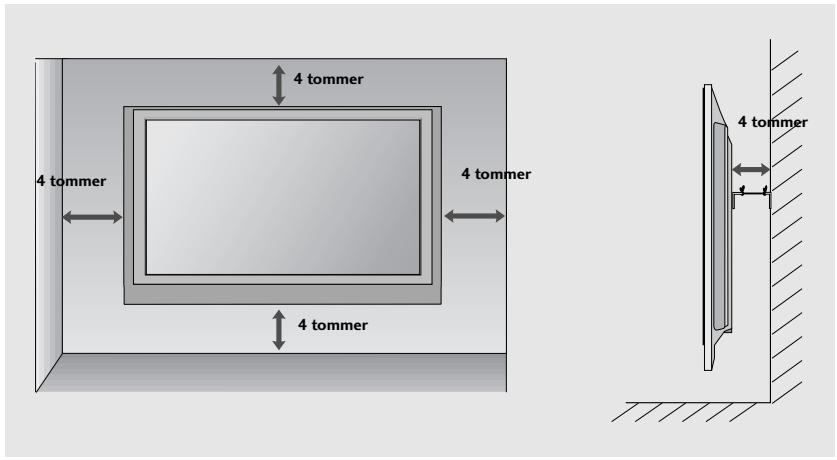
natural_image
Illustration of two hands holding a cylindrical device with a downward arrow indicating motion (no text or symbols)
natural_image
Simple diagram with concentric circles and a small o mark, no text or symbols presentnatural_image
Illustration of a computer monitor with a magnified inset showing internal components (no text or symbols)natural_image
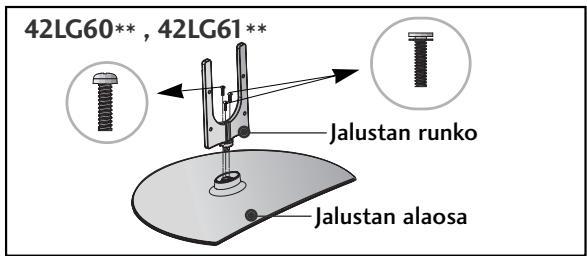
Line drawing of a mechanical component with mounting holes and a central housing, placed on a textured surface (no text or symbols)2 Kokoa jalustan rungon osat ja television jalustan alaosa.
natural_image
Technical illustration of a mechanical component with an inset showing internal structure (no text or symbols)natural_image
Technical line drawing of a mechanical assembly with bolts and a magnified inset showing a bolt detail (no text or symbols)ASENNA TV HUOLELLISESTI, JOTTEI SE KAADU.
flowchart
graph TD
    A["1"] --> B["Target"]
    C["2"] --> B["Target"]
natural_image
Diagram of a computer monitor with a stand and a vertical line labeled '3' (no text or symbols on the device itself)natural_image
Diagram showing a computer monitor with an inset close-up of its internal components (no text or symbols present)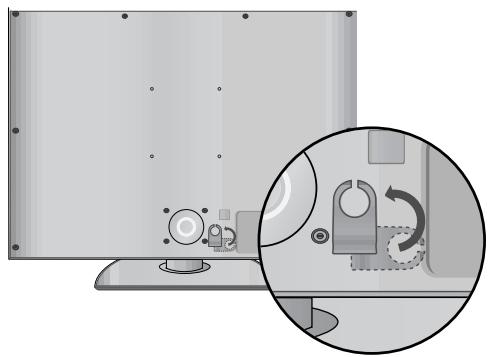
natural_image
Diagram showing a computer monitor with a close-up inset illustrating the internal mechanism of a device (no text or symbols present)natural_image
Illustration of a flat-screen monitor with an inset close-up showing internal components (no text or symbols)natural_image
Illustration of a flat-screen computer monitor with a circular base and control knob (no text or symbols)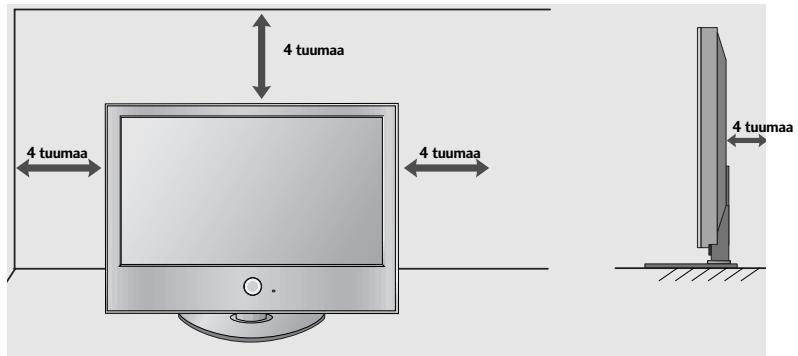
ASENTAMINEN SEINÄLLE: VAAKASUORA ASENNUS
natural_image
Illustration of a TV setup with a mounted device and cabinet, set against a patterned wall (no text or symbols)
KAUKOSÄÄTIMEN NÄPPÄINTOIMINNOT
natural_image
Illustration of two hands holding a cylindrical device with a downward arrow indicating motion (no text or symbols)natural_image
Simple diagram with concentric circles and a small circle connected by a line (no text or symbols)natural_image
Illustration of a computer monitor with an inset showing a close-up of a device inside a rack (no text or symbols present)natural_image
Isometric line drawing of a rectangular electronic device with mounting holes and a base plate, placed on a textured surface (no text or symbols)natural_image
Diagram showing a mechanical component with an arrow indicating direction, no text or symbols present4 Kinnitage need 4 polti tugevasti teleri tagumisel küljel olevatesse aukudesse.
natural_image
Technical line drawing of a mechanical assembly with bolts and a magnified inset showing a bolt detail (no text or symbols)TOOTE ÜLESSEADMISSE SUHTUGE PALUN HOOLIKALT, ET VÄLTIDA SELLE ÜMBERKUKKUMIST.
natural_image
Diagram of a computer monitor with a stand and a vertical line labeled '3' (no text or symbols on the monitor itself)natural_image
Diagram showing a computer monitor with an inset close-up of its internal components (no text or symbols present)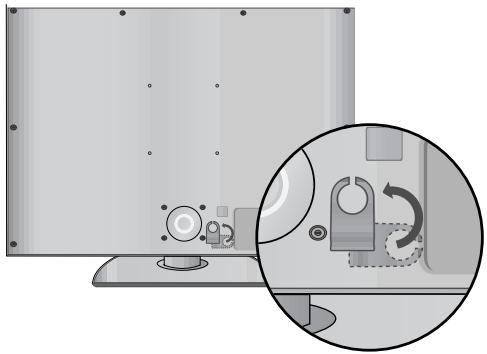
natural_image
Illustration of a flat-screen monitor with a magnified inset showing a mechanical device (no text or symbols present)natural_image
Illustration of a flat-screen monitor with an inset close-up showing internal components (no text or symbols)natural_image
Illustration of a flat-screen computer monitor with a circular base and control knob (no text or symbols)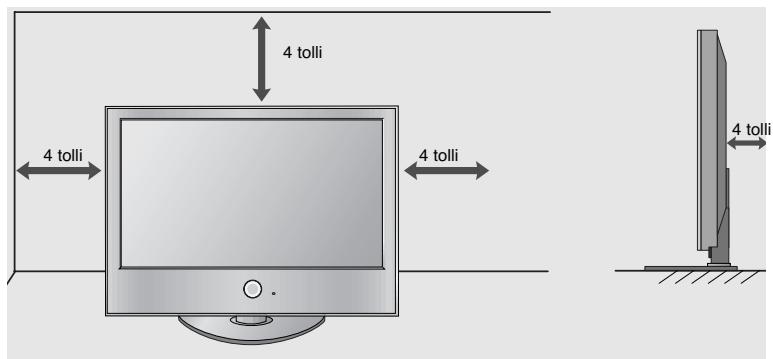
SEINAPAIGALDUS HORIZONTAALPAIGALDUS
natural_image
Illustration of a TV setup with a mounted monitor and cabinet, set against a patterned wall (no text or symbols)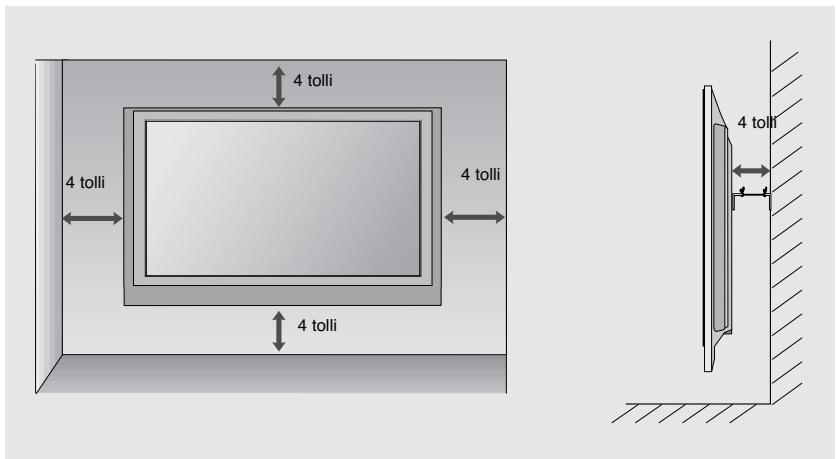
ETTEVALMISTUS
natural_image
Illustration of hands holding a device with a scroll, showing a right-hand rule (no text or symbols present)
Valige SETUP(Seadistus).
• See ei toeta USB HDD.
- See teler toetab JPEG ja MP3 formaate.
When removing the USB device(USB-seadet lahti ühendades)
Valige menüüst USB EJECT enne USB seadme eemaldamist.

Valige USB Eject(USB Eemaldamine).
HOOLDUS
Avage "My computer" -> avage "LG" -> avage"index.htm" fail.
KAAL
| MUDELID | 32LG60** | 37LG60** | 42LG60** | ||
| 32LG6000-ZA | 37LG6000-ZA | 42LG6000-ZA | |||
| Kaal | koos alusega | 14,4 kg / 31,7 naela | 21,2 kg / 46,3 naela | 24,1 kg / 53,1 naela | |
| ilma aluseta | 12,2 kg / 26,9 naela | 18,1 kg / 39,9 naela | 20,4 kg / 44,9 naela | ||
| MUDELID | 42LG61 ** | 47LG60** | |||
| 42LG6100-ZB | 47LG6000-ZA | ||||
| Kaal | koos alusega | 21,3 kg / 47 naela | 32,8 kg / 73,3 naela | ||
| ilma aluseta | 18 kg / 39,7 naela | 27,2 kg / 59,9 naela | |||
natural_image
Illustration of a computer monitor with an inset showing a device being processed, no text or symbols present.natural_image
Line drawing of a rectangular electronic device with mounting holes and internal components, placed on a textured base (no text or symbols)natural_image
Diagram showing a mechanical component with an arrow indicating direction, no text or symbols presentnatural_image
Technical line drawing of a mechanical assembly with bolts and a magnified inset showing a bolt detail (no text or symbols)SUMONTUOKITE ATIDŽIAI, KAD GAMINYS NEAPVIRSTŲ.a
flowchart
graph TD
    A["1"] --> B["Target"]
    C["2"] --> B["Target"]
natural_image
Diagram of a computer monitor with a stand and a vertical line labeled '3' (no text or symbols on the monitor itself)natural_image
Diagram showing a monitor with a circular component inserted into a device, and an inset close-up of the internal structure (no text or symbols present)
natural_image
Diagram showing a device with a magnified inset highlighting a mechanical component (no text or symbols present)2 Sujunkite laidus.
natural_image
Illustration of a flat-screen monitor with an inset close-up showing internal components (no text or symbols)natural_image
Illustration of a flat-screen computer monitor with a circular base and control knob (no text or symbols)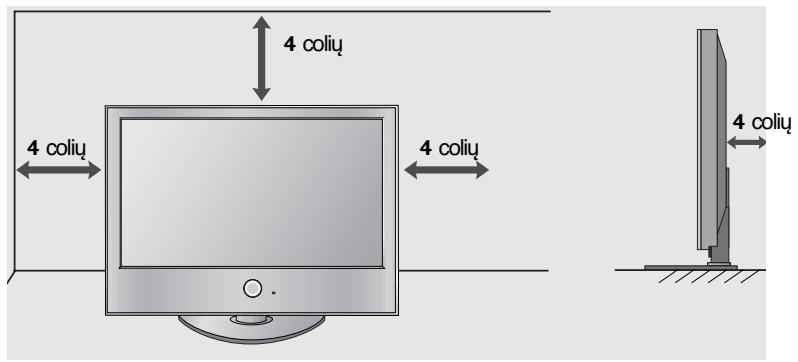
natural_image
Interior view of a room with a large TV mounted on a cabinet, no visible text or symbols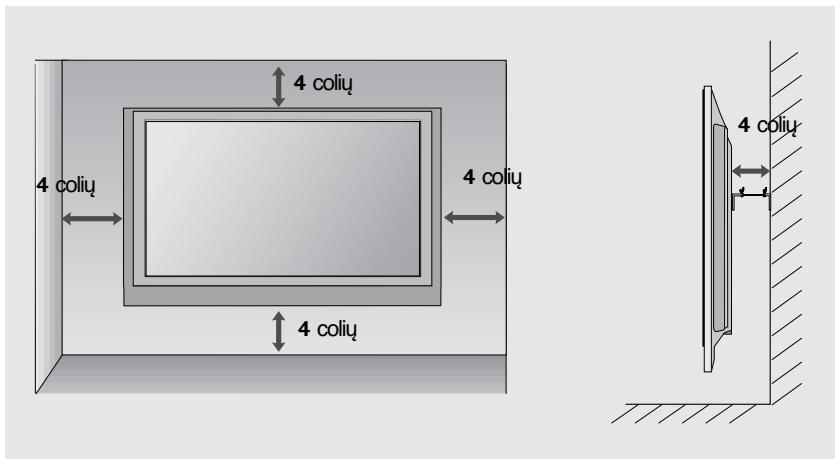
natural_image
Illustration of hands holding a device with an arrow indicating motion (no text or symbols)
Pasirinkite SETUP (NUSTATYMAS).

Pasirinkite Auto Tuning (Automatinis derinimas).
Pasirinkite Yes (Taip).

Vykdykite Auto tuning (Automatinis derinimas).
Prijungus USB jrenginj
Kai prijungiate USB jrenginj, šis ekranas parodomas automatiškai.
Atjungiant USB jrenginj
Prieš atjungdami USB jrenginj, pasirinkite meniu USB EJECT (USB ATJUNGIMAS).
Pasirinkite USB Eject (USB atjungimas).

Pasirinkite PHOTO LIST (NUOTRAUKU SARAŠAS) arba MUSIC LIST (MUZIKOS SARAŠAS).
TECHNINĖ PRIEŽIŪRA
natural_image
Illustration of a computer monitor with an inset showing a close-up of a device component (no text or symbols present)natural_image
Isometric line drawing of a rectangular electronic device with mounting holes and a base plate (no text or symbols)natural_image
Technical illustration of a mechanical component with an inset showing internal structure (no text or symbols)natural_image
Technical line drawing of a mechanical assembly with bolts and a magnified inset showing a bolt detail (no text or symbols)IERIKOJIET TO UZMANIGI, LAI PRODUKTS NEAPGAZTOS.
flowchart
graph TD
    A["1"] --> B["Target"]
    C["2"] --> B["Target"]
natural_image
Diagram of a computer monitor with a stand and a vertical line labeled '3' (no text or symbols on the device itself)natural_image
Diagram showing a computer monitor with an inset close-up of its internal components (no text or symbols present)
natural_image
Diagram showing a monitor with mechanical components and a magnified inset illustrating the internal mechanism (no text or symbols present)natural_image
Illustration of a flat-screen monitor with an inset close-up showing internal components (no text or symbols)natural_image
Illustration of a flat-screen computer monitor with a circular base and control knob (no text or symbols)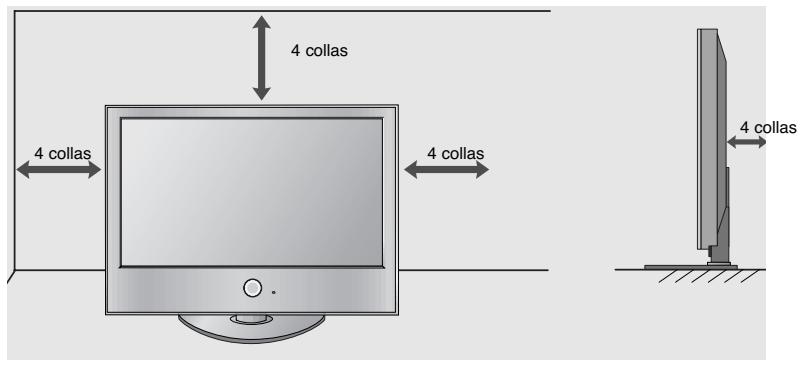
natural_image
Illustration of a TV set with a mounted device and cabinet, no text or symbols present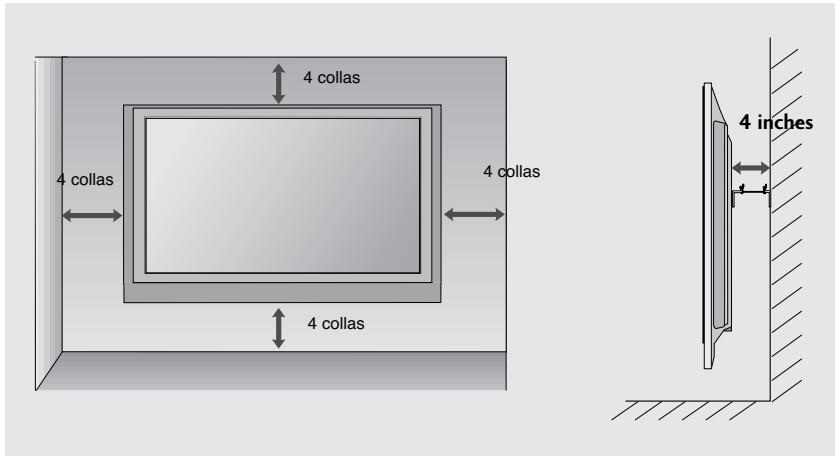
SAGATAVOŠANĀS
natural_image
Illustration of two hands holding a cylindrical device with an arrow indicating motion (no text or symbols)
Izvēlieties SETUP
(IESTATĪŠANA).
natural_image
Illustration of a computer monitor with an inset showing a close-up of a device component (no text or symbols present)natural_image
Technical line drawing of a mechanical component with mounting holes and a central housing (no text or symbols)2 Sestavite dele stojala in podstavek televizorja.
natural_image
Diagram showing a mechanical assembly with a fan blade and internal components, no text or symbols present.natural_image
Technical diagram of a mechanical assembly with bolts and a magnified inset showing a bolt detail (no text or symbols present)IZDELEK NAMESTITE PREVIDNO IN TAKO, DA SE NE PREVRNE.
flowchart
graph TD
    A["1"] --> B["Target"]
    C["2"] --> B["Target"]
natural_image
Diagram of a computer monitor with a stand and a vertical line labeled '3' (no text or symbols on the device itself)natural_image
Diagram showing a computer monitor with an inset close-up of its internal components (no text or symbols present)
natural_image
Illustration of a monitor with a close-up inset showing a mechanical component (no text or symbols)2 Uredite kable.
natural_image
Illustration of a flat-screen monitor with an inset close-up showing internal components (no text or symbols)natural_image
Illustration of a flat-screen computer monitor with a circular base and control knob (no text or symbols)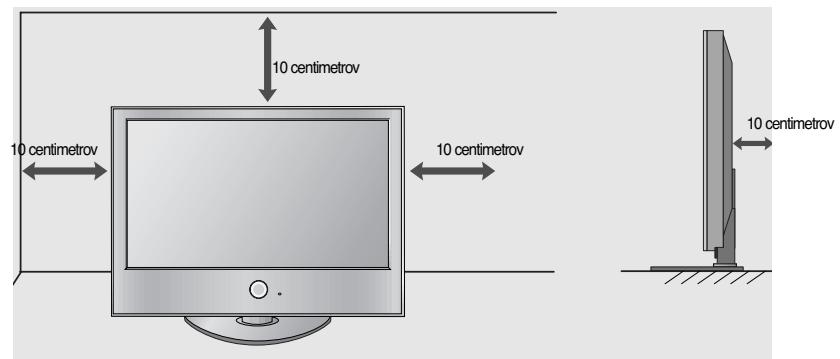
MONTAŽA NA STENO: VODORAVNA NAMESTITEV
natural_image
Interior view of a room with a TV mounted on a cabinet, no visible text or symbols
natural_image
Illustration of two hands holding a cylindrical device with an arrow indicating motion (no text or symbols)BEZBEDNOSNA UPUTSTVA
- Molimo vas da pažljivo pročitate ove mere predostrožnosti pre upotrebe proizvoda.
- U ovom uputstvu ilustracije mogu neznatno odstupati od Vašeg proizvoda jer služe samo kao pomoćni primer u uputstvu.

UPOZORENJE
natural_image
Illustration of a computer monitor with an inset showing a close-up of a device component (no text or symbols present)Nakon što ste uklonili zaštitni papir od zaštitnog poklopca, zalepite ga na TV kao što je prikazano.
INFORMACIJE NA ZADNJOJ PLOČI
■ Prikazana slika se može razlikovati od Vašeg TV-a.
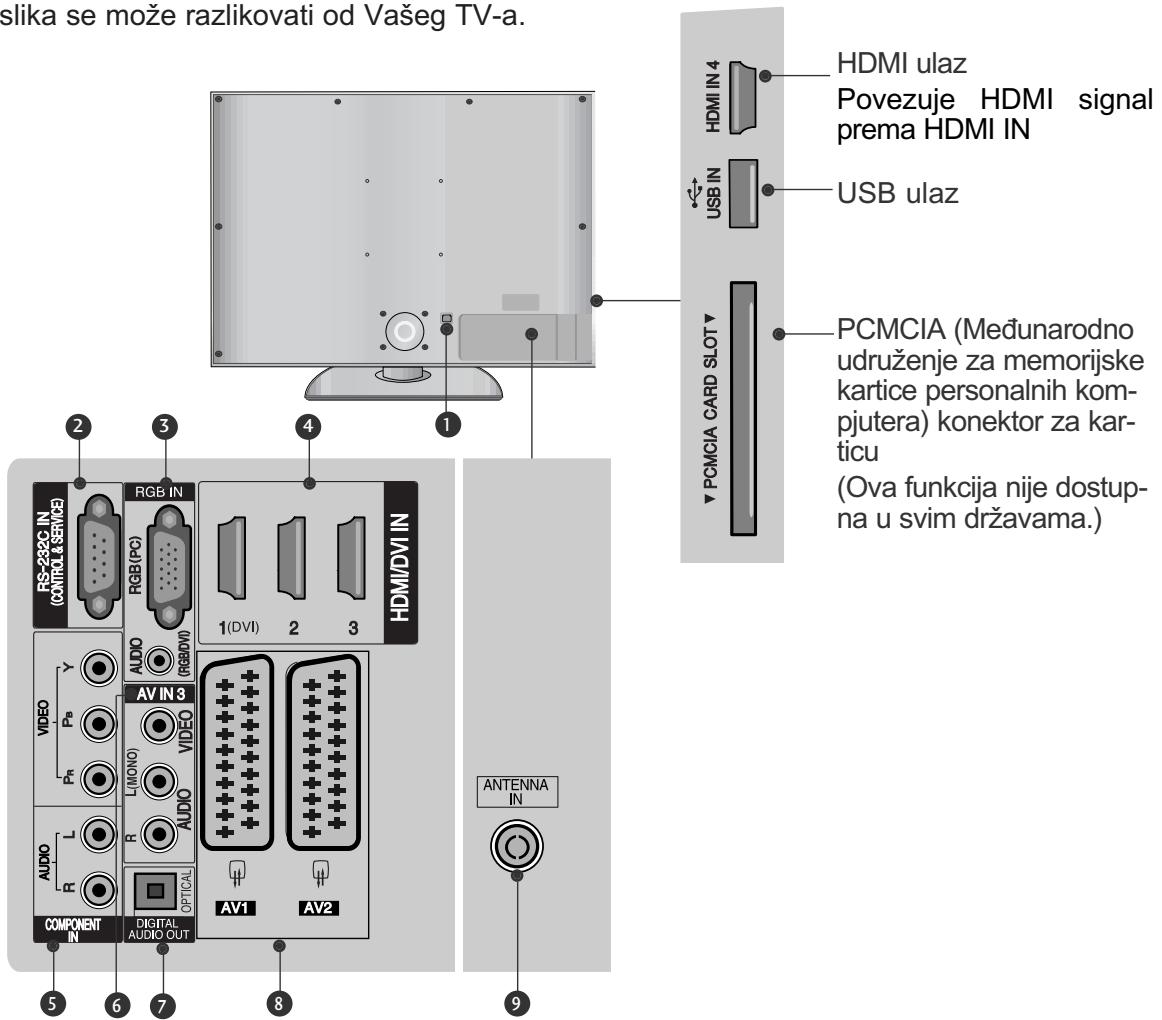
① Utičnica napojnog kabla
Ovaj TV radi na naizmeničnoj struji. Napon je naznačen na stranici tehničkih karakteristika. Nikada nemojte uključivati TV na jednosmernu struju.
② RS-232C ULAZNI (KONTROLNI I SERVISNI) PORT
Povezuje sa RS-232C portom na PC.
③ RGB ulaz
Povezuje izlaz iz PC.
RGB/DVI Audio ulaz
Povezuje audio signal od PC ili DTV.
4 HDMI ulaz
Povezuje HDMI signal prema HDMI IN, ili DVI (VIDEO) signal prema HDMI/DVI port sa DVI prema HDMI kablom.
natural_image
Isometric line drawing of a rectangular electronic device with mounting holes and a base plate (no text or symbols)2 Namontirajte delove tela postolja sa podnožjem TV-a.
natural_image
Technical illustration of a mechanical component with an arrow indicating assembly or transformation (no text or symbols present)natural_image
Technical diagram of a mechanical assembly with bolts and a magnified inset showing a bolt detail (no text or symbols present)MOLIMO DA POSTOLJE PAŽLJIVO MONTIRATE DA PROIZVOD NE BI PAO
natural_image
Diagram of a computer monitor with a stand and a vertical line labeled '3' (no text or symbols on the device itself)3 Upotrebite otporno uže da vežete TV. Sigurnije je da vežete uže horizontalno u odnosu na zid i TV-a.
! NAPOMENA
Kada pomerate TV prvo iskopčajte kablove.
▶ Upotrebite platformu ili orman koji je dovoljno jak i veliki da podrži veličinu i težinu TV-a.
▶ Za bezbednu upotrebu TV-a obezbedite da je visina nosača na zidu ista sa visinom TV-a.
ZADNJI POKLOPAC ZA UREĐENJE KABLOVA
■ Prikazana slika se može razlikovati od Vašeg TV-a.
natural_image
Diagram showing a monitor with a cable attachment and a close-up of the cable being inserted (no text or symbols present)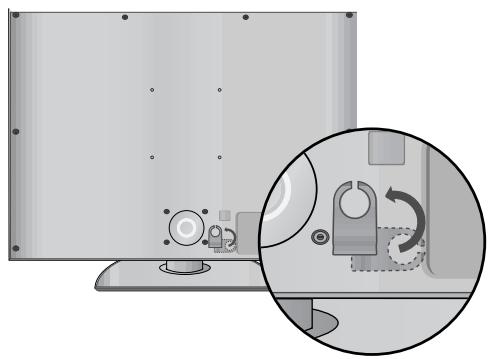
natural_image
Illustration of a computer monitor with a close-up inset showing a mechanical device (no text or symbols present)2 Povežite neophodne kablove.
natural_image
Illustration of a flat-screen monitor with an inset close-up showing internal components (no text or symbols)natural_image
Illustration of a flat-screen computer monitor with a circular base and control knob (no text or symbols)
MONTAŽA NA ZIDU: HORIZONTALNO POSTAVLJANJE
Radi adekvatne ventilacije omogućite slobodan prostor svuda oko TV-a od 4" (10 cm). Preporučujemo da koristite zidni nosač marke LG kada želite da montirate TV na zidu.
natural_image
Interior view of a room with a TV mounted on a cabinet and a wall-mounted device (no text or symbols visible)
natural_image
Illustration of two hands holding a cylindrical device with a downward arrow indicating motion (no text or symbols)2 Izaberite LISTA FOTOGR. ili LISTA MUZIKE.
natural_image
Illustration of a computer monitor with an inset showing a close-up of a device inside a tray (no text or symbols present)Nakon uklanjanja zaštitnog papira sa zaštitnog poklopca, pričvrstite ga na televizor kao što je prikazano.
INFORMACIJE O STRAŽNJOJ PLOČI
■ Prikazana slika može se razlikovati od vašeg TV uređaja.
① Utičnica za napajanje
TV uređaj radi s izmjeničnim AC napajanjem. Napon je naveden na stranici s tehničkim podacima. Nikad ne priključujte TV uređaj na istosmjerno DC napajanje.
② RS-232C IN (CONTROL & SERVICE)
(RS-232C ULAZ (UPRAVLJANJE I USLUGA))
Spojite na RS-232C ulaz PC-ja.
3 RGB ulaz
Spojite izlaz sa PC-ja.
RGB/DVI audio ulaz
Spojite audio sa PC-ja ili DTV-a.
4 HDMI IN (ULAZ)
Spojite HDMI signal na HDMI IN (ULAZ). Ili DVI (VIDEO) signal na HDMI/DVI IN (ULAZ) pomoću DVI na HDMI kabela.
⑤ Ulaz za komponentu
Spojite video/audio komponentu uređaja na ove utičnice.
6 Audio/video ulaz
Spojite audio/video izlaz s vanjskog uređaja na ove utičnice.
⑦ OPTIČKI DIGITALNI AUDIO IZLAZ
Spojite digitalni audio s različitih vrsta opreme.
Napomena: U stanju mirovanja, ovi ulazi ne rade.
8 Euro Scart utičnica (AV1/AV2)
Spojite scart utičnicu ulaza ili izlaza vanjskog uređaja na ove utičnice.
9 Antenski ulaz
Spojite RF antenu na ovu utičnicu.
Ugradnja postolja(samo 32/37/42LG60\*\*, 42LG61\*\*)
■ Prikazana slika može se razlikovati od vašeg TV uređaja.
Prilikom sastavljanja stalka za postavljanje na stol provjerite je li vijak potpuno pritegnut. (Ako vijak nije potpuno pritegnut, proizvod se nakon postavljanja može nagnuti prema naprijed). Ako vijak previše pritegnete, vijak se može deformirati uslijed trenja zateznog dijela vijka.
natural_image
Isometric line drawing of a rectangular electronic device with mounting holes and a base plate (no text or symbols)natural_image
Technical illustration of a mechanical component with an arrow indicating assembly or transformation (no text or symbols present)4 Sigurno učvrstite 4 usadna vijka na za to predviđene otvore na stražnjoj strani TV ekrana.
natural_image
Technical line drawing of a mechanical assembly with bolts and a magnified inset showing a bolt detail (no text or symbols)POSTAVLJANJE VRŠITE IZUZETNO PAŽLJIVO KAKO PROIZVOD NE BI PAO.
natural_image
Diagram of a computer monitor with a stand and a vertical line labeled '3' (no text or symbols on the device itself)natural_image
Diagram showing a monitor with a circular inset highlighting a mechanical component (no text or symbols present)
natural_image
Illustration of a computer monitor with a close-up inset showing a mechanical device (no text or symbols present)② Spojite kabele prema potrebi.
Za spajanje dodatne opreme, pogledajte poglavlje Postavljanje vanjske opreme.

natural_image
Illustration of a flat-screen monitor with an inset close-up showing internal components (no text or symbols)■ TV ekran je moguće ugraditi na različite načine poput ugradnje na zid, na podlogu i sl.
■ TV ekran je predviđen za vodoravnu ugradnju.
UZEMLJENJE
natural_image
Illustration of a flat-screen computer monitor with a circular base and stand (no text or symbols)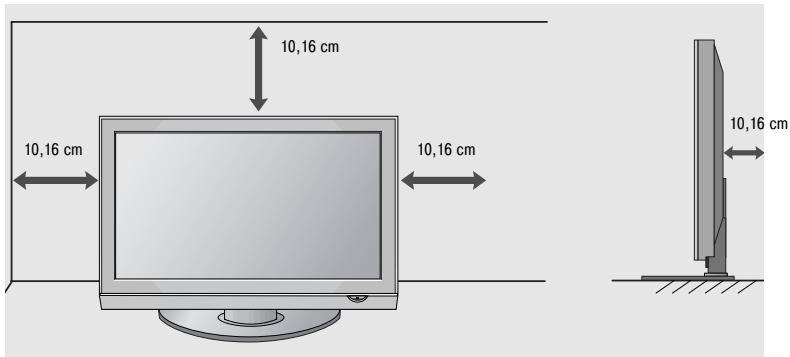
ZIDNA UGRADNJA : VODORAVNA
Ostavite prostor od 10 cm (4") oko TV ekrana radi odgovarajućeg prozračivanja Za postavljanje televizora na zid preporučujemo zidni nosač tvrtke LG.

natural_image
Interior view of a room with a large TV mounted on a cabinet, no visible text or symbols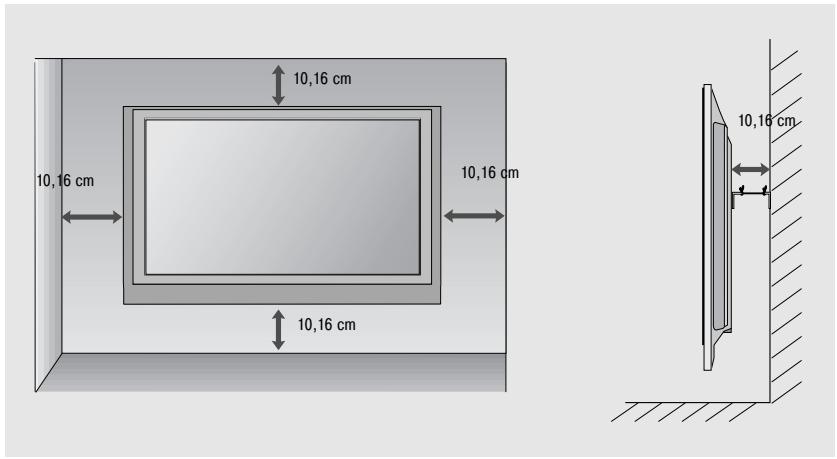
natural_image
Illustration of two hands holding a device with a downward arrow indicating motion (no text or symbols)- Otvorite poklopac pretinca za baterije na stražnjoj strani i postavite baterije tako da se polaritet podudara(+ i +,- i -).
■ Postavite dvije 1,5 V AAA baterije. Nemojte pomiješati stare ili korištene baterije s novima.
■ Zatvorite poklopac.
UKLJUČIVANJE TV PRIJEMNIKA
natural_image
Simple diagram with concentric circles and a small o mark, no text or symbols presentGÜÇ
natural_image
Illustration of a computer monitor with an inset showing a close-up of a device component (no text or symbols present)natural_image
Line drawing of a mechanical component with mounting holes and a rectangular base (no text or symbols)natural_image
Technical illustration of a mechanical component with an arrow indicating assembly or transformation (no text or symbols present)natural_image
Technical line drawing of a mechanical assembly with bolts and a magnified inset showing a bolt detail (no text or symbols)LÜTFEN ÜRÜNÜ DÜŞÜRMEYECEK ŞEKİLDE DİKKATLİCE KURUNUZ.
natural_image
Diagram of a computer monitor with a stand and a vertical line labeled '3' (no text or symbols on the device itself)natural_image
Diagram showing a computer monitor with an inset close-up of its internal components (no text or symbols present)
natural_image
Illustration of a monitor with a close-up inset showing a mechanical device (no text or symbols)natural_image
Illustration of a monitor with cable routing and a magnified inset showing internal components (no text or symbols)natural_image
Illustration of a flat-screen computer monitor with a circular base (no text or symbols)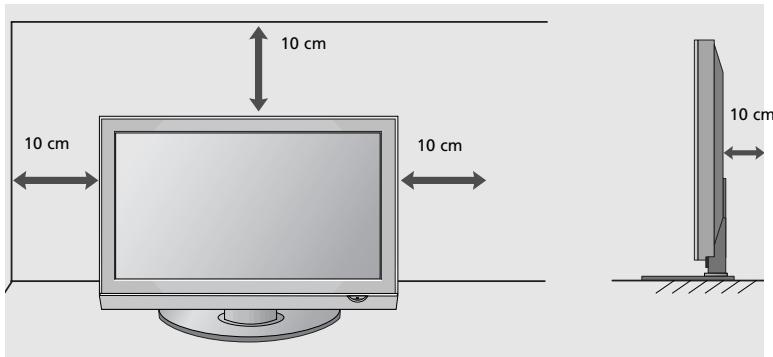
DUVARA MONTAJ: YATAY KURULUM
natural_image
Illustration of a TV setup with a mounted monitor and cabinet, set against a patterned wall (no text or symbols)
natural_image
Illustration of hands holding a cylindrical device with an arrow indicating motion (no text or symbols)If you expect to leave your TV dormant for prolonged periods (such as a holiday), unplug the power cord to protect against possible damage from lightning or power surges.
KULLANICI KILAVUZUNU CD-ROM'DA GÖRÜNTÜLEMEK
- User's Guide Specification
- Printing Specification
- NOTES
- Special Instructions
- Pagination sheet
- LCD TV
- OWNER'S MANUAL
- DVB®
- Connecting your Unit
- SAFETY INSTRUCTIONS
- Precaution in Installing the Product
- WARNING
- CAUTION
- Electrical Power Related Precautions
- Precautions in Moving the Product
- Precautions in Using the Product
- FRONT PANEL CONTROLS
- NOT USING THE DESK-TYPE STAND
- BACK PANEL INFORMATION
- STAND INSTALLATION (32/37/42LG60\*\*, 42LG61\*\* Only)
- PLEASE SET IT UP CAREFULLY SO THE PRODUCT DOESN'T FALL OVER.
- NOTE
- BACK COVER FOR WIRE ARRANGEMENT
- Align the hole with the tab on the CABLE MANAGEMENT CLIP.
- Connect the cables as necessary.
- EARTHING
- DESKTOP PEDESTAL INSTALLATION
- WALL MOUNT: HORIZONTAL INSTALLATION
- ANTENNA CONNECTION
- REMOTE CONTROL KEY FUNCTIONS
- TURNING ON THE TV
- Initializing setup
- Note:
- ON-SCREEN MENU LANGUAGE / COUNTRY SELECTION
- ON SCREEN MENUS SELECTION AND ADJUSTMENT
- AUTO PROGRAMME TUNING
- WHEN CONNECTING THE USB DEVICE
- When removing the USB device
- MAINTENANCE
- Cleaning the Screen
- Cleaning the Cabinet
- Extended Absence
- TO VIEW THE USER'S GUIDE ON THE CD-ROM
- To view the User's guide
- WEIGHT
- TROUBLESHOOTING
- (UK only)
- Keep this important information about how to re-tune your TV during the digital TV switchover
- How the switchover affects your TV equipment:
- When does switchover happen?
- Visit us at digitaluk.co.uk call us on 0845 6 50 50 50 †
- How to re-tune:
- LG Electronics Inc.
- Bedienungsanleitung
- DAS GERÄT MUSS SICHER MON- TIERT WERDEN, SO DASS ES NICHT UMFALLEN KANN.
- WANDMONTAGE: HORIZONTALE LAGE
- SI VOUS N'UTILISEZ PAS LE PIED A POSER
- VEUILLEZ INSTALLER LA TELEVISION AVEC PRECAUTION POUR EVITER QU'ELLE NE TOMBE.
- MONTAGE AU MUR : INSTALLATION HORIZONTALE
- INSTALLARE CON ATTENZIUONE IN MODO CHE IL PRODOTTO NON SI RIBALTI.
- POR FAVOR, INSTALE EL PRODUCTO CON CUIDADO PARA EVITAR QUE SE CAIGA.
- MANUAL DE INSTRUÇÕES
- POR FAVOR, INSTALE-O CUIDADOSAMENTE, PARA QUE O PRODUTO NÃO CAIA.
- ZET ALLES MET ZORG IN ELKAAR ZODAT DE TV NIET KAN OMVALLEN.
- WANDMONTAGE: HORIZONTALE INSTALLATIE
- KÉRJÜK, GONDOSAN SZERELJE FEL, HOGY A KÉSZÜLÉK NE BORULHASSON FEL.
- FALRA SZERELÉS: VÍZSZINTES FELSZERELÉS
- MONTAŻ NALEŻY WYKONAĆ OSTROŻNIE, ABY NIE PRZEWRÓCIĆ PRODUKTU.
- SEŠTAVTE TELEVIZOR PEČLIVE, ABY SE NEMOHL PREVRHNOUT.
- TELEVÍZOR UMIESTNITE BEZPECNE, ABY SA NEPREVRÁTIL.
- MONTÁŽ NA STENU: HORIZONTÁLNE UCHYTENIE
- SLEDOVANIE TELEVÍZIE/OVLÁDANIE PROGRAMOV
- ZAPNUTIE TV
- NASTAVENIE TELEVÍZNYCH STANÍC
- FĂRĂ A UTILIZA STANDUL TIP BIROU
- AVETI GRIJĂ LA MONTARE ASTFEL ÎNCÂT PRODUSUL SĂ NU CADĂ.
- MONTAREA PE PERETE. INSTALAREA PE ORIZONTALă
- MONTERA PRODUKTEN ORDENTLIGT SÅ ATT DEN INTE VÄLTER.
- VÄGGMONTERING: HORISONTELL INSTALLATION
- UTEN BRUK AV BENKTYPESTATIV
- SETT DEN OPP FORSIKTIG SLIK AT PRODUKTET IKKE VELTER.
- Veggmontering: Loddrett installering
- PLACER APPARATET OMHYGGELIGT, SÅ DET IKKE RISIKERER AT VÄLTE.
- Vægmontering: Vandret installation
- ASENNA TV HUOLELLISESTI, JOTTEI SE KAADU.
- ASENTAMINEN SEINÄLLE: VAAKASUORA ASENNUS
- KAUKOSÄÄTIMEN NÄPPÄINTOIMINNOT
- TOOTE ÜLESSEADMISSE SUHTUGE PALUN HOOLIKALT, ET VÄLTIDA SELLE ÜMBERKUKKUMIST.
- SEINAPAIGALDUS HORIZONTAALPAIGALDUS
- ETTEVALMISTUS
- HOOLDUS
- SUMONTUOKITE ATIDŽIAI, KAD GAMINYS NEAPVIRSTŲ.a
- Prijungus USB jrenginj
- TECHNINĖ PRIEŽIŪRA
- IERIKOJIET TO UZMANIGI, LAI PRODUKTS NEAPGAZTOS.
- SAGATAVOŠANĀS
- IZDELEK NAMESTITE PREVIDNO IN TAKO, DA SE NE PREVRNE.
- MONTAŽA NA STENO: VODORAVNA NAMESTITEV
- BEZBEDNOSNA UPUTSTVA
- INFORMACIJE NA ZADNJOJ PLOČI
- MOLIMO DA POSTOLJE PAŽLJIVO MONTIRATE DA PROIZVOD NE BI PAO
- ! NAPOMENA
- ZADNJI POKLOPAC ZA UREĐENJE KABLOVA
- MONTAŽA NA ZIDU: HORIZONTALNO POSTAVLJANJE
- INFORMACIJE O STRAŽNJOJ PLOČI
- Ugradnja postolja(samo 32/37/42LG60\*\*, 42LG61\*\*)
- POSTAVLJANJE VRŠITE IZUZETNO PAŽLJIVO KAKO PROIZVOD NE BI PAO.
- UZEMLJENJE
- ZIDNA UGRADNJA : VODORAVNA
- UKLJUČIVANJE TV PRIJEMNIKA
- LÜTFEN ÜRÜNÜ DÜŞÜRMEYECEK ŞEKİLDE DİKKATLİCE KURUNUZ.
- DUVARA MONTAJ: YATAY KURULUM
- KULLANICI KILAVUZUNU CD-ROM'DA GÖRÜNTÜLEMEK
Brand : LG
Model : 426100
Category : Television