Video Doorbell E340 - Doorbells eufy - Free user manual and instructions
Find the device manual for free Video Doorbell E340 eufy in PDF.

| Product type | Video doorbell |
| Brand | Eufy |
| Model | Video Doorbell E340 |
| Power supply | Rechargeable battery or wired (existing doorbell) |
| Video resolution | 2K (2560 x 1920 pixels) |
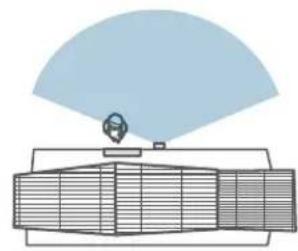
| Field of view | 160° diagonal |
| Audio | Two-way with noise reduction |
| Night vision | Infrared (up to 5 m) |
| Motion detection | Yes, with sensitivity adjustment and zones |
| Connectivity | Wi-Fi 2.4 GHz |
| Storage | Cloud (subscription) or local via HomeBase (sold separately) |
| Dimensions | Approximately 13 x 5 x 3 cm |
| Weight | Approximately 150 g |
| Operating temperature | -20°C to 50°C |
| Protection rating | IP65 (weather-resistant) |
| Installation | Wall-mounted (screws or adhesive), recommended height 1.2 m |
| Box contents | Doorbell, battery, mounting bracket, 15° wedge, screws, quick start guide |
| Warranty | 12 months |
| Maintenance | Clean with a soft dry cloth |
| Safety | Do not expose to extreme temperatures or excessive humidity. Dispose of batteries according to regulations. |
Frequently Asked Questions - Video Doorbell E340 eufy
User questions about Video Doorbell E340 eufy
0 question about this device. Answer the ones you know or ask your own.
Ask a new question about this device
Download the instructions for your Doorbells in PDF format for free! Find your manual Video Doorbell E340 - eufy and take your electronic device back in hand. On this page are published all the documents necessary for the use of your device. Video Doorbell E340 by eufy.
USER MANUAL Video Doorbell E340 eufy
natural_image
Line drawing of a dual-tiered electronic device with circular and rectangular components, labeled 'cufy SECURITY' (no additional text or symbols)Anker Innovations Limited. All rights reserved. eufy Security and eufy Security Logo are trademarks of Anker Innovations Limited, registered in the United States and other countries. All other trademarks are the property of their respective owners.
PAP 22
Raccolta Carta
Model: T8214
5100500XXXX V01
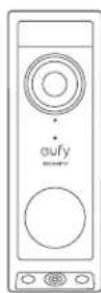
AT A GLANCE
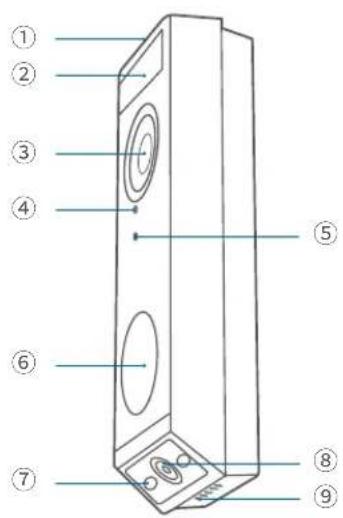
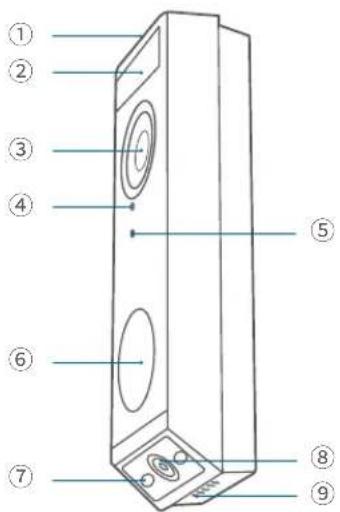
Front View
English
Deutsch
Español
Français
Italiano
Nederlands
Portuguese
لعرية
134
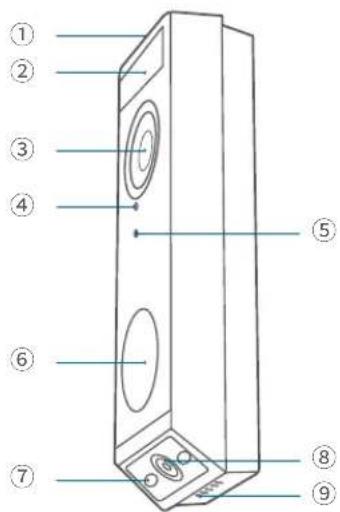
① LED Light
② Motion Sensor
③ Primary Camera Lens
④ Microphone
⑤ Ambient Light Sensor
⑥ LED Ring / Doorbell Button
⑦ LED Light
⑧ Secondary Camera Lens
⑨ Speaker
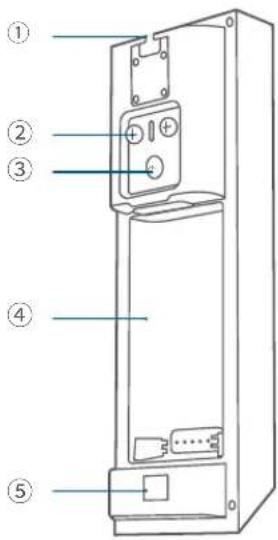
Rear View
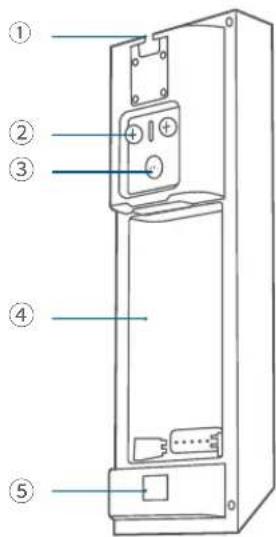
① Detaching Mechanism
② Power Terminals for Existing Doorbell
② Wires (Optional)
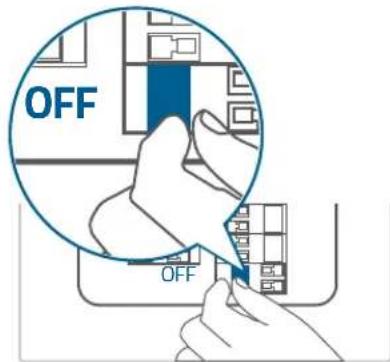
③ SYNC Button
Press to turn on the doorbell.
Press and hold for 2 seconds until you hear a beep to set up the doorbell. (Optional)
Press quickly 5 times within 3 seconds to turn off the doorbell.
④ Battery Compartment
⑤ QR Code (Scan to add the doorbell in the app)
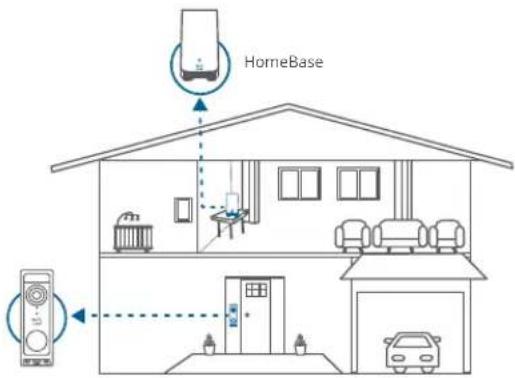
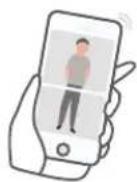
This video doorbell can work independently once it is connected to your home wireless router. Additionally, you have a variety of options to receive notifications and hear a ring when someone presses your video doorbell.
- Use a traditional doorbell chime (if you have one).
- Use a eufy Security doorbell chime (sold separately).
• Use an Amazon Alexa Echo Show device.
Works with eufy Security HomeBase (Optional)
The video doorbell detects motion at your porch and lets you to answer the door anytime, anywhere. You can store video clips in the built-in storage of your eufy Security HomeBase 2 or S380 HomeBase (sold separately). When someone rings the doorbell, people in the house will be notified.
EN 0302 EN
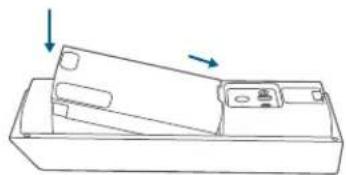
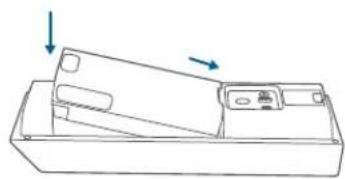
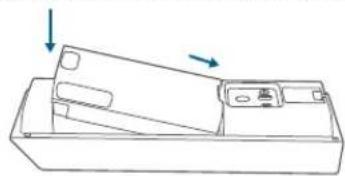
CHARGING THE BATTERY PACK
- Remove the pre-installed battery pack from the battery compartment.

natural_image
Line drawing of a hand holding an object with an arrow indicating direction (no text or symbols)- Fully charge the rechargeable battery pack before installation.

flowchart
graph LR
    A["Device with USB cable"] <--> B["USB cable"]
    B <--> C["Smartphone"]
- Place the battery pack into the battery compartment.
natural_image
Technical line drawing of a mechanical component with two arrows indicating direction (no text or symbols)SETTING UP THE SYSTEM
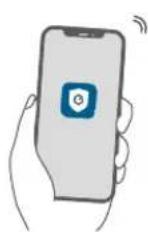
- Download and install the eufy Security app, then sign in or create an account.


- Follow the in-app instructions to add the video doorbell.
DETERMING THE POWER OPTION
Option 1: Battery Powered
If you don't have existing doorbell wiring at your front door, use the included battery. You are free to determine the location of the doorbell, and the mounting will be easy and quick.
When the battery is low, you will need to recharge it. Battery life varies with use. If you choose this option, please skip to DOORBELL MOUNTING (Battery Powered).
Option 2: Wire Powered
If you have existing and working doorbell wires at your front door, the video doorbell will be constantly powered by these wires. So there's no need to detach and recharge after installation.
The mounting position is limited. If you choose this option, please skip to DOORBELL MOUNTING (Wire Powered).
DOORBELL MOUNTING (Battery Powered)
Choose a Location
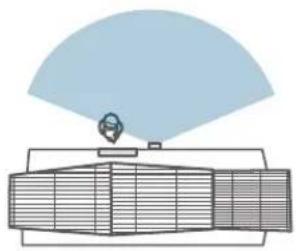
- Take the video doorbell to your front door and check the live view in the app. Choose a location where you can see the desired field of view. Consider the following factors:
- Check if you can reuse the existing holes and anchors in the wall or door frame.
- If you want to place the doorbell near a side wall, make sure the wall isn't in the field of view. Otherwise, the IR light will be reflected and the night vision will be blurred.
- If you are drilling the mounting holes for the first time, the recommended height is 48" (1.2m) above the ground.
- To adjust the angle, use the 15^ mounting wedge as a supplementary mounting bracket.


natural_image
Diagram of a radar or antenna system with a central sensor and surrounding grid components (no text or labels)
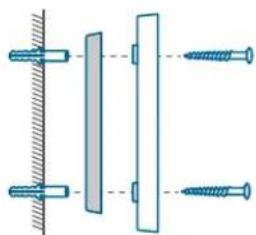
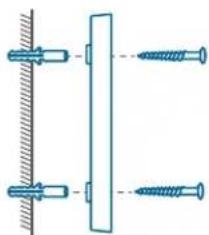
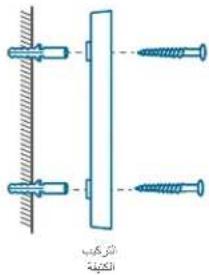
- Place the screw hole positioning card against the wall to mark the location. If mounting on a hard wall (brick, concrete, or stucco), use a 15/64" (5.95mm) drill bit to drill 2 holes through the screw hole positioning card.


What you need: Phillips-Head Screwdriver; Power Drill (15/64" Drill Bit)
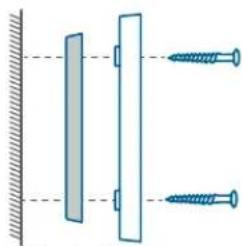
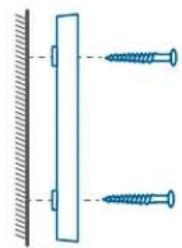
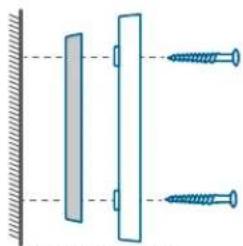
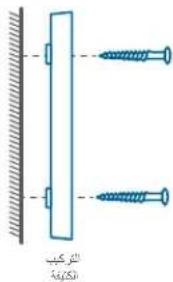
Mount the Bracket
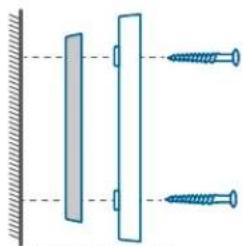
Use the provided screws to secure the mounting bracket on the wall.
Wooden Wall

natural_image
Diagram showing two screws attached to a vertical surface with a diagonal bar (no text or symbols)Mounting
Bracket
Without 15° Mounting Wedge
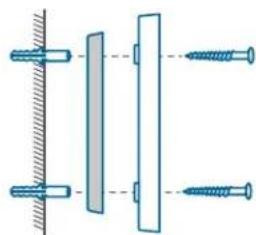
natural_image
Diagram showing two vertical bars mounted on a surface with two screws attached, no text or symbols present.Mounting Mounting
Wedge Bracket
With 15° Mounting Wedge
Hard Wall

natural_image
Diagram showing two screws attached to a vertical surface, with no text or symbols present.Mounting
Bracket
Without 15° Mounting Wedge
natural_image
Pure mechanical assembly diagram showing two vertical components with fasteners, no text or symbols presentMounting Mounting
Wedge Bracket
With 15° Mounting Wedge
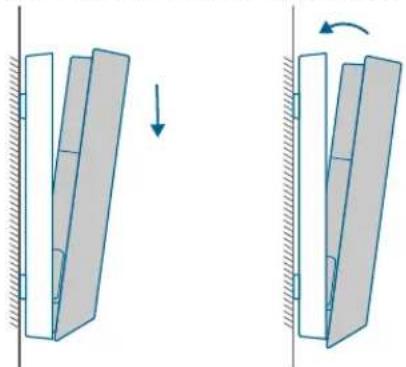
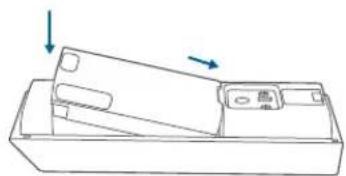
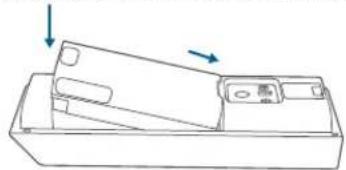
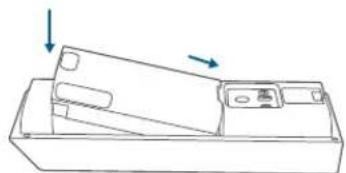
Install the Doorbell
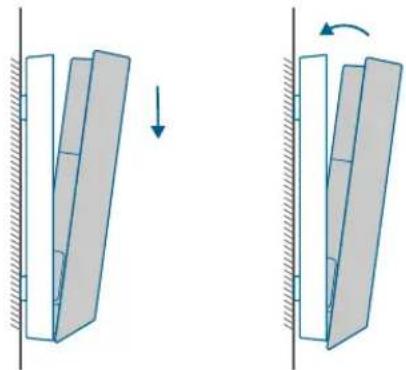
Align the doorbell with the bottom of the mounting bracket, then press the top of the doorbell into place until it clicks.
natural_image
Diagram showing two mechanical or structural changes with arrows indicating direction of movement (no text or symbols)Recharging the Battery
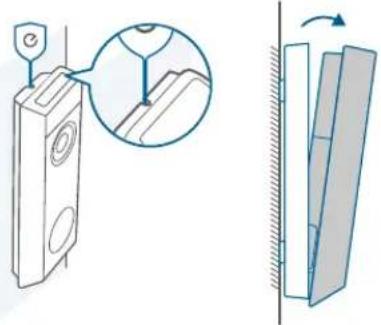
- Insert the detaching pin into the pin hole on the top of the doorbell, then lift the top for removal.
- Repeat steps in "CHARGING THE BATTERY PACK".

You can purchase an extra battery pack for quick replacement.
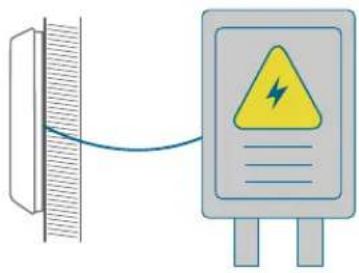
DOORBELL MOUNTING (Wire Powered)
Check the Doorbell Wires
- Ring the existing doorbell to check if it is working. If it doesn't ring, your doorbell wires may be defective. Power on the doorbell by the built-in battery or consult an electrician to repair the wires.
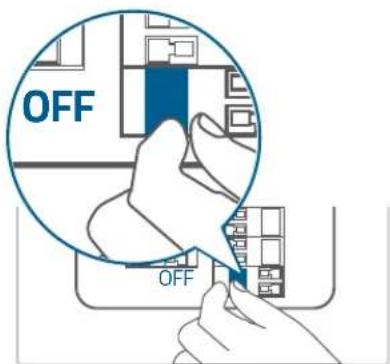
- Shut off the power at the circuit breaker. Turn the lights on and off to make sure the electricity in your home is properly shut off.

Always be careful when handling wires. If you're not comfortable installing it yourself, have a qualified electrician to do it.
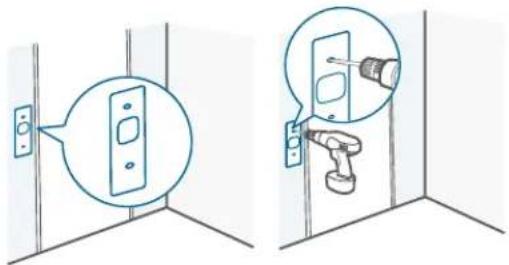
Detach the Existing Doorbell Button
If you already have existing doorbell wiring:
- Remove the existing doorbell button with a Phillips-head screwdriver (not provided).
- Pull the two wires out carefully when removing the existing doorbell. Straighten the wire ends if necessary.
natural_image
Simple line drawing of a door with a speech bubble highlighting the interior (no text or symbols)
natural_image
Simple line drawing of a door with a magnified inset showing a hand holding a wall-mounted device (no text or symbols)
natural_image
Simple line drawing of a door with a speech bubble and a small object, no text or symbols present.Choose a Location
-
Take the video doorbell to your front door and check the live view in the app. Choose a location where you can see the desired field of view. Consider the following factors:
-
Check if you can reuse the existing holes and anchors in the wall or door frame.
- If you want to place the doorbell near a side wall, make sure the wall isn't in the field of view. Otherwise, the IR light will be reflected and the night vision will be blurred
- If you are drilling the mounting holes for the first time, the recommended height is 48" (1.2m) above the ground.
- To adjust the angle, use the 15^ mounting wedge as a supplementary mounting bracket.
natural_image
Diagram of a radar or antenna system with a central sensor and surrounding grid components (no text or labels)
- Place the screw hole positioning card against the wall to mark the location. If mounting on a hard wall (brick, concrete, or stucco), use a 15/64" (5.95mm) drill bit to drill 2 holes through the screw hole positioning card.

What you need: Phillips-Head Screwdriver; Power Drill (15/64" Drill Bit)
Mount the Bracket
Use the provided screws to secure the mounting bracket on the wall.
Wooden Wall
natural_image
Diagram showing two screws attached to a vertical surface with a diagonal bar (no text or symbols)Mounting
Bracket
Without 15° Mounting Wedge

natural_image
Diagram showing two vertical bars mounted on a surface with two screws attached, no text or symbols present.Mounting Mounting
Wedge Bracket
With 15°
Mounting Wedge
Hard Wall
natural_image
Diagram showing two screws attached to a vertical surface, with no text or symbols present.Mounting
Bracket
Without 15° Mounting Wedge

natural_image
Pure mechanical assembly diagram showing two vertical components with fasteners, no text or symbols presentMounting Mounting
Wedge Bracket
With 15°
Mounting Wedge
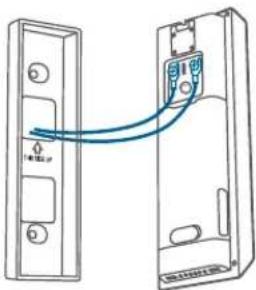
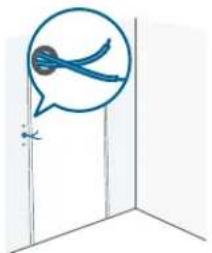
Connect the Wires to the Doorbell
Connect the wires to the terminals on the back of the doorbell, then tighten the terminal screws. Wire can be connected to any terminal.
natural_image
Diagram of two connected devices with a blue cable, showing internal components and mounting points (no text or symbols)

To prevent short-circuiting, make sure the wires are not touching each other after connecting them to the terminals.
If the wires are too short, use the extension wires and wire nuts to make them longer. Use electrical wiring tape instead if there is no more space on the wall for wire nuts.
Install the Doorbell
Align the doorbell with the bottom of the mounting bracket, then press the top of the doorbell into place until it clicks.
natural_image
Diagram showing two mechanical or structural states with directional arrows, no text or symbols presentRestore Power
Switch the main circuit breaker back to ON. You're all set!
SAFETY
- The suitable temperature for devices and accessories is -20^ to 50^ (Charging temperature is 0^ to 40^ ).
- Unless specifically indicated that it is safe to do so in the user guide or instruction manual, do not use this device in an environment that exceeds the recommended low or high temperature.
- Unless specifically indicated that it is safe to do so in the user guide or instruction manual, avoid exposing your device to direct sunshine or excessively wet environments.
- It is recommended to supply the device in an environment with a temperature that ranges from 5°C to 25°C.
- When supplying power, place the device in an environment that has a normal room temperature and good ventilation.

CAUTION!
THERE IS A RISK OF EXPLOSION IF AN INCORRECT BATTERY TYPE IS USED. DISPOSE OF USED BATTERIES ACCORDING TO THEIR INSTRUCTIONS.
Warning:
- Replacing a battery with an incorrect type may bypass safeguards and create danger;
- Disposal of a battery in a fire or other source of significant heat, or by crushing, or cutting, may result in an explosion as well as leakage of flammable liquids and gases;
• Leaving a battery in an extremely hot environment may result in an explosion as well as leakage of flammable liquids and gases; - A battery subjected to extremely low air pressure may result in an explosion as well as leakage of flammable liquids and gases.
NOTICE
Declaration of Conformity
CE This product complies with the radio interference requirements of the European Community.
Hereby, Anker Innovations Limited declares that this device is in compliance with the essential requirements and other relevant provisions of Directive 2014/53/EU. For the declaration of conformity, visit the Web site: https://uk.eufylife.com/.
UK This product complies with the radio interference requirements of the United Kingdom.
This product complies with the radio interference requirements of the United Kingdom.
Hereby, Anker Innovations Limited declares that this product is in compliance with Radio Equipment Regulations 2017(SI2017/1206). The full text of the UK declaration of conformity is available at the following internet address: https://uk.eufyllife.com.

Your product is designed and manufactured with high-quality materials and components, which can be recycled and reused.

This symbol means the product must not be discarded as household waste and should be delivered to an appropriate collection facility for recycling. Proper disposal and recycling help protect natural resources, human health, and the environment. For more information on the disposal and recycling of this product, contact your local municipality, disposal service, or the shop where you bought this product.
RF exposure information:
The Maximum Permissible Exposure (MPE) level has been calculated based on a distance of d=20 cm between the device and the human body. To maintain compliance with RF exposure requirements, use product that maintains a 20cm distance between the device and the human body. Frequency bands and power as below:
| Function Bands Operation Frequency Max. Power | |
| Wi-Fi for T8214 2.4GHz 2412-2472MHz 18.89 dBm | |
The following importer is the responsible party (contract for EU matters): Anker Innovations Deutschland GmbH | Georg-Muche-Strasse 3, 80807 Munich, Germany
The following importer is the responsible party (contract for UK matters): Anker Technology (UK) Limited I GNR8, 49 Clarendon Road, Watford, Hertfordshire, WD17 1HP, United Kingdom
AUF EINEN BLICK
Vorderansicht
natural_image
Line drawing of a hand holding a rectangular object with an arrow indicating direction (no text or symbols)flowchart
graph LR
    A["Device with battery"] <--> B["Switch"]
    B --> C["Smartphone with switch"]
    C --> D["Display"]
- Place the battery pack into the battery compartment.
natural_image
Line drawing of a rectangular device with internal components and directional arrows indicating movement (no text or symbols)DE 2322 DE
natural_image
Diagram of a mechanical or electrical component with a fan-like top and internal grid structure (no text or symbols)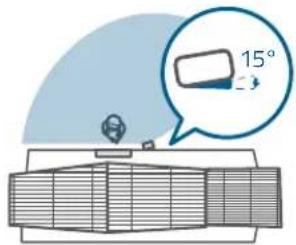

natural_image
Diagram showing two screws attached to a vertical surface with a hatched wall (no text or symbols)natural_image
Diagram showing two screws attached to a vertical panel with a hatched wall, no text or symbols presentnatural_image
Diagram showing two screws attached to a vertical bar with a hatched wall, no text or symbols presentnatural_image
Technical diagram showing two mechanical components with screws and a hatched surface, no text or symbols presentnatural_image
Diagram showing two mechanical or structural changes with arrows indicating direction, no text or symbols present.Aufladen des Akkus
natural_image
Diagram showing a device with a magnified view of a textured surface and a separate cross-section of a mechanical component (no text or symbols)natural_image
Simple line drawing of a door with a speech bubble highlighting a wall detail (no text or symbols)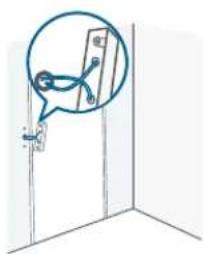
natural_image
Simple line drawing of a door with a hand holding a small object, no text or symbols present
natural_image
Simple line drawing of a door with a speech bubble and a small object inside (no text or symbols)DE 3130 DE
natural_image
Pure diagram of a mechanical or electrical component with no text, numbers, or symbols

natural_image
Diagram showing two screws attached to a vertical surface with a hatched wall (no text or symbols)natural_image
Diagram showing two screws attached to a wall and a vertical panel, with no text or symbols present.natural_image
Diagram showing two screws attached to a vertical bar with a hatched wall, no text or symbols presentnatural_image
Technical diagram showing two vertical components with fasteners and a hatched surface, no text or symbols presentnatural_image
Diagram showing two doors connected by a cable, one with a switch and the other with a device (no text or symbols present)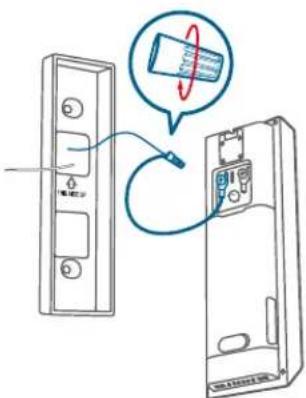

natural_image
Diagram showing two mechanical or structural states with a downward arrow indicating motion, no text or symbols present.natural_image
Line drawing of a hand holding an open rectangular object with a blue arrow indicating direction (no text or symbols)flowchart
graph LR
    A["Device with antenna"] <--> B["Device connected via wireless cable"]
    B --> C["Smartphone with display"]
    D["User interface"] --> E["Display screen"]
- Place the battery pack into the battery compartment.
natural_image
Technical line drawing of a mechanical component with arrows indicating direction (no text or symbols)natural_image
Illustration of a safety warning sign with a lightning bolt, connected to a wall-mounted device (no text or symbols present)natural_image
Diagram of a radar or antenna system with a central valve and grid array (no text or labels)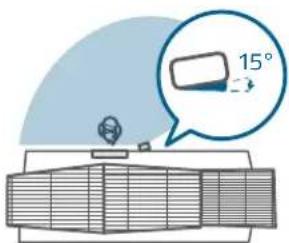
natural_image
Diagram showing two mechanical or structural states with directional arrows, no text or symbols presentnatural_image
Simple line drawing of a door with a speech bubble highlighting a wall detail (no text or symbols)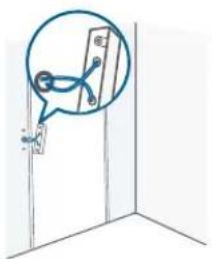
natural_image
Simple line drawing of a door with a speech bubble containing blue bird silhouettes (no text or symbols)natural_image
Diagram of a radar or antenna system with a dome-shaped component and grid base (no text or symbols)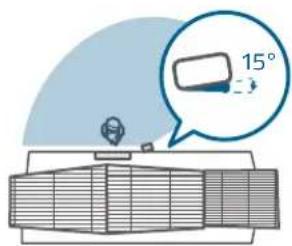
natural_image
Diagram of two doors connected by a cable, showing internal components and wiring (no text or symbols)

natural_image
Diagram showing two mechanical or structural states with a downward arrow and rotation arrow, no text or symbols present.Restaurar energía
natural_image
Line drawing of a hand holding an open rectangular object with a blue arrow indicating direction (no text or symbols)- Place the battery pack into the battery compartment.

natural_image
Line drawing of a rectangular electronic device with two arrows indicating direction (no text or symbols)FR 6160 FR
MISE EN PLACE DU SYSTÈME
natural_image
Diagram of a mechanical or electrical component with a fan-like top and internal grid structure (no text or symbols)

natural_image
Diagram showing two screws attached to a vertical surface with a hatched wall (no text or symbols)MONTAGE mural
Sans cale de montage de 15°
natural_image
Diagram showing two vertical bars mounted on a surface with two screws attached, no text or symbols presentnatural_image
Diagram showing two screws attached to a vertical bar with a hatched wall, no text or symbols presentMONTAGE mural
Sans cale de montage de 15°
natural_image
Technical diagram showing two vertical components with fasteners and a hatched surface, no text or symbols presentnatural_image
Diagram showing two mechanical or structural states with directional arrows, no text or symbols presentnatural_image
Diagram showing a mechanical component with an inset close-up of a pin inserted into a housing, alongside its cross-section view (no text or symbols)natural_image
Simple line drawing of a door with a speech bubble highlighting the interior (no text or symbols)

natural_image
Simple line drawing of a door with a speech bubble containing a blue bird silhouette (no text or symbols)FR 6968 FR
natural_image
Diagram of a radar or radar system with a central sensor and surrounding grid structure (no text or labels)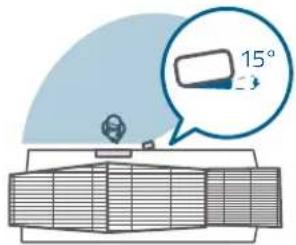

natural_image
Simple line drawing of a screw and its vertical alignment on a fixed surface (no text or symbols)MONTAGE mural
natural_image
Diagram showing two vertical bars with screw holes and a horizontal dashed line, no text or symbols presentMONTAGE MONTAGE Cale mural
natural_image
Diagram showing two screws attached to a vertical surface with a horizontal bar, no text or symbols presentMONTAGE mural
natural_image
Technical diagram showing two screws mounted on a wall and a vertical plate, with no text or symbols present.MONTAGE MONTAGE Cale mural
natural_image
Diagram of two doors connected by a cable, showing internal components and wiring (no text or symbols)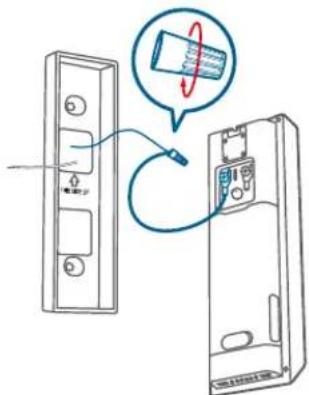

natural_image
Diagram showing two mechanical or structural states with a downward arrow indicating motion, no text or symbols present.natural_image
Line drawing of a hand holding an open electronic device with a blue arrow indicating direction (no text or symbols)flowchart
graph LR
    A["Device with antenna"] <--> B["Device connected via wireless cable"]
    B --> C["Smartphone with display"]
    D["User interface"] --> E["Display screen"]
- Place the battery pack into the battery compartment.
natural_image
Line drawing of a rectangular device with internal components and directional arrows indicating movement (no text or symbols)natural_image
Diagram showing a wall-mounted device connected to an electrical warning sign with a lightning bolt (no text or symbols present)natural_image
Diagram of a radar or antenna system with a central sensor and surrounding grid components (no text or labels)
natural_image
Diagram showing two mechanical or structural states with directional arrows, no text or symbols presentnatural_image
Simple line drawing of a door with a speech bubble highlighting a wall detail (no text or symbols)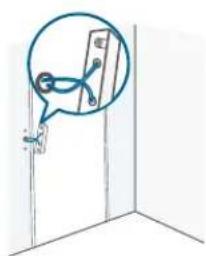
natural_image
Simple line drawing of a door with a hand holding a small object, no text or symbols present
natural_image
Simple line drawing of a door with a speech bubble containing blue scissors, no text or symbols presentnatural_image
Diagram of a radar or antenna system with a central sensor and surrounding grid components (no text or labels)
natural_image
Diagram of two connected devices with a blue cable, showing internal components and mounting points (no text or symbols)

natural_image
Diagram showing two mechanical or structural states with directional arrows, no text or symbols presentAnker Technology (UK) Limited, GNR8, 49 Clarendon Road, Watford, Hertfordshire, WD17 1HP, Regno Unito.
IN EEN OOGOPSLAG
Vooraanzicht
① LED-licht
② Bewegingssensor
③ Primaire cameralens
④ Microfoon
⑤ Omgevingslichtsensor
⑥ Led-ring/deurbelknop
⑦ LED-licht
⑧ Secundaire cameralens
⑨ Luidspreker
Achteraanzicht
natural_image
Line drawing of a hand holding a rectangular object with an arrow indicating direction (no text or symbols)flowchart
graph LR
    A["Device with cable"] <--> B["Switch"]
    B --> C["Smartphone with battery"]
    C --> D["Output"]
- Place the battery pack into the battery compartment.
natural_image
Line drawing of a mechanical device with arrows indicating direction (no text or symbols)HET OPZETTEN VAN HET SYUSTEEM
DE VOEDINGSOPTIE BEPALEN
DEURBEL MONTAGE (Op Batterijen)
Een locatie kiezen
natural_image
Diagram of a radar or radar system with a central sensor and surrounding grid structure (no text or labels)

natural_image
Diagram showing two screws attached to a vertical surface with a hatched wall (no text or symbols)MONTAGE
beusel
Zonder 15°
Montage Wig
natural_image
Diagram showing two vertical bars mounted on a surface with two screws attached, no text or symbols presentMONTAGE MONTAGE
wlg beugel
Met 15°
Montagewig
Harde muur

natural_image
Diagram showing two screws attached to a vertical bar with a hatched wall, no text or symbols presentMONTAGE
beuge
Zonder 15°
Montage Wig
natural_image
Technical diagram showing two vertical components with fasteners and a hatched surface, no text or symbols presentMONTAGE MONTAGE
wig beugel
Met 15°
Montagewig
Installeer de deurbel
natural_image
Diagram showing two mechanical or structural changes with arrows indicating direction of movement (no text or symbols)De batterij opladen
natural_image
Diagram showing a device with a magnified inset of its internal structure, alongside a schematic view of a mechanical component (no text or symbols present)- Herhaal de stappen in "DE BATTERIJ OPLADEN".

natural_image
Simple line drawing of a door with a speech bubble highlighting a wall detail (no text or symbols)

natural_image
Simple line drawing of a door with a speech bubble containing a bird silhouette (no text or symbols)NL 107106 NL
Een locatie kiezen
natural_image
Diagram of a radar or radar system with a central sensor and surrounding grid structure (no text or labels)

natural_image
Simple line drawing of a screw and nail assembly on a fixed surface (no text or symbols)MONTAGE
beugel
Zonder 15° Montage Wig
natural_image
Diagram showing two vertical bars with screw holes and a horizontal line, no text or symbols presentMONTAGE MONTAGE
wlg beugel
Met 15° Montagewig
Harde muur

natural_image
Diagram showing two screws attached to a vertical bar with a hatched wall, no text or symbols presentMONTAGE
beugel
Zonder 15°
Montage Wig
natural_image
Technical diagram showing two vertical components with fasteners and a hatched wall, no text or symbols presentMONTAGE MONTAGE
wig beugel
Met 15°
Montagewig
natural_image
Diagram of two connected devices with a blue cable, showing internal components and no text or symbols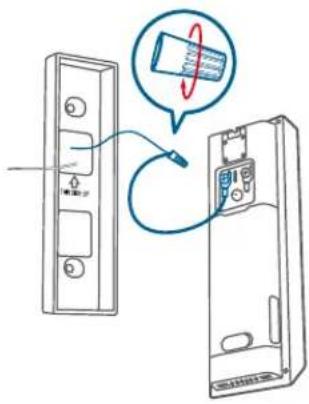

natural_image
Diagram showing two mechanical or structural states with a downward arrow indicating motion, no text or symbols present.natural_image
Line drawing of a hand holding an open rectangular object with a blue arrow indicating direction (no text or symbols)flowchart
graph LR
    A["Device with cable"] <--> B["USB cable"]
    B <--> C["Smartphone"]
- Place the battery pack into the battery compartment.
natural_image
Technical line drawing of a mechanical component with arrows indicating direction (no text or symbols)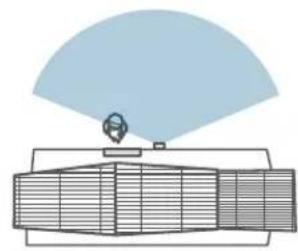
natural_image
Diagram of a radar or antenna system with a central sensor and surrounding grid components (no text or labels)
natural_image
Diagram showing two mechanical or structural states with a downward arrow indicating motion, no text or symbols present.Recarregando a bateria
natural_image
Simple line drawing of a door with a speech bubble highlighting the interior (no text or symbols)
natural_image
Simple line drawing of a door with a hanging object and a thought bubble showing a cable or wire (no text or symbols)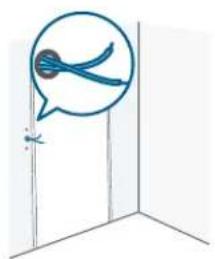
natural_image
Simple line drawing of a door with a speech bubble containing a blue bird silhouette (no text or symbols)Escolha um local
natural_image
Diagram of a radar or antenna system with a central sensor and surrounding grid components (no text or labels)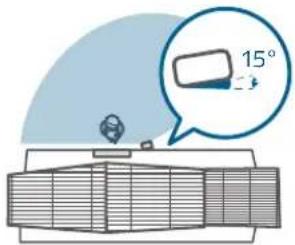
natural_image
Diagram of a device showing two rectangular panels connected by a blue cable, with no visible text or symbols.

natural_image
Diagram showing two mechanical or structural states with directional arrows indicating movement, no text or symbols present.Restaure Energia
https://uk.eufyllife.com.

نظرة سريعة
المنظمة الأمامي

① آلية الفصل
natural_image
Line drawing of a hand holding a rectangular object with an arrow indicating direction (no text or symbols)flowchart
graph LR
    A["Device with USB cable"] <--> B["USB cable"]
    B <--> C["Smartphone with USB cable"]
.Place the battery pack into the battery compartment .3

natural_image
Technical line drawing of a mechanical component with two arrows indicating direction (no text or symbols)كيف يعمل النظام
يعمل بشكل مستقل
natural_image
Diagram of a radar or radar system with a central sensor and grid array (no text or labels)
natural_image
Diagram showing two mechanical or structural states with directional arrows indicating movement, no text or symbols present.إعادة شحن البطارية
natural_image
Simple line drawing of a door with a speech bubble highlighting the interior (no text or symbols)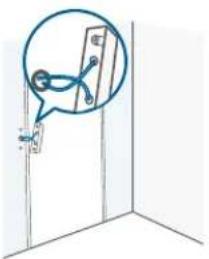
natural_image
Simple line drawing of a door with a hand holding a wall-mounted device (no text or symbols)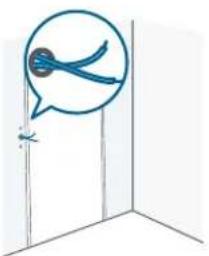
natural_image
Simple line drawing of a door with a speech bubble containing blue scissors (no text or symbols)natural_image
Diagram of a radar or radar system with a central sensor and grid array (no text or labels)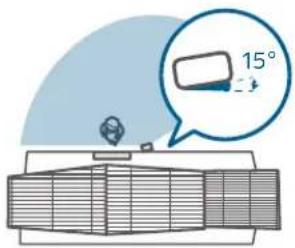
الحspot الخشبي
الحانط الصلب
Service client | Servizio clienti | Klantenservice
12-month limited warranty
(US) +1 (800) 988-7973
(UK) +44 (0) 1604 936200
(DE) +49 (0) 69 9579 7960
(中国)+86 400 0550 036
(日本)+81 03 4455 7823
(AU) +61 3 8331 4800
(Egypt) +20 8000000826
(UAE) +971 8000320817
(Kuwait) +965 22069086
(Saudi Arabia) +966 8008500030

support@eufy.com
Anker Innovations Limited
Room 1318-19, Hollywood Plaza, 610 Nathan Road, Mongkok, Kowloon, Hong Kong

@EufyOfficial @EufyOfficial @EufyOfficial