305740 - Energy meter Bearware - Free user manual and instructions
Find the device manual for free 305740 Bearware in PDF.


User questions about 305740 Bearware
0 question about this device. Answer the ones you know or ask your own.
Ask a new question about this device
Download the instructions for your Energy meter in PDF format for free! Find your manual 305740 - Bearware and take your electronic device back in hand. On this page are published all the documents necessary for the use of your device. 305740 by Bearware.
USER MANUAL 305740 Bearware
Thank you for choosing an BEARWARE product. Please read the following user manual carefully so as to get the most from the product you have purchased.
1. Scope of delivery
- Energy cost meter
- User manual
2. Technical data
| Electric supply 240 V | AC~ 50 Hz |
| Maximum current 16 | A |
| Maximum power 3680 W | |
| Power supply (data storage) | 3,6 V Ni-MH / 40 mAh |
| Operating temperature | 0°C to 40°C |
| Accuracy +/-2% | |
| Range/ Measurement range | 0.1 - 3680 W (power)200 V - 276 V (voltage)0.0 KWh - 9999.9 KWh (consumption)45-65 Hz (frequency range) |
| Features | Measurement and calculation of many data concerning energy consumption of the connected devicesData storage (battery operated) in case of power failure |
3. Initial use
Take the product out of the package and remove all the packaging material. Then plug the energy cost meter into a properly installed shockproof socket.
The device is now ready for use. Detailed information regarding the operation and settings is given in the following sections in this user manual.
12 English
4. Displays and controls
text_image
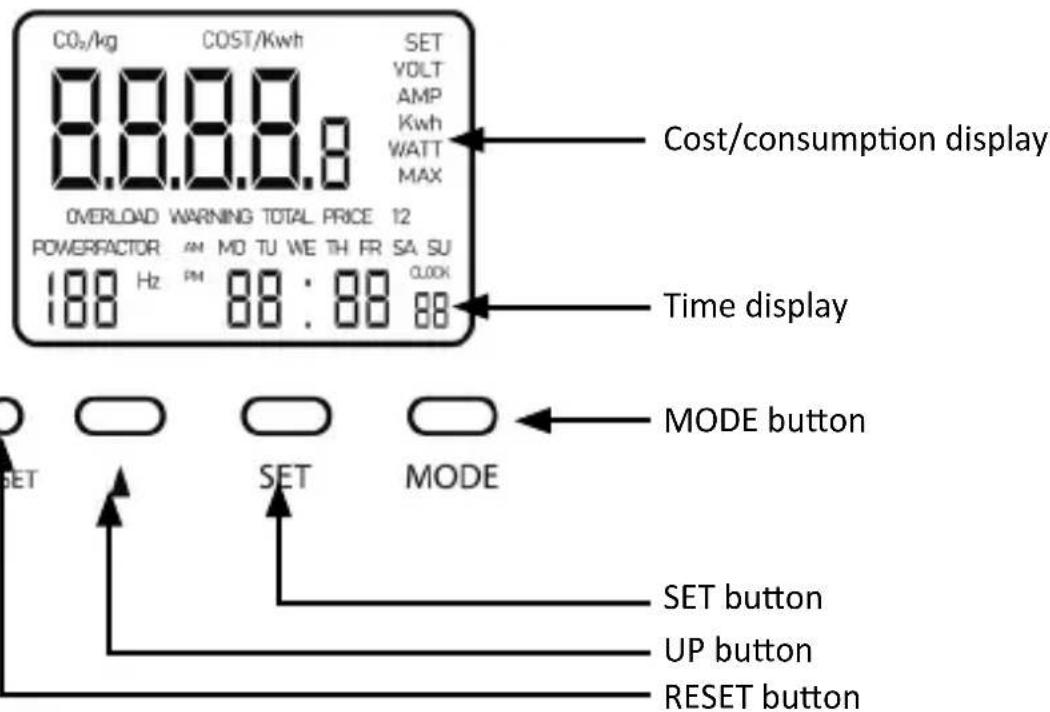
CO2/kg COST/Kwh SET VOLT AMP Kwh WATT MAX OVERLOAD WARNING TOTAL PRICE 12 POWERFACTOR AM MO TU WE TH FR SA SU 188 Hz PM 88:88 88 Cost/consumption display Time display MODE button SET SET MODE SET button UP button RESET button4.1 Display
Cost/consumption display:
The display shows current information on consumption, total costs of the time phases, mains voltage, power consumption of the load and CO2 values.
Time display:The display shows the current time.
4.2 Button functions
MODE button:
- You can switch between the different display modes using this button.
- In normal operation, you can switch between the 12 and 24-hour display using this button.
- The value can be increased using this button in the settings menu. Press and hold the button a little longer for faster scrolling.
UP button:
SET button:
- Open the settings menu.
RESET button:
Press and hold the RESET button using a sharp object to clear all settings (incl. time) and to restart the device.
5. Setting the time
Note: We advise you to charge the internal battery for about 2-3 hours using a properly installed socket before using the device for the first time.
- Press the „SET“ button once. The weekday display starts to flash (if this does not work, please press the „MODE“ button repeatedly until the time display appears at the bottom right of the display).
- Press the „UP“ button until the desired day of the week is set.
- Then press the „SET“ button. The hours display starts to flash.
- Press the „UP“ button until the desired hour is set.
- Then press the „SET“ button again. The minutes display starts to flash.
- Press the „UP“ key until the desired minute is set
- Then press the "SET" button again. The time display will reappear in the display.
Press the "UP" button when the time is shown in the display to switch between the 12-hour or 24-hour display.
If the time is displayed incorrectly, a new setting is required. Please repeat the steps above.
If all settings have been made and are correct, you can plug the unit into a properly connected 230-240 V socket.
Plug your electrical device into the power meter and switch it on. The energy cost meter will measure the power consumption of the plugged-in electrical device.
6. Cost settings
Press the "MODE" button for approx. 5 seconds while the display shows the voltage, current or power.
These 11 time phases are adjustable:
- Monday
- Tuesday
- Wednesday
- Thursday
- Friday
- Saturday
- Sunday
• Monday Tuesday Wednesday Thursday Friday
• Monday Tuesday Wednesday Thursday Friday Saturday - Saturday Sunday
• Monday Tuesday Wednesday Thursday Friday Saturday Sunday
Set the unit price 1
- Press the "SET" button once briefly. "SET" is shown in the display, the first digit of the first unit price/kWh starts flashing. Set this digit using the "UP" button.
- Press the "SET" button again to set the second digit. The second digit of the first unit price/kWh starts flashing. Set this digit using the "UP" button.
- Repeat the procedure with number 3 and 4.
- After setting the 4th digit, press the „SET“ button again to set the decimal point of the first unit price.
- The decimal point/kWh flashes. Set this using the „UP“ key.
- Then briefly press the "SET" button again, the day of the week (starting point) of the first individual price/kWh starts flashing. Set the day using the "UP" button.
- Repeat the procedure for the hour and minute display. You can set the values using the "UP" button.
Set the unit price 2
After you have set the unit price 1, press the "MODE" button once briefly to then set the second unit price. Proceed as described in the previous point.
Set maximum load current
- After setting the unit price 2, briefly press the "MODE" button.
-
Then press the "SET" button once briefly, "SET" and "AMP" appear in the display, the first digit of the max. load current starts flashing.
-
Press the "SET" button again, and the second digit of the max. load current starts flashing. You can set this digit with the "UP" button.
- Repeat the procedure with the number 3 and 4 of the max. load current.
- The overload warning indicator starts flashing as soon as the load has exceeded the set value. You must then remove the electrical device from the energy cost meter or set the overload value (max. load current) again.
Data display
Pressing the "MODE" button changes the display mode as follows:
Voltage -> current -> power -> max. power -> kWh -> CO2 -> total costs and total application time -> costs and application time at unit price 1 -> costs and application time at unit price 2
If the "OVER" symbol flashes in the display, the set max. load current has been exceeded.
Reset data
If you press the "MODE" button in the "max. power" display for approx. 5 seconds, the max. power display is reset.
If you press the "MODE" button for approx. 5 seconds while "Voltage" is displayed, the total electricity costs or the electricity costs for unit price 1 or unit price 2 are deleted.
8. Resetting the device
Press the "RESET" button on the front side of the device using a pointed object to delete all settings and restart the device. Caution! Be careful not to injure yourself with the object!

CAUTION!
- Do not connect in series!
- Disconnected only when the plug is removed!
- Only for indoor use!
• No maintenance required! - Do not connect any device in which the load exceeds 16 A.
- Ensure that the plug is fully and correctly inserted.
- Clean the device with a dry cloth only.
- Do not immerse the device in water!
Symbols
text_image
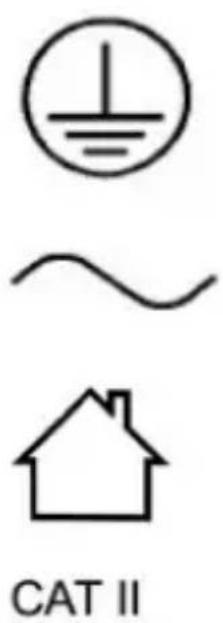
CAT IIGround terminal
AC
Only for indoor use
Overvoltage category II

9. Safety instructions and disclaimer
Never try to open the device to repair or make modifications. Avoid contact with the mains voltage. Do not short-circuit the product. The device is not waterproof, hence please use it only in dry surroundings. Protect it from high humidity, water and snow. Keep the product away from high temperatures.
Do not expose the product to sudden changes in temperature or strong vibrations, as this could damage the electronic components. Check the device for any damage before using it. The product should not be used if it was subject to impact or has been damaged in some other manner.
Please comply with the local regulations and restrictions. Do not use the product for purposes other than those described in the user manual. This product is not a toy. Keep it out of the reach of children or mentally disabled persons.
Any repair or modification to the product, which is not carried out by the original supplier, will void any warranty and guarantee claims. The product should only be used by those who have read and understood this user manual. The specifications of the product may be changed without any special prior notification.

10. Disposal instructions
In line with the European WEEE directive, electrical and electronic products should not be disposed of along with domestic waste. Their components have to be separately sent for recycling or disposal, because improper disposal of toxic and dangerous components may permanently damage the environment.
According to the electrical and electronic equipment act (ElektroG), you are obliged (as a consumer) to return (free of charge) electrical and electronic products to the manufacturer, the point of sale or public collection points at the end of their service life. The relevant local laws regulate the details in this regard.
The symbol displayed on the product, in the user manual or/and on the packaging refers to these regulations. With this manner of sorting, recycling and disposal of used products, you make an important contribution towards protecting our environment.

11. Instructions for battery disposal
In conjunction with the sale of batteries along with the supply of appliances that include batteries, the supplier is obliged to point out the following to the customer: The customer is legally obliged to return used batteries. He can return used batteries which the supplier offers or has offered as new batteries in his assortment free of charge to the supplier's dispatch warehouse (shipping address). The symbols shown on the batteries indicate the following: Pb = battery contains more than 0.004 percent lead by weight, Cd = battery contains more than 0.002 percent cadmium by weight, Hg = battery contains more than 0.0005 percent mercury by weight

The symbol of the crossed-out dustbin means that the battery should not be disposed of in household waste.

WEEE directive 2012/19/EU WEEE Register no.: DE 67896761
The company WD Plus GmbH hereby certifies that the product 305740 complies with the fundamental requirements and all other relevant stipulations. A complete conformity statement can be obtained from: WD Plus GmbH, Wohlenbergstraße 16, 30179 Hannover
natural_image
Pure electrical circuit symbol for a diode (no text or labels)
CAT II
text_image
CO2/kg COST/Kwh SET VOLT AMP Kwh WATT MAX OVERLOAD WARNING TOTAL PRICE 12 POWERFACTOR AM MO TU WE TH FR SA SU 188 Hz PM 88:88 88 Display costi/consumo Indicatore dell'ora Tasto MODE RESET SET MODE Tasto SET Tasto UP Tasto RESET4.1 Visualizzazione
Display costi/consumo:
natural_image
Simple electrical circuit symbol for a diode (no text or labels)
CAT II
Borne del conductor
Corriente alterna
MO-FR 9:30am - 18pm CET

text_image
QR code image containing encoded data, no visible human-readable textbrandson-equipment.de