302528 - Wifi repeater CSL - Free user manual and instructions
Find the device manual for free 302528 CSL in PDF.

| Product type | WLAN AC750 Repeater |
| Brand | CSL |
| Model | 302528 |
| Approximate dimensions | 80 x 60 x 30 mm |
| Approximate weight | 100 g |
| Power supply | 100-240 V AC, 50/60 Hz (direct power plug) |
| Interfaces | 1 LAN port 10/100 Mbps, WPS button, Reset button |
| Wi-Fi standard | IEEE 802.11 a/b/g/n/ac (2.4 GHz and 5 GHz bands) |
| Maximum theoretical speed | 300 Mbps (2.4 GHz) + 433 Mbps (5 GHz) |
| Wireless security | WEP, WPA, WPA2, WPS |
| Operating modes | Repeater (Wi-Fi extension) and Access Point (AP) |
| Configuration | Via WPS or web interface (192.168.10.2 or http://csl.repeater) |
| LED indicators | WiFi signal, wireless, WPS, Ethernet |
| Box contents | Repeater, LAN cable, user manual |
| Care and cleaning | Clean with a dry, soft cloth. Do not use chemical products. |
| Safety | Do not open the device. Avoid moisture and extreme temperatures. Keep out of reach of children. |
| Spare parts and repairability | No user-serviceable parts. Contact customer service in case of defect. |
| General information | Manual available for download at notice-facile.com. Compliant with WEEE directive (2012/19/EU). |
Frequently Asked Questions - 302528 CSL
User questions about 302528 CSL
0 question about this device. Answer the ones you know or ask your own.
Ask a new question about this device
Download the instructions for your Wifi repeater in PDF format for free! Find your manual 302528 - CSL and take your electronic device back in hand. On this page are published all the documents necessary for the use of your device. 302528 by CSL.
USER MANUAL 302528 CSL
Thank you for choosing a CSL product. Please read the following user manual carefully to have an enjoyable experience with your purchased product.
1 Scope of supply
- WiFi Repeater AC750
- LAN cable
- User manual
2 Product details
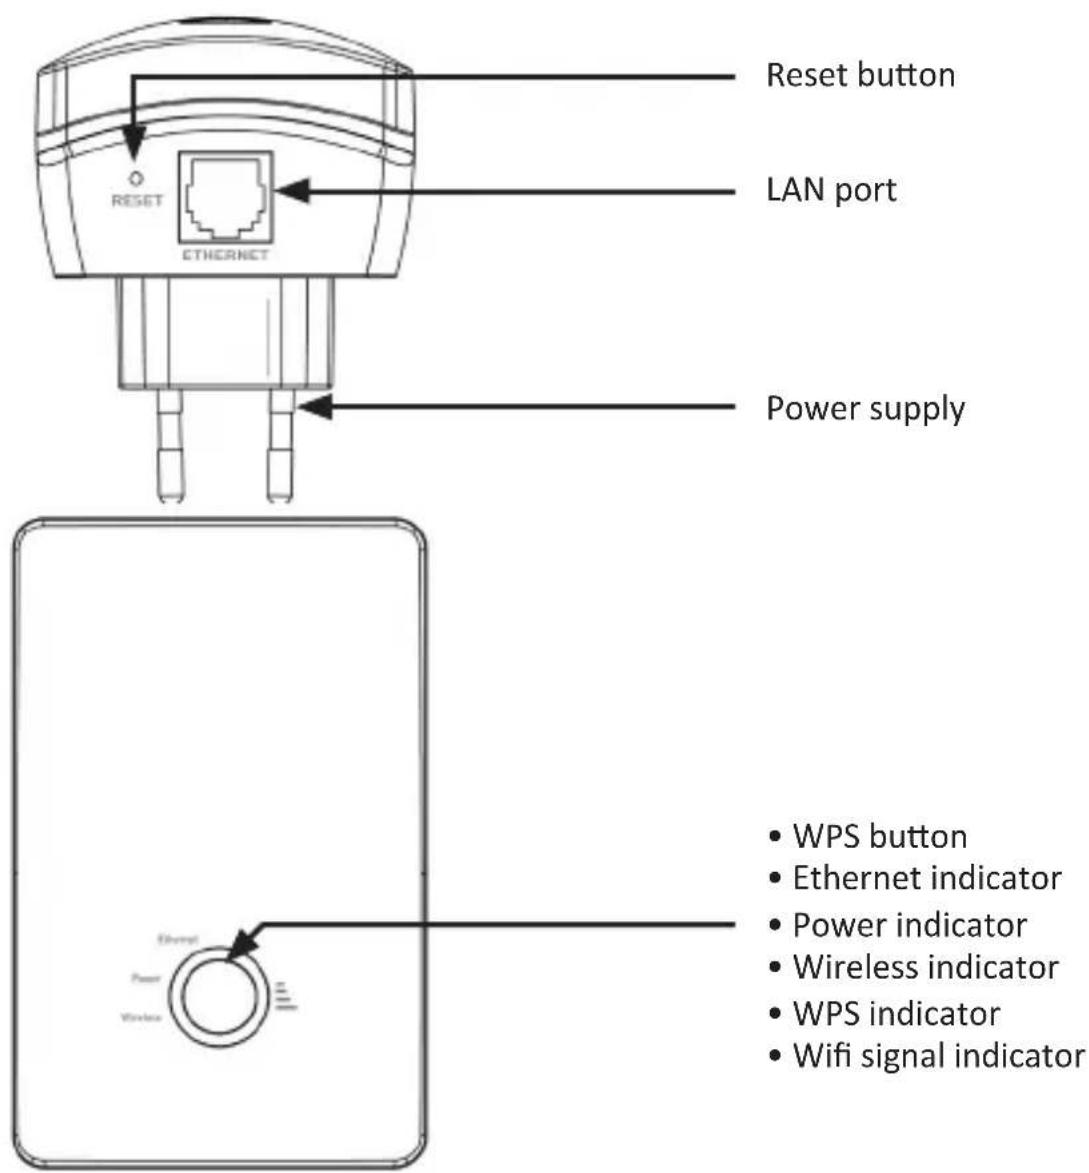
3 Displays
| Wifi signal Green | On: Wireless signal strength | |
| Off / Disabled: No connection | ||
| Wireless LED Green | On: WLAN connection established and enabled | |
| Flashes: WLAN connection transmits packages | ||
| WPS Green | Off / Disabled: WPS disabled | |
| Flashes: WPS enabled | ||
| Ethernet Green | On: LAN connection enabled | |
| Off / Disabled: LAN connection disabled | ||
| Flashes: LAN connection transmits packages |
4 Overview of the operating modes
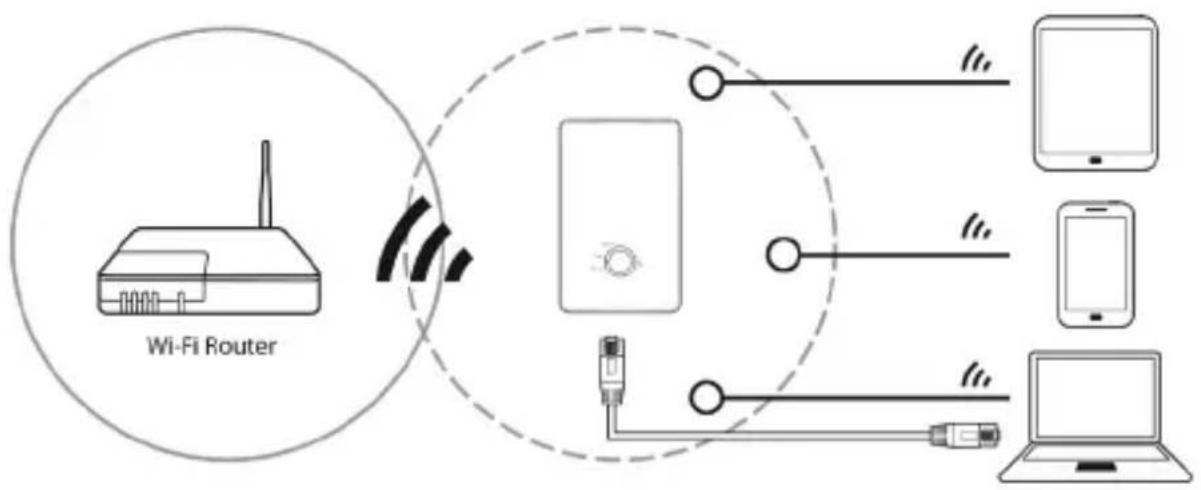
Repeater:
flowchart
graph TD
    A["Wi-Fi Router"] -->|Wireless Signal| B["Device"]
    B --> C["Mobile Device"]
    B --> D["Laptop"]
    B --> E["Smartphone"]
    B --> F["Switch"]
    style A fill:#f9f,stroke:#333
    style B fill:#ccf,stroke:#333
    style C fill:#cfc,stroke:#333
    style D fill:#fcc,stroke:#333
    style E fill:#cff,stroke:#333
    style F fill:#ffc,stroke:#333
In the "Repeater" mode, the WiFi Repeater copies and extends the data of your existing WiFi network or your existing WiFi access points. Network devices can be optionally connected using the WiFi or LAN interface of the WiFi Repeater.
AP (Access Point):

flowchart
graph LR
    A["ADSL Router"] -->|WAN| B((Central Device))
    B --> C["Device 1"]
    B --> D["Device 2"]
    B --> E["Device 3"]
    B --> F["Device 4"]
    B --> G["Device 5"]
    B --> H["Device 6"]
    B --> I["Device 7"]
    B --> J["Device 8"]
In the "AP" mode, the WiFi Repeater acts as the access point through which several WiFi devices can connect to the device connected to the LAN/WAN interface (for example, router). Thus, routers without a WiFi function can be extended with this function. Please note! WiFi devices connected to the WiFi Repeater do not get an IP address from the WiFi Repeater, but from the device connected to the LAN interface.
5 Repeater mode setup via WPS (recommended)
Requirements:
The router or the access point of the WiFi network to be expanded should support WPS. WPS has to be enabled for this purpose.
The SSID (network name) should be set to visible. If a MAC address filtering is enabled, then it is absolutely necessary to enter the MAC address of the WiFi Repeater as an exception.

Note for WPS configuration: While configuring, it can happen that SSID and password are not transmitted properly. Then you have to repeat the process.
The configuration of the AP mode have to be done via the webinterface, to include the AP into the subnet of the homenetwork, to ensure a stable connection.
The WiFi signal is transmitted unsecured (Out of the box), and have to be set manually.
First, check if your wireless router supports the "WPS" function. If you are not sure, refer to the user manual of the device.
Proceed as follows to setup the repeater:
- Connect the device to a properly installed socket.
- Press the WPS button on the upper side of the Repeater for about 3-4 seconds. The WiFi/WPS LED flashes for about two minutes.
- You have to press the WPS button on your router for about 2-3 seconds within these two minutes. Please read the user manual of your router for additional details.
The WiFi Repeater automatically connects to your wireless router and copies the network key and the SSID from the settings. You can access the wireless repeater using the SSID and the network key of your wireless router.
5.1 Repeater mode setup (wireless)
- Connect the device to a properly installed socket.
- Click on the network icon ("or") in the lower right side of your desktop. You can see the signal of the WiFi Repeater there (CSL_5G or CSL_2.4G). Click on "Connect" and wait for a few seconds till you are connected.
- Open your Internet browser and type "http://192.168.10.2" or "http://csl.repeater" in the address line and confirm with "Enter".

Note: If you are unable to access the Web interface by entering these addresses, you should reset your WiFi Repeater once. To do this, press the "Reset button" for about 5 seconds. Then try it again.
- The Web interface is displayed once you login via the Web browser. You will find the default data on the nameplate of the repeater.
The Web interface of the Repeater is displayed once you login successfully.
A list of available wireless devices is then displayed. Press on "Site Survey". Select the desired network by clicking on the "Select" box. Then press "Next".
After selecting a WiFi network, you need to enter the security key of your network.
After entering it click on "Connect". Once the device is restarted, the WiFi Repeater can be accessed under the SSID and the security key of your router.
5.2 Connecting via LAN
To set up the WiFi Repeater via LAN, connect your computer using the LAN cable provided to the LAN interface of the WiFi Repeater.
5.3 Accessing the web page
After connecting to the WiFi Repeater, you can access the WiFi Repeater via an Internet browser in order to configure it.
Enter "http://csl.repeater" in the browser's address line and press enter. If this doesn't work, configure your computer as given in Chapter 5.4 and instead enter the IP address 192.168.10.2 in the browser as the default IP address of the WiFi Repeater.
You can then configure the WiFi Repeater appropriately. It may be necessary to restart after changing the settings.
5.4 IP address setting of the computer
The procedure is explained below using Windows 7 as the example. Configure
Problembehandlung
your network card or your network adapter manually as follows:
Click the right mouse button on the icon in the taskbar and select "Open network and sharing centre".

In the new window for "Connections", click on the network card or the WiFi network adapter via which you want to connect to the WiFi Repeater.
Now select the "Properties" option.
Double-click on "Internet protocol version 4 (TCP/IPv4)".
Configure the IP address of your computer to 192.168.10.X (where X is an integer between 3 and 252), and the subnet mask to 255.255.255.0. Configure the gateway and the IP address of the DNS server. You can leave the two address fields blank if you do not know the gateway and DNS server. Click on "OK".
Remember to reset the IP address and the DNS server address after completing the configuration back to "get automatically".
6 Access Point mode
Connect the WiFi Repeater using the LAN cable provided to the LAN socket on your device, to which you want to add the WiFi function (e.g. router).
6.1 AP mode setup
Connect the WiFi Repeater via WiFi or using the LAN cable provided to the network port of your terminal device.
- Connect the device to a properly installed socket.
- Click on the network icon ("or") in the lower right side of your desktop. You can see the signal of the WiFi Repeater there (CSL_5G or CSL_2.4G). Click on "Connect" and wait for a few seconds till you are connected.
- Open your Internet browser and type "http://192.168.10.2" or "http://csl.repeater" in the address line and confirm with "Enter".

Note: If you are unable to access the Web interface by entering these addresses, you should reset your WiFi Repeater once. To do this, press the "Reset button" for about 5 seconds. Then try it again.
- Open the Web interface and navigate to the sub-menu "TCP/IP" and select the menu "LAN Interface".
- You can make the desired settings in this interface. In the "DHCP" menu, select in any case "Client" to use the device as the access point.
Then, click on "Apply Changes" and "Reboot Now". The WiFi Repeater restarts. After restarting, you can access the Repeater using the data entered previously.
7 Other settings via the WEB browser
Connect the WiFi Repeater to a properly installed power socket. Connect your DSL modem to the Ethernet LAN/WAN port of the Repeater using a RJ45 cable.
Connect the WiFi Repeater via WiFi.
Connect to the Repeater as described in section 5.1 and access the Web interface.
Under "WLAN1 (5 GHz)" or "WLAN2 (2.4GHz)", click "Basic Settings" of the desired network.
You can customise the wireless settings as desired here. You will find more settings under "Advanced" or "Access Control". Ensure that you change the extended settings only if you are aware of the effect of the change.
You can set the security settings of the WiFi network in the "Security" tab. Please
ensure that the WiFi connection of the Repeater is always encrypted. First, select the SSID and the desired encryption method and then enter the network security code. Subsequently save the settings.
You can make the WPS settings in the "WPS" tab.
7.1 Changing the password of the Web interface
Click on "Password" in the "Management" section to change the password of the Web interface.
7.2 Upgrading the firmware
Click on "Update firmware" under "Management" to update the firmware.
Select the new operating system that you want and click "Upload".

Note: Do not close your Internet browser during an update or do not disconnect your computer from the network. If the upload is interrupted, then the firmware is corrupted and the device may not work properly.
7.3 Taking a backup and resetting to factory settings
Select the "Save/Reload settings" sub-item under "Management" to reset the device to factory settings, to take or load a backup.
Press the "Save" button to take a backup of your current settings.
You can load the backup by selecting the file and clicking on the "Upload" button.
Click on the "Reset" button to reset the device to the default settings.

Please note!
8 Safety instructions and liability disclaimer
Never try to open the device to carry out repairs or conversions. Avoid contact
22 English
with mains voltages. Do not short-circuit the product. The device is not certified for use in the open air; only use it in dry conditions. Protect it from high humidity, water and snow. Keep it away from high temperatures. Do not subject the device to sudden changes in temperature or heavy vibration as this might damage electronic components. Examine the device for damage before using it. The unit should not be used if it has received an impact or has been damaged in any other way. Please observe national regulations and restrictions. Do not use the device for purposes other than those described in the instructions. This product is not a toy. Keep it out of the reach of children or mentally impaired persons. Any repair or alteration to the device not carried out by the original supplier, will invalidate the warranty or guarantee. The product may only be used by persons who have read and understood these instructions. The device specifications may change without any separate prior notice to this effect.

9 Disposal instructions
Electrical and electronic devices may only be disposed of in accordance with the European WEEE Directive and not with household rubbish. Components must be disposed of or recycled separately as dangerous, toxic elements can inflict sustained damage on the environment if they are disposed of incorrectly. As a consumer, you are bound by the Electrical and Electronic Devices Act (ElektroG) to return electrical and electronic goods free of charge at the end of their useful life to the manufacturer, the place of purchase or to specially set up, public collection points. The details in each case are governed by national law. The symbol on the product, the operating instructions and/or the packaging refers to these regulations. By separating materials in this way, recycling and disposing of old devices, you are making an important contribution towards protecting our environment.


WEEE guideline: 2012/19/EU
WEEE register number: DE 94495668
CSL Computer GmbH & Co. KG, herewith declares that this product 302528/20160830TW008 conforms to the principle requirements and other relevant stipulations of Directive 1999/5/EG. The complete Declaration of Conformity can be obtained from: CSL Computer GmbH & Co. KG, Sokelantstraße 35, 30165 Hanover