
Pixma TS5353 - Printer CANON - Free user manual and instructions
Find the device manual for free Pixma TS5353 CANON in PDF.

| Product type | Inkjet multifunction printer |
| Brand | Canon |
| Model | Pixma TS5353 |
| Functions | Print, copy, scan |
| Printing technology | FINE inkjet (separate color and black ink cartridges) |
| Maximum print resolution | 4800 x 1200 dpi |
| Print speed (black document) | Approx. 7.7 images per minute (ipm) |
| Print speed (color document) | Approx. 4.0 images per minute (ipm) |
| Supported paper formats | A4, Letter, Envelopes, Photo paper 10x15 cm |
| Paper capacity (cassette) | 100 sheets of plain paper |
| Paper capacity (rear tray) | 20 sheets of photo paper |
| Ink cartridges | FINE cartridges: black (PG-560) and color (CL-561) |
| Connectivity | Wi-Fi 802.11b/g/n, USB 2.0 |
| Display | 3.5 cm (1.44 inch) monochrome LCD |
| Dimensions (W x D x H) | Approx. 403 x 338 x 151 mm |
| Weight | Approx. 5.4 kg |
| Power supply | AC 100-240 V, 50/60 Hz |
| Power consumption (printing) | Approx. 11 W |
| Power consumption (standby) | Approx. 0.8 W |
| Compatible operating systems | Windows, macOS, iOS, Android (via Canon PRINT app) |
| Repairability index | 6/10 (estimate) |
Frequently Asked Questions - Pixma TS5353 CANON
User questions about Pixma TS5353 CANON
0 question about this device. Answer the ones you know or ask your own.
Ask a new question about this device
Download the instructions for your Printer in PDF format for free! Find your manual Pixma TS5353 - CANON and take your electronic device back in hand. On this page are published all the documents necessary for the use of your device. Pixma TS5353 by CANON.
USER MANUAL Pixma TS5353 CANON
Read Safety and Important Information (addendum) first.
natural_image
Icon showing a printer and a document with an arrow indicating process (no text or symbols)Installing the Printer......page 1
natural_image
Two white icons: a laptop and a smartphone, on a solid red background (no text or symbols)Connecting to a Computer, Smartphone or Tablet......page 4

Instructional Videos
Instructions vidéo
Anleitungsvideos
Instructievideo's
Video informativi
Setting Up the Printer
1. Box Contents
• FINE cartridges
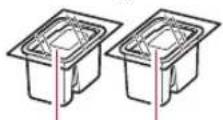
Color Black
Power cord
- Setup CD-ROM for Windows
• Safety and Important Information
• Getting Started (this manual)
2. Removing Packing Materials

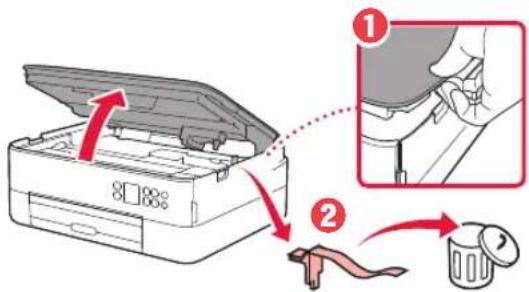
1 Remove and dispose of any packing materials and orange tape.
2 Open the scanning unit / cover, remove and dispose of the orange tape and protective material inside.
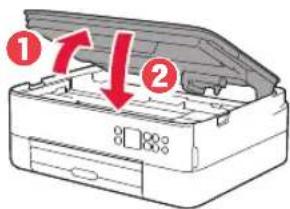
3 Close the scanning unit / cover.
- Open the scanning unit / cover fully and then close it.
Caution
Watch your fingers.
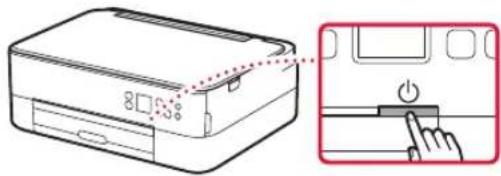
3. Turning on the Printer

1 Connect the power cord.
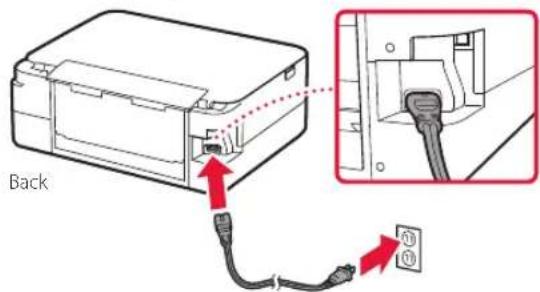
Important
At this time, do not connect any other cables.
2 Press the ON button.
3 Use the ▲, ▼ and OK buttons to select a language.
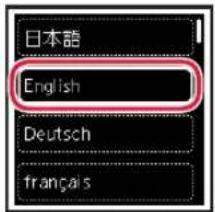
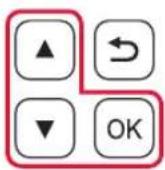

4 Press the OK button.

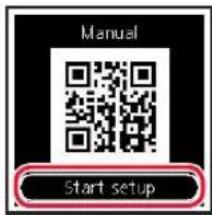
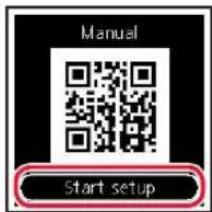
Important
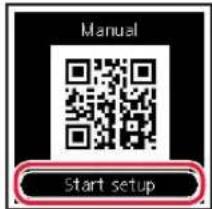
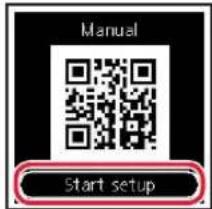
Scan the QR code for a video tutorial of the setup procedure.
5 Use the ▲ and ▼ buttons to check the on-screen content, and then press the OK button.

Setting Up the Printer
4. Installing the FINE Cartridges

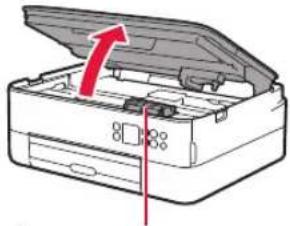
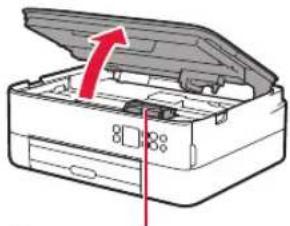
1 Open the scanning unit / cover.
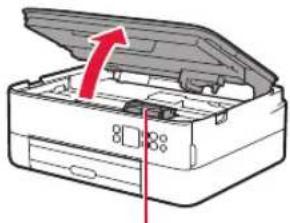
natural_image
Diagram of an open printer with a red arrow indicating the open lid (no text or symbols present)
Caution
Do not touch the FINE cartridge holder until it stops moving.
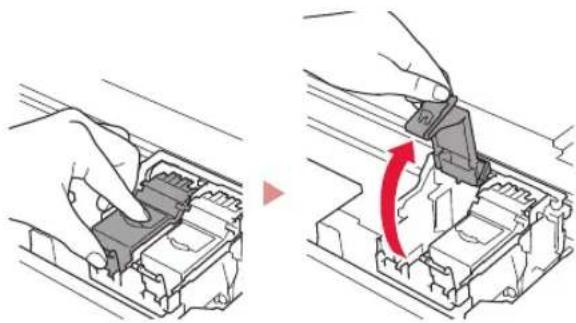
2 Pinch and open the ink cartridge locking cover on the left-hand side.
natural_image
Illustration of a hand inserting a component into a device housing, showing the process with a red arrow indicating rotation (no text or symbols present)3 Remove the Color FINE cartridge from the container and remove the protective tape.
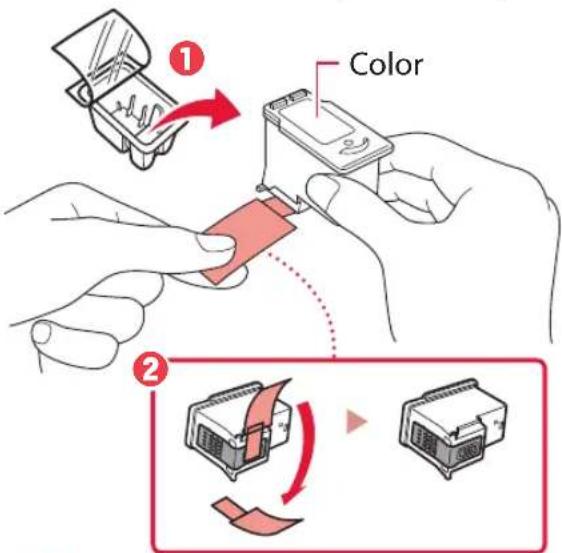

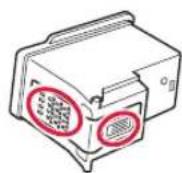
Important
- Do not touch the ink on the protective tape. It could stain your hands or surrounding objects.
- Do not touch the areas shown in the figure. Otherwise, the printer may not print correctly.

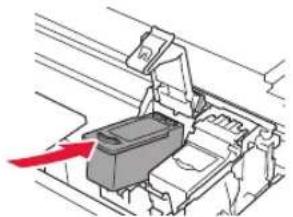
4 Set the Color FINE cartridge in the FINE cartridge holder.
natural_image
Diagram of a car interior showing a seatbelt mechanism with a red arrow indicating direction (no text or symbols present)
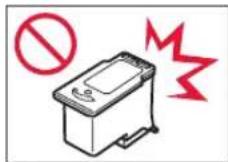
Important
Do not bump the FINE cartridge. Doing so may cause a malfunction.
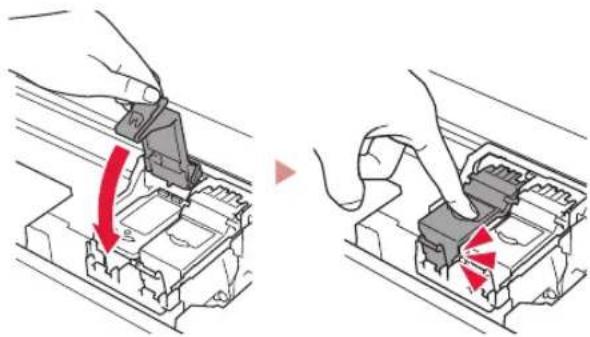
5 Push down the ink cartridge locking cover firmly until it snaps into place to close it completely.
natural_image
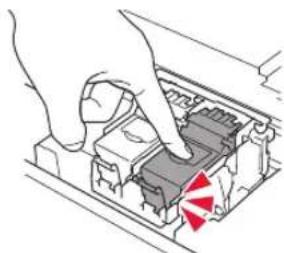
Two-step diagram showing a hand inserting a plug into a device, with red arrows indicating the process (no text or symbols present)6 Repeat steps 2 to 5 and install the Black FINE cartridge as well, on the right-hand side.
natural_image
Illustration of hands inserting a device into a container with a red triangular warning symbol (no text or labels)7 Close the scanning unit / cover.
• The printer will start initializing.
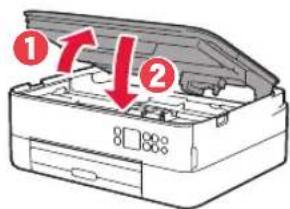

Caution
Watch your fingers.
5. Loading Paper

1 Press the OK button.
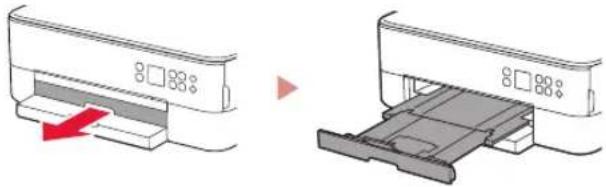
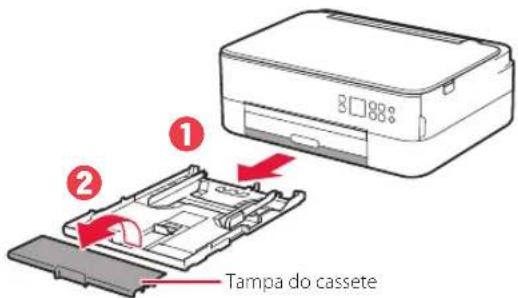
2 Remove the cassette from the printer and remove the cassette cover.
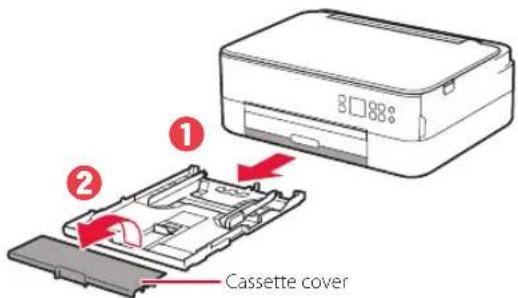
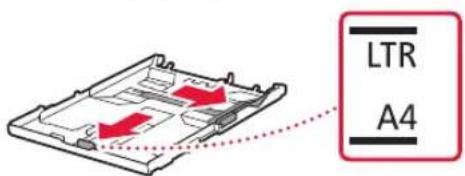
3 Slide apart the paper guides.
- Slide the right paper guide to the right edge. Align the front paper guide with the Letter or A4 mark.
4 Load paper.
- Load 2 or more sheets of Letter or A4 sized plain paper with the print side facing down.
- Place the paper against the front paper guide, and align the right paper guide to the width of the paper.

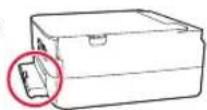
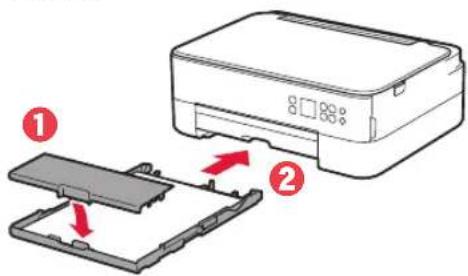
5 Attach the cassette cover and replace the cassette.
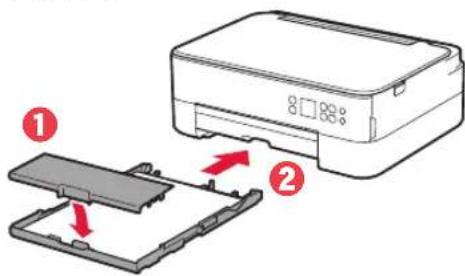
- Look at it from the side to confirm it looks like the diagram.
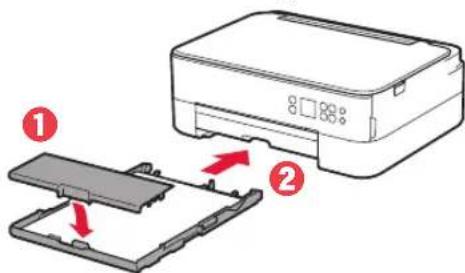
6 Pull out the paper output tray.
natural_image
Two-step diagram showing a printer being inserted into a stacker, with no visible text or symbols.7 Press the OK button.
![Load 2 or more sheets of A4 or Letter sized plain paper in cassette and press [OK]. OK Performing initial adjustments... Please wait momentarily About 1 minute](/content/2026/04/684926/images/dabe7ac0bf4959b65ef5362e4cfbffa7bbf73d70735ebdc22511e0ab52d064a6.jpg)
8 Press the OK button.
Important
Scan the QR code for a video tutorial of the setup procedure.
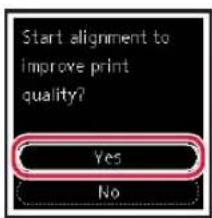
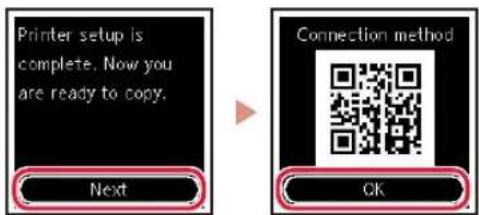
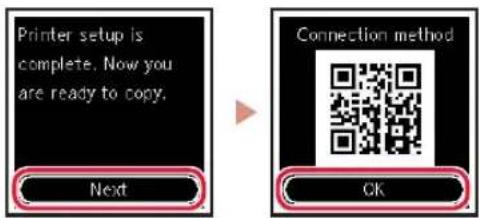
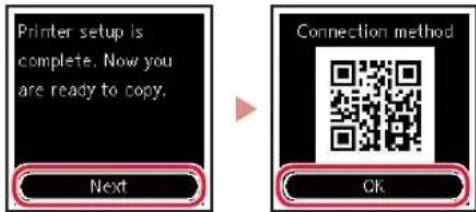
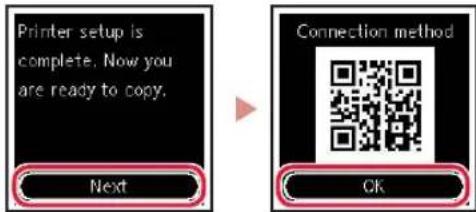
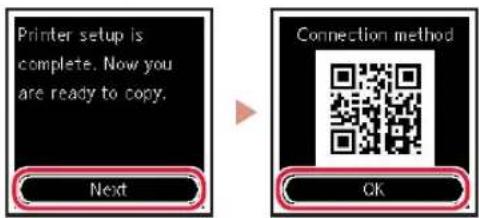
9 Check that the following screen appears.
If you will use the printer without connecting any other devices, setup is now complete.
What device are you connecting?


natural_image
Simple line drawing of a smartphone icon with no text or symbols6-a
Connecting to a Computer
If you are using multiple computers, perform these steps on each computer.

1 Access the Canon website from a computer.
https://ij.start.canon

2 Select Set Up.
3 Enter your printer's model name and click Go.
4 Click Start.
5 Click If you have already prepared your printer, go to Connect.
Note
The following steps are for Windows (except Windows 10 in S mode) and macOS users. For other operating systems, continue setup by following the on-screen instructions instead.
6 Click Download.
7 Run the downloaded file.
8 Click Start Setup.
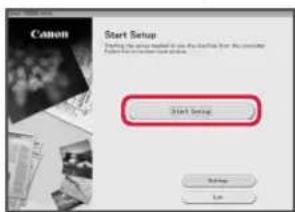
9 Follow the on-screen instructions.
• These operations may take some time.
- To connect to a smartphone as well, see "6-b. Connecting to a Smartphone" on page 5.
Using the Setup CD-ROM for Windows
Double click EasySetup.exe in the CD-ROM, and then continue from step 3. If you do not have an internet connection, open the win folder in the CD-ROM and double click SETUP.exe. This will install the printer driver.
6-b
Connecting to a Smartphone
If you are using multiple smartphones, perform these steps on each smartphone.

Prepare the following before starting.
1 Enable the Wi-Fi setting on your smartphone.
2 Connect your smartphone to the wireless router (if you have a wireless router). Refer to your smartphone and wireless router manuals for more details.
1 Install the "Canon PRINT Inkjet/SELPHY" app on your smartphone.
- Scan the QR code shown on the right to access the Canon website, and then download the app.

2 Open the installed app.
3 Follow the on-screen instructions in the app to add your printer.
Once you have added your printer, you can print from your smartphone.
To print photos, see "Loading Photo Paper" on page 6.
Loading Photo Paper
Photo paper can only be loaded in the rear tray.
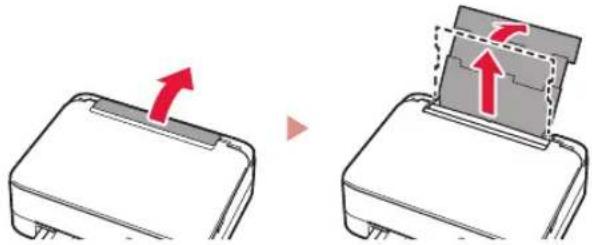
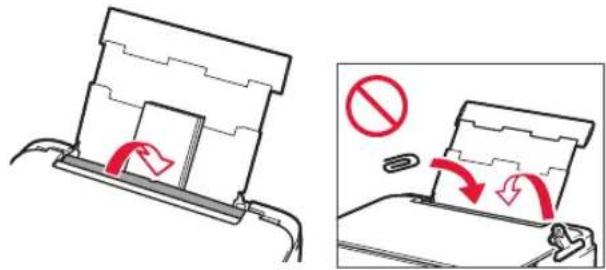
1 Open the rear tray cover and extend the paper support.
natural_image
Diagram showing two steps of a device with red arrows indicating motion, no text or symbols present2 Open the feed slot cover and slide the right-hand side paper guide to the far right.
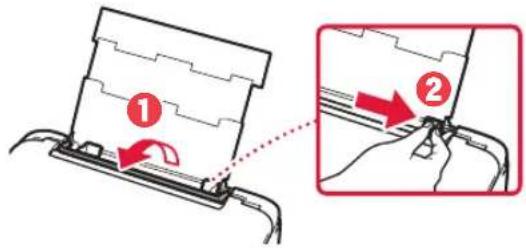
3 Load several sheets of photo paper with the print side facing up and slide the side paper guide against the edge of the paper stack.
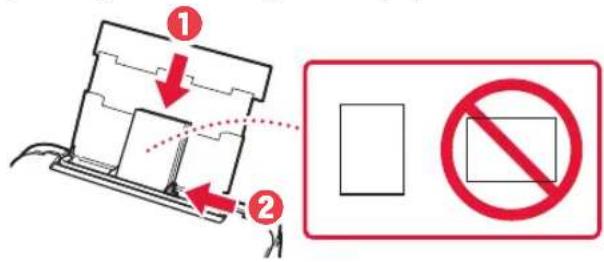
4 Close the feed slot cover.
- Follow the on-screen instructions to set information for the loaded paper.
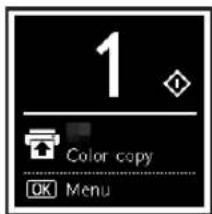
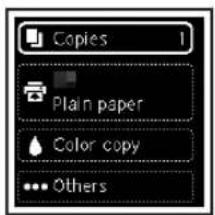
Copying
1 Turn on the printer.
2 Load Letter or A4 sized plain paper.
3 Open the document cover and place the document face down on the platen. Align the document with the alignment mark (↘)
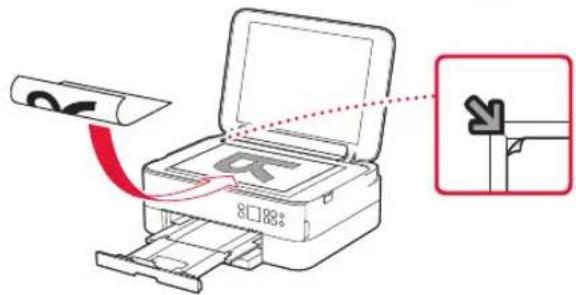
4 Close the document cover.
5 Press the OK button.
6 Select Copy settings, and then press the OK button.
7 Specify print settings using the ▲, ▼ and OK buttons.

8 Press the Start button.
Configuration de l'imprimante
Attention
natural_image
Illustration of a file organizer with an open lid and red arrow indicating compression (no text or symbols)Attention
natural_image
Illustration showing two steps of a mechanical assembly: one being inserted into a component, the other adjusting a component with a red arrow indicating rotation (no text or symbols present)natural_image
Diagram of a mechanical assembly with a red arrow pointing to a component (no text or symbols present)Important
natural_image
Illustration of hands inserting a device into a container with a red warning triangle (no text or symbols)Attention
natural_image
Diagram showing two printer printing process stages: one with a red arrow indicating compression, the other with a gray sheet (no text or symbols)natural_image
Diagram showing two steps of a device with red arrows indicating motion, no text or symbols presentCopie
Vorsicht
natural_image
Illustration of a file organizer with an open lid and red arrow indicating compression (no text or symbols)Vorsicht
natural_image
Illustration showing two steps of a mechanical assembly: one being inserted into a housing, the other adjusting a component with a red arrow indicating rotation (no text or symbols present)natural_image
Diagram of a vehicle seatbelt mechanism with a red arrow indicating direction (no text or symbols present)
Wichtig
natural_image
Two-step diagram showing hand operating a device with red arrows indicating rotation or change (no text or symbols present)natural_image
Illustration of hands inserting a device into a container with a red warning symbol (no text or labels)
Vorsicht
natural_image
Diagram showing two printer printing process stages: one with a red arrow indicating compression, the other with a gray handle and a black tray (no text or symbols)Wichtig
natural_image
Simple line drawing of a smartphone inside a rounded rectangle (no text or symbols)6-a
natural_image
Diagram showing two steps of a device with red arrows indicating motion, no text or symbols presentKopieren
3 Sluit de scaneenheid / klep.
Let op
De printer instellen
4. De FINE-cartridges installeren

1 Open de scaneenheid / klep.
natural_image
Illustration of a closed open file organizer with a red arrow indicating compression or shift (no text or symbols)
Let op
natural_image
Illustration showing two steps of a mechanical assembly: one being inserted into a component, the other adjusting a component with a red arrow indicating rotation (no text or symbols present)natural_image
Diagram of a car interior showing a hand holding a battery and a red arrow pointing to the battery (no text or symbols present)
Belangrijk
natural_image
Two-step diagram showing hand operating a device with red arrows indicating direction (no text or symbols)natural_image
Illustration of hands inserting a device into a container with a red warning symbol (no text or labels)7 Sluit de scaneenheid / klep.

Let op
natural_image
Diagram showing two printer printing process stages: one with a red arrow indicating compression, the other with a gray handle (no text or symbols)Belangrijk
natural_image
Simple line drawing of a smartphone inside a rounded rectangle (no text or symbols)6-a
natural_image
Diagram showing two mechanical components with red arrows indicating motion, one with a flat base and the other with a folded paper or sheet (no text or symbols)Kopiëren
natural_image
Illustration of a file organizer with an open lid and red arrow indicating compression (no text or symbols)Attenzione
natural_image
Illustration showing two steps of a mechanical assembly: adding a component to a housing, then adjusting a red arrow (no text or symbols present)Importante
natural_image
Diagram of a vehicle door handle assembly with a red arrow indicating direction (no text or symbols present)Importante
natural_image
Illustration of two hands installing or adjusting a device component, showing a red directional arrow indicating rotation (no text or symbols present)natural_image
Illustration of hands inserting a device into a container with a red warning symbol (no text or labels)Attenzione
natural_image
Diagram showing two printer printing process steps: one with a red arrow indicating compression, the other with a gray handle (no text or symbols)Importante

natural_image
Simple line drawing of a smartphone inside a rounded rectangle (no text or symbols)6-a
natural_image
Diagram showing two steps of a device with red arrows indicating motion, no text or symbols presentCopia
Cuidado
4 Pressione o botão OK.
Importante
Configurando a impressora
4. Instalando os Cartuchos FINE

natural_image
Diagram of an open printer with a red arrow indicating the open lid (no text or symbols present)Cuidado
natural_image
Illustration showing two steps of a mechanical assembly: adding a component to a housing, then adjusting a red arrow (no text or symbols present)Importante
natural_image
Diagram of a vehicle seatbelt mechanism with a red arrow indicating direction (no text or symbols present)
Importante
natural_image
Illustration of hands installing or adjusting a component in two different states (no text or symbols present)natural_image
Illustration of hands inserting a device into a container with a red triangular warning symbol (no text or labels)
Cuidado
2 Remova o cassete da impressora e remova a tampa do cassete.
3 Deslize as guias do papel.
5 Coloque a tampa do cassete e substitua o cassete.
natural_image
Diagram showing two printer printing process stages: one with a red arrow indicating compression, the other with a gray handle (no text or symbols)7 Pressione o botão OK.
![Load 2 or more sheets of A4 or Letter sized plain paper in cassette and press [OK]. OK Performing initial adjustments... Please wait momentarily About 1 minute](/content/2026/04/684926/images/0d828c8723afa290d35539feb47d346d8bd8d632a14aed4dc1dcfca75a7980a3.jpg)
8 Pressione o botão OK.
Importante
natural_image
Diagram showing two steps of a device with red arrows indicating motion, no text or symbols presentCopiando
Precaución
natural_image
Illustration of an open file organizer with a red arrow indicating compression or shift (no text or symbols)Precaución
natural_image
Illustration showing two steps of a mechanical assembly: one being inserted into a housing, the other adjusting a component with a red arrow indicating rotation (no text or symbols present)Importante
natural_image
Mechanical assembly diagram showing a bracket with a red arrow pointing to a component (no text or symbols present)Importante
natural_image
Two-step diagram showing hand inserting a component into a device, with red arrows indicating direction (no text or symbols)natural_image
Illustration of hands inserting a device into a container with a red warning triangle (no text or symbols)Precaución
5 Coloque la cubierta del cassette e inserte el cassette.

natural_image
Diagram showing two printer printing process stages: one with a red arrow indicating compression, the other with a gray handle (no text or symbols)Importante
natural_image
Simple line drawing of a smartphone inside a rounded rectangle (no text or symbols)6-a
natural_image
Diagram showing two steps of a device with red arrows indicating motion, no text or symbols presentCopia
⚠️ Προσοχή
natural_image
Illustration of a file organizer with an open lid and red arrow indicating compression (no text or symbols)⚠️ Προσοχή
natural_image
Two-step diagram showing a hand using a tool to adjust or install a mechanical component, with no visible text or symbols.natural_image
Diagram of a vehicle seatbelt mechanism with a red arrow indicating direction (no text or symbols present)Σημαντικό
natural_image
Two-step diagram showing hand inserting a component into a device, with red arrows indicating direction (no text or symbols)natural_image
Illustration of hands inserting a device into a container with a red warning symbol (no text or labels)⚠️ Προσοχή
natural_image
Diagram showing two printer printing process stages: one with a red arrow indicating compression, the other with a gray tray (no text or symbols)Σημαντικό
natural_image
Diagram showing two steps of a device with red arrows indicating motion, no text or symbols presentΑντιγραφή
4 Tryck på OK.

Viktigt!
Skanna QR-koden för videoinstruktioner för installationsproceduren.
Ställa in skrivaren
4. Installera FINE-kassetterna

natural_image
Illustration of an open file organizer with a red arrow indicating compression or shift (no text or symbols)⚠ Försiktighet
natural_image
Illustration showing two steps of a mechanical assembly: adding a component to a housing, then adjusting a component with a red arrow indicating rotation (no text or symbols present)natural_image
Diagram of a car interior showing a vehicle's seat and dashboard with a red arrow pointing to the seat (no text or symbols present)Viktigt!
natural_image
Illustration of hands inserting a device into a container with a red warning symbol (no text or labels)
Försiktighet
Akta fingrarna.
5. Fylla på papper

1 Tryck på OK.
natural_image
Diagram showing two printer units with a red arrow indicating a process or transformation (no text or symbols present)7 Tryck på OK.
![Load 2 or more sheets of A4 or Letter sized plain paper in cassette and press [OK]. OK Performing initial adjustments... Please wait momentarily About Ⅱ minutes](/content/2026/04/684926/images/e212a5a712fb9ba5c1a60d57e39d9402442ef4f94f8c7cb24ef77a03849cb5c6.jpg)
8 Tryck på OK.
Viktigt!
natural_image
Diagram showing two mechanical components with red arrows indicating motion, one moving and the other moving or interacting (no text or symbols)Kopiera
3 Lukk skanneenheten/dekselet.
4 Trykk på OK-knappen.
Viktig!
Skann QR-koden for en videoveiledning om oppsettsprosedyren.
Konfigurere skriveren
4. Installere FINE-kassettene

1 Åpne skanneenheten/dekselet.
natural_image
Illustration of an open file organizer with a red arrow indicating compression or shift (no text or symbols)
Forsiktig!
natural_image
Illustration showing two steps of a mechanical assembly: adding a component to a housing, then adjusting a component with a red arrow indicating rotation (no text or symbols present)
Viktig!
- Ikke berør blekket på tapen. Det kan sette flekker på hendene dine eller andre gjenstander.
- Ikke berør områdene som er vist på figuren. Skriveren vil ellers ikke kunne skrive ut riktig.
4 Sett FINE-kassetten med farger i FINE-kassettholderen.

natural_image
Diagram of a car interior showing a seatbelt mechanism with a red arrow indicating direction (no text or symbols present)
Viktig!
natural_image
Two-step diagram showing a hand inserting a component into a device, with red arrows indicating direction (no text or symbols present)natural_image
Illustration of hands inserting a device into a container with a red triangular warning symbol (no text or labels)7 Lukk skanneenheten/dekselet.
- Skriveren starter initialisering.


Forsiktig!
Pass på fingrene.
5. Legge i papir

1 Trykk på OK-knappen.
5 Fest kassettdekselet og skift ut kassetten.
natural_image
Diagram showing two printer units with a red arrow indicating compression or disassembly process (no text or symbols present)7 Trykk på OK-knappen.
![Load 2 or more sheets of A4 or Letter sized plain paper in cassette and press [OK]. OK Performing initial adjustments... Please wait momentarily About Ⅱ minutes](/content/2026/04/684926/images/6c0a598b85b457b795c9c0602098a762732d895bcbc7348d4991b3d8c080e172.jpg)
8 Trykk på OK-knappen.
Viktig!
Skann QR-koden for en videoveiledning om oppsettsprosedyren.
natural_image
Simple line drawing of a smartphone with no text or symbols6-a
Koble til en datamaskin
natural_image
Diagram showing two mechanical components with red arrows indicating motion, one being folded and the other being inserted (no text or symbols)4 Lukk spordekselet for mating.
Kopiere
4 Lukk dokumentdekselet.
5 Trykk på OK-knappen.
6 Velg Kopiinnstillinger (Copy settings), og trykk deretter på OK-knappen.
7 Angi utskriftsinnstillinger med knappene ▲, ▼ og OK.

Forsigtig
Pas på dine fingre.
3. Tænd printeren

4 Tryk på knappen OK.


Vigtigt
Konfigurere printeren
4. Installation af FINE-patroner

natural_image
Illustration of a file organizer with an open lid and red arrow indicating compression (no text or symbols)
Forsigtig
natural_image
Illustration showing two-step assembly process: adding a component into a device, then adjusting a red arrow (no text or symbols)
Vigtigt
natural_image
Diagram of a vehicle seatbelt mechanism with a red arrow indicating direction (no text or symbols present)
Vigtigt
natural_image
Two-step diagram showing a hand inserting a component into a device, with red arrows indicating direction (no text or symbols present)natural_image
Illustration of hands installing or adjusting a device into a container with a red warning symbol (no text or symbols present)
Forsigtig
Pas på dine fingre.
natural_image
Diagram showing two printer units with a red arrow indicating compression or disassembly process (no text or symbols present)7 Tryk på knappen OK.
![Load 2 or more sheets of A4 or Letter sized plain paper in cassette and press [OK]. OK Performing initial adjustments... Please wait momentarily About 1 minutes](/content/2026/04/684926/images/8b07d62e2da927c0d71a05d70358c65653f58133882ec50fe9d3e6f0aa52ad96.jpg)
8 Tryk på knappen OK.

Vigtigt
natural_image
Simple line drawing of a smartphone inside a rounded rectangle (no text or symbols)6-a
Tilslutning til en computer
natural_image
Diagram showing two mechanical components with red arrows indicating motion, one moving upward and the other moving downward (no text or symbols)Kopiering
Huomio
Varo sormiasi.
4 Paina OK-painiketta.
Tärkeää
Tulostimen asennus
4. FINE-kasettien asentaminen

natural_image
Illustration of an open printer with a red arrow indicating the open lid (no text or symbols present)
Huomio
natural_image
Illustration of a hand using a tool to adjust or install a mechanical component, showing a red arrow indicating rotation (no text or symbols present)natural_image
Diagram of a car interior showing a vehicle's seat and dashboard with a red arrow pointing to the seat (no text or symbols present)
Tärkeää
natural_image
Two-step diagram showing a hand inserting a component into a device, with red arrows indicating direction (no text or symbols present)natural_image
Illustration of hands inserting a device into a container with a red triangular warning symbol (no text or labels)
Huomio
Varo sormiasi.
natural_image
Diagram showing two printer printing process stages: one with a red arrow indicating compression, the other with a gray handle and a black tray (no text or symbols)7 Paina OK-painiketta.
![Load 2 or more sheets of A4 or Letter sized plain paper in cassette and press [OK]. OK Performing initial adjustments... Please wait momentarily About 1 minute](/content/2026/04/684926/images/79232a84ed5a3e1e14fa1130ab3c3f4de908e512945a62b3f922c052f1cab9d0.jpg)
8 Paina OK-painiketta.
Tärkeää
natural_image
Simple line drawing of a smartphone inside a rounded rectangle (no text or symbols)6-a
natural_image
Diagram showing two steps of a device with red arrows indicating motion, no text or symbols presentKopointi
8 Paina Aloita (Start) -painiketta.

natural_image
Red icon showing a globe with a question mark on a laptop, symbolizing global inquiry or search (no text present)Access Online Manual Zugriff auf das Online-Handbuch Accedere al Manuale online Acceso al Manual en línea Läs Onlinehandbok Åbn Online vejledning
- Setting Up the Printer
- Box Contents
- Removing Packing Materials
- Turning on the Printer
- Installing the FINE Cartridges
- Open the scanning unit / cover.
- Pinch and open the ink cartridge locking cover on the left-hand side.
- Remove the Color FINE cartridge from the container and remove the protective tape.
- Important
- Set the Color FINE cartridge in the FINE cartridge holder.
- Push down the ink cartridge locking cover firmly until it snaps into place to close it completely.
- Repeat steps 2 to 5 and install the Black FINE cartridge as well, on the right-hand side.
- Close the scanning unit / cover.
- Loading Paper
- Press the OK button.
- Remove the cassette from the printer and remove the cassette cover.
- Slide apart the paper guides.
- Load paper.
- Attach the cassette cover and replace the cassette.
- Pull out the paper output tray.
- Press the OK button.
- Press the OK button.
- Check that the following screen appears.
- 6-a
- Connecting to a Computer
- 6-b
- Connecting to a Smartphone
- Loading Photo Paper
- Copying
- Configuration de l'imprimante
- Copie
- Wichtig
- Kopieren
- De printer instellen
- De FINE-cartridges installeren
- Open de scaneenheid / klep.
- Sluit de scaneenheid / klep.
- Belangrijk
- Kopiëren
- Importante
- Copia
- Configurando a impressora
- Instalando os Cartuchos FINE
- Remova o cassete da impressora e remova a tampa do cassete.
- Deslize as guias do papel.
- Coloque a tampa do cassete e substitua o cassete.
- Pressione o botão OK.
- Pressione o botão OK.
- Copiando
- Coloque la cubierta del cassette e inserte el cassette.
- Σημαντικό
- Αντιγραφή
- Ställa in skrivaren
- Installera FINE-kassetterna
- Fylla på papper
- Tryck på OK.
- Tryck på OK.
- Tryck på OK.
- Viktigt!
- Kopiera
- Konfigurere skriveren
- Installere FINE-kassettene
- Åpne skanneenheten/dekselet.
- Sett FINE-kassetten med farger i FINE-kassettholderen.
- Lukk skanneenheten/dekselet.
- Legge i papir
- Trykk på OK-knappen.
- Fest kassettdekselet og skift ut kassetten.
- Trykk på OK-knappen.
- Trykk på OK-knappen.
- Viktig!
- Koble til en datamaskin
- Kopiere
- Tænd printeren
- Konfigurere printeren
- Installation af FINE-patroner
- Vigtigt
- Forsigtig
- Tryk på knappen OK.
- Tryk på knappen OK.
- Tilslutning til en computer
- Kopiering
- Tulostimen asennus
- FINE-kasettien asentaminen
- Paina OK-painiketta.
- Paina OK-painiketta.
- Tärkeää
- Kopointi
Brand : CANON
Model : Pixma TS5353
Category : Printer