
IR800W - Heating GORENJE - Free user manual and instructions
Find the device manual for free IR800W GORENJE in PDF.
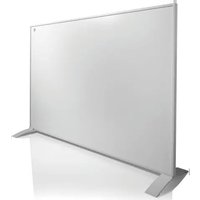


| Product type | Electric wall heater |
| Brand | Gorenje |
| Model | IR800W |
| Power supply | 220-240 V, 50/60 Hz |
| Power | 800 W |
| Dimensions (wall mounting) | Width: 42.4 cm, Height: 39.6 cm |
| Weight | Approximately 5 kg |
| Functions | Adjustable thermostat, timer, control via Wi-Fi app |
| Installation type | Free-standing or wall-mounted |
| Material | Glass panels |
| Safety | Mechanical safety switch, overheat protection, do not cover |
| Maintenance | Wipe with a soft damp cloth, do not use abrasive products |
| Warranty | 2 years manufacturer |
| Repairability | Do not open or repair yourself, contact authorized service center |
| Included accessories | 4 screws, 4 wall plugs, mounting template, instruction manual |
| Wi-Fi compatibility | Android/iOS app (Smart Life) |
Frequently Asked Questions - IR800W GORENJE
User questions about IR800W GORENJE
0 question about this device. Answer the ones you know or ask your own.
Ask a new question about this device
Download the instructions for your Heating in PDF format for free! Find your manual IR800W - GORENJE and take your electronic device back in hand. On this page are published all the documents necessary for the use of your device. IR800W by GORENJE.
USER MANUAL IR800W GORENJE
Important safety precautions
SAVE THESE INSTRUCTIONS
PLEASE READ AND SAVE THESE IMPORTANT SAFETY INSTRUCTIONS
When using electrical appliances, basic precautions should always be taken to reduce the risk of fire, electric shock, or personal injury. Such precautions include the following:
- Read all instructions before using this heater.
- Do not use this heater in the immediate vicinity of a bath, shower, or swimming pool.
Warning: this heater is not equipped with a device to control the external room thermostat.
- Do not use this heater in small rooms occupied by persons not capable of leaving the room on their own, unless constant supervision is provided.
- Children of less than 3 years should be kept away from the heater unless continuously supervised.
- Children aged between 3 and 8 should only switch the appliance on/off if it has been placed or installed in its intended normal operating position. This is on condition that they are supervised or have been given adequate instructions regarding the safe use of the appliance and that they understand the hazards involved. Children of this age should not plug in, regulate or clean the appliance, nor should they perform any user maintenance.
- This appliance can be used by children aged 8 and above and persons with reduced physical, sensory or mental capabilities, or lack of experience and knowledge, on condition that they are supervised or have been given adequate instructions regarding the safe use of the appliance and that they understand the hazards involved. Children should not play with the appliance, and cleaning and user maintenance should not be carried out by children without supervision.
- If the power cord is damaged, it must be replaced by the manufacturer, its service agent or similarly qualified persons in order to avoid a hazard.
- Caution: some parts of this product can become very hot and cause burns. Particular attention must be given where children and vulnerable people are present.
- In order to avoid overheating, do not cover the heater
- The heater must not be used if the glass (plaster) panels are damaged.
- The appliance is not to be used by persons (including children) with reduced physical, sensory or mental capabilities, or lack of experience and knowledge, unless they are supervised or have been given adequate instructions.
- Heater is hot when in use. To avoid burns, do not let any bare skin touch the hot surfaces of the appliance. Keep combustible materials such as furniture, pillows, bedding, paper, clothes, and curtains at least 3 feet (0.9m) from the front of the heater and keep them away from the sides and rear.
- Extreme caution is necessary when this heater is used by or near children or those with disabilities, as well as in cases where the heater is left to operate unattended. This appliance is not intended for use by persons (including children) with reduced physical, sensory or mental capabilities, or lack of experience and knowledge, unless they are supervised or have been given adequate instructions regarding the use of the appliance by a person responsible for their safety. Children should be supervised to ensure that they do not play with the appliance.
- Always unplug the heater when not in use.
- Do not operate any heater with a damaged cord or plug, and do not use the heater after it malfunctions or has been dropped or damaged in any way. Return it to an authorised service facility for examination, electrical or mechanical adjustment, or repair.
- Indoor use only, wall-mounted and ceiling-mounted. Do not use outdoors. (Omitted if the heater is intended for outdoor use.)
- This heater is not intended for use in bathrooms, laundry areas, or similar indoor locations with high humidity. Never place the heater where it may fall into the bathtub or any other water container.
- Do not run the cord under any material. Do not cover the cord with throws, rugs, runners, or similar coverings. Do not operate any heater after it malfunctions. Do not operate the heater if the alarm is sounding (or illuminating). Disconnect the power at the service panel and have the heater inspected by a reputable electrician before resuming use.
- To prevent a possible fire, do not block the space between the heater and the wall in any way as this space allows air to flow in and out.
- A heater has hot and arcing/sparking parts inside. Do not use it in areas where gasoline, paint, or flammable liquids are used or stored.
- Use this heater only as described in this manual. Any other use not recommended by the manufacturer may cause fire, electric shock, or personal injury.
- Avoid the use of an extension lead as it may overheat and cause a risk of fire.
- To prevent overloading a circuit, do not plug the heater into a circuit that already has other appliances working. Do not place the heater under the wall socket.
- It is normal for the plug to feel warm to the touch; however, a loose fit between the socket (receptacle) and plug may cause overheating and distortion of the plug. Contact a qualified electrician to replace loose or worn plug sockets.
- The output of this heater may vary and its temperature may become intense enough to burn exposed skin. To avoid burns, the use of this heater is not recommended for persons with reduced sensitivity to heat or delayed reactions.
- Do not cover the heater under any circumstances.
UNPACKING AND ASSEMBLY INSTRUCTIONS
PACKING LIST
- Heater: 1 piece
- 4x screws (ST 4*35mm )
- 4x plastic fittings
- 1x instruction manual
- 1x wall mounting template
SELF-STANDING ASSEMBLY INSTRUCTIONS
- Unscrew the two bottom corner screws on each side of the heater's back frame.
- Align the self-standing bracket hole to the frame hole such that the outer corners of the bracket and heater frame will be aligned.
- Screw the previously removed screws back in. Make sure to screw them into the screw insert on the frame.
- Start using your heater.
WALL MOUNTING INSTRUCTIONS
- Measure the distance between the centre of each heater bracket both horizontally and vertically to ensure you are drilling the holes in the correct place. Mark the positions of the 4 holes on the wall. You can also use the enclosed template or the below table.
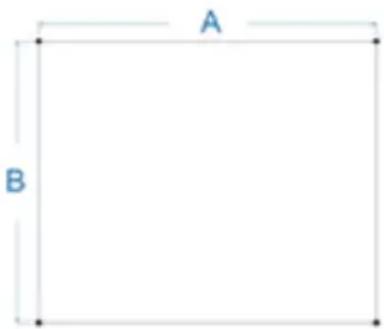
| MODEL A (cm) B (cm) | |
| IR540W29,2 | 24,4 |
| IR800W 42,4 | 39,6 |
| IR1200W 64,4 | 36,6 |
- Drill the holes with an appropriate drill bit for the material you are mounting the heater on.
- Insert the plastic fittings into the holes.
- Screw the 4 screws into the plastic fittings. Leave the screw approx. 4 to 5 mm out of the wall. Minor adjustments to the screws will be needed when putting the heater in place.
- Attach the panel heater onto the screws and move the heater to the left so that the screws drop into the securing slots.
OPERATING INSTRUCTIONS
- When connected to a power supply, press the red mechanical safety switch to the ON position. Switch is located on the side of the operating panel.
- The ON/OFF button will activate the heater to start working with the ambient temperature pre-set to 37°C. If your room temperature is lower than 37°C, the heater will start working immediately.
- Set the desired room temperature using the "+" and "-" buttons.
- TIMER CLOCK button will allow you to set a countdown time for the heater. Adjust the desired countdown time using the "+" and "-" buttons.
INSTRUCTIONS FOR CONNECTING TO THE APP
- On Google Play or the Apple Store, download the following application:
a. Android: https://play.google.com/store/apps/details?id=com.con.sec b. Apple: https://apps.apple.com/us/app/connectlife-robot/id1613312684
QR - Apple
QR - Android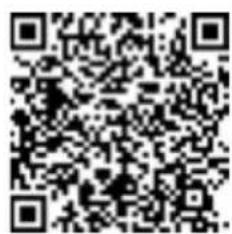
- Open the application and perform the registration process using a valid email or other suggested verification method.
- Turn on the heater and check that the Wi-Fi signal is blinking rapidly (3 blinks per second). If not, press the Wi-Fi button for 3 seconds to change the state of blinking.
- Turn on Wi-Fi and Bluetooth on your phone.
- Tap Add device on your application home screen.
- If the heater is not recognised automatically, find the Small Home Appliances tab on the left side and tap Heater (Wi-Fi) option.
- Follow the steps requested by the application to add the heater manually.
TROUBLESHOOTING
If your heater fails to operate, please follow these instructions:
- Ensure that your circuit breaker or fuse is working properly.
- Be sure the heater is plugged in and that the electrical outlet is working properly.
- If the ON/OFF switch is not illuminated in the ON position, send it to the service centre directly for repair.
NOTE: IF YOU EXPERIENCE PROBLEMS WITH YOUR HEATER, PLEASE SEE THE WARRANTY INFORMATION FOR INSTRUCTIONS. PLEASE DO NOT ATTEMPT TO OPEN OR REPAIR THE HEATER YOURSELF AS TO DO SO MAY VOID THE WARRANTY AND CAUSE DAMAGE OR PERSONAL INJURY. IF THE PROBLEM PERSISTS, PLEASE CONTACT THE DISTRIBUTOR.
CLEANING AND STORAGE
Before cleaning your heater, switch off the heater and allow it to cool. Disconnect the electricity supply to the appliance. The outside can be cleaned by wiping it over with a soft damp cloth and then dried. Do not use abrasive cleaning powders or furniture polish as this can damage the surface finish.
For short term storage, just plug out the heater and leave it; for long term storage, you can dismantle it from the wall.
SPECIFICATIONS
Voltage:
220-240V, 50/60Hz
Power:
540 Watts for PH-ET540E1
800 Watts for PH-ET800E1
1200Watts for PH-ET1200E1
Tolerances on all specifications:
Approximately +5%, -10%.
LIMITED WARRANTY AND SERVICE
2 year manufacturer's warranty. Please contact your dealer with your purchase receipt for warranty details.
| Correct Disposal of this product | |
| This marking indicates that this product should not be disposed of with other household wastes throughout the EU. To prevent possible harm to the environment or human health from uncontrolled waste disposal, recycle it responsibly to promote the sustainable reuse of material resources. To return your used device, please use the return and collection systems or contact the retailer where the product was purchased. They can take this product for environmentally-safe recycling. | |
| SI | GB | HR | MK | RO | SQ | RU | PL | |
| -2- | -6- | -14- | -18- | -23- | -28- | -33- | -38- | |
| SK | BG | CZ | HU | DE/AT | ES | ET | FR | IT |
| -43- | -48- | -53- | -57- | -62- | -67- | -72- | -76- | -81- |
IMPORTANT SAFETY MEASURES SAVE THESE INSTRUCTIONS
USER MANUAL
- When you turn on the heater for the first time, press the safety switch that is located in the ON position. The switches are located on the side of the operator panel.
- The on/off button will activate the heater to start working with a preset ambient temperature of 37°C. If your body temperature is lower than 37°C, the heater will start working immediately.
- Set your desired body temperature using the + and - buttons.
- Use the TIMER CLOCK to set the heating time for the heater. Adjust the desired heating time using the + and - buttons.
INSTRUCTIONS FOR CONNECTING WITH THE APP
- On Google Play or the Apple App Store, search for the app:
a. Android https://play.google.com/store/apps/details?id=com.con.sec b. Apple https://apps.apple.com/us/app/connectlife-robot/id1613312684
QR - Apple
QR - Android
- Open the app and complete the registration process. Use your email or another suggested verification method.
- Turn on the heater and check the Wi-Fi indicator for a fast blink (3 blinks per second). If not, press the Wi-Fi button for 3 seconds to change the blinking state.
- Turn on Wi-Fi and Bluetooth on your phone.
- Press "Add Device" on the home screen of the app.
- If the heater is not detected automatically, find the "Small Home Appliances" category on the left side and select "Heater" (Wi-Fi).
- Please read the instructions carefully before using the appliance.
TROUBLESHOOTING
If your appliance does not work, please follow the steps below:
Check that the power cord is properly plugged in and that the outlet works correctly. - Make sure the appliance is turned on and that the thermostat is set correctly. - If the plugging/unplugging does not solve the problem, take it directly to a service center for repair.
WARNING: If you have a problem with your appliance, please refer to the warranty information for details. Do not attempt to open or repair the appliance yourself, as this may void the warranty and cause injury or damage. If the problem persists, please contact your distributor.
CLEANING AND CARE
Before cleaning the appliance, unplug it and let it cool down. Unplug the appliance from the power supply. The exterior can be cleaned with a soft damp cloth and then dried. Do not use abrasive cleaners or solvents for cleaning, as they may damage the surface finish.
For short-term storage, simply unplug the appliance and store it; for long-term storage, you can disassemble it if needed.
SPECIFICATIONS
Voltage:
220-240V, 50/60Hz
Power:
540W for PH-ET540E1
800W for PH-ET800E1
1200W for PH-ET1200E1
Tolerance for this specification:
Approximately +5%, -10%.
LIMITED WARRANTY AND SERVICE
2-year manufacturer's warranty. Contact your local dealer together with your purchase receipt for warranty details.
| Прави乳业 OTстваье на овол пюзвод | |
| Оваа ознaka пokжуba дeca овол пюзвод не тpeба да се Фрna co дуг отпад сдомakинсвото НИЗЕ. 3a да спpeчпte можнаштета на лимьогната срешина иллкларJTо одравjectо на лугето od поюрларно денинраъе на отпадOT, решникларJTо одrogорно 3a дa помовирале одрхлamba посторна улотpeба на материалнITE pecурсп. 3a дa ro bparnte корисhevOT урд, користete Г сисмпerte 3a вра��аъе и прибиралъе иллковларJTо сддяпавочткideшTo e Кунен пюзвдOT. Тп можат дa ro земат овол пюзвод 3a ekolочки бezбедно решникларъе. | |
PACKAGING AND ASSEMBLY
COMPONENTS
- Heater: 1 pc.
- 4x screws (ST 4*35 mm)
- 4x plastic washers
- 1x operating instructions
- 1x wall mounting template
FLOOR INSTALLATION INSTRUCTIONS
- Unscrew the two screws in the lower corners on each side of the rear frame of the appliance.
- Align the holes on the feet with the holes
on the frame so that the outer edges of the feet align with the appliance.
3. Carefully screw the screws into place. Make sure they are screwed into the holes in the frame. 4. Your device is ready for operation.
INSTRUCTIONS FOR WALL MOUNTING
1. Measure the distance between the mounting holes on the device horizontally and vertically to be sure that you make the holes in the right place. Mark the locations for the holes on the wall. You can also use the included template or the table below.
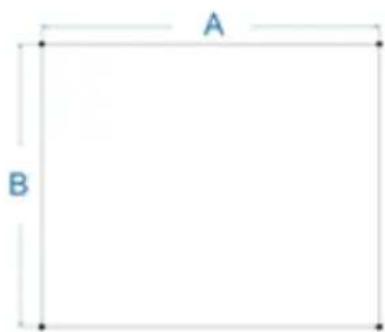
| MOДЕЛь A (cm) B (cm) | |
| IR540W29,2 24,4 | |
| IR800W 42,4 39,6 | |
| IR1200W 64,4 36,6 |
2. Drill the holes using a drill suitable for the material on which the device is installed. 3. Insert plastic plugs into the holes. 4. Screw 4 screws into the plastic plugs. Leave the screws protruding about 4-5 mm from the wall. When hanging the device, it may be necessary to adjust the depth of the screws. 5. Carefully hang the device on the screws and turn it to the left so that the screws fit into the locking grooves.
USAGE
- After connecting to the mains, press the red switch to turn on the device (ON position). The switch is located on the side of the control panel. 2. By pressing the ON/OFF button, the device turns on with a preset room temperature of 37°C. If the room temperature is below 37°C, the device will start working immediately.
- Adjust the room temperature using the buttons (+) and (-).
- The TIMER CLOCK button allows you to set the device shutdown time. Set the timer time using the «+» and «-» buttons.
CONNECTING THE APPLICATION
- Download the application from the Google Play or App Store:
a. Android https://play.google.com/store/apps/details?id=com.con.sec b. Apple https://apps.apple.com/us/app/connectlife-robot/id1613312684
QR - Apple
QR - Android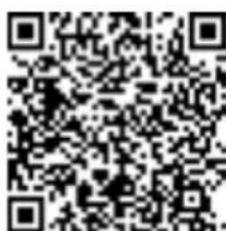
- Open the application and register using a valid email
address or another suggested verification method.
- Turn on the device and check that the Wi-Fi indicator blinks quickly (3 blinks per second). Otherwise, press and hold the Wi-Fi button for 3 seconds to change the blink speed.
- Turn on Wi-Fi and Bluetooth on your phone.
- Tap "Add device" on the home screen of the app.
- If the heater is not detected automatically, find the "Small Appliances" tab on the left side and tap "Heater (Wi-Fi)".
- Follow the steps required by the app to add the heater to your home.
TROUBLESHOOTING
If the device does not work, perform the following steps:
- Check that the automatic switch or fuse is working properly.
- Check that the power cord is connected and that the electrical outlet is working properly.
- If the ON/OFF switch does not light up in the ON position, contact a service center.
NOTE: IF YOU HAVE PROBLEMS WITH THE DEVICE, READ THE WARRANTY INFORMATION. DO NOT OPEN OR REPAIR THE DEVICE YOURSELF, AS THIS MAY VOID THE WARRANTY, CAUSE DAMAGE, OR RESULT IN INJURY. IF THE PROBLEM IS NOT RESOLVED, CONTACT A SERVICE CENTER.
CLEANING AND STORAGE
Before cleaning, turn off the device and let it cool down. Disconnect the device from the power outlet. Wipe the external surfaces with a soft damp cloth, then dry with a dry cloth. Do not use abrasive cleaners or powders on the device, as this may damage the surface. For short-term storage, unplug the plug
from the outlet. For long-term
storage, you can remove the device from the wall.
TECHNICAL SPECIFICATIONS
Parameters:
220-240V~, 50/60Hz
Power:
540W — PH-ET540E1
800W — PH-ET800E1
1200W — PH-ET1200E1
Tolerance for all technical specifications:
approximately +5%, -10%.
LIMITED WARRANTY
SERVICE
Manufacturer's warranty — 2 years. For detailed
warranty information, please contact
the store where you purchased
the appliance.
KEEP THESE INSTRUCTIONS SAFE
HOW TO OPERATE THE HEATER, PLEASE, FOLLOW THESE INSTRUCTIONS:
- Make sure that the voltage or the settings are correct.
- Make sure that the heater is plugged into the socket and that the electrical contact works properly.
- If the ON/OFF switch does not light up in the ON position, take it to a service center for repair.
WARNING: IF YOU HAVE PROBLEMS WITH YOUR HEATER, PLEASE, SEE THE WARRANTY INFORMATION FOR INSTRUCTIONS. PLEASE, DO NOT ATTEMPT TO OPEN OR REPAIR THE HEATER YOURSELF, AS THIS MAY VOID THE WARRANTY AND CAUSE DAMAGE OR PERSONAL INJURY. IF THE PROBLEM PERSISTS, PLEASE, CONTACT THE DISTRIBUTOR.
CLEANING AND STORAGE
Before cleaning, unplug the heater and let it cool down. Unplug
the electrical supply of the device.
The surface can be cleaned by wiping it with a damp cloth and then drying it. Do not use abrasive cleaners or polishes for furniture, as this may damage the surface. For short-term storage, simply unplug the heater and leave it; for long-term storage, you can remove it from the wall.
TECHNICAL SPECIFICATIONS
Voltage:
220-240 V, 50/60 Hz
Power:
540 W for PH-ET540E1
800 W 3a PH-ET800E1
1200 W 3a PH-ET1200E1
Permissible deviations for all specifications:
[ \text{Approximately} +5\% , -10\% . ]
LIMITED WARRANTY AND SERVICE
2-year manufacturer's warranty. For details regarding the warranty, please contact your dealer, and keep the original purchase receipt.
| Правлино узвъряне на поodyкta | |
| Този 3нak указа, че поodyкът He Тразьа Дд Сьд Узвърян 3аедно C obиновенite DOMAKINHСКИ OTпадьцИВ STРANITE OTЕВРОЕССКИ CBU03. 3a п徴OTВРАВАе Н eBEHTуалп Врedi Вьрху OKOLнATERA СрEDA ИЧОБЕШКОТ 3драве OT НЕКОТРОЛРАно I3XBьрЯне Ha OTпадьцИ, рсчКлрайte урEDA OTROBOPHO 3a Насьч汞аBERe H aYCTOчИВАп NOВТOPHA UNOTpe6а Ha MaTePиАЛNTe. 3a Дд ВьрпeTe OБрATHO CBОИ N3ПОЛЗВАн урED I3ПОЛЗВАн TEСТЕМITE 3a CBБИРаНe И ВьшAne Ha eЛЕКТчЕСКИ урДи ИЛСе CBБржET C TьрROBEца, OT KOДTO CTe 3akUnПиnpodукТa. Te MOrAT Дд п徴ДAT урEDA 3a BeЗОпаСНЗ 3a OKOLнATERA СрEDA рсчКлраНe. | |
Túresek minded specifications: Kb. +5%, -10%.
b. Apple https://apps.apple.com/us/app/connectlife-robot/id1613312684
QR - Apple
QR - Android


- IMPORTANT SAFETY PRECAUTIONS
- PLEASE READ AND SAVE THESE IMPORTANT SAFETY INSTRUCTIONS
- UNPACKING AND ASSEMBLY INSTRUCTIONS
- PACKING LIST
- SELF-STANDING ASSEMBLY INSTRUCTIONS
- WALL MOUNTING INSTRUCTIONS
- OPERATING INSTRUCTIONS
- INSTRUCTIONS FOR CONNECTING TO THE APP
- TROUBLESHOOTING
- CLEANING AND STORAGE
- SPECIFICATIONS
- LIMITED WARRANTY AND SERVICE
- IMPORTANT SAFETY MEASURES SAVE THESE INSTRUCTIONS
- USER MANUAL
- INSTRUCTIONS FOR CONNECTING WITH THE APP
- CLEANING AND CARE
- PACKAGING AND ASSEMBLY
- COMPONENTS
- FLOOR INSTALLATION INSTRUCTIONS
- INSTRUCTIONS FOR WALL MOUNTING
- USAGE
- CONNECTING THE APPLICATION
- TECHNICAL SPECIFICATIONS
- LIMITED WARRANTY
- SERVICE
Brand : GORENJE
Model : IR800W
Category : Heating