
C46B - Wine cellar DOMETIC - Free user manual and instructions
Find the device manual for free C46B DOMETIC in PDF.
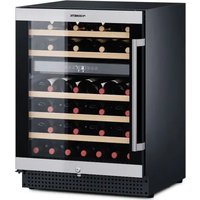


| Product type | Wine cellar (aging cellar) |
| Brand | Dometic |
| Model | C46B |
| Total volume | 128 L |
| Weight | 42 kg |
| Electrical supply | 220-240 V~, 50 Hz, 110 W |
| Power consumption | 160 kWh/year |
| Climate class | SN, N (ambient +10 °C to +32 °C) |
| Noise emissions | 39 dB(A) |
| Refrigerant | R600a |
| Temperature range upper zone | 4 °C to 12 °C |
| Temperature range lower zone | 12 °C to 22 °C |
| Temperature functions | Two independent zones, automatic defrosting, temperature memory and monitoring |
| Interior lighting | Interior LED lamp |
| Locking | Door lock (model C46B) |
| Display | LED screen with temperature display in °C/°F |
| Shelf | Sliding shelves with stop |
| Maintenance | Regular cleaning, annual replacement of activated carbon filter |
| Repairability | Repair by an authorized agent; original spare parts recommended |
| Warranty | Legal warranty; contact dealer or manufacturer |
Frequently Asked Questions - C46B DOMETIC
User questions about C46B DOMETIC
0 question about this device. Answer the ones you know or ask your own.
Ask a new question about this device
Download the instructions for your Wine cellar in PDF format for free! Find your manual C46B - DOMETIC and take your electronic device back in hand. On this page are published all the documents necessary for the use of your device. C46B by DOMETIC.
USER MANUAL C46B DOMETIC
C18B, C46B, D18B, D42B, D46B
EN Wine storage appliance Installation and Operating Manual. 16 DE Weinkühlschrank Montage- und Bedienungsanleitung .33 Cave de vieillissement Instructions de montage et de service. 52 ES Cava de vinos Instrucciones de montaje y de uso .72 IT Cantina climatizzata per vini Istruzioni di montaggio e d'uso. 91 Wijnkoelkast Montagehandleiding en gebruiksaanwijzing 111 DA Vinkoleskab Monterings- og betjeningsvejledning...130 SV Vinkyl Monterings- och bruksanvisning 147
Vinkjoleskap Monterings- og bruksanvisning. 164 Fi Viinijaahdytin Asennus- ja kayttoohje. 182 RU BHHbI XOJODHbHK IInctpykunno MoNTaKy nKcnnyatau 200 Ure'daj zaČuvanje vina Upute za montažu i uporabu 220 RO Aparatului pentru depositarea vinului Instruetuni de montaj si operare 238
© 2023 Dometic Group. The visual appearance of the contents of this manual is protected by copyright and design law. The underlying technical design and the products contained herein may be protected by design, patent or be patent pending. The trademarks mentioned in this manual belong to Dometic Sweden AB. All rights are reserved.
1 D42BC46B, D46BC18B, D18B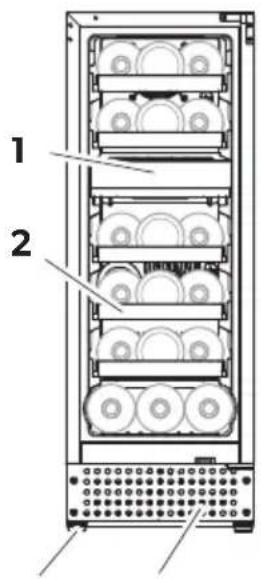
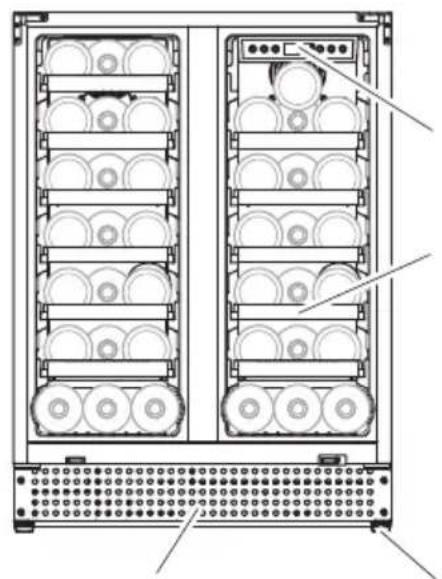
1 2 33444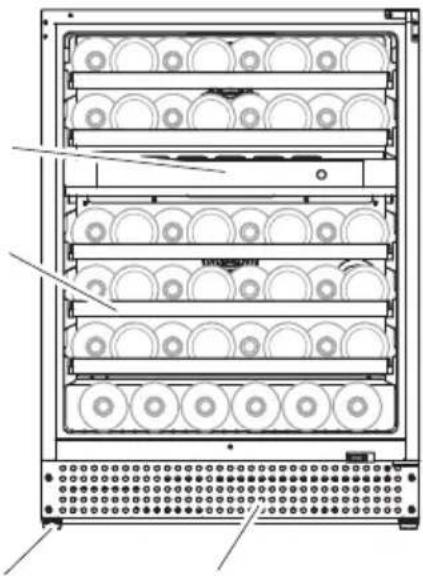
2 1234


5678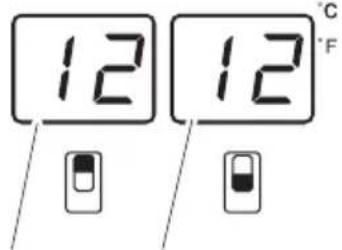



17 C18B,D18B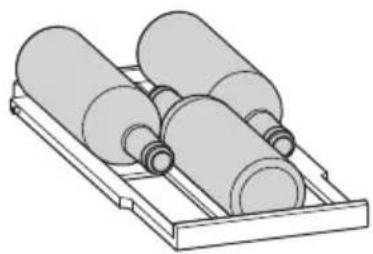
C46B, D42B, D46B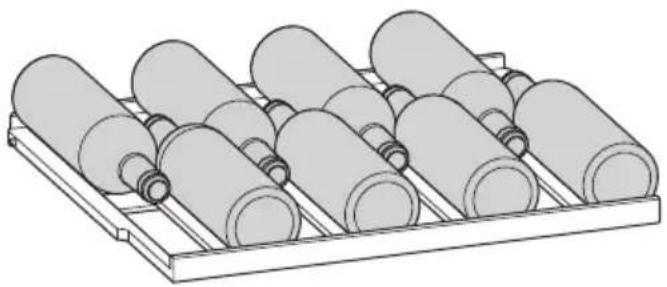
18 C18B,D18B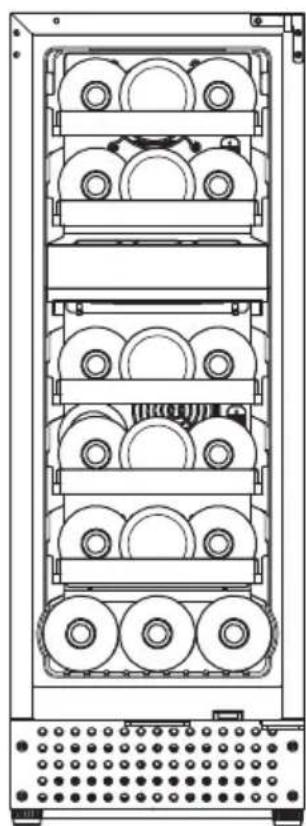
19 D42B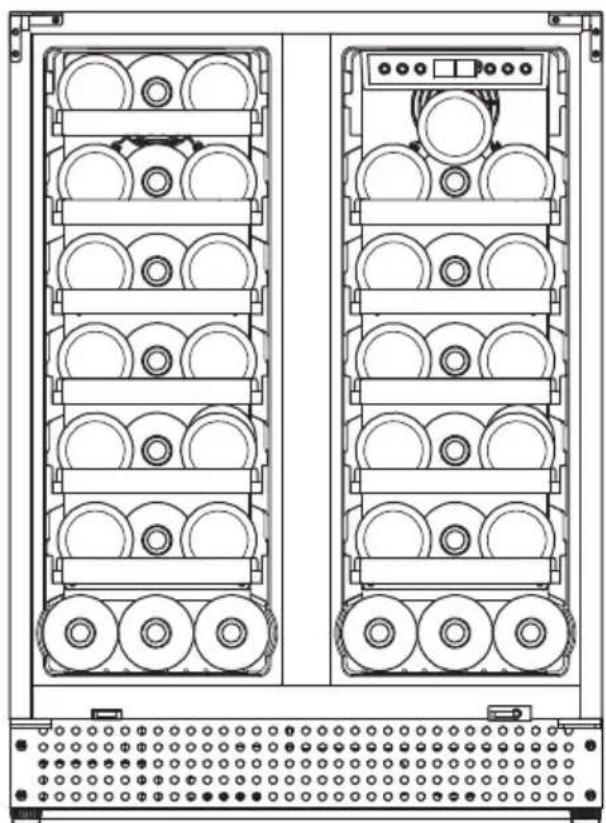
20 C46B,D46B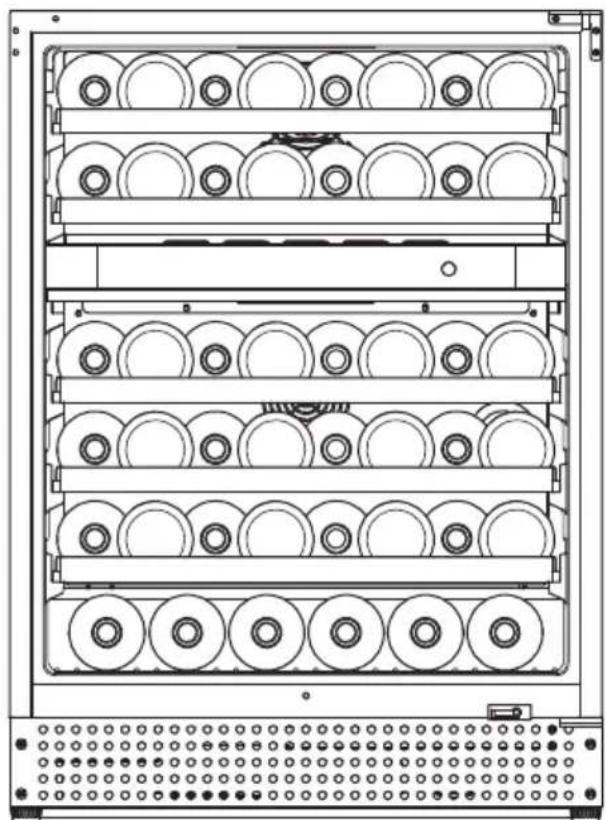
23 C18B D18B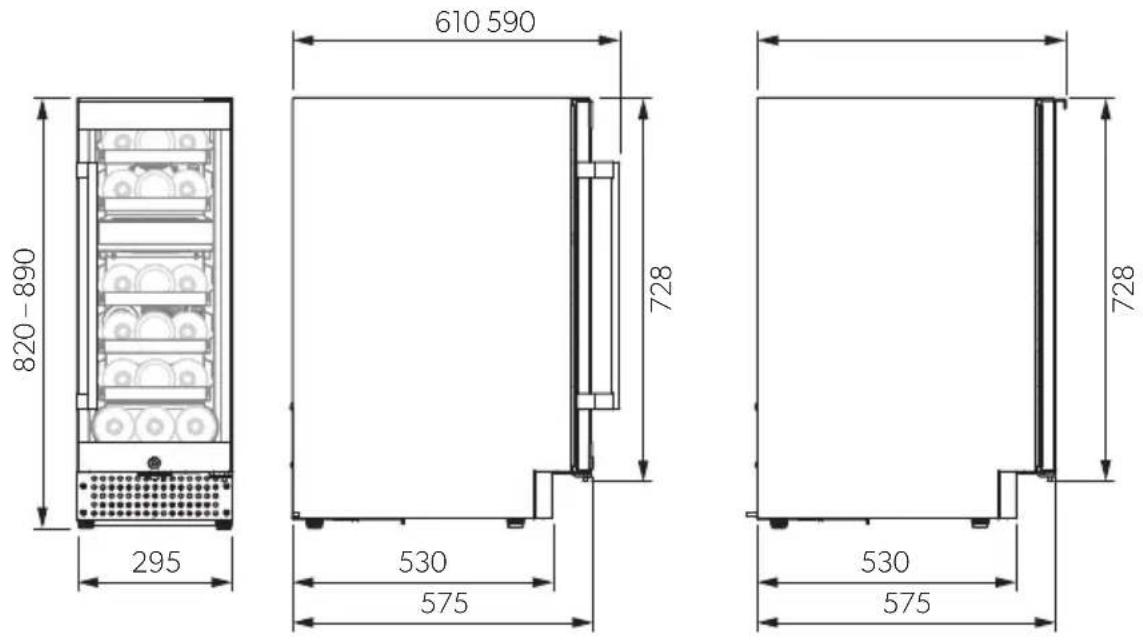
24 C46B D46B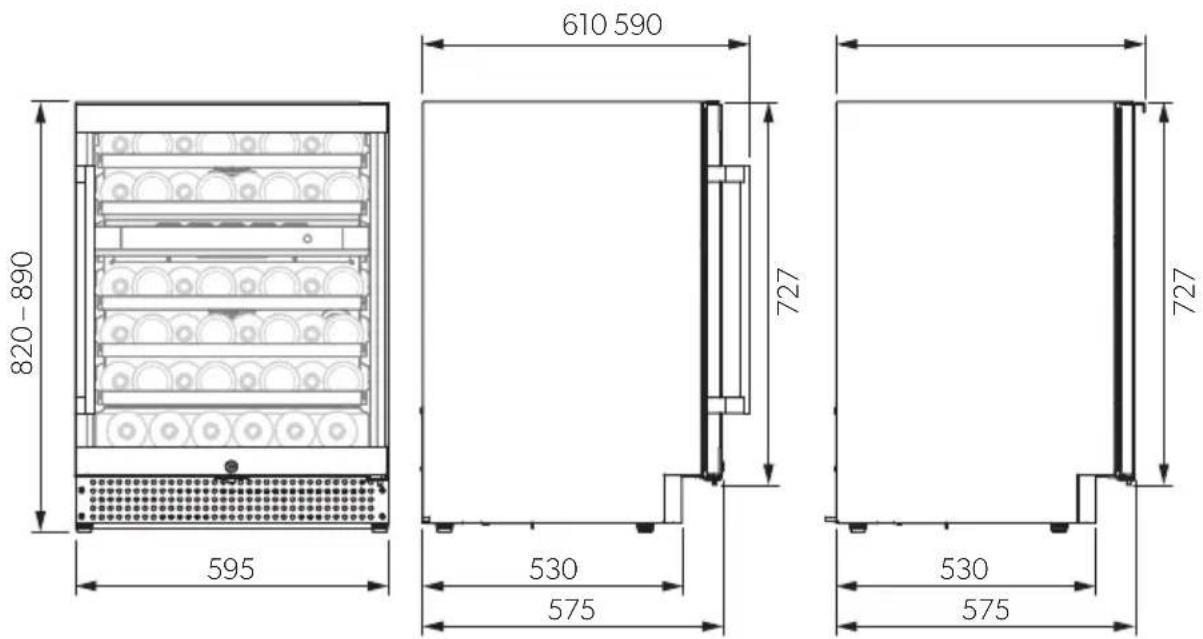
Please read these instructions carefully and follow all instructions, guidelines, and warnings included in this product manual in order to ensure that you install, use, and maintain the product properly at all times. These instructions MUST stay with this product.
By using the product, you hereby confirm that you have read all instructions, guidelines, and warnings carefully and that you understand and agree to abide by the terms and conditions as set forth herein. You agree to use this product only for the intended purpose and application and in accordance with the instructions, guidelines, and warnings as set forth in this product manual as well as in accordance with all applicable laws and regulations. A failure to read and follow the instructions and warnings set forth herein may result in an injury to yourself and others, damage to your product or damage to other property in the vicinity. This product manual, including the instructions, guidelines, and warnings, and related documentation, may be subject to changes and updates. For up-to-date product information, please visit documents.domatic.com.
Contents
1 Explanation of symbols 16 2 Safety instructions 17 3 Scope of delivery 19 4 Intended use 20 5 Technical description 21 6 Installation 22 7 Operation 24 8 Troubleshooting 27 9 Cleaning and maintenance 29 10 Warranty 30 11 Disposal 31 12 Technical data 31
1 Explanation of symbols
WARNING!
Safety instruction: Indicates a hazardous situation that, if not avoided, could result in death or serious injury.
CAUTION!
Safety instruction: Indicates a hazardous situation that, if not avoided, could result in minor or moderate injury.

NOTICE!
Indicates a situation that, if not avoided, can result in property damage.

NOTE
Supplementary information for operating the product.
2 Safety instructions
2.1 General safety
WARNING! Failure to obey these warnings could result in death or serious injury.
Electrocution hazard
- Do not operate the wine cooler if it is visibly damaged.
- If this wine cooler's power cable is damaged, it must be replaced by the manufacturer, a service agent or a similarly qualified person in order to prevent safety hazards.
- This wine cooler may only be repaired by qualified personnel. Inadequate repairs may cause serious hazards.
- When positioning the wine cooler, ensure the supply cord is not trapped or damaged.
- Do not locate multiple portable socket-outlets or portable power supplies at the rear of the wine cooler.
- Plug the device to sockets that ensure proper connection especially when the device needs to be earthed.
Fire hazard
- The refrigerant in the refrigerant circuit is highly flammable. In the event of any damage to the refrigerant circuit:
- Switch off the wine cooler.
- Avoid naked flames and sparks. Air the room well.
Health hazard
- This device can be used by children aged from 8 years and above and persons with reduced physical, sensory or mental capabilities or lack of experience and knowledge if they have been given supervision or instruction concerning use of the device in a safe way and understand the hazards involved.
Children shall not play with the device. Cleaning and user maintenance shall not be made by children without supervision. Children aged from 3 to 8 years are allowed to load and unload the wine cooler. To avoid a hazard due to instability of the wine storage appliance, it must be fixed in accordance with the installation instructions. Keep ventilation openings, in the wine cooler enclosure or in the built-in structure, clear of obstruction. Do not use mechanical devices or other means to accelerate the defrosting process, other than those recommended by the manufacturer. Do not damage the refrigerant circuit. Do not open the refrigerant circuit under any circumstances. Do not use electrical devices inside the wine cooler unless they are recommended by the manufacturer for that purpose.
Explosion hazard
- Do not store any explosive substances, such as spray cans with propellants, in the wine cooler.
CAUTION! Failure to obey these cautions could result in minor or moderate injury.
Risk of crushing
- Do not put your fingers into the hinge.
Health hazard
- Only closed and still sealed bottles may be stored in the appliance.

NOTICE! Damage hazard
- Check that the voltage specification on the data plate is the same as that of the power supply.
- Never pull the plug out of the socket by the connection cable.
- The wine cooler is not suitable for storing substances which are caustic or contain solvents.
- Keep the drainage outlet clean at all times.
- Never transport the wine cooler in a horizontal position, so that no oil can leak out of the compressor.
- Set up the wine cooler in a dry location where it is protected against splashing water.
2.2 Operating the wine cooler safely
DANGER! Failure to obey these warnings will result in death or serious injury.
Electrocution hazard
- Do not touch exposed cables with your bare hands.
CAUTION! Failure to obey these cautions could result in minor or moderate injury.
Electrocution hazard
- Before starting the wine cooler, ensure that the power supply line and the plug are dry.
Health hazard
- Opening the door for long periods can cause significant increase of the temperature in the compartments of the wine cooler.
- Clean regularly surfaces that can come in contact with wine bottles and accessible drainage systems.
- If the device is left empty for long periods:
- Switch off the wine cooler.
- Defrost the wine cooler.
- Clean and dry the wine cooler.
- Leave the door open to prevent mold developing within the wine cooler.

NOTICE! Damage hazard
- Do not place the wine cooler near naked flames or other heat sources (heaters, direct sunlight, gas ovens etc.)
- Danger of overheating!
Always ensure sufficient ventilation so that the heat generated during operation can dissipate. Make sure that the device is sufficiently far away from walls and other objects so that the air can circulate.
- Never immerse the wine cooler in water.
- Protect the wine cooler and the cable against heat and moisture.
- Make sure that wine bottles do not touch the walls of the cooling area.
3 SCOPE OF DELIVERY
- Wine cooler
- Installation and operating manual
4 Intended use
The wine storage appliance (also referred to as wine cooler) is designed for operation in enclosed buildings, such as:
- In staff kitchens in stores, offices and other work areas In the agricultural sector
- In hotels, motels and other accommodations In bed and breakfast establishments
- In catering businesses or similar wholesaler operations
The wine cooler is intended to be used either as a built-in appliance or as freestanding appliance. Refer to the installation instructions.
The wine cooler is intended to be used exclusively for the storage and temperature control of wine. Only closed and still sealed bottles may be stored in the appliance.
The wine cooler is not suitable for storing medicine or freezing foodstuffs.
This wine cooler is only suitable for the intended purpose and application in accordance with these instructions.
This manual provides information that is necessary for proper installation and/or operation of the wine cooler. Poor installation and/or improper operating or maintenance will result in unsatisfactory performance and a possible failure.
The manufacturer accepts no liability for any injury or damage to the product resulting from:
- Incorrect assembly or connection, including excess voltage
- Incorrect maintenance or use of spare parts other than original spare parts provided by the manufacturer
- Alterations to the product without express permission from the manufacturer
- Use for purposes other than those described in this manual
Domatic reserves the right to change product appearance and product specifications.
5 Technical description
The models of the wine cooler are equipped with:
- Two temperature zones:
- C18B, C46B, D18B, D46B: upper zone: 4°C to 12°C; lower zone: 12°C to 22°C. D42B: left and right zone: 4°C to 22°C.
Automatic defrost function
• Sensor buttons - °C/°F temperature display - Interior LED lamp - Temperature memory function: The set temperature is saved when the wine cooler is switched off. - Temperature monitor: A warning signal sounds and the temperature display flashes if the interior temperature noticeably deviates from the one set.
Overview
| Nr. in fig. 1, Designation page 3 |
| 1 Control panel |
| 2 S h e l f |
| 3 Adjustable feet |
| 4 Ventilation grille |
| - Lock (only for C18B and C46B) |
Control elements
| Nr. in fig. 2, Symbol Description page 3 | |
| 1 On/off button | |
| 2 | Increases the set temperature by 1 °C or 1 °F for top or left zone |
| 3 | Decreases the set temperature by 1 °C or 1 °F for top or left zone |
| Nr. in fig. 2, Symbol Description page 3 |
| 4 Temperature display (top or left zone) |
| 5 Temperature display (bottom or right zone) |
| 6 Increases the set temperature by 1 °C or 1 °F for bottom or right zone |
| 7 Decreases the set temperature by 1 °C or 1 °F for bottom or right zone |
| 8 Switches the interior LED lamp on or off |
6 Installation
6.1 Selecting the installation location
Observe the following when selecting the installation location:
- The ambient temperature should be in accordance with the climate class. Otherwise, it is possible that the inner temperature you set cannot be reached or maintained. This could also be the case if there are extreme fluctuations in the ambient temperature. The intended ambient temperature use and the climate class can be found in the technical data (see chapter "Technical data" on page 31) and on the data plate, which is located at the left on the inside of the wine cooler.
- The ground must be level and sufficiently stable to support the wine cooler at full capacity.
- The wine cooler must be positioned so that the plug is accessible.
- Note the information on the electrical connection, see chapter "Connecting the wine cooler" on page 23. Remove all the inner and outer packaging material before setting up.
6.2 Integrating free-standing wine coolers
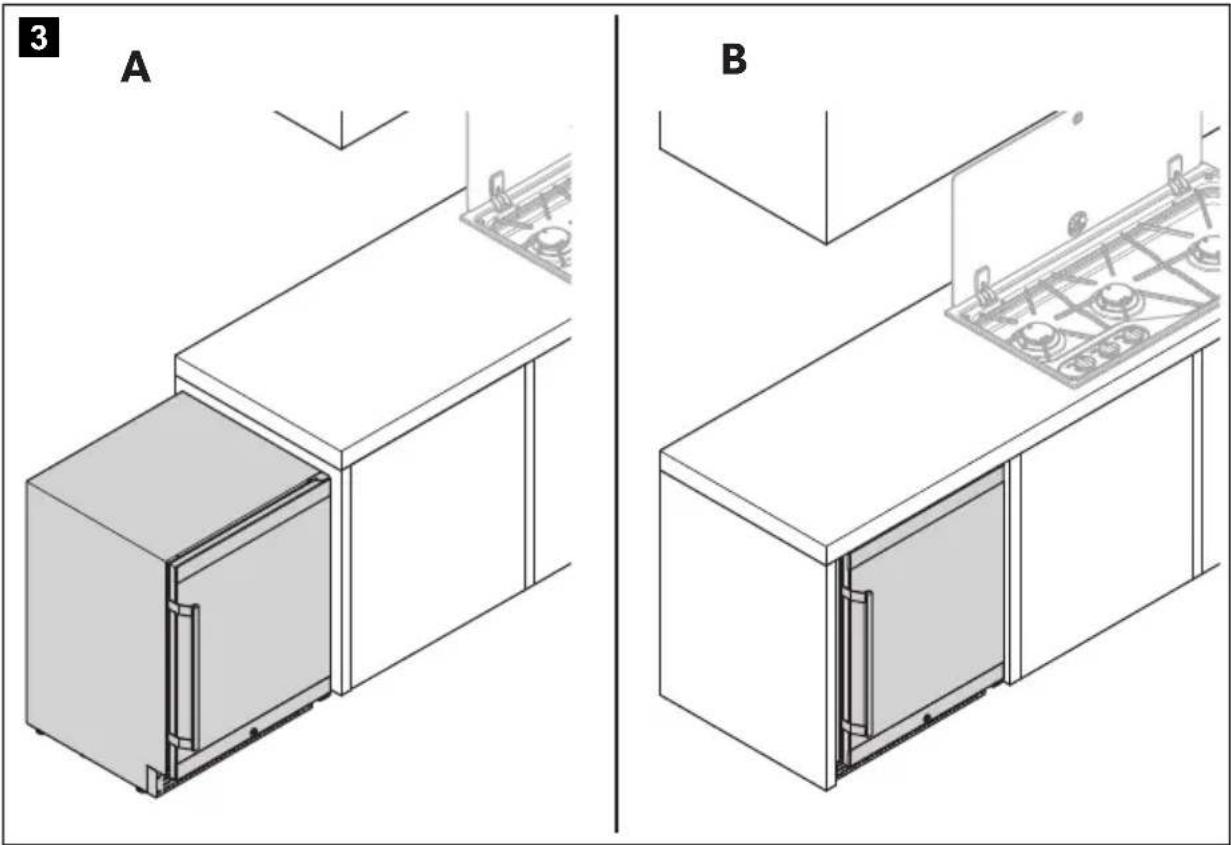
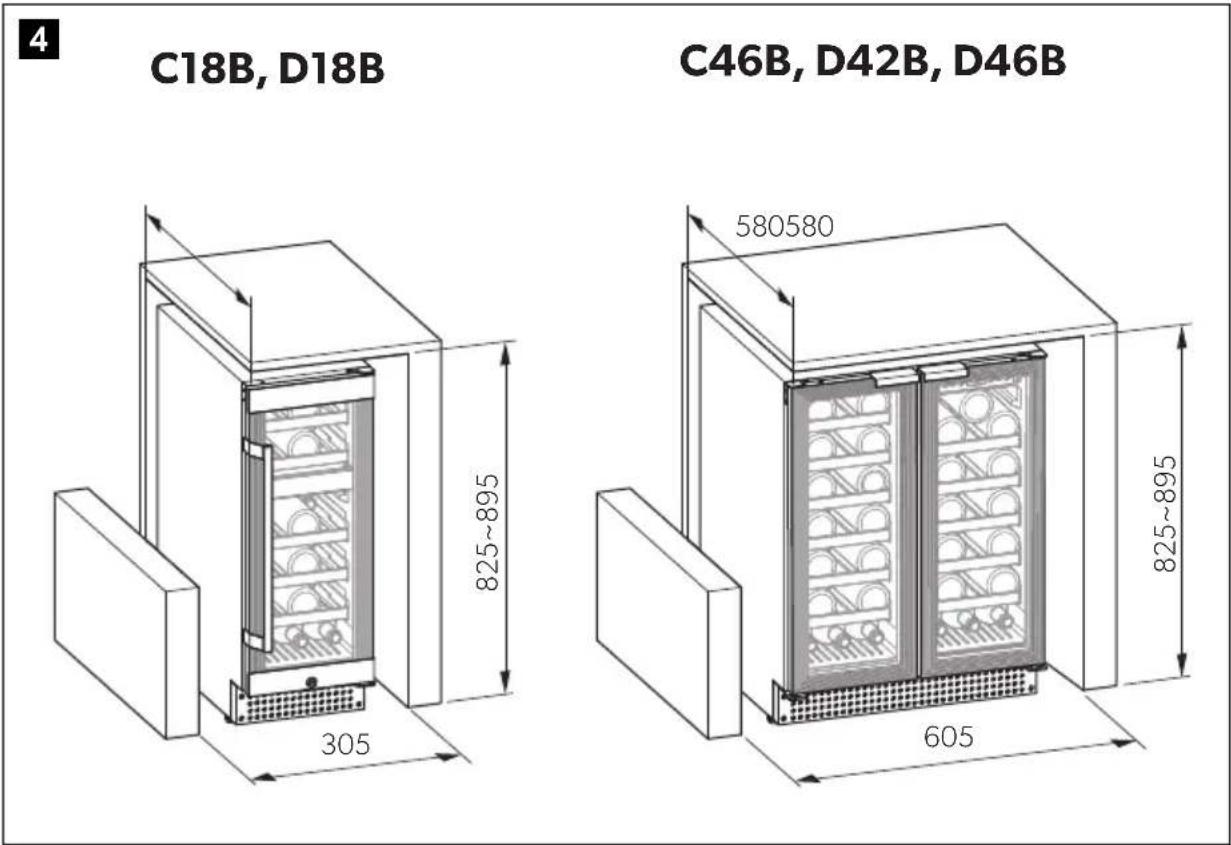
The wine cooler can be integrated either under a countertop or between other cabinets (fig. 3, page 4).
Observe the following when integrating the wine cooler:
- Observe the installation dimensions (fig. 4, page 4).
- Ensure the door will open and close properly in the chosen location.
- Waste heat produced by the wine cooler must be extracted via ventilation openings on the rear and at both sides.
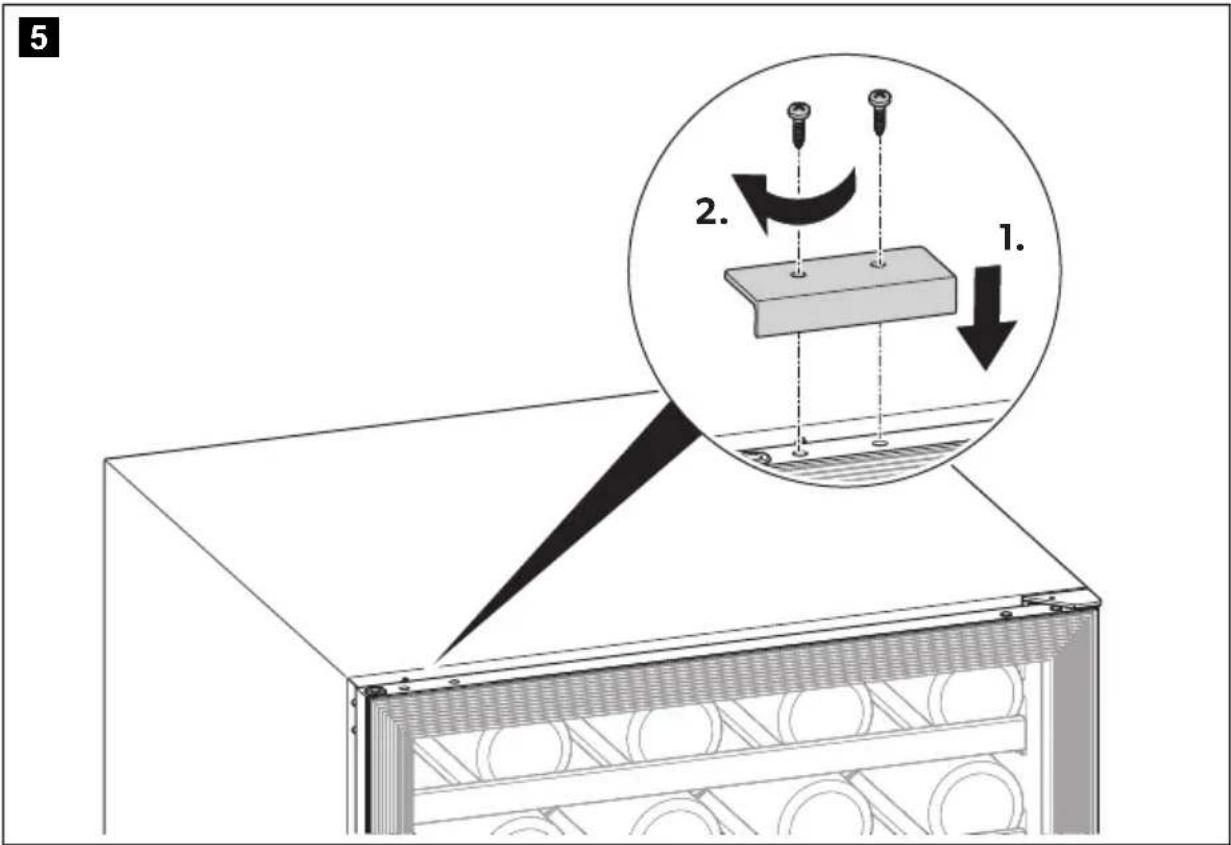
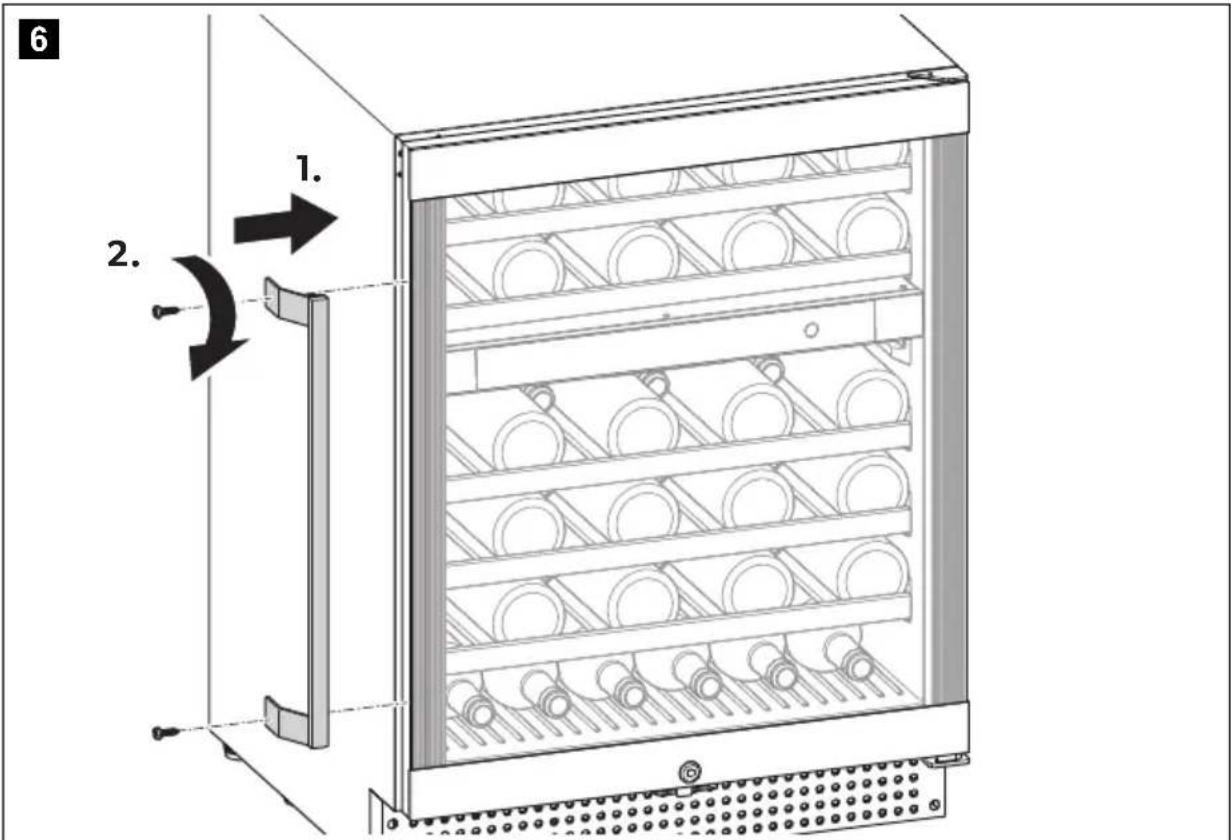
6.3 Mounting the door handle
Mount the handle as shown (fig. 5, page 5 and fig. 6, page 5).
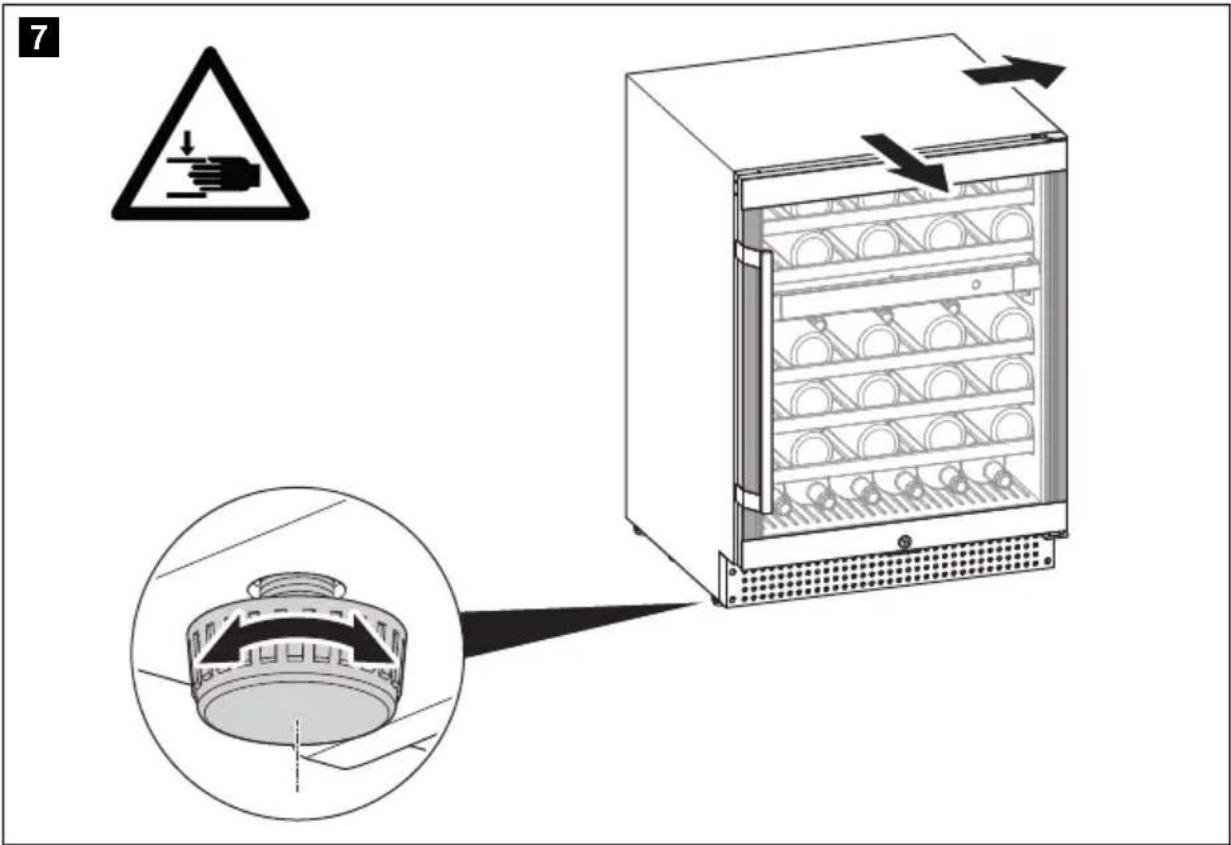
6.4 Adjusting the feet
Make sure the wine cooler is level by adjusting the feet (fig. 7, page 6).
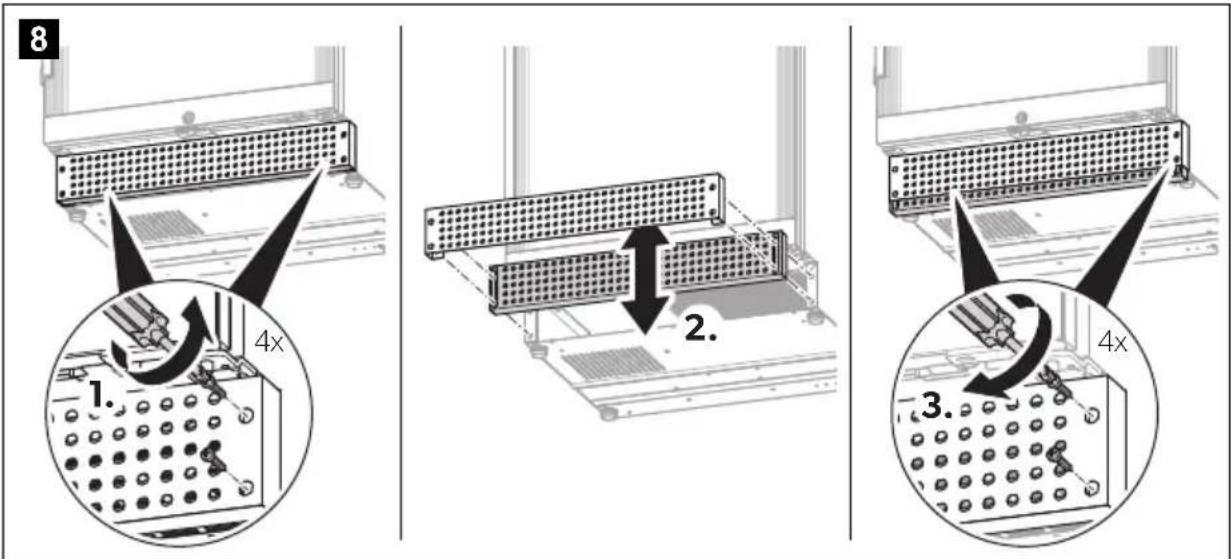
6.5 Adjusting the ventilation grille
Adjust the height of the ventilation grille (fig. 8, page 6).
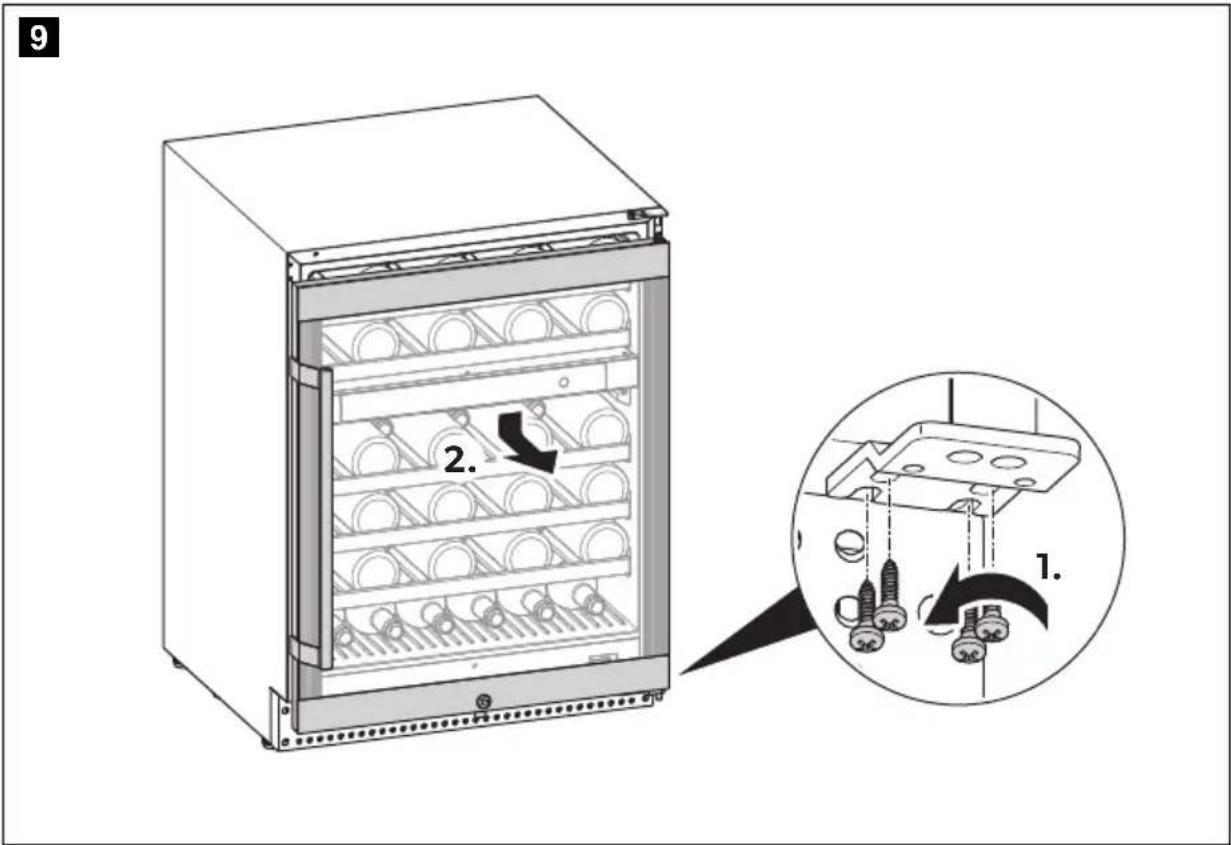
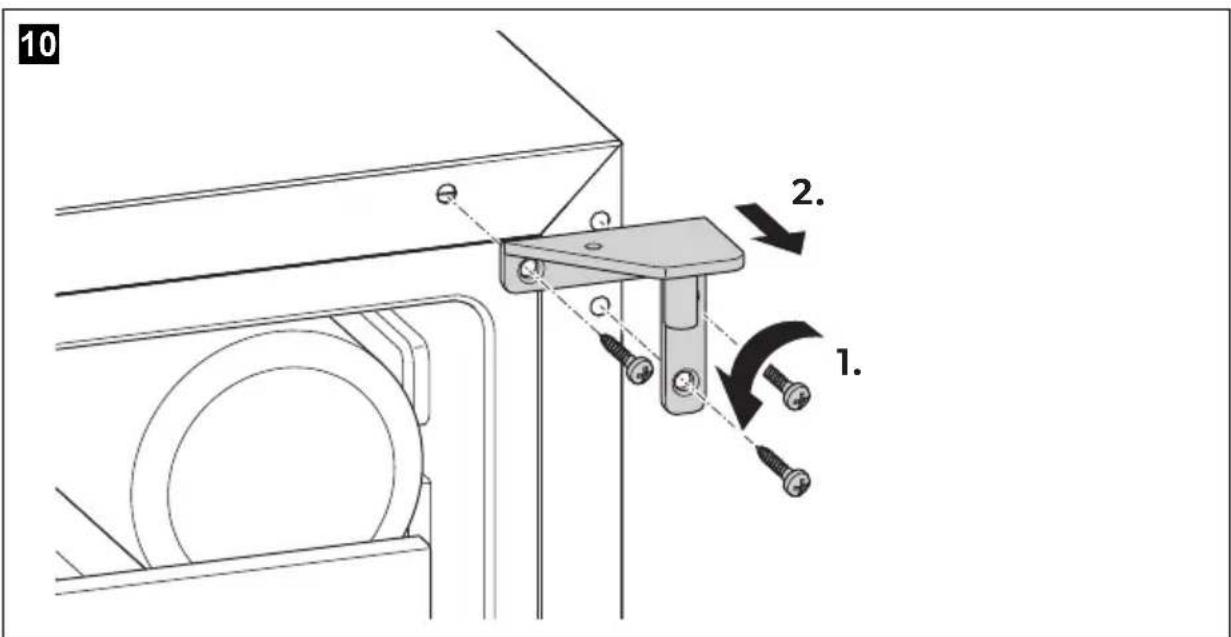
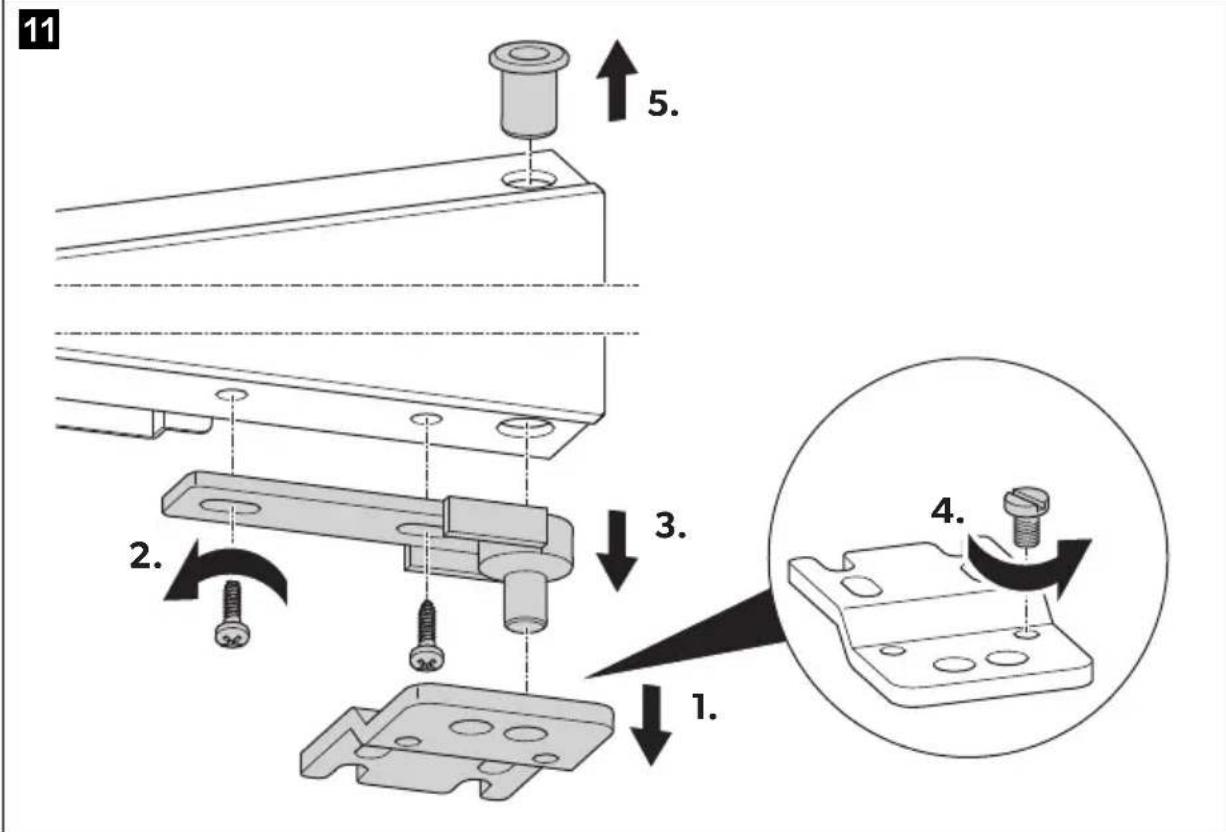
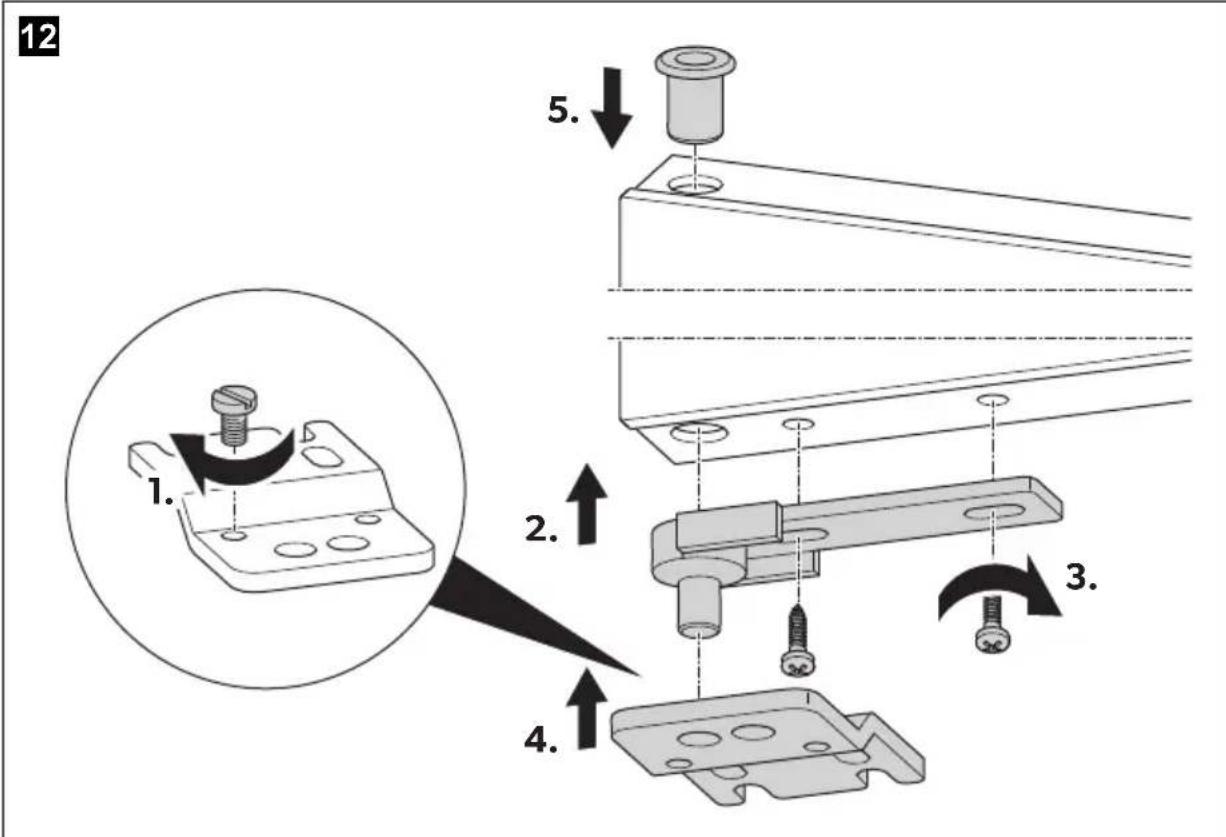
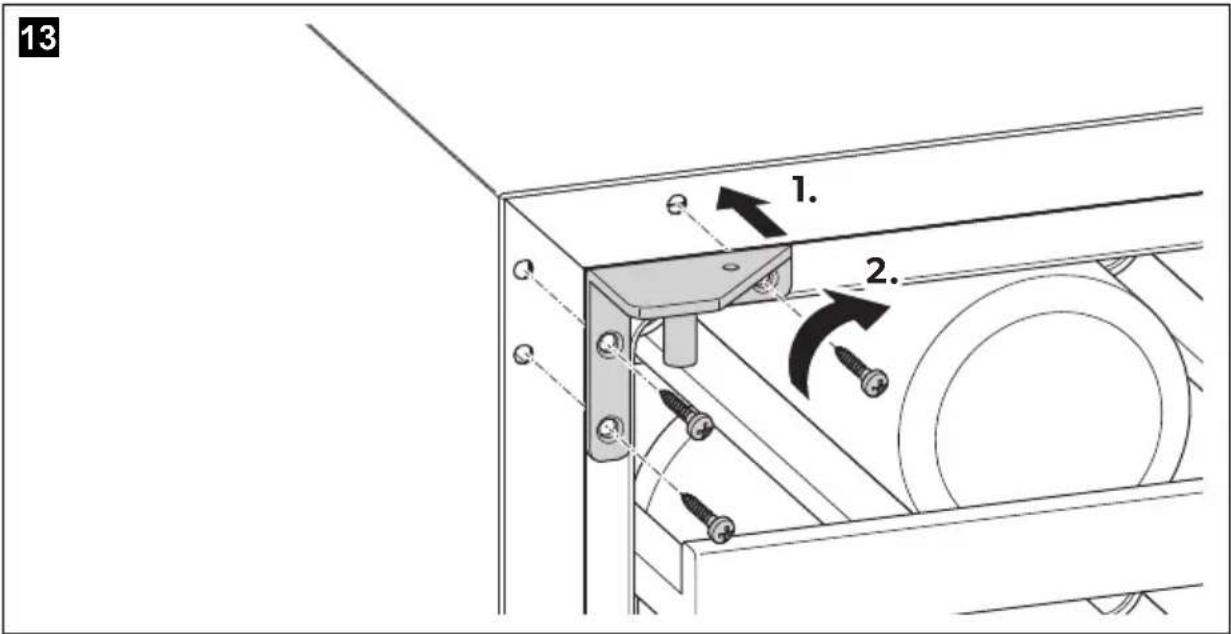
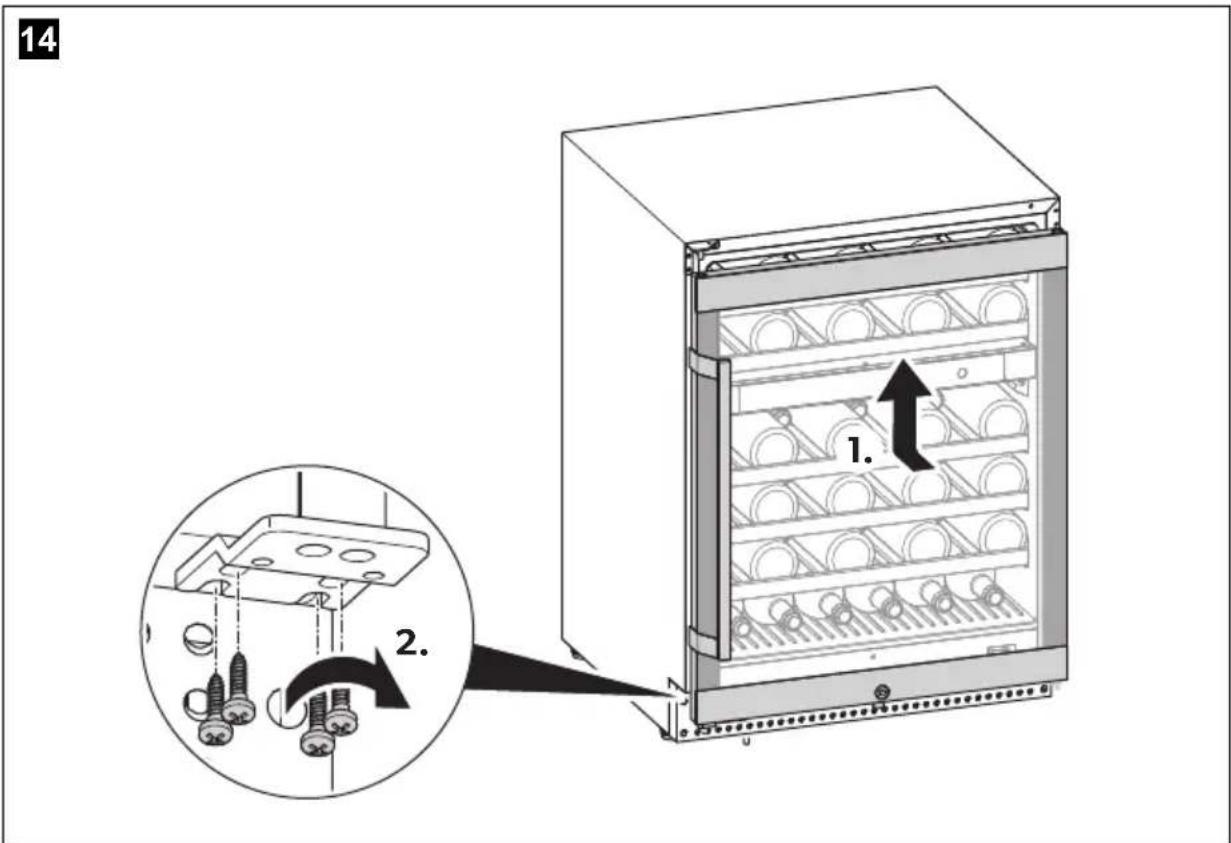
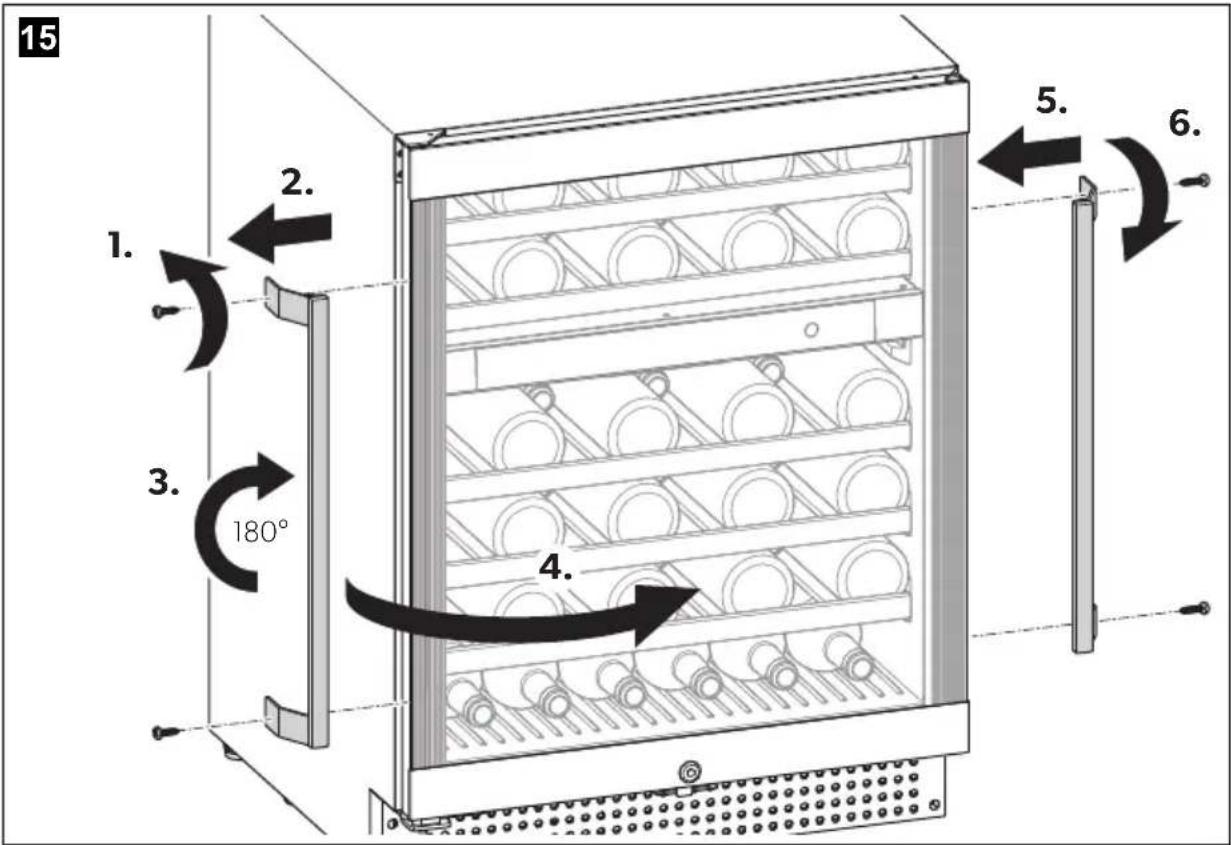
6.6 Changing the door hinge
You can change the hinge of the door, so that it opens to the left rather than the right.
- Proceed as shown to change the door hinge (fig. 9, page 7 to fig. 14, page 9).
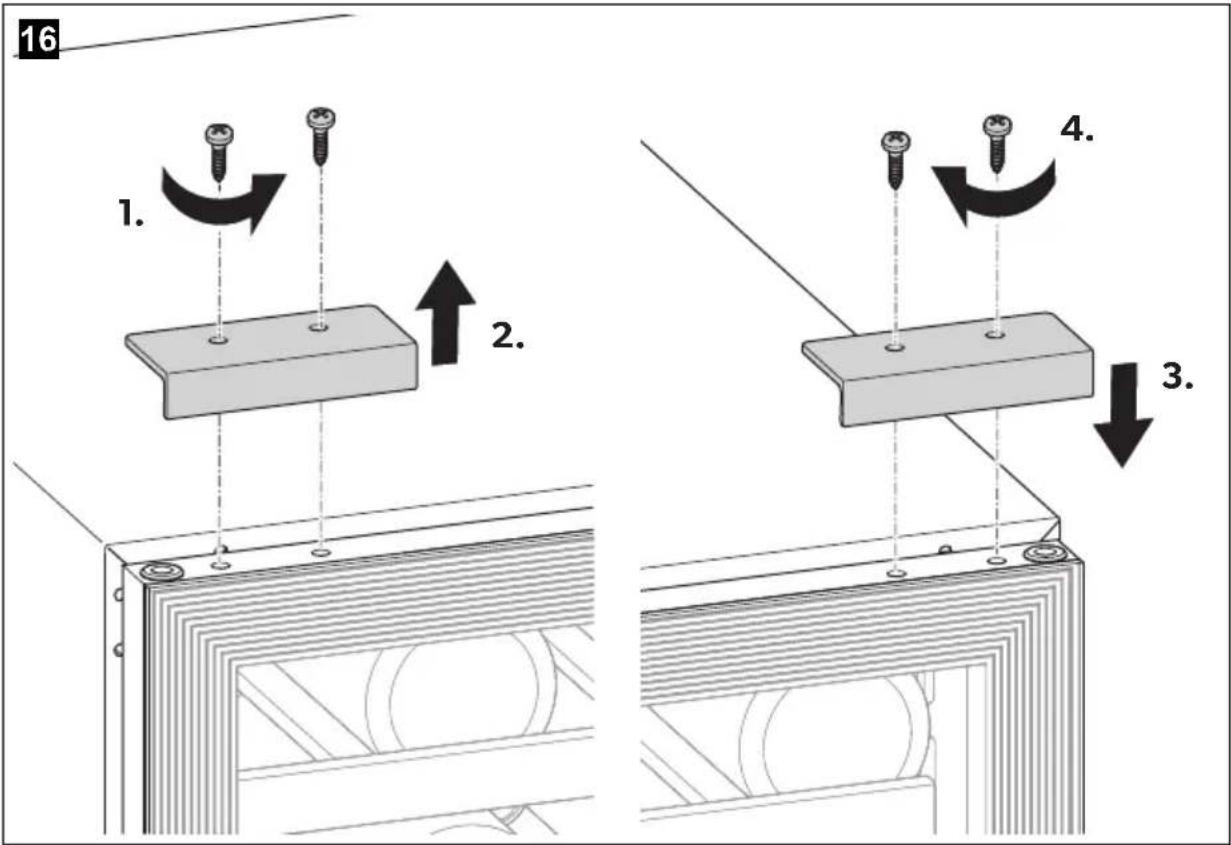
- Reverse the door handle (fig. 15, page 10 and fig. 16, page 10).
6.7 Connecting the wine cooler
Observe the following when connecting the wine cooler:
- Leave the wine cooler to stand upright for about 2 hours after transporting, before you connect it to the power supply. Otherwise this could cause faults in the cooling system.
- Connect the wine cooler to a circuit that is protected with 15 A.
- Have the socket and power circuit checked by a qualified electrician to ensure that the socket is earthed correctly. Do not use an extension cable or a multiple power socket.
- The power cable must rest securely behind the wine cooler and not be allowed to lie or hang unprotected.
- Ensure that the power cable is not jammed when pushing the wine cooler into place.
Connect the plug of the connection cable into the AC mains. The display turns on.
7 Operation
7.1 Before first use
Before first use, clean the wine cooler inside and outside with a damp cloth for hygienic reasons (see also chapter "Cleaning and maintenance" on page 29).
7.2 Storing bottles
Please note the following:
- Only store wine in wine bottles that are closed and still sealed.
- Do not overload the wine cooler.
- Do not cover the shelves with aluminum foil or any other objects, as this obstructs the air circulation.
- After a power cut or if the wine cooler has been switched off, wait 3 to 5 minutes before switching on the wine cooler again.
Position the bottles as shown in fig. 17, page 11 to fig. 20, page 12.
7.3 Saving energy
- Only open the wine cooler as often and for as long as necessary.
- Avoid unnecessarily low temperature settings.
- For optimal energy consumption, position the shelves and drawers according to their position on delivery.
- On a regularly basis, make sure the door seal still fits properly.
- Clean dust and dirt from the condenser at regular intervals.
7.4 Switching on and off
To switch on and off, press the button for at least 6 seconds.
7.5 Setting the temperature
To avoid food waste, note the following:
- Keep temperature fluctuation as low as possible. Only open the wine cooler as often and for as long as necessary. Store the wine bottles in such a way that the air can still circulate well.
- Adjust the temperature to the quantity and type of the wine bottles.
Setting the unit (°C or °F)
You can select whether the temperature is displayed in Fahrenheit or Celsius.
Press the and buttons simultaneously for 2 seconds. The unit is converted and the display shows the temperature in the selected unit.
Increasing and decreasing the temperature
The temperature can be set separately for the two zones.
Press the corresponding or button to set the temperature. The display flashes while you adjust the setting. Once you have set the temperature, the display shows the current temperature of the interior.

NOTE
When using the wine cooler for the first time or if it has not been used for a long time, the inner temperature could differ from the one you have set. The temperature display flashes as long as this is the case. Once the set temperature has been reached, the temperature display lights up constantly.
Checking the set temperature
Press the or button briefly. The set temperature is shown in the display for 5 seconds.
Then the display shows the current inner temperature again.

NOTE
In the event of an interruption to the power supply (power failure, switch over) the previous temperature settings are not saved. The temperature returns to the default temperature.
Monitoring the temperature
The warning signals prevent the temperature from falling or rising too much unnoticed, which could affect the quality of the wine. Once the wine cooler has reached the set temperature, the warning signal and the temperature display flashing stops.
A warning signal sounds and the temperature display flashes in the following cases:
- The inner temperature deviates from the set temperature by more than 5°C.
To switch off the warning signal prematurely:
Press the button briefly. - The temperature display flashes until the set temperature is reached. The display is then illuminated constantly and indicates that the alarm system is active again.
Storing and serving temperatures for wine
The recommended storing temperature for white wine and red wine is between 10°C and 14°C.
The serving temperature depends on the origin and grape.
| Region | Serving temperature | |
| White wine Red wine | ||
| Bordeaux 12°C 18°C | ||
| Bourgogne 10°C | 16°C | |
| Loire | 10°C | |
| Languedoc | 12°C 18°C | |
| Alsace grands crus | 12°C 16°C | |
| Piedmont, Tuscany | 10°C 18°C | |
| Rioja | 12°C | |
| Napa Valley 12°C 16°C | ||
| Australia | 10°C 16°C | |
| Chile | 10°C | |
| Liqueur wine | 8°C | |
| Champagne 6°C | - | |
7.6 Switching on and off the interior LED lamp
To switch on and off, press the button for at least 5 seconds.
7.7 Unlocking the buttons
To unlock the buttons, press the and buttons simultaneously.
7.8 Moving the cabinet shelves
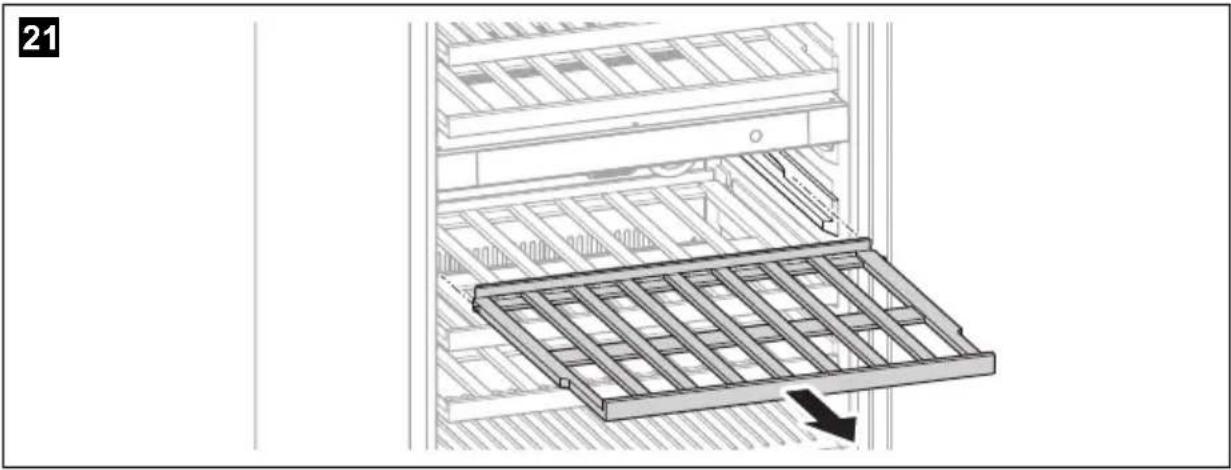
The shelves can be pulled out by a third so that you can reach the wine bottles easily.
The shelves have a limit stop to prevent them from being pulled out too far.
Proceed as shown to remove one of the shelves from the guide rail (fig. 21, page 13).
7.9 Defrosting
The wine cooler is equipped with an automatic defrost function.
7.10 Switching off and storing the wine cooler
If you do not intend to use the wine cooler for a long time, proceed as follows:
- Press the button until the wine cooler switches off.
- Disconnect the power cable.
- Clean the wine cooler (see chapter "Cleaning and maintenance" on page 29).
The door stays open thus preventing smells from arising.
8 Troubleshooting
If you are unable to solve a problem yourself, get in touch with a service agent.
| Fault Possible cause | Remedy | |
| The wine cooler does not work. | The wine cooler is not connected to a power supply. | Connect the wine cooler. |
| The wine cooler is switched off. | Switch the wine cooler on. | |
| The circuit breaker or fuse has blown. | Switch on the circuit breaker; switch on or replace the fuse. | |
Fault Possible cause Remedy
| The wine cooler is not cold enough. | The temperature is not set properly. | Check the set temperature. |
| The ambient temperature could require a higher temperature setting. | Set a higher temperature. | |
| The door was opened frequently. | Do not open the door more often than necessary. | |
| The door was not closed properly. | Close door properly. | |
| The door is not hermetically sealed. | Check the door seal and clean or replace. | |
| The wine cooler switches itself on and off. | The room temperature is higher than average. | Put the wine cooler in a cooler place. |
| The cabinet was recently replenished with new bottles. | Leave the wine cooler to work for a while until the set temperature has been reached. | |
| The door was opened frequently. | Do not open the door more often than necessary. | |
| The door was not closed properly. | Close door properly. | |
| The door is not hermetically sealed. | Check the door seal and clean or replace. | |
| The interior LED lamp does not work. | The wine cooler is not connected to a power supply. | Connect the wine cooler. |
| The circuit breaker or fuse has blown. | Switch on the circuit breaker; switch on or replace the fuse. | |
| The interior LED lamp was switched off on the control panel. | Switch on the interior LED lamp. |
Fault Possible cause Remedy
| The wine cooler vibrates. The wine cooler is not properly level. | Level out the wine cooler with the adjustable feet. | |
| The wine cooler seems to make a lot of noise. | The noise is probably caused by the refrigerant, which is nor- mal. At the end of each cycle, you will hear noises made by the flow of refrigerant. If temperature fluctuations occur, the contraction and expansion of the inner walls may cause popping and cracking noises. | |
| The wine cooler is not properly level. | Level out the wine cooler with the adjustable feet. | |
| The door does not close properly. | The wine cooler is not properly level. | Level out the wine cooler with the adjustable feet. |
| The door hinge was changed incorrectly. | Check the door hinge and reassemble correctly. | |
| The door seal is dirty. Clean the door seal. | ||
| The shelves are not fitted cor- rectly. | Check the shelves and refit correctly. | |
| The LED display shows EL or EH. | The temperature sensor for the air temperature inside the wine cooler shows an error. | This can only be repaired by a service agent. |
9 Cleaning and maintenance
WARNING! Risk of child entrapment
Before disposing of the wine cooler:
- Remove the door.
- Leave the shelves in the device so that children cannot climb inside.
9.1 Cleaning
WARNING! Electrocution hazard
Always disconnect the wine cooler from the mains before you clean and service it.

NOTICE! Damage hazard
- Do not use abrasive cleaning agents or hard objects during cleaning as these can damage the wine cooler.
- Never use hard or sharp tools to remove ice or to free objects frozen onto the device.
- Do not use any mechanical tools or any other tools to speed up the defrosting process.
Clean the wine cooler regularly and as soon as it becomes dirty with a damp cloth. Ensure that no water drips into the seals. This can damage the electronics. Wipe the wine cooler dry with a cloth after cleaning. Check the condensate drain regularly.
Clean the condensate drain when necessary. If it is blocked, the condensate collects on the bottom of the wine cooler.
9.2 Replacing the active charcoal filter
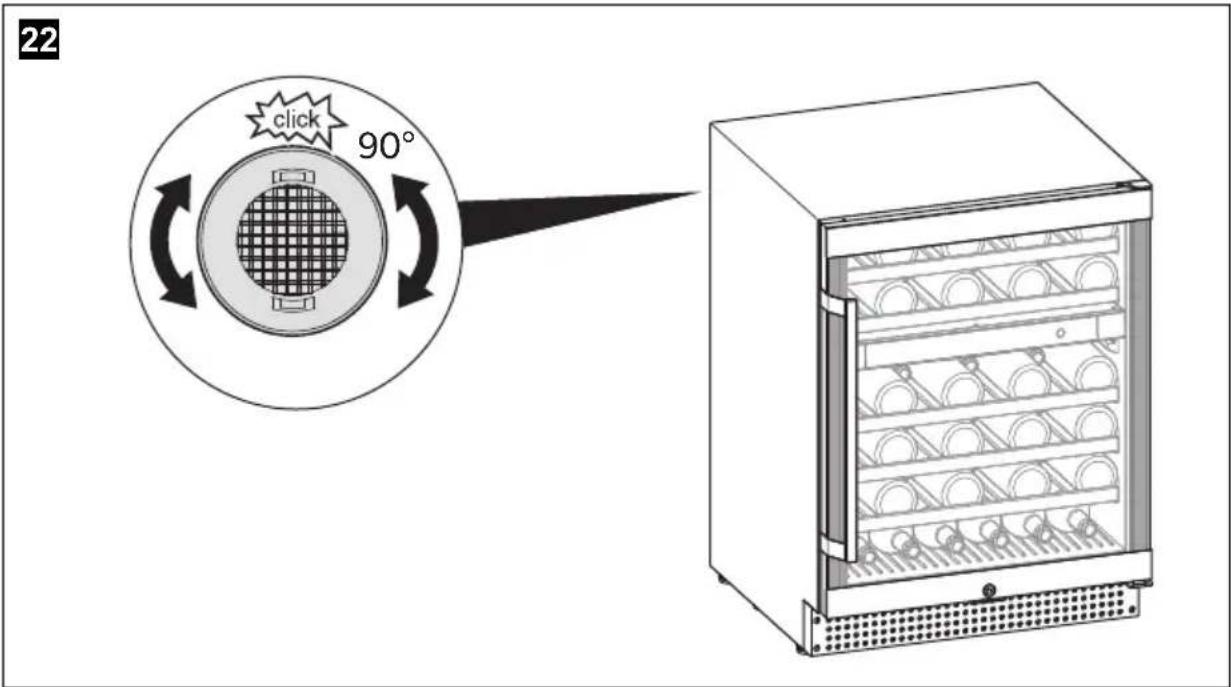
Replace the active charcoal filter with a new one once a year (fig. 22, page 13):
- Turn the filter 90° clockwise or anti-clockwise and remove it.
- Insert a new filter.
- Turn the filter 90° clockwise or anti-clockwise until it clicks into position.
10 Warranty
The statutory warranty period applies. If the product is defective, please contact your retailer or the manufacturer's branch in your country (see dometic.com/dealer).
For repair and warranty processing, please include the following documents when you send in the product:
- A copy of the receipt with purchasing date
- A reason for the claim or description of the fault
Note that self-repair or non-professional repair can have safety consequences and might void the warranty.
11 Disposal
Recycling products with non-replaceable batteries, rechargeable batteries or light sources
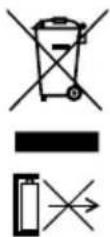
If the product contains any non-replaceable batteries, rechargeable batteries or light sources, you don't have to remove them before disposal. If you wish to finally dispose of the product, ask your local recycling center or specialist dealer for details about how to do this in accordance with the applicable disposal regulations. The product can be disposed free of charge.
Recycling packaging material

Place the packaging material in the appropriate recycling waste bins wherever possible.
12 Technical data
For the current EU declaration of conformity for your device please refer to the respective product page on dometic.com or contact the manufacturer directly (see dometic.com/dealer).
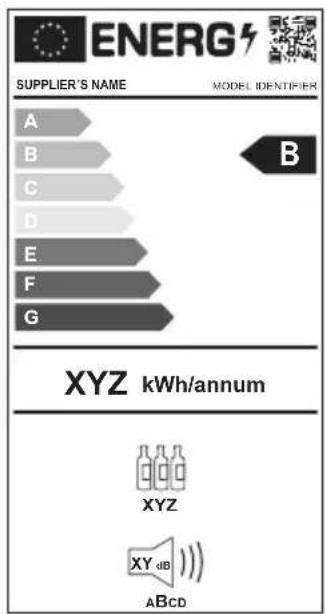
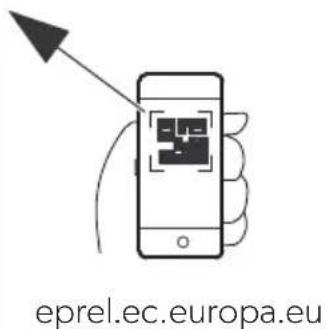
Further product information can be accessed via QR code on the energy label in the figures or via eprel.ec.europa.eu.
| C18B C46B | ||
| Input voltage: | 220 - 240 V~50 Hz | |
| Total volume: 55 l 128 l | ||
| Rated input power: 60 W 110 W | ||
| Energy consumption: 150 kWh/annum 160 kWh/annum | ||
| Climate class: | SN, N | |
| Storage temperature range: | ||
| - upper zone: | 4 °C to 12 °C | |
| - lower zone: | 12 °C to 22 °C | |
| Intended ambient tempera-ture use: | +10 °C to +32 °C | |
| Noise emission: | 39 dB(A) | |
| Propellant: Cyclopentane | ||
| Refrigerant: R600a | ||
| Dimensions (W x H x D): | see fig. 23, page 14 | see fig. 24, page 14 |
| Weight: 30kg 42kg | ||
| Test/certificates: | CEUKCA | |
| D18B D42B | D46B | ||
| Input voltage: | 220-240 V~50 Hz | ||
| Total volume: | 55 l | 120 l | 128 l |
| Rated input power: | 60 W | 110 W | 110 W |
| Energy consumption: | 150 kWh/annum | 158 kWh/annum | 160 kWh/annum |
| Climate class: | SN, N | ||
| Storage temperature range:- upper/left zone:- lower/right zone: | 4°C to 12°C12°C to 22°C | 4°C to 22°C4°C to 22°C | 4°C to 12°C12°C to 22°C |
| Intended ambient tempera-ture use: | +10°C to +32°C | ||
| Noise emission: | 39 dB(A) | ||
| Propellant: Cyclopentane | |||
| Refrigerant: R600a | |||
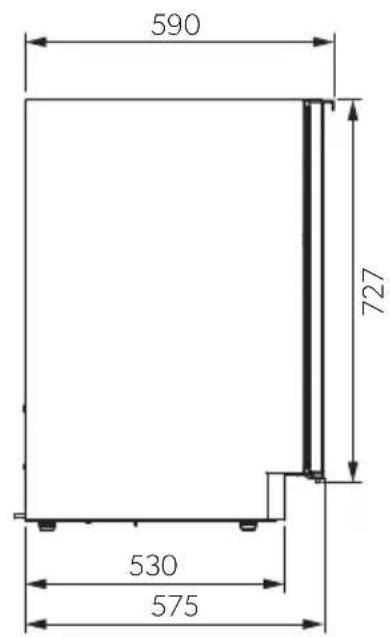
| Dimensions (W x H x D): | see fig. 23, page 14 | see fig. 25, page 15 | see fig. 24, page 14 |
| Weight: | 30 kg | 43.5 kg | 42 kg |
| Test/certificates: | CEUKCA | ||
Risk of overheating!
5 Technical description
7.5 Setting the temperature
7.5 Set the temperature
- Risk of overheating!
Indicates a situation that, if not avoided, may result in material damage.

NOTICE
6.3 Mounting the door handle
Mount the handle as shown in the figure (fig. 5, page 5 and fig. 6, page 5).
6.4 Adjusting the feet
Level the refrigerator horizontally using the height-adjustable feet (fig. 7, page 6).
6.5 Adjusting the ventilation grille
Adjust the height of the ventilation grille (Fig. 8, page 6).
6.6 Reversing the door
You can reverse the door so that it opens to the left instead of to the right.
- The hinge installation is carried out as follows (Fig. 9, page 7 - Fig. 14, page 9).
- Install the door handle on the opposite side (Fig. 15, page 10 and Fig. 16, page 10).
6.7 Connecting the wine cooler
When connecting the wine cooler, follow the instructions below:
- Before connecting the wine cooler to the electrical network, let it stand vertically for at least 2 hours. Failure to do so may lead to malfunctions in the cooling system.
- Connect the wine cooler to a socket protected by a 15 A fuse.
- The socket and power supply must be checked by a qualified electrician to ensure that the socket is properly grounded. Do not use extension cords or multi-socket adapters.
- The power cord must be securely fastened behind the wine cooler and must not lie or hang without protection.
- Insert the plug of the connected cable into the AC outlet. The display will light up.
The temperature can be set separately for two zones.
To set the temperature, press the corresponding buttons. The display will show the temperature during adjustment. After you set the temperature, the display will show the current temperature of the chamber.

NOTE
In case of power failure (power outage, switch replacement), the appliance will not retain the temperature settings in memory. The temperature will return to the default settings.
Temperature control
The shelf can be pulled out to the third stop to reach the bottles at the back.
The shelves have a stop so that they cannot be pulled out too far.
Act as shown in the figure to remove one of the shelves from the guide (fig. 21, p. 13).
7.9 Defrosting
The wine cooler is equipped with an automatic defrosting function.
7.10 Switching off and storing the wine cooler
If the wine cooler is switched off for an extended period, perform the following:
- Press the button to switch off the wine cooler.
- Connect the power cable.
- Clean the wine cooler (see section "Cleaning and Care" on page 215).
The door remains open, preventing the appearance of odors.
8 Troubleshooting
If you cannot solve the problem yourself, contact the service center.
dometic.com/sales-offices


- CONTENTS
- EXPLANATION OF SYMBOLS
- WARNING
- CAUTION
- NOTICE
- NOTE
- SAFETY INSTRUCTIONS
- GENERAL SAFETY
- WARNING! FAILURE TO OBEY THESE WARNINGS COULD RESULT IN DEATH OR SERIOUS INJURY
- ELECTROCUTION HAZARD
- FIRE HAZARD
- HEALTH HAZARD
- EXPLOSION HAZARD
- CAUTION! FAILURE TO OBEY THESE CAUTIONS COULD RESULT IN MINOR OR MODERATE INJURY
- RISK OF CRUSHING
- NOTICE! DAMAGE HAZARD
- OPERATING THE WINE COOLER SAFELY
- DANGER! FAILURE TO OBEY THESE WARNINGS WILL RESULT IN DEATH OR SERIOUS INJURY
- SCOPE OF DELIVERY
- INTENDED USE
- TECHNICAL DESCRIPTION
- OVERVIEW
- CONTROL ELEMENTS
- INSTALLATION
- SELECTING THE INSTALLATION LOCATION
- INTEGRATING FREE-STANDING WINE COOLERS
- MOUNTING THE DOOR HANDLE
- ADJUSTING THE FEET
- ADJUSTING THE VENTILATION GRILLE
- CHANGING THE DOOR HINGE
- CONNECTING THE WINE COOLER
- OPERATION
- BEFORE FIRST USE
- STORING BOTTLES
- SAVING ENERGY
- SWITCHING ON AND OFF
- SETTING THE TEMPERATURE
- SETTING THE UNIT (°C OR °F)
- INCREASING AND DECREASING THE TEMPERATURE
- CHECKING THE SET TEMPERATURE
- MONITORING THE TEMPERATURE
- STORING AND SERVING TEMPERATURES FOR WINE
- SWITCHING ON AND OFF THE INTERIOR LED LAMP
- UNLOCKING THE BUTTONS
- MOVING THE CABINET SHELVES
- DEFROSTING
- SWITCHING OFF AND STORING THE WINE COOLER
- TROUBLESHOOTING
- FAULT POSSIBLE CAUSE REMEDY
- CLEANING AND MAINTENANCE
- WARNING! RISK OF CHILD ENTRAPMENT
- CLEANING
- WARNING! ELECTROCUTION HAZARD
- REPLACING THE ACTIVE CHARCOAL FILTER
- WARRANTY
- DISPOSAL
- RECYCLING PRODUCTS WITH NON-REPLACEABLE BATTERIES, RECHARGEABLE BATTERIES OR LIGHT SOURCES
- RECYCLING PACKAGING MATERIAL
- TECHNICAL DATA
- RISK OF OVERHEATING
- SET THE TEMPERATURE
- REVERSING THE DOOR
- TEMPERATURE CONTROL
Brand : DOMETIC
Model : C46B
Category : Wine cellar