Geniale Semi-Automatic 3 Groups - Coffee machine LA PAVONI - Free user manual and instructions
Find the device manual for free Geniale Semi-Automatic 3 Groups LA PAVONI in PDF.

User questions about Geniale Semi-Automatic 3 Groups LA PAVONI
0 question about this device. Answer the ones you know or ask your own.
Ask a new question about this device
Download the instructions for your Coffee machine in PDF format for free! Find your manual Geniale Semi-Automatic 3 Groups - LA PAVONI and take your electronic device back in hand. On this page are published all the documents necessary for the use of your device. Geniale Semi-Automatic 3 Groups by LA PAVONI.
USER MANUAL Geniale Semi-Automatic 3 Groups LA PAVONI
natural_image
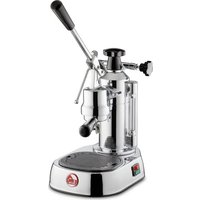
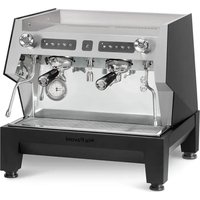
Exterior view of a modern espresso machine (no signage or text visible on the device itself)DESIDERIO V
text_image
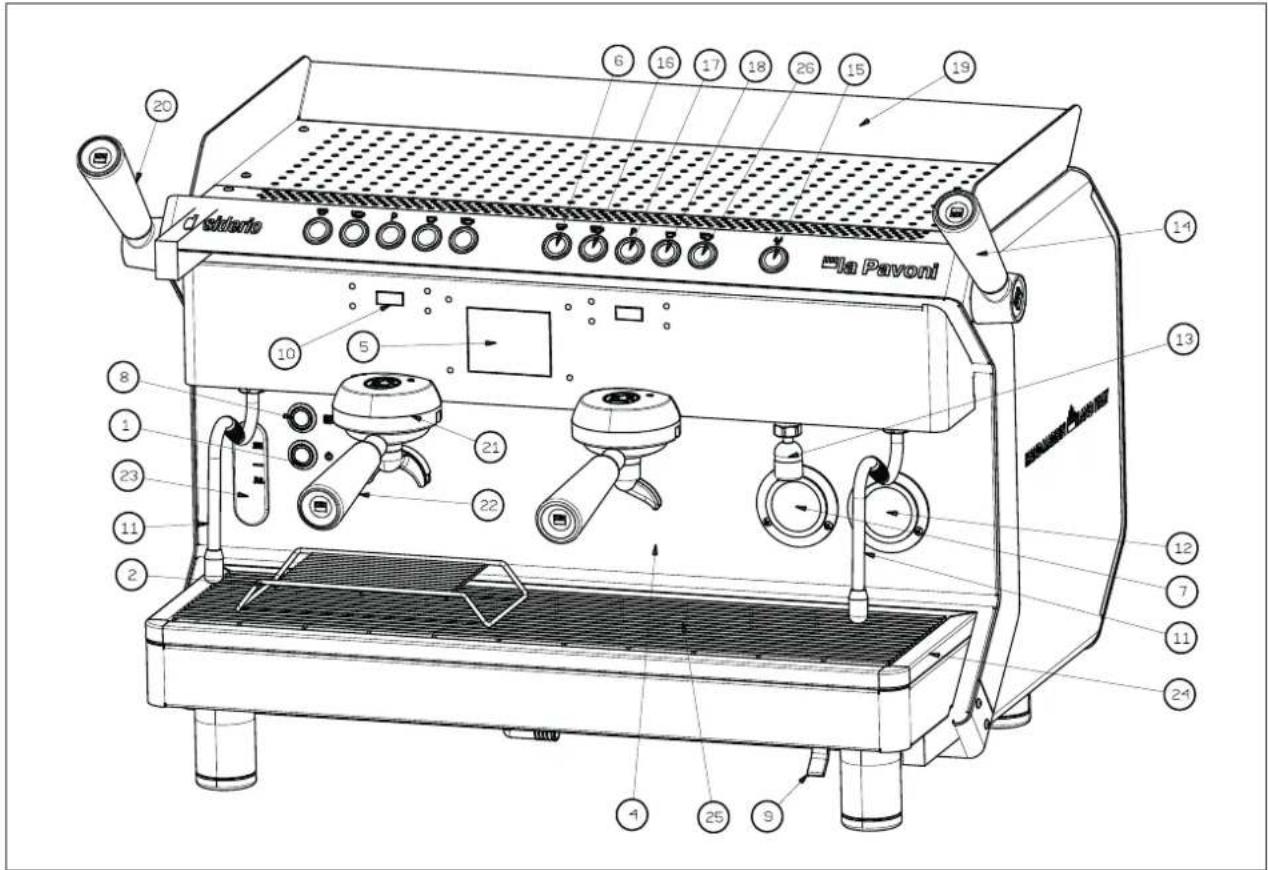
Sistario La Pavoni 19 18 17 16 15 14 13 12 11 10 5 21 22 8 1 23 11 2 4 25 9GENIALE V
text_image
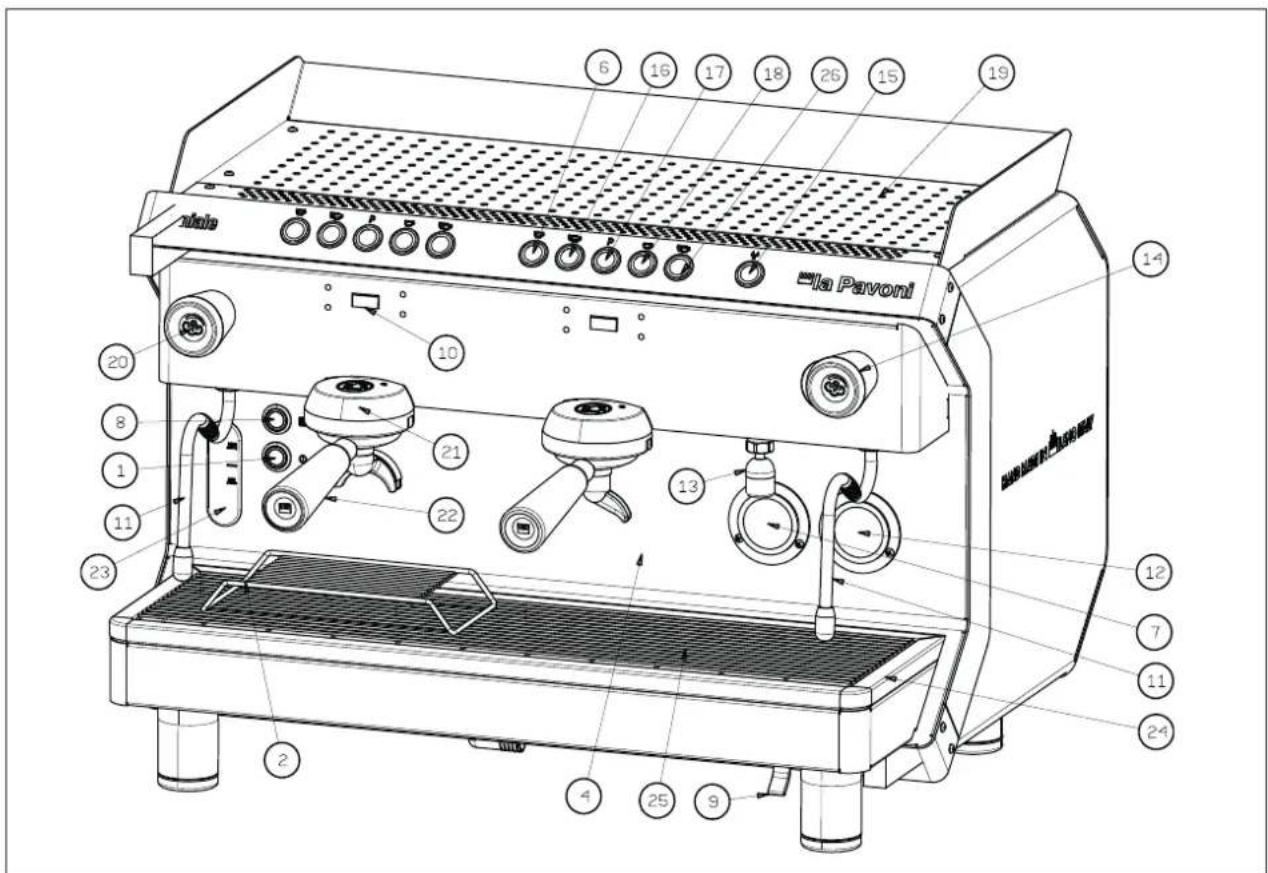
6 16 17 18 26 15 19 10 20 8 1 11 23 21 22 13 4 25 9 24 La PayoniGENIALE M
text_image
17 17 15 19 20 21 22 13 7 12 11 8 3 11 23 1 4 25 9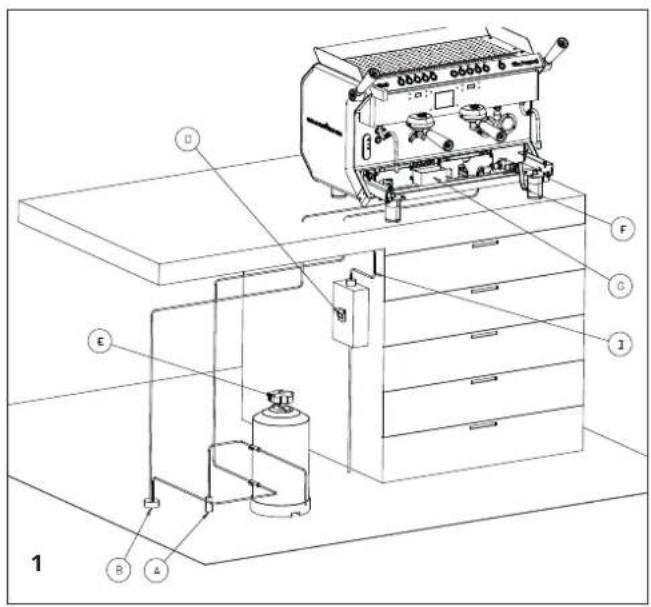
text_image
Technical diagram of a coffee machine setup with labeled components and piping connections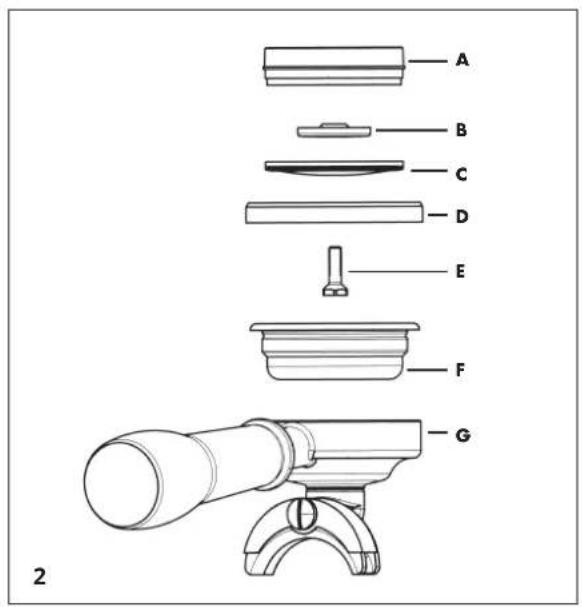
text_image
A B C D E F G 2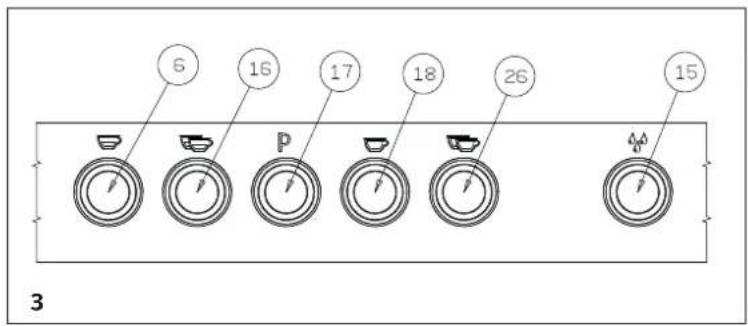
text_image
6 16 17 18 26 15 3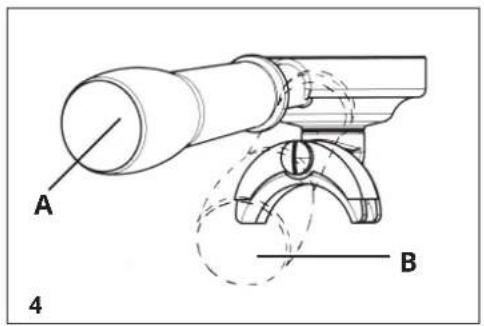
text_image
A B 4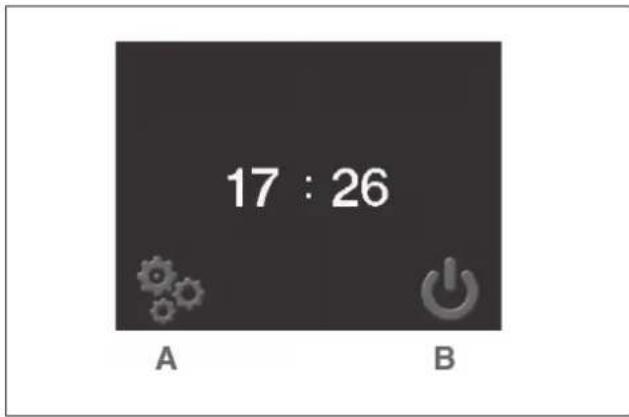
text_image
17 : 26 A B5
text_image
C 833 A D F E G8
text_image
A 81.5 °C B 94.0 °C C 61.4 °C 1 16 : 29 105 °C F G D 1 2 Se rossa attiva Red if active Si rouge active Aktiv, wenn rot Se rossa = pagina If red = screen Si rouge = page Wenn rot = Seite6
text_image
E F G H I L A D C B9
other
| Category | Temperature (°C) | Time (s) | |---|---|---| | A | 81.5 | 999 | | B | 94.0 | 75 | | C | 61.5 | 150 | | D | 180 | | | E | 8 | | | F | 17 | | G7
text_image
SETTINGS A B C D10
text_image
A LANGUAGE B F G C E D11
20098 San Giuliano Milanese (Mi) - Italy
Tel. +39.02.982171
Fax +39.02.9821787
Cod. Fiscale e P.IVA 00790800155
DICHIARAZIONE DI CONFORMITA' CE – EC DECLARATION OF CONFORMITY DECLARATION DE CONFORMITE CE - EG – KONFORMITÄTSERKLÄRUNG – DECLARACIÓ DE CONFORMIDAD CE
La Pavoni S.p.A.
Dichiara sotto la propria responsabilità che il prodotto: Macchina per caffè per uso professionale Declare that the following product: Espresso coffee machines for professional use Déclare que les produits suivants: Machines à café expresso pour usage professionnel Erklärt, dass die folgenden Produkte: Gewerbe Espresso Kaffeemaschinen Declara bajo nuestra responsabilidad que el producto: Máquina para café de uso profesional
Modello – Model – Modale – Modell – Modelo : DESIDERIO2VB – DESIDERIO2VN - DESIDERIO3VB – DESIDERIO3VN
al quale è riferita questa Dichiarazione, secondo quanto prescritto dalle direttive specifiche: to which this declaration relates is, according to the provisions of the specific directives:: à laquelle se réfère cette déclaration, selon les prescriptions des directives spécifiques: auf das sich diese Erklärung bezieht, Entsprechend der Vorschriften der spezifischen Richtlinien: al cual se refiere esta Declaración, de acuerdo con lo prescrito por las específicas directivas:
2014/35/UE ; 2014/30/UE ; 2014/68/UE
20098 San Giuliano Milanese (Mi) - Italy
Tel. +39.02.982171
Fax +39.02.9821787
Cod. Fiscale e P.IVA 00790800155
DICHIARAZIONE DI CONFORMITA' CE – EC DECLARATION OF CONFORMITY DECLARATION DE CONFORMITE CE - EG – KONFORMITÄTSERKLÄRUNG – DECLARACIÓ DE CONFORMIDAD CE
La Pavoni S.p.A.
Declare that the following product: Espresso coffee machines for professional use
to which this declaration relates is, according to the provisions of the specific directives::
It complies with the following norms:
text_image
ATTACCO MACCHINA DA CAFFE ATTACCO RETE IDRICA VALVOLA D NON RITORNOnatural_image
Close-up of a metallic screw and screw base on a surface, with a small triangular symbol drawn on the wall (no text or symbols present)
text_image
zone tattiliThis machine must only be used by adults who have carefully read and understood this manual and all the safety indications contained in it. The user is responsible for third-party liability within the operating area.
The installer, the user and the maintenance technician must notify the manufacturer of any defects or deterioration of the machine that may affect its initial level of safety.
The installer must make sure that the environmental conditions are correct (the room temperature must be between 5° and 35°C) and in order to guarantee user safety and hygiene the installer must avoid installing the machine in places where water jets are used. Installation must be carried out exclusively by authorised personnel who have specific technical knowledge, following the manufacturer's instructions and according to current regulations. The machine must be installed in premises where its use and maintenance are entrusted to qualified people.
For safety reasons, worn or damaged parts must be replaced promptly and with original spare parts.
Regularly check that the power cable is in good condition. Do not repair a damaged cable with tape or terminal blocks.
The power cable can only be replaced by the manufacturer or at an authorised service centre. It cannot be replaced by the user.
Do not expose the machine to atmospheric agents (sun, rain etc.).
If the machine remains unused for a long time at temperatures below 5^ C (five degrees centigrade), it may seriously damage or break the boiler piping and the boiler itself: drain the water circuit completely if the machine is not going to be used for a long time.
It is prohibited to remove the guards and/or safety devices on the machine.
The packaging should be taken to a proper waste disposal centre. Under no circumstances should it be left unattended where children, animals or unauthorized persons may have access to it. The manufacturer declines any liability for damage to property or injury to people or animals, due to interventions on the machine by unqualified or unauthorized persons.
Unauthorized repairs or the use of non-original spare parts will void the warranty and relieve the manufacturer of all liability.
The user must comply with the safety regulations in force in the country of installation in addition
to using common sense and making sure that periodic maintenance is carried out properly. The user must not touch the machine if he/she has wet or damp feet, or use it when bare footed. Even if the machine is earthed, we recommend using a wooden platform and a circuit-breaker system that complies with the local regulations in order to avoid the risk of electric shocks as far as possible.
Do not touch the boiler, the group heads, the filter-holder spouts, the hot water and steam wands with your hands or other parts of the body, since the liquids or steam dispensed are extremely hot and may cause scalding.
Do not operate the machine if there is no water in the reservoir.
Any obstructions may cause sudden jets of liquid or steam to be discharged and cause serious injuries. Use water filters and softeners to keep the water as clean as possible.
In the case of faults or malfunction, switch off the machine. Do not attempt to repair it yourself. Contact an authorised service centre.
Before carrying out cleaning or maintenance, disconnect the machine from the power supply using the main switch, turn off the mains switch and remove the plug from the power socket (without pulling the power cable); do not use water jets or detergents.
Cups should be thoroughly dried before being placed on the shelf provided.
This appliance must not be used by persons (including children) with reduced physical, sensory or mental capabilities or without sufficient experience and knowledge, unless appropriately supervised or instructed on the safe use of the appliance by a person responsible for their safety. Children must be supervised at all times to ensure they do not play with the appliance.
Instructions for use of models
DESIDERIO AND GENIALE
Dear Customer,
Thank you for having purchased one of our products, which has been manufactured using the latest technological innovations. By carefully following some simple instructions regarding the correct use of our product in compliance with the essential safety instructions indicated in this manual, you will be able to obtain the best performance and enjoy the remarkable reliability of this product over the years. In case of faults, please contact one of our Service Centres that are at your disposal from now on.
SYMBOLS USED IN THIS MANUAL
Important information is indicated by these symbols. It is imperative that you comply with these instructions.


Please read the instructions manual carefully before using the appliance!

Caution! Particularly important and/or dangerous operations.

Information (useful for using the appliance).

Advice.

Operations that can be carried out by the user.

Operations that should only be carried out by a qualified technician.

PRODUCT END-OF-LIFE INSTRUCTIONS
This product complies with EU Directive 2002/96/EC.
The symbol on the product or on its packaging indicates that this product may not be treated as household waste. It should be taken to an appropriate collection point for the recycling of electrical and electronic equipment provided by the local authorities. Alternatively, it can be returned to your retailer when you purchase a new equivalent appliance. The user is responsible for taking the appliance to the appropriate collection facilities at the end of its working life. Improper disposal of it may be punishable by law.
The correct disposal of the old appliance for recycling, treatment and environmentally sustainable disposal will help prevent potential negative effects on the environment and human health, and will help recycle the materials that make up the appliance.
For further details about recycling this product, please contact your local waste disposal service or the shop where you purchased it. The manufacturer and/or importer comply with their responsibilities regarding recycling, treatment and environmentally sustainable disposal both independently and by participating in collective back recycling schemes.
CONTENTS
| 1. | INSTRUCTIONS | MANUAL | - | USE | AND | STORAGE |
| 2. | MACHINE | FUNCTION | ||||
| 3. | INSTALLATION | |||||
| 3-1. | CONNECTING TO THE WATER SUPPLY | 20 | ||||
| 3-2. | ELECTRICAL CONNECTION | 21 | ||||
| 4. | MACHINE | DESCRIPTION | ||||
| 5. | STARTING THE MACHINE FOR THE FIRST TIME | 22 | ||||
| 5-1. | PRESSURE SWITCH (GENIALE "M" VERSION ONLY) | 22 | ||||
| 6. | PREPARING | COFFEE | ||||
| 7. | DISPENSING | COFFEE | ||||
| 7-1. | MODEL DESIDERIO "V" | 23 | ||||
| 7-2. | MODEL GENIALE "V" | 23 | ||||
| 7-3. | MODEL GENIALE "M" | 23 | ||||
| 8. | TOUCH SCREEN DISPLAY PROGRAMMING INSTRUCTIONS | 23 | ||||
| 8-1. | IDLE-OFF DISPLAY (FIG. 5) | 23 | ||||
| 8-2. | SCREEN 1 DISPLAY (FIG. 6) | 24 | ||||
| 8-3. | SCREEN 2 DISPLAY (FIG. 7) | 24 | ||||
| 8-4. | SCREEN 3 DISPLAY (FIG. 8) | 24 | ||||
| 8-5. | SCREEN 4 DISPLAY | 24 | ||||
| 8-6. | PASSWORD SCREEN DISPLAY (FIG. 9) | 24 | ||||
| 8-7. | PROGRAMMING MENU SCREEN (FIG. 10) | 24 | ||||
| 9. | PROGRAMMING | AND | COFFEE | DOSING | INSTRUCTIONS | |
| 9-1. | WATER DOSE PROGRAMMING INSTRUCTIONS | 25 | ||||
| 9-2. | SPECIAL PUSH-BUTTON PANEL FUNCTIONS - MODEL "DESIDERIO" | 25 | ||||
| 9-3. | SPECIAL PUSH-BUTTON PANEL FUNCTIONS - MODEL "GENIALE V" | 25 | ||||
| 10. | DISPENSING | COFFEE | ||||
| 10-1. | PRE-INFUSION | 27 | ||||
| 11. | DISPENSING | HOT | WATER | |||
| 11-1. | MODELS WITH HOT WATER DISPENSING BUTTON | 27 | ||||
| 12. | PREPARING | OTHER | DRINKS | |||
| 12-1. | MILK, CAPPUCCINO AND OTHER HOT DRINKS | 27 | ||||
| 12-2. | TEA, CAMOMILE TEA | 27 | ||||
| 13. | CLEANING | AND | MAINTENANCE | |||
| 13-1. | CLEANING THE STEAM WANDS | 27 | ||||
| 13-2. | DAILY CLEANING | 27 | ||||
| 14. | WEEKLY | CLEANING | ||||
| 14-1. | CLEANING THE GROUP HEAD AND SPOUTS | 27 | ||||
| 14-2. | CLEANING THE FILTERS AND FILTER HOLDERS | 27 | ||||
| 14-3. | CLEANING THE LOWER DRIP TRAY | 28 | ||||
| 14-4. | CLEANING THE OUTSIDE OF THE MACHINE | 28 | ||||
| 15. | REPLACING THE GROUP HEAD GASKET | 28 | ||||
| 16. | REPLACING THE WATER IN THE BOILER | 28 | ||||
| 17. | USING | THE | WATER | SOFTENER | ||
| 18. | SCRAPPING | THE | MACHINE | |||
| 19. | TROUBLESHOOTING | 30 | ||||
20

26
2
2
27
2
1. INSTRUCTIONS MANUAL - USE AND STORAGE
This instructions manual is intended for the user, the owner of the machine and for the technician in charge of installation, and must always be available for reference.
The purpose of the instructions manual is to indicate the intended use of the machine according to its design, its technical characteristics and to provide instructions for its correct use, cleaning and regulation. It also provides important instructions regarding maintenance, residual risks and any operations that need to be carried out with particular care. This manual should be considered part of the machine and should be KEPT FOR FUTURE REFERENCE until the machine is scrapped. If it is lost or becomes damaged, you can request a replacement to the manufacturer or your dealer, indicating the machine model and serial number shown on the identification plate. This manual reflects the state of technology at the time it was written. The manufacturer reserves the right to make any necessary technical modifications to its products and to update the manuals with no obligation to revise previous versions.
LA PAVONI S.p.A. declines any liability for damage or injury that may be caused directly or indirectly to people or property due to:
•the failure to comply with all the requirements of current safety regulations
- incorrect installation
•defective power supply
- improper or incorrect use of the coffee machine
•use other than that specified in this publication
- lack of or incorrect scheduled and recommended maintenance
•unauthorised modifications or repairs
•the use of non original or non model-specific spare parts
- complete or partial failure to follow the instructions
•exceptional events
2. MACHINE FUNCTION
This appliance has been designed for professional use to prepare espresso coffee using coffee blends, to produce hot water and/or steam and to prepare hot milk. Its components are made of non-toxic and durable materials and are easily accessible for cleaning and maintenance.
In order for the machine to be used properly, the operator must have carefully read and understand the instructions provided in this booklet.
3. INSTALLATION
(Fig. 1)
A. Water supply
B. Drain conduit
D. Circuit breaker
E. Water softener
F. Boiler supply tap
G. Drip tray
I. Power cable
Before installing, make sure that:
• there are no dents, bumps or deformations
- there are no wet areas or other signs that may indicate that the packaging has been exposed to bad weather
- there are no signs that it has been tampered with
After making sure that the machine has been transported correctly, proceed with the installation.
Make sure that the machine can be installed on a flat surface suitable for supporting its weight, at a minimum height of 90 cm and that there is a clearance of at least 30 cm around the machine. Then install the machine, following the steps in the order described below.
3-1. CONNECTING TO THE WATER SUPPLY

The machine must be supplied with water with hardness greater than 8^ F. It is not possible to use pipes and gaskets that have already been used.

it is recommended that you install a water softener on the machine water supply system.
Make sure that the water in the water supply that you will be connecting the machine to is potable. This appliance should be connected to the water supply in compliance with the national legislation of the country in which it is used.
The maximum inlet pressure to the machine from the water supply must not exceed 0,65MPa.
- Connect the water softener (E) to the water
supply (A).

Before connecting the water softener to the machine, carry out a washing cycle until the water is clear and then connect the water softener to the machine.
Connect the drip tray (G) to the drain conduit (B). If the mains water pressure is higher than 0.5 Mpa (5 bar), it is recommended to install a balanced pressure regulator for high pressures (a device that prevents an increase in supply pressure from affecting the output pressure).
3-2. ELECTRICAL CONNECTION

text_image
COFFEE MACHINE CONNECTION WATER SUPPLY CONNECTION NON-RETURN VALVE
Before connecting the machine to the power supply, make sure that the voltage is the same as that indicated on the CE plate.
Make sure that the mains supply is suitable for the power requirements of the machine (see section 4 - technical specifications table).
Connect to an earth socket that complies with current regulations.
Make sure that the power cable is working correctly and that it complies with national and European safety regulations.
The user is responsible for installing a suitable safety switch (circuit breaker) on the power line to the machine according to the regulations in force in the country of use.
Connect the power cable (I) to the power line using a multi-pole circuit breaker (D) with a distance between contacts of at least 3 mm for disconnecting the mains power supply.
To change voltage, please refer to the diagram on the box of the main switch.

It is compulsory to connect the yellow/green cable to the earthing system of the premises.
The machine is fitted with an equipotential bonding terminal under the drip tray next to the following symbol
The terminal can be used to connect power cables from 2.5 mm to 6 mm with ring terminals for M6 screws.
natural_image
Interior view of a bathroom sink with a glass lamp and a paper drawing on the wall (no visible text or symbols)
The single-phase connection of the coffee machine is only allowed in premises that have an electrical system with an impedance adequate for the adsorbed current of the appliance.
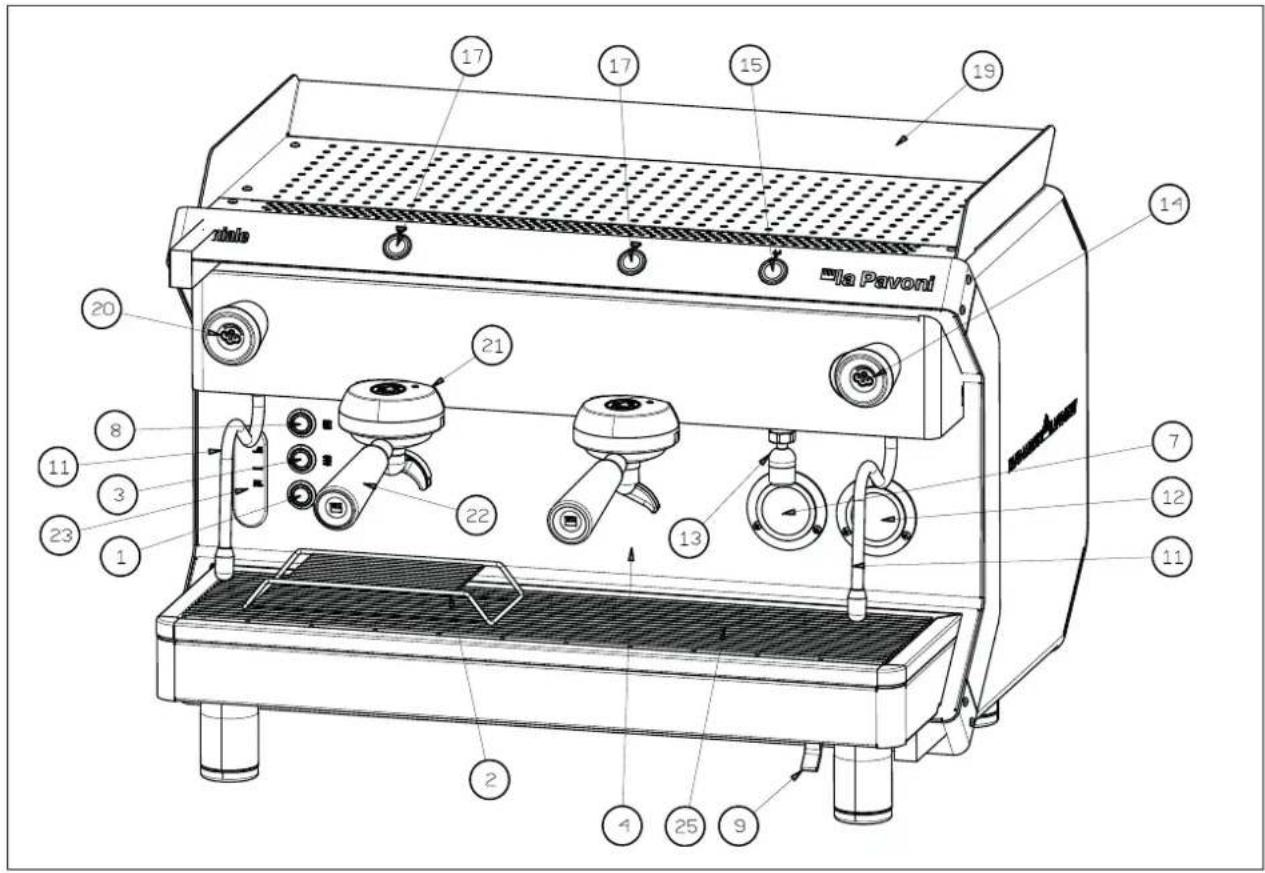
4. MACHINE DESCRIPTION
- ON / OFF switch
- Coffee cup rest
- Heating element on
- Front panel
- Touch screen display
6.1 normal coffee - Boiler pressure gauge
- Cup warmer illuminated switch
- Manual boiler water filling button
- Timer display
- Steam nozzle
- Pump pressure gauge
- Hot water dispensing tap
- Steam knob/lever
- Hot water dispensing button
- 2 normal coffees
- Stop group head controls/Continuous delivery
- 1 long coffee
- Cup warmer shelf
- Steam knob/lever
- Group head
- Filter holder
- Water level indicator
- Drip tray
- Drip tray grid
- 2 long coffees
5. STARTING THE MACHINE FOR THE FIRST TIME
Once the hydraulic and electrical connections have been completed, the machine can be started up.
Open the water tap (A).
Turn off the circuit breaker (D).
Press the power on button (1); the power on light will come on.
The automatic water level device will start filling the boiler with water until it automatically reaches an intermediate position between MIN and MAX on the level indicator (23).
Once the automatic water filling procedure is complete, press the maximum power button (3) to switch on the heating element to heat the water (Geniale "M" version only).
Wait for the machine to reach the operating pressure of 1.1 ÷ 1.3 bar, checking the pressure of the boiler on the pressure gauge (7).
If the machine does not stabilise at the values indicated, you should adjust the pressure switch as indicated in paragraph 6.1.
Check the pressure on the pump pressure gauge (12) by operating a group head with the filter holder inserted and full of properly ground, dosed and pressed coffee, to obtain an effective operating pressure of 8/9 bar.
If you need to adjust the pump pressure, follow the instructions in paragraph 6.2.
The machine is now ready for use.
The automatic water level device will start filling the boiler with water until it reaches the pre-set level; the level of water in the boiler is checked automatically and will be topped up automatically to the required level.
Regularly check the amount of water in the boiler, which should not fall below the MIN level of the indicator (23); if necessary, top up the level by pressing the boiler water filling button (9).

If there is no water in the boiler when the machine is in operation, the heating element will fail. This must be replaced by an authorised service centre.
During start-up:
when the boiler pressure gauge (7) indicates approximately 0.5 bar, slowly open the steam knoblever (14-20) to discharge any air that may be contained in the boiler. Wait until steam starts to come out of the steam wand (11) before closing it. Wait until the machine reaches the operating pressure and the correct thermal balance, after 35-45 minutes.

Do not press the hot water dispensing button or turn the tap before the correct operating pressure of 1.1 bar has been reached, indicated on the boiler pressure gauge (7).
5-1. PRESSURE SWITCH (Geniale "M" version only)
The function of the pressure switch shown in the figure is to keep the pressure in the boiler constant by activating or deactivating the electric heating element.
The pressure switch is adjusted to 1.1 ÷ 1.3 bar when the machine is tested.
6. PREPARING COFFEE
To obtain a good cup of espresso coffee, it is important that you use good quality, well roasted and correctly ground coffee. Grinding is optimal when it takes 15-18 seconds for one cup and 30-35 seconds for two cups to be delivered. Coffee should be ground just before it is used. Once ground, coffee loses its flavour very quickly. If the coffee is too coarsely ground, the coffee will be light coloured and weak without froth and if the coffee is too finely ground the espresso will be dark and strong with little froth. Warm cups help maintain the coffee at the right temperature. We therefore recommended that before using them, you place the cups on the cup warmer shelf (19), which will be warmed by the heat given off from the boiler.
On machines fitted with an electric cup warmer, cups are pre-heated by pressing the button (8); the light inside the button will turn on to indicate that the cup warmer is in operation. Press the button (8) again to switch off the cup warmer.

Do not cover the cup-warming shelf with fabrics, felt etc.
After placing the filter in the filter holder (22), fill the filter with the amount of coffee required for 1 or 2 cups (7 g - 14 g), then level the coffee and compact it using the tamper. Remove any coffee residues from the edge of the filter using the palm of your hand and insert the filter holder into the group head (21), moving it towards the right to secure it.
Place the cups under the spouts and start to dispense coffee using the group head control lever (17).
Once the required amount of coffee has been dispensed, stop delivery using the group head control (17) and leave the filter-holder in place.
To prepare additional cups of coffee, remove the filter holder (22) from the group head by moving it towards the left, empty the coffee grounds into the drawer and repeat the steps described above.

Do not touch the group heads or the steam and hot water nozzles when the machine is in operation and do not place your hands under the groups or nozzles during delivery in order to avoid possible scalding.
It is recommended to leave the filter holders, together with the filters and coffee grounds, in the group head so that the filter holder will always be at the right temperature.

When the machine is new, the filter holder may not be aligned (perpendicular to the machine) as shown in the figure. However, this however does not prevent the machine from working properly. After being used for a short time, the filter holder will gradually become settled in the correct position.
(Fig. 4)
A. Position of the closed filter holder when the machine is new.
B. Position of the closed filter holder after the machine has been in use for a short time.
7. DISPENSING COFFEE
7-1. MODEL DESIDERIO "V"
Espresso coffee machine with electronic dosing and temperature control for each group head and boiler using PID temperature control technology. Touch screen display for the dispensing controls with four programmable coffee settings, timed hot water dispensing.
Timer display for displaying the temperature of the group heads and coffee dispensing times. Reinforced steel illuminated buttons for dispensing coffee and hot water.
7-2. MODEL GENIALE "V"
Espresso coffee machine with electronic dosing and PID technology boiler temperature control. Timer display for displaying the temperature of the boiler and coffee dispensing times.
Reinforced steel buttons for controlling delivery, with four programmable coffee settings, timed hot water dispensing.
7-3. MODEL GENIALE "M"
Espresso coffee machine with semi-automatic continuous delivery group heads with solenoid valve.
Coffee is dispensed by pressing the illuminated switch (17).
The switch will start the electric pump to deliver water under pressure and a solenoid valve to open the group head to allow the heated water to wet the coffee to pre-infuse and then infuse it. Once the required amount of coffee has been obtained, press the illuminated switch again to stop delivery.
8. TOUCH SCREEN DISPLAY PROGRAMMING INSTRUCTIONS (MODEL "DESIDERIO V" ONLY)
tactile areas
natural_image
Abstract geometric pattern with connected dots and lines forming a grid-like structure (no text or symbols)tactile areas
Programming can be carried out using the touch screen display (5).
The figure below shows the 8 tactile zones with which you can interact and move around the various menus on the display.
8-1. IDLE-OFF DISPLAY (Fig. 5)
The touch screen display (5) in IDLE-OFF mode appears as follows:
A - access TECHNICAL PROGRAMMING
B - switch on machine
8-2. SCREEN 1 DISPLAY (Fig. 6)
The touch screen display (5) in IDLE-ON mode appears as follows (screen 1):
A - group head 1 temperature and heating element on, alarms AL1, AL2, AL3
B - group head 2 temperature and heating element on, alarms AL1, AL2, AL3
C - group head 3 temperature and heating element on, alarms AL1, AL2, AL3
AL1 - group temperature probe short circuited
AL2 - group head temperature probe failure
AL3 - no impulses from group head volumetric meter
D - steam boiler temperature and heating element on
F - steam boiler level
G - selected screen (in red)
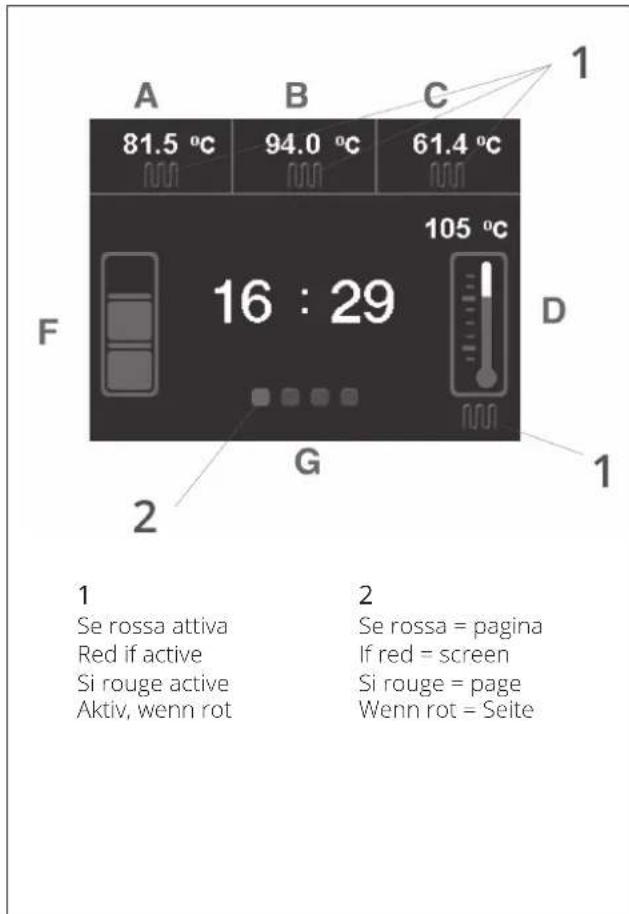
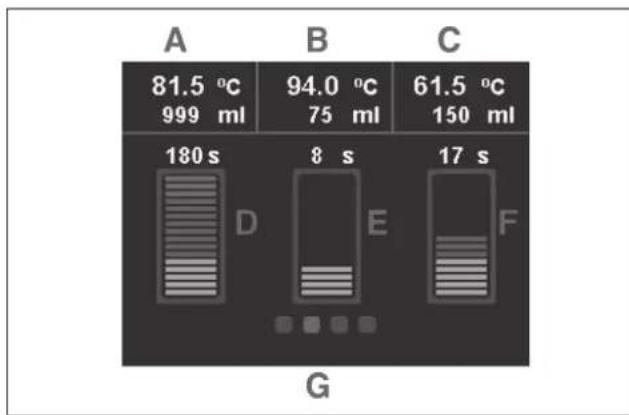
8-3. SCREEN 2 DISPLAY (Fig. 7)
When the second screen is accessed, the touch screen display (5) appears as follows:
A - group head 1 temperature and amount of coffee dispensed in ml
B - group head 2 temperature and amount of coffee dispensed in ml
C - group head 3 temperature and amount of coffee dispensed in ml
D - group head 1 dispensing time
E - group head 2 dispensing time
F - group head 3 dispensing time
G - selected screen (in red)
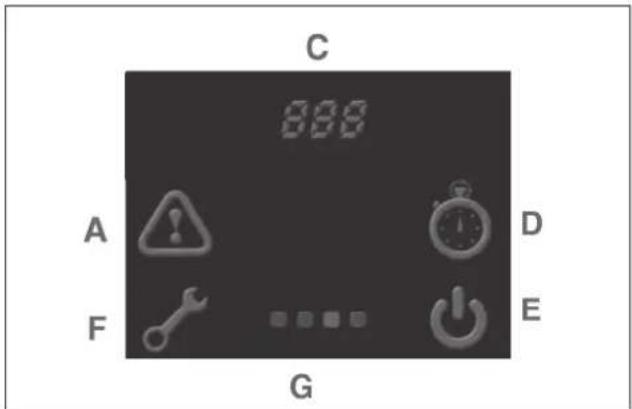
8-4. SCREEN 3 DISPLAY (Fig. 8)
When the third screen is accessed, the touch screen display (5) appears as follows:
A - alarm display
C - number of coffees dispensed
D - automatic switch on
E - machine switching off
F - total drinks dispensed
G - selected screen (in red)
8-5. SCREEN 4 DISPLAY
The customer's name/logo is shown on screen 4. The PROGRAMMING screen can be accessed from the IDLE-OFF screen via the specific icon (see previous pages) after entering the password.
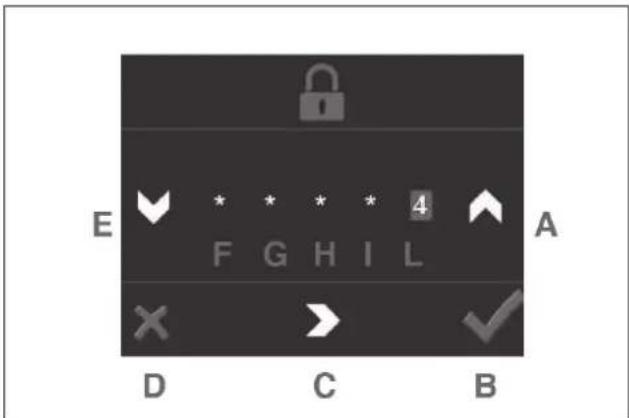
8-6. PASSWORD SCREEN DISPLAY (Fig. 9)
A - increase value
B - enter
C - forward
D - back
E - decrease value
F - first digit of password
G - second digit of password
H - third digit of password
I - fourth digit of password
L - fifth digit of password
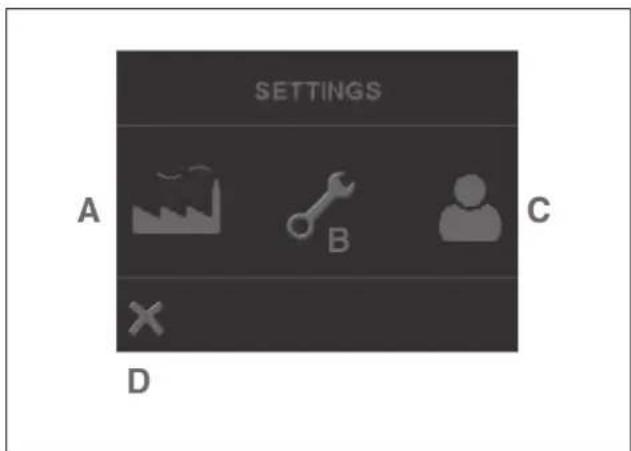
8-7. PROGRAMMING MENU SCREEN (Fig. 10)
The programming parameters are divided into 3 levels protected by passwords to ensure that "critical" parameters can only be accessed by authorized personnel.
•Factory level: allows access to all parameters
- Technical level: allows access to technical and barman parameters
- Barman/Operator level: only allows access to barman parameters
A - FACTORY parameters
B - TECHNICAL parameters
C - BARMAN parameters (password 33333 not to be disclosed)
D - back
The following screens can be found in the BARMAN menu (password 33333)
•Language
- Date
•Time
•Day Week
- Enable Pre-infusion: ON (default)
•Maintenance Cycles: 0000 (default)
- Units of measure Temperature: °C (default)
•Machine Name: DESIDERIO
- Steam boiler temperature (T°SET): 120°C (default)
•Group head 1 temperature (T°SET): 89°C (default)
•Group head 2 temperature (T°SET): 89°C (default)
- Group head 3 temperature (T°SET): 89°C (default)
•Max. litres for filter warning alarm: 0000 (default)
•Economy Temperature for steam boiler: 105°C (default)
- Wait time before switching to economy (eco): 120 MIN (default)
•Economy temperature for group heads: 75°C (default)
Change password
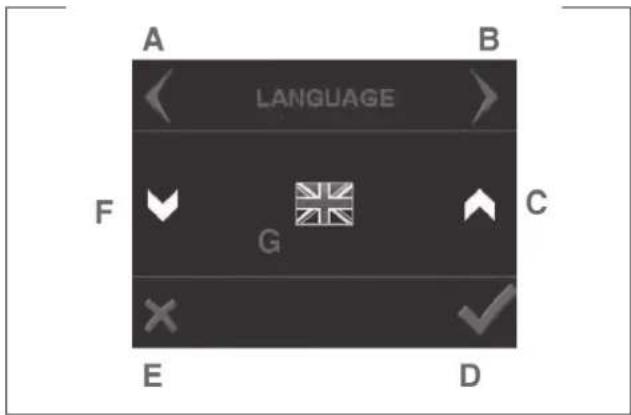
Example screen (Fig. 11)
A - Scroll menu BACKWARDS
B - Scroll menu FORWARDS
C - INCREASE value
D - ENTER
E - BACK
F - DECREASE value
G - the parameter to modify
9. PROGRAMMING AND COFFEE DOSING INSTRUCTIONS (DESIDERIO AND GENIALE "V" MODELS) (Fig. 2)
Button function:
-
1 normal coffee
-
2 normal coffees
- 1 long coffee
- 2 long coffees
- Stop group head controls / continuous delivery.
The button (17) is used for continuous delivery and to stop delivery.
Therefore the machine has a double function:
- A. Pressing button (17) will make the machine operate in semi-automatic mode.
•B. Pressing the 4 selection buttons will make the machine operate in electronic volumetric dosing mode.
Pressing and holding the button (17) for 5 seconds will make the machine switch to programming mode, which will be indicated by the slow flashing of the LED.
Release the programming button (the LED will continue to flash); within 30 seconds press the button of the group head on which you wish to program coffee dosing. Once the required dose has been reached, press any button of the same group head to stop delivery. The dose will be stored in the memory and the machine will exit from programming mode (the flashing LED will switch off).
- This should be repeated for the remaining selection buttons of the various group heads.
- Repeat the same procedure if you wish to increase or decrease the set dose.
- Programming the first group head on the left will copy the settings onto the other group heads. This does not prevent you from using procedure described above to program the remaining group heads independently from the first one.
9-1. WATER DOSE PROGRAMMING INSTRUCTIONS
Pressing and holding the button (17) for 5 seconds will make the machine switch to programming mode; release the programming button (the LED will continue to flash). Press the hot water dispensing button (15) within 30 seconds; hot water will start to be dispensed from the tap (13); once the required dose has been reached, press the hot water delivery button to stop the water. The LED will switch off, the dose will be stored in memory and the machine will exit from programming mode.
9-2. SPECIAL PUSH-BUTTON PANEL FUNCTIONS - MODEL "DESIDERIO"
A. Machine switching off
When the machine is on, you can switch to IDLE-OFF mode by pressing and holding the button (17) and then the button (18) immediately afterwards. Press the button (18) to switch the machine on again.

The following combination works on the control panel for the first group head.
B. Switching the heating for individual group heads on and off
The heating of the individual group heads can be switched off by pressing and holding the button (17) and then the button (16) immediately afterwards.
To switch the heating on again, press the button (17) and then the button (16) immediately afterwards.
C. Washing
A wash cycle can be activated for each group head by pressing and holding the button (17) and then the button (6) immediately afterwards.
The solenoid valve and the pump of the selected group head will function for 5 consecutive delivery cycles of approximately 10 seconds each; with a 3-second pause between cycles.
9-3. SPECIAL PUSH-BUTTON PANEL FUNCTIONS - MODEL "GENIALE V"
Carry out the settings from group head 1 push-button panel.
- Machine switching off
When the machine is on, you can switch to IDLE-OFF mode by pressing and holding the button (17) and then the button (18) immediately afterwards. Press the button (18) to switch the machine on again.

The following combination works on the control panel for the first group head.
2. Washing
A wash cycle can be activated for each group head by pressing and holding the button (17) and then the button (6) immediately afterwards.
The solenoid valve and the pump of the selected group head will function for 5 consecutive delivery
cycles of approximately 10 seconds each; with a 3-second pause between cycles.
3. Push-button panel LED illumination
Switch off the machine using the main switch (1). To turn on the LEDs, press and hold the button (17) + the button (6); switch on the machine using the button (1); after 5 seconds, buttons 6 and 17 light up and LED ON appears on the display (10); confirm using the button (18).
To turn off the LEDs, press and hold the button (17) + the button (16); switch on the machine using the button (6); after 5 seconds, buttons (16) and (17) light up and LED OFF appears on the display (10); confirm using the button (18).
4. Pre-infusion ON/OFF
Switch off the machine using the main switch (1). To activate pre-infusion, press and hold the button (6); switch on the machine using the button (1); after 5 seconds the button 6 lights up and PRE ON appears on the display (10); confirm using the button (18).
To deactivate pre-infusion, press and hold the button (16); switch on the machine using the button (6); after 5 seconds, the button (16) lights up and PRE OFF appears on the display (10); confirm using the button (18).
- Deactivating pre-infusion on buttons 18 and 26 Switch off the machine using the main switch (1). The programming is set for the dosage of buttons (6) - (16) - (18) - (26). To switch off pre-infusion just for buttons (18) and (26), press button (6) + button (16); switch off the machine using the main switch (1); after 5 seconds the buttons (6) and (16) light up and P34 ON or OFF appears on the display (10) confirm using the button (18).
6. Units of measure (C ° / F) and boiler temperature
Switch to IDLE-OFF mode by pressing and holding the button (17) and then the button (18) immediately afterwards.
Press the button (17) for at least 5 sec. until F01 (units of measure) appears on the display; confirm using the button (17).
Pressing buttons (6) and (16) selects the unit of measure C° or F; confirm using the button (17). Press the button (17) until F02 appears on the display; confirm using the button (17).
Use buttons (6) and (16) (+ / -) to modify the temperature value; confirm using the button (17). Go back to IDLE ON mode by pressing and holding the button (17) and then the button (18) immediately afterwards.
7. Resetting factory settings
Switch to IDLE-OFF mode by pressing and holding the button (17) and then the button (18) immediately afterwards.
Press and hold buttons (6) + (17) + (18); after 5 seconds the buttons (6) - (17) - (18) light up and PRS appears on the display (10).
10. DISPENSING COFFEE
To dispense coffee, press the selected group head control button. Only the LED of the selected dose will remain lit and coffee will start to be dispensed. It will stop automatically when the previously programmed amount is dispensed. When the coffee has been dispensed, all the LEDs on the push-button panel will light up.
Delivery can be interrupted or the selection cancelled by pressing any of the group head control buttons.
In addition to interrupting delivery and cancelling the selection, the button (17) also has a continuous delivery function. This means that the dose is not pre-set and that the group head will continue to deliver coffee until the button is pressed again, which stops delivery.
If the coffee is too finely ground or too much coffee has been placed in the filter, when you press one of the four coffee control selectors, coffee will not be dispensed. After 10 seconds, the LED of the dose selected will start to flash and alarm AL3 will be displayed. A flashing triangle appears on the display; to view the alarm you have to go to the alarm display screen.
To restart the machine, remove the filter-holder and replace the coffee in the filter basket. Press the main switch (1) to switch off the machine and then restart it.

We recommend that you dispense steam for a maximum of 60 seconds. To prevent the machine from blocking, if coffee does not start to be dispensed within 10 seconds, press one of the selector buttons to cancel the command, replace the coffee in the filter and repeat the dispensing procedure.
10-1. PRE-INFUSION

The settings entered on group head 1 (via the first push-button panel) will be copied automatically to all the other group heads.
Our software allows configuring the dosage so that the volumetrically controlled doses of coffee is preceded by pre-infusion.
After time 1 (ON), coffee dispensing stops for time 2 (OFF) and then continues until the selected dose has been dispensed completely.
If you press one of the volumetric controlled dose buttons, the normal dispensing cycle is preceded by a short timed jet of water to dampen the coffee dose before actual dispensing takes place.
This function ensures the optimum use of the coffee dose.
11. DISPENSING HOT WATER
11-1. MODELS WITH HOT WATER DISPENSING BUTTON
Place a container under the hot water dispensing tap (13), press the button (15) that will activate a device that mixes the pre-set amount of hot water from the boiler and cold water from the water supply.

We recommend that you dispense steam for a maximum of 60 seconds.
12. PREPARING OTHER DRINKS
12-1. MILK, CAPPUCCINO AND OTHER HOT DRINKS
Before heating drinks, carefully dispense a small amount of steam from the steam wand (11) by turning the steam knob / lever (14 - 20) anticlockwise to eliminate any condensation that may have formed in the boiler.
Place the liquid to be prepared in a container, immerse the steam wand (11) into the liquid and slowly turn the steam knob / lever (14 - 20) anticlockwise. Then open the steam knob completely to dispense a large quantity of steam that will bring the liquid to boiling point. To froth milk for a cappuccino, half fill a tall narrow container with the milk to be prepared.
Immerse the steam wand (11) until it touches the bottom of the container and bring the milk almost to boiling.
Move the container up and down with the tap open until you just touch the surface of the milk for a few seconds, until the froth has formed. To make a cappuccino, add the hot frothed milk to the hot coffee that is already in the cup.
12-2. TEA, CAMOMILE TEA
Place a container under the hot water dispensing tap (13), press the button (15) to dispense the water and then add the bag/sachet of the drink to prepare.
13. CLEANING AND MAINTENANCE
13-1. CLEANING THE STEAM WANDS
To avoid altering the taste of the drinks to be heated and to prevent the holes at the end of the steam nozzle from becoming clogged, we recommend cleaning the nozzle thoroughly after every use.
13-2. DAILY CLEANING
Rinse the filter baskets and filter-holders in boiling water to prevent scale or remove coffee deposits and clean the shower screens of the group heads.
14. WEEKLY CLEANING
14-1. CLEANING THE GROUP HEAD AND SPOUTS Remove the filter holder from the group head.
Place the membrane provided into the filter, add a spoonful of coffee machine cleaning powder and insert the filter holder (22) into the group head to be cleaned (21).
Use the group head control (17) to start dispensing and stop delivery after approximately 4-5 seconds.
Start and stop delivery alternately for approximately one minute to remove coffee and limescale deposits.
Remove the membrane and start dispensing several times in order to rinse the group head. Dispense several cups to eliminate unpleasant tastes from the spouts and the group head.
After hot water has remained in the pipes for a long time, allow water to flow downwards to remove any deposits.
14-2. CLEANING THE FILTERS AND FILTER HOLDERS
Regularly check the holes in the filters in order to remove any coffee deposits.
Place approximately one litre of boiling water and four teaspoons of coffee machine cleaner in a suitable container. Immerse the filters and filter holders in the solution for 20-30 minutes. Then rinse thoroughly under running water.
Remove the drip tray grid (25) and the drip tray (24). Remove any coffee residues from it.
14-4. CLEANING THE OUTSIDE OF THE MACHINE
Use a damp, non-abrasive cloth, without alcohol or solvents, to avoid damaging the sides, the base and any painted parts.
IMPORTANT! The machine must not be immersed in water and should not be cleaned with jets of water.
15. REPLACING THE GROUP HEAD GASKET
If the coffee leaks from around the edges of the filter holder when it is dispensed, it may be due to an obstruction in the delivery hole of the filter-holder, in which case the hole should be cleaned. If the problem persists or if the group head moves significantly beyond the centre of the group head when it is being fitted, the group head gasket should be replaced.
To replace it (Fig. 3), loosen the spout fixing screw (E), remove the spout (C) and the sprayer (B). Then use a screwdriver as a lever to remove the round metal block (A) and then the gasket (D).
After having removed the gasket, thoroughly clean the seat before inserting the new gasket. Then reinstall the components by following the above steps in reverse order.
16. REPLACING THE WATER IN THE BOILER
The water contained in the boiler should be replaced every 15-20 days in order to eliminate iron bacteria and various residues that build up due to water stagnation.
Turn off the main switch (1), remove the drip tray grid (25) and the lower drip tray (24).
Open the drain tap placed under the sight glass (with the boiler under pressure) and allow the water to drain completely from the boiler. Close the tap and repeat the start-up procedure described in another section of this manual.
17. USING THE WATER SOFTENER

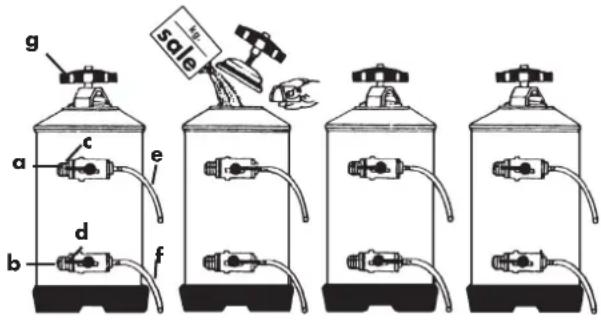
The procedures described below refer to the water softener shown in the figures. If your appliance is not the same, follow the instructions attached to the softener.
Calcium and magnesium contained in the water circulating inside the boiler and the group head circuits damage the machine. The function of the softener is to dissolve the calcium and magnesium and make them settle out on the resins contained in the softener.
text_image
g sale a c e d b fTo prevent the build-up of deposits from saturating the resins, and thereby limiting their function, they should be regenerated at regular intervals according to the following criteria:
- 8-litre softener for water with a hardness of 40 French degrees:
- up to 400 cups of coffee/day, every 10 days
- up to 800 cups of coffee/day, every 5 days
- up to 1000 cups of coffee/day, every 3 days
- 12-litre softener for water with a hardness of 40 French degrees:
- up to 500 cups of coffee/day, every 15 days
- up to 1000 cups of coffee/day, every 7 days
- up to 1500 cups of coffee/day, every 5 days
- up to 2000 cups of coffee/day, every 3 days
Delaying regeneration and therefore allowing scale to build-up, may affect the thermal and mechanical functions of the machine and the taste of the coffee.
To regenerate the resins proceed as follows:
- Place an empty container, having a capacity of at least two litres, under the pipe (e), turn the levers (c) and (d) to the right; unscrew the lid (g) and wait for the water to drain completely from the hose (e). Add 1.5 kg of cooking salt for the 8-litre model or 2 kg of salt for the 12-litre model. Replace the lid and turn the lever (c) from right to left; allow the salted water drain from the
hose (f) until the water has become soft again (the cycle takes approximately 90 minutes).
a Water inlet
b Water outlet
c Inlet tap
d Outlet tap
e Vacuum pipe
f Regeneration pipe
g Lid knob
- Do not use the machine during the regeneration cycle. For machines equipped with an automatic water level device, it is recommended to disconnect the power supply to the pump, to prevent it operating dry.
- Wash the resins before connecting the softener to the machine by connecting to the water supply and allowing the water to run for five minutes.
18. SCRAPPING THE MACHINE
If you decide you no longer wish to use the machine because of wear or for other reasons, we recommend making it unusable by cutting the power cable after having removed the plug from the socket.
When scrapping the machine, we recommended separating the various parts according to their material (plastic, metal etc.). Then give the various parts of the machine to specialised companies for disposal.
- TROUBLESHOOTING
| PROBLEM CAUSE SOLUTION | ||
| The machine does not switch on 1. Mains power switch off2. Incorrect connection to the water supply | 1. Rotate the main switch to ON2. Contact qualified personnel to check the connection | |
| No water in the boiler 1. Water supply tap closed2. Pump filter clogged3. Motor pump not working | 1. Open water supply tap2. Replace the filter3. Contact qualified personnel | |
| Coffee not dispensed 1. Water supply tap closed2. Pump motor not working3. Control unit fuse blown4. Control unit fuse blown5. Group head control not working | 1. Open the network tap2. Contact qualified personnel3. Contact qualified personnel4. Contact qualified personnel5. Contact qualified personnel | |
| No steam comes out of the wands 1. Too much water in the boiler2. Heating element damaged3. Sprayer clogged4. Heating element protection thermostat disconnected | 1. See specific problem2. Contact qualified personnel3. Clean the sprayer4. Contact qualified personnel | |
| Too much water in the boiler 1. The pump motor does not switch off2. Hole in the heat exchanger3. Automatic filling solenoid valve blocked | 1. Contact qualified personnel2. Contact qualified personnel3. Contact qualified personnel | |
| Water leaking onto the counter 1. Drip tray dirty2. Drain hose clogged or disconnected3. Other leaks | 1. Clean drain tray2. Replace the drain hose3. Contact qualified personnel | |
| Wet coffee grounds 1. Coffee ground too finely2. Group head has not warmed up yet3. Solenoid valve does not discharge | 1. Regulate grinding2. Wait for the machine to reach the required temperature3. Contact qualified personnel | |
| Coffee is dispensed too slowly 1. Coffee ground too finely2. Filter holder dirty3. Group head clogged4. Solenoid valve partially clogged | 1. Adjust grinding2. Replace the filter and clean the filter holder more frequently3. Contact qualified personnel4. Contact qualified personnel | |
| Coffee is dispensed too quickly 1. Coffee ground too coarsely 1. Adjust grinding | ||
| The coffee dispensed is cold 1. Scale on the heat exchangers or on the heating element2. Pressure switch contacts oxidised3. Electrical connection fault4. Heating element partially burnt out5. Heating element protection thermostat disconnected | 1. Contact qualified personnel2. Contact qualified personnel3. Contact qualified personnel4. Replace the heating element5. Contact qualified personnel | |
| The coffee dispensed is too hot 1. Pressure switch incorrectly calibrated (GENIALE M model only) | 1. Regulate the pressure switch using the screw provided (section 6.1) (GENIALE M model only) |
AVERTISSEMENT DE SÉCURITÉ
natural_image
Interior view of a lab bench with a glass bulb, a cube, and a triangular symbol on a wall (no visible text or labels)
natural_image
Abstract geometric pattern with connected dots and lines forming a grid-like structure (no text or symbols)zones tactiles
8-1. AFFICHAGE IDLE OFF (Fig.5)
Distribution continue.
natural_image
Interior view of a laboratory or lab bench with a small glass bulb and a paper label featuring a triangle symbol (no readable text or numbers)
natural_image
Abstract geometric pattern with interconnected lines and dots on a dark grid (no text or symbols)Schaltflächen
8-1. ANZEIGE IDLE-OFF (Abb.5)
•Maschinename: DESIDERIO
•Temperatur (T°SET) Dampfkessel: 120 °C (Standard)
- Temperatur (T°SET) Brühgruppe 1: 89 °C (Standard)
- Temperatur (T°SET) Brühgruppe 2: 89 °C (Standard)
- Temperatur (T°SET) Brühgruppe 3: 89 °C (Standard)