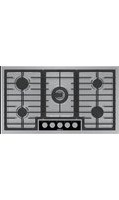
PVQ895H26E - Cooker BOSCH - Free user manual and instructions
Find the device manual for free PVQ895H26E BOSCH in PDF.

User questions about PVQ895H26E BOSCH
0 question about this device. Answer the ones you know or ask your own.
Ask a new question about this device
Download the instructions for your Cooker in PDF format for free! Find your manual PVQ895H26E - BOSCH and take your electronic device back in hand. On this page are published all the documents necessary for the use of your device. PVQ895H26E by BOSCH.
USER MANUAL PVQ895H26E BOSCH

m = 311
20
22
m = 311 ;
24
25
26

27

28
29
31
m = 311
33
35
36
38
37
40


42
43
44

45
m = 311
47

49
51
52
53
es
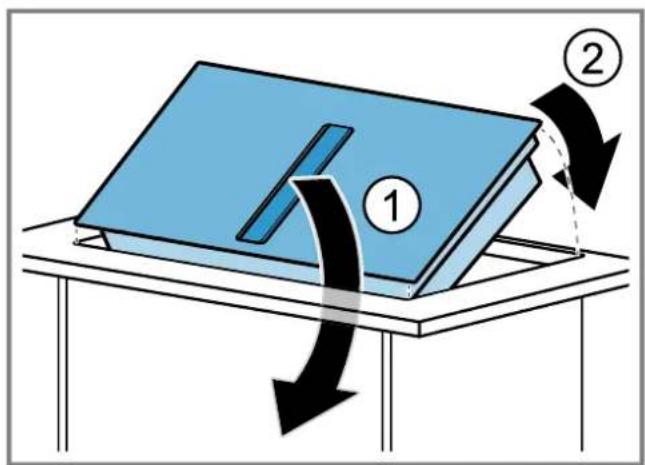
After unpacking all parts, check for any damage in transit and completeness of the delivery.
Fig. 1
QR code for the installation video
This is were you will find the QR code for the installation video. Fig. 2
Appliance dimensions
You will find the dimensions of the appliance here Fig.
Installation dimensions for flat duct bends
This is where you can find an overview of the installation dimensions for the flat duct bends.
Side view:
Fig. 4 Fig. 5 Fig. 6
Front view:
Fig. 7
Installation variants
This is where you can find an overview of the different installation variants.
Odour filter and adapter for circulating-air mode: Fig. 8
Odour filter, diffuser and seal for circulating-air mode:
Fig. 9
Acoustics filter and seal for air extraction mode: Fig. 10
Note: Channels suitable for installation can be obtained from customer service, our website or from specialist retailers.
Safety clearances
Comply with the safety clearances for the appliance. Clearances to the overflow container:
Fig. 11
Position of the overflow container: Fig. 12
The performance is optimal at a clearance of 50~mm between the unit back panel and the wall. The performance is reduced at a smaller clearance.
Fig. 13
Observe the safety clearances for the worktop cutout.
Do not place any objects in the drawer which exceed the maximum height of the drawer. The objects may come into contact with the base of the appliance and thus disrupt the functions.
Fig. 14

General information
- Read this instruction manual carefully.
Only a licensed expert may connect the appliance. - Switch off the power supply before carrying out any work.
- Never use this appliance in boats or in vehicles.
- Follow the worktop manufacturer's recommendations.
Safe installation
Follow these safety instructions when installing the appliance.
The appliance can only be used safely if it is correctly installed according to the safety instructions.
The installer is responsible for ensuring that the appliance works perfectly at its installation location.
WARNING - Danger: Magnetism!
The appliance contains permanent magnets. They may affect electronic implants, e.g. pacemakers or insulin pumps.
Persons with electronic implants must stand at least 10cm away from the appliance.
WARNING - Risk of poisoning!
Risk of poisoning from flue gases being drawn back in. Room-air-dependent heat-producing appliances (e.g. gas, oil, wood or coal-operated heaters, continuous flow heaters or water heaters) obtain combustion air from the room in which they are installed and discharge the exhaust gases into the open through an exhaust gas system (e.g. a chimney). With the extractor hood switched on, air is extracted from the kitchen and the adjacent rooms. Without an adequate supply of air, the air pressure falls below atmospheric pressure. Toxic gases from the chimney or the extraction shaft are sucked back into the living space.
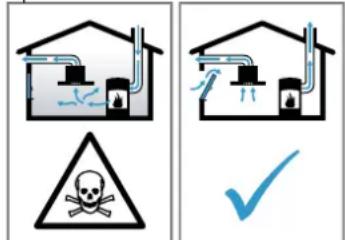
Always ensure adequate fresh air in the room if the appliance is being operated in exhaust air mode at the same time as a room-air-dependent heat-producing appliance is being operated.
It is only possible to safely operate the appliance if the pressure in the room in which the heating appliance is installed does not fall below 4 Pa (0.04 mbar). This can be achieved whenever the air needed for combustion is able to enter through openings that cannot be sealed, for example in doors, windows, incoming/exhaust air wall boxes or by other technical means. An incoming/exhaust air wall box alone is not sufficient to ensure compliance with the limit.
In any case, consult your responsible chimney sweep. They are able to assess the house's entire ventilation setup and will suggest the suitable ventilation measures to you.
Unrestricted operation is possible if the appliance is operated exclusively in circulating-air mode.
WARNING - Risk of fire!
The grease deposits in the grease filter may catch fire.
- Never work with naked flames close to the appliance (e.g. flambéing).
- Do not install the appliance near a heat-producing appliance for solid fuel (e.g. wood or coal) unless a closed, non-removable cover is present. There must be no flying sparks.
WARNING - Risk of injury!
Changes to the electrical or mechanical assembly are dangerous and may lead to malfunctions.
- Do not make any changes to the electrical or mechanical assembly.
Parts that are accessible during installation may have sharp edges and may lead to cutting injuries.
Wear protective gloves.
The appliance is heavy.
To move the appliance, two people are required.
Use only suitable tools and equipment.
WARNING - Risk of suffocation!
Children may put packaging material over their heads or wrap themselves up in it and suffocate.
- Keep packaging material away from children.
Do not let children play with packaging material.
WARNING - Risk of poisoning!
Risk of poisoning from flue gases being drawn back in.
- Do not emit the exhaust air into a smoke or exhaust gas flue that is in operation.
- Do not emit the exhaust air into a shaft that is used to ventilate installation rooms for heat-producing appliances.
If the exhaust air is to be conveyed into a smoke or exhaust gas flue, you must obtain the consent of the heating engineer responsible.
Risk of poisoning from flue gases being drawn back in.
If an extractor hood with an open-flued heat production source is installed, the power supply for the extractor hood must be provided with a suitable safety switch.
Information about the electrical connection
In order to safely connect the appliance to the electrical system, follow these instructions.
WARNING - Risk of electric shock!
It must always be possible to disconnect the appliance from the electricity supply. The appliance must only be connected to a mains socket that has been installed correctly.
An all-pole isolating switch must be integrated into the permanent electrical installation in accordance with the conditions of overvoltage category III and in accordance with the installation regulations.
The permanent electrical installation must only be wired by a professional electrician. We recommend installing a residual-current circuit breaker (RCCB) in the appliance's power supply circuit.
- Do not kink or trap the connection cable, and keep it away from sharp edges.
- Route the connection cable in such a way that it does not touch the hot casing.
- Use only the connection cable that is supplied with the appliance or is provided by technical after-sales service.
This appliance complies with the EC interference suppression regulations.
The appliance corresponds to protection class 1. You should therefore only use the appliance with a protective earth connection.
- The manufacturer shall assume no liability for malfunctions or damage resulting from incorrect electrical wiring.
Preparing the electrical connection
Requirement: Only after-sales service staff who have been trained accordingly may carry out work on the inside of the appliance or replace the power cord.
- Observe the information about the electrical connection.
An incorrect installation, an improper installation or connection invalidates the warranty. - If a longer mains power cable is required, contact the after-sales service. Connecting cables up to 2.20m are available.
- On appliances without a preinstalled cable, insert the power cable into the mains socket.
Opening the mains socket
- Use a screwdriver to lift the cover of the mains outlet.
→ Fig. 15
Preparing the mains socket
- Undo the screw.
$$ \rightarrow \text {F i g .} 1 6 $$
- Use a screwdriver to lift the strain relief.
$$ \rightarrow \text {F i g .} $$
- Loosen the strain relief.
$$ \rightarrow \text {F i g .} 1 8 $$
Connecting the cable to the mains socket
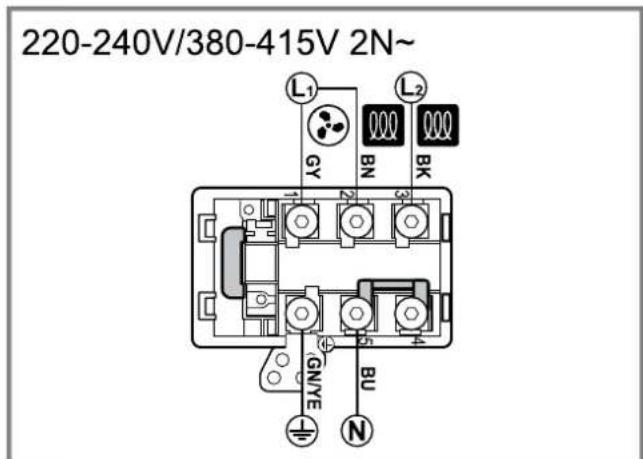
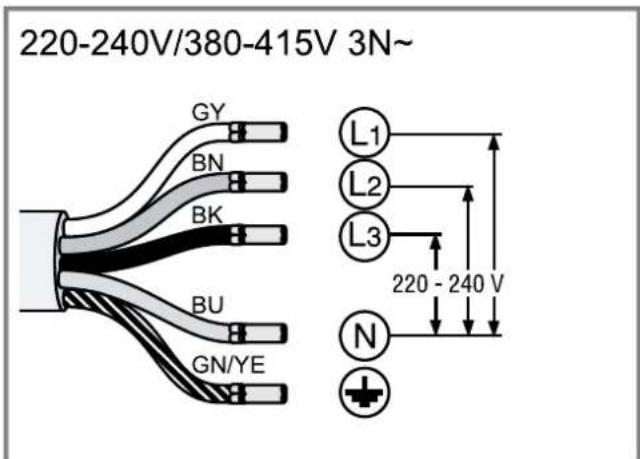
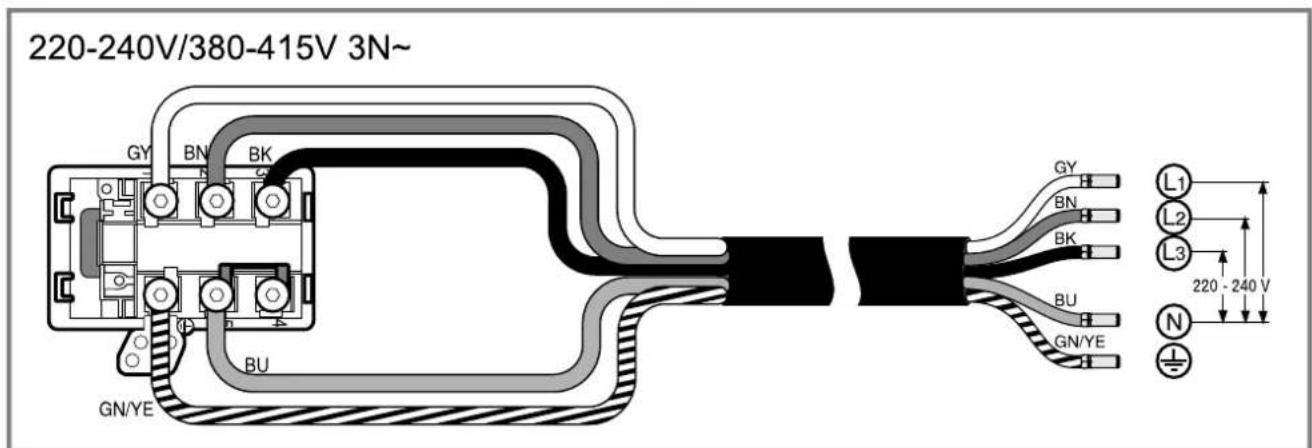
- For 3N connect the cable to the mains socket in accordance with the following figure.
$$ \rightarrow \text {F i g .} 1 9 $$
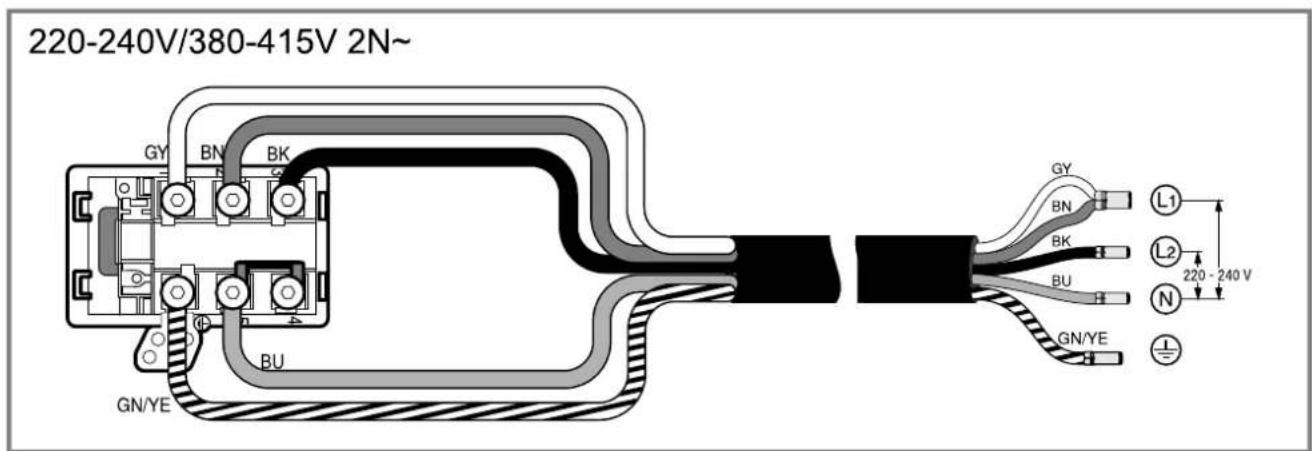
- For 2 N ,connect the cable to the mains socket in
$$ \text {a c c o r d a n c e} $$
$$ \rightarrow F i g. \boxed {2 0} $$
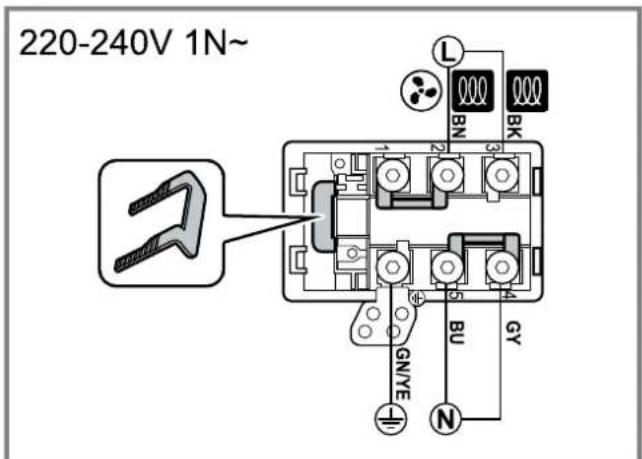
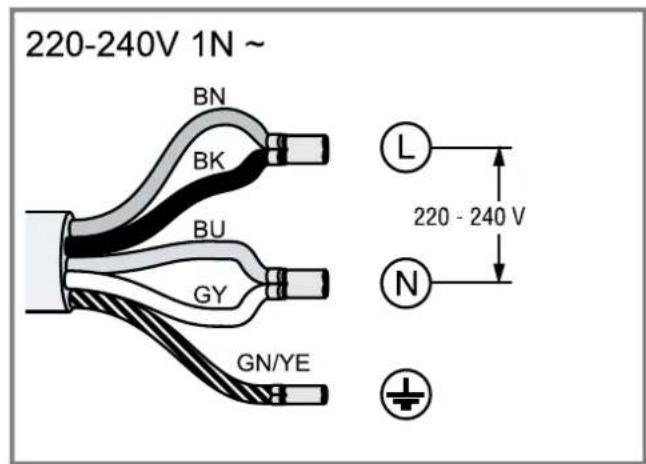
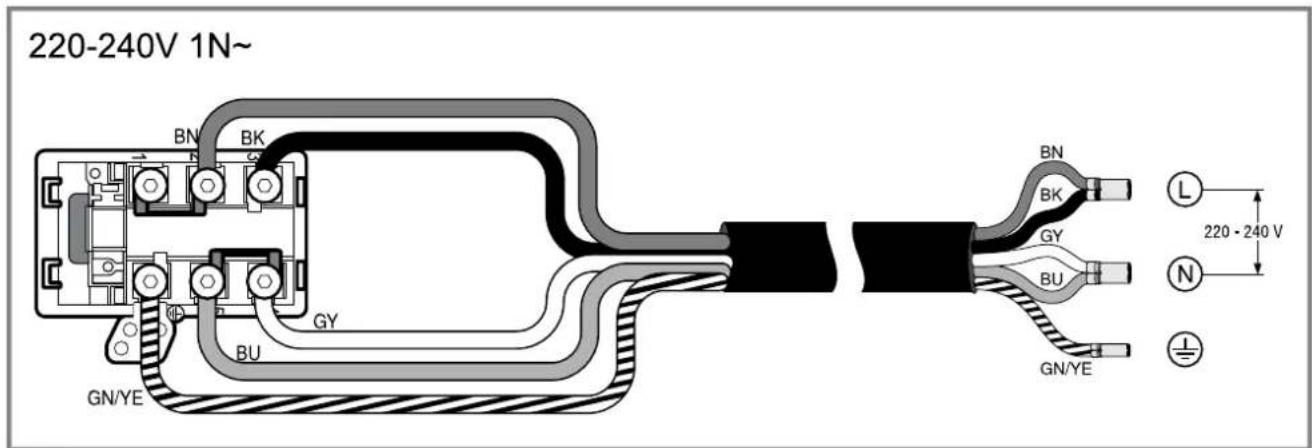
- For 1 N, connect the cable to the mains socket in accordance with the following figure.
$$ \rightarrow \text {F i g .} 2 1 $$
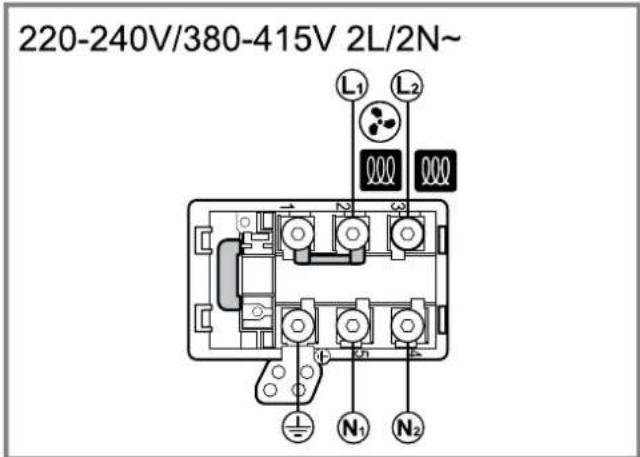
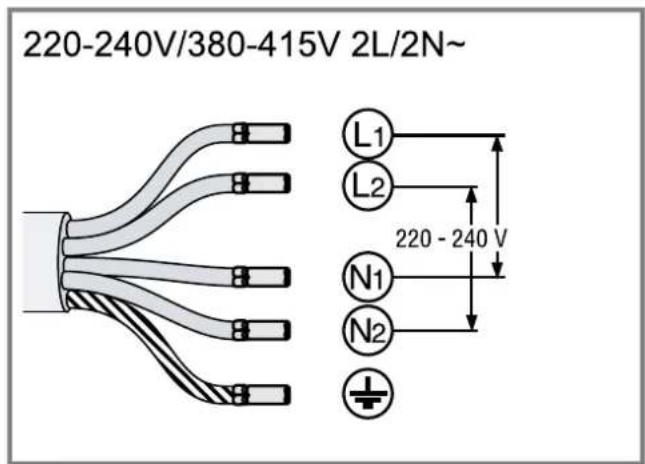
- For 2L / 2N connect the cable to the mains socket in accordance with the following figure.
$$ \rightarrow \text {F i g .} $$
-
Note the colours of the cables.
-
BN: Brown
- BU: Blue
- GN/YE: Yellow and green
- BK: Black
-
GY: Grey
-
If required, install the enclosed copper bridges in accordance with the connection diagram.
- Connect the cables and then tighten the screws of the mains socket.
- For a 1N^ or 2L/2N connection in accordance with the connection diagram, 1 corresponds to the fan motor.
- For a 2N^ / 3N^ connection, phase L1 (grey) corresponds to the fan motor.
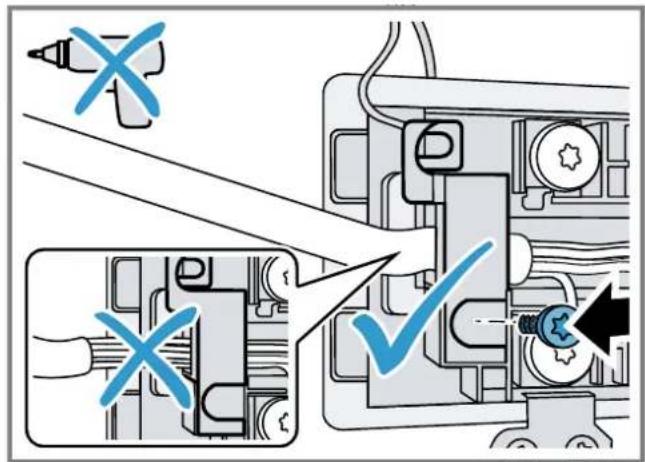
Secure the cable in the mains socket
- Use the strain relief to secure the power cable in place.
-
Tighten the screw at the correct position.
-
Do not use a cordless screwdriver.
$$ \rightarrow \text {F i g .} 2 3 $$
- To facilitate closing the mains socket, arrange the cables in the central area of the mains socket.
- Close the cover on the mains socket.
Instructions for the exhaust air pipe
The appliance manufacturer does not provide any warranty for faults attributable to the pipeline.
Use a short, straight exhaust air pipe with as large a pipe diameter as possible.
- Long, rough exhaust air pipes, many pipe bends or small pipe diameters reduce the suction power and increase the fan noise.
Use an exhaust air pipe that is made of non-combustible material.
- To prevent condensate from returning, fit the exhaust pipe with a 1^ gradient from the appliance.
Flat ducts
Use flat ducts with an inner cross-section that corresponds to the diameter of the round pipes:
Diameter of 150~mm corresponds to approx. 177~cm^2
Use sealing strips for different pipe diameters.
- Do not use any flat ducts with sharp bends.
Round pipes
Round pipes with an inner diameter of 150~mm
Instructions for the air extraction mode
For air extraction mode, a one-way flap should be installed.
Notes
If a one-way flap is not included with the appliance, one can be ordered from a specialist retailer.
If the exhaust air is conveyed through the external wall, a telescopic duct should be used.
Checking the units
- Check whether the fitted unit is level and has sufficient load-bearing capacity.
The maximum weight of the appliance is approx. 25kg
The worktop into which you are fitting the appliance must be able to withstand loads of approx. 60kg
- Ensure that the stability of the fitted unit is also guaranteed following cut-out work.
-
Use suitable substructures to ensure the load-bearing capacity and stability, particularly in the case of thin worktops.
-
Take the appliance weight, including additional load, into consideration.
-
Use heat-resistant and moisture-resistant reinforcement material.
-
Ensure that the fitted unit is heat-resistant up to 90^ .
- Do not support any other appliances, e.g. ovens, refrigerators, dishwashers or washing machines.
- Only check that the appliance is level once it has been installed in the installation opening.
- You can freely select the clearance to a top cabinet. In doing so, take into consideration the ease of use and ergonomics when using the plate.
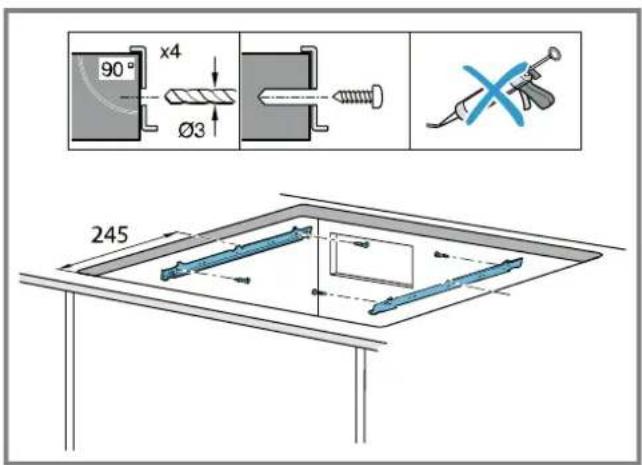
Installing the support rails
Install the support rails in the unit.
-
Glue the support rails to the stone worktop. For stone worktops, use a heat-resistant adhesive suitable for gluing metal and stone.
-
Do not use silicone for sealing.
$$ \rightarrow F i g. \quad 2 4 $$
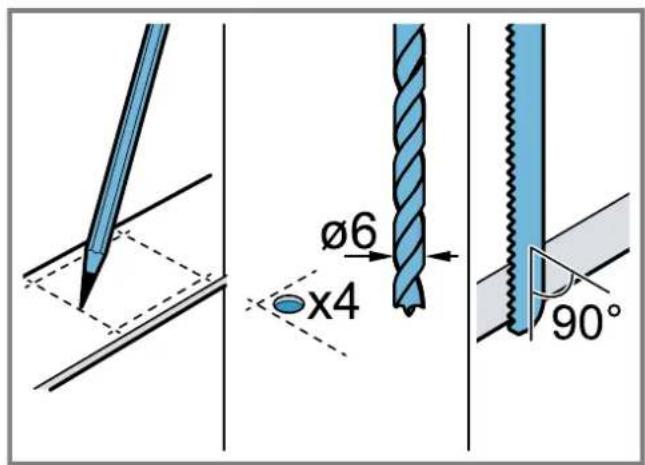
Preparing the units
Requirement: The fitted units are heat-resistant up to 90^
$$ \rightarrow \text {F i g .} 1 4 $$
$$ \rightarrow \text {F i g .} $$
$$ \rightarrow \text {F i g .} $$
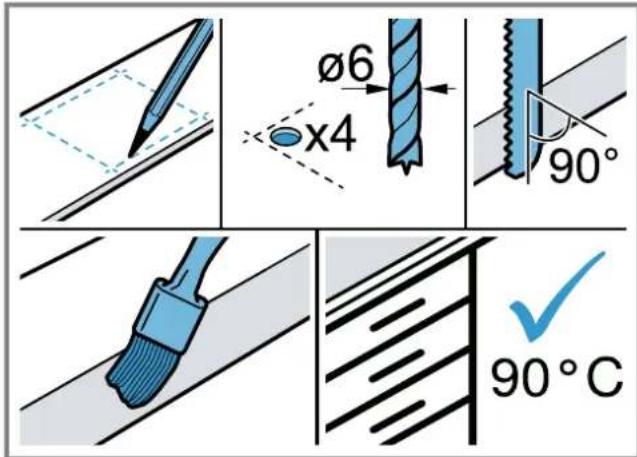
- Mark the unit cut-out in accordance with the installation diagram.
- Drill four holes with a diameter of 6mm
- Ensure that the angle of the cut surface to the worktop is 90^ .
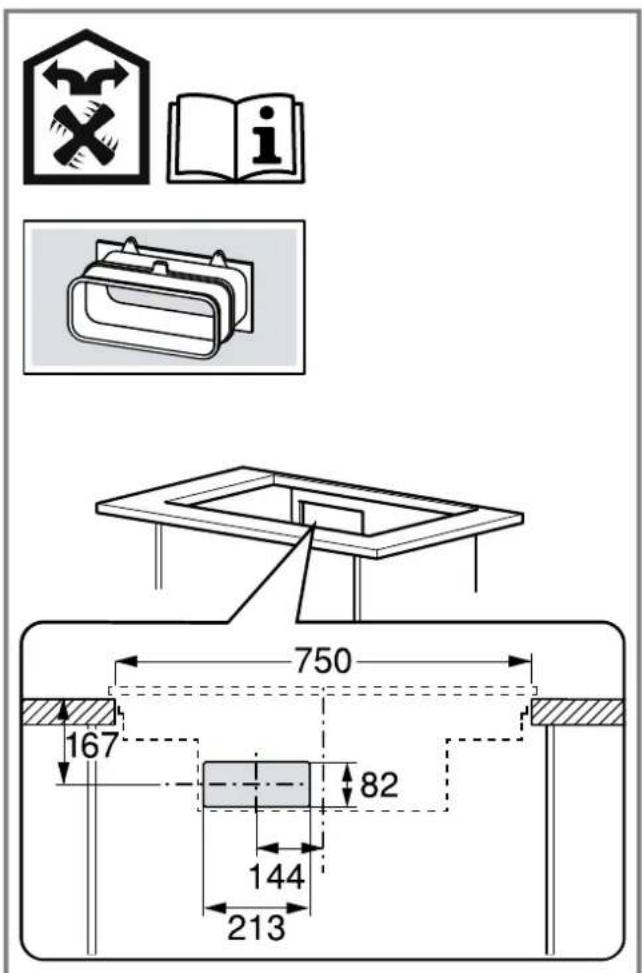
Observing the minimum clearances when installing above a drawer
- When removing the overflow container on integrated appliances, take the minimum clearances into consideration.
$$ \rightarrow \text {F i g .} \mathbf {m} $$
- Observe the position of the overflow container.
$$ \rightarrow \text {F i g .} $$
Preparing the unit for circulating-air mode with the adapter
Notes
We do not recommend to install on a nonthermally insulated outer wall or above a cold floor ( ≥ 0.5W / m^2 ^ C)
Air outlets must not be directed at other appliances, they should be parted by a separation panel. If you cannot install any separation panels, refer to other installation types..
1. Observe the relevant dimensions when combining with the adapter for the cut-out in the back wall. Fig. 26
2. Measure the thickness of the worktop. Transfer the measurement to the template and draw a line that corresponds to it.
Fig. 27
- Cut the template along the marked line for worktop thickness A, the cut centre line B and the reference line to the inner air outlet C.
- Mark the centre of the cut-out in the worktop as the centre line on the back panel of the unit.
Fig. 28
- Align the template to the centre line of the back panel of the unit and to the lower edge of the work surface.
- Use the template to make the cut-out in the back panel.
- After making the cut-outs, remove any shavings.
- Seal the cut surfaces so that they are heat-resistant and waterproof.
Fig. 25
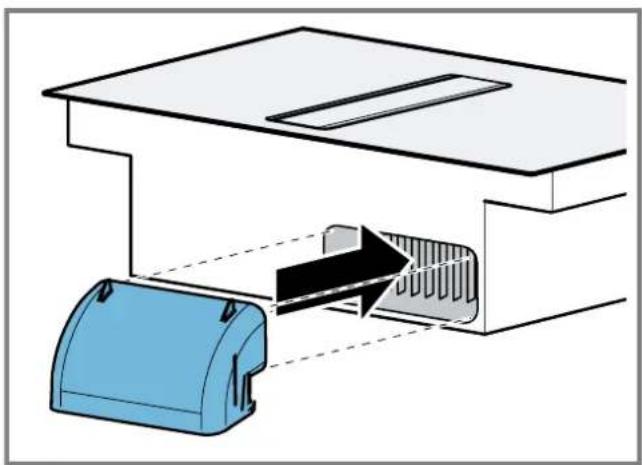
Ventilation
- In circulating-air mode, establish an air outlet in the unit's plinth.
- Provide a minimum air outlet cross-section of approx. 400~cm^2
- Make the outlet opening in the base panel as large as possible in order to keep draughts and noise to a minimum.
- Make the outlet opening by shortening the plinth or by using suitable ventilation grilles or a lamellar plinth.
- To guarantee that the appliance works correctly, ventilate the hob appropriately via an air outlet with a minimum cross-section of 200~cm^2 in the base unit.
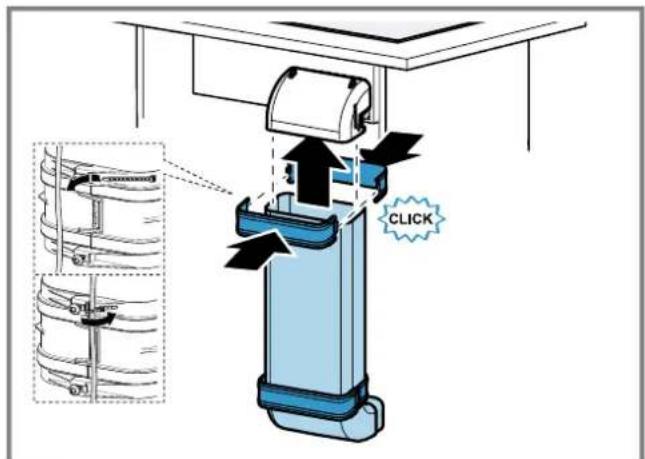
Installing an appliance featuring circulating-air mode with adapter
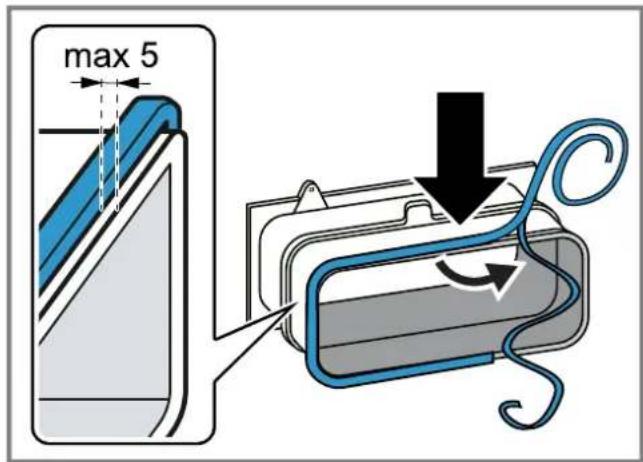
Attaching the seal to the adapter
- Attach the seal to the adapter with max. 5mm to the edge.
Fig. 29
Attaching the adapter
- Clean and degrease the adhesive surface around the cut-out in the unit's back panel.
- Insert the adapter into the outlet opening on the rear of the hob.
→ Fig. 30
- Remove the adhesive tape's protective film from the adapter.
Fig. 31
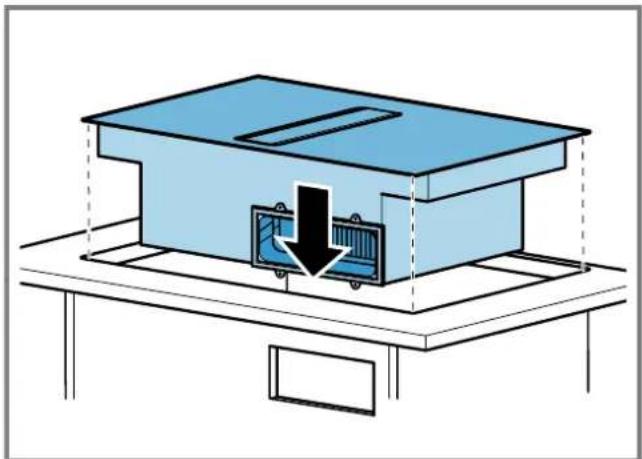
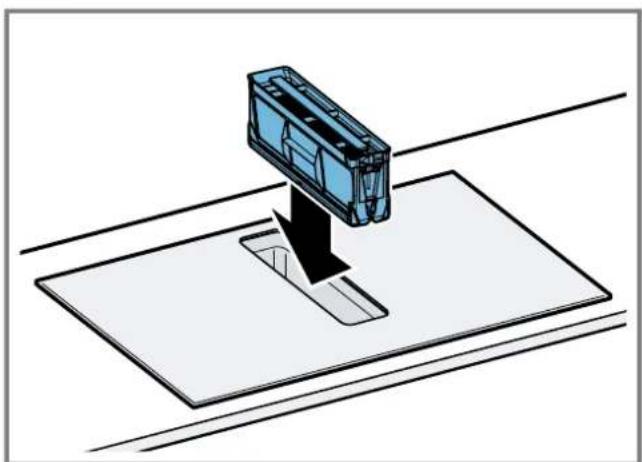
Inserting the appliance into the worktop cut-out
- Ensure that the connection cable is connected to the appliance.
- Carefully insert the appliance into the worktop cutout.
Fig. 32
Securing the adapter
- Hold the adapter at the central holder and use the side holders to slide it towards the unit's back panel in the base unit, then affix it.
→Fig. 33 - If required, also use screws to secure it.
→Fig.34
Preparing the unit for circulating-air mode with a circulating-air duct
- If required, remove the unit's back wall.
- Observe the relevant dimensions when combining with the flat duct elbow for the cut-out in the back wall.
→Fig.35
-
In circulating-air mode, establish an air outlet in the unit's plinth.
-
Provide a minimum air outlet cross-section of approx. 400~cm^2
- Make the outlet opening in the base panel as large as possible in order to keep draughts and noise to a minimum.
-
Make the outlet opening by shortening the plinth or by using suitable ventilation grilles or a lamellar plinth.
-
To guarantee that the appliance works correctly, ventilate the hob appropriately via an air outlet with a minimum cross-section of 200~cm^2 in the base unit.
- After making the cut-outs, remove any shavings.
- Seal the cut surfaces so that they are heat-resistant and waterproof.
Fig. 25
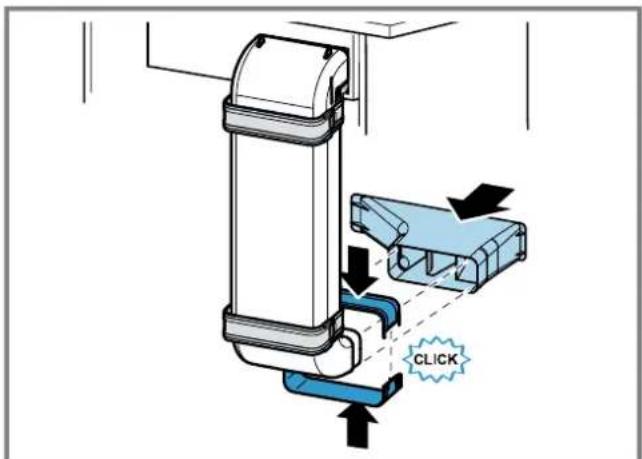
Installing the appliance for air recirculation mode with circulating-air duct
- For circulating-air mode, use the seal, the circulating-air duct, the diffuser and the odour filter.
- Observe the dimensions for the different flat duct bends. Page 19
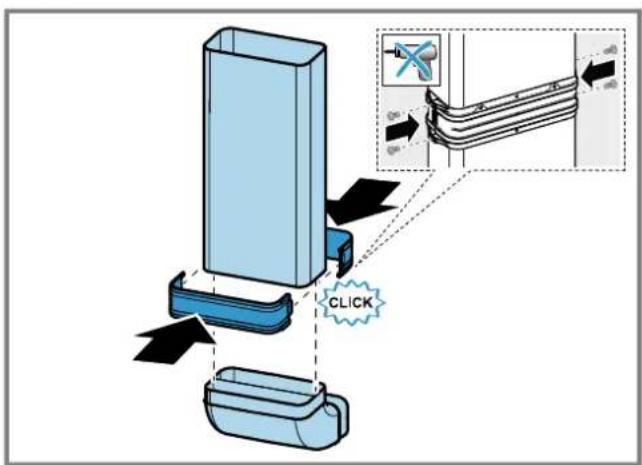
Securing the seal
- Secure the enclosed seal on the flat duct elbow at a maximum of 5mm from the edge.
Fig. 36
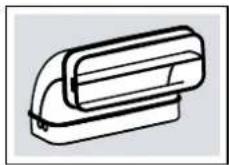
Inserting the flat duct elbow
- Insert the flat duct elbow into the outlet opening on the rear of the appliance.
Fig. 37
Inserting the appliance into the worktop cut-out
- Ensure that the connection cable is connected to the appliance.
- Carefully insert the appliance into the worktop cutout.
→Fig. 38
Establishing the pipework between the appliance and the diffuser
-
Connect the components of the circulating-air duct to each other.
-
Secure the flat duct pipe connector by engaging it in place.
-
For an additional fixing, screw the flat duct pipe connector together using 4 × PT 4 × 8 ~mm screws for plastic.
→Fig. 39 -
Connect the circulating-air duct to the flat duct elbow on the rear of the hob.
Fig. 40 - Connect the diffuser to the circulating-air duct.
→Fig.41
Preparing the unit for air extraction mode
- If required, remove the unit's back wall.
- Observe the relevant dimensions when combining with a flat duct elbow for the cut-out in the back wall. Fig. 42
- After making the cut-outs, remove any shavings.
- Seal the cut surfaces so that they are heat-resistant and waterproof. Fig. 43
Install the appliance for air extraction mode
- For air extraction mode, use the seal and the acoustics filters.
- Observe the instructions for the exhaust air pipe. Page 21
Securing the seal
- Secure the enclosed seal on the flat duct elbow at a maximum of 5mm from the edge. Fig. 36
Establishing the piping
- Insert the flat duct elbow into the outlet opening on the rear of the appliance. Fig. 37
- If required, install additional piping elements.
Inserting the appliance into the worktop cut-out
- Ensure that the connection cable is connected to the appliance.
- Carefully insert the appliance into the worktop cutout. Fig. 38
Connecting the exhaust air pipe
- Secure the exhaust air pipe to the flat duct bend.
- Establish the connection to the exhaust air opening.
- Seal the joints appropriately.
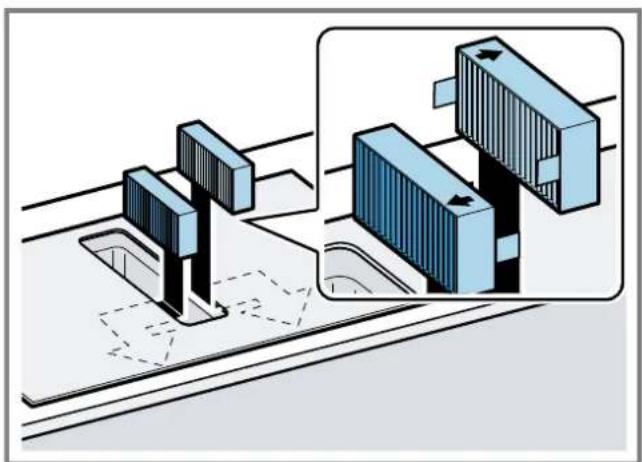
Inserting filters
Note: For circulating-air mode, insert the odour filters.
For air extraction mode, insert the acoustics filters.
- Observe the filters' air flow direction.
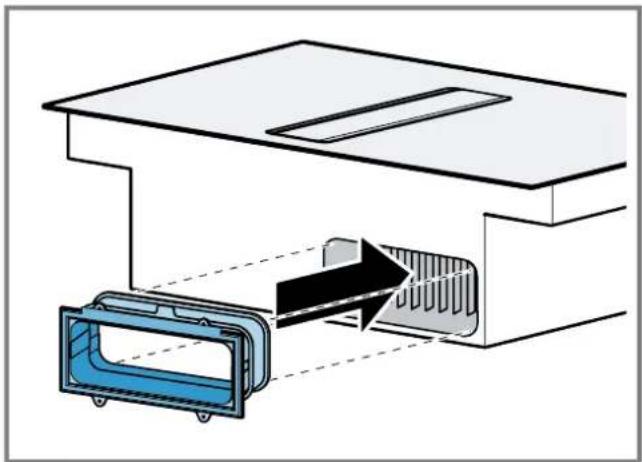
- Insert two of the filters into the left and right of the appliance, and slide them forwards. Fig. 44
- Insert the other filters into the left and right of the appliance. Fig. 45
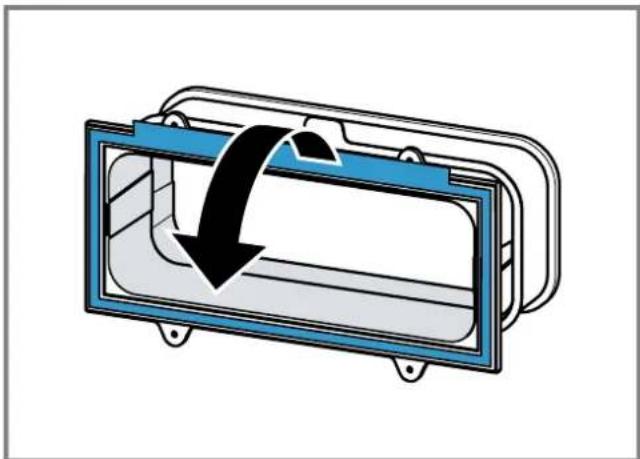
Inserting grease filters
Insert the grease filter. Fig. 46
Establishing the connection to the power supply
- Observe the connection data on the rating plate.
- For 3N connect the cable to the mains socket in accordance with the figure. Fig.47
- For 2N connect the cable to the mains socket in accordance with the figure. Fig.48
4.For 1 connect the cable to the mains socket in accordance with the figure. Fig. 49
5.For 2L / 2N connect the cable to the mains socket in accordance with the figure. Fig.50 -
Note the colours of the cables. - BN: Brown
-
BU: Blue
- GN/YE: Yellow and green
BK: Black -
GY: Grey
-
If required, arrange the supplied wire end ferrules differently depending on the type of connection.
- To connect two cables, if required, use a wire end ferrule.
Shorten the wires.
- Remove the insulation.
Checking the function
- Switch on the appliance.
- If the appliance is not connected correctly. "Checking and correcting the electrical connection", Page 23
- If no faults appear in the appliance's display, use the operating instructions to check that the ventilation is working.
Checking and correcting the electrical connection
- Disconnect the appliance from the power supply.
- Check whether the connection to the appliance and the building-side connection correspond to the connection diagram in these installation instructions. "Preparing the electrical connection", Page 20 "Establishing the connection to the power supply", Page 23
3.For 3N observe the following figure. Fig.51
4.For 2 N, observe the following figure. Fig.52
5.For 1 N, observe the following figure. Fig.53
Switching the display for air extraction mode
- If required for the air extraction mode and the air recirculation mode, change the display of the electronic control in the basic settings.
- Observe the basic settings section in the instruction manual.
Removing the appliance
ATTENTION!
Tools may damage the appliance frame.
Do not perish out the appliance from above.
- Disconnect the appliance from the power supply.
- Remove the exhaust air duct or undo the circulating-air connections.
- Push out the appliance from below.
fr
ADVARSEL-Fare for forgiving!
ADVARSEL - Brandfare!
Fedtaflejringer i fedtfiltret kan blive antaendt.
ADVARSEL-Fare for forgiving!
Fastgoring at taeling
Fastgoring at taeling
- Fastgor den medfolgende taeling pa fladkanalbogening maks. 5 mm fra kanten.
$$ \rightarrow \text {F i g .} 3 6 $$
Monte as calhas de fixacao no movable.
Monteringsmal for flat rorbend
Her finner du en oversikt over monteringsmalene for flate rorbend.
Sett fra sider:
$$ \rightarrow \text {F i g .} 4, \rightarrow \text {F i g .} 5, \rightarrow \text {F i g .} 6 $$
Sett forra:
$$ \rightarrow F i g. 7 $$
ADVARSEL-Fare for forgiving!
ADVARSEL-Fare for forgiving!
Montere holdeskinner
Ynoeic yio Tov aywyo anaywnc Tou aepa
O kataaekuaaotnc tnc ouokueunc dev avaalapavei kaia euthetayn ia Tic diapartupie, nou ofeiaovta oTo TuHaTsw OAnvWv.
Xpnaioioiote evav kovto, euoypaumoo oanva Eepioou uia kata to duvatov yvaa n daeTpo ownva.
Oi eyaai, traxeic oanvnc anaywng tou aepa, oi naaec kaunuec n iikpoc diapetoi awnv wuivuv tviauc avappoonc kai auqavouv tov 0puo tou avmuotnpa.
Xpnaioioiote evav oawiva eepiaou aio n EukAekto uiko.
Tia va aioouyete nV eIiatoaoumuukwuaotc, tooThe note tov oAiva Eaepiou ao Tn epia Tnc ouakeunc me kian 1°.
Eniteδα καναλια
Xpnoiopoioite e niiéda kavai, twv onoiw v eoTEpiK diatouh avtiotoxei otn diapetpo twv otpoyuaw ownv:
3ndeB npuBeH o63op BINOB pa3nHbIX BapnaHTOB yCTaHOBKN.
ΦHbTp dny ydaJIeHHa 3anXOB n aanTeP nnpeKnMa UHPKUYIaUN BO3dyxa:
→Pnc. 8
HnIbTp dny ydaeneHH 3anaxOB, nHΦy3Op nynlnotHTeNb dny peKmua npkpyaunn BO3dyxa:
→PNC.
UymonornoTHTeNb ynnotHnTeNb dny peKnma OTBODa BO3dyxa:
→Pnc.10
3ametka: PtoxOJHnne Bo3dyXoBOJb Ia yCTaHOBKn BmOKeTe npno6peCTn B cepBnCHOn CnyK6e, HaHaMe Be6caIte NnB CneuAnuNpOBaHHbIX MaarAHax.
БezonauchblepacToHHN
Co6JIIOaIte 6e3oIacHbIe pacCTOraHHn dIra BaUero np6Opa.
PacctoHHe Do EMKoCTn DJIa CInBa JINuHEn KINkoCTn:
→PUC.11
PacnoonoxeHne EMKoCTn DnIa CNBa NnHHe KnKoCTn:
→PUC.12
OnTImaJIbHaM MoUHOCb DoCTnIaeTcA, ecIn paCctOAHHe MExd3aHHei CTeHKo Me6EIn H CTeHO CoCTaBnReT 50 MM. Pn HeIOCTaTOHOM paCctOHHMoUHOCb CHNKAeTcA.
→PNC.13
BbIepKbBaTe 6e3oNaChbIe paCCTOaHH npN BblOnHeHH Bblpe3a B cToJIeHHnCe.
He klaaTe B bIDBnKHO nIK npEdMeTbI, BbICota KOTOpbIX pBeBbIwaet MaKcImaJIbHyO BbICOTy RuaKa. TaKe npeDMeTbIM Oryt ynpaTbcR B OCHOBaHne npnbopa, TEm caMbIM MeWAr ero pa6ote.
→PNC.14

06uhe yka3aHnra
BHHMaTeIbHo npOHTaIte daHHepe pyKOBODCTBO.
ToIbKO KBaIIHΦIuPObaHHbI CneuaJIInCT MoKET BbINONHHTb NOkJIIOUeHHe NpIbOpa.
IpeD npoBeHnem IIO6bIX paOTo OTKHO-CHTE NOauy 3NEKTPO3Heprn.
3anpeaaetca hcnonb3oBaTb npn6op Ha noKax HIN B aBTOMO6nJx.
Co6IIOdaIte peKOMeHdaIIN npOn3BOIDTeJIa CTOJIeUHNuJIb.
Be30nachoctb npn MOHTaKe
Pn yctaHOBKe np6opacobnoaTe daHHbIe yka3aHn noTexnke 6e3oNaCHOCTN.
БezonaHocTh ekCnnyatau npraHTnpyETcToIbKo npi KbaIINpOBAHH oYCTaHOBKe C co6NIOHeHem HnCTpyKuHIO MOHTaKy. 3a npaBnIbHOCTb yCTaHOBKn OTBeTCTBeHHOCt b HecET yCTaHOBUnK.
NPEyPExKDEHNE-Onachocb:MarHeTH3M!
Pn6bOp cOePKNIT NOCToAHHbIe MaHHTbl. OHN MOryT Bo3-DeiCTBOBaTb Ha BxHBLeHHbIe 3JeKTPoHHbIe np6Opbl, HApnMep, Ha KapDIOCTmMyJrTObpI ININ HHCyHHOBBie NOMbl.
JincaMc3JIeKToHHbIMnHmIIaHTaTaMn3anpeuaeTc np6IHKaTbcraK np6bopy 6IHXe, yem Ha 10 cm.
NPEyPEXKDEHNE -OnachocbOpabJeHnA!
Bthytbie 0bpaTHo oTpaObTaUWe ra3bI MOrY cTbI npuHnO OtpaBLeHn. NcToUHNK nIaMeHn C NOBODOM Bo3dyXa I3 NOMeHn (HaNPmep, pa6oTaIOUne Ha r3e, JHKoM TOnJIbE, ApOBax IINy yrIe HArpeBaTeN, IpOTouHbIe BOHOHarpeBaTeN, BoIIepbl) NOLyauOT Bo3dyX dJa CxHraHn TOnJIbA N3 NOMeUHeN, rDe OHN yCTaHOBLeHbI, a OTPaOoTbUWe Ra3bI OTXoJr Tyepe BByTAAKHyU CnCTeMy (HaNPmep, BByTAKHyU Tpy6y) I3 NOMeUHeN Ha yLIuCy. Bo Bpemra Pa6ObTI BByTAKKn I3 KXYHn I pACNoIarAOUxCn PdOM NOMeUHeN yDAnReTcB O3dyX. Be3 DocTaOuHoro npITOKa atMocΦepHoro BO3dyXa B NOMeUHeN DaBLeHne MoKet YMeHbWHTbcR, IN TOKChUhBe Ira3bI N3 DbIMOXOda IIN BeHTNIAuHn HaHyT BCaCbIbATbcR O6pTHo B XInIOe NOMeUHeN.


Bcerda obecneuBaIte npitOK doCTaTOHOro KOJIueCTBa BO3dyxa, ecn np6Op n HcTouHnK PIIaMeHN C NOBODOM BO3dyxa n3 NOMEeHHra pa6OtaHOT OHOBpeMeHHo B peJXIME OTBOJa BO3dyxa.
Be30nacbIM dIg 3KcNpyataun npnbopa c oTkpbblbIM nIamaHem ABnRETCa NOHHKeHne DaBJeHH He 6Oonee Hm Ha 4 Pa (0,04 M6ap).TO MoKet 6bIt BoCTnHyTo, eCIn Tpe6yEmbl dIg CxHraHH B03dYx 6yDet NocTyNaTb uepe3 He3aKpbIbAemble OTBepCTHn, HAnpImep, B DBePax, OKHax, C NOMoBbO CTeHHORO KOpOba CnCTeMH bPiNToka/OTBOda BO3dYxa ININ hBix TEXHNuecknx MEP. Bcero OINH npNTOHO-BBtAAHON KJIanAH He ObecneHT rapaHTNO CO6IIIODeHH ppeJIbHOrO 3HaueHH.
B IIObOu CHTyaUOn ObaauaTecb 3a COBeTom K KOMTeHTHOMy Nluy,OTBeTCTBeHHOMy 3a 3KcNpyaTaunIO OoNCTKy Tpy6,CnOCOBHO My OueHHTb BEHTNJIAUHOHHyIO CNCTeMy Bcero Doma H PpeJNOXHTb Bam peSeHne No npHATINCOOTBeTCTByIOxMep.
Ecnn npnbop pa6oTaET NCKIIOHTeBHO B peKmE UINPKyJIaUN BO3dyxa,TO 3KcIIpyataunn BO3MOxHa 6e3 OrpaHIn-ueHH.
NPEUYPEXKDEHNE -Onachoctb Bo3ropaHa!
OTIOXKeHnJ KnpaB KInpoynabNBAuOcEm FnIbTpE MOryt BCnblxHyTb.
Hikorda He pa6oTaTe C oTKpbTbIM nIaMeHem prdOM c np6opom (Haipmep, Pham6npoBaHne).
Pn6bop MoKHO yCTaHaBnBaTb B6H3N NCTOCHNA DnC KnraHn TBepDOro TOnnBa (HAnpHMeP, DpoBa HnYrObl), ecn npedyCMOTpeHa uehha HecbemHa 3a- uHTHa NaHeB. He DonxHo 6bItb pa3netaUOuXxCnKp.
1PENEYNPEXKDEHNE-Onachoctb TpaBMnpoBaHNA!
I3MeHeHne MexaHuecko Hn 3JeKtpueeCKo KOHcTpkyu MoKet CTaTb HCTOCHNKOM OaCHOCTN IN PpNBcETN K BblXOy pnp6opa n3 cTpor.
H3MeHeHmexaHnueckoNIN3eKtpnueckoKOHCTpykun 3anpeuHo.
IeTaN,OTKpbItbIe npN MOHTaKe,MOYT 6bITb OCTpbIMn I npNBecTN K nope3aM.
HcnoIb3yIte 3aunTHbIe nepuATKn.
Pnp6op TaKJIbI.
Iraero nepemeseHHn noTpe6yOTc 2eNoBeKa.
HcnoIb3yIe ToIbKO NOxOJaUHe BCNOMOraTeIbHbIe cpeCTBa.
PNEyIPEKJEHNE -OnacHocTb ydybja!
TeMOry3aBepHyTbCByynaKOBOUHbMaTePnAnnnHa-DeTbeeroce6eHa roNoByu 3aOxHyTbCra.
He noDnyckaTe DeTe K ynaKoBOOHMy MaTePnany.
He no3B0JIe Te DeTAM HrpaTb C yNaKOBOUHbIM MaTePnaJOM.
I NPEUYPEXKDEHNE -OnacchoBt OtpaBJeHnA!
Btanytbie 6bpaTHOBnmeHne Otpa6oTaBunne ra3bl MoryT CTaTB npuHNO OtpaBHeHH.
BbTAAKHO B03DyH He DOnJIeH BByXOAnTb uepe3 DbIMOByTOpy6y HnN BO3DyXoBOOp npn Hx 3KnnyatauH.
IIT OTOBDA BbITKHO BO3dyX He CNEyET NcNtOB3oBaTb BEHTKaHaJ, CNYkaUIN DJIe BeHTnlaUIN NOMeHIN, B KOTOpBX YCTaHOBHeHb INCTOUYHKn PJaMeHN.
PnnoKIOUeHNBbITAKKKNHENCNOL3yeMOMyDbIMOXOy,Heo6XODIMO NOUYHTb pa3peWHe B CNEuaJIbHOH INCTaHUN,OTBeauOSe 3a EKcNpyTaunu H NcTky Tpy6.
Brahytbe 6paTHOBnmeHne OtpaOToBunne ra3bl MoryT CTaTb npuHNO OtpaBHeHH.
Pn yctaHOBKe BbITJHKN B NOMeUeHnX, Ine npncytCTBye NTcOuHHK NlAmEHn C NOBODOM BO3dyxa H3 NOMEuEHHN, CNCTema NOpau NHTaHHBbTJAKKn DOJIHXa 6bItbOBopuyoBaHa FyHKnue aBapmHoro OTKIOUeHHN.
Yka3aHnno noNoDKNIOUeHHo K 3JIeKTpocetH
ДябзогиpoKIOUeHINI np6opaK 3NEKTPOcETN co6JDAJIte daHHbIe INCTpyKUn.
I PEPENPEKDEHNE -Onachoctb npaHexn 3JIeKTPnueckm TOKOM!
CneIyET o6ecnetaB 803MOKHOCTb OTKHOUeHIN npnbopa ot 3JIeKTPocetN B JIOBOJ MOMHT. 3OT Tnp6Op MOKHO NOI-KIIOUaTb K cTeN TObKO UpeE3 PpaBnIbHO yCTaHOBNeHHYOp pacnPepenntelHyO Kopo6Ky.
B ctaHapHO 3neKtpoPBOKe Heo6xOIMo Ppey-CMOPTeB CteuaJIbHbI BbIKIOuTeIb IaPa3MbkaHnBCex IOJIIOCB corlaCHO ycIOBnM KaTeOpnNepeHaipJKeHn III n corlaCHO ycIOBnM MOHTaKa.
POnKlnHcHHe cTauHApHOrO 3eKtpoobOpyDoBaHHn DOJIHXIOHN3BOINbCToIbKO KBaIIHmUnpoBaHHbIM 3eKtpnKOM.Mbi peKOMeHNdyEM yCTaHOBt bYCTpoNCTBO 3aUNTHoro OTKIOHEn (Y3O) B 3eKtpuueckOuenn CHa6XeHn np6OpOB.
PocneHte,TO6bI cTeBOKKa6JIb He 6bl3aKaT,He nepeRnBancn HaxOdnCBAJINOT OCTpbIX KpOMOK.
IpoknlaDbBaIe ceteBoi Ka6enb TaK, YTO6bI OH He Ka- canHaPepTorO Kopnyca npnbopa.
IcnoB3yTeToIbKOceTeBOKKa6JIb,BXOJaUIN B KOMJIeKTNoCTaBKnPn6OpaNNIOCTaBJIHeMbI cepBHCHOJ ClyXbO.
3TOT npH6op cooTBeTcByeT Tpe6oBaHnM npaBn EC no nOdaBneHHo paHONOMex.
Pn6bop COOTBeTCTBye KNaCCy 3aUHTb1 1, No3Tomy OH DOJIKeH 3KcIIpyATnpoBaTbcra TOnbKO C 3a3eMIAIOUM IPOBODOM.
Ipon3BODHTeH He HecET OTBeTCTBeHHOCTH 3a HEnCnpaBHOCTN NIN BO3MOXHbIe NIOpeXJdEHN, KOTOpbIE MOYT6bITb C8r3aHbI C HecOoTBetCTByUcIM 3JIeKTPnueCKMMOHTaXOM.
IoproTOBka K 3JIeKTPponoKnIOUoyEHNUO
Tpe6oBaHne:Pa60TaB C BHyTpEHHMn YactaMn Pnp6opa nIIN IPOUN3BODNTb 3aMeHy cTeBOrO Ka6eJIr MOyr TOnbKO npOweDnne ObyeHne CneuHaNCTbl cepBnCHOn CnyK6bl.
- Co6nOdaIte yka3aHnno no NOkNIOueHnK 3neKtpocTeH. B cnyae HeKoppeKTHOIN cbOpKn, HecooTBeTCTByIOeYcTaHOBKn NNI NOkNIOueHnRapaHTnHa np6Op nepeCTaET DeICTBoBaTb.
2 EcnBam Tpe6yetc 60Jee nnHHbI cTeBOB Ka6eJIb, 6paTntecb B cepBnchHyO cnJx6y. B haHnHmEIOCTc Ka6eJIu DnHHO 2,20 M.
3. Пи установке приборов бeз ппдварпьно CMоHTиpoBaHHoro KaБела Heo6xOДИМо превсп сеТВОй Ka-белк pacпpeДeNTeьн корбke.
OTkpbBaHne pacnpedeHtEnbHOKopo6Kn
- PpHnOaHmHMeKpblIeKy paCnpedeIeJIbHOJ Kopo6Kn c nOMoUbIO OTBepTK.
→PUC.15
Poirotobka pacnpedeJInteJIbHOJ Kopo6Kn
- Ocna6bTe BnHT.
→PNC.16
2 PnpnoDHHMnTe Ka6eBbHbI amOpTH3atop OTBepTKoI. Pnc.17
3.Ocna6bTe ΦKcauHIO Ka6eBHoTo aMOpTHaTopa.
→PUC.18
PoiKJIIOUeHHe Ka6eJI K paCppeIeNTeJIb-HoN Kopo6Ke
1.ПОДКЛЮЧITEКLEММу 3 N ka6eЯн КpacnpedeentelbHон
Kopo6Ke,ΚΑΚ ΚΝΑЗАΗ ḌСЕДΥΟΥΕΜ pιсунke.
→Pιс. 19
2.Подклочп Клемmy 2N ka6еля КpacпepeДитьнов Коробke,кak nokazaho Ha cneyuHcem pucyHke. →Pnc.20
3.ПоДКЛЮЧИТЕКLEММу1Nka6eЯKpacnpeДENTeHOB Kopo6Ke,KaK NOKa3aHoHa cIeIyHOUeM pncyHKe. →Pnc.21
4.ПОДКИОЧITE KIeMMy 2L/2N Ka6eRЯKpacpeJeNTeHbHOI Kopo6Ke, KaK nOKa3aHo Ha cIeDyIOUeM pUCyHKe. P_HC 22
5. YuHTbIbAaTe UBeT KaBenei.
- BN: KOpnUHeBbI
- BU: cHnH
- GN/YE: JkIbI N 3eJIbI
-BK:YephB
-GY:cepbii
- Пи Heo6xOdmoCTn yctaHObnte nocTaBJIreMbIe B KOMPJIeKTe MeHbIe nepeMbIcKu corlaCHO CXMe noJ-KJIIOUHeHЯ.
- NookHIOHTe Ka6eIN, a 3aTeM 3aTnHTe BnHTbHa paCnpedeHNTeBHOH Kopo6Ke.
- Cornaccho cxeme nodknkyehnnoiknyeHHIO 1 N\~nn2 L/2N cooTBeTCTByet pha3a 1 əJIeKtpoDbHraTeIeBentnIyTopa.
9.ПОДКЛЮЧЕНIO 2N\~/3N\~ coOTBeTcTBByET Φa3a L1 (cepbI) 3JIeKTKpOdBnraTeIa BEHTIJIrTopa.
Фнкcaия Ka6eЯВpacnpeJeNTeJbHOn Kopo6Ke
- 3aФИКСИРУTe ceTeBOI Ka6eJIb Ka6eJIbHbIM amOpTN3aTOpOM.
2.3aTAHHTe BINTB INpaBnHbHOM NIOJKeHHN. He nCnoB3yIte aKKyMnyTopHbI raIKOBepT. P_HC 23 - YTo6bI yInPoCTnTb 3aKpbIBaHne pacnPpeJenTeJbHOJ KoPobKn, pacNoIOXKe TKeBEN B CpeDHeu cactN Kopo6Kn.
- 3aKpoIe KpbIuKy po3eKn.
Yka3aHnnoOTbOyBO3dyXa
PpOINBODInTeIb npHbopa He DaET rapaHTn B Cnyae peKnaMaun, KacaUxxCyuactKOB Tpy6OpBOda dIry OTBODa BO3dyxa.
IcnoB3yTe KopoTkyIO npAmyIO BbTTKHyIO Tpy6y, ImeIOUIO BO3MOXHOCTN 6OJIbwoI DnAmETp.
-ДиHHbIe WepoxOBaTbe BbITaHbIe TpybI,6OJIbUoe KOJIInueCTBO KOneH ININ TpybMaIOrO DnAmEtpa YMeHbIaIOT MOuHOCTb BbITaKKn yBeJIuHbAIO T yM O T paObTbI BeHTnIATopa.
NcnoB3yTe BbITXHbIe Tpy6bl N3 HeBOcPnAmEHHIOxCRA MATEpnaIOB.
TTo6blIpeoTOBpaHTb BO3BpaT KOHDeHcata,yCTaHOBnTe BbITKHyIO TpyOyno yrnom 1° K npnbopy.
ПлOCKне Каналы
HcnoIb3yIte IIOCKHe KaHaIbI, BHyTppeHHee CeeyHe KOTOp bIX COOTBeCTByET DnAmEtpy KpyIbIX Tpy6:
Dnametp 150 MM COOTBETCTByET npm. 177 cm².
-Пи HeCOOTBETCTBnДиAmeTPOB Tpy6 NcNoIb3yIte repMeTN3NpyUOuYIOJIeHTy.
He nCnoNb3yIte nIIOCKNe KaHaJIbI cpe3KIMn H3rH6aMn.
KpyrIbIe Tpy6bl
PekomeHdyembI BHyTppeHHn DnaMeTp Kpyrblx Tpy6- 150 MM.
Yka3aHnIepeKnMaOTbOaBO3dyXa
BpeKIMe OToBa BO3dyxa DOJIkHa 6bITb yCTaHOBJIeHa 3acNoHka 6paTHoN Tn.
PpIMeuaHn
Ecn 3acnoHka o6paTHoT Tn He BXOHT B KOMPnKeT NOCTaBKn np6opa, eMozHO npNo6peCTn B CneuaJIIN3npoBaHHOM Ma3nHe.
EcnBbTJHKHOB3DyXOTBOINTCYpee3HapyKHyOCTeHy,CneDyeETNCIOJIb3OBaTBTeLECKONUeCKNBEHTNIOnOHhbI KaHaJ,npoxoJnB CteHe.
PpOBepKa Me6eJn
-
Y6eIntecb, yTO Me6eIb IJI BCTpaINBaHnY yCTaHOBneHa pOBHo nCnoc6Ha BbIepKaTb HArpy3Ky. MakcImaJIbHbI BEc np6opa coCTaBnAET npIM. 25 Kr. CToJeuHnua, B KOTOpUy BCTpaINBaETc np6op, DOnKHa BbIepKHNBaTb HArpy3Ky npIM. 60 Kr.
2.ПослЕБынгеньыpeзпровертусоювocь MeбелДЯВCTpaHbHaN.
3.CneIyET ObecneuHb HecCyUHO cnOCo6HoCTb N yCTOnHBOCTb C NOMOsbHO NOxOaJuxN ONOpHBIX KOHCTpyKcH,OCo6eHHoY TOHKX CTJoneHnU. -
YuHTbIaIe BeC npH6opa, BkJIouaA DonONHITeINbHyIO HArpy3ky.
-
HcnoIb3yIte JapOppoHbI IN BlaRoCTOIKM MaTePnAn.
-
Y6eIntecb, yTO Me6eIb IJI R BCTpaBHa HcNOCo6Ha Bbl-epKnBaTb TemnepaTy pO 90 °C.
5.He BCTpaBaNte DnyXOBbIe Wkafo, XOLOINbHnKn, NocyDOMoeuHbIe MaunHbI, CTnpaJIbHbIe MaunHbI IN DpyryTOxHNky NOI npNoOpom. - Tocnoctb pacnoonKeHn np6opBa B rnp3oHTaBHOIIOCKOCTn CneJyET npOBepNTb nocJe erO yCTaHOBKn BMOHTaKHBn pOeM.
- PacToaHHe Do HaBeCHOro ⅢkaFa MoXHo BbIbpaTb NcBOeMy yCMOTpeHHO. Pn HcNoJIb3OBaHHn NaHeHN YUHTbBaTe yIO6CTBO n 3pRoHOmNky.
YcTaHOBbAnOpHbIXnHaHOK
YcTaHOBIne onOpHbIe PnAhnBmBe6enb.
- PnKneTe onOpHbIe nHaHKN K KaMeHHoI CToneuHnue. Pn paBoTe C KaMeHHbIMN CToneuHnUaMn IcNoJIb3yI Te TepMoCTOKn KNe, NOxOJaun dna CKNeHBaHn MeTaNJa N KAMH.
- npiHKnEHNBaHn HEnb3n HCNoB3oBaTb CNIKHO-BbI rEPMeTNK.
Pnc.24
PoiroTOBka Me6eHn
Tpe6oBaHHe:Me6eIbIaBcTpAunBaHHaBbIepeKHNBaETemnepatpydo 90^
- Pa3MeTbTe MeCTo BbIpe3a B Me6eHn B COOTBeTCTBn CxEMoYcTaHOBKn.
$$ \rightarrow P u c. \square $$
2.ПрсБергЛпЕЧETыpe OTВерсТиЯДиАмETрОМ 6 MM. →PnC.25
3. Y6eHITecb, yTO yrO1 cpe3a OTHOCTeNbHO NOBepxHOCTn CToneuHnUcI coCTaBnAET 90^
$$ \rightarrow P u c. \boxed {2 5} $$
Pn yCTaHOBKe HaI BblBHXHbIM AUNKOM BblepXHBaTe MHHMaJIbHbIe OTCTynbl.
- Пи сгтпс EMKOCTN ДЯ снва ЛшнжИКOCTN Ha yctaHOBHeHOM np6ope co6IIOaTe MHHMaJIbHbIe OT-CTybl.
$$ \rightarrow P u c. 1 1 $$
- YuHTbIbAte paCNOJIOXHeHne EMKoCTn IJI R CINBa JINUHei HNIDKoCTn.
$$ \rightarrow P _ {H C}. 1 2 $$
IoproToBka Me6eN K yctaHOBHe np6opa dna uKpyuHN Bo3dyxa c aanTepom
PpIMeuaHn
YcTaHOBka Ha BHeUHEn CTHe 6e3 TeIIOIN3OJIaUNn Hau HeOTaIIINBaEMbIM NOnOM He peKOMeHNyETCA ( ≥ 0,5BT / M^2 C)
He nodklouaHTe CTOpOHy Ha BbIyB HAnpMyIO KdpYrMn npnbopam 6e3 neperopoOK. EcnH HeBO3MOxHO yCTaHOBt bneperopokn CM. "pyrHne cnocobbl yctaHOBKn".
- Пи КOMБИHINPOВАнС CаДАNTePOM yuHTbIBAITe COOTBeTCTBnpe pa3MepOB BbIpe3a B 3aHHeN CTeHKe.
$$ \rightarrow P _ {H C}. \quad 2 6 $$
2 N3mepbTe TOnuHnHy CToJeunuI. IpeHenCe 3aMep Ha 100 H npOBeDnTE COOTBETCTBYUOyU YINHO.
$$ \rightarrow P u c. \underline {{2 7}} $$
- BbipeKbTe 7a6IOH no pa3MeueHHo IINn IIN TOnIINhBcToneuHnucbA, cHTpaIbHOI INn Bbipe3a Bn KOHTpObnHOI INn IIN bHyTppeHHero BblNyCKHOrO OTBepCTnC.
- OTMeTbTe ueHTp Bbipe3a B CToneuHnue ueHTpaIbHOJ HnHe Ha 3aDHei CTeHKe Me6eHN.
$$ \rightarrow P _ {H C}. \quad 2 8 $$
- BbipOBHnTe WApON No cHTpaIbHOJ NINHN Ha 3aDHei CTeHKe Me6eNn I NO HxKHeMy KpaIO CTOJIeUHnIbI.
- CdelaaTe Bbpe3 B 3aHnei CTeHKe B COOTBeTCTBnC Waa-6JHOHOM.
7.Посль Был�нень Вьрета удалпte onnilkn. - 3aRepeMeTHN3HpyIe CTbIKH TePMoCTOKNM H BOHOHePNOHnCaemBIM TepMeTNIKOM.
$$ \rightarrow P _ {N C} \text {, 两} $$
BeHTnlaucna
-
YcTaHOBnTe Bo3DyUHbI KJIaHaN B COKone DJIrapeKHMa CInPKyJrCIN BO3DyXa.
-
MinHmAlbHoe nOpepueHoe ceeHne BO3dUshoro KlananaHa DoJIHHo 6bIb npHM.400 cm².
BbIyckHoe OTBepCTHe BIOKOLE DOJIKHO 6bITb DOCTaTOUHO 60JIbUIM, YTO6bI CHN3NTb MOUHOCTb TARn I OBeCneHTb Hn3KN yPOBeHb Wyma.
CenaiTe BixOHOe OTBepCTne, YKOPOTNB 0OKoNbHbIe peIKn, NIO HOJIb3yTe COOTBeTCTBYIOUHe BEHTINRAuONHHbe peWetKN INI ININTYca. -
TTo6bI npH6op fHyHKUHOHPOBaI npaBnIbHo, o6ecneYbTe npITOK Bo3dyxa K BapOCHo NaHei Ype3 OTBepCTne DnB BixOda Bo3dyxa C MINHMaJIbHbIM NOpEpuHbIM CeueHem 200cM² B HnKHeM uKaΦy.
YcTaHOBka np6opa c peKHMOM UnpKyIaun Bo3dyxa C aanTePOM KpenneHne ynloTHnteHa aanTepe
3aKpeHTE yIIOTHHTeJIb Ha aIaITepe Ha pacCToHHn He 60Jee 5 MM OT Kpa.
→PUC.29
YcTaHOBKa aAnTepa
- OuHCTnTe N o6e3KnPbTe NOBepxHOCTb PnPKJEnBaHN BOKpyr Bbipe3a B 3aDHe CTeHKe Me6eN.
2.YctaHOBtte aanTep B BbInyckHoe OTBepCTne B 3aHHe yactn BapOHH naHEn.
→PNC.301
- CHIMITE 3aunTHyIO nHky c aanTepa.
→PUC.31
YctaHOBka np6opa B Bbipe3 CTOJeHHne
- Y6eIntecb, yTO cTeBoi Ka6eBn NOKJIIOUeH K npN60py.
2.AkkypaTHO yCTaHOBNTe npn6Op B BVipe3 CTOneWHNubl.
→PUC.39
ФнкациyaanTepa
- YdepknBaCpeHnI DepKaTeB aAnTepa, CdbNbTe ero 60KobIMN DePKaTeJMaM N 3aDHe cTeHKe B HxKHeM uKafo npNKneTe.
→PUC.33 - Pn Heo6xOIMOCTN DOnONHITeNbHO 3aФHKcpyTe aDanTep BHTAmN.
→PnC.34
IodrotOBka Me6eHN K yctaHOBKe np6opa IJIa cHpKyJauuN BO3dyxa C cHpKyJauuNHOHbIM KaHaJOM
- Pn Heo6xOaHMOCTn CHIMTe 3aDHIO CTeHKy Me6JI.
2.ПиКOM6HINPOBAHIN CПLOCKIM KaHAnOM yHTbIaTe COOTBETCTBNE pa3MepOB BbIpe3a B 3aHHe CTeHKe.
→PUC. 35
3.YcTaHOBnTe Bo3DyHbI KlaNaH B LOKone IJIpeKHMa CHPkyJUcIN BO3DyXa.
MHHMaIbHoe NOppeuHoe CeueHne Bo3dUshoro KlaNaHa DOJXHO 6bTb npm.400 cm².
BbIyckHoe OTBepCTHe BUCOKOE DOnJHKo 6bITb DOCTaTOHO 60JIbWM, UTO6bl CHN3NTb MOUHOCTb TARINOBecneHTb Hn3Km yPOBeHb Wyma.
CdeNaTe BbIXoHoe OTBepCTne, yKOpOTNB 0OKoJIbHbIe peKN, NIOBOJb3yTe COOTBeTCTBYOUINE BEHTNIARUONHHbe peWeTKn NIN NNINTyca.
- TTo6b npIn6op fynKunOHPOBaI npaBnJIbHO, oBeCneBte npITOK Bo3Dyxa K BapOuHoi NaHei Yepe3 OTBepCTne DnB BixOda Bo3Dyxa C MINHMajlbHbIM NOpEpeHbIM ceHHeM 200cM² B HnKHeM WkaFy.
- Nocne BbInonHeHnBbpe3a ydaJIte OINIKN.
- 3aRepeMTeH3npyIe CTbIKN TePMOCTOKNIM N BOHOHeNPOHnuaeMbIM RepeMeTNIKOM.
→PHC.25
YcTaHOBKa npH6opa IJI pa6OtBI peKHMe UINPKyJIaIuN BO3dUxa C UINPKyJIaIuNOHHbIM KaHaJOM
- HcnoIb3yIte yIIOTHIeIb, cIpyKJIaHIOHHb KaHaI, dIΦ- cy3Op I OINbTp dIy aIaeHn 3aIaxOB B peKIMpeCIPKyJauu BO3dyxa.
- YUHTbIbaIte pa3MepeI pa3NHybIX nIOCKNX BO3dyXOBO- IOB. CtpaHua 74
ФнкациулnotHTteJIa
3aKpeNITe BXOJHnB KOMNJIeKT NOCTABKN yIIOHTHeBaHa NIOCKOM KaHane He daJIbWe 5 MM OT Kpa.
→PUC.36
YctaHOBka IIOCKORKaHaJa
YcTaHOBnTe NIOCKn KaHaN B BbInyCKHoe OTBepCTHe Ha 3aDHe nCTeHKe npNo6opa.
→PUC.37
YctaHOBka np6opa B Bbipe3 CToJeHHne
- Y6eIntecb, yTO cTeBoi KaebIb NpIKJIIOUeH K npIbOpy.
2.AKKypaTHO yCTAHOBITE np6Op B BBpe3 CToneuHnubI. P_NC 38
YcTaHOBbA CnCTeMbI Tpy6 MeKdy npH6Opom HnΦΦy3OpOM
-
CoeINHInTe KOMnHOENTbI UINPKyJIaCIOHOHorO KaHaJa MeKdy co6oJ.
-
3aKpeHnTe CoeINHnTeI INIOCKnx BO3dYXOBoOB, 3a-ΦHKcnpoBaB INx CO ΚeJyKOM.
-ДлгболгеHaJaEжногФикcaипprИКpyTITeCoeINHITeIbПLOCKOROBO3dYxOBoa4BnHTaMnДлгпlaCTNkAPT4x8MM.
PUC. 39
2.ПодсоeннiteинкулсnoHHьkananCnlockmBo3-DyXOBODM K 3aDneHuaCTN BapOuHoi nAHeIi.
→PUC.40
3.ПодсоeДинHTe ДИФуЗОК PцИрКУЛЯЦИОНHOMу KaHany.
PUC.41
IodrotOBKa Me6eJn JJI yCTaHOBKn peKIMa OTbOda BO3dYxa
- Пи НeoбхоДИМОСТСHIMITE 3aДHIOCTeHKy Me6eJI.N.
2.ПиКOM6HINHPOBAHN CПLOCKIM KaHAnOM yuHTbIaTe COOTBETCTBNE pa3MepOB Bblpe3a B 3aHne CTeHKe.
→PNC.42
- Nocle BbINONHeHH BBype3a ydaJIte OnnIKN.
- 3aRepMetn3npyIe CTbIKN TepMOCTOKNM IN BOHOHePNOHuaembIM TepMeTNIKOM.
→PUC.4K
YcTaHOBka npH6opa IJIpa6Otbl BpeKHMe OTBOJa BO3dYaXa
- B peKHMe OTbOa Bo3dyxa HcNoIb3yIe yNIOTHHTeIb IyMOnOrnlo7aIoUne FInbTpbl.
2 Co6nOaIte yka3aHn no pa6ote B pexnme OTbOda BO3dyxa. CtpaHnua 75
ФнкациулnotHTteJA
3aKpeNTe BXOJnB KOMNJIeKT NocTaBKN yNIOHTeNB Ha NIOCKOM KaHane He daJIbIe 5 MM OT KpaI.
→PUC.36
YctaHOBKa CnCTEmbI Tpy6
- YcTaHOBInTe NIOCKn KaHaN B BbInyCKHoe OTBepCTne Ha 3aDHeN CTeHKe npNo6opa.
→PUC.37
2.Пи Heo6xOAnMoCTn MOHTnpyIte DoONHHTeNbHbIe 3neMeHTbI ChCTeMbI Tpy6.
YctaHOBka np6opa B Bbipe3 B cToJeHHne
- Y6eIntecb, yTO ceTeBOH Ka6eN b NOkKnOueH K npH6OpY.
2.AKKypaTHO yCTAHOBNTe np6Op B BBipe3 cToJeHHuB. P_HC 38
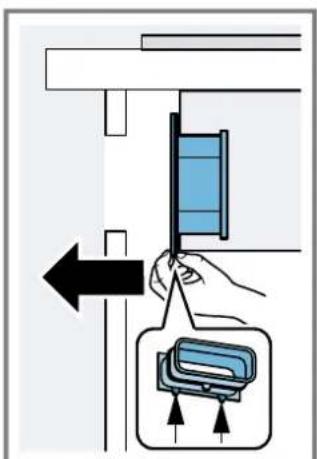
POncoeHHeHne BbITaHHoTpy6bl
- 3aKpeIe TBy BITAAKHyIO Tpy6y Ha KOJIeHe IIOCKOrO BO3dYXOBoJa.
- BbINOJIHHTe coeINHeHHe c BbITaIKHbIM OTBepCTHEM.
- 3aRepeMeTn3npyTe MeCTa COeINHeHr COOTBETCTByIO-
YctaHOBkaΦHbTpOB
3aMeKa:BpeKHeMueuRyIaun ycTaHOBHTe HnIbTpbl, nOrloaioune 3anax.
BpeKnme OTOBa BO3dyxa yCTaHOBtTe WymONOrNoaIOU 1uIne fHbTpbl.
- 06paTHe BnMaHne Ha HAnpaBHeHne Bo3dyuHoro nToKa ΦnIbTpOB.
2.BCTaBbTe B npn6op DBA fNtpa CneBa n Cnpaba N CdBnHbTe IX BnpeE.
→Pnc.44
- BcTaBbTe B np6Op dpyRnE nBa fNbTpbl cIeBa n cnpaBA.
→PUC.45
YcTaHOBbKa HnpoyBaJIbBaIOUeO ΦIbTp a
YcTaHOBnTe KInpoynabNBAoUmHnIbTp.
→Pnc.46
3NeKtpnueckoe noDKJIIOUeHne
- YuHTbBaIe npaMeTpbl NOdkJIIOueHnHa TINOBO Ta-6JNHyKe.
2.ПоdkлочиКлему3Nkaбянкpacpeдentьhoe Kopo6ke,KaK nOKa3aHoHa pncyHke.
Pnc.47
3.ПодкючiteКлему2NkaбелЯраспpeДeNTьнов Коробke,КakпokазанHa рсунke.
→PNC.48
4.ПодключITEКлемmy1NkaбелЯраспpeДeЛтьног Коробke,KaKпOKa3aHoHa рсунke.
→PUC.49
5.ПодклочпеКлемmy2L/2Nka6eЯKpacnpedentel- HOI Kopo6ke, KaK noka3aHoHa pncyhke.
→PUC.50
6. YUHTbIbAaTe UBeT KaBeJeI.
- BN: KOpnUHeBbI
- BU: cHnH
-
GN/YE: Jéltbɪn 3eJIeHbɪ
-BK:чрнь
-GY:cepb -
B 3aBnHmOCTn OT Tnna NODKJIIOUeHn, npi Heo6xOIMoCTn paCNOJIOKeTKeAkeNBhIe 3aXHMbl, NOCTaBnHEMbIe B KOMnJIeKTe, No-pa3HOMy.
-
Pn Heo6xOaMocTn HcNoIb3yIe Ka6eJIbHbIe 3aKmbl Ira coeINHeHH DaBy X Ka6eNei.
-
YkopoTte KJIbI Ka6enei.
- YdaIaIte H3OJIaIIO.
PpOBepka pa6oTbI
- BkHouTe npn6op.
- EcHn 3aRopaetc H8E6pOp nKIO-ueH HeKOppeKTHO. "PpOBepKa n OTnAka NOkHIOueHHa K 3neKtpocEt", CtpaHnua 78
- EcIn Ha DnCnnee npnbopa He noBnReTcHnDnKaun OuN6ok, npOBepbTe paOToY BeHTnIaun, cneDyR pyKOBOCTBy NO 3KcNpyaTuIN.
PpOBeRka n OToJaKa POnKJIIOUeHnK 3JNeK- TpOcETn
- OToeDHHTe npH6op ot ceTH.
- Y6eIntecb, yTO NOkHIOueHHe Ha npBope n NOkHIOueHHe Ha CTeHe COOTBeTCTByOT CXEMe NOkHIOUeHnB INCHyKuINo MOHTaKy. "NoIroTOBka K 3NeKtpOnOKnHIOueHnO", CtpaHnua 75 "3NeKtpnueckoe NOkHIOueHne", CtpaHnua 78
3.ДЯ3NOBpaTHTeBHIMaHHeHaCneIyOuINpucyHOK. →Pc.51
4.ДЯ2NobpaTHTeBHIMaHHeHaCneIyUoIuPncyHOK. →Pnc.52
5.ДЯ1N O6paTnTe BHMaHHe Ha cIeIyUoIuI pUCyHOK. →PcC. 53
IpepeHaCTpOJa HnDnKaaun Ha peKHM OTBOda BO3dYxa
- Пин Heo6xOДmOCTn NepeHAcTpoIe COOTBeTcByIOUIM O6pa3OM 3neKToPOnHoe ynpaBHeHne B 6a3OBbIX yCTaHOB-Kax ДЯ peKIMa OTbOda BO3dYxa.
- CM. rnaBy «Ba30BbIe yCTaHOBKn» B pyKOBoIDCTBe no 3Kc- nlyaTaunn.
ДемоNTан пибopa
BHIMAHNE!
PnncnoB3OBaHm HnCTpyMeHTOB MoXHO NOBpeDntb paMy np60pa.
He n3BnKeKaIe npHbOp cBepxv.
1. OToeDHHte npH6Op ot 3neKtpocetH.
2 CHIMITE BbITaHKHO KaHAN INN OcIa6Be CoeINHeHNE DnR CUPKyIaUNB03Dyxa.
3. N3BJIeKInTe npN6Op, BbIToJIKNHyB eO CHN3y.