
Digiclock 2 - Radio TECHNISAT - Free user manual and instructions
Find the device manual for free Digiclock 2 TECHNISAT in PDF.

| Product type | Radio alarm clock with LED display |
| Brand | TechniSat |
| Model | Digiclock 2 |
| Frequency range | FM 87.5 - 108 MHz |
| Display | LED 0.6" |
| Audio power | 0.5 W RMS |
| Mains power supply | 230 V ~ 50 Hz, 0.3 A |
| Backup batteries | 2 AAA batteries (not included) |
| Dimensions (W x H x D) | 125.4 x 50 x 60 mm |
| Number of favorite stations | 20 |
| Main functions | Radio alarm, dual alarm, snooze, sleep timer, brightness adjustment |
| Time setting | Manual |
| Alarm modes | Radio or buzzer |
| Snooze duration | 20 minutes |
| Sleep timer | 10 to 90 minutes (adjustable in 10-minute increments) |
| Brightness levels | 2 |
| Antenna | Wired antenna |
| Safety | Do not open the device, avoid exposure to water, do not use near a bathtub or pool |
| Maintenance and cleaning | Clean with a dry cloth, do not use abrasive products |
| Intended use | Indoors only, private use |
| Warranty | 24 months (statutory warranty) |
| Certification | CE |
Frequently Asked Questions - Digiclock 2 TECHNISAT
User questions about Digiclock 2 TECHNISAT
0 question about this device. Answer the ones you know or ask your own.
Ask a new question about this device
Download the instructions for your Radio in PDF format for free! Find your manual Digiclock 2 - TECHNISAT and take your electronic device back in hand. On this page are published all the documents necessary for the use of your device. Digiclock 2 by TECHNISAT.
USER MANUAL Digiclock 2 TECHNISAT
Operating instructions
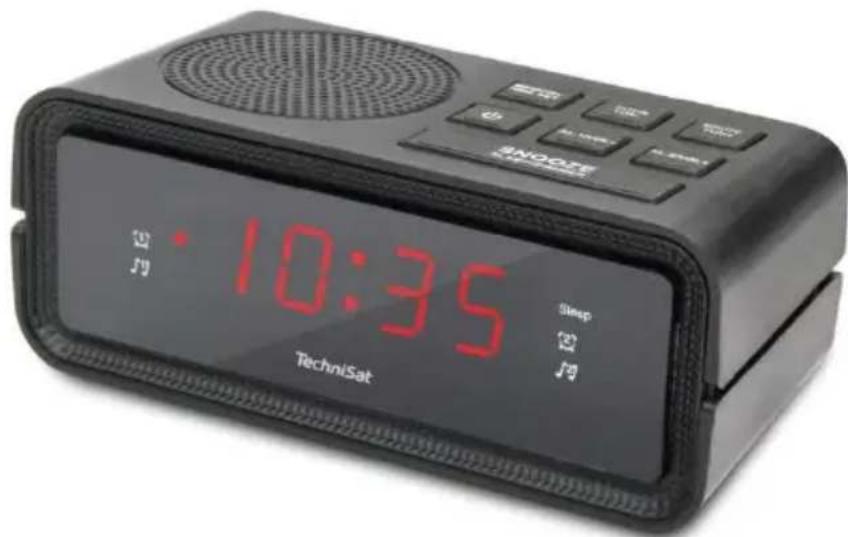
DIGICLOCK 2
Radio alarm clock with LED display
TechniSat
1 Safety instructions
1.1 Foreword
Dear customers,
Thank you for choosing a TechniSat radio alarm clock.
These operating instructions are intended to help you familiarise yourself with the functions of your new device and use them optimally. It will help you to use the radio alarm clock safely and in accordance with its intended use. It is intended for anyone who installs, operates, cleans or disposes of the appliance.
Keep the operating instructions in a safe place for future reference.
TechniSat team
1.2 Symbols and symbols used
In this manual:

Indicates a safety instruction, failure to follow which may cause serious injury or death. Observe the following signal words:
DANGER - Serious injury resulting in death.
WARNING - Severe personal injury that could lead to death.
NOTE - Injuries.

It indicates the note to be observed in order to avoid device malfunctions, data loss/misuse or unintended operation. It also describes further functions of the device.

Warning against electrical voltage. Observe all safety instructions to avoid electric shock. Never open the appliance.
On the device:

Indoor use - appliances marked with this symbol are suitable for indoor use only.

Your device is CE marked and meets all required EU standards.

This appliance has been designed and manufactured using high-quality materials and components that are recyclable. The symbol of the crossed-out wheeled bin indicates that the product is subject to separate collection in accordance with the European Parliament Directive and Council 2012/19/EU and in accordance with Directive 2006/66/EC of the European Parliament and of the Council and informs that electrical and electronic equipment and batteries and accumulators, after their useful life, must not be disposed of with the
other household waste. The user is obliged to hand it over to a collector of waste electrical and electronic equipment as well as batteries and accumulators setting up a system for the collection of such waste, including to an appropriate shop, local collection point or municipal unit. Waste equipment can have a harmful impact on the environment and human health due to its potential content of hazardous substances, mixtures and components. The household plays an important role in contributing to the reuse and recovery, including recycling, of waste equipment. At this stage, attitudes are formed that influence the preservation of the common good, which is a clean environment. Households are also one of the biggest users of small equipment and rational management of this equipment influences the recovery of secondary raw materials. In the event of improper disposal of this product, penalties may be imposed in accordance with national legislation At the end of the product's life cycle, it should not be disposed of in the
rubbish from normal household waste but to the collection point for waste electrical and electronic equipment. This is indicated by the symbol on the product, user manual or packaging. Materials are recyclable according to the label. By reusing, recycling or otherwise recycling your old equipment, you are making an important contribution to environmental protection.
1.3 Purpose
EN
The TechniSat DIGICLOCK 2 is designed to receive FM radio broadcasts. The device is intended for private use and is not suitable for commercial purposes.
1.4 Safe handling
Observe the following instructions to minimise safety risks, avoid damage to the equipment and contribute to environmental protection.
Read all safety instructions carefully and keep them for future reference. Always observe all warnings and instructions in this manual and on the back of the appliance.

DANGER!
Never open the appliance!
Touching live components is life-threatening!

WARNING!
Danger of suffocation! Do not leave packaging and its parts in the care of children. Danger of suffocation from foil and other packaging materials!

To ensure the correct use of the appliance and to avoid damage to the appliance and personal injury, all the following instructions must be followed.
- Do not repair the appliance yourself. Repairs should only be carried out by trained professionals. Contact
our customer service centres.
- The device must only be operated under the environmental conditions specified for it.
- Do not expose the appliance to dripping or splashing water. If water enters the appliance, switch it off and notify the service department.
- Do not expose the unit to heat sources that heat up the unit in addition to normal use.
In the event of a noticeable defect in the appliance, odour or smoke, significant faults or damage to the housing, contact the service centre immediately. - The device may only be operated at the specified mains voltage. Never attempt to operate the unit at any other voltage.
- If the unit is damaged, it must not be operated.
- Do not use the unit near bathtubs, showers, swimming pools or flowing/splashing water. There is a risk of electric shock and/or damage to the equipment.
- Foreign objects, e.g. needles, coins, etc. must not fall into the device. Do not touch the connection contacts with metal objects or fingers. This may cause a short circuit.
- The appliance is not intended for use by persons (including children) with reduced physical, sensory or mental capabilities, or lack of experience and/or knowledge, unless they have received supervision or instruction on the use of the appliance from a person responsible for their safety.
It is forbidden to make changes to the device.
1.4.1 Legal guidelines

TechniSat hereby declares that the radio device type DIGICLOCK 2 (76-4902-00) is in compliance with Directive 2014/53/EU and RoHS. The full text of the EU Declaration of Conformity is available at the following web address:
TechniSat is not responsible for damage to the product caused by external influences, wear and tear or improper handling, unauthorised repairs, modifications or accidents.

Subject to changes and printing errors. Reproduction and duplication only with permission of the publisher. The latest version of the manual is available in PDF format in the download area of the TechniSat homepage at
www.technisat.pl.
1.4.2 Service information
This product is quality tested and comes with a statutory warranty period of 24 months from the date of purchase. Please keep your invoice receipt as proof of purchase. In the event of warranty claims, the cost of postage directly to the manufacturer will be paid by the customer.
For questions and information or if you have a problem with this device, our technical hotline is available: Monday. - to Friday, from 8:00 a.m. to 4:00 p.m. on telephone number: +71 310 41 48.
The guarantor, within the scope of the granted guarantee, undertakes to remove at its own expense any defects in the product. The removal of defects will take place by replacing the defective product with a new, defect-free one or by repairing it.
In order to make use of the guarantee, the purchaser must report the defective product to the point of sale where the product was purchased and deliver the defective product there. The product must be delivered complete.
The warranty does not cover product defects caused by the purchaser or resulting from:
EN
- use or install the product in a manner inconsistent with the instructions for use,
- improper storage or maintenance of the appliance,
- repairs or modifications to the product carried out by unauthorised persons,
- ingress of liquids or foreign bodies,
- lightning strikes and power line surges
The provisions of the guarantee do not exclude, limit or suspend the rights of purchasers (consumers) under generally applicable law (warranty).
To obtain detailed information on a Product, including the rules and procedures for the guarantee procedure, the assignment of an RMA number, it is possible to by telephone 71 310 41 48 or email serwis@technisat.com , on working days, 8 a.m. to 4 p.m. Service requests ON-LINE via www.serwis.technisat.com.
2 Description of the device
2.1 Contents of the device
Please check that the following are included: 1x
TechniSat DIGICLOCK 2
1x User manual
2.2 Special features
The radio has the following special features:
FM radio reception.
UKW reception range 87.5-108 MHz (analogue).
LED display.
RMS audio power 0.5W.
Programme memory 20 for FM stations.
2.3 Preparing the device for operation
2.3.1 Setting up a wire antenna
The number and quality of stations received depends on the reception conditions at the installation site. Excellent reception can be achieved with a wire antenna.
Position the wire antenna lengthways.
i Accurate positioning of the wire antenna is often important, especially in peripheral FM reception areas.
i Start your first search at the window towards the transmitter mast. In bad weather reception may be limited.
i Do not touch the wire antenna during station playback. This may lead to reception interference and sound fading.
2.3.2 Connection to power supply

WARNING!
Do not touch the plug with wet hands, risk of electric shock!

NOTE!
Arrange the network cable so that no one trips over it.
Plug the mains plug of the DIGICLOCK 2 into a mains socket (AC 230V ~ 50Hz).
Before connecting the appliance to a wall socket, ensure that the operating voltage of the appliance corresponds to the local mains voltage.

Pull the plug out of the socket when not in use. Pull the plug, not the cable.
Unplug the device before a storm. Unplug the appliance if it will not be used for a long time, e.g. before starting a long journey. The heat generated during operation must be dissipated by adequate air circulation. Therefore, do not cover the appliance or place it in a closed cabinet. Ensure there is free space around
equipment at least 10 cm wide.

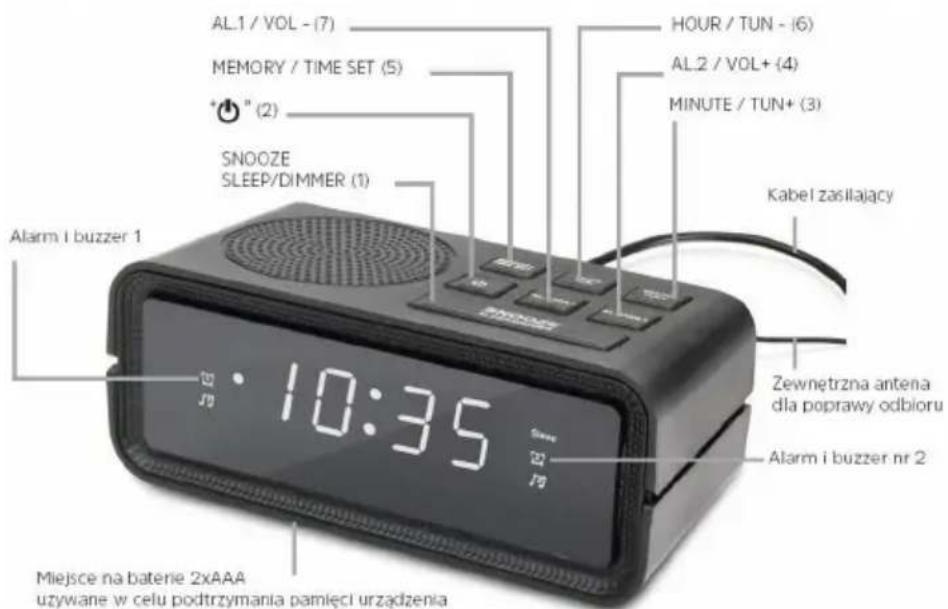
The radio alarm clock is powered by alternating current. Use two AAA-size batteries to keep accurate time during mains power failure.
Insert the batteries, matching the polarity markings (+/-) in the battery compartment. Replace all batteries with new ones at the same time. Remove all batteries when the device will not be used for a long period of time.
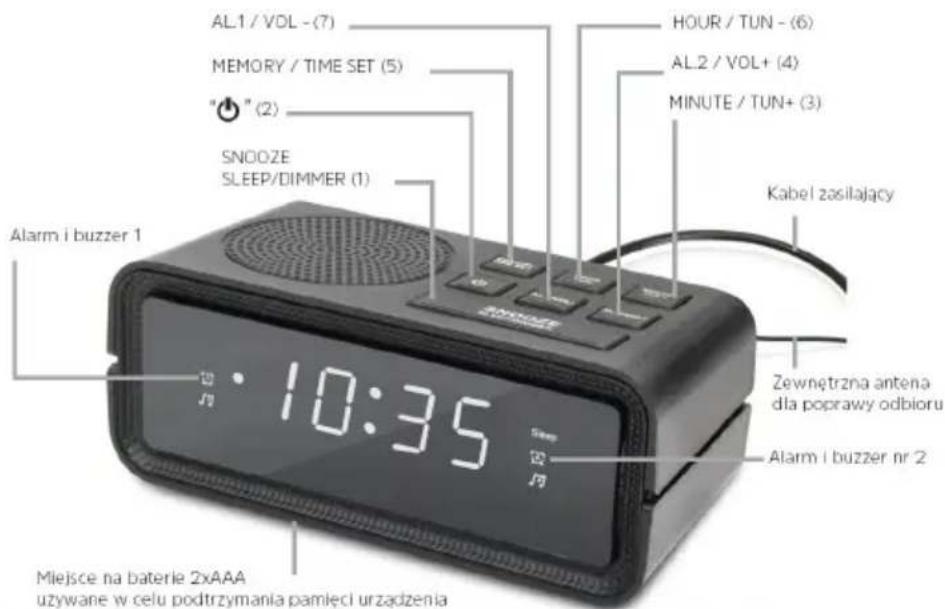
2.4 Device functions
2.4.1 Setting the correct time
To set the correct time, switch the unit off by pressing the OFF/ON button (2).
Then press the MEMORY / TIME SET button (5) for longer.
To set the time, press the HOUR / TUN- button (6).
To set the minutes, please use the MINUTE / TUN+ button (3).
2.4.2 Automatic tuning
To start the automatic station search, press the HOUR / TUN- (6) or MINUTE / TUN+ (3) button longer.
The radio alarm clock will start automatically searching the band, which will stop at the first station found.
2.4.3 Manual radio tuning
To set the correct reception frequency, please use the HOUR / TUN- (6) and MINUTE / TUN+ (3) buttons. Each time they are pressed, the frequency is changed by 0.1 MHz.
2.4.4 Save stations to favourites
To save a station to the favourites list, press the MEMORY/ TIME SET (5).
The programme number will flash on the screen. Using the HOUR / TUN- (6) or MINUTE / TUN+ (3) buttons, set the desired number and save the programme by confirming with the MEMORY / TIME SET (5) button.
2.4.5 Calling a programme from the radio programme list
Press the MEMORY / TIME SET button (5).
Then use the HOUR / TUN- (6) or MINUTE / TUN+ (3) buttons to select the programme number and confirm your selection with the MEMORY / TIME SET (5) button.
2.4.6 Alarm setting
To set the alarm, switch off the radio alarm clock by pressing the button OFF/ON (2).
After switching off the device, please press and hold the AL.1 / VOL- button (7) or AL.2 / VOL+ (4) until the time setting flashes on the display.
You can choose whether you want the device to operate in mode during the alarm: Radio or Buzzer. The LED with the bell symbol is the option with buzzer. The LED with the note symbol is the option with radio. Press AL.1 / VOL- button. (7) or AL.2 / VOL+ (4) to select the desired mode.
If you have already selected the alarm mode you can now set the alarm time. Press HOUR/TUN-(6)to set and MINUTE/TUN+(3) to set the minutes.
Press MEMORY / TIME SET (5) to save the alarm time.
2.4.7 Alarm activation and deactivation
When the radio alarm clock is switched off, you can choose whether to operate the device in mode during the alarm: Radio or Buzzer. The LED with the bell symbol is the option with the buzzer. The LED with the note symbol is the option with radio. Press AL.1 / VOL- (7) or AL.2 / VOL+ (3) to select the desired mode.
To deactivate the alarm press AL.1 / VOL- (7) or AL.2 / VOL+ (3) until the red indicator next to the bell and note symbol disappears.
When the alarm is activated, in order to deactivate it, press the button On/off (2).
2.4.8 Snooze function
During the alarm, pressing the SNOOZE/SLEEP/DIMMER button(1) will result in shutdown for 20 min.
During snooze time, the LED located next to the bell and note symbol blinks.
After 20 minutes, the alarm will sound again.
To switch off the alarm completely, press the On/Off button (2), the LED symbolising the alarm type will stop blinking.
2.4.9 Setting the switch-off timer
The switch-off timer is set when the radio alarm clock is switched on.
By pressing the SNOOZE/SLEEP/DIMMER button(1), you have the option of changing the time after which the unit automatically switches off.
The following settings are available: 10, 20, 30, 40, 50, 60, 70, 80, 90 min and OFF (timer off).
2.4.10 Changing the volume
While listening to the radio, please press AL.1 / VOL- (7) to decrease the volume.
While listening to the radio, please press AL.2 / VOL+ (3) to increase the volume.
2.4.11 Changing the intensity of the LED display backlight
Two screen brightness settings are available.
To change the brightness, press and hold the SNOOZE/SLEEP/ button. DIMMER (1)
Pressing the SNOOZE/SLEEP/DIMMER button(1) again for a longer time will return the LED backlight to its previous intensity.
3 Specification
Frequency range: FM 87.5 -108 MHz
LED display: 0.6"
Power source: AC 230V ~ 50 Hz, 0.3A
Device dimensions: 125.4x50x60mm
Batteries: 2x AAA for memory backup RMS
power: 0.5W
Number of favourite stations: 20
NOTE: Battery power is only used to maintain the unit's memory in the event of a power failure (e.g. time memory). Batteries not included.
4 Manufacturer
TechniSat Digital Sp. z o.o.
ul. Poznańska 2,
Siemianice 55-120 Oborniki
Slaskie
Customer Service Office
tel: +48 71 310 41 41, e-mail: biuro@technisat.com
Open Monday to Friday from: 8:00-16:00
Használati utasítás
DIGICLOCK 2
1.4 Manipulation sure
BaeweTo yctpoiCtBO mma MapKnipOBka CE n OTroBapra Ha BCnUKN Heo6xOJIMN cTaHdaptn C.
Ha EC.

To3n ypeE npoeKtnpaH n npoN3BeDeH C BnCOKOKaYeCTBHeH MaTePnaJI N KOMNoHEHTN, KOIto MOraT da ce peuNKInpaT. CmBOJbT Ha 3auepkHaT KOHTeINep Ha KOJIeJIca Noka3Ba, Ye npOdyKTbT NOJNeKn Ha pa3deJIHO Cb6nPaHcBoTBcTcBHe c DnpeKtNbAba H a EbponeiCKn NapJaMeNT N CbBETA 2012/19/EC n B cbOTBeTcTBHe c DnpeKtNbA 2006/66/EO ha
Ebponeecknnapnaemnt Ha CbBbTa nHΦopMnpa, ye eJektpnueeckoTo n eJektpoHHOT o6OpyDbAHe, KaKTo n 6aTepeNtTe n akymyIaNtoprTe, cJeI N3TtUaHe Ha NOJIe3HnI M XINBOT, He Tp8Ba Da ce I3XbPnT C
dpyu 6bTOBn OTNaIbCn. NOpTe6nteT e IJbXeH da ro npede Ha c6bnpaHa HO TcnaIbIcN OIeKtpueecko IeKtpoHNO o6OpyDbAne, KaKTo n Ha 6aTeepn H akyMylatopn, KOTo e Cb3daI CNCTema 3a Cb6pHaHe Ha TAKBa OTNaIbCn, BKNIOHTENHO B NOxOJaMaRa3IN, MeCTe H c6bnpaTeHn PnykT nII N O6UHNC0 3BeHo. OTNaIbCtte OT o6OpyDbAne MORaT Da IMaT BpeDHO B3DeIcTBVe BbpXy OKoJIHaTa CpeDa I YOBeIJKOTO 3dPaBe NopAdn NotEHnauHOTc BdbPkaHne Ha ONaCHN BeIeCTBa, Cmecn IN KOMNoHETN. DOMaKInCTBOTo INrpae BaxHa PoJra, KaTO dOpnpHaCz 3a NOBTOHPATA yNtpe6a I ONO3OTBOPRABaHTo, BKIOUHTENHO peuKlnpaHTo, Ha OTNaIbUHTo O6OpYDbAne. Ha To3n etan ce fOpMupat Harglacn, KOTo OKa3BaT BnIaHne BbpXy ONA3BaHTo Ha O6IoTO 6laRo, KAKBoto e YnCTata OKoJHa CpeDa. DOMaKInCTBaTa ca n Ednr ot HaI- rOJeMITE Ntpe6nteHa I Dpe6HO o6OpyDbAne I paUOnHaJIHOTo UnpaBLeHne Ha TOBa O6OpYDbAne BnIe BbpXy OON3OTBOPRABaHTo Ha BTOpUHN CypOBHH. B clyuaHn H enpabUNHO n3XBbpIaHne Ha To3n IPOdyKT MOrAT Da 6bDaT HAnOKeHn CaHKUHN B CbOTBETCTBNe C HAOnOHANOHTO 3akOHDoATEJCTBO B kpa H Ja Xn3HeHn ZIKbl Ha npOdyKTA Toi He Tp8Ba Da ce N3XBbpIa B 6OKnyk OT o6NKHOBEHNTe 6tOBn OTNaIbCn, Ho Do nyHKTa 3a C6bnpaHe Ha OTNaIbCn OT eNEKtpueecko I eNEKtpoHNO o6OpyDbAne. Toba e 6oO3NaUeHO Cbc CMBOJ BbpXy pO4yKTA, PbKOBOIDCTBOTO 3a Ntpe6nteHa IINI ONAOKKaTa. MaTePnaIte NoIeXgat Ha peuKlnpaHne B cBoTBETCTBNe C eTKKeTa. Ype3 IOBTOPhA Ta yNtpe6a, peuKlnpaHne IINI dpyr Naun H a ONoI3OTBOPRABaHe Ha CTAPOTO BV O6OpyDbAne BVE DOnpinaCAte 3NaHTeHNO 3a ONA3BaHeto Ha OKOIHaTa CpeDa.
13 Lien
TechniSat DIGICLOCK 2 e npedHa3Hauen 3a npemane Ha FM paiooppeabaHn. YcpoicBOTO e npedHa3HaueNo 3a yacTna ynoTpe6a n He e noxOJIo 3a TbpROBcN ueIi.
14 Bezona cha pa60Ta
Cna3BaIte cIeHNITe HNCTpyKcH, 3a Da CBeJeTe Do MNHMym pNCKOBeTe 3a 6e3oNaChocTta, Da n36eHHeTe NOBpeHa o6OpyDbaHeto N da DOnpInHeceTe 3a ONa3BaHTo Ha OKoJHaTa cpeJa.
IpoyeTe BHNMaTeJHO BCnKu INHCTpyKcN 3a 6e3OnacHocT n rN 3ana3eTe 3a 6bDeu cnpaBKn. BuHaRn cna3BaIte BCnKu ppeDynpexKeHnry n HnCTpyKcN B TOBa pbKOBOCTBO n Ha Tbp6a Ha ypeDa.

ONACHOCT!
Hnkora He oTbapnTe ypea!
ДOKOCBAHETO Ha XINBIV KOMNOHEHTN E XINBOTO3aCTpaUbaIoo!

NPEdynPExKdEHHe!
Onachoct OT 3aDywaBaHe! He octabrTe onakOBkata n HeHnTe qactn Ha rpnKte Ha deca. OnachocT OT 3aDywaBaHe ot fOJno n dpyrn OnakOBbHm MaTePnAn!

3a da ce rapaHTnpa npabnHaTa ynoTpe6a Ha ypea n da ce n36eHne NOBpeHa Ha ypea n HapaHbAHe Ha Xopa, Tp8Ba Da ce cna3BaT BCNUKn
CneBbAun HNCTpyKcUN.
He pemontnpaTe ypeTa camn. PonpaBknte Tp6Ba da ce n3BbPWBat camo ot obyuHn cneuaJIncTn. CbpxTe ce c
HaunTe 电HTpoBe 3a 06cnyKbaHe Ha KnneHTN.
- YcTpoiCTBOTO Tp6Ba Da ce n3nOJ3Ba cAmO npN onpeJeHne 3a Hero yCIOBnHa OKoJHaTa CpeJa.
He n3naraTe ypeHa Ha kanea nn npbckaasa Boda.Ako BVpeDa nonaDHe BODa, n3KnOyete ro n yBeDoMeTe cepBn3HaTa cnjx6a.
He n3naraTe ycTpoiCTBOTO Ha n3TOUHnHa TOnnHa, KOnTo ro HarpBaT B DonbJHHeHne KbM HopMaJHaTa yNoTpe6a.
B cnyaHa 3a6eJexMa nOBpeHa Ha ypeHa, Mnpu3Ma nn DNIM, 3NaHTeJIHn DeΦeKtn nn NIOBpeNn NO KOpnyCa, He3a6abHO ce CbByPKeTe Cbc cepBN3HnA ueHTbp. - YcTpoiCTBOTo MoKe Da pa6OTn cMo C nOcoeHOTo MpeXoBO HanpeXeHne. Hnkora He ce OINTBaIte Da n3NoJ3BaTe ycTpoiCTBOTo npn dpyro HanpeXeHne.
Ako yctpoiCTBOTo e noBpeJeHO, To He Tp86Ba da ce n3noJ3Ba.
He n3noJ3BaIte yCTpoiCtBOTO B 6Jn3OCT Do BAHN, dyWOBe, pnyBn 6aceHn nn Teuaa/pa3npbckBaa ce BoJa. CbIeCTByBa pNCK OT TOKOB yIap n/nn noBpeHa ha o6OpyDbaHeTo.
B yctpoiCTBOTo He Tp86Ba Da nonaDat yxkDn PpeMeTu, Hanp. ngnn MOhetn np. He DOKOCBAIte Cbbp3BaunTe KOHTAKTN C MetaJIHn PpeMeTu nnn npbcTn. ToBa MoKe Da DoBeDe Do Kbco CbeDInHeHne. - YpeIbT He e npEHa3HaueH 3a n3NoJ3BaHe OT Iuca (BKNIOUHTeJIHO Deua) C HamaJIeHN cN3nueckn, CETINBn IJN yMCTBeHn CNOCO6HOCTn IJN C HeIOCTaTbueH ONIT N/IIJN IO3HaHnA, OCBEN aKO He ca NOJyUnn Ha3Op IJN INCTpyKcUN 3a n3NoJ3BaHeTo Ha ypeJa OT JInCe, OTROBOPHO 3a TjXHaTa 6e3oNaCHOCT.
3a6paHEno e da ce npabT npomeHn B yCTpoIcTBOTO.
1.4.1 Правни haćokn
i C hactoTo TechniSat deKnappa, ye paNoocpOcTBOTn DIGICLOCK 2 (76-4902-00) e B cBoTBeTcTBne C DnpeKtNb a 2014/53/EC n RoHS. IbHnA r TeKCT Ha EC deKnapaunra Ta 3a cBoTBeTcTBne e DoctbneH ha cIeHNy ye6 aDPEC:
He dokocbaite uencela c mokpn pbue, Ima onachoct ot TokOB yap!

BHIMAHHE!
Pa3noJoxTe MpeKOBna Ka6eTaka, Ye HIKoJa He Ce cNbBa B Hero.
BknHouTe eenceHa DIGICLOCK 2 B KOHTaKT Ha eJeKtpnueckaTa Mpeka (AC 230V ~ 50Hz).
Прдда CBьржete урда Кьм CTehня KOHTaKT, ce ybepeTe, ye pa60THOTO HanpexeHne Ha ypeDa CbOTBeTcTBa Ha HanpexeHneTO B MecTHaTa eJektpnuecka Мржа.

I3dpbnaTe 5e nceTa, KOraTo He ro I3noJ3BaTe. N3dbpnaTe 5e nceTa, a He Ka6ena. N3KnIOUeTe yCTpoiCTBOTo OT eJeKTPnueckaTa Mpeka
Ipei6ypr. H3KIOUcTe ypea OT eNEKTPnueckata Mpeka, aKO Hma da ce
H3no3Ba DbIro BpeMe, HAp. Ipei Da 3aOnuHeTe Dblro PbTyBaHe.
TOnnHaTa, reHepnpaHa nO BpeMe Ha pa60ta, Tp6Ba Da ce pa3ceBa Ype3
NoXoJaHa zInpkylaun Ha Bb3dyxa. 3aTOBa He NOKPnBaIe ypea n He ro
NoCTabYte B 3aTBOpEn ShkaΦ. YBepTe ce, ye hMa CBO6oJHO npocTpaHCTBO
OKOJIO
obopydbahe c shnpounha hai-majko 10 cm.

Papno6ydnHKnBcT ce 3axpaHbC npomeHnB TOK. H3noJ3BaIe DBe 6aTePN C pa3mep AAA, 3a Da 3ana3nte TOOHTo Bpeme npi npeKbcAHe Ha eJeKtpnueckKaTa Mpeka.
IocTaBete 6aTePnHTe, KaTO cna3BaTe MapKnpoBkata 3a noJapHocT (+/-) B OTdJeHHeTo 3a 6aTePnN. 3aMeHete BCnUKN 6aTePnN C HOBn eDHOBpeMeHNo. N3BaTe TE BCnUKN 6aTePnN, KOraTO yCTpOJCTBOTo HЯMa da ce N3PON3Ba 3a Dblr nepNOd OT BpeMe.

ФункцинHaустойТВOTO
2.4.1
3aabaheHaTouHnYac
3a da HactpoNTe npabunHOTOBpeMe, n3KlnOHTe ypeDa, KaTO HaTnCHTe 6yToHa OFF/ON (2).
Cnéд това натусяпе бутона MEMORY / TIME SET (5) за по-дьлг.
3a da 3aadaTe yaca, HATnCHte 6yToHa HOUR / TUN- (6).
3aДанactponTe MmHyTnte,ИЗПОЛЗВайTe 6уToHa MINUTE/TUN+ (3).
2.4.2
ABTomatuHn HacTpoBbHe
3a da cTaptnpate aBtOMaTHHOTo TbpcHe Ha cTaHcN, HATNCHE Te noDbIro 6yToHa HOUR/TUN-(6) nnn MINUTE/TUN+ (3).
PaIIO6yIDINHIKbT 3aONUHe aBToMaTHUHO da TbpcN B dHaNa3OHa, KaTO ige cnpe Ha NpBbTa HamepeHa cTaHcY.
2.4.3
PbUHO HAcTpoBaHe Ha paAnoTo
3a da 3adaTe npabunHaTa YecToTa Ha npHemaHe, n3noJ3BaIte 6yTOHHTE HOUR / TUN- (6) u MINUTE / TUN+ (3). Pn BCaKO TExHO HATnCKaHe YecToTata ce npomeHa c 0,1 MHz.
2.4.4
3aHcBaHe Ha cTaHcMn B JIO6HMN
3a da 3ana3nte cTaHnB CnncbKa C IIO6mN, HATNCHeTe 6yToHa
HACTPOVIKA HA NAMETTA/BPEMETO (5).
HomepbT ha nporpaMaTa ige mHa ha ekpaHa. C 6byToHnTe HOUR / TUN- (6) nIN MINUTE / TUN+ (3) 3aJaTe JKeIaHnJ HOMep n 3ana3eTe nporpaMaTa, KaTO nOTBbPdInTe c 6byToHa MEMORY / TIME SET (5).
0.3A Pa3Mepn Ha yCtpoNCTBOTo:
125.4x50x60mm BaTePm: 2x AAA 3a
apxnbpahe Ha nametTa EpekTnBHa
MOUHOCT:0,5W
Bpoi IIO6mN cTaHcnn: 20
3A6EJIEXKKA: 3axpaHbAHeto OT 6aTepeYTa ce n3noJ3Ba cAmo 3a noIbPkaHe Ha NaMeTTa Ha yCTpOiCTBOTo B CnyaH Ha npeKbcBaHe Ha eJeKTpo3axpaHbAHeto (HaNP. NaMeTTa 3a BpeMeTo). BaTeepnnte He ca BKIOUeHN B KOMNKeTA.
4 PpOu3BovnteJ
TechniSat Digital Sp. z o.o.
ul. Poznańska 2,
Siemianice 55-120 Oborniki
Slaskie
Návod k obssluze
DIGICLOCK 2
125.4x50x60mm Patareid: 125.4x50x60mm
RMS voimsus: 0,5W
- Operating instructions
- DIGICLOCK 2
- Safety instructions
- Foreword
- Dear customers,
- Symbols and symbols used
- In this manual:
- On the device:
- Purpose
- Safe handling
- DANGER!
- WARNING!
- Legal guidelines
- Service information
- Description of the device
- Contents of the device
- Special features
- Preparing the device for operation
- Setting up a wire antenna
- Connection to power supply
- NOTE!
- Device functions
- Setting the correct time
- Automatic tuning
- Manual radio tuning
- Save stations to favourites
- Calling a programme from the radio programme list
- Alarm setting
- Alarm activation and deactivation
- Snooze function
- Setting the switch-off timer
- Changing the volume
- Changing the intensity of the LED display backlight
- Specification
- Manufacturer
- Használati utasítás
- Manipulation sure
- Lien
- Bezona cha pa60Ta
- ONACHOCT!
- NPEdynPExKdEHHe!
- Правни haćokn
- BHIMAHHE!
- ФункцинHaустойТВOTO
- 2.4.1
- 2.4.2
- 2.4.3
- PbUHO HAcTpoBaHe Ha paAnoTo
- 2.4.4
- 3aHcBaHe Ha cTaHcMn B JIO6HMN
- PpOu3BovnteJ
- Návod k obssluze
Brand : TECHNISAT
Model : Digiclock 2
Category : Radio