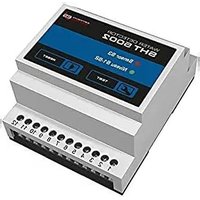
SHT 5002 - Alarm system Schabus - Free user manual and instructions
Find the device manual for free SHT 5002 Schabus in PDF.


| Product type | Water detector / level controller |
| Brand | Schabus |
| Model | SHT 5002 |
| Dimensions (H x W x D) | 57 x 72 x 90 mm |
| Power supply | 230 V AC (±10%) / 50-60 Hz or 12-16 V DC / 0.5 A |
| Power consumption | approx. 3 W |
| Protection type | IP20 |
| Operating temperature range | 0 °C to +40 °C |
| Sensor connections | 3 inputs: S1, S2 for level control; S3 for indication |
| Sensor voltage | 2.5 V AC |
| Sensor switching threshold | RS < 80 kOhm |
| Max sensor cable length | 50 m |
| Relay K1 (level S1-S2) | max. 5 A / 230 V (1 potential-free switch) |
| Relay K2 (sensor S3) | max. 5 A / 230 V (1 potential-free switch) |
| Mounting | On 35 mm hat rail, in junction box or electrical cabinet |
| Main functions | Level control (filling/draining), overflow indication, dry run, water level with sensor S3 |
| Maintenance and cleaning | Clean with a slightly dampened dry cloth; no solvents |
| Safety | Installation by qualified professional; do not open the device |
| Warranty | Legal warranty against material defects and quality defects |
| General information | CE certification; WEEE no. 91394868 |
Frequently Asked Questions - SHT 5002 Schabus
User questions about SHT 5002 Schabus
0 question about this device. Answer the ones you know or ask your own.
Ask a new question about this device
Download the instructions for your Alarm system in PDF format for free! Find your manual SHT 5002 - Schabus and take your electronic device back in hand. On this page are published all the documents necessary for the use of your device. SHT 5002 by Schabus.
USER MANUAL SHT 5002 Schabus
Operating instructions
Water detector (Level Control) SHT 5002 Item no.: 300749

HERZLICHEN DANK FÜR IHR VERTRAUEN!
In order to be able to constantly guarantee the product's optimum functionality and readiness for operation as well as your safety, we have a request: Please thoroughly read this operating instruction prior to the first use and observe all safety instructions! The operating instruction is a component of this product. Keep this, so you can always refer to it.
1. DELIVERY SCOPE
1 control device ▶
1 operating instruction ▶
2. SAFETY INSTRUCTIONS
2.1 General
Before you start mounting the device please read the operating instructions carefully.
The installation shall be performed by qualified personnel.
Packaging material is not a children's toy. Keep it away from children!
Do not open the device. It does not contain parts you have to maintain.
2.2 Ambient conditions
The standards used to assess the product specify limit values for use in the living area, business area and in small enterprises; the product has been intended for use in the following operating environments:
Residential buildings/living areas such as houses, flats, rooms, etc. selling areas such as • shops, wholesale markets, etc.
Premises of small enterprises such as workshops, service centers, etc.
All areas of application characterize themselves by a connection to the public low voltage • mains.
3. APPROPRIATE USE
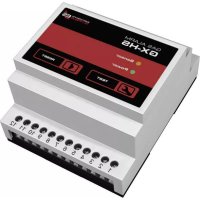
The SHT 5002 water detector is designed for level control (2-point controller). An upper and lower level are defined by two water sensors or a float switch and can be used to automatically fill or empty a container.
The SHT 5002 water detector also has another sensor input for a water detector with a potential-free relay contact. This makes it possible to determine the water level independent from the current level control.
Examples of use:
Overflow warning in the event of pump failure ▶
Dry running warning to protect the pump ▶
Water level report
4. ASSEMBLY INSTRUCTIONS AND CONFIGURATION

A qualified technician must install the device.
4.1 Installing the sensor
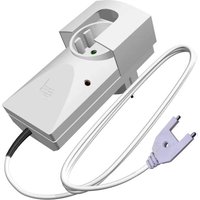
The SHT 5006 water detector (art. no.: 300745) responds to contact with water via two metal contacts (sensor circuit is closed). You can extend the sensor cable with a dual-core wire (2 x 0.5 mm 4 ) up to 50 metres.
Use our mini float switches for non-conductive liquids:
Mini-float switch made of plastic (art. no. 200940)
Mini-float switch made of stainless steel (art. no. 200941)
4.2 Installation
The SHT 5002 water detector is installed on a 35 mm top-hat rail in a distributor, switch cabinet or wall-mounted housing.
Instead of 230 V AC operating voltage, you can also operate the SHT 5002 water detector with 12 – 16 V DC/0.5 A. Use the clamps 5 (+) and 6 (-) for this purpose.
4.3 Level control (2-point controller)
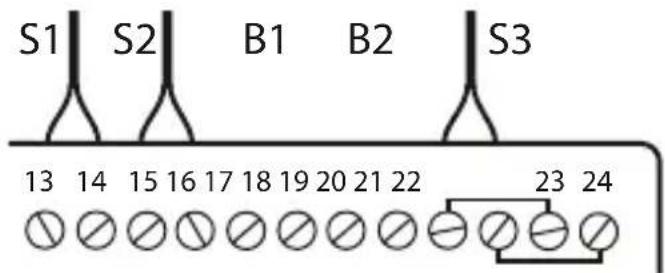
Sensor 1 determines the lower level and sensor 2 determines the upper level. The B1 jumper is used to define the switching behaviour of the K1 relay.
4.3.1 Filling the container (Fig. page 13) without jumper B1
Water level below sensor 1: K1 relay picked up - pump ON
Water level at sensor 2: K1 relay dropped out - pump OFF
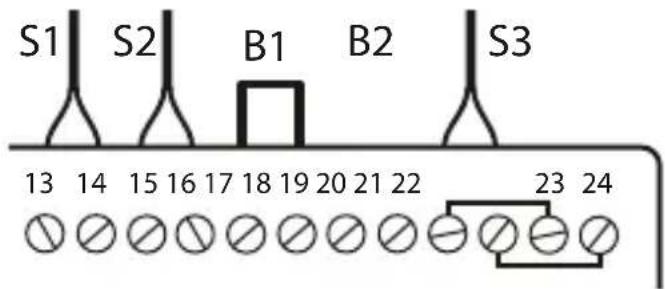
4.3.2 Emptying the container (Fig. page 14) with jumper B1
Water level below sensor 1: K1 relay dropped out - pump OFF
Water level at sensor 2: K1 relay picked up - pump ON
Connection example 1: Filling the container
![graph TD A["Sensor 1 Level down"] --> B["Pump"] C["Sensor 2 Level up"] --> D["Sensor 3 Overflow"] E["Sensor 3 SHT 5002"] --> F["TEST RESET"] G["Sensor 3 SHT 5002"] --> H["Niveau S1-S2 Sensor"] I["Sensor 3 SHT 5002"] --> J["L N 12 V + - K1 K2"] K["Sensor 3 SHT 5002"] --> L["L N 230 V AC"] M["Sensor 3…](/content/2026/04/673982/images/615064684a65ea8b629726d044583bbdbe5c8a5315c96006a0e7a4184a9caa22.jpg)
Connection example 2: Emptying the container
![graph TD A["Sensor 1 Level down"] --> B["Pump"] C["Sensor 2 Level up"] --> D["Sensor 3 Overflow"] E["WATER DETECTOR SHT 5002"] --> F["TEST"] F --> G["L N 12 V + - K1 T1 12"] G --> H["230 V AC L N"] I["Overflow warning e.g. signal horn"] --> J["Sensor 3"] J --> K["Sensor 2"] style A fill:#f9f,stroke:…](/content/2026/04/673982/images/e602d1025d61666a9f920ad6244e2a72a19b0dd699ce4b58143f242ebadc38b5.jpg)
4.4 S3 sensor warning
With sensor 3, you can determine the water level independent of the level control in order to obtain e.g. the following warnings:
▶ Overflow warning in the event of pump failure (sensor 3 is installed over sensor 2)
▶ Dry running warning for the protection of the pump (sensor 3 is mounted under sensor 1) Water level report (sensor 3 is installed between sensor 1 and 2) ▶
4.4.1 Switching behaviour of the K2 relay
Water level below sensor 3 - K2 relay picked up
Water at sensor 3 - K2 relay dropped out
4.4.2 Configuration of the S3 sensor warning
You can define two different output messages for the S3 sensor input:
▶ S3 sensor warning with storage function: The warning persists or the K2 relay stays switched until a button is pushed to clear the warning.
▶ S3 sensor warning without storage function: The warning persists or the K2 relay stays switched until the sensor no longer reports water.
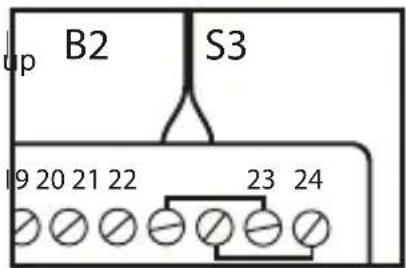
Storage function ON with jumper B2
The
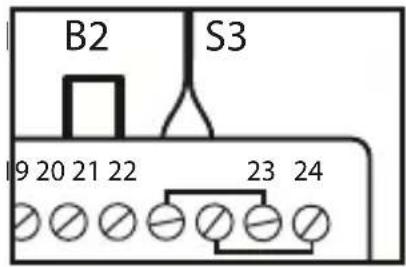
Storage function OFF without jumper B2
The
4.4.3 Acknowledgement of K2 relay
The K2 relay can be acknowledged separately with the
5. OPERATION
5.1 Operating display
LED
LED
5.2 Function test
5.2.1 Function test S3 sensor warning
Pushing the
5.2.2 Function test level control
Touch the sensor contacts (in sequence) with a cloth soaked in water or an electrically conductive metal to simulate a change in the water level.

For your safety, we recommend that you regularly check the function of the unit!
6. TECHNICAL DATA
Operating voltage: 230 V AC (+/-10 %)/50 – 60 Hz 12 – 16 V DC/0.5 A
Power consumption: approximately 3 W
Sensor connections: 2x level control/2x overflow
Sensor voltage: 2.5 V AC
Sensor switching point: RS<80 KOhm
Sensor cable length: up to 50 m possible
K1 relay for S1-S2 level: max. 5 A/230 V
(1 potential-free changeover contact)
K2 relay for S3 sensor: max. 5 A/230 V
(1 potential-free changeover contact)
Functional range: 0 °C/+40 °C
Protection class: IP 20
External dimensions (HxWxD): 57x72x90 mm
7. GENERAL
Elektrotechnik Schabus GmbH & Co. KG is not liable for damages and/or losses of any kind such as individual damages or consequential damages brought about by the water detector not issuing an alarm despite any changes in water conditions.
7.1 Cleaning and care
Avoid the effects of moisture (spray or rain water), dust as well as direct insolation on the device. Clean the device exclusively with a dry linen cloth; in case of heavy dirt accumulation, it may be slightly moistened. Do not use any detergents containing solvents.
7.2 Declaration of conformity
The CE mark on the device confirms that it conforms to relevant EU directives. The declaration of conformity is available for viewing at the address below.
All rights, technical changes, errors and misprints are reserved.
7.3 Warranty
We grant an implied warranty on material and quality defects of your electronic product by Elektrotechnik Schabus from the date of purchase. Elektrotechnik Schabus will repair or replace your device free of charge on the following conditions:
In case of implied warranty, the device has to be returned with the following documents: error description, proof of purchase as well as your address and delivery address (name, phone number, street, house number, postcode, city, country).
Devices returned to Elektrotechnik Schabus shall be sufficiently packaged. Elektrotechnik • Schabus will not take liability for any damage or loss during shipment.
- The device has to have been used in accordance with the operating instructions. Elektrotechnik Schabus will not take liability for any damage resulting from accident, abuse, modifications or carelessness.
Elektrotechnik Schabus will not take liability for any loss, damage or costs resulting from the use of the devices or the accessory equipment.
The warranty does not affect your statutory rights as consumer.
7.4 Return shipment
Should your device be defective, we offer you the following option:
Contact Elektrotechnik Schabus by
Phone +49 (0) 80 36 / 67 49 79 - 0
Fax +49 (0) 80 36 / 67 49 79 - 79
Email info@elektrotechnik-schabus.de
7.5 Environmental information
For the production of the purchased product, natural raw materials had to be obtained and used. It may contain substances hazardous to health and the environment.
In order to avoid the distribution of these substances in your environment and save natural resources, we ask you to use the appropriate take-back systems. Thanks to these systems, the materials of your product can be recycled in an environmentally friendly way, after its service life has expired. (WEEE-NO: 91394868)
The strike-through wastepaper basket symbol reminds you of the use of these systems.
Should you wish to obtain more information on collection, reuse and recycling systems, please refer to the waste advisory service in your city. You may also refer to us to obtain more information on the environmental compatibility of our products.
MERCI DE VOTRE CONFIANCE!


- OPERATING INSTRUCTIONS
- HERZLICHEN DANK FÜR IHR VERTRAUEN
- DELIVERY SCOPE
- SAFETY INSTRUCTIONS
- 2.1 GENERAL
- 2.2 AMBIENT CONDITIONS
- APPROPRIATE USE
- ASSEMBLY INSTRUCTIONS AND CONFIGURATION
- A QUALIFIED TECHNICIAN MUST INSTALL THE DEVICE
- 4.1 INSTALLING THE SENSOR
- 4.2 INSTALLATION
- 4.3 LEVEL CONTROL (2-POINT CONTROLLER)
- 4.3.1 FILLING THE CONTAINER (FIG. PAGE 13) WITHOUT JUMPER B1
- 4.3.2 EMPTYING THE CONTAINER (FIG. PAGE 14) WITH JUMPER B1
- 4.4 S3 SENSOR WARNING
- 4.4.1 SWITCHING BEHAVIOUR OF THE K2 RELAY
- 4.4.2 CONFIGURATION OF THE S3 SENSOR WARNING
- STORAGE FUNCTION ON WITH JUMPER B2
- STORAGE FUNCTION OFF WITHOUT JUMPER B2
- 4.4.3 ACKNOWLEDGEMENT OF K2 RELAY
- OPERATION
- 5.1 OPERATING DISPLAY
- 5.2 FUNCTION TEST
- 5.2.1 FUNCTION TEST S3 SENSOR WARNING
- 5.2.2 FUNCTION TEST LEVEL CONTROL
- TECHNICAL DATA
- GENERAL
- 7.1 CLEANING AND CARE
- 7.2 DECLARATION OF CONFORMITY
- 7.3 WARRANTY
- 7.4 RETURN SHIPMENT
- 7.5 ENVIRONMENTAL INFORMATION
- MERCI DE VOTRE CONFIANCE
Brand : Schabus
Model : SHT 5002
Category : Alarm system