AF-50 - Microphone Dörr - Free user manual and instructions
Find the device manual for free AF-50 Dörr in PDF.

| Product type | Wireless microphone kit (mono) with 2.4 GHz radio transmission |
| Brand | Dörr |
| Model | AF-50 |
| Frequency range | 2.4 GHz (2400-2483 MHz) |
| Directional characteristic | Omnidirectional (sphere) |
| Frequency response | 50 Hz - 15 kHz ± 3 dB |
| Sensitivity | -34 dB ± 3 dB |
| Self-noise | 25 dB-A |
| Max. sound pressure | 120 dB |
| Signal-to-noise ratio | >84 dB |
| Output impedance | 600 Ω |
| Total harmonic distortion | <0.03% (32 Ω, 1 kHz, 80 mW) |
| Range | Approx. 20 m (indoor), 50 m (outdoor) |
| Transmission power | 10 mW |
| Power supply | Built-in 3.7 V, 800 mAh lithium-polymer battery (transmitter and receiver) |
| Battery life | Approx. 8 hours |
| Charging | USB-C (cable included) |
| Connectivity | 1x 3.5 mm TRS microphone input (transmitter), 1x 3.5 mm TRS/TRRS output (receiver), 1x 3.5 mm headphone output (receiver) |
| Dimensions (transmitter/receiver) | Approx. 7 x 3 x 2.3 cm |
| Total weight (kit) | Approx. 95 g (transmitter + receiver) |
| Package contents | 1 transmitter, 1 receiver, 1 lavalier microphone, 1 spiral TRS cable, 1 spiral TRRS cable, 1 USB-C cable, 1 carrying bag, 1 manual |
| Care | Slightly damp microfiber cloth, no harsh chemicals |
| Storage temperature | Dry, cool, dust-free place |
| Standards | CE, RoHS, WEEE directive |
Frequently Asked Questions - AF-50 Dörr
User questions about AF-50 Dörr
0 question about this device. Answer the ones you know or ask your own.
Ask a new question about this device
Download the instructions for your Microphone in PDF format for free! Find your manual AF-50 - Dörr and take your electronic device back in hand. On this page are published all the documents necessary for the use of your device. AF-50 by Dörr.
USER MANUAL AF-50 Dörr
natural_image
Black Dörr recording device with microphone and control buttons, no visible text or symbols on main bodyAF-50

natural_image
Black DSLR camera with lens on a plain teal background (no text or symbols visible)09.3 ROHS KONFORMITÄT
THANK YOU for choosing this DÖRR quality product.
Please read the instruction manual and safety hints carefully before first use.
Keep this instruction manual together with the device for future use. If other people use this device, make this instruction manual available. This instruction manual is part of the device and must be supplied with the device in case of sale.
DÖRR is not liable for damages caused by improper use or the failure to observe the instruction manual and safety hints.
01 | SAFETY HINTS
- Do not throw the transmitter and the receiver into fire, do not short-circuit, and do not disassemble them – risk of explosion from the built-in batteries!
- Before first use, please fully charge the built-in Lithium Polymer battery of transmitter and receiver. The battery may become warm when charging and discharging. This is not a technical defect. Only charge the battery with the supplied USB-C charging cable. Never leave the transmitter/receiver unattended while charging.
- If device is not in use for a long period of time, we recommend charging the battery to about 75%. The storage of an empty or fully charged battery will shorten its life.
- Protect the device from liquids, rain, moisture, direct sunlight and extreme temperatures.
- Do not operate or touch the device with wet hands.
- Protect the device against impacts. Do not use the device if it has been dropped. In this case a qualified electrician should inspect the device before you use it again.
- Do not attempt to repair the device by yourself. Risk of electric shock! When service or repair is required, contact qualified service personnel.
- People with physical or cognitive disabilities should use the device with supervision.
- People with cardiac pacemakers, defibrillators or any other electrical implants should maintain a minimum distance of 30 cm, as the device generates magnetic fields.
- Do not use the device nearby devices that generate strong electromagnetic fields.
- This device is not a toy. To prevent accidents and suffocation keep the device, the accessories and the packing materials away from children and pets.
- Protect the device against dirt. Never use aggressive cleansing agents or benzine to clean the device. We recommend a soft, slightly damp microfiber cloth to clean the outer parts of the device. Before cleaning make sure to switch off the device!
- Store the device in a dust-free, dry and cool place.
- If the device is defective or without any further use, dispose of the device according to the Waste Electrical and Electronic Equipment Directive WEEE. For further information, please contact your local authorities.
02 | PRODUCT DESCRIPTION
Clip-On microphone kit for a wireless 2.4 GHz radio transmission with a range of up to 50 meters.
- Provides clear sound recordings for webinars, broadcasts, reports, documentaries, presentations, interviews
- Can be used with smartphones, tablets, laptops, PCs, DSLR, system and compact cameras, camcorders
• Built-in rechargeable batteries for a long operating time of up to 8 hours, charged via USB-C - Microphone with windshield and tie clip, receiver and transmitter with belt clip
- Supplied with 3,5 mm TRS & TRRS plug cable, USB-C charging cable and bag
03 | NOMENCLATURE
01 Transmitter
Marking S the rear side
01a) LED Indicator
01b) Line-in socket
01c) Microphone socket
01d) USB-C socket
01e) LED charging indicator
01f) Belt clip/Hot shoe mount
01g) On/Off switch
01h) Pairing button
01i) Mute button
03 Microphone with windshield
Marking 5 the rear side
02a) LED Indicator
02b) Headphone socket
02c) Output socket
02d) USB-C socket
02e) LED charging indicator
02f) Belt clip/Hot shoe mount
02g) On/Off switch
02h) Volume + / Pairing button
02i) Volume - / Pairing button
04 USB charging cable
04.1 Charging the built-in batteries
Please fully charge the Li-Ion batteries built into the transmitter (01) and receiver (02) before using them for the first time.
04.1.1 Charging the transmitter
Insert the USB-C plug (04a) of the supplied USB charging cable (04) into the USB-C socket (01d) of the transmitter (01). Connect the USB-A plug (04b) of the USB charging cable to a USB socket at your computer. While charging the LED charging indicator (01e) lights up red. When the battery is fully charged, the LED charging indicator (01e) turns off. Remove the USB cable from your computer and the transmitter. When battery is low, the LED charging indicator (01e) flashes red. Please charge the transmitter promptly.
04.1.2 Charging the receiver
Insert the USB-C plug (04a) of the supplied USB charging cable (04) into the USB-C socket (02d) of the receiver (02). Connect the USB-A plug (04b) of the USB charging cable to a USB socket at your computer. While charging the LED charging indicator (02e) lights up red. When the battery is fully charged, the LED charging indicator (02e) turns off. Remove the USB cable from your computer and the receiver. When battery is low, the LED charging indicator (02e) flashes red. Please charge the receiver promptly.
04.2 Preparing the microphone/transmitter
- Insert the mini jack plug (03b) on the microphone cable (03) into the microphone socket (01c) of the transmitter (01).
- Use the tie clip (03a) to attach the microphone (03) to your tie or to the collar of your jacket, blazer, shirt or blouse.
- Use the belt clip (01f) to attach the transmitter (01) to a discreet position, e.g. at the belt, to the waistband, to the inside pocket of your jacket, etc. or you can simply stow it in a pocket.
04.3 Preparing the receiver
PLEASE NOTE: To ensure correct function, always use the two supplied cables as described below.
04.3.1 Using with a camera, camcorder or other audio/video recording device
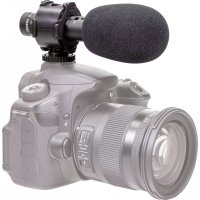
To use the DÖRR AF-50 wireless microphone set with a camera, camcorder or other audio/video recording device, please use the supplied TRS spiral cable (05) with the two 3-pin 3,5 mm mini jack plugs (05a). Insert one of the two mini jack plugs (05a) into the output socket (02c) of the receiver (02). Plug the other mini jack plug (05a) into the microphone socket of your camera or recording device.
If your camera or recording device is equipped with a hot shoe mount, the belt clip (02f) can be used as a hot shoe and the receiver (02) can be mounted onto your camera.

natural_image
Black DSLR camera with lens on a light blue background (no visible text or symbols)04.3.2 Using with a smartphone/tablet
To use the DÖRR AF-50 wireless microphone set with your smartphone or tablet, please use the supplied TRRS spiral cable (06) with one 3-pin 3,5 mm mini jack plug (06a) and one 4-pin 3,5 mm mini jack plug (06b). Insert the 3-pin 3,5 mm mini jack plug (06a) into the output socket (02c) of the receiver (02). Plug the 4-pin 3,5 mm mini jack plug (06b) into the headphone socket of your smartphone or tablet.
05 | OPERATION
05.1 Switching on/wireless connection
Slide the On/Off switch (01g) to position ON to switch on the transmitter (01) - the LED indicator (01a) flashes blue. Slide the On/Off switch (02g) to position ON to switch on the receiver (02) - the LED indicator (02a) flashes blue.
Press the "Pair" button (01h) on the transmitter (01) and at the same time the two buttons for volume + and - (02h and 02i) on the receiver for approx. 2 seconds. While connecting, the blue LED indicators (01a and 02a) flash quickly. If the wireless connection is successful, the LED indicators (01a and 02a) light up blue constantly.
After a one-time, successful pairing, the transmitter (01) and receiver (02) automatically connect to each other when they are switched on again.
If the radio connection is interrupted during the recording (e.g. out of range, due to obstacles such as metal objects, walls, people between the transmitter and receiver), the two LED indicators (01a and 02a) flash blue. If so, get back within the range. The transmitter (01) and the receiver (02) connect again automatically. If not, please pair them again as described above.
Start the video recording on your camera/recording device or on your smartphone/tablet and speak into the microphone (03). The person with the transmitter (01) and the microphone (03) will be recorded.
| NOTE: | When used with smartphoneTo hear the sound while playing the video or audio recording, please unplug the cable from your smartphone/tablet. |
05.2 Mute
If you want to interrupt or mute the recording, press the Mute button (01i) at the transmitter (01). While pressing the Mute button, the spoken word will not be recorded. As soon as you release the button, the microphone or transmitter continues to record.
05.3 Listening to the recordings
The person with the receiver (02) has the option of listening to the recordings made by the person with the microphone (03) and the transmitter (01). For this you need headphones with a 3,5 mm mini jack plug. Connect the headphone to the headphone socket (02b) at the receiver. You can use the volume buttons at the receiver (02h = volume up and 02i = volume down) to regulate the volume of the headphones.
05.4 Connect an external audio source
In order to accompany your video recordings e.g. with music or pre-made speeches you can connect an external audio source (e.g. a smartphone) to the transmitter (01). Connect the external audio source to the "Line in" socket (01b) at the transmitter (01) and start the music player on your audio source.
NOTE: Please remove the microphone (03) for this.
After use, please switch off the transmitter (01) and the receiver (02) with the respective On/Off switch (01g and 02g).
06 | CLEANING AND STORAGE
Never use aggressive cleansing agents or benzine to clean the device. We recommend a soft, slightly damp microfiber cloth to clean the outer parts of the device. Before cleaning, switch off the device and disconnect the USB power connection. Store the device in a dust-free, dry and cool place. This device is not a toy - keep it out of reach of children. Keep away from pets.
07 | TECHNICAL SPECIFICATIONS
| Type | Wireless Microphone (Mono) |
| RF Modulation | GFSK (Gaussian Frequency Shift Keying) |
| Frequency band | 2,4 GHz (2400-2483MHz) |
| Polar pattern omnidirectional | |
| Frequency response | 50 Hz - 15 KHz ± 3 dB |
| Sensitivity - 34 dB ± 3 dB | |
| Equivalent noise 25 dB-A | |
| Maximum Sound Pressure Level (Max SPL) | 120 dB |
| Signal-To-Noise ratio | >84 dB |
| Output impedance | 600 Ω |
| Harmonic distortion | 0.03% or less (32 Ω, 1 kHz, 80 mW output) |
| Operation range approx. | 20 m (indoor), 50 m (outdoor) |
| RF output level | 10 mW |
| Earphone socket output | 32 Ω, 80 mW |
| Connection | 1x 3,5 mm TRRS mini jack for smartphones1x 3,5 mm TRS mini jack for cameras |
| Power supply | Built-in Lithium Polymer battery 3,7 V 800mAh |
| Charging cable | USB-C to USB-A |
| Operation time with fully charged battery approx. | 8 h |
| Dimensions transmitter/receiver approx. | 7 x 3 x 2,3 cm |
| Weight approx. | 95 g |
Dörr GmbH reserves the right to make technical changes without notice.
08 | SCOPE OF DELIVERY
1x Transmitter
1x 3,5 mm TRS spiral cable
1x Receiver
1x 3,5 mm TRRS spiral cable
1x Microphone 1x Bag
1x USB charging cable 1x Safety hints
09 | DISPOSAL, CE MARKING, SIMPLIFIED EU DECLARATION OF CONFORMITY

09.1 DISPOSAL OF BATTERIES/ACCUMULATORS
Batteries are marked with the symbol of a crossed-out bin. This symbol indicates that empty batteries or accumulators which can no longer be charged should not be disposed of with household waste. Waste batteries may contain harmful substances that can cause damage to health and to the environment. Please use the return and collection systems available in your country for the disposal of the waste batteries.

09.2 WEEE INFORMATION
The Waste Electrical and Electronic Equipment Directive (WEEE Directive) is the European community directive on waste electrical and electronic equipment, which became European law in February 2003. The main purpose of this directive is to prevent electronic waste. Recycling and other forms of waste recovery should be encouraged to reduce waste. The symbol (trash can) on the product and on the packing means that used electrical and electronic products should not be disposed of with general household waste. It is your responsibility to dispose of all your electronic or electrical waste at designated collection points. Disposing of this product correctly will help to save valuable resources and it is a significant contribution to protect our environment as well as human health. For more information about the correct disposal of electrical and electronic equipment, recycling and collection points please contact your local authorities, waste management companies, your retailer or the manufacturer of this device.
√ 09.3 ROHS CONFORMITY
This product is compliant with the European RoHS directive for the restriction of use of certain hazardous substances in electrical and electronic equipment and its amendments.
CE 09.4 CE MARKING
The CE marking complies with the European standards and indicates that the product meets the requirements of the applicable EU directives.
09.5 SIMPLIFIED EU DECLARATION OF CONFORMITY
Hereby, DÖRR GmbH declares that the radio equipment type [395081] is in compliance with directive 2014/53/EU. The full text of the EU declaration of conformity is available at the following internet address: http://www.doerr-foto.de