SHZ 500-2 - Electric winch EINHELL - Free user manual and instructions
Find the device manual for free SHZ 500-2 EINHELL in PDF.


User questions about SHZ 500-2 EINHELL
0 question about this device. Answer the ones you know or ask your own.
Ask a new question about this device
Download the instructions for your Electric winch in PDF format for free! Find your manual SHZ 500-2 - EINHELL and take your electronic device back in hand. On this page are published all the documents necessary for the use of your device. SHZ 500-2 by EINHELL.
USER MANUAL SHZ 500-2 EINHELL
natural_image
Illustration of a mechanical lifting device with a hook and lever (no text or symbols)SHZ 300-2
SHZ 500-2
SHZ 600
Abb. 3
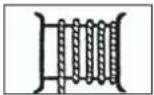
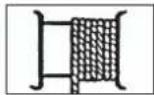
incorrect incorrect correct
fout
fout
correct
natural_image
Three hand-drawn geological cross-sections showing layered rock formations (no text or symbols)Damaged cables, as illustrated in 1, 2 and 3 here, must be replaced immediately.
2
text_image
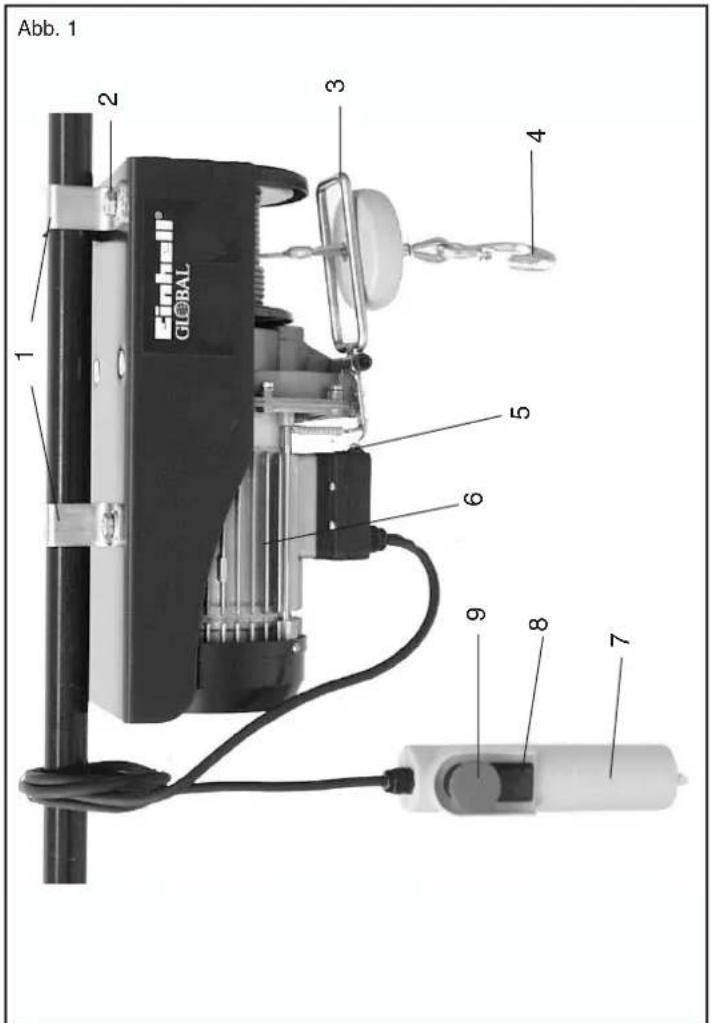
Abb. 1 2 3 4 5 6 7 8 9 Einhai® GLOBAL3
text_image
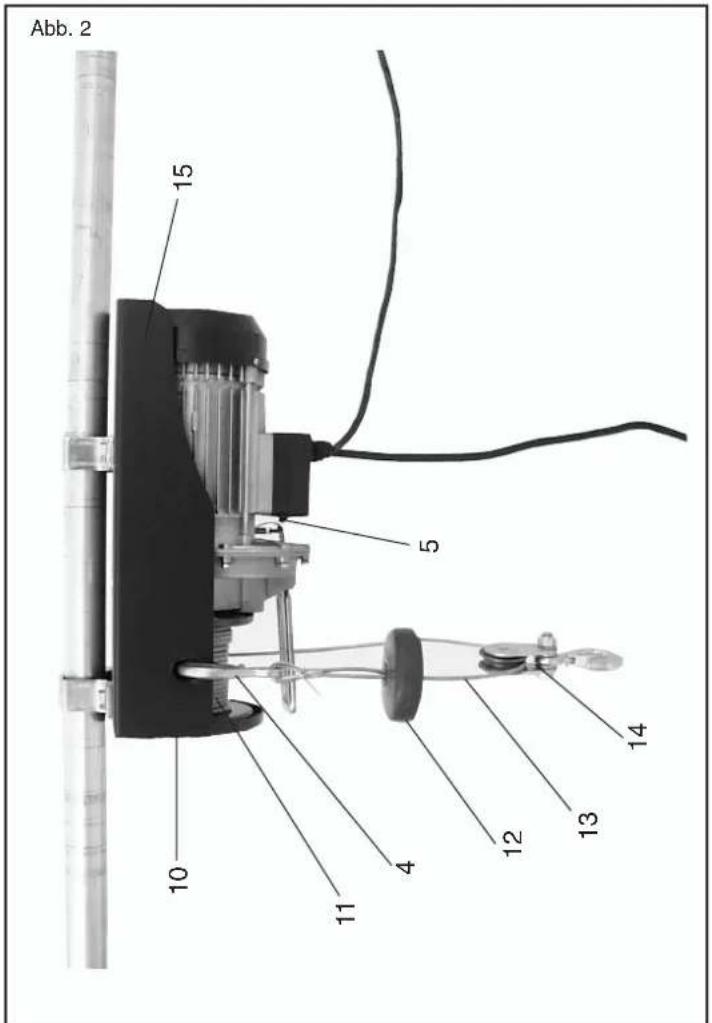
Abb. 2 15 5 10 4 12 13 144
D
- Fastening brackets
- Allen screws
- Switch-off lever
- Lifting hook
- Limit switch
- Motor
- Switch case
- Operating switch
- Emergency ston switch
10 Hook holder - Hook holder
- Cable reel
- Cable feel 12. will be off
- Witch-off Weight
- Steel cable
- Return pulley
- Carrier housing
2. General
Important!
The cable winch is designed for private household use only!
It is not designed for continuous use in commercial or industrial operations.
Please read the operating instructions carefully before you mount the device and use it for the first time, and keep them in a safe place for future reference.
Damage in transit
Check the device for damage in transit. Please advise the delivery company immediately if you discover any damage.
The cable winch is not designed for continuous use. The motor in the cable winch has a thermostat to protect it against overheating from overloading.
Intermittent periodic duty
Intermittent periodic duty (S3) requirements mean that you must allow for breaks for the device to cool down when in use. For a maximum permissible nominal load of 125 kg, for example, this standard specifies an operating time of 1 minute and a break time of 6 minutes. Should the operating time be increased, the thermostat will shut down in response to the increase in the temperature of the motor. Only after a break for cooling will the thermostat switch itself back on automatically. With a smaller load, the operating time is increased and the break time reduced accordingly.
Important!
The temperature of the housing will increase dramatically if exposed to direct sunlight, resulting in a major reduction in operating times.
-
Safety instructions Important! When using the cable winch you must comply with the following basic safety precautions for protection against electric shock and risk of injury and fire. Be sure to read and note these regulations before you use the device.
-
Do not overload your device. Do not exceed its maximum admissible load (refer to rating plate, not lifting hook!)
- Make sure you keep your working area tidy. An untidy working area can cause accidents.
- Take account of environmental influences. Do not expose electric equipment to the rain. Do not use electrical equipment in damp or wet environments. Make sure that you have adequate lighting. Do not use electrical equipment in the vicinity of combustible liquids or gases.
- Protect yourself from electric shocks. Avoid bodily contact with earthed parts.
- Keep children away from the equipment! Do not let anyone else touch the equipment or cables and let no one near your working area.
- Wear appropriate clothing. Do not wear any loose clothing or jewellery.
- Do not misuse the cable. Do not carry the equipment by the cable and do not pull the plug
GB
out by the cable either. Protect the cable from heat, oil and sharp edges.
- Take good care of your equipment. Keep the equipment clean for effective and safe operation. Check the plug and the cable at regular intervals and have them repaired by specially authorized persons if damaged. Check extension cables at regular intervals and replace if damaged.
- Pull out the mains plug when not in use.
- Extension cables in the open. When used outdoors, only use extension cables that are certified for the purpose and are labelled accordingly (up to 20 m ∅ 1,5 mm²; 20 - 50 m ∅ 2,5 mm²).
- Be attentive at all times. Watch your work and carry out your work with care. Do not use your cable winch when you lack concentration.
- Check your equipment for damage. Before continuing to use the equipment you must check that the safety devices function properly and as prescribed. Check that the moving parts function properly and that they do not jam, and check for damaged parts. All parts must be installed correctly in order for the equipment to be fully functional. Damaged safety devices and parts must be
repaired correctly or replaced by an after-sales service workshop, unless otherwise specified in the operating instructions. Damaged switches must be replaced by an after-sales service workshop. Do not use any equipment with a switch that cannot be switched either on or off.
- Do not let the cable unwind so far that it starts to wind up again in reverse - this will cause the cable to kink. The winding and unwinding directions will reverse, the limit switch will not function and the cable will kink as result. There must be at least three revolutions of cable left on the reel at all times, and whenever the red end of the cable appears you must not unwind any further!
- The electric motor of the cable winch is equipped with a thermostat for protection against overloading. The cable winch will stop operating if the thermostat is actuated and will only become operational again after a break for cooling (approx. 5 minutes).
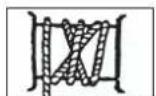
- The cable should be wound up in the way shown in Fig. 3.
- Have damaged parts replaced immediately.
- Repairs and maintenance work may only be carried out in specially authorized workshops by skilled persons. This electrical
equipment complies with appli- cable safety regulations. Repairs may only be carried out by a skilled person, other- wise the user risks the occur- rence of accidents.
- Use genuine spare parts only.
- Never attempt to carry out repairs yourself (forfeiture of warranty and loss of safety.)
- Do not expose the winch unnecessarily to the weather, sunshine, dust or cold.
- The winch must never be exposed to spraying or submerged in any kind of liquid. Never use in rain or during a thunder storm.
- As far as possible the winch should be used and stored in a dry place.
- It is absolutely prohibited to modify the winch.
- Use the device only for its intended purpose. Do not use the cable winch for any purposes or operations for which it is not intended. Do not carry persons with the cable winch.
- Do not stand or work under a lifted load.
GB
4. Technical data
| SHZ 300-2 SHZ 500-2 SHZ 600 | ||||||
| Withoutreturn returnpulley | Withreturn returnpulley | Withoutreturn returnpulley | Pulley | Pulley | Pulley | |
| Loading capacity 150 kg | 300 kg 250 kg | 500 kg 300 kg | 600 kg | |||
| Max. lifting height | 11,5 m | 5,7 m | 11,5 m | 5,7 m | 11,5 m | 5,7 m |
| Averagelifting speed | 10 m/min. | 5 m/min. | 10 m/min. | 5 m/min. | 10 m/min. | 5 m/min. |
| Cable length | 12 m | 12 m | 12 m | |||
| Non self-turning 3,05 mminsteel cable CK 45 Ω | 4,2 mm | 4,5 mm | ||||
| Cable breaking limit | 1200 kg | 2000 kg | 2400 kg | |||
| Electric motor:Line voltage 230 V - 50 Hz | 230 V - 50 Hz | 230 V - 50 Hz | ||||
| Power | P_1 550 W P | 1900 W | P_1 1050 W | |||
| Protection type | IP 54 | IP 54 | IP 54 | |||
| Insulation class | KL | KL | KL | |||
| Intermittent periodicduty | S3 20% - 10 min. | S3 25% - 10 min. | S3 20% - 10 min. | |||
| Engine class | 1 EM | 1 EM | 1 EM | |||
y
GB
5. Using for the first time
Check that the mains voltage is the same as the voltage shown on the rating plate on the cable winch. Protect your electrical system against short circuits with a 10 A overcurrent circuit-breaker. For additional operator safety, use the equipment with an earth-leakage circuit-breaker. Make sure that the switch is turned off when you connect the machinery to the mains power supply.
steel tube cantilever arm. The steel tube must have a diameter of 43 mm and a wall thickness of at least 3 mm.
- The cantilever arm must be firmly anchored in a wall. The anchoring must be of a correspondingly stable design to be able to bear the impacting loads.
■ Make sure that the device is always fastened in a horizontal and never in a vertical position. - If you use the return pulley you should hang the lifting hook (4) from the hook holder (10) in the carrier housing (15).
Operating instructions
• Winches may only be operated by persons who are clearly familiar with the operating regulations.
- The winch must be operated from a position where the operator is not at any risk from possible falling loads.
• Before any load is lifted or lowered, make sure that no one is within the danger area.
- The winch operator is responsible for the fault-free condition of the equipment, such as return pulleys and fastening parts, as well as for their secure fastening on stable fastening points.
- The winch operator is responsible for ensuring that the maximum load is not exceeded. Lifting cables and loads must never be drawn or pulled over edges.
• The winch operator must always check the safety devices each time before the winch is used.
- The load must never be fastened directly to the lifting cable. It must be fastened to the lifting hook only.
- The winch operator must keep a permanent eye on the movement of the load.
- If the winch operator cannot see the lifting or lowering movements, the danger area must be sealed off and additional persons with a full view of the operating area used to give instructions.
- The winch operator must always be able to see the end of the load path, otherwise the emergency limit switch will be actuated in the course of operations.
• If the operator leaves the control position of devices with suspended loads, the danger area beneath the load must be made secure.
- Winches may only be used for lifting and lowering loads. Their use for carrying persons is absolutely prohibited.
• The interlocking of loads is absolutely prohibited since this will overload the winch.
• The load to be moved must always be hooked firmly and securely on the fastening hook.
7. Operation
- Before starting operations you must make sure that the operator switch (8) is in the OFF position and the steel cable (13) is wound around the cable reel (11) with each cable revolution flush to the next (see Fig. 3.). To prevent possible damage, make sure that even when fully unwound there are still at least three cable revolutions on the cable reel.
- The equipment is controlled with the operator switch (8) on the switch case (7). You switch this according to the desired direction of movement. Do not switch directly from unwind to rewind but first stop the equipment between these two functions.
- If you press the emergency stop switch (9) the cable winch will be switched off and protected against switching on again. To start using the cable winch again the emergency stop switch must first be turned to the left. The red switch will come up again as a result and the cable winch will be ready for use again.
- When the red end of the cable appears you must not unwind the cable any further!
- If the cable winch is unable to lift a load immediately, switch it off immediately, otherwise there is a risk of damage and accidents.
- Make sure that the load is properly secured to the lifting hook (4) or return pulley (14) and always slay at a distance from the load and the steel cable (13).
- When you lower the load, account for the fact that the cable winch can run on several centimetres after stopping. You must therefore stop in good time!
- Make sure that the steel cable (13) does not deviate off line by more than approx. 15°.
8. Maintenance
- You must check both the entire length of the steel cable (13) for damage and the proper working condition of the limit switch (5) at regular intervals (wind up the cable winch until the switch-off weight (12) actuates the switch-off lever (3)).
- If the steel cable (13) is damaged (kinked or splayed, see Fig. 4) it must be replaced by a genuine replacement part. Have the cable repla-
- You must check both the entire length of the steel cable (13) for damage and the proper working condition of the limit switch (5) at regular intervals (wind up the cable winch until the switch-off weight (12) actuates the switch-off lever (3)).
- If the steel cable (13) is damaged (kinked or splayed, see Fig. 4) it must be replaced by a genuine replacement part. Have the cable repla-
6. Installation
- The load-bearing member on which the winch is fastened must be able to bear at least double the expected load. (We recommend that you seek the advice of a suitably qualified person.)
• Ideally the cable winch should be mounted on a
GB
ced at a qualified workshop. When the cable is fitted it is imperative that the switch-off weight (12), for reliable limit stopping, is not forgotten.
- You should apply a little oil to the bearing of the return pulley (14) at regular intervals.
- Check the smooth running of all the mechanical parts of the winch with the equipment switched off.
- The device must be inspected by a qualified person at least once a year. The results of the inspection must be recorded in an inspection book.
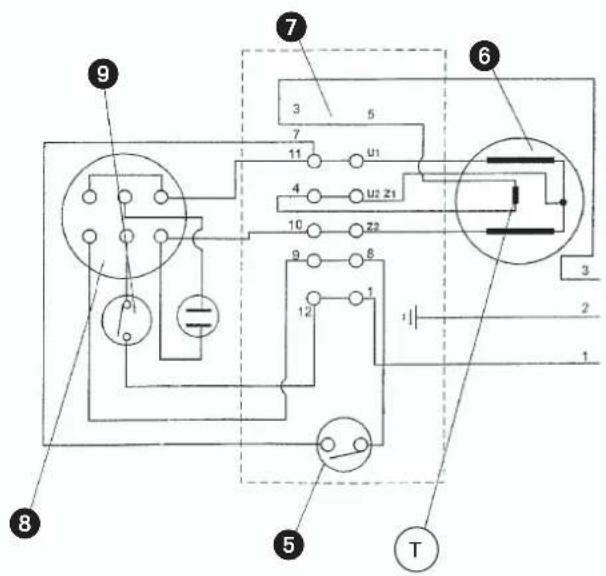
9. Circuit diagram
text_image
Electrical circuit diagram with labeled components and connections, including meters, resistors, and a power source.
GB
10. Checklist
Dear Customer,
To prevent possible damage to properly or personal injury, the operator of the cable winch is responsible for ensuring it is kept in proper condition and good working order. The following checklist should be used as the basis for inspections and documentation to be carried out at regular intervals as set down by the operator. Any defects found should be dealt with by a qualified workshop immediately.
| Date | Date Date | ||
| Wire cable: | |||
| Individual wires checked | ○ Yes ○ No | ○ Yes ○ No | ○ Yes ○ No |
| Wire cable checked for kinks | ○ Yes ○ No | ○ Yes ○ No | ○ Yes ○ No |
| Wire cable checked for freedom from twisting | ○ Yes ○ No | ○ Yes ○ No | ○ Yes ○ No |
| Press-fitted clips | ○ Yes ○ No | ○ Yes ○ No | ○ Yes ○ No |
| Lifting hook: | |||
| Hook checked for cracks | ○ Yes ○ No | ○ Yes ○ No | ○ Yes ○ No |
| Hook checked for fractures | ○ Yes ○ No | ○ Yes ○ No | ○ Yes ○ No |
| Holding spring | ○ Yes ○ No | ○ Yes ○ No | ○ Yes ○ No |
| Cables: | |||
| Power cable checked | ○ Yes ○ No | ○ Yes ○ No | ○ Yes ○ No |
| Switch cable checked | ○ Yes ○ No | ○ Yes ○ No | ○ Yes ○ No |
| Limit switch: | |||
| Limit switch checked | ○ Yes ○ No | ○ Yes ○ No | ○ Yes ○ No |
| Control device: | |||
| Switch case checked | ○ Yes ○ No | ○ Yes ○ No | ○ Yes ○ No |
| Switches checked | ○ Yes ○ No | ○ Yes ○ No | ○ Yes ○ No |
| Terminal box: | |||
| Terminal box checked for breakage points | ○ Yes ○ No | ○ Yes ○ No | ○ Yes ○ No |
| Brake: | |||
| Brake checked | ○ Yes ○ No | ○ Yes ○ No | ○ Yes ○ No |
| Ventilator cowl: | |||
| Ventilator cowl free from dirt | ○ Yes ○ No | ○ Yes ○ No | ○ Yes ○ No |
| Fastening screws: | |||
| Screws checked | ○ Yes ○ No | ○ Yes ○ No | ○ Yes ○ No |
| Bearing elements and mounting elements checked | ○ Yes ○ No | ○ Yes ○ No | ○ Yes ○ No |
| Device checked for rust and corrosion | ○ Yes ○ No | ○ Yes ○ No | ○ Yes ○ No |
| Device housing checked for tightness | ○ Yes ○ No | ○ Yes ○ No | ○ Yes ○ No |
F
Service intermittent
text_image
Technical schematic diagram with numbered components and labeled parts, including switches, meters, and a timer.F
text_image
Electrical circuit diagram with numbered components and labeled connections
NL
10. Checklist
Geachte klant,
text_image
Technical schematic diagram with numbered components and labeled parts, including switches, meters, and a timer.E
text_image
Electrical circuit diagram with labeled components and connections, including meters, resistors, and a power source.
P
10. Lista de controlo
Estimado cliente.
text_image
Electrical circuit diagram with labeled components and connections, including meters, resistors, and a power source.
59
FIN
10. Tarkastusluettelo
Arvoisa asiakas,
text_image
Electrical circuit diagram with numbered components and labeled connections
I
10. Checklist
Ai nostri clienti
text_image
Technical schematic diagram with numbered components and labeled connections, including meters, switches, and a meter.H
10. Cseklista
Kedves Väsárlönk,
text_image
Technical schematic diagram with numbered components and labeled connections, including meters, switches, and a meter.TR
10. Kontrol listesi
Sayın Müşteri.
text_image
Technical schematic diagram with numbered components and labeled connections, including measurement instruments and a timer T.text_image
Electrical circuit diagram with numbered components and labeled connections
SLO
knjižico o izvajanih pregledih.
10. Kontrolni list
Spoštovani kupec!
text_image
Electrical circuit diagram with numbered components and labeled connections
104
kontrolnu knjižicu.
10. Popis za kontrole
Poštovani kupče,
Eschenstraße 6 · D-94405 Landau/Isar (Germany)
Info-Tel. 0180-5 120 509 • Telefax 0180-5 835 830
The product cesor bed in these instructions comes with a 2-year warranty covering defects. This 2-year warranty period begins with the passing of risk or when the customer receives the product.
For warranty claims to be accepted, the product has to receive the current maintenance and be put to the proper use as described in the operating instructions.
Your statutory rights of warranty are naturally unaffected during these 2 years.
This warranty applies in Germany or in the respective country of the manufacturer's main regional sales partner, as a supplement to local regulations. Please note the details for contacting the customer service center responsible for your region or the service address listed below.
NL GARANTIE
natural_image
Symbol of a trash bin with no text or labels⑥ Nur für EU-Länder
For EU countries only
Never place any electric tools in your household refuse.
To comply with European Directive 2002/96/EC concerning old electric and electronic equipment and its implementation in national laws, old electric tools have to be separated from other waste and disposed of in an environment-friendly fashion, e.g. by taking to a recycling depot.
Recycling alternative to the demand to return electrical devices:
As an alternative to returning the electrical device, the owner is obliged to cooperate in ensuring that the device is properly recycled if ownership is relinquished. This can also be done by handing over the used device to a returns center, which will dispose of it in accordance with national commercial and industrial waste management legislation. This does not apply to the accessories and auxiliary equipment without any electrical components which are included with the used device.
The reprinting or reproduction by any other means, in whole or in part, of documentation and papers accompanying products is permitted only with the express consent of ISC GmbH.