
AIR TRIPOD CLASSIC - Fan Create - Free user manual and instructions
Find the device manual for free AIR TRIPOD CLASSIC Create in PDF.

| Brand | Create |
| Model | AIR TRIPOD CLASSIC |
| Product type | Pedestal fan (tripod) |
| Number of speeds | 3 speeds (low, medium, high) |
| Height adjustment | Yes, with locking screw |
| Adjustable tilt | Yes, by pushing the grille |
| Power supply | Mains (power cord) |
| Tripod material | Wood and metal |
| Protective grille | Yes, removable for cleaning |
| Assembly required | Yes, assembly of tripod and head |
| Maintenance | Clean with a damp cloth and mild detergent |
| Safety | Do not immerse, do not use without grille, keep out of reach of children |
| Spare parts provided | Screws, springs, nuts, base links |
| Oscillation | No |
| Remote control | No |
| Base type | Wooden tripod |
| Control | Rotary switch |
Frequently Asked Questions - AIR TRIPOD CLASSIC Create
User questions about AIR TRIPOD CLASSIC Create
0 question about this device. Answer the ones you know or ask your own.
Ask a new question about this device
Download the instructions for your Fan in PDF format for free! Find your manual AIR TRIPOD CLASSIC - Create and take your electronic device back in hand. On this page are published all the documents necessary for the use of your device. AIR TRIPOD CLASSIC by Create.
USER MANUAL AIR TRIPOD CLASSIC Create
natural_image
Line drawing of a three-legged tripod-mounted air fan with a circular top (no text or symbols)STAND FAN VENTILADOR DE PIE
USER MANUAL
CREATE CREATE CREATE ATE CREATE CREATE CRE CREATE CREATE CREATE ATE CREATE CREATE CRE CREATE CREATE CREATE ATE CREATE CREATE CRE CREATE CREATE CREATE ATE CREATE CREATE CRE CREATE CREATE CREATE ATE CREATE CREATE CRE CREATE CREATE CREATE ATE CREATE CREATE CRE CREATE CREATE CREATE ATE CREATE CREATE CRE CREATE CREATE CREATE ATE CREATE CREATE CRE CREATE CREATE CREATE ATE CREATE CREATE CRE CREATE CREATE CRE CREATE CREATE CRE CREATE CREATE CRE CREATE CREATE CRE
CREATE CREATE CREATE ATE CREATE CREATE CRE CREATE CREATE CREATE ATE CREATE CREATE CRE CREATE CREATE CREATE ATE CREATE CREATE CRE CREATE CREATE CREATE ATE CREATE CREATE CRE CREATE CREATE CREATE ATE CREATE CREATE CRE CREATE CREATE CREATE CREATE CREATE CREATE CREATE CREATE CREATE CREATE CREATE CREATE CREATE CREATE CREATE CREATE CREATE CREATE CREATE CREATE CREATE CREATE CREATE CREATE CREATE CREATE CREATE CREATE CREATE CREATE CREATE CREATE CREATE CREATE CREATE CREATE CREATE CREATE CREATE
INDEX
ENGLISH
Important safeguards 6
Parts list 7
Also included 7
Thank you for choosing our fan. Before using the appliance, and to ensure the best use, carefully read these instructions.
The safety precautions enclosed herein reduce the risk of death, injury and electrical shock when correctly adhered to. Keep the manual in a safe place for future reference, along with the completed warranty card, purchase receipt and package. If applicable, pass these instructions on to the next owner of the appliance. Always follow basic safety precautions and accident prevention measures when using an electrical appliance. We assume no liability for customer failing to comply with these requirements.
IMPORTANT SAFEGUARDS
When using any electrical appliance, basic safety precautions should always be observed.
- Read and save these instructions.
- This appliance can be used by children aged from 8 years and above and persons with reduced physical, sensory or mental capabilities or lack of experience and knowledge if they have been given supervision or instruction concerning use of the appliance in a safe way and understand the hazards involved.
• Children shall not play with the appliance. - Cleaning and user maintenance shall not be made by children without supervision.
- If the supply cord is damaged, it must be replaced by the manufacturer, its service agent or similarly qualified persons in order to avoid a hazard.
- This appliance is intended to be used in household and similar applications.
- Incorrect operation and improper handling can lead to faults on the appliance and injuries to the user.
- In the event of improper use or incorrect handling, no liability can be accepted for any damage that may occur.
- Do not immerse the unit or mains plug in water or other liquids. There is danger to life due to electric shock! However, if this occurs, remove the mains plug immediately and then have the unit checked by an expert before using it again.
- Do not operate the appliance if the mains cable or the mains plug show signs of damage, if the appliance has fallen on the floor or has been otherwise damaged. In such cases take the appliance to a specialist for checking and repair if necessary.
- Never remove the mains plug from the socket by pulling on the mains cable, or with wet hands.
- Ensure that the mains cable does not hang over sharp edges or allow it to become trapped.
- Keep the appliance away from damp, and protect from splashes.
- Keep the appliance away from hot objects (e.g. hotplates) and open flames.
- Keep the appliance and its cord out of reach of children less than 8 years.
- Use the appliance on a flat, dry and heat resistance surface.
- Never leave the appliance unattended during use.
- Do not store or operate the appliance in the open air.
- Keep the appliance in a dry place, inaccessible to children.
- Never put fingers or any other objects through the grilles (fan guards) when the fan is running.
- Never operate the appliance without the grilles (fan guards) in place, as serious personal
injury may result.
- Watch out for long hair! It can be caught in the fan owing to the air turbulence.
- Do not point the air flow to the people for a long time.
- Ensure that the fan is switched off from the supply mains before removing the guard.
- Have any repairs carried out solely by a qualified electrician. Never try to repair the appliance yourself.
PARTS LIST
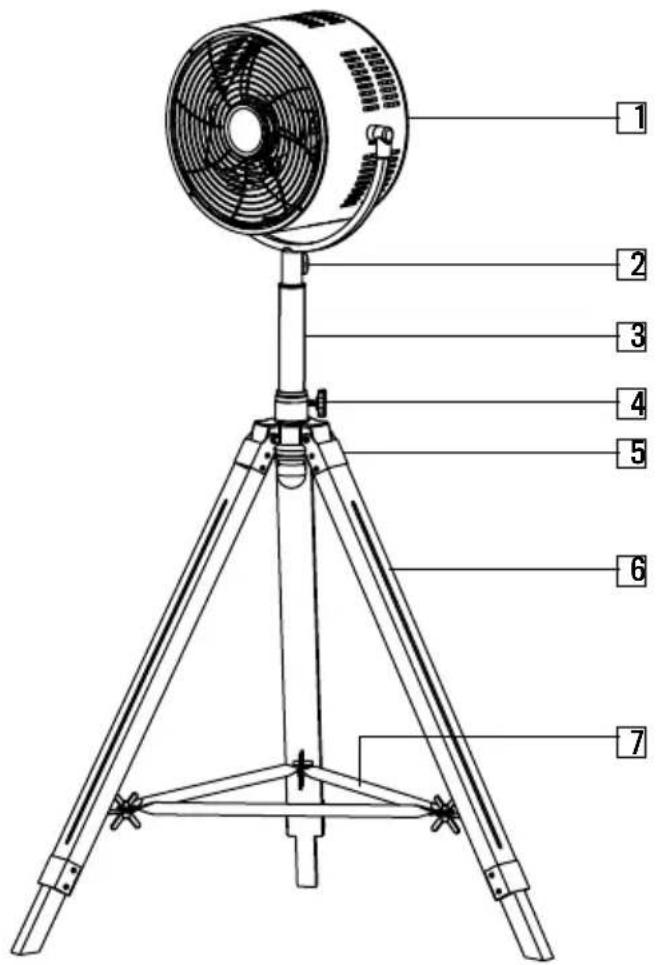
-
Motor housing and switch knob
-
Locking knob
-
Standing pole
-
Height adjusting knob
-
Tripod connection part
-
Leg
-
Fixing base
ALSO INCLUDED
-
Securing screw of tripod connection part (x3)
-
Spring (x3)
-
Main nut (x3)
-
Butterfly screws (x3)
-
Butterfly nuts (x3)
-
Base links (x3)
The identification number of each connection piece is included in brackets in the assembly instructions below.
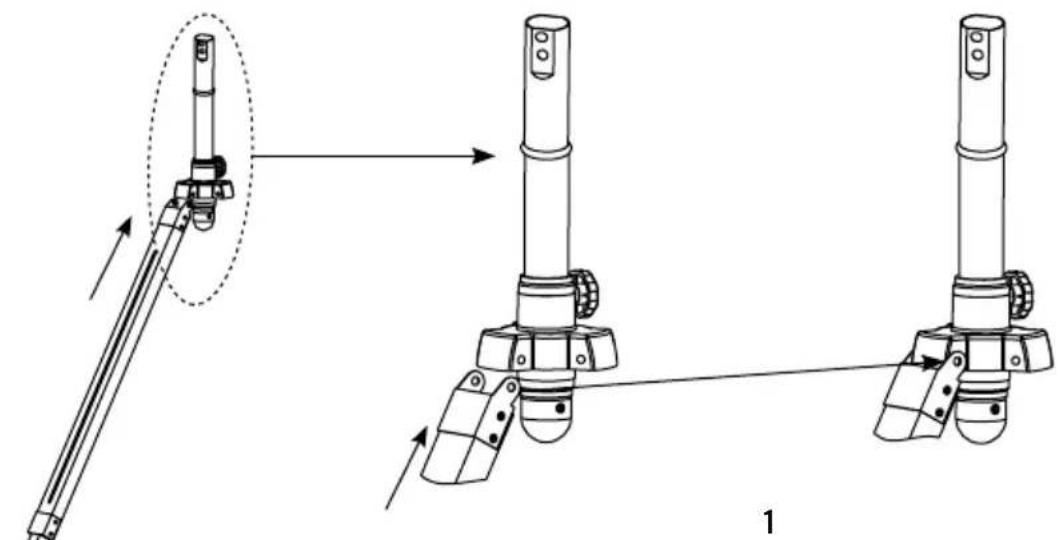
TRIPOD ASSEMBLY
natural_image
Technical line drawing of mechanical assembly with two views showing tool positioning and assembly steps (no text or symbols)Flx every wooden leg to its metal connection part (5) and then to the connection on the standing pipe.
natural_image
Technical line drawing of two mechanical components with a directional arrow indicating transformation (no text or symbols)Flx the tripod connector securing screw (8), spring (9) and tripod main nut (10).

natural_image
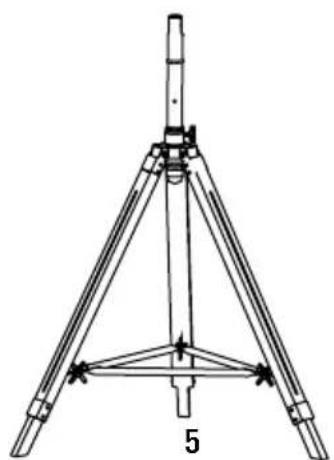
Technical line drawing of a mechanical device with a cylindrical top and three base supports (no text or symbols)Repeat previous step with the three legs of the tripod.
natural_image
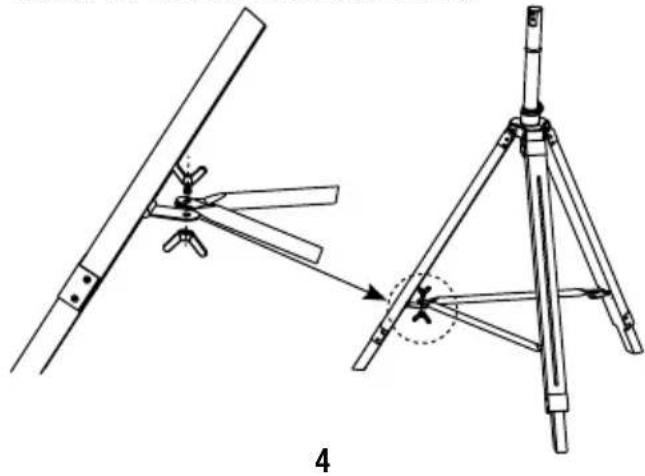
Technical line drawing showing a mechanical assembly with a tripod base and a lever mechanism (no text or symbols)Fix the base links (13) to the tripod using the butterfly screws (11) and nuts (12).
natural_image
Technical line drawing of a tripod-mounted surveying instrument with no visible text or symbolsRepeat the previous step with every base link and tripod leg.
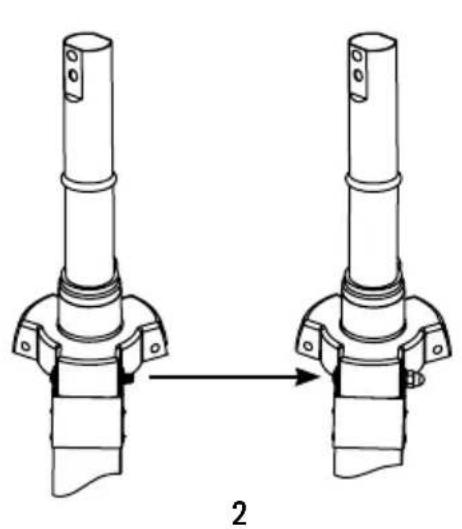
HEAD ASSEMBLY
natural_image
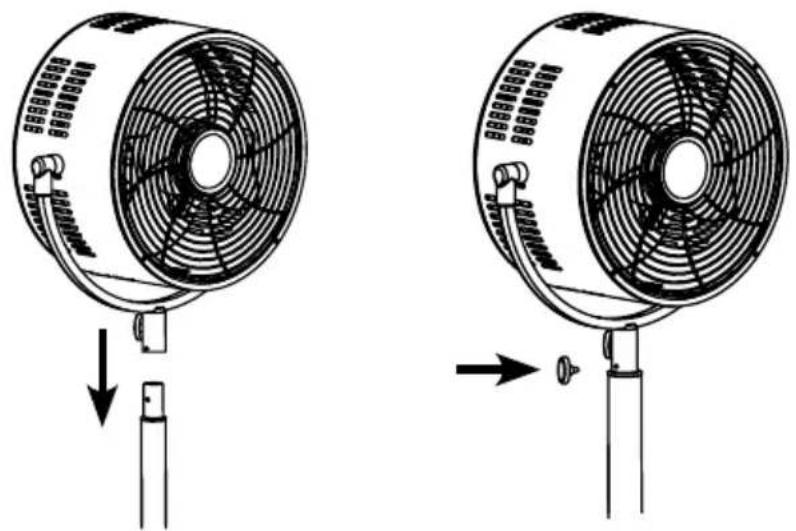
Two diagrams showing a fan with internal blades and a base, illustrating the process of mounting or disassembly (no text or symbols present)- Remove the locking knob (2) from the pole beneath the U-holder.
- Insert the pole into the top of the height adjustable pole and align the holes.
- Insert the locking knob (2) through the holes and tighten it at the desired height.
HOW TO USE THE FAN
Plug the power cord into a suitable socket.
Switch on the fan by using the speed switch.
- 0 = OFF
- I = Low speed
• II = Medium speed - III = High speed
- Tilting angles: By pushing the fan-guard, you can adjust to the preferred elevation.
- The height of the fan can also be adjusted: Loosen the screw to move the stand up or down as required. Tighten the screw at the desired position.
CLEANING
• Always switch the fan off and unplug it before cleaning.
- Clean the parts using a damp cloth and a mild detergent, and ensure that all detergent residues are removed.
- Never use abrasive cleaning agents or solvents.
- Do not immerse in any form of liquid.
WARNING: In order to reduce the risk of fire or electric shock, never use the appliance together with an electronic timer.
In compliance with Directives: 2012/19/EU and 2015/863/EU on the restriction of the use of dangerous substances in electric and electronic equipment as well as their waste disposal. The symbol with the crossed dustbin shown on the package indicates that the product at the end of its service life shall be collected as separate waste. Therefore, any products that have reached the end of their useful life must be given to waste disposal centres specialising in separate collection of waste electrical and electronic equipment, or given back to the retailer at the time of purchasing new similar equipment, on a one for one basis. The adequate separate collection for the subsequent start-up of the equipment sent to be recycled, treated and disposed of in an environmentally compatible way contributes to preventing possible negative effects on the environment and health and optimises the recycling and reuse of components making up the apparatus. Abusive disposal of the product by the user involves application of the administrative sanctions according to the laws.
natural_image
Technical line drawing of mechanical assembly with two views showing tool positioning and assembly steps (no text or symbols)natural_image
Technical line drawing of two mechanical components with a directional arrow indicating transformation (no text or symbols)natural_image
Technical line drawing of a mechanical device with three legs and a central shaft (no text or symbols)natural_image
Technical line drawing of a mechanical assembly with two views (top and side), no text or symbols present.natural_image
Technical line drawing of a tripod-mounted surveying instrument with no visible text or symbolsnatural_image
Two technical illustrations of a fan with internal blades, shown from different angles (no text or symbols present)natural_image
Technical line drawing of mechanical assembly with two views showing shafts and mounting features (no text or symbols)natural_image
Technical line drawing of two mechanical components with a directional arrow indicating assembly (no text or symbols)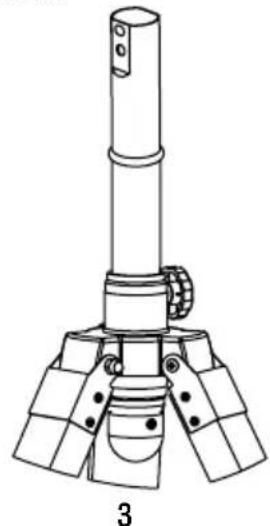
natural_image
Technical line drawing of a mechanical device with three legs and a central shaft (no text or symbols)natural_image
Technical line drawing of a tripod-mounted surveying instrument with no visible text or symbolsnatural_image
Two diagrams showing a fan with internal blades and a base, illustrating the process of mounting or disassembly (no text or symbols present)natural_image
Technical line drawing of mechanical assembly steps showing tool positioning and assembly (no text or symbols)natural_image
Technical line drawing of two mechanical components with a directional arrow indicating assembly or transformation (no text or symbols)
natural_image
Technical line drawing of a mechanical device with three legs and a central shaft (no text or symbols)natural_image
Technical line drawing of a mechanical assembly with two views (top and side), no text or symbols present.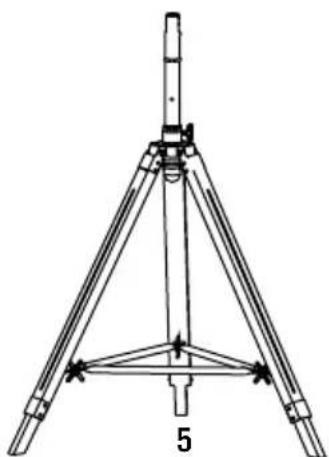
natural_image
Technical line drawing of a tripod-mounted surveying instrument with no visible text or symbolsnatural_image
Two technical illustrations of a fan with blades and mounting base, showing mechanical components (no text or symbols)natural_image
Technical line drawing of mechanical assembly with two views showing a lever and base mount (no text or symbols)natural_image
Technical line drawing of two mechanical components with a directional arrow indicating assembly (no text or symbols)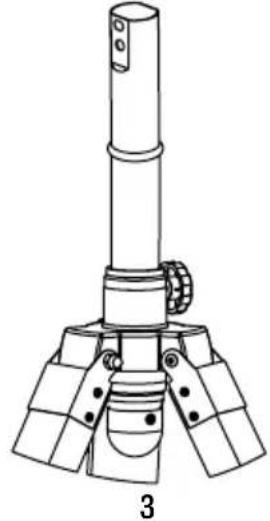
natural_image
Technical line drawing of a mechanical device with three legs and a central shaft (no text or symbols)natural_image
Technical line drawing of a mechanical assembly with two views (top and side), no text or symbols present.natural_image
Technical line drawing of a tripod-mounted surveying instrument with no visible text or symbolsnatural_image
Two diagrams showing a fan with internal blades and a base, illustrating the process of mounting or disassembly (no text or symbols present)natural_image
Technical line drawing of two mechanical components with a directional arrow indicating transformation (no text or symbols)natural_image
Technical line drawing of a mechanical device with three legs and a central shaft (no text or symbols)natural_image
Technical line drawing of a mechanical assembly with two views (top and side), showing components like blades and rods, no text or symbols present.natural_image
Technical line drawing of a tripod-mounted surveying instrument with no visible text or symbolsnatural_image
Two diagrams showing a fan with blades and a base, illustrating the process of fan rotation or ventilation (no text or symbols present)natural_image
Technical line drawing of two mechanical components with a directional arrow indicating transformation (no text or symbols)
natural_image
Technical line drawing of a mechanical device with three legs and a central shaft (no text or symbols)natural_image
Technical line drawing of a mechanical assembly with two views (top and side), no text or symbols present.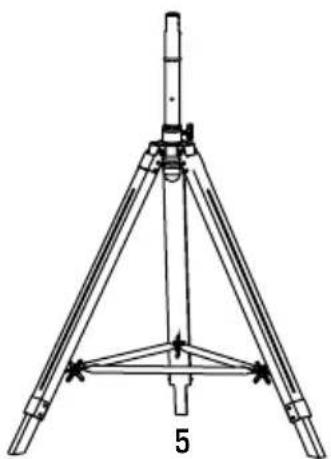
natural_image
Technical line drawing of a tripod-mounted surveying instrument with no visible text or symbolsnatural_image
Two diagrams showing a fan with blades and a base, illustrating the process of mounting or mounting mechanism (no text or symbols present)natural_image
Two technical illustrations of a fan with blades and mounting base, showing mechanical components (no text or symbols)

Brand : Create
Model : AIR TRIPOD CLASSIC
Category : Fan