UVC-Xtreme 1200 - Water filter sera - Free user manual and instructions
Find the device manual for free UVC-Xtreme 1200 sera in PDF.


User questions about UVC-Xtreme 1200 sera
0 question about this device. Answer the ones you know or ask your own.
Ask a new question about this device
Download the instructions for your Water filter in PDF format for free! Find your manual UVC-Xtreme 1200 - sera and take your electronic device back in hand. On this page are published all the documents necessary for the use of your device. UVC-Xtreme 1200 by sera.
USER MANUAL UVC-Xtreme 1200 sera
US Electronically adjustable external filters
• economic and efficient
text_image
Exploded view diagram of a chemical cleaning device with labeled parts and specifications2
text_image
IN OUT UVC-200000 + S UVC4
natural_image
Close-up of a mechanical component being adjusted with a hand, showing a close-up inset of a pipe fitting (no text or symbols visible)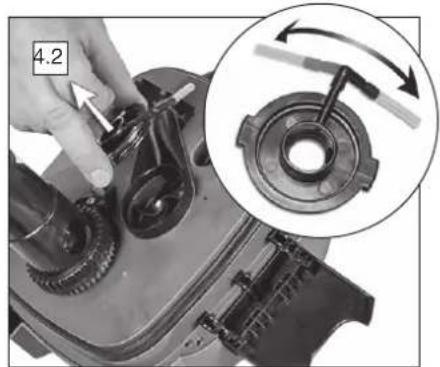
natural_image
Close-up of mechanical gear assembly with a magnified inset showing a rotating component (no text or symbols visible)3
natural_image
Technical line drawing of a mechanical device with exploded view showing internal components (no text or symbols)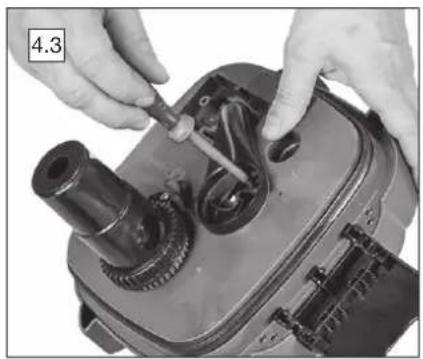
natural_image
Close-up of hands using a screwdriver to adjust internal components on a mechanical device (no visible text or symbols)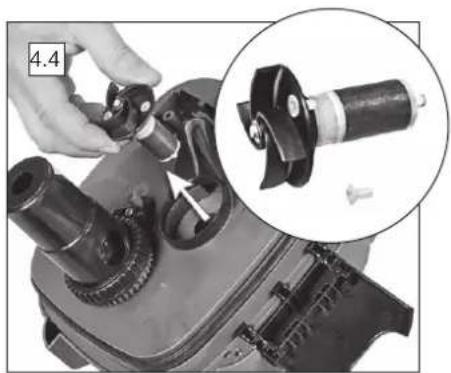
natural_image
Close-up of mechanical components with a magnified inset showing a disassembled shaft assembly (no text or symbols visible)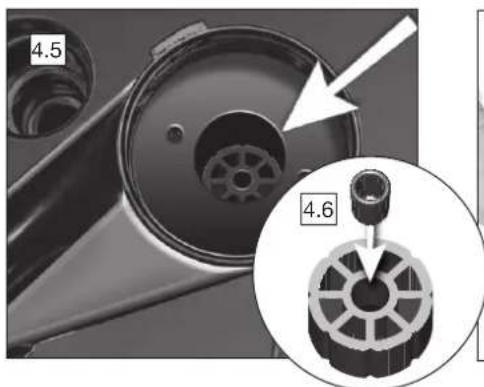
text_image
4.5 4.6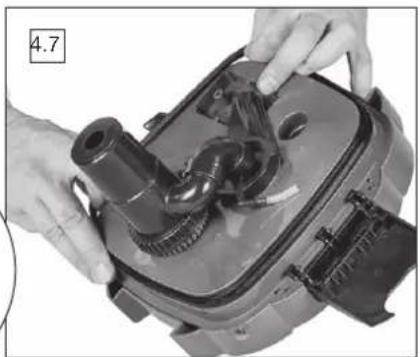
natural_image
Close-up of hands assembling a mechanical device with a hose and handle (no visible text or symbols)5
5.1
natural_image
Cross-sectional diagram of a mechanical device showing internal components and flow paths (no text or labels)5.2
natural_image
Cross-sectional diagram of a mechanical device showing internal components and fluid flow (no text or labels)6
text_image
6.1 6.2 6.3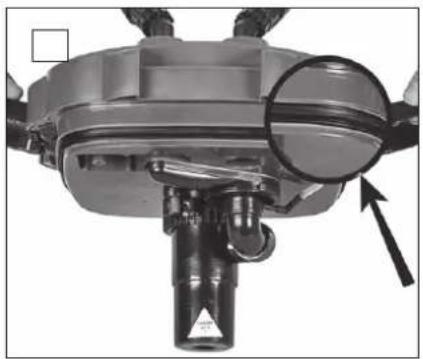
natural_image
Close-up of a mechanical device with a magnified circular detail and an arrow pointing to a component (no visible text or symbols)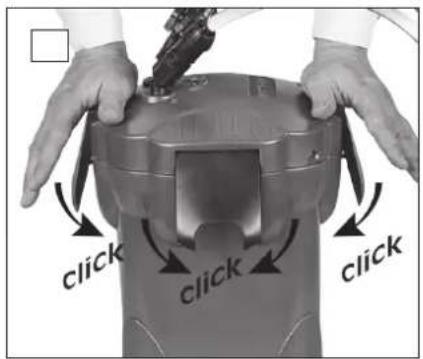
text_image
click click click
text_image
6.4 6.66.5 CLOSED OPEN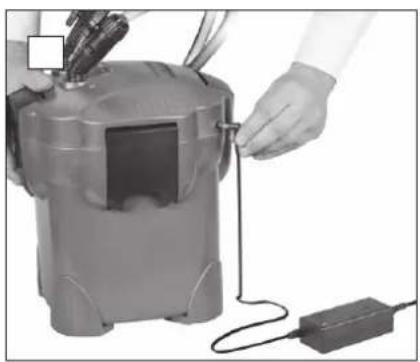
natural_image
Person operating a portable device connected to a power cord (no visible text or symbols)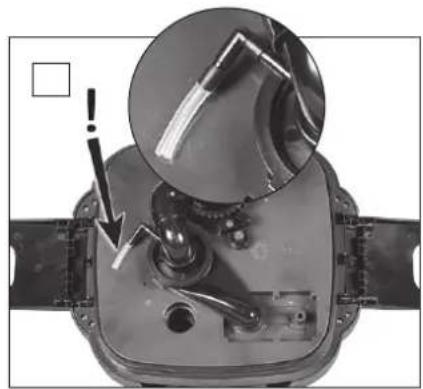
natural_image
Close-up of a mechanical device with a magnified inset showing internal components (no visible text or symbols)7
text_image
7.1 max. 1,5 m (4.9 ft.) max. 15 cm (6 in.) IN OUT min. 20 cm (8 in.) IN OUT A B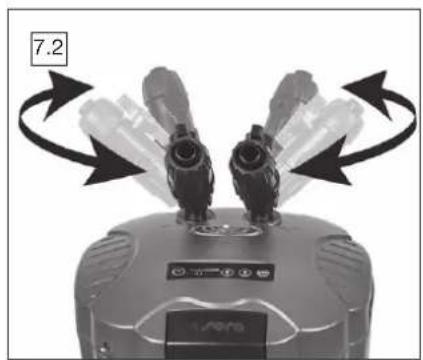
natural_image
Close-up of a robotic device with two protruding blades and directional arrows indicating motion (no text or symbols)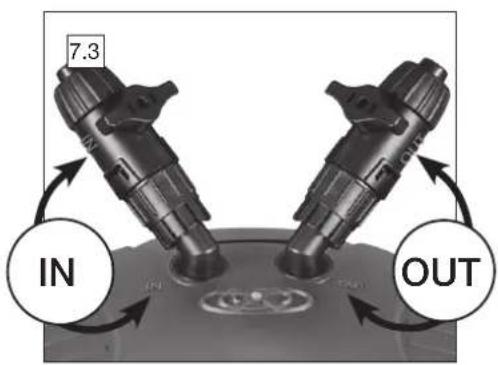
text_image
7.3 IN OUT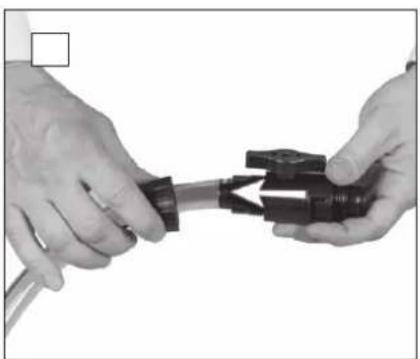
natural_image
Close-up of hands holding a mechanical component with a pipe fitting (no visible text or symbols)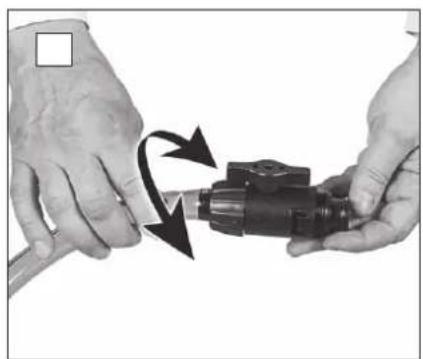
natural_image
Close-up of hands holding a mechanical component with directional arrows indicating motion (no text or symbols)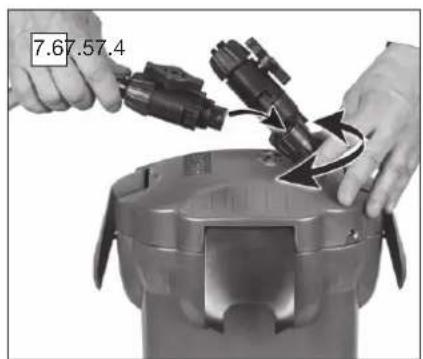
natural_image
Close-up of hands using a mechanical device to adjust or install a component, with no visible text or symbols.8
natural_image
Close-up of hands holding a cylindrical tool on a mechanical device (no visible text or symbols)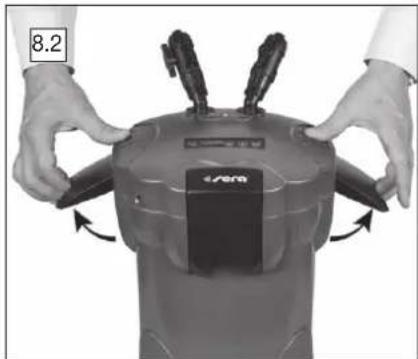
natural_image
Person adjusting a device with arrows indicating motion, no visible text or symbols9
natural_image
Close-up of hands using a screwdriver to adjust or install a mechanical component (no visible text or symbols)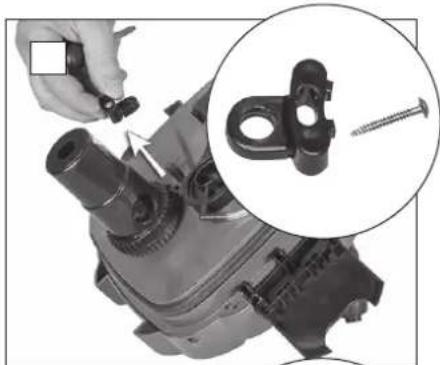
natural_image
Close-up of a mechanical assembly with a magnified inset showing a screw fastener attachment (no text or symbols visible)product may not be exactly as illustrated
Subject to technical alterations and errors
natural_image
Close-up of a mechanical component being adjusted, with an inset close-up showing a pipe fitting (no text or symbols visible)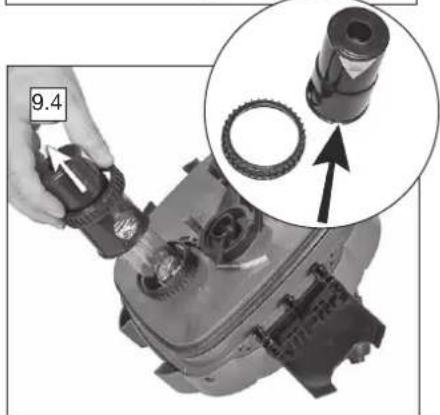
natural_image
Close-up of a mechanical component with a hand adjusting a bolt, showing a close-up inset of a gear assembly (no text or symbols visible)10
natural_image
Close-up of a mechanical device with three views of a component, showing a hand holding a small component and three close-up insets (no visible text or symbols)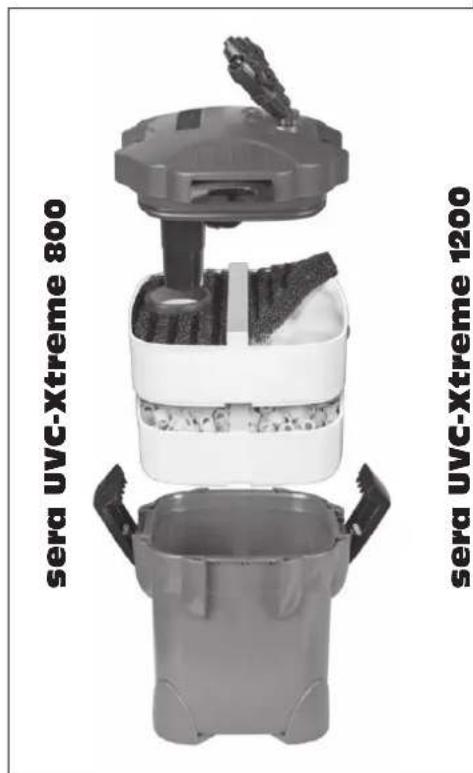
text_image
sera UVC-Xtreme 800 sera UVC-Xtreme 1200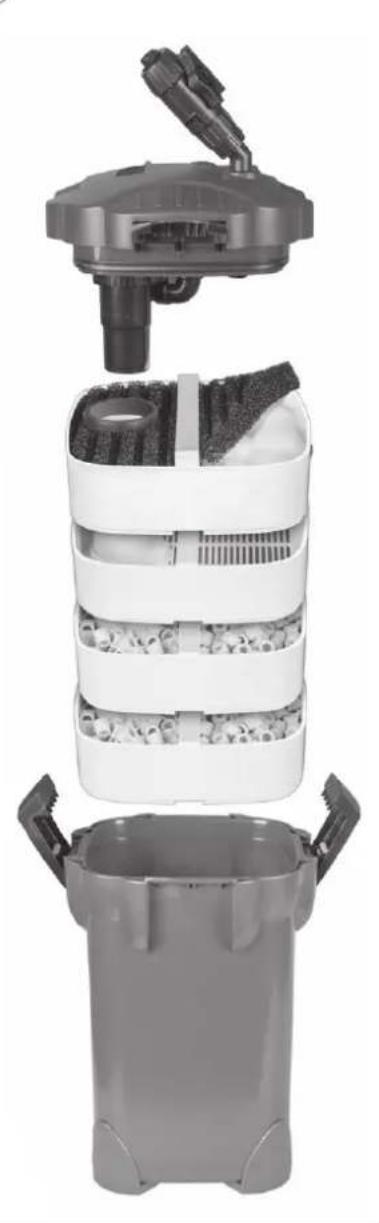
natural_image
Stacked cylindrical device with internal compartments and a top-mounted sensor or sensor assembly (no visible text or symbols)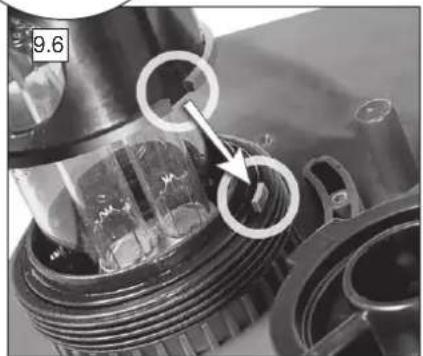
natural_image
Close-up of mechanical components with a numbered annotation (9.6) pointing to a component, no readable text or symbols present.MMC-Xtreme 800/1200
US Electronically adjustable external filters – economic and efficient 14
fresh water aquariums
24 V = max. 24 W
incl. UV Lamp 5 W G23
Qmax: 840 l/h / max. 35°C
(order code 32148)
External Filter for 200 - 1.200 l
fresh water aquariums
24 V = max. 34 W
incl. UV Lamp 5 W G23
Qmax: 1.220 l/h / max. 35°C

sera ballast (order code 32181)
Input 100 - 240 V \~ 50/60 Hz / Output 24 V DC 2A

Please read these instructions carefully and keep for future use. When forwarding this unit to third parties, this information for use is also to be handed over.
Congratulations!
Congratulations for buying the UVC-Xtreme external filter. The UVC-Xtreme 800 and 1200 external filters provide UV-C supported filter performance while saving energy to an extent that could not yet reached before. The modern low noise low voltage motor can be adjusted to the desired performance precisely and just as required via the control panel, and thus extends the application range of these external filters. High pump performance can already be selected in energy saving mode with wattages between 5 W – 10 W. This is possible due to a hydrodynamically optimized drive and ideal dimensioning.
The filters include an integrated UV-C unit that is switchable via the control panel. This is operated with a specially doped and particularly powerful amalgam lamp, and ensures even higher reduction of pathogens and floating algae compared to common UV-C lamps. This indirectly supports the health of the fish in a merely physical manner, while the density of many algae stadiums is reduced at the same time.
An electric suction pump allows for comfortably drawing water into the filter, which furthermore also provides a permanent de-aeration function. The filter media baskets are optimized considering flow rate and volume, and provide numerous applications with various filter media.
This combination makes the filters of the Xtreme series very service friendly and allows for long service intervals. The valves are rotatable by 360°. They make placing the filter very flexible and make it easy to place and handle them. The filter includes a complete connection kit consisting of intake and outlet tubes, hoses and attachment material. The 24 V ballast powers the filter via an easily accessible plug connection at the side of the filter head.
SAFETY PRECAUTIONS


DANGER
1. WARNING: Dangerous ultraviolet radiation!
a. To prevent eye damage, never look directly into the UV-C lamp without protection when it is operating (eye damage!) The UV-C lamp provides a protective switch-off against looking into it accidentally. The protective mechanisms must not be deactivated.
b. Use only original sera amalgam replacement lamps for the UV-C unit.
-
Make sure that voltage and frequency of the mains supply matches the data on the type plate before connecting the ballast to the mains supply. Position the ballast above the UVC-Xtreme external filter, and use exclusively the ballast provided by sera.
-
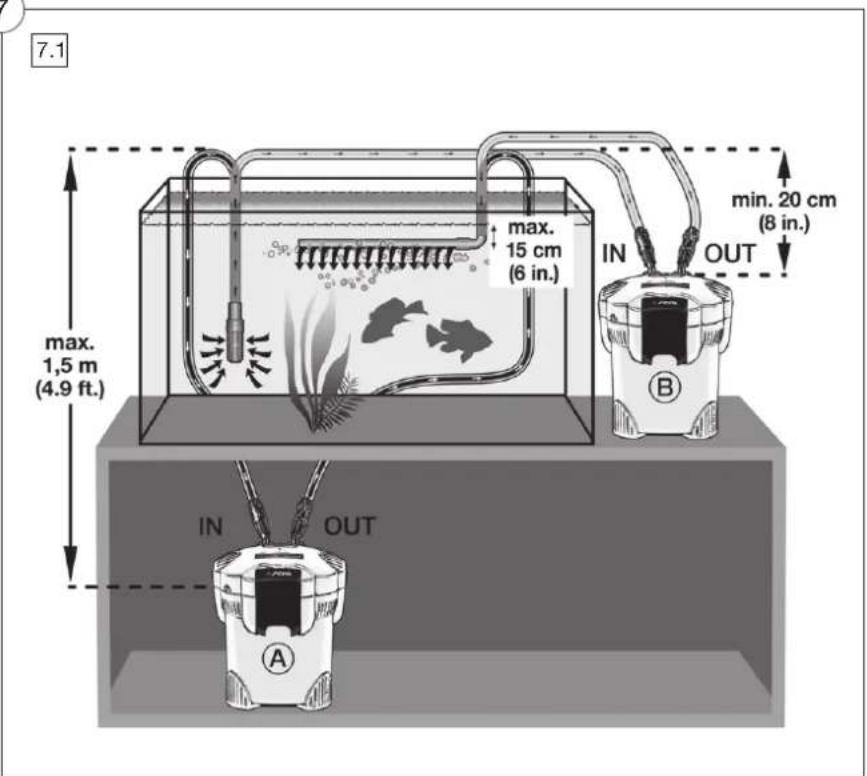
The UVC-Xtreme external filter must be placed safely and dry below the water surface level. Placing it more than 1.5 m (4.9 ft.) below the water surface level is not permitted.
-
Usage is permitted only indoors.
-
Check plug and socket for water being present before putting into operation. Never touch the plug or the socket before switching off the circuit in case of a wet plug or a wet socket. Protect the power plug against moisture and dripping water.
-
Never pull the power plug out of the socket by the cable.
-
Never operate without or without sufficient water flow.
-
Especially before working in the aquarium (water) or at the UVC-Xtreme external filter, disconnect it and all other electrical appliances from the mains supply.
-
The UVC-Xtreme external filter may only be operated completely assembled.
-
Operation is permitted only for the described application pur pose.
-
The water temperature must not exceed 35^ C ( 95^ F).
-
Damage of the motor, the cable or the plug must not be repaired! In this case the filter must immediately be disconnected from mains supply, and must not be operated any more. This also applies in case of intended alterations of these parts. This kind of damage must not be repaired or mended. In case of damage or leakage at the filter canister, at the seals, or in the parts that contain water, the filter must immediately been taken apart and repaired.
-
The circuit to which the UVC-Xtreme external filter is connected must be protected with a fault current protection switch (RCD 30 mA).
-
Always carry the filter by supporting the bottom. Never lift it by the filter head, its external parts or its hose connections.
-
Operate the ballast only in a dry environment. Install ballasts protected against splash water.
-
Operate the filter only in upright position. Do not lay down or tilt.
-
Do not expose the appliance to damage by frost.
-
Product contains magnetic and electromagnetic components that may affect or damage magnetic fields. People wearing cardiac pacemakers should keep the required safety distance according to the cardiac pacemaker manuals.
- When doing maintenance at the rotor, be careful about the crushing hazard due to magnetic forces.
- The pump head must only be opened by staff qualified for maintenance work!
Warning!
- Children should be supervised to ensure that they do not play with the appliance.
- The appliance can be used by children above 8 years as well as by persons with reduced physical, sensory or mental capacities, or lack of experience and knowledge, if they have been given supervision or instruction concerning use of the appliance and have understood the dangers arising thereof. Children must not play with the appliance. Cleaning and user maintenance must not be carried out by children unless they are above 8 years old and under supervision. Keep the appliance and its cables out of the reach of children below 8 years of age.
- If the supply cord is damaged, it must be replaced by the manufacturer, its service agent or similarly qualified persons in order to avoid a hazard.
Disposal of the unit:
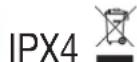
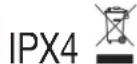
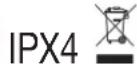
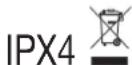
Waste electrical and electronic equipment (WEEE) must not get into domestic waste!
If ever the unit cannot be used anymore, the consumer is legally obliged to hand in waste electrical and electronic equipment (WEEE) separately from domestic waste, e.g. at a collection point of his community/his district. This ensures that waste electrical and electronic equipment (WEEE) is expertly processed and that negative effects to the environment are avoided.
Therefore electrical and electronic
equipment bears the following symbol:

Kit includes (1)
UVC-Xtreme 800
Filter canister
Filter head
2 filter media baskets
1 sponge
12 pcs sera crystal clear Professional
1,000 ml (290 g/10.2 oz.) sera siporax Professional
1 accessories box
Manual
Contents of the included accessories box:
Connection kit (1.37/1.38), 2 x 1.5 m (4.9 ft.) hoses 16/22 mm
(0.63/0.87 in.), ballast 24 V DC / 2 A, "IN"/"OUT" valves
UVC-Xtreme 1200
Filter canister
Filter head
4 filter media baskets
1 sponge
12 pcs sera crystal clear Professional
2,000 ml (580 g/20.4 oz.) sera siporax Professional
1 accessories box
Manual
Contents of the included accessories box:
Connection kit (1.37/1.38), 2 x 1.5 m (4.9 ft.) hoses 18/23 mm
(0.71/0.91 in.), ballast 24 V DC / 2 A, "IN"/"OUT" valves
Parts overview
1.1 Ballast (UVC-Xtreme 800 / UVC-Xtreme 1200)
1.2 Nozzle for valve (800)
1.3 Nozzle for valve (1200)
1.4 "IN"/"OUT" valves with seal rings (800)
1.5 "IN"/"OUT" valves with seal rings (1200)
1.6 External O-ring for valve (800)
1.7 External O-ring for valve (1200)
1.8 Internal O-ring for valve (800/1200)
1.9 Suction pump with attached parts (800/1200)
1.10 Inverter for integrated UV-C (800/1200)
1.11 UV-C indicator lamp on circuit board with plug socket (800/1200)
1.12 UV-C socket with cable (800/1200)
1.13 Chamber cover for pump (800/1200)
1.14 Running unit with front bearing (800/1200)
1.15 Sleeve for shaft bearing (800/1200)
1.16 Back bearing for running unit (800/1200)
1.17 Plastic screws for front bearing (800/1200)
1.18 UV-C protection magnetic contact (800/1200)
1.19 90° angle pieces pump suction side (800/1200)
1.20 UV-C tube with union nut (800/1200)
1.21 Sponge with ridges (800/1200)
1.22 Amalgam UV-C lamp 5 W (800/1200)
1.23 Clips small for filter head (800/1200)
1.24 Clips large for filter canister (800/1200)
1.25 Accessories box (800)
1.26 Accessories box (1200)
1.27 Control circuit board with plug sockets (800)
1.28 Control circuit board with plug sockets (1200)
1.29 Filter head screw kit (800/1200)
1.30 Hose 18/23 mm (0.71/0.91 in., 1200) / Spare part
1.31 Filter head seal (800/1200)
1.32 Glass cylinder with seals (800/1200)
1.33 Filter media basket seal (800/1200)
1.34 Filter media basket (800/1200)
1.35 sera crystal clear Professional (800/1200)
1.36 sera siporax Professional (800/1200)
1.37 Tubing "IN" (800/1200)
1.38 Tubing "OUT" (800/1200)
General function description
1. Motor:
The entire filter as well as the pump built into the external filter are operated with a 24 V DC / 2 A ballast (1.1). The low voltage motor allows for 8 different settings. The water flow rate through the filter of course depends on how the baskets are filled with filter material. The finer the filter material, the more water flow is slowed down. The stronger biogenic or particular layers on the filter materials are, the more the flow performance is reduced. In case of a sinking flow rate, the filter material should therefore be cleaned as to reinstate the previous flow rate. Hoses can also bear a considerable amount of biofilm layers, which may strongly reduce the flow rate.
The rotor is hydrodynamically optimized and provides a special noise reducing bearing.
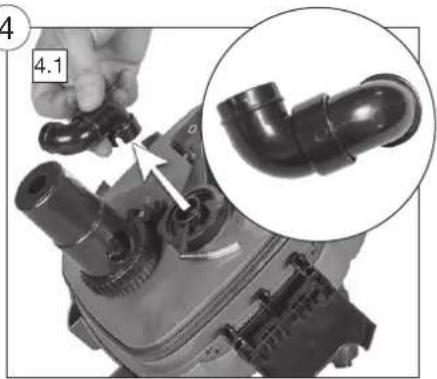
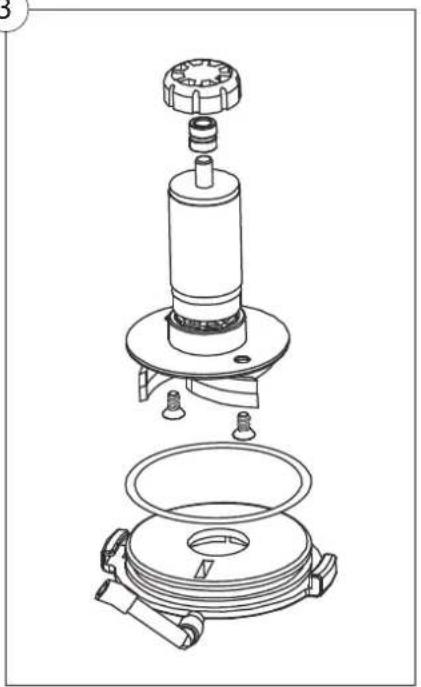
You first need to remove the two 90^ angle pieces (4.1) between UV-C intake cylinder and motor chamber to get access to the running unit (3). These two angle pieces are only pushed into each other and can be separated from the UV-C unit by twisting against the motor nozzle. The motor cover for pump (4.2) can be taken off by turning it 90^ in the bayonet. The rotor is now exposed freely. In case of deposits you can now remove them. The rotor should be freely and easily rotatable by hand. If this is not the case you should check the back magnetic part of the running unit.
Carefully unscrew the two white plastic screws (4.3) for removing the running unit, then carefully take out the rotor with its holder plate and shaft (3/4.4). The back star-shaped EPDM bearing with the central graphite bearing can be removed with a pair of tweezers if required (4.5/4.6). Ensure correct positioning of the EPDM bearing during assembly. It has gaps that fit in noses on the casing in the front and back bearings. Make sure the rotor is freely rotatable before assembling the pump chamber. Then put the pump chamber lid on and make the push-on connection to the UV-C nozzle by means of the two 90° angle pieces clickable into each other (4.7 – 4.1).
3. Water flow through the filter:
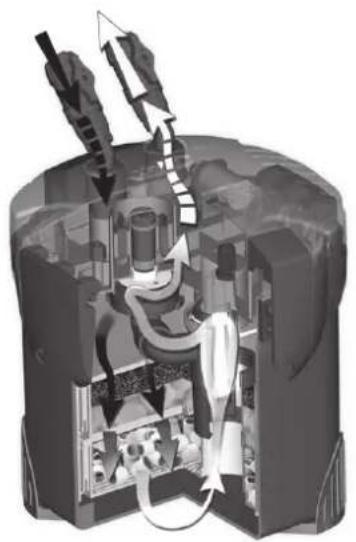
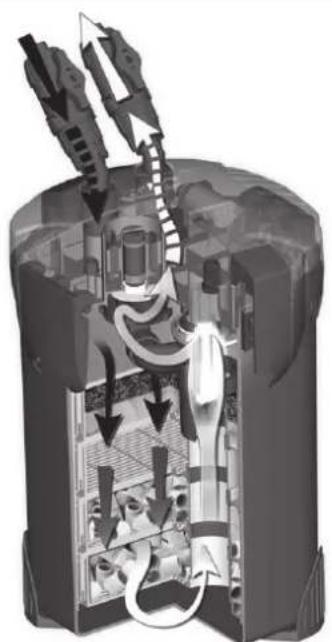
The water flows through the filter media baskets (1.34) from the top downwards.
Water flowing into the filter is directed into the filter through the "IN" intake valve and gets on the filter media in the uppermost basket, which is equipped with a sponge with ridges (1.21) and sera crystal clear Professional (1.35). The baskets underneath can be filled, for instance, with sera siporax Professional (1.36). After the water has flown through
the last basket it is drawn to the UV-C unit through the central duct. Here, the mechanically and biologically pre-cleaned water is irradiated by the strong UV-C amalgam lamp and directed into the motor chamber and the aquarium through the "OUT" outlet valve (5.1/5.2).
4. Function of the electric suction pump (6.1 - 6.6):
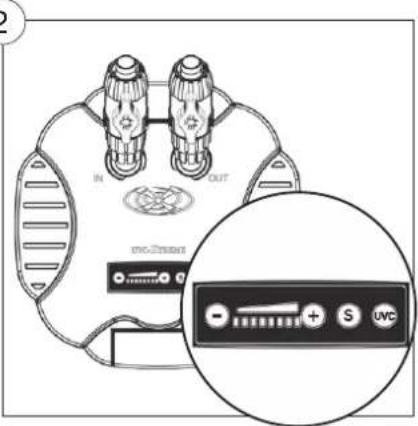
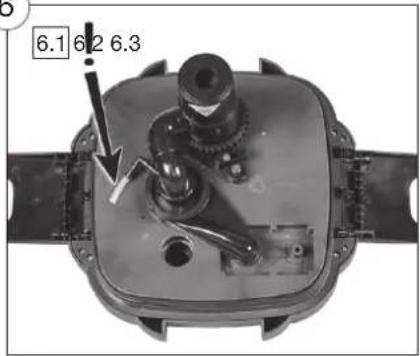
Bigger amounts of air are located in the canister of the filter and the filter media especially in case of a new setup or after cleaning the filter. This needs to be removed in order to make the filter function correctly and quiet. Make sure that the filter volume is filled with water by about two thirds, and put the filter head on (6.1). Please make sure the head seal O-ring is seated correctly (6.2) and lock the head to the canister (6.3). Now reconnect the valves with their attached hoses to the filter head and open the valve taps (6.4). Make the electric connection to the filter head via the ballast and its plug connector (6.5), and plug the mains plug of the ballast into the mains socket. The motor will start running. Now press the "S" key on the control panel (2). The motor will stop immediately, and the suction pump will now begin drawing air trapped out from underneath the filter head and expel it through the "OUT" connector. The suction pump will stop after it has run for about 15 seconds, and the filter pump motor will restart by itself. The air is then pressed out of the hose and, above the motor, into the aquarium. This process can be repeated several times if required, even during the operational phase of the filter. You will see the LEDs of the control panel lighting one after the other during the suction pump function. The motor will return to the previously chosen performance setting after having finished the suction pump action and press the air through the outlet hose. You can stop suction pump action anytime by pressing "S" (2) again. You should choose a higher motor performance setting in case plenty of air is trapped. This makes it easier for the pump to press the air out. You can reduce the performance as desired afterwards. The gases released during filter operation gather underneath the filter head and are continuously removed through a hose at the motor pump chamber (6.6).
5. Function of the UV-C system:
Compared to other UV-C lamps, an amalgam UV-C lamp has a better stabilized performance over the typical operational temperature range between 80 and 90 °C (176 and 194°F). The specially doped lamp ensures better distribution and density of metal steam and, correspondingly, constant electric flux through the amalgam lamp. The UV-C radiation therefore reaches an overall higher emission performance, which in return provides a higher potential for irradiating pathogens and algae in the water. The lamp should be operated permanently for best results. Switching it on and off daily should be avoided as it does not make much sense considering the combat of quickly multiplying pathogens. Depending on the switching cycles, the life expectancy of the amalgam UV-C lamp is between one and two years. The lamp should be changed after 1.5 years as to ensure its full function. Should the lamp fail due to a broken filament or similar, the blue LED indicator lamp on the top of the filter will also turn off. We recommend exchanging the lamp as soon as possible. Only use sera UV-C amalgam replacement lamps for these external filters.
Operation
Step 1: Filling with filter media
Please fill your filter with the following filtration media from top to bottom:
- Sponge (1.21), profile facing upwards. This material holds back coarse particles.
- sera crystal clear Professional (1.35): This filter material holds back finest particles.
- Biofilter material [e.g. sera siporax Professional (1.36) for highest biological filter performance].
This order of filter media increases the running time between cleaning of the filter (10).
The larger the amount of biological filtration material, the higher the biofilter performance of the filter. The UVC-Xtreme 800 external filter has 2 filter media baskets (1.34), one of which can be used for biofilter material; the UVC-Xtreme 1200 external filter has 4 filter media baskets (1.34), at the maximum 3 of them can be used for biofilter material. Of course, other filter media such as active carbon or absorbents can be used temporarily.
Step 2: Positioning
Please place the filter so it stands safely and does not amplify vibrations (7.1). The connectors are rotatable by 360^ (7.2) and allow for easy connection of the hoses. These are 1.5 m (4.9 ft.) long and allow for sufficient freedom for positioning the filter underneath or beside the aquarium.
Step 3: Hose installation
Connect the intake and outlet tubes (1.37/1.38) to the hoses included with the kit. Avoid hoses being bent sharply or loops being formed. Shorten the hoses – if the full length is not required – according to your installation requirements. The shorter the hoses, the less friction loss there is. Should you need longer hoses, however, please choose the corresponding diameter [16/22 mm (0.63/0.87 in.) for the UVC-Xtreme 800, and 18/23 mm (0.71/0.91 in.) for the UVC-Xtreme 1200]. Smaller internal hose diameters will reduce the flow rate! If you install hard intake and outlet tubing via a hose connector, please choose an appropriate diameter and make sure you use 90° elbow fittings and not 90° angle pieces.
Connect the hose from the intake tube coming from the aquarium to the "IN" valve, and the hose to the outlet tube back into the aquarium with the "OUT" valve. Use the union nuts for on the valves for securing the hoses.
First loosen the nuts and push them loosely over the hose (7.4).
Then please push the hose ends into the circular gap between the pressure latches and the inner edge of the hose connector. Then fasten the squeezing screws of the valves by hand (please do not use any unsuitable tools such as a pipe wrench). Now hoses and taps are firmly connected to each other (7.5). Then you can connect the valves to the filter head valve nozzles (7.6).
Mount the spray bar by means of the included suction cup holders underneath the desired water surface of the aquarium and direct it in a way that the small holes are roughly parallel 5 – 15 cm (2 – 6 in.) underneath the water surface (7.1).
Connect the "IN" intake valve to the connector on top of the filter head marked in the same way, and analogously the "OUT" outlet valve to the "OUT" connector (7.3).
Step 4: Start
Fill the canister with water by about two thirds, and attach the filter head to the canister appropriately. The UV-C tube (1.20) must be inserted into the holes of the filter media baskets (1.34). The filter head is now connected to the filter canister by closing the 4 clip locks (6.2 and 6.3).
Please make sure the filter head seal is seated properly. Now open the taps on the "IN" and "OUT" valves (6.4) if you have not already done so yet. Now connect the included ballast to the mains socket and connect angled barrel plug to the socket on the filter head (6.5).
The motor of the filter will now start running on level 4, the display (2) will show 4 active LEDs. Now press the "S" key on the control panel and thus activate the suction pump. Now the suction pump will press air trapped inside the filter into the "OUT" hose. The suction pump will stop after 15 seconds, then the motor will start. Water will now run from the aquarium into the filter. The suction pump can be activated repeatedly as required in case there is still air trapped inside the filter. The operational noise will be louder as long as air still gets to the rotor, but this will disappear after a few minutes. This time can even be shortened if you set the motor performance to level 8 for a short while.
Step 5: Adjusting the flow rate (choosing the performance setting)
You can adjust the motor performance as required after the air has been removed completely from the filter.
Pressing the “+” key on the control panel (2) once increases the performance setting of the motor by one step, pressing the “-” key reduces it by one step each time you press it.
The default setting is level 4. This setting will be active every time the filter has been disconnected from the mains supply. You will then need to re-adjust it if applicable.
During operation, you can at any time re-adjust the motor performance of the filter pump (exception: not while the suction pump is active).
Technical data
UVC-Xtreme 800
| Level Filter circulation ^* (l/h / US gph) | Pump power consumption (W) |
| 1 450 / 119.5 | |
| 2 590 / 156 8.5 | |
| 3 630 / 166 10 | |
| 4 650 / 172 11.5 | |
| 5 685 / 181 13 | |
| 6 740 / 196 15 | |
| 7 770 / 203 17 | |
| 8 840 / 222 19 | |
| UV-C lamp additionally 5 |
UVC-Xtreme 1200
| Level Filter circulation ^* (l/h / US gph) | Pump power consumption (W) | |
| 1 570 / 150 5 | ||
| 2 730 / 193 9 | ||
| 3 820 / 217 12 | ||
| 4 920 / 243 15 | ||
| 5 980 / 259 18 | ||
| 6 1040 / 275 20 | ||
| 7 1090 / 288 23 | ||
| 8 1220 / 322 29 | ||
| UV-C lamp additionally 5 | ||
* Circulation measured with filter head mounted on filter canister, 1.5 m (4.9 ft.) included hose attached, with filter media baskets without filter material.
Technical data
sera UVC-Xtreme 800 sera UVC-Xtreme 1200
(order code 32147)
External Filter for 100 - 800 l
(26 - 211 US gal.)
fresh water aquariums
24 V = max. 24 W
incl. UV Lamp 5 W G23
Qmax: 840 l/h / max. 35°C
(222 US gph / max. 95°F)
(order code 32148)
External Filter for 200 - 1,200 l
(53 - 317 US gal.)
fresh water aquariums
24 V = max. 34 W
incl. UV Lamp 5 W G23
Qmax: 1,220 l/h / max. 35°C
(322 US gph / max. 95°F)

sera ballast (order code 32181)
Input 100 - 240 V \~ 50/60 Hz / Output 24 V DC 2A

The UV-C amalgam lamp switches on together with the motor and can be switched off by pressing the key "UVC" (2) if desired. The smaller the tank, the lower the required hourly water turnover in the aquarium. The lower the circulation setting, the higher the degree of the pathogen and algae reduction, since the water passing the UV-C unit is being exposed to the UV-C radiation longer. Depending on the pathogenic pollution it may be advantageous to choose a relatively low water turnover at first and then accelerate it by and by. Certain pathogens can divide every 20 minutes and therefore multiply immensely within shortest time. Once most of the pathogens have been eliminated with a low motor performance setting, you can increase the motor performance as required. This is of course only a pathogen reduction, not a sterilization. Sterile conditions are impossible in an aquarium with animals, plants, decoration and sand. The useful filter bacteria are located on the filter media and on surfaces. They are not affected by the UV-C radiation of the UVC-Xtreme filter.
Switching the UV-C lamp on and off:
The UV-C lamp is switched on automatically when putting the filter into operation. This is indicated by the blue LED light on the filter head (2). We recommend permanent UV-C water treatment while the filter is in operation.
1. Switching off the UV-C lamp:
During maintenance, the UV-C lamp can be switched off easily by pressing the "UVC" key. When doing so, the ^1 LED indicator (red) will light up once while the blue LED indicator in the center that indicates UV-C operation will turn off.
2. Switching on the UV-C lamp:
Press the "UVC" key on the panel (2) briefly. The 8LED indicator (red) will light up twice when doing so while the blue LED in the center that indicates UV-C operation will turn on.
Separating the external filter from the mains supply:
The external filter can be switched off by:
– pulling the barrel plug from the socket (6.5); or by
– pulling the mains plug of the ballast from the mains socket.
Opening of the filter head:
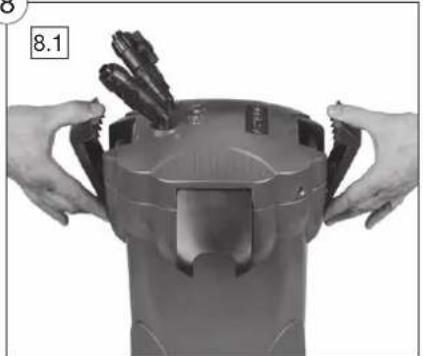
First switch off the external filter by pulling the barrel plug (6.5). Then close the "IN"/"OUT" taps (6.4). Open the 4 holder clips (8.1 - 8.2), but leave the filter head in position otherwise. Now you can unscrew the valves underneath the valve taps (7.6). A small amount of water can run out of the valve when doing so.
Maintenance and care
Cleaning (every 4 – 12 weeks)
Over time and depending on biological load, food amount and aquarium volume, mechanical and biological filter media get clogged more or less quickly. Due to increasing sedimentation, the turnover through the filter is reduced.
For cleaning, please first pull the barrel plug from the filter head (6.5) and then close the valves by turning the taps by 90^ perpendicular to the flow direction (6.4).
Now open the 4 holder clips (8.1 - 8.2). This leads to pressure release, and you can now unscrew the valves from the filter head without water running out (7.6). Now take the filter head off and lay it aside, or put it back if you wish to carry it to a sink or the location where you wish to clean the filter media.
You can now take the filter media baskets (1.34) out from above and wash out the filter materials. It is best to use aquarium water for washing them out since this, unlike tap water, does not endanger the filter bacteria. Never replace the filter material entirely but always retain used filter material. By doing so, the filter bacteria will then spread over the entire filter material again. Newly setup filters can also be activated by using used filter material.
Maintenance of the running unit (every 3 - 9 months)
Please check the bottom side of the filter head whether the running unit can move freely. To do so, please remove the two 90° elbows and the pump chamber cover. Turn the rotor with your fingers. You should be able to turn it without suspicious resistance. Rinse the openings thoroughly with a water beam, depending on deposits and biofilm, and re-assemble the filter (4.1 – 4.7).
Replacing the UV-C lamp (every 1 - 1.5 years)
Should the blue LED indicator lamp stay off, or if the UV-C lamp is 1.5 years old at the maximum, it needs to be replaced. First switch off the filter head for replacing the lamp. Pull the barrel plug from the filter head (6.5). Then you can disconnect the head from the filter (8.1 - 8.2).
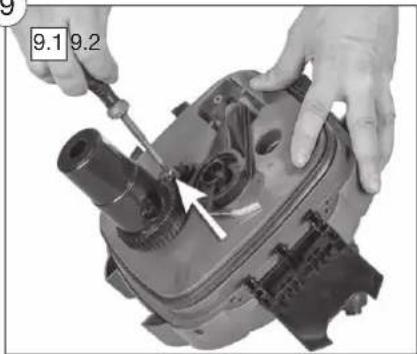
Unscrew the union nut of the UV-C intake nozzle after having removed the magnetic contact (1.18, 9.1/9.2), then pull the two 90° elbows attached to the nozzles (9.3).
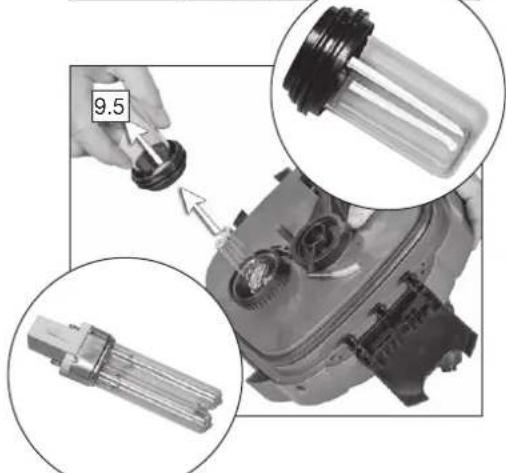
Now the union nut of the UV-C nozzle can be unscrewed (9.4). Pull the nozzle off upwards. The quartz glass cylinder is located underneath. It can now be pulled off, granting access to the lamp (9.5). The UV-C lamp can be removed from the socket by pulling it gently. It can now be replaced with a suitable replacement lamp. Then re-assemble the filter in reverse order (9.6 - 9.1).
Switch-off protection: UV-C radiation is dangerous. Irradiation of eyes and skin must be strictly avoided. The filters are constructed according to latest safety standards in a way that a magnetic switch switches off the UV-C lamp as soon as the lamp casing is opened. Prior to every maintenance measure, the magnetic contact should be removed first before removing the two clickable 90° elbows, as this will prevent possible eye or skin damage caused by UV-C radiation being released from the now opened connection of the two 90° elbows at the UV-C tube, in case disconnecting the device from the mains supply was forgotten.
Possible problem sources and solution
| Problem Possible cause Possible solution | ||
| E1 Suction pump does not fill up the filter | E1.1 Are "IN" and "OUT" valves/noses mixed up?Check if bubbles are coming out of the intake strainer while suction pump is in operation. | Yes, switch "IN" and "OUT" valves/hoses.Make sure that the valve marking corresponds with the valve connector marking (7.3). |
| No, see item E1.2 | ||
| E1.2 Are "IN"/"OUT" valves still closed? Yes, open taps (6.4) of the "IN"/"OUT" valves. | No, see item E1.3 | |
| E1.3 Did you forget to insert the filter head seal (1.31)? | Yes, insert the filter head seal. | |
| No, see item E1.4 | ||
| E1.4 Are hoses laid out in a loop? | Yes, lay the hoses out without loops, shorten them if applicable. | |
| No, see item E1.5 | ||
| E1.5 Is the filter in operation for the first time? Yes, fill the filter canister with water by two thirds. Then press "S". | No, see item E1.6 | |
| E1.6 Dirt particles in the outlet valve? | Yes, remove the valve, clean it, and re-assemble. | |
| No, see item E1.7 | ||
| E1.7 Too low water level of the tank (e.g. terrapin tank)? | Yes, press "S" button (2) repeatedly after suction is completed, or raise the performance setting by pressing the "+" button. The setting can be adjusted as desired once the air trapped inside the filter has escaped. | |
| No, see item E1.8 | ||
| E1.8 Is the spray bar too deep underneath the water surface? | Yes, install the spray bar parallel to water surface, 15 cm (6 in.) underneath it at the maximum (7.1). | |
| No, see item E5, or please contact your retailer. | ||
| E2 Pump does not work E2.1 Power supply interrupted? Check mains and 5.5 mm (0.2 in.) barrel plugs. | Yes, connect to power supply. | |
| No, see item E2.2 | ||
| No, see item E2.3 | ||
| Yes, exit standby mode by pressing the "+" button (2). | ||
| No, see item E2.4 | ||
| Yes,- disconnect the filter from the mains supply and reconnect it; or-disconnect the filter from the mains supply, open the filter head (8.1 - 8.2). Clean the filter head, in particular the rotor (3), so the rotor can rotate freely. | ||
| No, see item E2.5 | ||
| Yes, see item E5 of the chart. | ||
| No, please contact your retailer. | ||
| E3 Pump performance has strongly decreased | E3.1 Are the valve taps (6.4) not in the correct "OPEN" position? | Yes, open the valve taps properly so both handles are parallel to the longitudinal axis of the valves. |
| No, see item E3.2 | ||
| E3.2 Hoses bent, polluted or covered with biofilm layers? Is there an obstacle in the tubing? | Yes, clean/brush hoses and tubing, remove biofilm inside the hoses by means of a hose brush. Remove obstacles in the tubing. | |
| No, see item E3.3 | ||
| E3.3 Intake strainer or outlet clogged? | Yes, clean strainer or outlet and remove coarse dirt. | |
| No, see item E3.4 | ||
| E3.4 Too much air trapped inside the filter? | Yes, press "S" key (2) until pump works properly, repeat as required. | |
| No, see item E3.5 | ||
| E3.5 Too many devices connected to filter? | Yes, prefilters, T pieces, UV-C lamps etc. additionally connected to the intake or outlet reduce the flow rate. The UVC-Xtreme filter already contains a suitable UV-C lamp. | |
| No, see item E3.6 | ||
| E3 Pump performance has strongly decreased | E3.6 Filter media clogged? | Yes, open filter head (8.1 - 8.2), take the filter media baskets (1.34) out, and rinse filter media with lukewarm water. |
| No, see item E3.7 | ||
| E3.7 Filter media arranged in wrong order? | Yes, please re-arrange according to "Operation Step 1: Filling with filter media". | |
| No, see item E3.8 | ||
| E3.8 Filter media filled into too fine mesh bags? | Yes, please place filter media directly in the filter media baskets (1.34). The filter media recommended by sera are optimal for the filtration inside the UVC-Xtreme filter and do not require additional filter media bags. | |
| No, see item E3.9 | ||
| E3.9 Air intake tubing clogged? Yes, remove air intake tube (4.2), clean it and | push it back on again. | |
| No, see item E3.10 | ||
| E3.10 Pump dirty? Yes, clean pump chamber, impeller (3) and filter path inside the filter head. | No, please contact your retailer. | |
| E4 Water flows over E4.1 Filter head seal (1.31) forgotten? Yes, install correctly. | ||
| No, see item E4.2 | ||
| No, see item E4.3 | ||
| Yes, please place filter in a higher position (7.1), or reduce aquarium height. | ||
| No, please contact your retailer. | ||
| E5 Too much air in the filter | E5.1 Air entered the filter during maintenance? | Yes, press "S" key (2) until pump works properly, repeat as required.Should the suction pump not remove air entirely, see item E1 in the chart. |
| No, see item E5.2 | ||
| E5.2 Intake strainer partially outside the water? | Yes, attach intake strainer in a way that it is completely submerged in water. | |
| No, see item E5.3 | ||
| E5.3 Filter positioned too high? | Yes, place filter in a lower position. The upper edge of the filter head should be at least 20 cm (8 in.) underneath the water level (7.1). | |
| No, see item E5.4 | ||
| E5.4 Are there air bubbles emerging from other devices such as an air pump in the immediate vicinity of the intake tube? | Yes, change position of airstone in a way that it is not located in the immediate vicinity of the intake tube of the filter. | |
| No, see item E5.5 | ||
| E5.5 Are hoses, tubing or other connections leaky, e.g. due to seal rings that fell out? | Yes, re-establish proper connection, or replace parts affected by material fatigue. | |
| No, see item E5.6 | ||
| E5.6 Air intake hose and tube (4.2) clogged? | Yes, remove and clean air intake hose and tube. | |
| No, please contact your retailer. | ||
| E6 UV-C LED indicator does not light up | E6.1 Was the UV-C lamp switched off manually? | Yes, press "UVC" key (2) once until the UV-C LED indicator turns on. |
| No, see item E6.2 | ||
| E6.2 Was the magnetic contact (1.18, 9.2) not reinstalled after replacing the lamp? | Yes, install. | |
| No, see item E6.3 | ||
| E6.3 UV-C lamp faulty? | Yes, replace UV-C lamp. | |
| No, see item E6.4 | ||
| E6.4 Was the UV-C LED display cable accidentally torn off? | Yes, order the corresponding LED indicator unit from your retailer and replace it. | |
| No, please contact your retailer. | ||
| E7 Filter suddenly became noisy | E7.1 Pressure side covered by sediments or dirt? | Yes, please check outlet tube up to the actual outlet, disassemble affected parts and clean them. |
| No, see item E7.2 | ||
| E7.2 Too much air in the filter? | Yes, see item E5 of the chart. | |
| No, see item E7.3 | ||
| E7.3 Running unit (3) not installed correctly, e.g. in a tilted position? | Yes, please install correctly according to fig. 4.4 - 4.1. | |
| No, see item E7.4 | ||
| E7.4 Ceramic shaft broken? | Yes, please replace complete running unit (3). | |
| No, please contact your retailer. | ||
| E8 Sudden and rapid algae growth | E8.1 UV-C lamp switched off? | Yes, press "UVC" key until the blue LED indicator turns on. |
| No, see item E8.2 | ||
| E8.2 UV-C lamp faulty or in use for too long? | Yes, replace the lamp. | |
| No, please contact your retailer. | ||
| E9 Nitrite level suddenly rises | E9.1 Filter media changed entirely recently? | Yes,- repeat partial water changes until nitrite values are alright again.- use sera bio nitrivec.- only replace filter material partially in the future. |
| No, check other care conditions that have possibly changed, and improve them. | ||
Manufacturer guaranty:
We, sera GmbH (warrantor), Borsigstraße 49, 52525 Heinsberg, Germany, grant a 3 year voluntary guaranty* for the UVC-Xtreme external filters covering freedom of defects in material and production, commencing on the purchase date.
The 3 year sera guaranty is to be understood as an additional service of the manufacturer and not as a replacement for your rights arising from §§ 437 BGB (German Civil Code). Your statutory rights are not limited by this guaranty. Claims arising from statutory liability for defects are also not affected!
Guaranty exclusion (\*):
The following parts are excluded from guaranty:
a) Guaranty does NOT apply for wear and tear parts such as filter media, seal rings, running unit (rotor, bearing, shaft) and UV-C lamps.
b) The ballast is NOT covered by a 3 year guaranty. You are still entitled to 2 years of guaranty.
c) Any kind of damage on electric cables and plugs of the ballast as well as glass are excluded from guaranty, unless the fault arises due to a material or manufacturing flaw.
In case the mains cable of the ballast is damaged, the cable must be replaced immediately. These cables are not being repaired by the manufacturer due to safety reasons (explanation: moisture that gets into the cable often leads to subsequent corrosion and short circuits). Replacing the entire DC cable on the low voltage side of the ballast is not possible due to technical reasons. The ballast must be replaced in this case.
Expiring of guaranty:
Guaranty obligations are void if:
– the information for use was not followed and the device was exposed to negligent, improper or unsuitable use, maintenance and repair;
- the device was damaged by external force, external influences or intentionally;
– third party spare parts not approved by the company sera were installed.
Our obligations:
In case of a guaranty claim, the sera GmbH at their own discretion obliges to either repair the device, or to replace or repair the faulty part, or to replace the device with a functioning product of the same value.
Your obligations:
Important: In case the device is faulty, please first consult our retailer where you purchased the device and let him check whether a guaranty case is applicable before you turn in the device as a complaint. This is the only way to avoid unnecessary freight costs you could possibly be charged for.
Manufacturer contact:
sera GmbH
Borsigstraße 49
52525 Heinsberg
Germany
fresh water aquariums
24 V = max. 24 W
incl. UV Lamp 5 W G23
Qmax: 840 l/h / max. 35°C
(order code 32148)
External Filter for 200 - 1.200 l
fresh water aquariums
24 V = max. 34 W
incl. UV Lamp 5 W G23
Qmax: 1.220 l/h / max. 35°C

sera ballast (order code 32181)
Input 100 - 240 V \~ 50/60 Hz / Output 24 V DC 2A

fresh water aquariums
24 V — max. 24 W
incl. UV Lamp 5 W G23
Qmax: 840 l/h / max. 35°C
sera UVC-Xtreme 1200
(order code 32148)
External Filter for 200 - 1.200 l
fresh water aquariums
24 V — max. 34 W
incl. UV Lamp 5 W G23
Qmax: 1.220 l/h / max. 35°C


sera ballast (order code 32181)
Input 100 - 240 V \~ 50/60 Hz / Output 24 V DC 2A

fresh water aquariums
24 V = max. 24 W
incl. UV Lamp 5 W G23
Qmax: 840 l/h / max. 35°C
sera UVC-Xtreme 1200
(order code 32148)
External Filter for 200 - 1.200 l
fresh water aquariums
24 V = max. 34 W
incl. UV Lamp 5 W G23
Qmax: 1.220 l/h / max. 35°C

sera ballast (order code 32181)
Input 100 - 240 V \~ 50/60 Hz / Output 24 V DC 2A

fresh water aquariums
24 V = max. 24 W
incl. UV Lamp 5 W G23
Qmax: 840 l/h / max. 35°C
sera UVC-Xtreme 1200
(order code 32148)
External Filter for 200 - 1.200 l
fresh water aquariums
24 V = max. 34 W
incl. UV Lamp 5 W G23
Qmax: 1.220 l/h / max. 35°C

sera ballast (order code 32181)
Input 100 - 240 V \~ 50/60 Hz / Output 24 V DC 2A

1.37 Tubo "IN" (800/1200)
1.38 Tubo "OUT" (800/1200)
fresh water aquariums
24 V = max. 24 W
incl. UV Lamp 5 W G23
Qmax: 840 l/h / max. 35°C
sera UVC-Xtreme 1200
(order code 32148)
External Filter for 200 - 1.200 l
fresh water aquariums
24 V = max. 34 W
incl. UV Lamp 5 W G23
Qmax: 1.220 l/h / max. 35°C

sera ballast (order code 32181)
Input 100 - 240 V \~ 50/60 Hz / Output 24 V DC 2A

fresh water aquariums
24 V — max. 24 W
incl. UV Lamp 5 W G23
Qmax: 840 l/h / max. 35°C
sera UVC-Xtreme 1200
(order code 32148)
External Filter for 200 - 1.200 l
fresh water aquariums
24 V — max. 34 W
incl. UV Lamp 5 W G23
Qmax: 1.220 l/h / max. 35°C

sera ballast (order code 32181)
Input 100 - 240 V \~ 50/60 Hz / Output 24 V DC 2A

1.22 Amalgam UV-C lamba 5 W (800/1200)
fresh water aquariums
24 V — max. 24 W
incl. UV Lamp 5 W G23
Qmax: 840 l/h / max. 35°C
(order code 32148)
External Filter for 200 - 1.200 l
fresh water aquariums
24 V — max. 34 W
incl. UV Lamp 5 W G23
Qmax: 1.220 l/h / max. 35°C


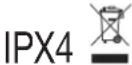
IPX4

sera ballast (order code 32181)
Input 100 - 240 V \~ 50/60 Hz / Output 24 V DC 2A




fresh water aquariums
24 V — max. 24 W
incl. UV Lamp 5 W G23
Qmax: 840 l/h / max. 35°C
sera UVC-Xtreme 1200
48)
External Filter for 200 - 1,200 I
fresh water aquariums
24 V — max. 34 W
incl. UV Lamp 5 W G23
Qmax: 1,220 l/h / max. 35°C

sera ballast (order code 32181)
Input 100 – 240 V ∼ 50/60 Hz / Output 24 V DC 2A

fresh water aquariums
24 V — max. 24 W
incl. UV Lamp 5 W G23
Qmax: 840 l/h / max. 35°C
External Filter for 200 - 1.200 l
fresh water aquariums
24 V — max. 34 W
incl. UV Lamp 5 W G23
Qmax: 1.220 l/h / max. 35°C

sera ballast (order code 32181)
Input 100 - 240 V \~ 50/60 Hz / Output 24 V DC 2A

fresh water aquariums
24 V — max. 24 W
incl. UV Lamp 5 W G23
Qmax: 840 l/h / max. 35°C
sera UVC-Xtreme 1200
(order code 32148)
External Filter for 200 - 1.200 l
fresh water aquariums
24 V — max. 34 W
incl. UV Lamp 5 W G23
Qmax: 1.220 l/h / max. 35°C

sera ballast (order code 32181)
Input 100 - 240 V \~ 50/60 Hz / Output 24 V DC 2A

fresh water aquariums
24 V — max. 24 W
incl. UV Lamp 5 W G23
Qmax: 840 l/h / max. 35°C
sera UVC-Xtreme 1200
(order code 32148)
External Filter for 200 - 1200 l
fresh water aquariums
24 V — max. 34 W
incl. UV Lamp 5 W G23
Qmax: 1220 l/h / max. 35°C

sera ballast (order code 32181)
Input 100 - 240 V \~ 50/60 Hz / Output 24 V DC 2A

fresh water aquariums fresh water aquariums
24 V max. 24 W 24 V max. 34 W
incl. UV Lamp 5 W G23
Qmax: 840 l/h / max. 35°C

incl. UV Lamp 5 W G23
Qmax: 1220 l/h / max. 35°C


sera ballast (order code 32181)
Input 100 - 240 V \~ 50/60 Hz / Output 24 V DC 2A