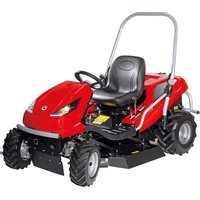
Tuareg 92 - Lawn mower Efco - Free user manual and instructions
Find the device manual for free Tuareg 92 Efco in PDF.


User questions about Tuareg 92 Efco
0 question about this device. Answer the ones you know or ask your own.
Ask a new question about this device
Download the instructions for your Lawn mower in PDF format for free! Find your manual Tuareg 92 - Efco and take your electronic device back in hand. On this page are published all the documents necessary for the use of your device. Tuareg 92 by Efco.
USER MANUAL Tuareg 92 Efco
natural_image
Exterior view of a modern grass lawn tractor with visible tracks and wheels (no text or symbols)
text_image
CE
GB 10
D 50
F 94
I 137
NL 179
E 221
PL 263
HU 305
| 1.2 | 6—5—4—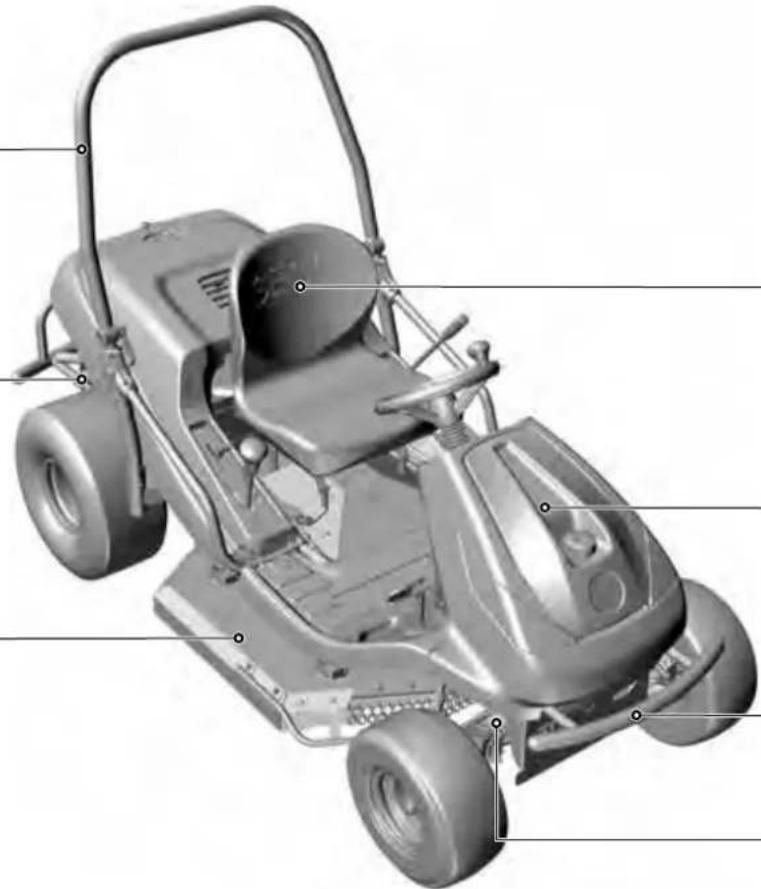 ——7123 ——7123 |
| 1.3.1 | 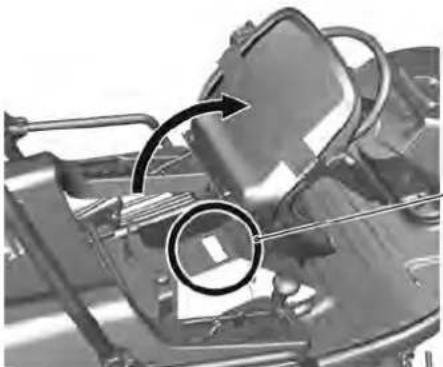 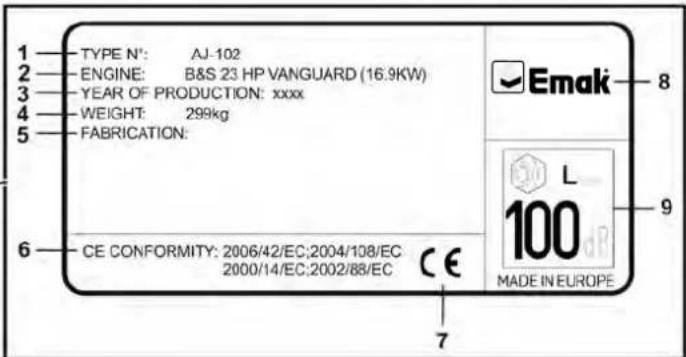 |
| 1.3.2a | 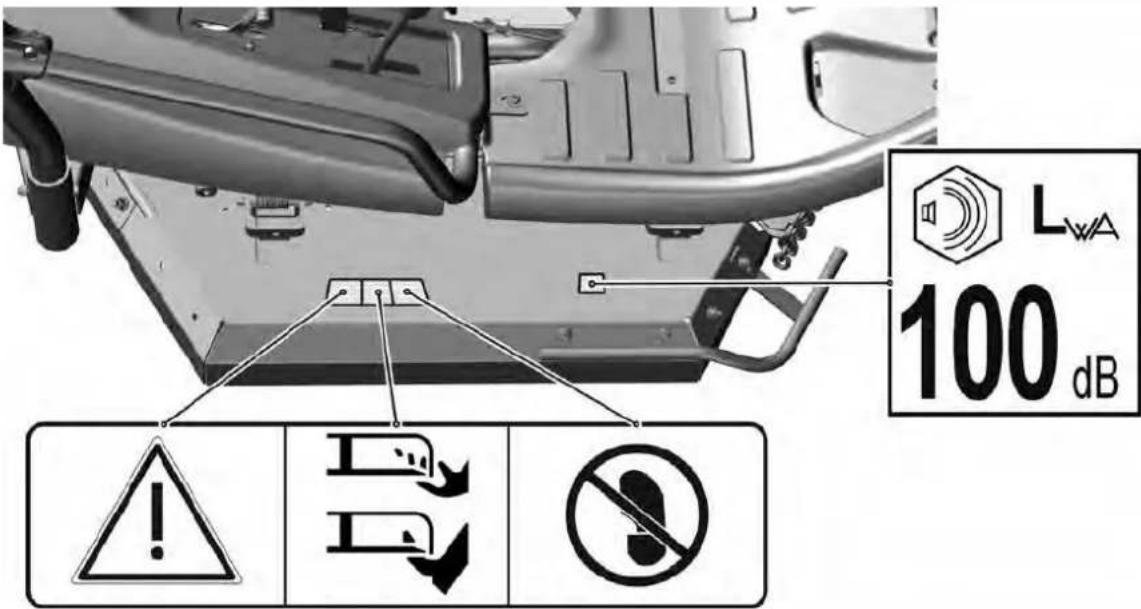 |
| 1.3.2b | 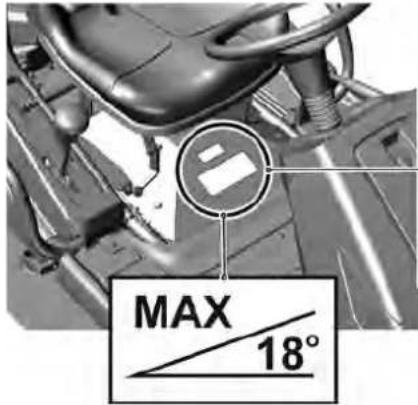 | 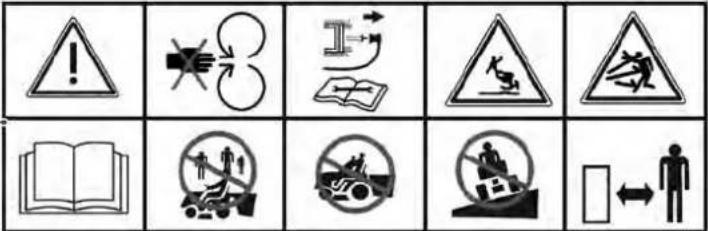 |
| 1.3.2c | 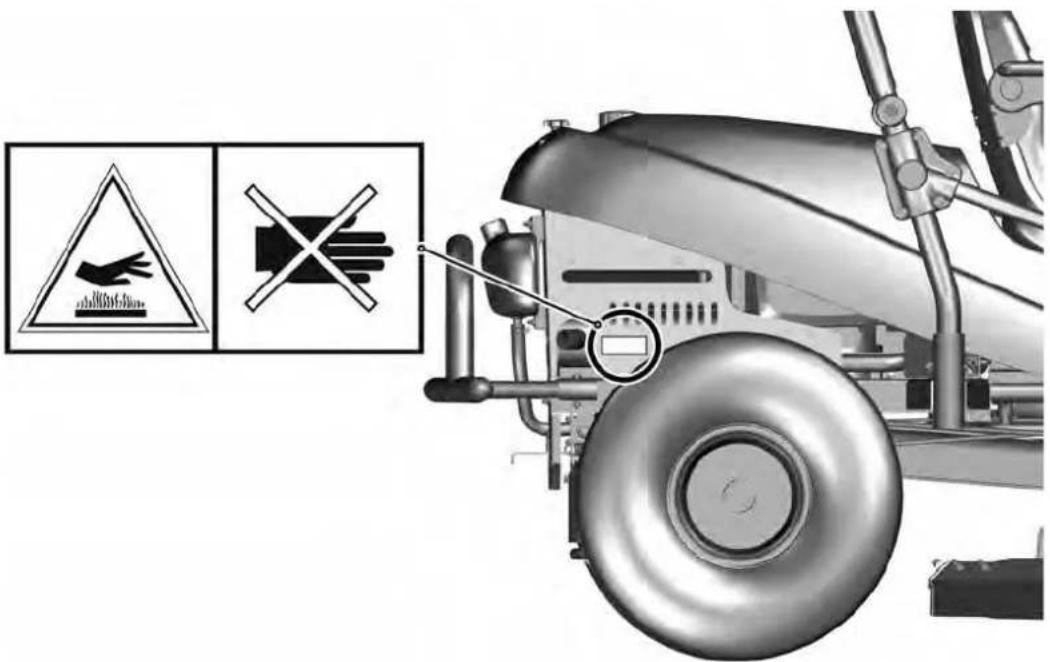 | |
| 1.3.2d | 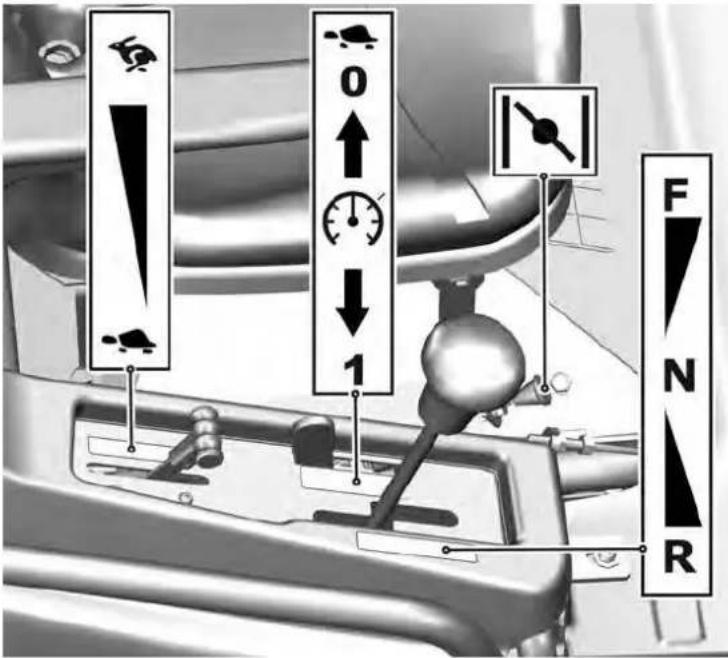 | |
| 3.1 | 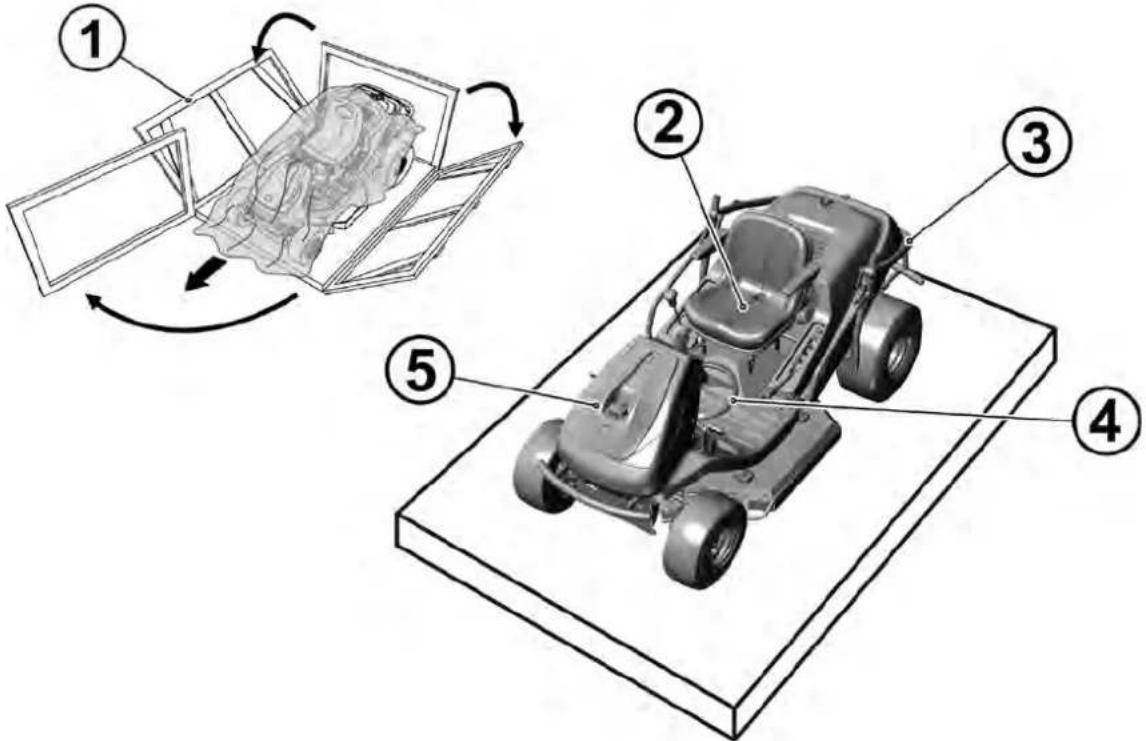 | |
| 3.3a | 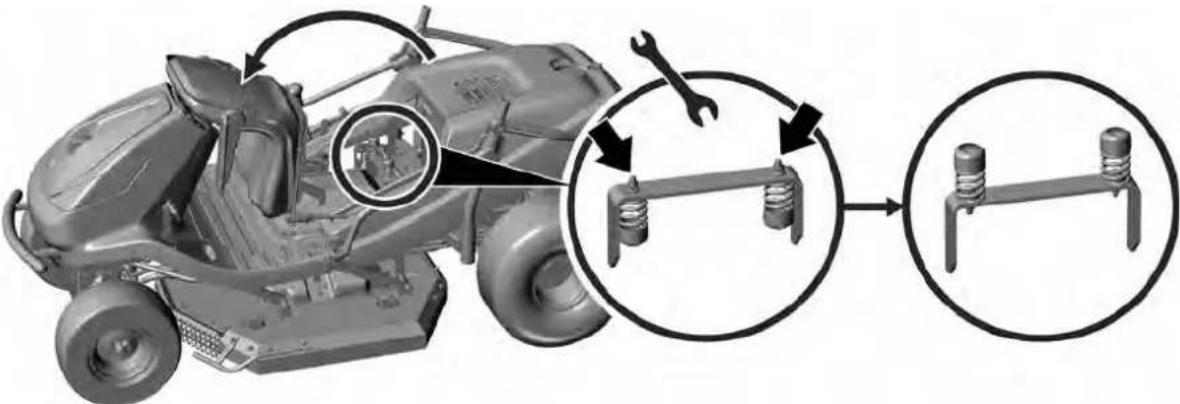 | |
| 3.3b | 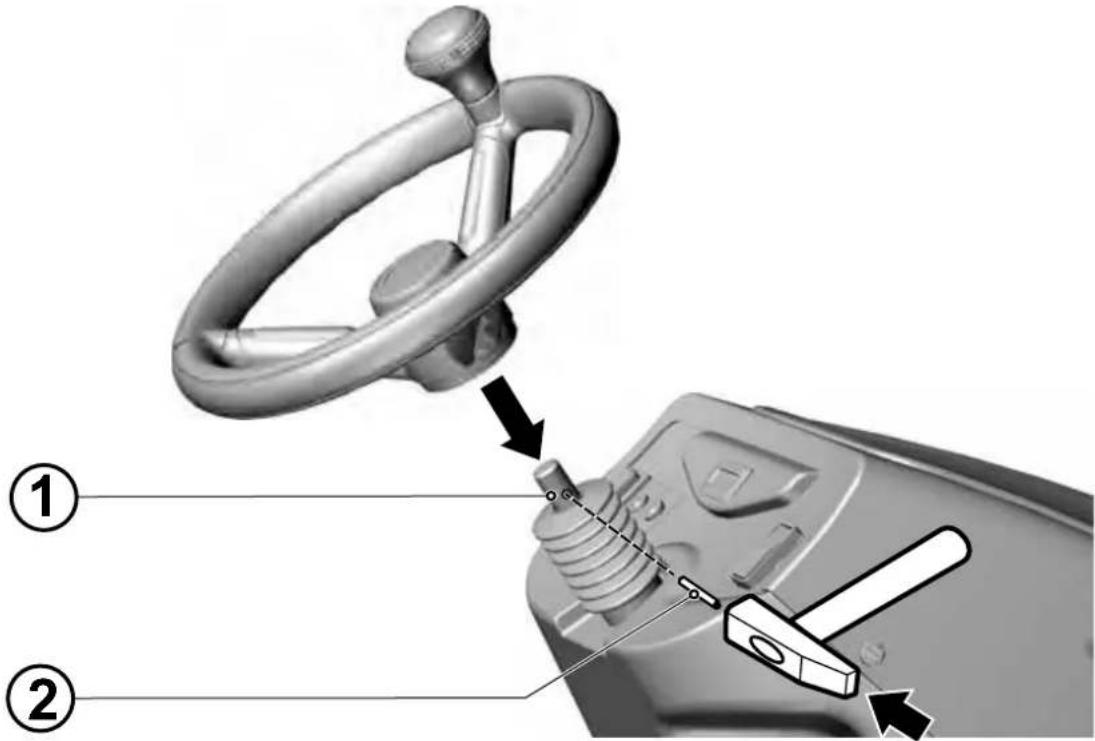 | |
| 3.3c | 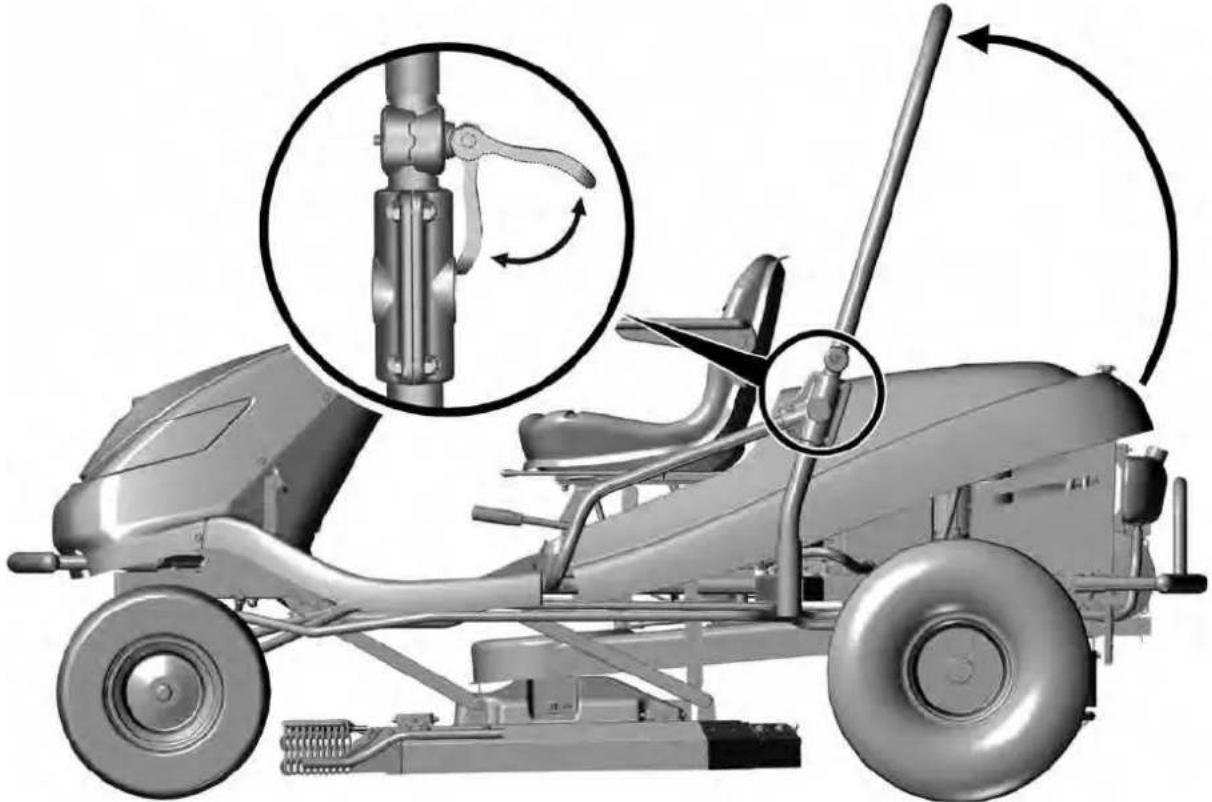 | |
| 3.3d | 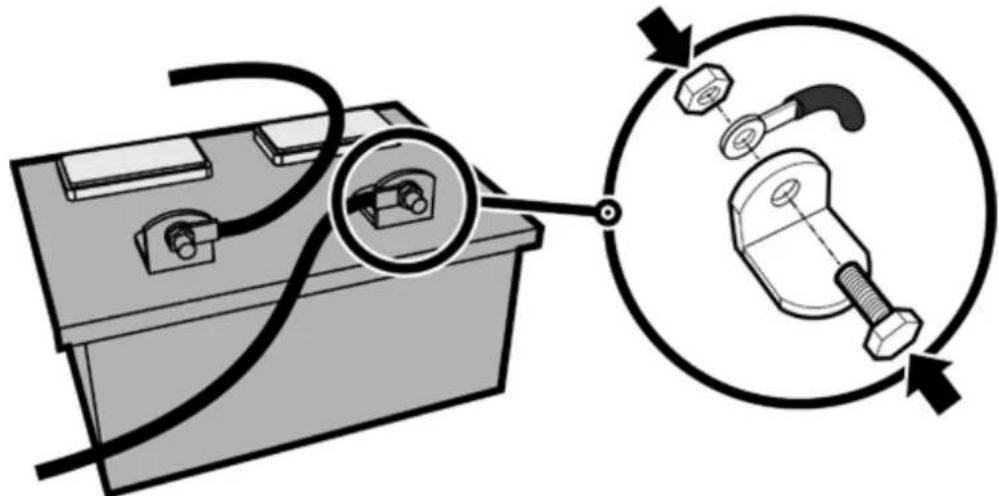 | |
| 4.1 | 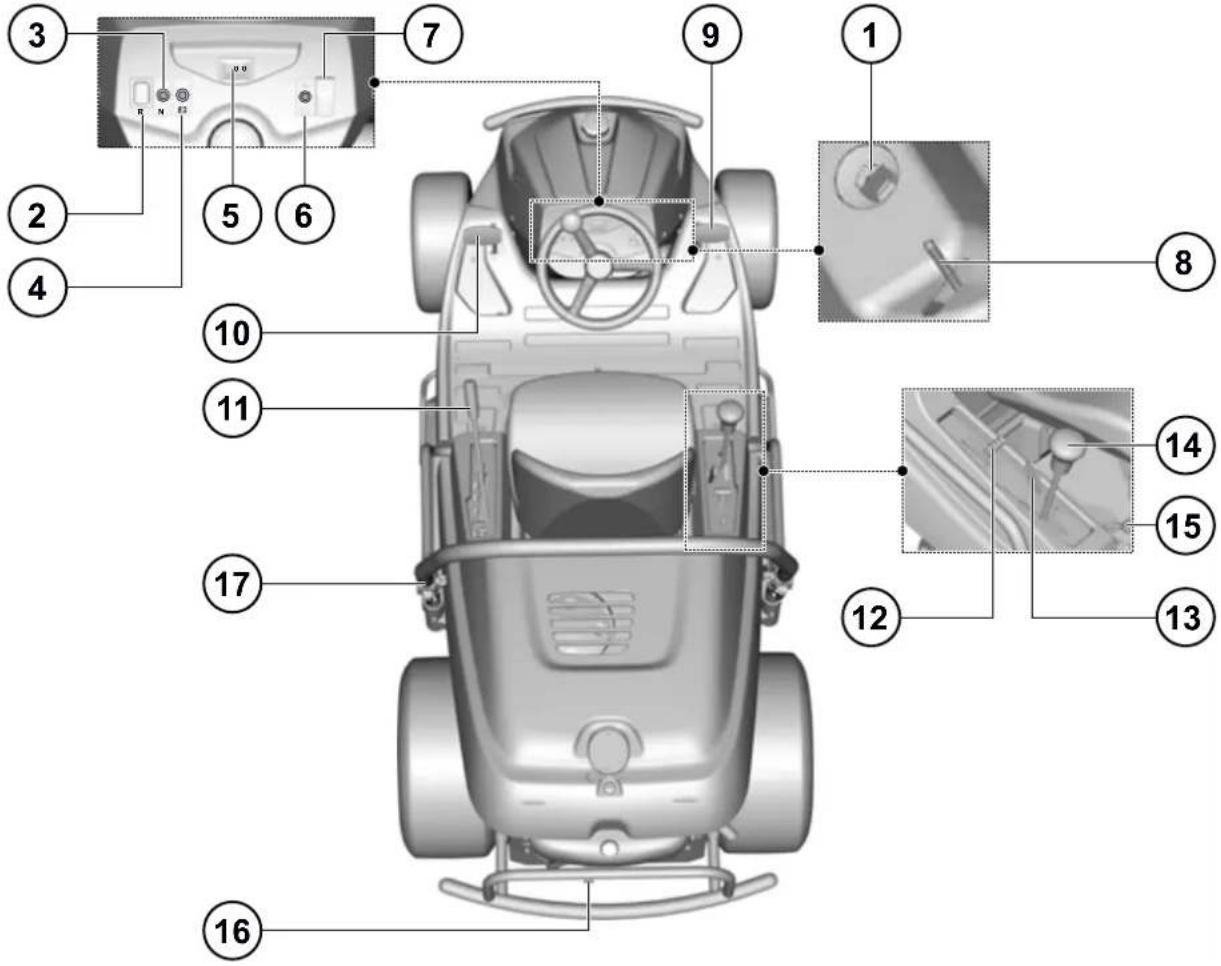 | |
| 6.3.7 | 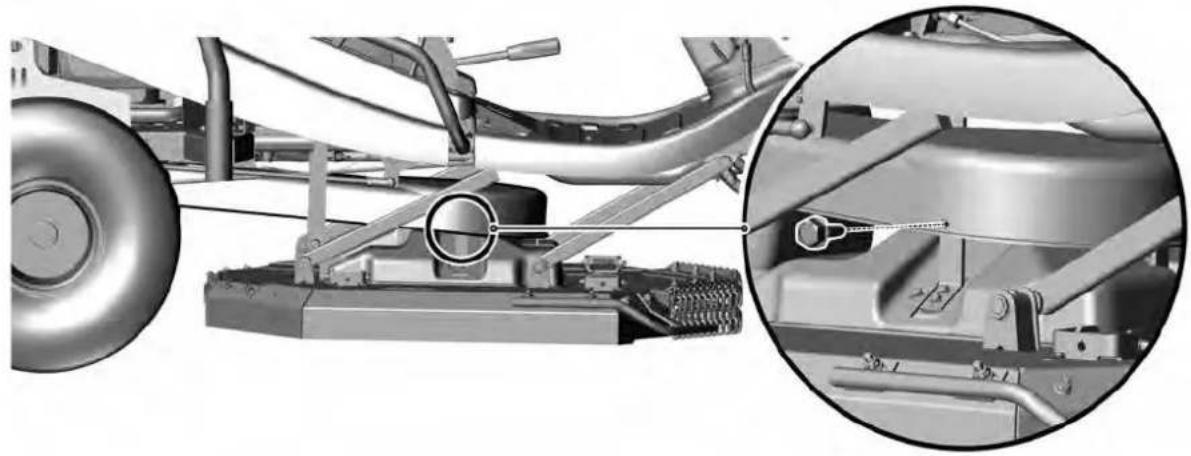 | |
| 6.3.13 | 92 EVO 92 EVO 4x4 | |
 |  | |
| 6.4 | 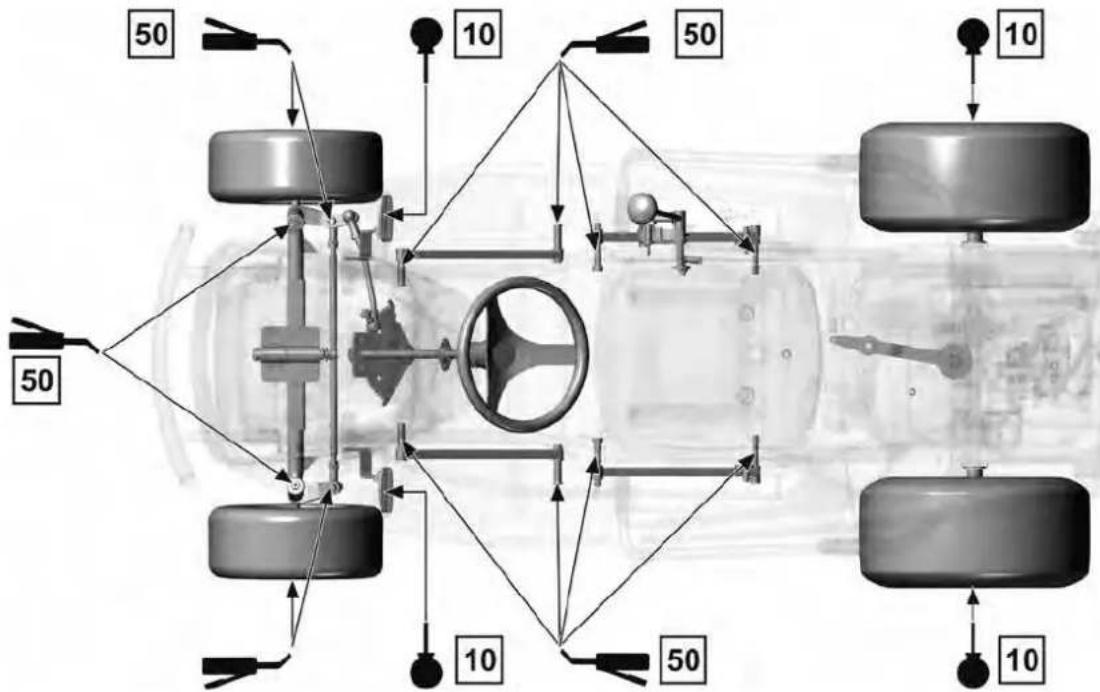 | |
FOREWORD
Dear customer,
Thank you for purchasing this riding mower from Emak S.p.A., a company renowned both in Europe and internationally as a manufacturer of quality mowers and accessories for the maintenance of grass areas.
ABOUT THIS MANUAL
This manual should guide you through, in the most simple way possible, the safe installation, operation and maintenance of your riding mower and provide information about its options and capabilities. It is therefore intended for all persons that will come into contact with the riding mower during its installation, operation and maintenance.
Please carefully study the manual before doing anything with the mower. Follow the instructions contained in this user's manual precisely so that operating the mower is easier and that it is used optimally and has a long lifetime.
SYMBOLS USED IN THIS USER'S MANUAL
| SYMBOL MEANING | |
 | These symbols mean "ATTENTION" and "WARNING" they inform you about things that may damage your mower and/or cause serious injury to the user. |
 | |
 | This symbol indicates an important instruction, property, procedure or issue, which you need to be aware of and adhere to during assembly, operation and maintenance of the mower. |
 | This symbol indicates useful information relating to the mower or to its accessories. |
 | This symbol is a reference to an image in the front part of the user's manual. It is always accompanied by the number of the image. |
 | This symbol is a reference to another chapter in this or another user's manual and most often it is shown together with the number of the chapter to which it refers. |
ESSENTIAL INFORMATION
This user's manual is an integral part of the riding mower that must be included with the mower in the event that it is sold. For this reason, store it for future use.
Do not put the mower into operation until you have thoroughly read all the instructions, restrictions and recommendations contained in this user's manual, paying particular attention to the chapter "Safety of operation".
The illustrations and pictures contained in this user's manual may not always correspond to reality, their purpose is the description of the main principles of the device.
WHEN IN DOUBT
In practice, unforeseeable situations frequently arise that cannot be included and described in this user's manual. Therefore, if you are ever unsure about a procedure or if anything is unclear or you have questions, do not hesitate to contact one of our more that 100 authorised, professionally-equipped service centres located all over Europe, where trained and tested experts will be ready to assist you.
1 TECHNICAL INFORMATION
1.1 APPLICATION
Mowers with the APACHE/ TUAREG business brand are two-axle terrain mowing riding mowers designed for mowing both maintained and unkempt grass areas on level ground and slopes with an incline of up to 22° (40%) free of foreign objects (stones, fallen branches, bones, hard items etc.). It can be used to mow multi-year vegetation, intertwined with raspberries, blackberries and various other weeds.

Any use of this riding mower, which is not described in this user's manual and which goes beyond the use here described is considered to be in contradiction to its intended purpose or use. The manufacturer of the mower is not responsible for damages arising from such use; the risk is borne by its user. The user is also responsible for adhering to the conditions prescribed by the manufacturer for the operation, maintenance and repairs of this mower, which may only be used, maintained and repaired by persons that know these conditions and have been informed about possible dangers.
Only accessories, which have been approved by the manufacturer may be connected to the mower. The use of other accessories will result in the warranty being immediately void.
1.2 MAIN PARTS OF THE RIDING MOWER
The riding mower consists of the following basic sections:

1.2
(1) Hood with storage space
The hood is a combination of plastic and metal covers, which contain storage space for the battery and the fuel tank.
(2) Frame with a bumper
The frame with bumpers serves as a bearing element for most of the main parts of the mower.
(3) Front axle with wheels including steering\*
The front axle enables the wheels to turn. The wheels are turned by the steering wheel by means of a rack mechanism.
The APACHE/TUAREG mower is equipped with front-wheel drive. All-wheel drive is engaged automatically, with power distributed to the individual axles depending on the current traction conditions and the travel mode (forward or reverse).
(4) Mowing deck
The mowing deck mows the grass. It is located under the mower. It consists of a cover, main plate, blade holders and two massive mowing blades. The deck is powered by the mower's engine through an electromagnetic clutch and a V-belt.
(5) Engine, gear box including rear-wheel drive via a bypass
The four-stroke petrol engine is mounted to the frame in the rear part of the mower. The gear box with hydrostatic power transmission serves to change gears while driving. The bypass lever is located on the mower's rear plate. It serves to engage and disengage the gear box for the rear wheels.
(6) Tilting frame of the mower
The tilting frame is intended as an aid for maintenance and servicing works and as protection of the user against tree and bush branches.
(7) Driver's location
The comfortable seat enables easy access to all control elements on the mower. The seat used ensures safe and comfortable operation.

* ATTENTION: Due to construction design, the APACHE/ TUAREG riding mower does not enable the disconnection of the front axle drive – the hydraulic system is not equipped with a by-pass valve, which significantly limits the option of moving the mower when the engine is not running. During such movement the front axle is significantly overloaded and may be damaged. The bypass lever on this mower is primarily used to bleed the hydrostatic system. The mower must not be used (gear shifted into drive) if the bypass lever is in the disengaged position - there is a danger of damage to the transmissions!!
1.3 PRODUCT IDENTIFICATION LABEL AND OTHER LABELS WITH SYMBOLS USED ON THE RIDING MOWER
1.3.1 PRODUCT IDENTIFICATION LABEL
Every riding mower is marked with a product identification label, located underneath the seat. It can be accessed by lifting the seat.

1.3.1
- Mower model
- Type of engine
- Year of production
- Weight
- Name and address of the manufacturer
- Compliance mark of the product
- Logo of the manufacturer

The seller will write down the serial number on the other side of the front page of this manual when handing over the mower.
1.3.2 OTHER LABELS AND THEIR MEANINGS
The following labels and stickers are attached to the mower:
Labels on the mowing deck:
 1.3.2a 1.3.2a |  | Danger Do not s |  | |
 | Rotary tools |  | Guaranteed acoustic power level according to directive 2000/14/EC |
Labels on the fairing under the seat:
| 1.3.2b |  | Danger |  | Do not touch during operation | 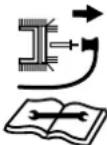 | Follow the manual when repairing |
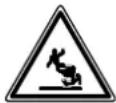 | Do not leave the mower while driving it | 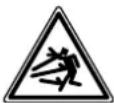 | Caution, deflected objects |  | Read the manual | |
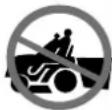 | Do not mow near other people | 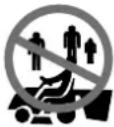 | Do not take on passengers |  | Do not drive perpendicular to the slope | |
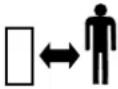 | Keep unauthorised persons at a safe distance | 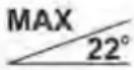 | Maximum working incline | |||
Labels on the rear side of the mower:
 1.3.2c 1.3.2c | 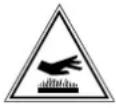 | Attention Hot surface! |  | Risk of burns |
Labels at the travel lever:
 1.3.2d 1.3.2d |  | Choke |
 | Cruise control | |
| 0 | Cruise control deactivated | |
| 1 | Cruise control activated | |
 | Fast | |
 | Slow | |
| F | Travel forward | |
| N | Neutral | |
| R | Travel reverse |

It is strictly forbidden to remove or damage labels and symbols attached to the mower. In the event of damage or illegibility of the label, please contact the supplier or mower manufacturer and request a replacement.
1.4 TECHNICAL PARAMETERS
| BASIC PARAMETERS UNITS 92 EVO 92 EVO 4x4 | |||||
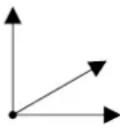 | Dimensions of the mower(length x width x height): | [mm] 2310 x 1030 x 1540 | |||
 | Wheel gauge | Front | [mm] 850/790 825/790 | ||
| Rear | |||||
 | Weight of the mower [kg] 331 353 | ||||
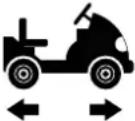 | Speed forward / reverse [km/h] 9 / 7 | 9 / 7 | |||
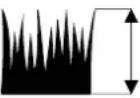 | Mowing height / Transport position [mm] 50 - 100 / 120 | ||||
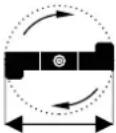 | Mowing width | [mm] 920 | |||
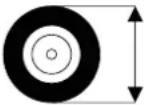 | Wheel dimensions | Front | ["] | 16x6.5-8 | 16x6.5-8 |
| Rear | 20x10.0-8 | 20x10.0-8 | |||
 | Fuel tank capacity | [l] | 19 | ||
 | Fuel type | --- | Lead-free petrol Natural 95 | ||
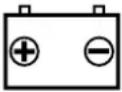 | Type of battery | --- | 12V 28 Ah | 12V 32 Ah | |
* - for specific values see the table on the next page.
| Engine | Speed (min-1) | Declared emission level of acoustic pressure at the place of operation L_pAd (dB)EN ISO 5395-1 | Guaranteed emission level of acoustic power L_WAG (dB)2000/14/EC | Declared vibration level (m.s-2) EN ISO 5395-1 | |
| total vibrations a_wd | transferred to the hand - arm a_hvd | ||||
| B&S 21 Vanguard | 3000 82+2 100 0.7+0.3 2.7+1.3 | ||||
| B&S 23 Vanguard | 3000 87+4 100 1.5+0.6 < 2.5 | ||||
| Loncin LC2P77F | 3000 85+2 100 1.0+0.4 2.9+1.5 | ||||
| EMAK K2400 | 3000 85+2 100 1,0+0,4 2,9+1,5 | ||||

The values measured according to ČSN EN ISO 5395-1 correspond to values according to ČSN EN 836+A4
2. WORK SAFETY AND HEALTH
Riding mowers models 92 EVO and 92 EVO 4x4 under the brand name CROSSJET are manufactured according to valid European safety norms. The mower's manufacturer confirms this fact in the Statement of compliance, which is included at the end of this user's manual (10).
If this mower is used properly and according to the user's manual, it is very safe.

In the event that work safety is not adhered to and all warnings in this manual are not respected, this riding mower may cut off hands, legs or deflect objects and so may cause serious injury or death to persons, damage or destructions of the mower or one of its parts or accessories.
2.1 SAFETY INSTRUCTIONS
The person primarily responsible for their own safety and the safety of others during the operation of the riding mower is its user. The manufacturer takes no responsibility for the injury of persons or damage to the mower and ecological damage resulting from the mower not being used and operated in accordance with all safety instructions included in this user's manual.
2.1.1 GENERAL SAFETY INSTRUCTIONS
! This mower may only be driven by a person over 18 years of age that has read this user's manual.
! The user of the mower is responsible for the safety of persons in the vicinity of the work area of the mower.
! It is not permitted to perform any technical modifications to the mower and its accessories without the manufacturer's written consent. Unauthorised modifications may lead to hazardous work safety conditions and void the warranty.
! Adhere to all requirements relating to fire safety ( 2.4).
! Do not remove safety stickers or labels from the mower.
! Do not stay in the vicinity of the mower or under it, if it is lifted and is not sufficiently secured against falling or tipping over in the lifted position.
! Always turn off the mowing deck and engine and take the key out of the ignition, when:
▶ you are cleaning the mower
▶ you are removing accumulated grass from the mowing deck
▶ you have driven over a foreign object and it is necessary to check whether the mower has been damaged or it is necessary to remedy the damage
▶ the mower is vibrating with unusual force and it is necessary to identify the cause of the vibrations
▶ you are repairing the engine or other moving parts (also disconnect cables from the spark plugs)
2.1.2 CLOTHING AND PROTECTIVE AIDS OF THE DRIVER
! When operating the mower, always use appropriate work attire. Never wear loose clothing and short pants.
! When operating the mower, always wear firm, closed footwear, ideally with non-slip soles. Never operate the mower when wearing sandals or barefoot.
! Noise and vibration values at the location of the operator provided in this manual (1.4) are closely related to the requirements of directives EU 2003/10/ES (exposure to noise) and 2002/44/ES (exposure to vibrations), that regulate the conditions for use of personal protective aids against noise and vibrations and also the reduction of exposure time of the operator by means of appropriate work breaks. The mower manufacturer recommends always using hearing protection when operating the mower. Not adhering to these instructions may result in permanent health damage!
2.1.3 BEFORE USING THE MOWER
! Do not use the riding mower if it is damaged or if any of its protective elements are missing. All covers and other protective elements must always be in their place. Therefore, do not remove or put out of operation any of the mower's protective elements. Regularly check that these elements are working correctly.
! Do not work with the mower after consuming alcohol, drugs or medication affecting your perception.
! Do not work with the mower if you suffer from dizziness, fainting or if you are weakened or distracted in any other way.
! Before putting the mower into operation, thoroughly learn about all the control elements and ensure that you can control them in such a way that if necessary you can immediately stop or turn off the engine.
! Do not adjust the engine regulator or the engine speed limiter.
! Before you start working with the mower, remove from the surface of the area you will be mowing, all stones, pieces of wood, wire, bones, fallen branches and other items, which could be deflected during the mowing process.
! Remedy all defects before further use. Before starting work, thoroughly check that the belts are tensioned, the blades are sharp and that the area inside the mowing deck is clear.
! The mower must not be used for work on slopes that have an incline greater than 22^ (40%).
! Transport of other passengers, animals or loads directly on the mower is forbidden. Transport of loads is only permitted on trailers approved by the mower's manufacturer.
! Even when leaving the mower for a short time, always remove the key from the ignition.
! If you are driving the mower away from the work area where you are mowing, always disengage the mowing deck and lift it to the transport position.
! Do not mow near piles of material, holes or banks. The riding mower may suddenly roll over if the wheel goes over the edge of a hole, trench or an edge that may collapse.
! When working, avoid concrete supports, tree stumps, garden bed and footpath kerbs, which must not come into contact with the blades and so cause damage to the mowing deck and the mower's mechanism.
! In the event of an impact into a rigid object, stop and turn off the mowing deck and engine and inspect the entire mower, particularly the steering mechanism. If necessary perform repairs before starting up the engine again.
! Whenever possible avoid using the mower in wet grass. Reduced traction may lead to skidding.
! Avoid obstacles (e.g. sudden change in the incline of a slope, ditches, etc.) on which the mower could roll over.
! If mowing is deactivated, the mowing deck must always be in the transport position.
! Do not attempt to maintain the stability of the mower by stepping on the ground.
! Only use the mower in daylight hours or with good artificial lighting.
! Driving the mower on public roads is not permitted.
! When operating the mower do not wear loose clothing and short pants, use solid fully-closed footwear. Never operate the mower when wearing sandals or barefoot.
! Do not leave the engine running in closed areas. The exhaust fumes contain substances that are odourless but are fatally poisonous.
! Do not put your hands or legs underneath the mowing deck cover. Never put any part of your body near the rotating or moving parts of the mower.
! Do not start the engine without an exhaust pipe.
! Usually the noise emitted during mowing does not exceed the acoustic pressure and acoustic power values specified in this user's manual (1.4). In certain cases, however, it may under certain conditions and due to the condition of the terrain exceed the specified noise levels for a short time.
! The mower manufacturer recommends the use of hearing protection when operating the mower because stressing the hearing organ with an excessive noise level or long term effects of noise may lead to permanent hearing damage.
! Always pay full attention to driving and other activities performed with the mower. The most common causes of loss of control over the mower are for example:
▶ Loss of wheel traction.
▶ Excessive; not adjusting speed to current conditions and terrain properties.
▶ Sudden breaking where the wheels lock up.
▶ Using the mower for purposes for which is was not designed.
2.1.5 AFTER FINISHING WORK WITH THE MOWER
! Always maintain the mower and its accessories clean and in good technical condition.
! The rotating blades are sharp and may cause injuries. Whenever handing the blades always use protective gloves or wrap the blades.
! Regularly check the nuts and bolts securing the blades so that they are tightened with the appropriate amount of torque (6.3.6).
! Pay special attention to lock nuts. After the nut is loosened a second time its locking capability is reduced and therefore it needs to be replaced with a new one.
! Regularly inspect all components and if necessary replace those that need to be replaced based on the manufacturer's recommendations.
2.2 SAFETY INSTRUCTIONS FOR WORK ON SLOPES
Slopes are the main cause of accidents, loss of control over the mower or subsequent roll-overs, which may lead to serious injuries or death. Mowing on slopes always requires an increased level of attention. If you are not sure, or it exceeds your ability, do not mow on slopes.
! Riding mowers can be used on slopes with a maximum incline of 22^ (40%) and only in the direction of the fall line, i.e. upwards or downwards. More information ■5.5.4.
! When changing direction increased care is needed. Do not turn on a slope unless it is absolutely necessary.
! Watch out for holes, roots, uneven terrain. Uneven terrain may cause the mower to turn over. High grass may conceal hidden obstacles. Therefore, remove all foreign objects from the area where you wish to mow in advance.
! Select such a speed so that you do not need to stop when on a hill.
! Be very careful when attaching various hitch attachments. It may lead to a reduced stability of the mower.
! Perform all movements on a slope slowly and smoothly. Do not make sudden changes to speed or direction.
! Avoid starting up or stopping on a slope. In the event that the wheels lose traction, turn off the power to the blades and drive slowly down the hill.
! Start driving very carefully and slowly when on a slope so that the mower does not "skip". Always reduce the mower's driving speed before a slope, and especially when driving down a hill lower the driving speed to minimum to take advantage of the braking effect of the gearbox. This braking effect is significantly higher on the AC 92-23 4x4 mower.
2.3 CHILD SAFETY
If the riding mower operator is not prepared for the presence of children then a tragic accident may happen. The movement of a riding mower attracts the attention of children. Never assume that children will remain in the location where you last saw them.
! Do not allow children without supervision in areas where you are mowing grass.
! Always be prepared - if children approach you then turn off the mower.
! Before and while reversing look behind you and at the ground.
! Never transport children, they may fall and seriously injure themselves, or they may dangerously interfere with the riding mower controls. Never allow children to operate the mower.
! Pay increased attention in places with limited visibility (near trees, bushes, walls, etc.).
2.4 FIRE SAFETY
When reversing the riding mower it is necessary to adhere to fundamentals and regulations for work safety and fire protection relating to work with this type of mower.
! Regularly remove flammable substances (dry grass, leaves, etc.) from the area around the exhaust, engine, battery and anywhere, where they could come into contact with petrol or oil and subsequently catch on fire and so result in a fire on the mower.
! Allow the riding mower engine to cool down before parking it in an enclosed location.
! Pay increased attention when working with petrol, oil and other flammable substances. These are very flammable substances, the fumes of which are explosive. Do not smoke during this work. Never unscrew the petrol tank cap and refill with petrol while the engine is running, if the engine is hot or if the mower is in a closed location.
! Check the petrol lines before using and do not fill the petrol all the way up to the bottleneck of the tank. The heat generated by the engine, sun and the expansion of the fuel may lead to the fuel overflowing and a subsequent fire.
! For storing flammable substances use containers designed for this purpose. Never store a canister with petrol or the mower inside a building near any source of heat.
! Pay increased attention when working with the battery. The gas inside the battery is highly explosive, therefore do not smoke in the vicinity of the battery and do not use an open flame so as to avoid serious injuries.
! The riding mower is designed so that when properly operated in perfect technical condition, it poses no danger to the driver and his/her surroundings. Nevertheless, there may arise situations during operation, maintenance and adjustment that pose a danger to workers if they are not aware of them and do not adhere to the safety instruction here provided. These hazards represent so-called residual hazards – they are hazards that remain even after all preventive and protective measures have been considered and implemented. Residual hazards are present during use, maintenance and adjustment of the mower. Therefore, every person that comes into work contact with the mower must know these hazards and must adhere to all recommendations for their mitigation.
MOWING BLADES
! Rotating mowing blades are very sharp and coming into contact with them creates a serious risk of injury to limbs. Therefore, do not put your hands or legs underneath the mowing deck cover. Never put any part of your body near the rotating or moving blades. Do not attempt to use your hands or other temporary items to stop or slow down moving mowing blades!
MOVING AND HOT PARTS
When the engine is running, there are parts that are rotating and may cause serious injury to various parts of the body. When performing maintenance or adjustment of mower parts located underneath the hood or underneath the raised mower, it is thus necessary to pay increased attention and never to bring any part of the body in the vicinity of moving parts. Only a person with perfect knowledge of the principles of motion of these parts may perform their maintenance and adjustment. During operation, parts located under the hood heated up and when touched with an unprotected part of the body may result in serious burns. Therefore, before opening the hood for the purpose of performing maintenance or servicing tasks, always allow the mower to cool down and use safety gloves for protection.
DRIVER'S LOCATION
! In the driver's location, there is a risk of falling from the platform or slipping as a result of inattentiveness. Therefore, always be careful when getting on or getting off the mower. Another hazard for the driver is fatigue, stress or erroneous behaviour caused by work overload, insufficient illumination of the mowed area or noise during operation. It is, therefore, necessary to always use hearing protection while using the mower, do not overload yourself and take breaks.
FUEL TANK
! The fuel in the fuel tank is a highly flammable substance the fumes of which are explosive. When working with fuel or in the vicinity of the fuel tank (even when closed), never smoke, never come close with an open flame or with items that generate high temperatures.
This chapter primarily serves the needs of the vendor's mechanics that prepare the mower for the user within the scope of pre-sale service. In the event that you have received your mower already assembled and ready for operation, please skip directly to chapter 4.
In the event that you have unpacked the mower yourself, then it is necessary to prepare it for operation according to the instructions contained in this chapter. In the event that you are unsure about the procedure or you have insufficient equipment, tools or experience, please do not hesitate to contact the vendor of the mower for assistance.
We recommend performing all assembly works in a team of at least two people.

Inspect immediately after delivery that the packed mower has not been damaged. In the event of damage inform the carrier. If the complaint is not lodged in time, no potential demands can be claimed.
Check that the mower model is the same as you ordered. In the event of an irregularity do not unpack the mower and immediately report this discrepancy to the supplier.

3.1
- Crate packaging
- Seat
- Folding frame
- Steering wheel
- Documentation (located underneath the hood)
Using a suitable tool (e.g. crowbar or hammer, etc.) remove the crate (1) and the packaging on the mower.
Visually inspect the mower and assemblies for damage that may have occurred during transport. Unpack all separately packed assemblies and inspect them.
The basic package includes:
▶ Riding mower
▶ Seat (2)
▶ Folding frame in the folded state (3)
▶ Steering wheel (4)
▶ Documentation (5) (packed parts list, user's manual for the riding mower, user's manual for the engine, user's manual for the battery, service log book)
3.2 DISPOSAL OF THE PACKAGING

After unpacking the accessories, ensure that the packaging material is properly disposed of or recycled. The disposal must conform to relevant waste disposal laws valid in the user's country.

Disposal may be performed by a specialised company.
3.3 ASSEMBLY OF THE SEPARATELY PACKED ASSEMBLIES

Due to the technical nature of this task, the mower is prepared for operation by the vendor of your riding mower (according to the following instructions).

Before starting installation, remove all covering, protective and fastening materials.

3.3a
a) Install the seat springs:
▶ Tilt out the seat.
▶ Unscrew the bolts holding down the seating spring under the bracket. Then install the springs so that they are above the bracket.
▶ Set the appropriate distance of the seat from the steering wheel by pressing the seat positioning lever which is a part of the seat.

Under no circumstances should you sit on the seat before installing the seat springs into a working state! A collision with the hood could occur and damage it.

3.3b
b) Install the steering wheel:
▶ Using a hammer and a suitable rod, knock out the pin (2), which is inserted in the shaft hole (1).
The steering wheel is set it two height positions, which are set by two holes in the steering wheel shaft. Select the optimal steering wheel position, attach it on to the rod (1) and turn it so that the holes in the steering wheel and the rod align.
▶ Reinsert the pin into the hole and knock it in using a hammer.

3.3c
c) Set the folding frame to the correct position:
▶ Using the quick coupler levers set the folding frame to the vertical position.

3.3d
d) Connect the battery:
▶ Open the storage area in the hood and loosen the bolts on the battery pole terminals.
▶ Black wire Place on the (+) pole of the battery and secure in place with the bolt.
▶ Brown wire Place on the (−) pole of the battery and secure in place with the bolt.

Connecting the wires in opposite to that described above will damage the mower.
When disconnecting the battery, always disconnect the negative (−) terminal of the battery first.
When putting the battery into operation and when performing maintenance on it, proceed according to the instructions in the user's manual for the battery. Also follow all safety instructions contained therein.
Now prepare the mower for the first start up according to the following chapter.
3.4 CHECKS PRIOR TO STARTING UP
Due to the technical nature of this task the mower is put into operation by the seller of your riding mower (according to the manufacturer's instructions).
3.4.1 CHECKING THE MOTOR OIL
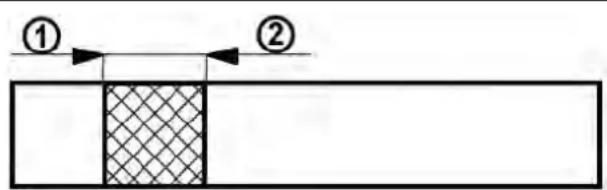
The mower must be in a horizontal position before the oil level can be checked. The cap of the bottleneck is located on the engine covers at the rear side of the mower. Screw out the oil dipstick, wipe it dry, reinsert it and screw in. Then again screw it out and take the oil level reading.
text_image
① ②Oil level dipstick:
(1) - (ADD) low oil level
(2) - (FULL) maximum oil level
The oil level must be between the two marks on the dipstick. If it is not, fill up with motor oil so that it reaches the "FULL" mark. The motor oil type is indicated in the user's manual of the engine.

The oil level must be checked before every work session.
3.4.2 CHECKING THE BATTERY
Check the battery charge level according to the user's manual of the battery.
3.4.3 FILLING THE FUEL TANK WITH FUEL
For safety reasons the riding mower is transported without fuel and before the first start up it is necessary to fill it up. The fuel tank is located at the front side of the mower and has a capacity of 19 l of fuel.

Use only petrol with the octane number specified in the user's manual of the engine, i.e. lead-free petrol NATURAL 95. Defects caused by the use of incorrect fuel are not covered by the warranty!
Only fill the fuel tank with the engine turned off and when the engine is cold. Fill up the fuel tank in a well ventilated location.
When handling fuel, do not eat, smoke or use an open flame.
For filling, use a funnel designed for refilling fuel.
Ensure that fuel is not spilled when refilling. Spilled fuel can very easily catch on fire. If fuel does spill, thoroughly wipe dry.
Store fuels out of the reach of children.
Procedure for filling up:
▶ Open the fuel tank lid. Open it slowly because there may be overpressure in the fuel tank caused by petrol vapours.
▶ Insert a funnel into the fuel tank bottleneck and start to pour the fuel from the canister.
▶ After filling up the fuel tank always wipe dry the area around the fuel tank bottleneck as well as the fuel tank bottleneck itself. It is good to check the condition of the fuel lines.
It is recommended to regularly also clean out the actual fuel tank because impurities found in the fuel may cause an engine malfunction.
3.4.4 CHECKING THE AIR PRESSURE IN THE TYRES
Before putting the mower into operation, check the air pressure in the tyres.
Tyre pressure differs according to the type used. The correct tyre pressure is always provided on the tyres.

Do not exceed the maximum pressure marked on the tyres that are being used.
3.4.5 CHECKING THE OIL LEVEL IN THE HYDRAULIC CIRCUIT (APPLIES FOR MODEL 92 EVO 4X4)
The mower is supplied with a bled hydraulic circuit and with an equalisation tank with the prescribed amount of oil. The oil level in the tank may decline during transport.
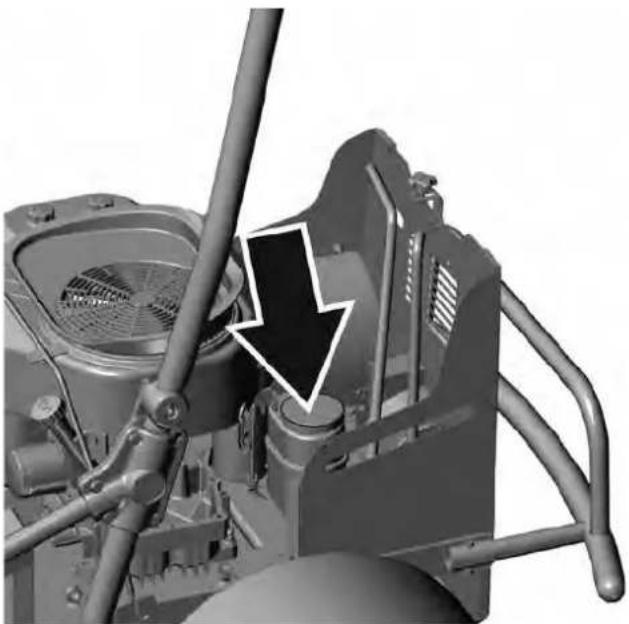
The equalisation tank is located in the rear part of the mower under the engine cover.
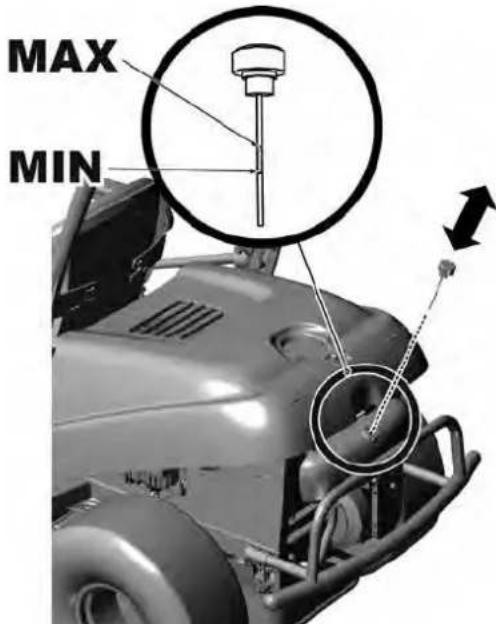
▶ Check that the oil level is between the two marks on the measure of the closing lid, if necessary fill up with the necessary amount of the prescribed oil.
▶ Wipe clean the area around the tank bottleneck and the tank bottleneck itself. Also regularly clean the entire tank, because any dirt in the oil reduces the lifespan of the oil filter and may possibly cause a malfunction.
The system is fully bled during the first couple of hours of driving the mower – we recommend that you "run the mower in" under a mild load for 1 to 2 hours.
3.4.6 PERFORMING A LEAK TEST ON THE HYDRAULIC CIRCUIT
Visually check the hydraulic circuit for oil leaks, namely the locations where fittings are connected to the transmissions. If you discover any leaks, inform your service centre.
3.5 DRIVING THE MOWER FROM THE PALLET
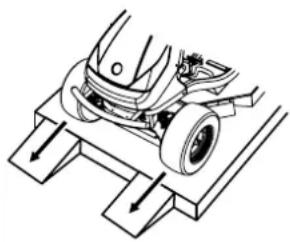
Prepare two suitable ramps and place them next to the pallet so that the mower's wheels can ride on to them. If you drive off the pallet without ramps, there is a danger of damaging the underside of the mower, particularly the mowing deck!
▶ Lift the mowing deck into the transport position by pulling on the mowing deck elevation lever (4.2.1 (10)).
▶ Move the throttle lever from position 🔍 approximately half way (■.2.1(5)).
▶ Pull out the choke lever (4.2.1 (6)).
▶ Set the by-pass lever to position "1" (4.2.1 (11)).
▶ Start up the mower by turning the key to position ⏻(■.2.1(1)) and slowly drive the mower down off the pallet.
natural_image
Technical line drawing of a car wheel mounted on a platform with directional arrows indicating motion (no text or symbols)Further details about starting up and stopping the engine are provided in 5.2 and 5.3.
The shown locations of control elements may differ from their actual locations depending on the selected configuration of the mower.
4.1 LOCATION OF THE MAIN CONTROL ELEMENTS

4.1
(1) Main power switch
(2) Deactivation of the mowing deck disengagement for reversing
(3) Neutral gear engaged indicator
(4) Battery charging indicator light
(5) Motor hours counter
(6) Mowing deck engagement switch
(7) Mowing deck engagement and run down indicator
(8) Parking brake lever
(9) Brake pedal
(10) Differential lock pedal
(11) Mowing deck elevation adjustment lever
(12) Throttle lever
(13) Cruise control disengagement lever
(14) Travel lever
(15) Choke
(16) Bypass lever
(17) Tilting frame control levers
4.2 DESCRIPTION AND FUNCTIONS OF THE CONTROL ELEMENTS
(1) MAIN POWER SWITCH
Serves to start up / shut off the engine. It has the following 4 positions:
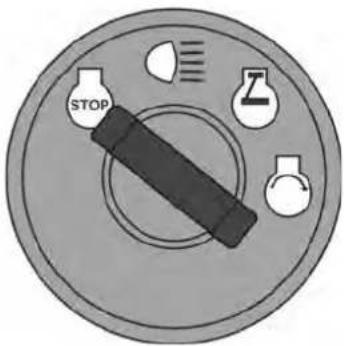 |  | Ignition off / turn off the ignition |
 | Turn on / turn off the headlights on the hood | |
 | Ignition on, the engine is running. | |
 | Start engine – starting position |
(2) DEACTIVATION OF THE MOWING DECK DISENGAGEMENT FOR REVERSING
The R switch serves to disengage the automatic mowing deck disengagement function when reversing (5.5.1).
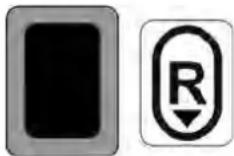
The switch needs to be pressed when the mowing deck has already been automatically disengaged but the blades have not yet stopped rotating (approx. 4 seconds) or when the mowing deck is started immediately before the reverse travel pedal is stepped on. Then with every subsequent change in the travel direction from reverse to forward, the disengagement of the mowing deck is again reactivated.
(3) NEUTRAL GEAR ENGAGED INDICATOR
The indicator light serves to show that the travel lever is in neutral.

Not lit - the travel lever is in position F (forward) or R (reverse)
Lit green - the travel lever is in position N (neutral)
(4) BATTERY CHARGING INDICATOR LIGHT
The indicator light serves to signal the battery power level. When the key is engaged and the engine is not running, it may signal the following:

SLOWLY FLASHING RED: It is advisable to charge the battery.
QUICKLY FLASHING RED: The battery is almost flat and there may be problems with starting the mower

ATTENTION: If the indicator light starts flashing after the engine is started, the battery recharging process is no working correctly. If this happens, it is necessary to contact an authorised service centre and have the engine inspected.
(5) MOTOR HOURS COUNTER
Displays the number of motor hours.
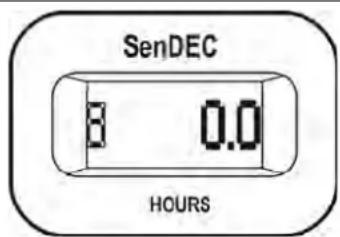
text_image
SenDEC 8 0.0 HOURS
Tampering with the counter will void the warranty – the motor hours connection is equipped with a tamper seal.
Immediately contact your service centre if the motor hours counter malfunctions.
(6) MOWING DECK ENGAGEMENT AND RUN DOWN INDICATOR
This indicator indicates when the mowing deck is on and running down.
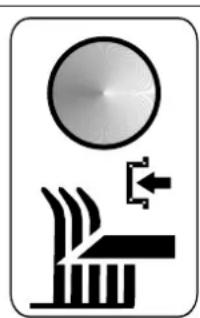
natural_image
Pure diagram of a circular object above a stylized structure with arrows, no text or symbols present.Lit The mowing deck is activated
Flashing
The mowing deck is deactivated, but the blades are still rotating (the indicator flashes for approx. 10 seconds)
(7) MOWING DECK ENGAGEMENT SWITCH
Pressing the part with the symbol engages the mowing deck. Pressing the part without the symbol disengages the mowing deck.
 | 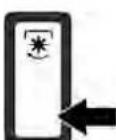 | DISENGAGED | Disengagement of the mowing deck / the mowing deck is disengaged |
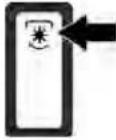 | ENGAGED Engagement of the mowing deck | ||
text_image
Diagram showing a hand holding a tool with two numbered arrows indicating movement or sequence, labeled ① and ②.The parking brake has two positions. In position (1) the brake is not active, after shifting to position (2) while stepping down on brake pedal the parking brake is activated (will brake).
Stepping on the brake pedal will deactivate the parking brake and the lever will automatically be released and shift to position (1).
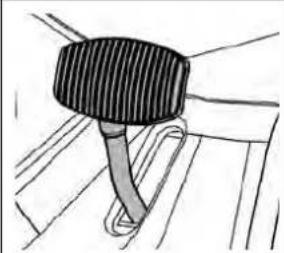
(9) BRAKE PEDAL
natural_image
Simple line drawing of a mechanical component with a threaded end and curved base (no text or symbols)Stepping on the brake pedal will slow down the riding mower.
Never use the brake at the same time as the travel direction function – there is a danger of damaging the transmission!
(10) DIFFERENTIAL LOCK PEDAL
The pedal is used only if necessary and only when driving directly forward. It has two positions:

text_image
Diagram showing a mechanical component with bidirectional arrows indicating movement or force, possibly illustrating a motion or assembly.When the pedal is pushed down the lock is engaged.
When the pedal is released the lock is automatically disengaged.

Use the lock only when driving directly forward and only if necessary (loss of traction). Never use the differential lock when changing travel direction. Otherwise there is a risk of serious damage to the transmission!
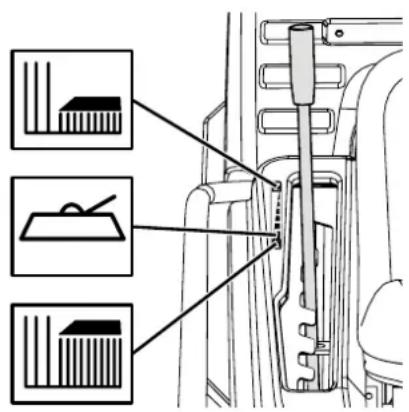
(11) MOWING DECK ELEVATION ADJUSTMENT LEVER
The lever serves to set the elevation height of the mowing deck from the ground.
text_image
Technical diagram showing mechanical assembly with three labeled components and directional arrows indicating assembly steps.The lever has 4 work positions (50 - 60 - 75 - 100 mm), where the corresponding mowing height is 5 to 10 cm. The higher the number of the lever position, the higher vegetation height remains after mowing.
There is also 1 transport position, which is 120 mm above the ground. When the lever is set to the transport position it is not possible to engage the mowing deck as a safety switch is built into this position.

When travelling without mowing the lever must be set to the transport position!

The mulching function can be improved by using a special accessory, a so-called "mulching set", which is supplied separately as a special accessory for mowing maintained lawns.
(12) THROTTLE LEVER
Serves to regulate the engine speed. It has the following positions:
 |  | MAX Maximum engine speed |
 | MIN Minimum engine speed (idle) |
(13) CRUISE CONTROL DI SENGAGE LEVER
This lever disengages the mechanical cruise control function and so it is possible to travel with the mower very accurately at a slow speed.
Do not disengage the cruise control when travelling at a high speed!
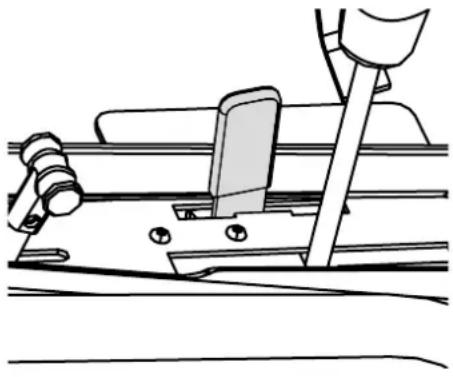 | 0 Cruise control is disengaged |
| 1 Cruise control is engaged |
(14) TRAVEL DIRECTION LEVER
It controls the power supplied to the rear wheels and regulates the speed of the mower in both directions. In the basic setting it is equipped with a mechanical cruise control function, which is automatically deactivated by pressing the brake pedal.
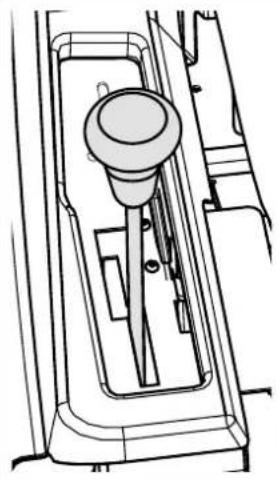 | F | Forward drive | Moving the lever closer to the letter F corresponds to a higher speed and vice versa |
| N | Neutral The mower is still | ||
| R | Reverse drive | Moving the lever closer to the letter R corresponds to a higher speed and vice versa |

Changing the travel direction from forward to reverse or from reverse to forward is only possible after stopping the mower. When the brake pedal is stepped on, the travel lever automatically shifts to position "N".
(15) CHOKE
Enables the starting of a cold engine.
 |  | CHOKE $starting a cold engine |
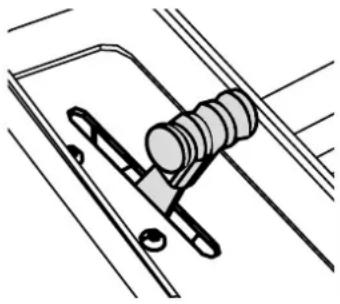
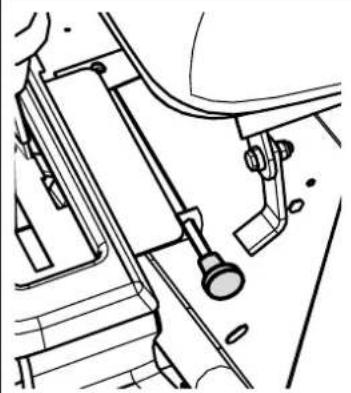
(16) BY-PASS LEVER - FREE MOVEMENT OF THE REAR WHEELS
The bypass lever serves to disengage the transmission for the rear wheel drive and is used to push or pull the mower without using the engine. The lever is located on the rear side of the mower and has the following two positions:
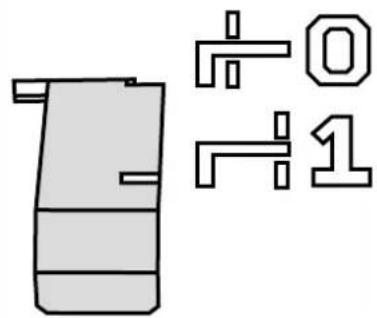 | Position Rear wheel drive Use | |
| (0) DISENGAGED | Lever is extended - for pushing the mower | |
| (1) ENGAGED | Lever is inserted - for driving the mower |

ATTENTION! On the 92 EVO 4x4 mower the lever is used primarily for bleeding the hydrostatic system. Due to the high demands on equipment, have this procedure performed by a specialised service centre.
The mower must not be used (gear shifted into drive) if the by-pass lever is in the disengaged position - there is a danger of damage to the transmissions!
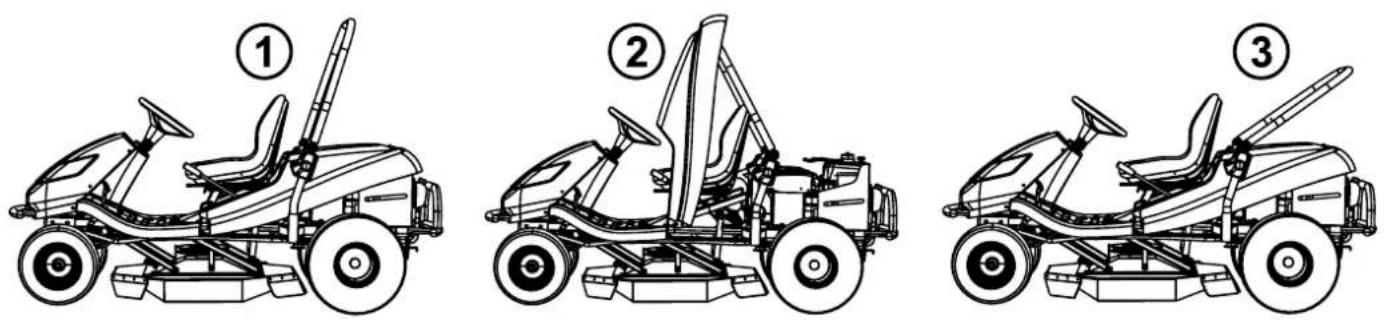
(17) TILTING FRAME CONTROL LEVERS
The tilting frame is intended as an aid for maintenance and servicing works and as protection of the user against tree and bush branches. The control levers serve to set the frame to one of the following three positions:
- Work
- Service
- Auxiliary for handling the mower
text_image
Diagram showing three stages of a motorized car with labeled parts: top view, middle view, and bottom view.The individual positions are set using quick coupler levers on the sides of the frame.

THE TILTING FRAME DOES NOT SERVE AS MOWER ROLL-OVER PROTECTION FOR THE USER!
5. OPERATION AND HANDLING OF THE MOWER
i
Information which it is good to know before the riding mower is first turned on:
The riding mower is equipped with safety contacts, which are connected by a switch located under the seat.
The engine will automatically shut off when the driver leaves the seat and the mower is not secured using the parking brake.
The engine can only be started when the mowing deck is turned off and the mowing deck elevation adjustment lever is in the transport position.
5.1 CHECKS PRIOR TO STARTING UP THE MOWER
Before starting up the riding mower check the following:
▶ Oil level in the engine (■ 3.4.1)
▶ Battery charge level (■ 3.4.2)
▶ Fuel level (3.4.3)
▶ Air pressure in the tyres (■ 3.4.4)
▶ That the bypass lever is in position "1"
5.2 STARTING UP THE ENGINE
The mower is equipped with a function that prevents the engine from starting if the following safety conditions are not met:
The drive of the mowing deck is disengaged (the mowing deck engagement indicator is not lit)
▶ The travel lever is in position N (neutral)
▶ The driver is sitting on the seat of the mower
After meeting the described conditions, start the engine as follows:
a) Set the mowing deck elevation adjustment lever to the transport position.
b) Move the mowing deck activation switch to position "DEACTIVATED".
c) Move the travel direction lever to position "N".
d) Move the throttle lever to maximum engine speed.
e) Pull out the choke.
f) Start up the engine by moving the ignition key to position "Start engine". After starting the engine, release the key. The key will automatically return to the position "Ignition on".

As soon as the engine starts up, release the ignition key. The duration of starting up must not exceed 10 seconds, otherwise there is danger of damage to the switch!
Never use fixed external starters to start the mower. This could damage the electrical wiring. It is possible to connect a higher capacity 12V battery.
g) Push in the choke.
h) Slowly move the throttle lever to the idle position (reduce the engine speed).

Allow the engine to run several minutes before turning on the mowing deck.

Never leave a started engine running in a closed or poorly ventilated area. Exhaust fumes contain gases that are harmful to your health.
Keep your hands, legs and clothing away from moving parts and the exhaust.
5.3 TURNING OFF THE ENGINE
a) Move the throttle lever to position "MIN".
b) If the mowing deck is activated, deactivate it by pushing down the switch.
c) Turn off the engine by moving the key to position "STOP" and take the key out of the ignition.

If the engine is overheated, allow it to run for a while at minimum speed.

Never stop the engine by merely getting off the seat, while leaving the key in the ignition in the position "ON" as this may result in an electrical defect.
Always turn the key to the "OFF" position and remove it from the ignition. This will prevent an undesirable start up of the mower by an unauthorised person or children.
Before turning off the ignition, lower the engine speed to slow for the event of self-ignition. Not following this instruction may result in damage to the engine and exhaust.
Never disconnect the battery cables while the engine is running! This could damage the engine regulator.
5.4 ENGAGING AND DISENGAGING THE MOWING DECK
5.4.1 ENGAGING THE MOWING DECK
▶ Move the throttle lever to position "MAX".
▶ Using the mowing deck elevation adjustment lever set the position of the mowing deck and thereby the mowing height.
▶ Set the mowing deck engagement switch to position "ENGAGED".

Conditions for engaging the mowing deck:
- the driver is sitting in the seat of the mower
- the mowing deck elevation adjustment lever is not in the transport position
5.4.2 DISENGAGING THE MOWING DECK
▶ Disengage the mowing deck by pushing down the engagement switch.

If the driver leaves the seat, the engine will automatically shut down and thereby the rotation of the mowing blades also.
However, never turn off the mowing deck by simply leaving the seat. If you do not move the key in the ignition from the position "ON" to position "STOP", then a part of the electrical installation will still be live and this may result in it being damaged. Also the motor hours counter remains activated.
5.4.3 SETTING THE ELEVATION OF THE MOWING DECK FOR MOWING
| ▶ If you wish to set the mowing deck higher off the ground, move the mowing deck elevation adjustment lever upwards to position 50 or 100. This position is used to mow high and wet vegetation to a height of 5 or 10 cm. | 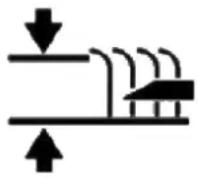 |
| ▶ If you wish to set the mowing deck closer to the ground, move the mowing deck elevation adjustment lever downwards to position 50 or 60. This position is used to mow level and maintained areas to a height of 5 or 6 cm. | 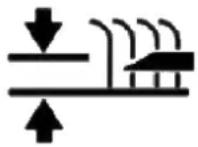 |
5.5 DRIVING THE MOWER
GENERAL WARNINGS BEFORE DRIVING:
▶ Make sure that the parking brake is disengaged. The parking brake must not remain in position "2" (4.2.1 (3)). Stepping down on the operating brake automatically disengages the parking brake.
The bypass lever must be set to position "1", i.e. bypass of the drive must be engaged.
▶ When travelling to the mowing location, the mowing deck must be disengaged and raised in the transport position.
▶ When travelling over obstacles higher than 8 cm (kerbs, etc.) it is necessary to use ramps to avoid damaging the mowing deck and the gear box.
▶ Avoid hard impacts of the front wheels against rigid obstacles, this may result in damage to the front axle, particularly when the mower is travelling at a high speed.
5.5.1 TRAVELLING FORWARD / REVERSING
▶ While accelerating slowly move the travel lever to the required direction of travel, i.e. to travel forward to position "F", and to reverse to position "R".
▶ If you wish to reduce your travelling speed, move the gear lever away from the direction of travel. To increase the travelling speed move the travel lever the direction of travel.

Changing the direction of travel forward-reverse is possible only after moving the gear lever to position "N" and leaving the lever in this position for a short while. If the mower is not still, there is a danger of damaging the transmission.
Never use the travel direction lever and the brake at the same time – this may damage the transmission.
The system is equipped with an automatic mowing deck disengagement system for reversing when travelling at a speed higher than 0.3 m/s (approx. 1 km/hour).
In the event of intentional and controlled reversing with the mowing deck engaged, it is possible to disengage this safety function by pressing the R button located next to the steering wheel (4.2 (2)). Then with every subsequent change in the travel direction from reverse to forward, the disengagement of the mowing deck is reactivated.

When using the disengagement of this function with the R button, pay exceptional attention to the area behind the mower when reversing.
5.5.2 STOPPING TRAVEL
The movement of the mower forward / reverse is stopped by stepping down on the brake pedal and the gear stick will automatically return to the position "N". The braking distance is shorter than 1.5m.

In the event that cruise control is engaged and the brake pedal is stepped on, it automatically moves to the neutral position. The braking distance is shorter than 2 m.

The mower can only be stopped by gradually moving the travel direction lever to position "N" and then gradually stepping on the brake pedal.
Never use the travel direction lever and the brake at the same time – this may damage the transmission.
5.5.3 TRAVELLING SPEED AND MOWING GRASS
It generally applies that the wetter, higher and more dense the grass is, the lower the travelling speed that should be used. When the mower is travelling too fast or higher demands are place on it, the blade rotation speed declines as does the mowing quality. Under such conditions always set the engine to maximum power.
▶ If the grass is very high, it is necessary to mow it several times. First mow at maximum elevation and with narrower mowing coverage width if necessary. The second run can then proceed at the required mowing height.
▶ We recommend mowing in the parallel or cross direction. Covering the previous coverage of the mower increases the effectiveness of the blades and will improve the appearance of the mowed area.
- When travelling over uneven terrain the travelling speed may fluctuate.
5.5.4 TRAVELLING ON A SLOPE
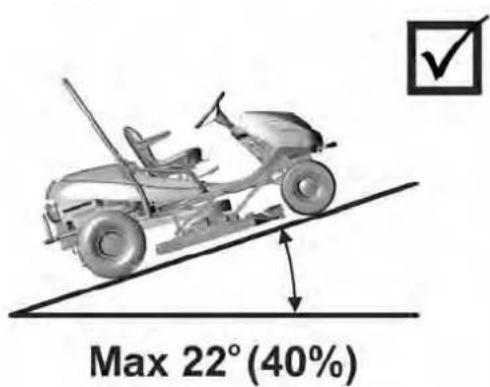
Riding mowers models 92 EVO and 92 EVO 4x4 can work on slopes with an incline of up to 22° (40%).
When working on a slope it is necessary to adhere to the following fundamentals:
▶ Pay increased attention when travelling on a slope.
▶ Always use a lower travelling speed and regulate the travelling speed by moving the driving lever.
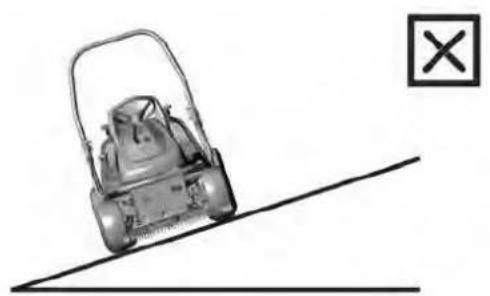
▶ Only travel perpendicular to the contour, i.e. up and down. Travelling in the direction of the contour is possible with extra attention only when turning the mower. If at all possible, avoid travelling along the contour.
- When turning ensure that a wheel does not drive over an elevated obstacle (rock, tree root, etc.)
▶ Travel slower when travelling down a slope or over obstacles. Pay special attention when turning and turning around on slopes.
▶ If you stop on a slope, always use the parking brake.
Correct
text_image
Max 22° (40%)Wrong
natural_image
Illustration of a lawn mower on an inclined plane with a cross symbol (no text or labels)
When overloading the mower by travelling on slopes over 22^ (40%) there is a risk of serious damage to the transmission. The manufacturer is not responsible for damage caused in this way.
6. MAINTENANCE AND ADJUSTMENT
Properly performed regular maintenance and inspection of the riding mower helps to increase its problem-free operating lifetime. Worn or damaged parts must be replaced in time. When replacing parts, use only original spare parts, using non-original parts may damage the mower, endanger the health of the driver or other persons and during the warranty period it voids the warranty. To order spare parts, always contact the mower's manufacturer or an authorised service centre.
On the AC 92-23 4x4 mower, change the oil after the first 50 operating hours, and then after every 200 operating hours.
6.1 OVERVIEW OF INSPECTIONS AND MAINTENANCE
| PART | INTERVAL | NOTE | ||
| Before every use | After every 50 hours of operation or 1x per year | Every 100 hours or 1x per year | ||
| BATTERY --- --- | --- Check the connection | |||
| FUEL FILTER --- --- | Replacement --- | |||
| BLADE HOLDER Check --- --- --- | ||||
| ELECTRICAL CIRCUIT Check safety switches Check cable bundles --- --- | ||||
| HYDRAULIC CIRCUIT | Check for leaks | --- --- --- | ||
| ENGING COOLING | Remove grass from the engine grille and from the exhaust | Cleaning | --- --- | |
| DRIVE V-BELT | Check for wear, tension | --- --- --- | ||
| MOWING V-BELT | Check for wear, tension | --- --- --- | ||
| MOTOR OIL | Check the level, fill up | Oil change --- --- | ||
| V-BELT TENSIONING MECHANISM | Check if working | Check condition | --- --- | |
| OIL IN THE HYDRAULIC CIRCUIT | --- --- --- | Replacement after 200 hours of operation | ||
| OIL FILTER | --- --- Replacement | |||
| OIL FILTER OF THE TRANSMISSION | --- --- --- | Replacement after 200 hours of operation | ||
| PARKING BRAKE | Check if working | Check mechanism | --- | |
| TYRES | Check pressure and condition | --- --- | Front 150kpa Rear 80kpa | |
| CONTROL ELEMENTS | --- Check --- --- | |||
| RUBBER COVERS | Check condition | --- --- --- | ||
| FRONT DRIVE AXLE. (FOR MODEL AC 92-23 4x4) | Check condition and fastening of all ball joints and check the steering connection rod | --- --- | The ball joints must have minimum looseness.The connecting rod must not show signs of damage (cracks) | |
| FRONT AXLE | Check the condition of the joints and wheels | Lubrication of vertical joints | --- --- | |
| GEAR BOX1 | Check for leaks | Check condition of pulley | Check oil level | Oil SAE 10w-40 5w-50 (4x4) |
| TRAVEL LEVER | Check if working | Check belt tension | --- | --- |
| STEERING | --- | Check if working | --- --- | |
| SPARK PLUGS | --- --- | Clean and adjust or replace | --- | |
| FAN, ENGINE RADIATOR FINS | --- --- | Cleaning | --- | |
| ALL PULLEYS | Check condition and working order | --- --- --- | ||
| MOWING HEIGHT | Check, lubrication of pins | --- --- --- | ||
| AIR FILTER Cleaning | Replacement | Depending on nature of use - more often | ||
| MOWING BLADES | Check condition and fastening | --- --- --- | ||
| MOWING DECK | Check condition and fastening | --- --- --- | ||
For the replacement of all parts or for repairs, which require disassembly and which are not described in this user's manual, contact your vendor or an authorised service centre. Contact your seller also for the following adjustments and maintenance:
- adjustment of the electromagnetic clutch
- adjustment of the brake
- adjustment of the engine
- replacement of V-Belts
- bleeding of the hydraulic circuit (for model 92 EVO 4x4)
- adjustment of the front drive axle (for model 92 EVO 4x4)
- other problems with the hydraulic circuit (for model 92 EVO 4x4)
• in the event of other difficulties
6.2 DAILY CHECKS AND MAINTENANCE

Before starting any maintenance or repair works, thoroughly reacquaint yourself with all instructions, restrictions and recommendations in this user's manual.
Always remove the key from the ignition and disconnect the spark plug cables before performing any cleaning, maintenance or repairs.
When working use suitable work clothing and work footwear. Use suitable gloves when handling a mowing blade or for activities where there is a risk of cuts.
Avoid spilling fuel, oils or other harmful substances.
Do not perform any major repairs if you do not have the necessary tools and a good knowledge about repairs of combustion engines!

Dispose of used oil, fuel or other hazardous substances and materials in accordance environmental protection regulations in force.
6.2.1 BEFORE STARTING WORK
INSPECTION OF TYRE PRESSURE
Maintain the prescribed tyre pressure and check it regularly. Maintaining the prescribed tyre pressure is important for even mowing. Various pressure values may cause difficulty in driving, or even loss of control over the mower.
Tyre pressure differs according to the type used. The correct tyre pressure is always provided on the tyres.
INSPECTION OF THE OIL LEVEL IN THE ENGINE
Park the riding mower on a horizontal surface. Open the hood and unscrew the cap of the filling opening. Screw out the oil dipstick, wipe it dry, reinsert it and screw in. Then again screw it out and take the oil level reading.
The oil level must be between the two marks on the dipstick. If it is not, fill up with motor oil so that it reaches the "FULL" mark.

Further details about checking and filling of oil are included in a separate user's manual supplied by the engine's manufacturer.
INSPECTION OF CABLES AND BOLT CONNECTIONS
Visually inspect the condition of cables and manually check the tightness of bolt connections.
INSPECTION OF WORKING ORDER OF BRAKES
Check that the brakes work properly. Proceed as follows:
▶ Park the mower on an even surface and turn off the engine.
▶ Step on the brake pedal and engage the parking brake.
▶ Using the bypass lever disengage the rear wheel drive.
▶ Try to push the mower forward. If the rear wheels rotate, then the brakes need to be serviced. Contact an authorised service centre to have them adjusted.
6.2.2 AFTER FINISHING WORK
CONFIGURING THE MOWER
After finishing mowing, elevate the mowing deck to the highest position and disable the drive for the mowing blades.
Turn off the ignition, step on the brake pedal and secure the mower in position with the parking brake.
CLEANING THE MOWER
▶ Remove all dirt and grass remains from the surface of the mower.
▶ Also remove grass, dust and other flammable materials from the edge of the exhaust.
CLEANING THE MOWING DECK
The mowing deck must be carefully cleaned after every use, namely the inside walls of the deck. Use a scraper, spatula or a current of water for cleaning. Proper maintenance and treatment of the mowing deck improves work quality and the mower's lifespan. Proceed as follows:
▶ Secure the mower against movement.
▶ Elevate the mowing deck to the transport position.
▶ Lift (tilt out) the protective metal cover on the right side of the chamber. Clean out the entire area of the mowing deck.
▶ While cleaning also check the condition of the blades (6.3.6).
WASHING THE MOWER

We do not recommend cleaning the mower using high pressure water! If despite this you do clean in this way, ensure that water does not enter the carburettor, air filter, ignition, exhaust, battery and other electrical components.
Never direct the water current at the ball bearings (bearings in the blade holder, wheels) or on to parts in which there is oil (oil filter, filler neck, etc.)
Before washing it, park the mower on a suitable even surface.
▶ Plastic parts on the mower:
- clean using a sponge and soapy water
6.3 REGULAR CHECKS, MAINTENANCE AND ADJUSTMENTS
6.3.1 BATTERY
Correct and regular maintenance of the battery will extend its lifespan. Therefore, regularly check its condition according to the manual supplied by the battery's manufacturer.
-
Keep the battery contacts clean. If dirt accumulates on them, or they are rusty, clean them according to the recommendations of the battery's manufacturer. Interruption of the circuit caused by the oxidation of the contacts may lead to the malfunction of the recharging function of the engine!
▶ A flat battery needs to be recharged as soon as possible, otherwise its cells may be irreparably damaged.
▶ It is always necessary to charge the battery before: -
first use
- when not planning on using it for a long time
- before starting up after a longer break
- in other cases, specified in the user's manual of the battery drawn up by its manufacturer.
▶ If it is necessary to replace the battery, always use a battery of the same size and type.

Further details about checking and maintaining batteries are included in a separate user's manual supplied by the battery's manufacturer.
6.3.2 ENGINE
CHANGING OIL
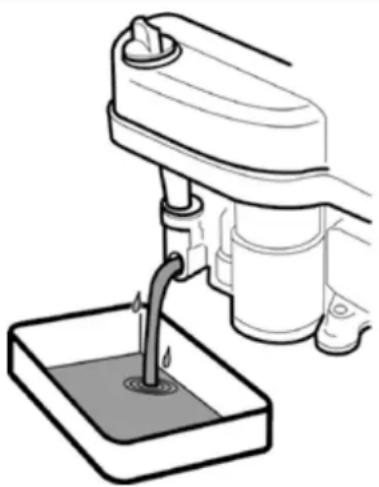
Before changing the oil, prepare a container with a volume of at least 2 litres. So that all the oil flows out of the engine we recommend that you place something (e.g. wooden blocks) under the side opposite the drain bolt. Drain the oil while it is still warm.
▶ Unscrew the bottleneck cap of the oil so that the oil flows better and faster out of the engine.
▶ Unscrew the drain bolt and allow the oil to fully flow out into the prepared container.
- Screw the drain bolt back on and fill the engine with the correct amount of the recommended oil (User's manual for the engine) and close the oil bottleneck cap.
▶ Use the dipstick to check the correct oil level. If necessary fill up the oil so that the oil is at the correct level.
natural_image
Diagram of a mechanical device with a drain and base, showing fluid flow or material movement (no text or symbols)
Further details about replacing oil as well as its type and amount are included in a separate user's manual supplied by the engine's manufacturer.

If you come into contact with used oil, we recommend that you thoroughly wash your hands with soap and water.
Dispose of used oil according to environment protection laws. It is appropriate to deliver the oil in a closed container to a used oil collection point. Under no circumstances should dispose of the used oil with other waste or pour it down the drain, on to waste or on the floor.
MAINTENANCE OF THE AIR FILTER
Never allow the engine to run without an air filter. This rapidly wears out the engine.

Maintain the air filter according to the instructions contained in the user's manual for the engine supplied by its manufacturer.
MAINTENANCE OF THE SPARK PLUG
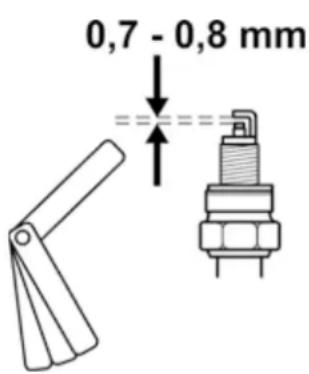
For the engine to run perfectly the spark plug must be correctly set and clean from deposits.

Always use only the spark plug specified by the engine's manufacturer!
If the engine was running shortly before the inspection or replacement, then the spark plug will be very hot. So be very careful not to burn yourself.
▶ Take off the spark plug cable and remove the spark plug using a wrench key.
▶ Visually inspect the exterior appearance of the spark plug. If the spark plug is visibly significantly worn out or if the insulator is cracked or it is peeling, it is necessary to replace it.
▶ If the spark plug is soiled or only slightly worn, it is necessary to carefully clean it with a suitable wire brush (copper).
▶ Using a gauge measure set the distance of the electrodes (User's manual for the engine).
▶ After performing maintenance on or replacing the spark plug, pull it tight in position. An incorrectly tightened spark plug heats up significantly and may cause serious damage to the engine.
text_image
0,7 - 0,8 mm
Check, maintain and replace spark plugs according to the instructions contained in the user's manual for the engine supplied by its manufacturer.
REPLACEMENT OF THE FUEL FILTER
Never allow the engine to run without a fuel filter. This rapidly wears out the engine.

Replace the fuel filter according to the instructions contained in the user's manual for the engine supplied by its manufacturer.
MAINTENANCE OF THE ENGINE COOLING
Before each use or during work check that the grille on the engine is not clogged with grass remains or other objects. Clean the grille if necessary!
After every 100 hours of operation or once a year remove the fan cover and clean soiled and clogged areas and the cooling fins of the engine. This will avoid the engine from overheating or being damaged. Clean more frequently if necessary.
6.3.3 REPLACING LIGHT BULBS
Light bulbs are seated in a holder and are accessible after lifting the hood.
▶ Turn the rotating lock holding down the front hood, remove the light bulb by sliding it out of the holder, e.g. using a screwdriver and reinsert. Return the lid of the hood

The light bulb type and its rating are specified in the spare parts catalogue.
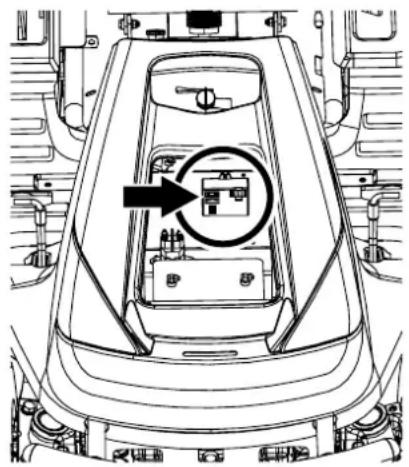
6.3.4 REPLACING A FUSE
If a fuse is damaged the engine will immediately shut off, the mowing deck will stop and all indicator lights on the dash board will turn off. In this case it is necessary to find the faulty fuse and replace it with a new one. Under no circumstances should you replace a faulty fuse with a fuse that has a higher current rating!
▶ Release the screw holding down the front hood, lift the hood and remove the protective fuse cover.
Remove the old fuse and insert a new fuse with the same value as the initial fuse, i.e. 20 A or 10 A.
natural_image
Top-down technical line drawing of a vehicle's rear compartment showing internal components and a circular component with an arrow (no text or symbols)
If even after replacing the fuse the engine or the mowing deck will not work, contact an authorised service centre.
Under no circumstances should you attempt to remove the control unit of the electrical system!
If you wish to lift the riding mower, use a jack and supports.
Proceed as follows:
Place the jack underneath the gear box on the rear axle and lift the rear part of the mower.
- Insert two supports underneath the ends of the axles from the inner side of the rear wheels.
▶ Lift the front part of the mower and insert two supports under both ends of the front wheel axles.

Never lean the mower to the side where the carburettor is located. Oil could enter the air filter!
6.3.6 MOWING DECK - CHECKING AND MAINTENANCE OF THE MOWING BLADES
Before each use of the riding mower check the condition of the blades (damage, wear, condition of the cutting edge). If the blades are blunt, bent or broken it will negatively affect mowing quality. Damaged blades are very dangerous.
A part of the material could break off and be deflected from the work area of the mower.

Whenever handling the mowing blades, always use heavy-duty work gloves.
REPLACING BLADES
If due to frequent use the blades are worn or damaged, they cannot be balanced or sharpened properly, it is necessary to replace them immediately.

The blades are sharpened from both sides so in the event that one side is blunt, it is possible to turn the blade around.
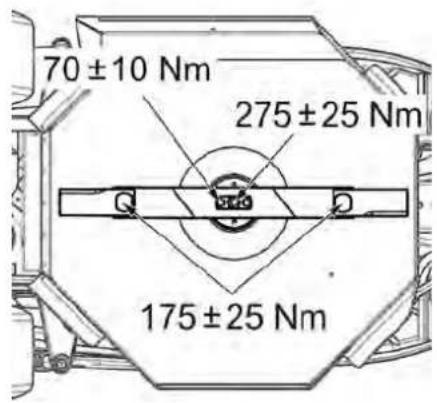
Always completely replace both blades and use new M16 lock nuts for attachment. This will ensure that the mowing deck is balanced and that the blades are securely attached. Proceed as follows:
▶ Turn off the engine and take the key out of the ignition.
- Secure the mower against movement.
▶ Elevate the mowing deck to the transport position.
▶ Open the metal cover on the right side of the mowing deck chamber.
▶ Screw out the M16 lock nut.
▶ Take off the fasting bolt, O-ring and blade.
Install a new or sharpened blade proceeding in the reverse sequence.
▶ Use new, unused M16 lock nuts.
▶ Before replacing the second blade turn the blade holder with your hand by 180°.
Replace the second blade following the same procedure as for the replacement of the first blade.
When reinstalling the blades, ensure that they are correctly fastened and secured in place!
text_image
70 ± 10 Nm 275 ± 25 Nm 175 ± 25 NmSHARPENING THE BLADES
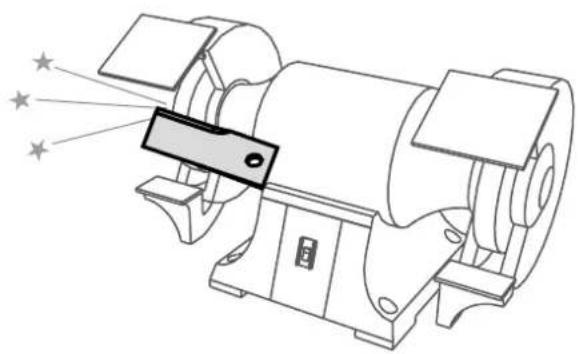
The mowing blades must be sharp, statically balanced and straight. Blunt, incorrectly sharpened or damaged mowing blades cause grass to be torn out of the ground, damage to lawns and mediocre collection of mowed grass in the grass catcher.
If the blades are merely blunt and do not exhibit any other damage, then they may be sharpened. After sharpening the pair of blades must be balanced. Balancing will prevent vibrations of the mowing deck. The weight difference between the individual blades may not exceed 2g. During replacement always also check the wear on the distance sleeves and mounting bolts, ensuring they are in perfect condition. If serious damage to the mowing deck is discovered it is necessary to have the mower thoroughly inspected at an authorised service centre.

Always use a new, unused M16 lock nut. Never reuse a lock nut that has already been used, because safe attachment of the blade cannot be guaranteed!

Do not repair a blade that is deformed or otherwise damaged, replace it immediately.
Whenever handling the mowing blades, always use heavy-duty work gloves.
Sharpening procedure:
▶ Turn off the engine and take the key out of the ignition.
▶ Secure the mower against movement.
▶ Elevate the mowing deck to the transport position.
▶ Open the metal cover on the right side of the mowing deck chamber.
▶ Screw out the M16 lock nut.
▶ Take off the fasting bolt, distance sleeve and blade.
▶ Remove the second blade in the same way as the first.
▶ Clean both blades.
▶ First sharpen with a grinder and then with a file.
natural_image
Technical line drawing of a mechanical device with starburst light emission (no text or symbols)
Do not sharpen directly on the mowing deck.
Install the sharpened blade proceeding in the reverse sequence.
▶ Use new, unused M16 lock nuts.
▶ Before replacing the second blade turn the blade holder with your hand by 180^ .
6.3.7 MOWING DECK - CHECKING THE DRIVE PULLEY OF THE DECK

6.3.7
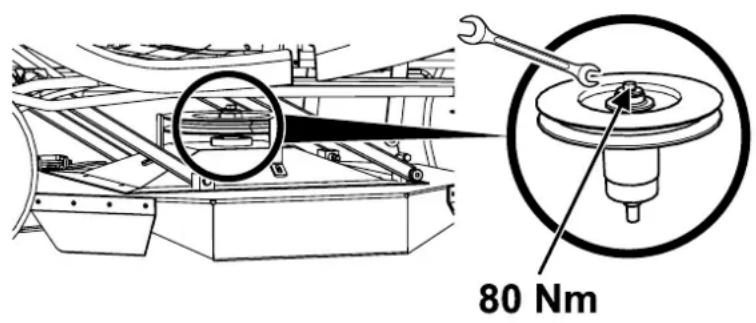
The mowing deck drive belt pulley and belt are protected under a plastic cover. For the purpose of cleaning, inspection and adjustment, this cover can be removed by unscrewing the two screws on its sides.
Before every use of the mower, check the fastening bolt of the pulley. The bolt should be pulled tight with a torque of 80 Nm.
The belt pulley is accessible after lowering the mowing deck to the lowest position.
text_image
80 Nm6.3.8 CHECKING AND ADJUSTING THE DRIVE BELT

When working on various parts of the mower's drive always turn off the engine and take the key out of the ignition.
Regularly check the wear and tension of V-belts and the tensioning mechanism.
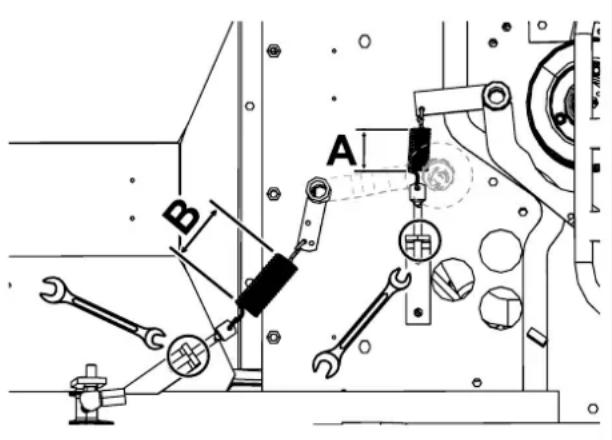
The drive V-belts (travel and mowing) are automatically tensioned by a spring and a pulley. Before starting work or at least after every 50 hours of operation check the wear on the V-belts and the working order of the tensioning mechanism.
Adjust the position of the drive belt tensioning pulley using adjusting nuts.
Distance A = 46 mm.
Distance B = 78 mm (set the mowing deck elevation adjustment lever to the second last position)
text_image
Technical diagram of a mechanical assembly with labeled parts A and B, showing wrenches, gears, and components.
When attaching a new belt pay special attention when working with the mower because the belt is not yet sufficiently run-in.
6.3.9 REPLACING BELTS
Replacing the drive belts is a relatively demanding operation, which needs to perform by an authorised service centre.
If cruise control is activated and the drive lever is independently returning to position "N", then it is necessary to adjust the cruise control lever. Have this task performed at a specialised service centre.
6.3.11 REPLACING WHEELS
Before replacing one of the wheels, park the mower on a horizontal and rigid surface, turn off the engine and remove the key from the ignition. Secure the mower against movement. Do not replace the wheel if the mower is not sufficiently secured in the elevated position!

If you do not have suitable tools or the necessary knowledge, contact your vendor.
Perform the replacement as follows:
Place the jack underneath the front or rear bumper near to the wheel which you wish to replace. For model AC 92-23 4x4 – always place the jack against the frame - do not lean it on the transmission, this could damage it!
▶ Keep lifting the mower until the wheel, which you wish to change no longer touches the ground.
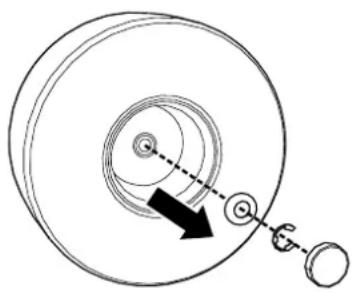
▶ Remove the protective cover from the wheel.
▶ Using a suitable screwdriver remove the retaining ring and remove the washer.
▶ Pull the wheel off the shaft.
natural_image
Diagram of a mechanical pulley system with a rotating shaft and attached weights (no text or labels)When reattaching the wheel proceed in the reverse sequence to its removal. Before attaching the wheel clean all parts and lightly grease the shaft with a plastic lubricant. Especially for wheels on the rear axle this lubrication is essential for the subsequent removal of the wheel. In the event that lubrication is not performed the subsequent attachment may be very difficult.
When attaching the rear wheel pay attention to the mutual alignment of the pin on the shaft and the groove on the wheel.
Finally, check the tyre pressure.
6.3.12 REPAIRING A TYRE PUNCTURE
The mower is equipped with tubeless tyres. In the event of a puncture, have it repaired at a specialised tyre repair shop or at an authorised Seco mower service centre.
6.3.13 MAINTENANCE OF THE HYDROSTATIC TRANSMISSION

6.4
For the reliable operation of the transmission it is necessary to maintain the correct oil level. In the event of problems with the transmission immediately seek the help of an authorised service centre, there is a risk of serious damage to the transmission.
| Mower model Oil type Oil level | ||
| 92 EVO SAE | 10W-40, API CD At least to half the height of the equalisation tank | |
| 92 EVO 4x4 SAE | 5W-50 synthetic oil | Between the marks on the dipstick in the tank cap (total oil volume in the hydraulic system is 6l) |

In the event of problems with the transmission immediately seek the help of an authorised service centre, there is a risk of serious damage.
6.3.14 OVERVIEW OF THE TIGHTENING TORQUE OF BOLT CONNECTIONS
| Steering: Torque | |
| M14 nut of steering segment 92 - 132 Nm | |
| M14 nuts of the angle pins on the steering 60 - 83 Nm | |
| Securing of pins on the front axle SC 2x4 40 - 50 Nm | |
| Engine: | |
| Bolt of the electromagnetic clutch 60 - 70 Nm | |
| Mowing: | |
| M10 nut of the tensioning mowing pulley 33 - 48 Nm | |
| M20 nut of the blade holder 250 - 300 Nm | |
| M16 nut securing the blades to the blade holder 150 - 200 Nm | |
| M12x30 bolt on the mowing pulley 60 - 80 Nm | |
| Travel controls: | |
| M10 nut on the drive pulley SC 2x4 24 - 30 Nm | |
| M10 nut on the drive pulley SC 4x4 35 - 45 Nm |

When lock nuts are removed and then returned they need to be replaced with new ones.
6.4 LUBRICATION
Lubricate the mower according to the following lubrication plan.
Ball bearings of the tension pulleys, guide pulleys and bearings on the mowing deck are self-lubricating.
Before putting the mower out of service for an extended period, thoroughly lubricate all places shown on the diagram. Namely the half axle of the front and rear axle (it is necessary to remove the rear wheels).
 6.4 6.4 | Symbol Explanation | |
 | Plastic lubricant A00 | |
 | Oil SAE 30 | |
 | Interval in hours | |
Plastic lubricant is used to lubricate:
▶ steering segment - using a lubricating nipple
▶ wheel turning pin - using lubricating nipples
▶ mowing deck lifting arms - using a lubricating nipple
▶ tensioning pulley - remove, lubricate
▶ central front axle pivot pin - using a lubricating nipple (model AC 92-23 4x4 is equipped with self-lubricating sliding sleeves)
▶ angle joints connecting the steering draw bars - remove, lubricate
▶ front wheel half-axles – on AC 92-23 4x4 mower, the interval is 10 hours!
Oil is used to lubricate rotating points:
▶ differential lock pedal
▶ brake pedal
▶ travel levers
▶ rear wheel half axles - the interval is 10 hours
7. REPAIRING MALFUNCTIONS AND DEFECTS
Do not perform any repairs if you do not have the appropriate technical equipment and qualifications. The repairs described below may be performed by the user of the mower. Other repairs performed by the user that are not specified here will void the warranty. The manufacturer takes no responsibility for damages resulting from poorly performed unapproved repairs by the user.
| Malfunction, defect | Remedy |
| The mowing deck mows unevenly | Remove grass that has accumulated on the underside of the mowing deck.Make sure that the blades are sharp, are not deformed or damaged.Check that the blades are properly fastened.Check the blade shafts and the seating of the bearings. Replace them if they are damaged or overly worn. |
| When mowing, some vegetation remains uncut | Check the bearing housings for damage. Based on your findings either repair or replace them. When mowing thick grass or grass that is too wet, an unmowed strip may remain. The travel speed should be adjusted to respect the mowing conditions by shifting into a suitable gear. The engine should not run with the throttle valve fully open.Check that the blades are sharp and undamaged. Replace the blades if necessary.Check the tension and condition of the V-belt of the mowing drive |
| The mowing deck drive belt stops during operation | The mowing deck drive belt may be damaged, when it jumps out of the pulley while the mower is running. If it jumps out even after rechecking according to the following steps, it is necessary to replace the belt.Check the tension of the belt (6.3.7). If necessary adjust the tension.Check the belt guide pulleys.Check the set mowing height, adjust if necessary.Check whether the movement of the belt is not prevented by a foreign object. If yes, remove the foreign object.Recheck all the belts. Buckled or cracked belt pulleys may cause problems. Replace if necessary.Check the inside surface of the pulley on the engine. If it is coarse or has cracks, it is necessary to replace the pulley.Check the parts of the tensioning mechanism for wear, replace the worn out parts if necessary.Change the travelling speed (e.g. slow down)Lift the mowing deck to a higher position |
| The mowing deck drive belt is slipping through | If the grass is too tall or wet, the mowing deck drive belt may slip through. Check that the belt is not worn out. If it is, replace it.Reduce the speed of the mower.Increase the mowing height.Check belt tension. If necessary adjust the tension.Check the tensioning mechanism (spring, pulley). Replace the spring if it is overstretched or damaged. |
| The mowing deck drive belt is being excessively worn out | Check the belt guide pulley.Check whether the movement of the belt is not prevented by a foreign object. If yes, remove the foreign object.Check the pulleys, if they are damaged, replace them.Check the set mowing height, adjust if necessary.Check the tension of the belt (6.3.7). If necessary adjust the tension. |
| The mowing deck cannot be started | Check that the belt is not worn out or damaged. If it is, replace it. If it is loose, tension it.Check the tensioning mechanism spring. Replace the spring if it is cracked or damaged.Check whether the movement of the belt is not prevented by a foreign object. If yes, remove the foreign object.Check the position of the mowing height lever. The safety switch prevents the engagement of the electromagnetic clutch when in the transport position. Move the lever to the work position.Check the setting of the mowing deck switch |
| Belts vibrate extremely when turning on the mowing deck | ▸ Check that the blades are not bent or twisted, also check that they are balanced. If they are deformed, replace them.▸ Check that the belt does not have burned areas or irregularities, which could cause the vibrations. If the belt is damaged, replace it.▸ Check that the blades are not worn out or damaged. Replace them if necessary.▸ Check that the electromagnetic clutch switches properly. If the clutch is not working properly have it replaced or repaired at an authorised service centre.▸ Check the inside surface of the pulley on the engine. If it is coarse or has cracks, it is necessary to replace the pulley.▸ Check whether grass has accumulated on the underside of the mowing deck. It is necessary to remove this grass.▸ Check whether the defect is not in the engine mount. Tighten bolts or replace as necessary.▸ Check the tension of the belt (6.3.7). If necessary adjust the tension. |
| The travel drive belt of the mower is slipping | ▸ Check the tension of the travel drive belt (6.3.8). If necessary adjust its tension. Also check the tension spring, replace it if necessary.▸ Check whether the belt is damaged or worn out.▸ Check whether the movement of the clutch mechanism is blocked by a foreign object. If yes, remove the foreign object.▸ Check the engine belt pulley or transmission belt pulley for damage. Replace if necessary. |
| The travel drive belt is being excessively worn out | ▸ Check belt tension.▸ Check the tensioning mechanism, replace the damaged spring▸ Check whether a foreign object is blocking the movement of the belt. If yes, remove the foreign object.▸ Check the condition of the pulleys - replace the pulleys if necessary. |
| The mower does not travel after shifting into gear | ▸ Check the gear shifting mechanism - attachment of the draw bar of the travel direction lever.▸ Check the oil level in the equalisation tank |
| The mower is unusually loud after shifting into gear | ▸ Check the oil level in the equalisation tank and fill it up if necessary.▸ There are air pockets in the hydraulic circuit – drive the mower on level ground forward and back for several minutes. Contact your service centre. |
| The mower loses power when travelling up a hill | ▸ When the mower is under a high load and the ambient temperature is high, then the maximum working temperature of the oil may be exceeded. Lower the work demands on the mower. |
| Extreme vibrations occur when travelling | ▸ Check whether any pulleys are damage or deformed. Replace them if necessary.▸ Check whether the belt has any burned spaces or other irregularities. Replace it if necessary.▸ Check the tension of the travel drive belt (6.3.8). If necessary adjust its tension.▸ Check that the mowing blades are balanced. Balance or replace them if necessary. |
| The steering is slipping through or loose | ▸ Check that the space between the pinion and the segment is not too large. If yes, adjust the cogged segment. Check for wear on the ball and socket joints. Replace the joints if necessary. |
| The engine does not run | ▸ Check that there is petrol in the petrol tank.▸ Check that the prescribed procedure for starting the engine was followed (5.2)▸ Check the fuse. Replace if necessary.▸ Check whether the voltage on the battery terminals is 12 V. On a new mower check whether the battery was activated and charged. On new mowers replace the spark plug and check that there is not oil accumulated on the cylinder due to incorrect handling.▸ Check that all wire connections are in order and that the electrical system switches work.▸ Check the engine again exactly according to the instructions in the User's manual of the engine manufacturer. Have the electrical system checked at a specialised workshop. |
| The engine is rotating but will not start up | ▸ Check that the prescribed procedure for starting the engine was followed (5.2). Check that the petrol in the petrol tank is clean.▸ Check that the fuel filter is not clogged.▸ Make sure that the throttle lever is in the position"CHOKE".▸ Check the engine again exactly according to the instructions in the User's manual of the engine manufacturer. Have the cabling and switches checked at a specialised workshop. |
7.1 ORDERING SPARE PARTS
We recommend that you use exclusively original spare parts, which ensure safety and compatibility. Always order spare parts from an authorised distributor or service organisation, which is informed about the current technical changes performed on the products during manufacture.
For easy, fast and exact identification of the necessary spare part always provide in your order the serial number found on the second side of the cover of this publication. Also provide the year of manufacture as shown on the product identification label under the seat.
7.2 WARRANTY
This machine has been designed and manufactured using the most modern techniques. The manufacturer guarantees its products for 24 months from the date of purchase, for private and hobby use. The warranty is limited to 12 months in case of professional use.
Limited warranty
1) The warranty period starts on the date of purchase. The manufacturer, acting through the sales and technical assistance network, shall replace free of charge any parts proven defective in material, machining or manufacturing. The warranty does not affect the purchaser's rights as established under legislation governing the consequences of defects in the machine.
2) Technical personnel will undertake the necessary repairs in the minimum time possible, compatible with organisational needs.
3) To make any claim under the warranty, this certificate of warranty, fully completed, bearing the dealer's stamp and accompanied by the invoice or receipt showing the date of purchase, must be displayed to the personnel authorised to approve work.
4) The warranty shall be null and void if:
- the machine has evidently not been serviced correctly
- the machine has been used for improper purposes or has been modified in any way,
- unsuitable lubricants and fuels have been used
- non-original spare parts and accessories have been fitted
- work has been done on the machine by unauthorised personnel
5) The warranty does not cover consumables or parts subject to normal wear.
6) The warranty does not cover work to update or improve the machine.
7) The warranty does not cover any preparation or servicing work required during the warranty period.
8) Damage incurred during transport must be immediately brought to the attention of the carrier: failure to do so shall render the warranty null and void.
9) Engines of other manufacturers (Briggs & Stratton, Subaru, Honda, Lombardini, Kohler, etc.) fitted to our machines are covered by the warranties of the engine manufacturer.
10) The warranty does not cover injury or damage caused directly or indirectly to persons or things by defects in the machine or by periods of extended disuse of the machine resulting from the said defects.
MODELO
N° DE SERIE
ADQUIRIDO POR EL SR.
After the end of the season or if you will not be using your riding mower for more than 30 days, make sure to prepare your mower for storage as soon as possible. If fuel remains in the petrol tank without movement for more than 30 days, a sticky deposit may form, which can have a negative effect on the carburettor and cause poor engine operation. For this reason empty the petrol tank.

Never store the riding mower with a full petrol tank inside of buildings or poorly ventilated areas, where there are fuel vapours, open flames, sparking or lighting flames, furnaces, central heating, dry rags, etc. Handle fuels and lubricants with care, they are highly flammable and careless handling may lead to serious burns or damage to property.
Only empty the petrol tank into approved containers outdoors away from open flames.
Recommended procedure for preparing the riding mower for storage:
▶ Thoroughly clean the entire mower, especially inside the mowing deck (6.2.2).

Never use petrol for cleaning. Use degreasing agents and warm water.
▶ Repair and paint dinted places to prevent corrosion from occurring.
▶ Replace faulty or worn out parts and tighten all loose nuts and bolts.
Prepare the engine for storage according to the user's manual for the operation and maintenance of the engine.
▶ Lubricate all lubrication locations according to the lubrication diagram (6.4).
▶ Take out the battery, clean it and charge it fully. Store the battery in a cool, dry location, as necessary. Charge the battery every 30 days and regularly check its voltage.
- Store the riding mower covered in a clean and dry environment.

The best way to ensure the riding mower's ideal operating condition for the next season is to have it inspected and tuned at an authorised service centre every year.
8.1 MOWER BELTS
It is not necessary to release the belts when the mower is taken out of operation for an extended period of time. When the mower is started up for use again, we strongly recommend that you allow the mower belts to run free for at least 5 minutes. This will prevent vibrations and ensure that after an extended period of inactivity the belts will align into the correct working position.
9. DISPOSAL OF THE MOWER
After the operational life of the mower is over, the owner of the mower is responsible for its disposal. This may be performed in two ways:
a) Hand the mower over to an authorised company (scrap yard, secondary waste collection point, etc.). You will receive documented confirmation of the handover for disposal.
b) Dispose of the mower yourself. In this case we recommend the following procedure:
▶ Dispose of the product utilising recyclable material according to the applicable waste disposal law.
▶ Disassemble the entire mower.
▶ Parts that can be reused should be cleaned, preserved and stored for further use.
▶ Sort the remaining parts into those that are and are not environmentally friendly, e.g. rubber parts (gaskets), lubricant remains in the bearings or on gears. The environmentally harmful components must be handled according to the relevant waste disposal law applicable in the country of the user.
▶ Sort the waste according to the Wastes Catalogue in accordance with the relevant ordinance. Ecologically friendly waste shall be treated as reusable material.
10. ES STATEMENT OF COMPLIANCE (ORIGINAL)
pursuant to: Council Directive No. 2006/42/EC (Government directive NV 176/2008 Coll.)
Council Directive No. 2014/30/EC (Government directive NV 117/2016 Coll.)
Council Directive No. 2000/14/EC (Government directive NV 9/2002 Coll.)
A. We: EMAK spa via Fermi, 4 - 42011 Bagnolo in Piano (RE) ITALY
issue the following statement:
B. Mechanical equipment
- name: Riding mower
- model: Oleo-Mac Apache 92 EVO - Apache 92 EVO 4x4
Efco Tuareg 92 EVO - Tuareg 92 EVO 4x4
- serial number AC 00001÷99999
C. Legislation forming the basis for assessment of compliance:
EN ISO 5395-1 - EN ISO 5395-3 - EN ISO 14982
D. Assessment of compliance was performed according to the designated procedure in:
- EP and Council Directive No. 2006/42/EC, Annex VIII,(eqv.Annex no. 8, NV No. 176/2008 Coll.)
- EP and Council Directive No. 2014/30/EU, Annex II,(eqv.Annex no. 2, NV No. 117/2016 Coll.)
- EP and Council Directive No. 2000/14/EC, Annex VI,(eqv.Annex no. 5, NV No. 9/2002 Coll.) under supervision of the notified entity
SZS Praha, NB 1016
Třanovského 622/11
163 04 Prague 6, Czech Republic
- this mechanical equipment meets all respective provisions of the aforementioned directives (NV)
- measures have been taken to ensure the compliance of all products introduced to the market with the technical documentation and the requirements contained in technical regulations.
- guaranteed emission level of acoustic power L _WAG is 100 dB(A)
Measured mean values of acoustic power depending on the engine used:
| Engine | Speed (min ^-1 ) | Measured value of ac.power [dB(A)] |
| Briggs & Stratton 21 HP Vanguard | 3000 | 98 |
| Briggs & Stratton 23 HP Vanguard | 3000 | 98 |
| Loncin LC2P77F | 3000 | 98 |
| EMAK K2400 | 3000 | 98 |
Technical Documentation in the scope pursuant to annex VII for the Directive 2006/42/EC a pursuant to annex VIII for the Directive 2000/14/EC is kept at the place of business of the manufacturer at the address:
Bagnolo in Piano (RE) Italy 2.1. 2022
text_image
Fausto Bellamico - President Emak® s.p.a.Emak S.p.A. is dedicated to the continuous development and improvement of all its machines. Therefore, some technical differences in terminology may appear in this manual when compared with the actual product. No claims can be deduced from this. Print, duplication, publication and translation (even in part) must not be performed without the written consent of Emak S.p.A. The manufacturer reserves the right to change technical parameters of the product, without prior customer notification.
VORWORT
natural_image
Technical line drawing of a mechanical assembly with no visible text or symbols(10) PEDAL DIFFERENTIALSPERRE
text_image
Technical diagram showing mechanical assembly with three labeled components: tool, bracket, and base plate.natural_image
Line drawing of a golf car with steering wheel and gear (no text or symbols)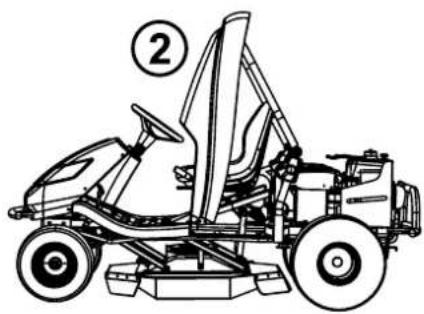
natural_image
Line drawing of a racing car with two numbered components (② and ②), no text or symbols present.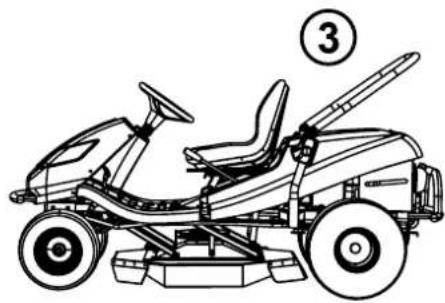
natural_image
Line drawing of a motorized racing car with visible wheels and suspension (no text or symbols)natural_image
Illustration of a mechanical device on an inclined plane with a cross symbol (no text or labels)
natural_image
Line drawing of a mechanical device with a drain and base, no text or symbols present
natural_image
Top-down technical diagram of a car's front view showing internal components and a circular connector (no text or symbols)
natural_image
Technical line drawing of a mechanical device with no visible text or symbols
natural_image
Technical diagram of a mechanical assembly with a wrench inserted, showing internal components and a close-up view of a mechanical component (no text or symbols present)80 Nm
text_image
Technical diagram of a mechanical assembly with labeled parts A and B, showing tool connections and components.
natural_image
Diagram of a mechanical pulley system with a rotating shaft and guide mechanism (no text or labels)Bagnolo in Piano (RE) Italy 2.1.2022

natural_image
Mechanical diagram showing a car wheel mounted on a platform with directional arrows indicating motion (no text or symbols)natural_image
Diagram of a car on an inclined plane with a checkmark indicating alignment (no text or symbols present)Max 22^ (40%)
Incorrect
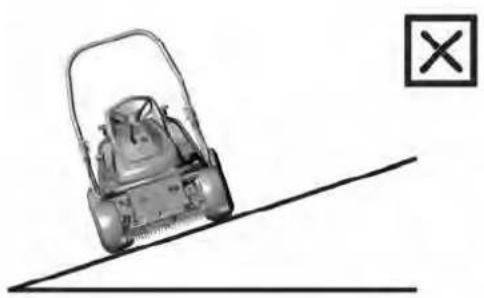
natural_image
Illustration of a lawn mower on an inclined plane with a cross symbol (no text or labels)
natural_image
Diagram of a mechanical device with a drain and base, no text or symbols present
natural_image
Top-down technical diagram of a car's front view showing internal components and a circular component with an arrow (no text or symbols)
REPLACEMENT DES LAMES
natural_image
Technical line drawing of a mechanical device with starburst light emission (no text or symbols)
natural_image
Technical line drawing of a mechanical assembly with a magnified inset showing a component detail (no text or symbols)80 Nm
6.3.8 CONTRÔLE ET AJUSTEMENT DE LA COURROI E D'ENTRAÎ NEMENT

text_image
Technical diagram showing mechanical assembly with labeled parts A and B, likely from an engineering or manufacturing context.
natural_image
Diagram of a mechanical pulley system with a hanging hook and directional arrow (no text or labels)Bagnolo in Piano (RE) Italy 1.2.2022

natural_image
Technical line drawing of a car wheel assembly with arrows indicating motion direction (no text or symbols)text_image
Technical diagram showing mechanical assembly with three labeled components: a tool, a bracket, and a base plate.natural_image
Line drawing of a golf club with steering wheel and gear (no text or symbols)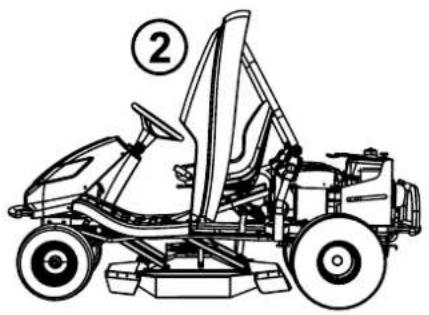
natural_image
Line drawing of a golf cart with driver seat and steering wheel (no text or symbols)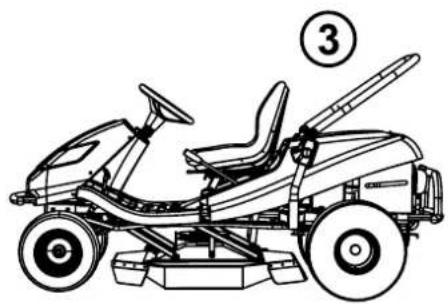
natural_image
Line drawing of a motorized car with visible wheels and suspension components (no text or symbols)text_image
Max 22° (40%)Errato
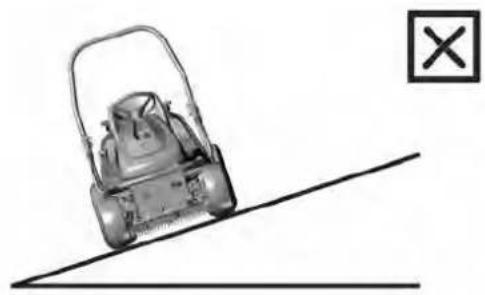
natural_image
Illustration of a lawn mower on an inclined plane with a cross symbol (no text or labels)
natural_image
Diagram of a mechanical device with a drain and base, showing fluid flow or material movement (no text or symbols)
natural_image
Top-down technical diagram of a vehicle's rear engine compartment showing internal components and a circular component with an arrow (no text or labels)
natural_image
Technical line drawing of a mechanical device with no visible text or symbols
natural_image
Technical line drawing of a mechanical assembly with a magnified inset showing a disassembly or repair operation (no text or symbols present)80 Nm
text_image
Technical diagram showing mechanical assembly with labeled parts A and B, likely from an engineering or manufacturing context.
natural_image
Diagram of a mechanical pulley system with a rotating shaft and attached circular components (no text or labels)Bagnolo in Piano (RE) Italy 1.2. 2022

natural_image
Technical line drawing of a car wheel assembly on a platform, showing mechanical components and motion arrows (no text or symbols)(4) INDICATIELAMPJE VOOR OPLADEN VAN ACCU
text_image
Technical diagram showing mechanical assembly with three labeled components: tool, bracket, and base plate.natural_image
Line drawing of a golf car with visible steering wheel, gear shift, and front-mounted gun (no text or symbols)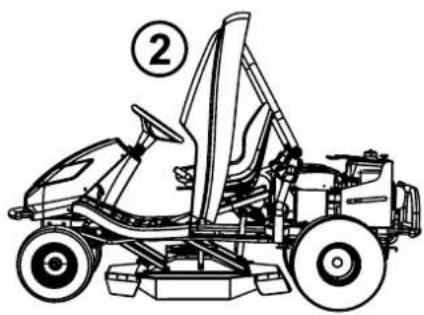
natural_image
Line drawing of a golf car with visible wheelbars and suspension components (no text or symbols)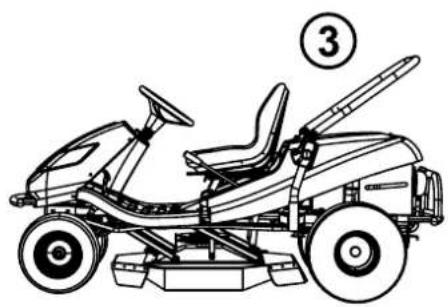
natural_image
Line drawing of a motorized car with steering wheel and three numbered components (no text or symbols)natural_image
Illustration of a golf car on an inclined plane with a checkmark indicating the correct lane (no text or symbols present)Max 22°(40%)
Verkeerd
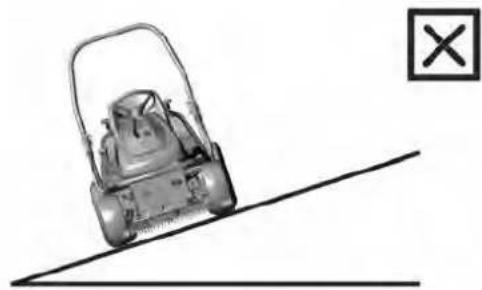
natural_image
Illustration of a lawn mower on an inclined plane with a cross symbol (no text or labels)
natural_image
Diagram of a mechanical device with a drain and base, showing fluid flow or material movement (no text or symbols)
natural_image
Top-down technical diagram of a car's front engine compartment showing internal components and a circular component with an arrow (no text or labels)
natural_image
Technical line drawing of a mechanical device with starburst light emission (no text or symbols)
text_image
Technical diagram showing mechanical assembly with labeled parts A and B, likely from an engineering or manufacturing context.
natural_image
Diagram of a mechanical pulley system with a rotating shaft and guide mechanism (no text or labels)KÄUFER GEKOCHT DOOR DHR./MEVR.
Bagnolo in Piano (RE) Italy 2.1.2022
text_image
Fausto Bellamico - President Emak® s.p.a.DEPÓSI TO DE COMBUSTIBLE
natural_image
Technical line drawing of a mechanical assembly with arrows indicating motion direction (no text or symbols)text_image
Technical diagram showing mechanical assembly with three labeled components: tool, bracket, and base plate.natural_image
Line drawing of a motorized sports car with steering wheel and gear assembly (no text or symbols)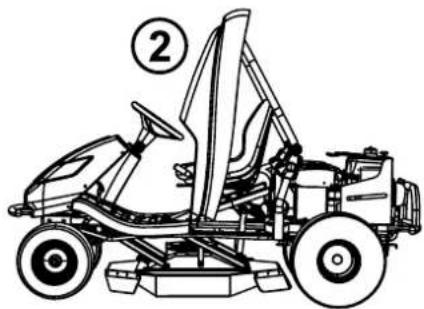
natural_image
Line drawing of a golf car with visible wheelbars and suspension components (no text or symbols)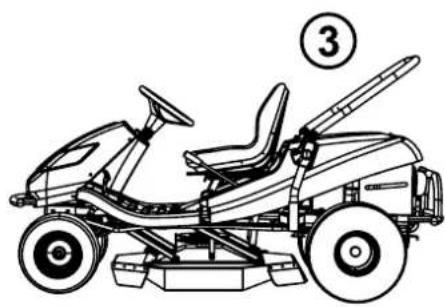
natural_image
Line drawing of a motorized car with steering wheel and three numbered components (no text or symbols)natural_image
Diagram of a golf car on an inclined plane with a checkmark indicating alignment (no text or symbols present)Max 22°(40%)
Incorrecto
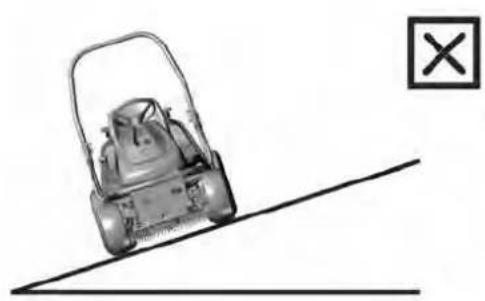
natural_image
Illustration of a mechanical device on an inclined plane with a cross symbol (no text or labels)
natural_image
Diagram of a spray gun dispensing liquid into a container (no text or symbols)
natural_image
Top-down technical line drawing of a car interior with no visible text or symbols
natural_image
Technical line drawing of a mechanical device with no visible text or symbols
text_image
Technical diagram showing mechanical assembly with labeled parts A and B, likely from an engineering or manufacturing context.
natural_image
Diagram of a mechanical pulley system with a rotating wheel and attached spring (no text or labels)Bagnolo in Piano (RE) Italy 1.02.2022

text_image
Fausto Bellamico - President Emak® s.p.a.natural_image
Technical line drawing of a car wheel assembly with mounting base (no text or symbols)
text_image
Technical diagram showing mechanical assembly with three labeled components and directional arrows indicating assembly steps.natural_image
Line drawing of a golf car with steering wheel and gear (no text or symbols)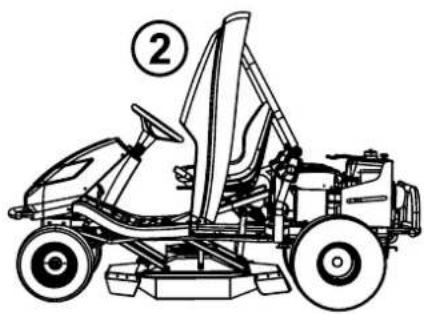
natural_image
Line drawing of a motor in a racing suit with two numbered components (no text or symbols)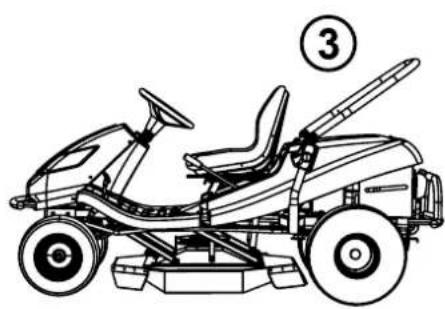
natural_image
Line drawing of a golf club with steering wheel and three numbered components (no text or symbols)5. PRACA I OBSŁUGA MASZYNY
i
natural_image
Diagram of a golf car on an inclined plane with a checkmark indicating alignment (no text or symbols present)Max 22^ (40%)
źle
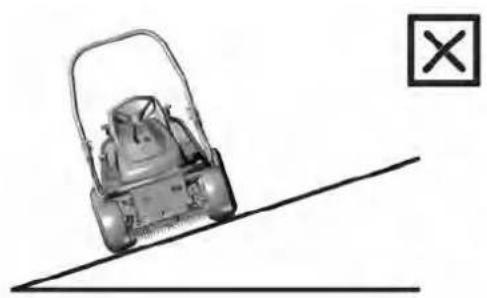
natural_image
Illustration of a grass lawn mower on an inclined plane with a cross symbol (no text or labels)
natural_image
Diagram of a mechanical device with a drain and base, no text or symbols present
natural_image
Top-down technical line drawing of a car interior with no visible text or symbols
natural_image
Technical line drawing of a mechanical device with no visible text or symbols
text_image
Technical diagram showing mechanical assembly with labeled parts A and B, including wrenches, bolts, and circular components.
natural_image
Diagram of a mechanical pulley system with a rotating wheel and connecting rod (no text or labels)9. LIKWIDACJA MASZYNY
Bagnolo in Piano (RE) Italy 2.1. 2022

text_image
Fausto Bellamico - President Emak® s.p.a.natural_image
Technical line drawing of a car wheel assembly with mounting base (no text or symbols)text_image
Diagram showing a hand holding a bandage with two lock symbols labeled ① and ②, indicating correct and incorrect states.natural_image
Simple line drawing of a mechanical component with a curved handle and textured base (no text or symbols)text_image
Diagram showing a mechanical component with bidirectional arrows indicating movement or force, labeled with lock symbols.text_image
Technical diagram showing mechanical assembly with three labeled components: a tool, a bracket, and a base plate.natural_image
Line drawing of a motorized sports car with steering wheel and gear (no text or symbols)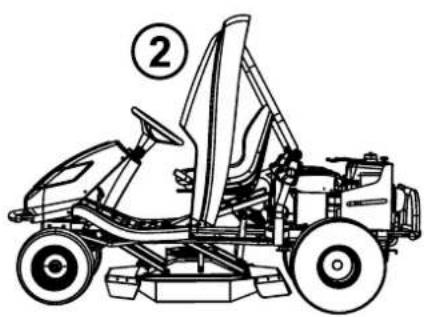
natural_image
Line drawing of a golf car with visible wheelbars and suspension components (no text or symbols)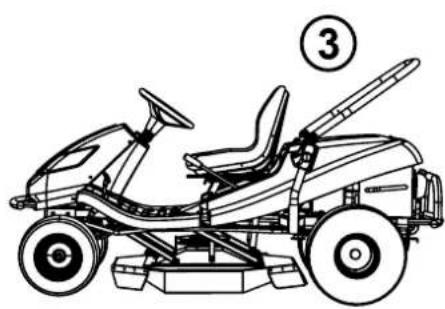
natural_image
Line drawing of a golf club with steering wheel and three numbered components (no text or symbols)natural_image
Illustration of a golf car on an inclined plane with a checkmark indicating a location (no text or symbols present)Max 22^ (40%)
Helytelen
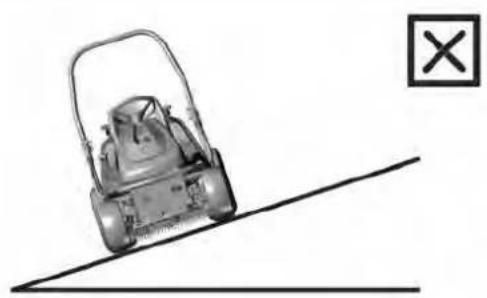
natural_image
Illustration of a lawn mower on an inclined plane with a cross symbol (no text or labels)
natural_image
Diagram of a spray gun dispensing liquid into a container (no text or symbols)
natural_image
Top-down line drawing of a car's front view showing engine compartment with a circular component and directional arrow (no text or symbols)
natural_image
Technical line drawing of a mechanical device with no visible text or symbols
text_image
Technical diagram of a mechanical assembly with labeled parts A and B, showing tool arms and components.
natural_image
Diagram of a mechanical pulley system with a rotating wheel and connecting rod (no text or labels)9. A GÉP MEGSEMMISÍ TÉSE
Bagnolo in Piano (RE) Italy 1.2. 2022

text_image
jogecu Emak® s.p.a. Fausto Bellamico - PresidentGB WARNING! – This owner's manual must stay with the machine for all its life.