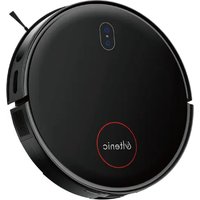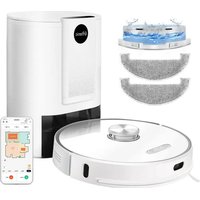
T10 - Vacuum Cleaner Ultenic - Free user manual and instructions
Find the device manual for free T10 Ultenic in PDF.


User questions about T10 Ultenic
0 question about this device. Answer the ones you know or ask your own.
Ask a new question about this device
Download the instructions for your Vacuum Cleaner in PDF format for free! Find your manual T10 - Ultenic and take your electronic device back in hand. On this page are published all the documents necessary for the use of your device. T10 by Ultenic.
USER MANUAL T10 Ultenic
natural_image
Line drawing of a robotic vacuum cleaner with a circular base and top unit (no text or symbols)User Manual
T10
Shenzhen Ultenic Technology Co., Ltd
Floor B, Block A, building S, Tusincere Park, Longcheng street,
Longgang district, Shenzhen City, China
Uitenio Sp Z0.0
ul Ovedle Przemyskowe 16/2, 69-100 Siubice
ULTENIC UK LTD
71-75 Shelton Street, Covent Garden, London, WOZH 9JQ
(1) 2017年1月1日
ULTENIC FRANCE
TU REP 320 rue Saint-Honoré 75001 Paris
E-mail: support@oufenic.com Tel: 133753753975
VIII
PLEASE READ CAREFULLY AND KEEP FOR FUTURE REFERENCE.
Contents
English 1-15
Français 16-30
Deutsch-31-45
Español 46-60
Italiano 61-75
Polski 76-90
Русский 91-105
日本語 106-120
EN
EN
Important Safety Instructions
To reduce the risk of injury or damage, keep these safety precautions in mind when setting up, using and maintaining your robot vacuum cleaner:
- Read all safety and operating instructions before operating your robot.
- Retain the safety and operating instructions for future reference.
• Pay attention to all warnings on your robot, battery, charging dock and in the user manual.
• Follow all operating instructions. - The external cable or cord of the power supply unit can not be replaced; if the cord or plug is damaged, the power supply unit shall be disposed of.
- This product is designed to be plugged into a standard outlet only. Product may not be used with any type of power converter. Use of power converters will immediately void the warranty.
- Please charge and remove the battery from your robot and accessories before long-term storage or transportation.
- The battery must be removed from this device before this device is disposed of. To remove the battery from this device, first remove the screws on the bottom, then remove the main PCB and unscrew the battery cover by using a screwdriver. Remove the battery by disconnecting the quick connector.
- WARNING: Chemical Exposure: If the battery pack is leaking, do not allow the liquid to come in contact with skin or eyes. If contact has been made, wash the affected area with copious amounts of water and seek medical advice. Place the battery (the used battery pack included when the robot will be disposed) in a sealed plastic bag and dispose of safely according to local environmental regulation.
- WARNING: Fire or Explosion Hazard; Do not crush or dismantle battery packs. Do not heat or place the battery pack near any heat source or direct sunlight. Do not incinerate or short-circuit the battery pack. Do not subject batteries to mechanical shock.
- Contact your local waste management authority for battery recycling and disposal regulations in your area.
- Your robot is not a toy. Do not sit or stand on robot. Children and pets should be supervised when your robot is operating.
• Robot is for indoor use only. - Do not use non-rechargeable batteries. Use the rechargeable battery provided with the product only. For replacement, purchase identical robot batteries or contact robot Customer Care for alternative battery options.
- Store and operate the robot In a room with moderate temperatures only.
• Do not spray or pour liquids on your Robot. - Do not use any other power supply cord. For replacement cords, please contact Customer Care to ensure proper selection of country-specific power supply cord.
* Do not use the robot to pick up sharp objects, glass, or anything that is burning or smoking.
• Do not immerse the battery pack In any liquid. - Do not use the robot to pick up spills of water bleach, paint, or other chemicals, or anything wet.
01
- Picking up objects like clothing, loose papers, pull cords for blinds or curtains, power cords, and any fragile objects before using the robot. If the robot passes over a power cord and drags it, objects on table or shelves are likely to fall off.
- If the room to be cleaned contains a balcony, a physical barrier should be used to prevent access to the balcony and ensure safe operation.
• Do not place anything on top of your robot. - Be aware that the robot moves on its own. Take care when walking in the area that the robot is operating in to avoid stepping on it.
- Do not operate the robot in areas with exposed electrical outlets on the floor.
- Do not use this device on an unfinished, unsealed, waxed or rough floor. It may cause damage to the floor and this device. Use only on hard floor surfaces or low pile carpets.
- This device has been designed to be used on floors without scratching them. We still recommend that you test this device on a small area of the room to be cleaned to ensure no scratches are made before cleaning the whole room.
Battery and Charging Information
Lithium-ion Battery
Important: Lithium-ion batteries and products that contain Lithium-ion are subject to stringent transportation regulations. If you need to ship this product (with the battery included) for service, travel or any other reason, you MUST comply with the following shipping instructions:
- Remove the Lithium-ion battery from the product.
- Place a piece of tape over the battery's metal charging contacts.
- Reinstall the battery (with the tape on it) in the product and secure the battery door.
- Package the product in its original packaging or in your own packaging that prevents any movement during transportation.
- Ship via ground transportation only (no air shipping).
Battery Storage
If storing robot off the charging dock, remove the battery first. Then store robot and the battery in a cool, dry place.
The symbol on the product or its packaging indicates:
Do not dispose of electrical appliances as unsorted municipal waste, use separate collection facilities. Contact your local authority for information regarding the collection systems available. If electrical appliances are disposed of in landfills or dumps, hazardous substances can leak into the groundwater and get into the food chain, damaging your health and well-being. Please contact your local or regional waste authority for more information on collection, reuse and recycling programs.
02
EN
FCC Statement
This device complies with Part 15 of the FCC Rules. Operation is subject to the following two conditions: (1) This device may not cause harmful interference, and (2) this device must accept any interference received, including interference that may cause undesired operation.
Warning: Changes or modifications not expressly approved by the party responsible for compliance could void the user's authority to operate the equipment.
Note: This equipment has been tested and found to comply with the limits for a Class B digital device, pursuant to Part 15 of the FCC Rules. These limits are designed to provide reasonable protection against harmful interference in a residential installation. This equipment generates, uses, and can radiate radio frequency energy and, if not installed and used in accordance with the instructions, may cause harmful interference to radio communications. However, there is no guarantee that interference will not occur in a particular installation. If this equipment does cause harmful interference to radio or television reception, which can be determined by turning the equipment off and on, the user is encouraged to try to correct the interference by one or more of the following measures: (1) Reorient or relocate the receiving antenna. (2) Increase the separation between the equipment and receiver. (3) Connect the equipment into an outlet on a circuit different from that to which the receiver is connected. (4) Consult the dealer or an experienced radio/ TV technician for help.
Declaration of Conformity
This product complies with the radio interference requirements of the European Community. Hereby, we declare that the radio equipment type T2253 is in compliance with Directive 2014/53/EU.
Trademark Notice
• Amazon, Echo, Alexa and all related logos are trademarks of Amazon.com, Inc. or its affiliates.
- Apple and the Apple logo are trademarks of Apple Inc., registered in the U.S. and other countries. App Store is a service mark of Apple Inc., registered in the U.S. and other countries.
• Google Play and the Google Play logo are trademarks of Google Inc.
• Google Home is a trademark of Google Inc.
03
About Your Robot
- What's in the Box
1 x Robot Vaccum T10
1 x Auto Empty Base

1 x Remote Control with Batteries

1 x Cleaning Brush


1x Mop attachment

1 x Spare Side Brush1 x Spare Washable Mop 1 x Spare Ho with Sponge

with Sponge

2 x Spare Dust Bag

1 x Quick Start Guide 1 x APP User Guide 1 x User Manual


- Product Overview

text_image
Laser Module Speaker Wall sensor Power button/ Home button Front Infrared sensor BumperEN
04
EN
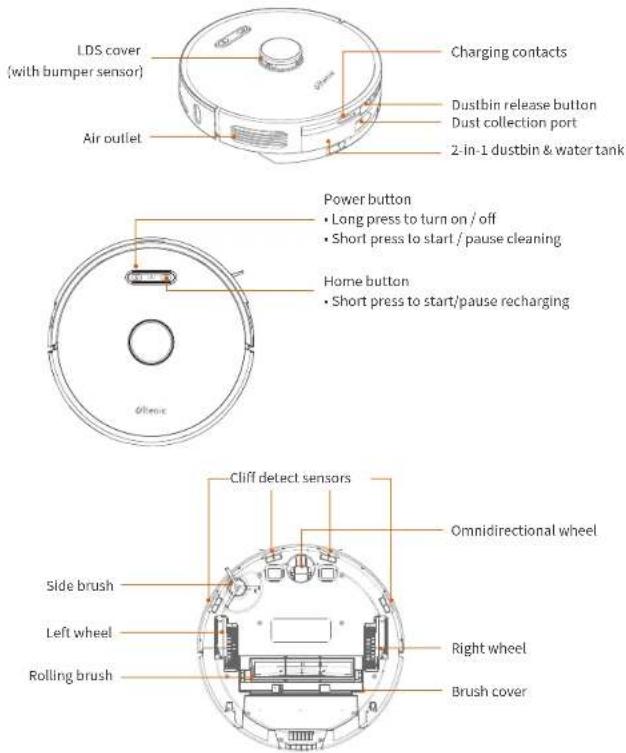
text_image
LDS cover (with bumper sensor) Air outlet Charging contacts Dustbin release button Dust collection port 2-in-1 dustbin & water tank Power button • Long press to turn on / off • Short press to start / pause cleaning Home button • Short press to start/pause recharging Cliff detect sensors Omnidirectional wheel Side brush Left wheel Right wheel Rolling brush Brush coverLED indicator
- Flashing blue light: Powering on/configuring network/upgrading firmware
• Solid blue light: Powered on/normal working state
• Flashing yellow light: Low battery/recharging - Flashing green light: Charging
• Solid green light: Fully charged - Flashing red light: Error state
• Light off: Power off/sleeping

- Dustbin & Water Tank
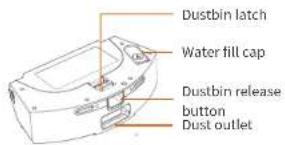
text_image
Dustbin latch Water fill cap Dustbin release button Dust outlet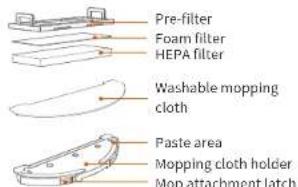
text_image
Pre-filter Foam filter HEPA filter Washable mopping cloth Paste area Mopping cloth holder Mop attachment latch- Auto Empty Base
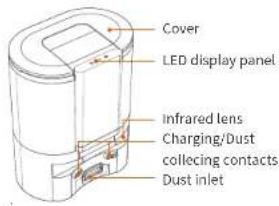
text_image
Cover LED display panel Infrared lens Charging/Dust collecting contacts Dust inlet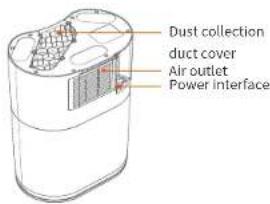
text_image
Dust collection duct cover Air outlet Power interface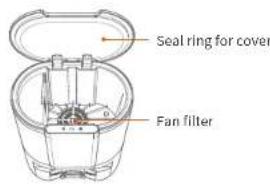
text_image
Seal ring for cover Fan filter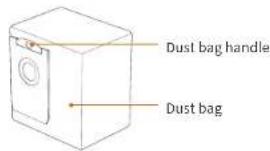
text_image
Dust bag handle Dust bag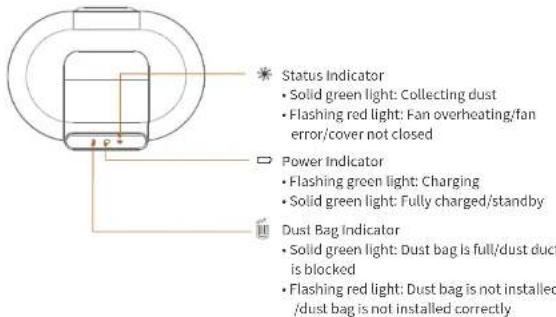
text_image
Status Indicator • Solid green light: Collecting dust • Flashing red light: Fan overheating/fan error/cover not closed Power Indicator • Flashing green light: Charging • Solid green light: Fully charged/standby Dust Bag Indicator • Solid green light: Dust bag is full/dust duct is blocked • Flashing red light: Dust bag is not installed /dust bag is not installed correctly

EN
5. Remote control
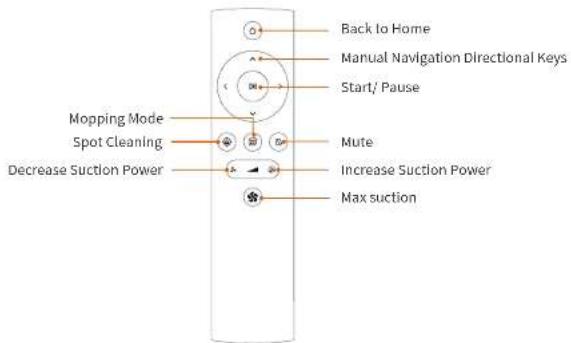
text_image
Back to Home Manual Navigation Directional Keys Start/ Pause Mopping Mode Spot Cleaning Decrease Suction Power Mute Increase Suction Power Max suctionNote:
- It is recommended to point the remote to the front of the Robot for best results.
- The remote control range is 3-6 meters (10-20 feet).
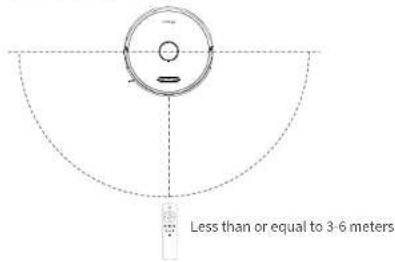
text_image
Less than or equal to 3-6 metersUsing Your Robot
1. Setting up the Auto Empty Base
About your Auto Empty Base
The Auto Empty Base is designed to automatically empty and charge the Ultenic robot vacuum cleaner T10. Plug the power cable into the back panel of the Base and plug the other end in a functioning wall outlet. Place on a flat, hard surface at least 2.5 inches away from the wall. Ensure that there is a clear space in front and both sides so that your T10 can return to Base to recharge and empty.
07
EN
How to place your Auto Empty Base
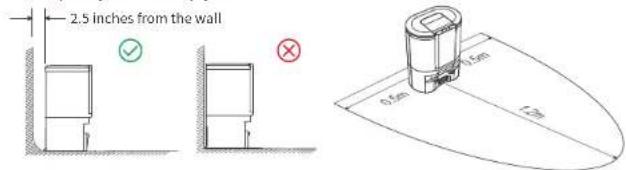
text_image
2.5 inches from the wall 0.5m 1.6m 1.7mNote:
- Place the Auto Empty Base where the robot can easily access.
- The Auto Empty Base must always remain connected to power. Avoid using a power source that may inadvertently be switched off.
2. Setting up the Robot
Step 1:
Position the Robot on the floor near your Auto Empty Base. Press and hold the “()” Power button until the indicator turns blue. You will hear a welcome message.
Note:
Voice prompt volume can be adjusted later in the Ultenic App or muted using the remote control.
Step 2:
Press the "Home button to pair the Robot to your Auto Empty Base. The Robot will navigate and dock to the base. Allow the Robot to fully charge before first use.
Note:
Dust collection may activate during initial docking. Do not be alarmed. Dust collection frequency can be adjusted later in the Ultenic App.
3. Getting Started
Before using this product, please clear the floor of all objects other than furniture as some small objects may obstruct, get caught in, or damage your Robot.
Use Your Robot with the Ultenic App
To fully enjoy all the available features, it is recommended to control your Robot via the Ultenic app.
Before you start, make sure that:
- Your smartphone or tablet is connected to a Wi-Fi network.
- Your smartphone or tablet is running iOS 8.0 (or above) or Android 4.4 (or above).
• The 2.4GHz band wireless signal is enabled on your wireless router.
08



L. Download the Ultenic app from the App Store (iOS devices) or Google Play (Android devices).
2. Open the app and create a user account.
3. Tap the “+” icon to add the Robot T10 to your Ultenic account.
4. Follow the instructions in the app to set up the Wi-Fi connection.
After connecting successfully, you can control your Robot via the app. With the app, you can select cleaning at your desired suction level, schedule cleaning, view the cleaning map, set up "No-Mop" or "No-Go" zones, set up dust empty frequency, check the network connection status, and access additional features.
First Cleaning and Home Mapping
After the first Auto-clean cycle the Robot will create a virtual map of your home, viewable in the Ultenic app. Using that map you can define Areas and set Virtual Boundaries. Those Areas and Boundaries can then be used in any of your cleaning cycles and schedules (eg avoid the "Baby Room" during a daytime clean, mop ONLY the "Kitchen").
Use the included remote control, or the Uitenic APP to control your preferred cleaning method. Once you have chosen your preferred cleaning method, the Robot will start cleaning and will continue until it has covered the entire cleaning area, or until the battery is low and needs to be re-charged. Once cleaning is finished, the Robot will automatically return back to the Auto Empty Base to empty the dustbin. If a cleaning session was interrupted due to low battery, it will automatically resume cleaning once the power has been sufficiently restored.
Cleaning Modes
Auto Clean - The Robot will automatically clean your floor until it has covered the entire surface. Once cleaning is finished or the battery needs to be re-charged, the Robot will automatically return back to the Auto Empty Base to empty the Robot's dustbin and charge or resume cleaning.
Area Clean - Create customizable areas on your floor plan within the Ultenic App for your Robot to specifically clean or avoid.
Spot Clean - The Robot will focus on a specific spot you desire to have cleaned thoroughly. First, use the manual navigation control on the remote (or in the app) to guide the Robot to the desired area. Then, choose Spot Clean mode.
Mopping - Attach the water tank attachment to the dustbin from the rear of the Robot. Choose Mopping mode in the Ultenic App or the included remote and the Robot will automatically mop the surface and return to the Auto Empty Base once complete.
Manual Control - Using the Ultenic App or the included remote, you can manually control where the Robot goes.


Maintenance and Care
Your Robot is designed to be used regularly. As with most floor care devices, regular use may cause build-up around brushes, in debris compartments and near filters. We recommend performing regular maintenance, as outlined in the following pages, to keep your Robot running at optimal performance.
- Recommended Care/ Replacement Frequency
| PART | CARE FREQUENCY REPLACEMENT FREQUENCY | |
| Rolling brush | Once per week | Every 6-12 months |
| Side brush | Once per week | Every 3-6 months |
| Filters | Once per week | Every 2 months |
| Sensors | Once per month | — |
| Charging contacts | Once per month | — |
| Omnidirectional wheel | Once per month | — |
2. Maintaining Side Brush

Use a Philips screwdriver to unscrew the side brush screw and remove the side brush.
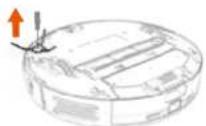

Remove dirt and debris and reinstall using Philips screwdriver.
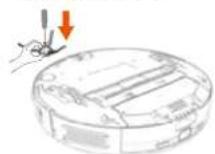

Note:
It is recommended to replace the side brush every 3-6 months depending on use.
3. Maintaining Rolling Brush

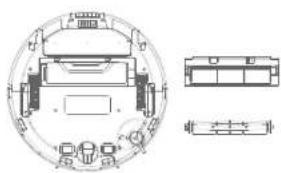
Pinch the left and right tabs on the rolling brush cover. Lift and remove the cover.
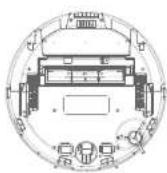

Remove the main brush and clean with included cleaning tool as seen in the figure below.
natural_image
Technical line drawing of a circular mechanical component with internal components and two separate views (no text or symbols)
EN
3 Replace the main brush and snap the cover back into place.

Note:
It is recommended to replace the main brush every 6-12 months depending on use.
4. Maintaining the Dustbin/ Water Tank
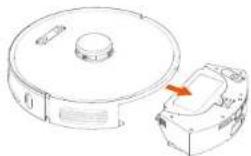
1 Press the dust bin release button and remove the dust bin.
natural_image
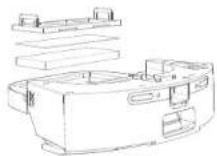
Technical line drawing of a circular device with a central hub and a separate mechanical component (no text or symbols)3 Remove the primary filter and HEPA filter, wipe down the surface with a dry cloth or use the cleaning tool. Rinse the primary filter with water and let dry.
5 Pour out the remaining water in the water tank and dry the water tank.

2 Open the dust bin and empty contents.
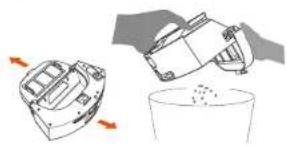
natural_image
Illustration of a hand pouring liquid into a container with arrows indicating flow direction (no text or symbols)4 Remove the mop pad to wash and dry in the sun.
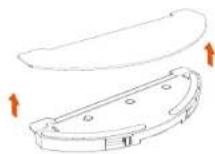
6 After the filter, dust box, mop cloth and water tank are all dried, put them back together for next use.
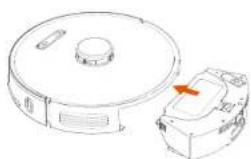
natural_image
Line drawing of a robotic vacuum cleaner with a red arrow pointing to the component (no text or symbols)11
EN
5. Maintaining Sensors, Charging Contacts and Omnidirectional Wheel
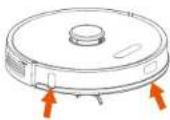
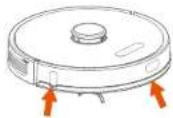
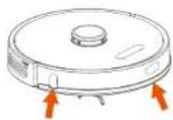
1 Use a damp cloth to clean all sensors on the Robot.
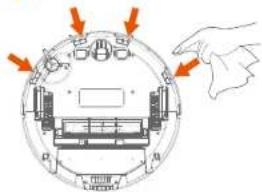
text_image
Diagram showing a device interior with labeled components and directional arrows indicating movement or flow.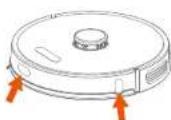
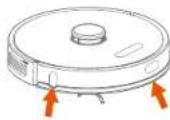
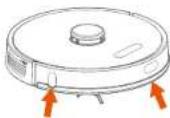
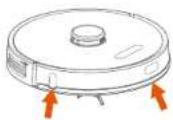
2 Use a dry cloth to clean the charging contacts on the Robot (alcohol is not recommended).
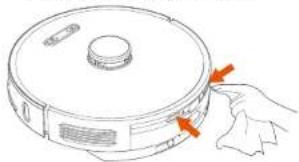
natural_image
Line drawing of a robotic vacuum cleaner with orange arrows indicating motion direction (no text or symbols)3 Remove any trapped hair or debris from the omnidirectional wheel with the cleaning brush provided.
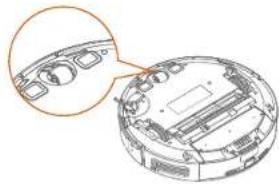
natural_image
Diagram of a circular device with internal components and a magnified inset showing a component detail (no text or symbols)Note:
Do not clean the omnidirectional wheel with water.
6. Maintaining Auto Empty Base
Auto Empty Base Dust Bag
The Auto Empty Base will indicate when the dust bag is full on the smart LED display panel (Dust bag indicator * will be green). Discard of dust bag once full and replace dust bag with a new one.
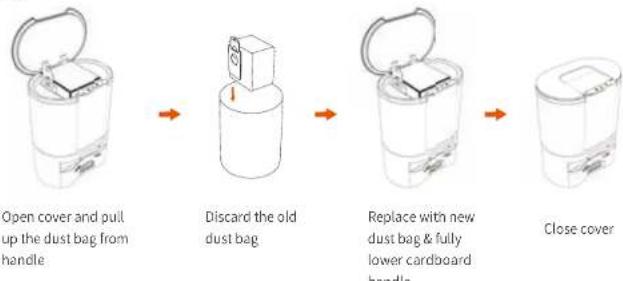
flowchart
graph LR
    A["Open cover and pull up the dust bag from handle"] --> B["Discard the old dust bag"]
    B --> C["Replace with new dust bag & fully lower cardboard handle"]
    C --> D["Close cover"]
12
EN
Dust Duct and Filter
If the Auto Empty Base indicator light "★" flashes or the r "☐" is solid green, and the dust bag is not full, it is time to clean the filter and dust duct.

Use a Philips screwdriver to unscrew the side brush screw and remove the side brush.2Remove dirt and debris and reinstall using Philips screwdriver.

Open the exhaust at the rear of the Auto Empty Base, clean the filter, and reinstall.
Fan Filter Support
Check if the fan filter support is contaminated by any debris and clean it with a dry cloth. It is recommended to clean it at least once a month.
IR Lens and Charging/Dust Collecting Contacts
Check if the IR Lens and the Charging/Dust Collecting Contacts are contaminated and clean it with a dry cloth. It is recommended to clean it at least once a month.
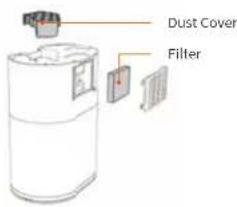
text_image
Dust Cover Filter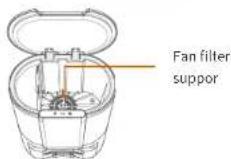
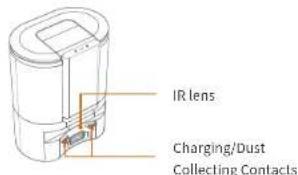
text_image
IR lens Charging/Dust Collecting ContactsSpecifications
| Robot | Dimensions | 350mm 350mmx98mm |
| Product weight | ≈3.6kg | |
| Rated voltage | 14.4V | |
| Rated power | 50W | |
| Battery capacity | 5200mAh | |
| Auto Empty Base | Dimensions | 282mmx361mmx202mm |
| Product weight | ≈3.82kg | |
| Rated voltage | 1050W | |
| Input Rating | 100-240V~50/60Hz | |
| Output Rating | DC24V=1.2A |


Troubleshooting
When your Robot encounters a problem, try the solutions below to solve the problem. If the problem persists, contact the Ultonic service center for help.
| Problems Solutions | |
| Unable to power on/start cleaning | Please charge before use. This is commonly caused due to low battery. |
| Unable to return to Auto Empty Base | Make sure the Auto Empty Base is connected to a power source.Check if there are too many obstacles near the Auto Empty Base. Please put the base in an open area.The Robot is out of range of the Auto Empty Base. Move the Robot closer to the Auto Empty Base to re-establish connection.Check if the battery level is critically low or empty.It is recommended to control the robot back to the dust emptying base before the first cleaning to let the robot memorize the starting point. |
| Abnormal noise during cleaning | Please check if the main brush, side brush or left/right wheel are tangled with any objects. If there is an obstruction clear it and restart the Robot. |
| Decrease in cleaning ability or dust falling out from dustbin | The dustbin is full, please empty the dustbin.Check and clean the HEPA filter.Check that the brush is clear from obstruction. |
| Robot's movements or travel path are abnormal | Clean the sensors carefully with a dry cloth.Restart the Robot by turning it off and on. |
| Unable to connect to WiFi | Make sure you've entered the right password.Keep the robot, mobile device and your router being as close as possible.Make sure you selected a 2.4GHz WiFi.It's not recommended to use public network.Long press And Simultaneously for 5 seconds to reset the robot WiFi, then try again.Reinstall the Ultenic App and try to connect to WiFi again. |
| Unable to charge after docking | Make sure there is no obstruction or heavy dust on both the Robot and Auto Empty Base charging contacts. |
| Water is not released during mopping | Make sure there is enough water in the water tank.Check if the mopping attachment is correctly installed.Check if the water outlets are blocked. |
| The remote doesn't work. | Make sure that the batteries in the remote have power.Make sure you have powered on the robot.Check if the battery level is critically low or empty.Check if the distance between the Robot and remote within the effective range (3m/9.84ft). |
| The auto empty base doesn't collect the dust. | Check if the dust bag is full and replace it with a new oneCheck if the dust bag is properly installed.Check if you have set up not to automatically empty after cleaning in Ultenic App. |


| Indicator | Definition | Solution |
| Flashing red | Fan errorOverheatingThe cover is not closed properly | 1. Frequent dust collection leads to fan overheating protection or fan malfunction. It is recommended to try to collect dust after 30 minutes.2. Ensure that the cover of the Auto Empty Base is completely closed. |
| Flashing red | The dust bag is not installed or installed properly | 1. Check whether the dust bag is installed, if not, please install the dust bag.2. Ensure that the dust bag is properly installed and fully lower the cardboard handle. |
After-Sale Service
The professional customer service team from Ultenic will be responsible and provide support to all products that come with a worry-free warranty for one year automatically after purchase.
Please contact Ultenic Support and Service via Email below.
| United States | service-us@ultenic.com |
| Deutschland | service-de@ultenic.com |
| France | service-fr@ultenic.com |
| España | service-es@ultenic.com |
| Canada | service-ca@ultenic.com |
| United Kingdom | service-uk@ultenic.com |
| Italia | service-it@ultenic.com |
| 日本 | service-jp@ultenic.com |


natural_image
Circular diagram with a central hole and an orange rectangular element, no text or symbols present.text_image
Diagram of a device with labeled components and connection points, including a rectangular component and concentric rings.Indicateur d'état
natural_image
Technical line drawing of a circular mechanical component with internal components and two separate views (no text or symbols)25

natural_image
Illustration of a hand pouring liquid into a container with arrows indicating flow direction (no text or symbols)
natural_image
Line drawing of a robotic vacuum cleaner with a close-up view of its internal components (no text or symbols)FR
26
FR
text_image
Diagram showing a circular device with labeled components and directional arrows indicating movement or assembly.
natural_image
Line drawing of a robotic vacuum cleaner with orange arrows indicating component movement (no text or symbols)natural_image
Diagram of a circular device with internal components and an inset circle highlighting a section (no text or symbols)Note:
natural_image
Technical line drawing of a mechanical assembly with exploded and assembled views (no text or symbols)
DE
natural_image
Illustration of a hand pouring liquid into a container with an orange arrow indicating direction (no text or symbols)natural_image
Technical line drawing of a robotic vacuum cleaner with orange arrows indicating component alignment (no text or symbols)natural_image
Line drawing of a robotic vacuum cleaner with orange arrows indicating component movement (no text or symbols)natural_image
Diagram of a circular device with internal components and a magnified inset showing a component detail (no text or symbols)Hinweis:
natural_image
Technical line drawing of a circular mechanical component with internal components and external assembly (no text or symbols)55
natural_image
Line drawing of a circular device next to a rectangular device with an orange arrow indicating rotation (no text or symbols)natural_image
Illustration of a hand pouring liquid into a container with arrows indicating flow direction (no text or symbols)text_image
Diagram showing a circular device with labeled components and directional arrows indicating movement or assembly.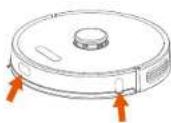
natural_image
Line drawing of a robotic vacuum cleaner with orange arrows indicating component motion (no text or symbols)natural_image
Technical line drawing of a circular device with internal components and a magnified inset showing a detail (no text or symbols)Note:
natural_image
Technical line drawing of a circular mechanical component with internal components and a separate schematic view (no text or labels)
IT
natural_image
Line drawing of a vacuum cleaner with a red arrow pointing to the component (no text or symbols)text_image
Diagram showing a device interior with labeled components and directional arrows indicating movement or flow.
natural_image
Line drawing of a robotic vacuum cleaner with orange arrows indicating component movement (no text or symbols)natural_image
Diagram of a circular device with internal components and a magnified inset showing a component detail (no text or symbols)Note:
natural_image
Circular diagram with a central circle and an attached rectangular element, labeled 'Bifeno' at the bottom (no other text or symbols)Use Your Robot with the Ultenic App
To fully enjoy all the available features, it is recommended to control your Robot via the Ultenic App. Before you start, make sure that:
- Your smartphone or tablet is connected to a Wi-Fi network.
- Your smartphone or tablet is running iOS8.0 (or above) or Android4.4 (or above).
• The 2.4GHz band wireless signal is enabled on your wireless router.



natural_image
Technical line drawing of a circular mechanical or architectural component with internal components and two separate views (no text or symbols)35
natural_image
Line drawing of a robotic vacuum cleaner with a highlighted component (no text or symbols)natural_image
Illustration of a robotic device being lifted by a container with particles, showing motion arrows (no text or symbols)natural_image
Line drawing of a robotic vacuum cleaner with a highlighted component (no text or symbols)PL
86
PL
5. Maintaining Sensors, Charging Contacts and Omnidirectional Wheel
1
text_image
Diagram showing a device interior with labeled components and directional arrows indicating movement or assembly.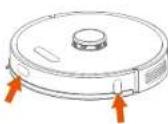
2
natural_image
Line drawing of a robotic vacuum cleaner with orange arrows indicating rotation direction (no text or symbols)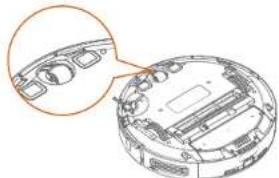
natural_image
Diagram of a circular device with internal components and a magnified inset showing a component detail (no text or symbols)1
Uwaga:
m = 311
text_image
Wspornik filtru wently latora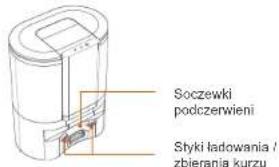
m = 311
PL
m = 311
natural_image
Pure diagram of a mechanical component with concentric circles and a central rectangular block, no text or symbols present.- Recommended Care/ Replacement Frequency
natural_image
Technical line drawing of a mechanical component with cross-sectional and top views (no text or symbols)
RU
natural_image
Illustration of a robotic device pouring liquid into a container with arrows indicating motion (no text or symbols)
natural_image
Technical line drawing of a vacuum cleaner with a close-up view of its internal components (no text or symbols)101
RU
natural_image
Diagram of a circular device with internal components and arrows indicating motion or force (no text or symbols)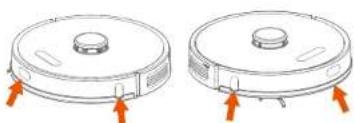
natural_image
Two identical circular vacuum cleaner designs with orange arrows pointing to the side (no text or symbols)
natural_image
Line drawing of a robotic vacuum cleaner with orange arrows indicating component alignment (no text or symbols)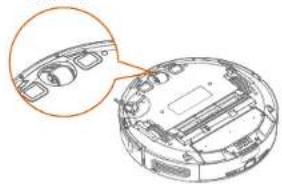
natural_image
Technical line drawing of a circular mechanical component with an inset close-up view (no text or symbols)
Примечание:
flowchart
graph LR
    A["Device with lid"] --> B["Cylinder with box"]
    B --> C["Device with lid"]
    C --> D["Cylinder with lid"]
natural_image
Pure diagram of a mechanical or electrical component with concentric circles and internal lines, no text or symbols present.natural_image
Technical line drawing of a circular mechanical component with internal components and cross-sectional views (no text or labels)115
natural_image
Illustration of a robotic device and a cup with arrows indicating motion (no text or symbols)natural_image
Line drawing of a vacuum cleaner with a close-up view of its internal components (no text or symbols)JP
116
JP
text_image
Diagram showing a device with labeled components and directional arrows indicating movement or assembly.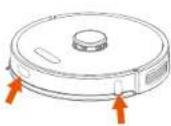
natural_image
Line drawing of a robotic vacuum cleaner with orange arrows indicating motion (no text or symbols)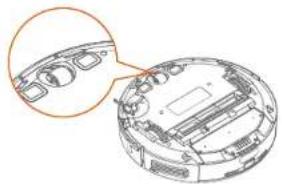
natural_image
Diagram of a circular device with internal components and a magnified inset showing a component detail (no text or symbols)①メモ: