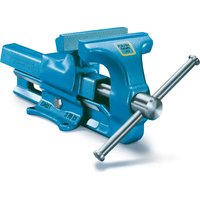
100 180 - Industrial machine Brockhaus HEUER - Free user manual and instructions
Find the device manual for free 100 180 Brockhaus HEUER in PDF.


User questions about 100 180 Brockhaus HEUER
0 question about this device. Answer the ones you know or ask your own.
Ask a new question about this device
Download the instructions for your Industrial machine in PDF format for free! Find your manual 100 180 - Brockhaus HEUER and take your electronic device back in hand. On this page are published all the documents necessary for the use of your device. 100 180 by Brockhaus HEUER.
USER MANUAL 100 180 Brockhaus HEUER
text_image
HELMETH FINANCE 150 HOLDEN FINANCE 150de HEUER Montage- und Bedienungsanleitung
en HEUER Assembly and operating instructions
fr HEUER Notice de montage et d'utilisation
es HEUER Manual de instrucciones
el HEUER Οδηγίες συναρμολόγησης
και χρήσης
nl HEUER Montage- en bedieningshandleiding
sv HEUER Monterings- och bruksanvisning
it HEUER Montaggio e manuale d'istruzioni
da HEUER Montage og brugsvejledning
fi HEUER Asennus ja käyttöohje
ru Руководство по монтажу и эксплуатации HEUER
zh HEUER 装配与使用说明书
ar دليل المستخدم والتركيب HEUER
pt Instruções de montagem e operação da HEUER
Assembly and Maintenance Instructions HEUER Vice
Our forged steel Parallel Vice System HEUER is a high quality product. By following the correct assembly and maintenance, it will give decades of reliable service.
1. Assembly
a) The vice must be assembled on the workbench in such a way that the clamping jaw on the fixed rear clamp projects vertically over the front of the workbench. This ensures that the benefit of the large side span depth when clamping long work pieces vertically in front of the work bench can be fully exploited.
b) The best way of securing the vice is to use clearance bolts and nuts. The bolt holes should be carefully marked and drilled about 2 mm larger than the bolt diameter. When the bolts are pushed through the vice and workbench, they must never be tight or skewed in their holes.
c) At the start of the assembly, the two vice jaws must be firmly clamped together. Before the bolts are inserted and tightened, it is especially important to ensure that the vice does not rock, but sits flat and square on the workbench. The four fixing screws should be uniformly tightened, using a crosswise tightening sequence, especially when fixing the vice to a softer material such as wood. If the base of the vice does not sit flat and square, or the bolts become skewed or wedged due to uneven tightening, the vice will bind and/or move jerkily, and the guides will one-sided burden...
2. Maintenance
a) In the final stages of manufacture the guide surfaces are, if necessary, carefully
cleaned to remove any traces of paint over spray, and are then newly lubricated with light machine oil. This cleaning and oiling of the guide runners should be repeated as often as required. However, the side location of the guide runners generally provides excellent protection from both dirt and damage.
b) Despite the good protection afforded to the spindle, it is still recommended that the spindle threads and the spindle nut are cleaned and re-greased every two years. To carry this out, the adjustment screw for the guide, that simultaneously restricts the opening width, must first be removed. After the spindle has been unwound from the spindle nut, the movable front portion of the vice can be removed on its own. The spindle threads and spindle nut should be thoroughly cleaned using a suitable de-greasing fluid, and then re-greased. At the same time, the inner guide surfaces of the fixed portion of the vice can be cleaned. It also helps re-assembly of the movable portion if a few drops of oil are applied to the spindle head and pressure ring in the spindle housing. Re-assembly is the reverse sequence of disassembly.
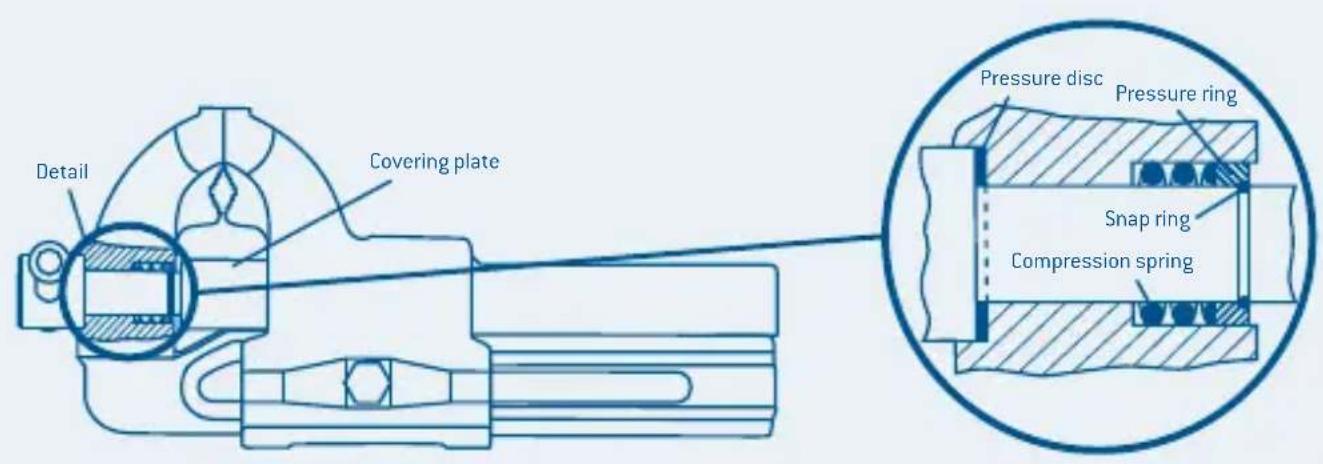
3. Replace the spindle (see fig. on page 15)
i.e. the spring assembly using HEUER bench vice. Firstly, the pressure ring must be pressed against the compression spring in the front jaw hole. To do this, an angle iron or another suitable object is clamped between the cover
plate and pressure ring. The bench vice is then closed until the pressure ring disappears in the front jaw and the snap ring is exposed. The snap ring can then be removed from the slot using a sharp object and pushed over the spindle. Following this the spindle, compression spring, pressure ring, snap ring and pressure disc can be removed from the front jaw. The front jaw hole and the spindle must be sufficiently lubricated during assembly.
4. Guide Adjustment
The guide mechanism leaves the factory in a carefully set position and normally requires no adjustment. In the event that this becomes necessary, the 4 fixing screws should first be loosened, to release the guiding brackets. Then the adjustment of the screw can be carried out by turning the adjuster nut as required. Only very small rotations of the adjuster nut are needed. Never over-tighten the adjuster nut such that the vice binds or opens and closes jerkily. When adjustment is complete, the 4 fixing screws should be re-tightened as shown on item 1 c.
Video on www.youtube.com/BHE58840
5. Jerky or uneven operation of the vice
If the vice opens and closes with a jerky motion, this is not necessarily a fault, but is a warning that the guide is not operating smoothly and correctly. Possible reasons for this are:
a) The vice was fixed to the workbench in a stressed condition; see point 1, c above.
b) The guide is very dirty, or lacking oil; see Point 2, a above.
c) The guide is incorrectly adjusted; see Point 4
above.
6. Using the vice for Welding
The working surfaces of the vice jaws have been carefully hardened. When solding or welding a clamped work piece in the vice, it is very important to ensure that welding flame does not cause the jaws to glow red. In such instances, fire and heat-resistant materials should be placed over the jaw surfaces before work begins.
7. Vices with rotation feature
The assembly of the vice on its rotation plate follows as described under Point 1, c. When bolting the rotation plate to the workbench, the three-point fixing arrangement of the plate prevents unwanted stressing during tightening. The rotation device itself needs no maintenance. During operation, when a frequent rotation of the vice is required, it is sufficient to tighten only the centre spindle fixing screw while the screw opposite is held and turned with a hexagon key.
Admissible maximum clamping force (manual)
| HEUER bench vice | HEUER Compact | ||
| kN | kN | ||
| 100 | 15 – 17,5 | 120 | 10 |
| 120 | 25 – 30 | ||
| 140 | 30 – 35 | ||
| 160/180 | 35 – 40 | ||
Assembling and Maintenance Instructions HEUER Compact bench vice
1. Assembly
a) The vice is to be placed on the workbench so that the fixed rear saddle is vertically flush with the front edge of the workbench. This makes it possible to utilize the full side clamping potential of the vice and allows longer work pieces to be clamped upright in front of the workbench.
b) To secure the HEUER Compact bench vice to the workbench use clearance bolts with a diameter of 6 mm with matching nuts and washers.
c) The holes for the screws are to be carefully marked and drilled about 2 mm larger than the bolt diameter.
2. Maintenance
a) At delivery the guide bar and threaded spindle are already ideally oiled. The cleaning and light oiling of these two elements with a not too viscous machine oil can be repeated as necessary
b) It is recommended to inspect, clean, and oil the spindle threads in annual intervals. When holding the front part upright a few drops of oil should also flow over the spindle head and pressure ring into the spindle housing.
c) After great soiling it can be worthwhile to clean the Quicklaunch. To do this, remove the cap on the adjustment bar and blow pressurized air into the scale groove. Repeat procedure in closed and open position of the Compact.
ATTENTION: Adhere to all safety measures! Expressly the wearing of safety glasses and mouth mask!
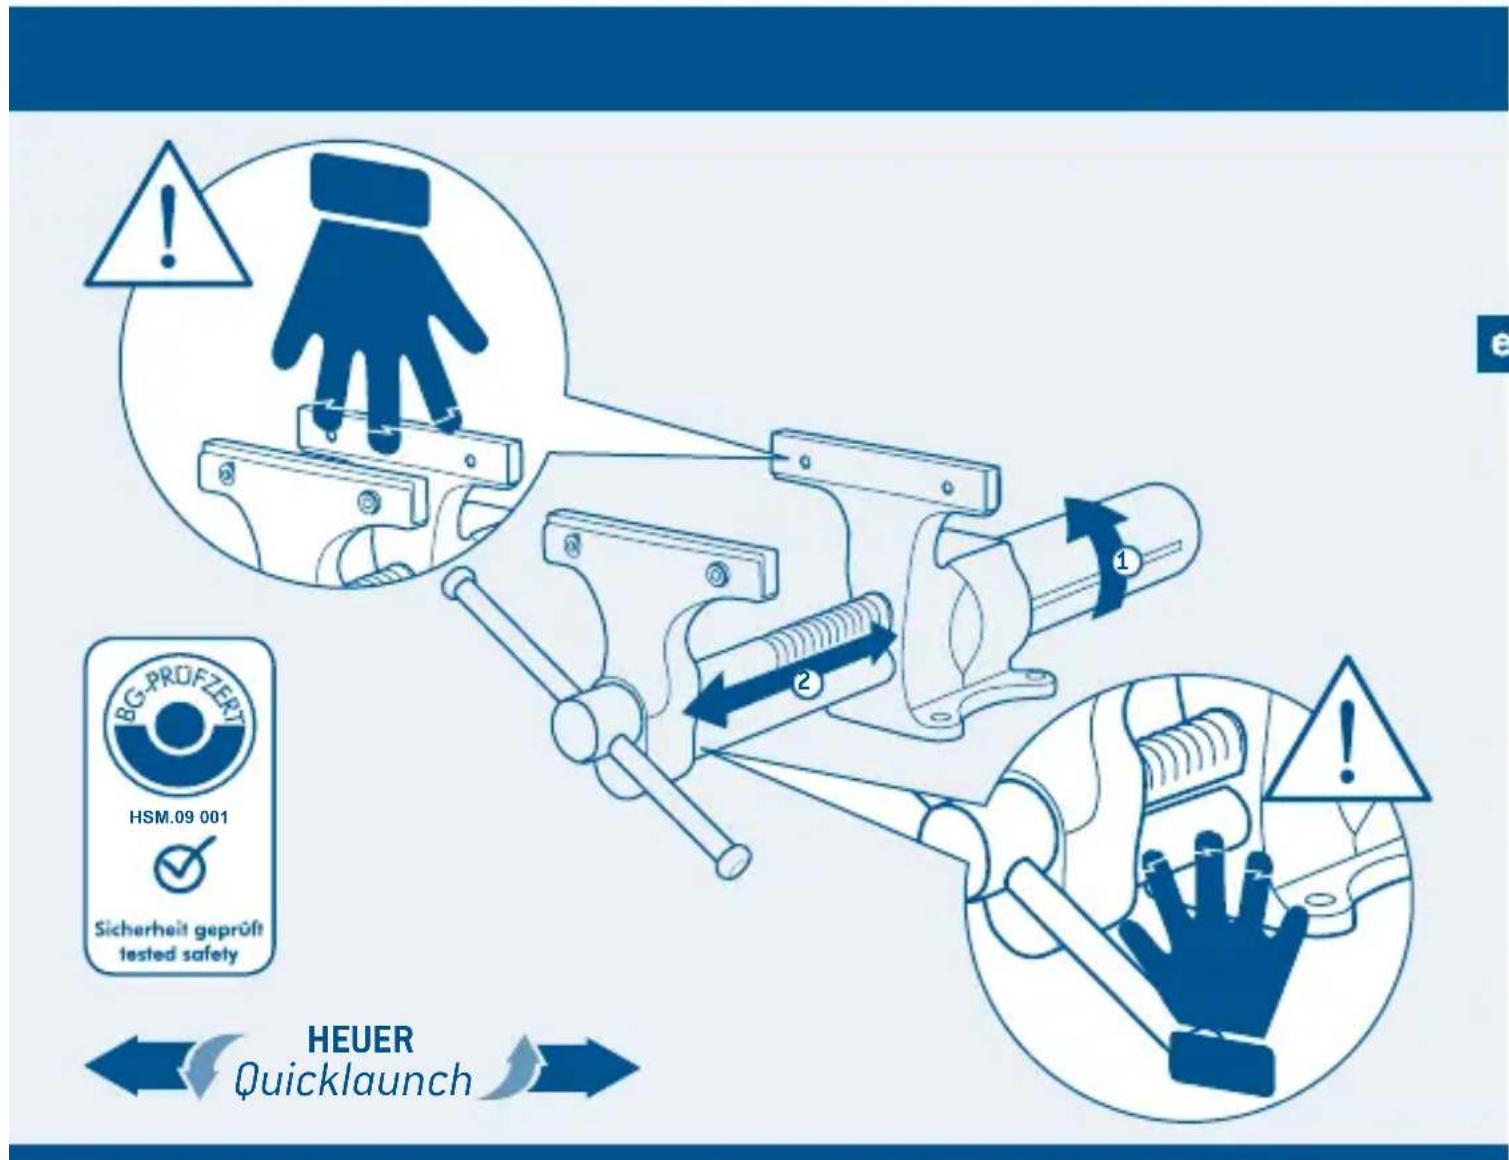
3. Handling the HEUER Compact Quicklaunch bench vice
To open or close the vice by Quicklaunch (quick adjustment) turn the rear bar with the millimetre scale, when looking from the front, clockwise to the stop, hold in this position and remove or slide in the front jaw. Then release the Quicklaunch bar. A return spring brings the adjusting mechanism back into the original position.
If the mechanism is not immediately loosened or the quick gripping pipe does not immediately click into place after releasing then do this by gently turning the spindle.
Remark: For safety reasons the adjusting mechanism does not function if loaded.
Attention! Clamping forces of over 10 kN (Kilo Newton) can lead to deformation of the lever and spindle.
If you have questions concerning usage or the product you can find further information at www.heuer.de.
text_image
HEUER Quicklaunch BG-PRÜFZERY HSM.09 001 Sicherheit geprüft tested safety 1 2 !Replace the spindle
on the Heuer bench vice (see page 12, point 3)
text_image
Detail Covering plate Pressure disc Pressure ring Snap ring Compression springAssembly Instructions HEUER Lift
The vice can, with the height and rotation options of the HEUER Lift device, be adjusted to the height of the user, the size of the workpiece and the necessary task, making working more comfortable.
Assembly:
Place HEUER Lift with base plate onto the workbench and press onto the mounting surface. If the workbench is uneven, underlay the base plate to create a tight fitting surface and secure it in this position with three M12 screws (the most secure are through going screws with nuts). Afterwards mount vice.
Operation:
After releasing the clamping with the safety clamping lever the vice can effortlessly be put into the desired work position. A gas shock absorber, specially tuned to the weight of the vice, makes the vice practically weightless.
Attention:: Do not release clamping when loaded! In optimum work position the vice is then adjusted with the safety clamping lever.
Remark: The safety clamping lever is not frictional in the rest position. To activate move lever in direction of device.
| Width of jaw/mm* | Permitted loading / kg | Item No. | |
| 100 | 4 - 10 | 104200 | |
| 120 | 4 - 10 | 104220 | |
| 140 | 10 - 16 | 104240 | |
| 160/180 | 16 - 29 | 104260 |
* Data refers to HEUER Vices. Also suitable for other makes provided that permitted loading weights are observed. When ordering please do not forget details of make and size.

text_image
BG-PROFZERT HSM 10016 GS green-GPA industrial
text_image
360° 200 mmAssembly and operating instructions HEUER Stand-Lift
The vice can, with the height and rotation options of the HEUER Stand-Lift device, be adjusted to the height of the user, the size of the workpiece and the necessary task, making working more comfortable. In addition it offers the option of working all around the workpiece, because it can be installed in the middle of a room and does not require a workbench.
Assembly:
Select a position with enough space. Set up the base plate of the HEUER Stand-Lift. Mark drill holes. Move HEUER Stand-Lift and drill the holes for the four foundation bolts (M12, not included in the delivery)
Put in corresponding dowels, position HEUER Stand-Lift and secure with foundation bolts.
Then mount vice.
Remark: Screws and dowels are not included in the delivery.
Operating:
After releasing the clamping with the safety clamping lever the vice can be effortlessly put into the desired work position.
Attention: Do not release clamping when loaded! A gas shock absorber - specially tuned to the weight of each vice - makes the vice practically weightless. In optimum work position the vice is then adjusted.
Remark: The safety clamping lever is not frictional in the rest position. To activate, move lever in direction of device.
| Width of jaw/mm* | Approx. Weight/kg | Permitted loading/kg | |
| Item No. | |||
| 120 | 214 - 10 117120 | ||
| 140 | 21 10 - 16 117140 | ||
| 160/180 | 21 16 - 19 117160 | ||
* Data refers to HEUER Vices. Also suitable for other makes provided that permitted loading weights are observed. When ordering please do not forget details of make and size.

Assembly instructions for the HEUER collapsible-lift and HEUER collapsible
When not in use the vice can be folded under the workbench, thus freeing the whole workspace for other work. Furthermore, when in a working position, the vice of the HEUER collapsible-lift is height adjustable by approx. 175 mm and can be rotated by 360°.
Assembly:
Push the HEUER collapsible-lift or HEUER collapsible under the workbench and against the contact surface. In order to ensure that the stop plate of the device is flush to the top of the workbench, if necessary use washers or other as shim. Secure in this position with three through-going coach bolts M12 and nuts. Then mount vice.
Operating:
a) Height adjustment [only HEUER collapsible-lift]:
The vice can only be adjusted in height and rotated if the knurled thumb screw (left) is pulled tight and the clamping is released by the safety clamping lever.
Attention: Do not release clamping when loaded! The safety clamping lever is not frictional in the rest position. To activate, move lever in direction of device. After releasing the clamping with the safety clamping lever the vice can effortlessly be put into the desired work position. A gas shock absorber - specially tuned to the weight of each vice - makes the vice practically weightless. In optimum work position the vice is then adjusted with the safety clamping lever.
b1) Folding down the HEUER collapsible-lift:
Before collapsing the vice must be brought into the lowest position and in a right angle to the workbench. Adjust in this position with the safety clamping lever (right) and unscrew the
knurled thumb screw (left) to the stop.
Remark: The vice can only be collapsed under the workbench in this position. Because of the integrated safety system the height adjustment is blocked even if the safety clamping lever is not tightened or not tightened sufficiently.
Because of the height adjustment and rotational options the HEUER Collapsible Lift can be adjusted to the height of the user, the size of the workpiece and the necessary task, making working more comfortable.
b2) Folding down the HEUER collapsible:
Unscrew the knurled screws as far as possible and then fold down the device. To lock the device in the intended position, repeat this process in a reverse order.
Adapter plate for a 40-mm workbench top available upon request.

text_image
BG-PROFEZEN HSM 10035 GS **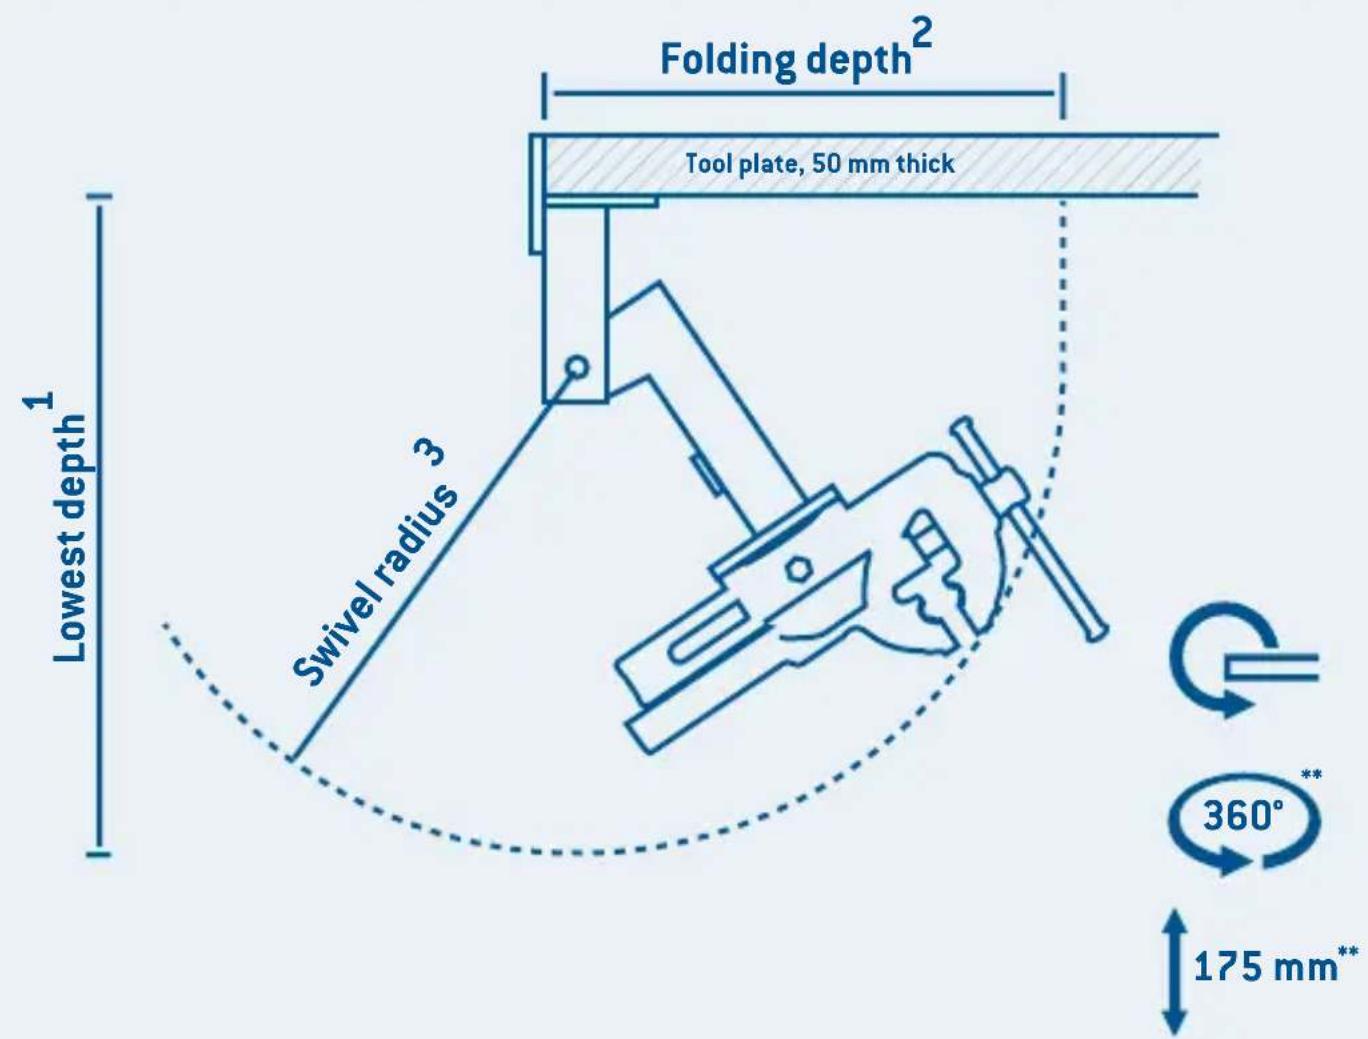
text_image
Folding depth² Tool plate, 50 mm thick Lowest depth¹ Swivel radius 3 175 mm**HEUER collapsible-lift: HEUER collapsible:
other
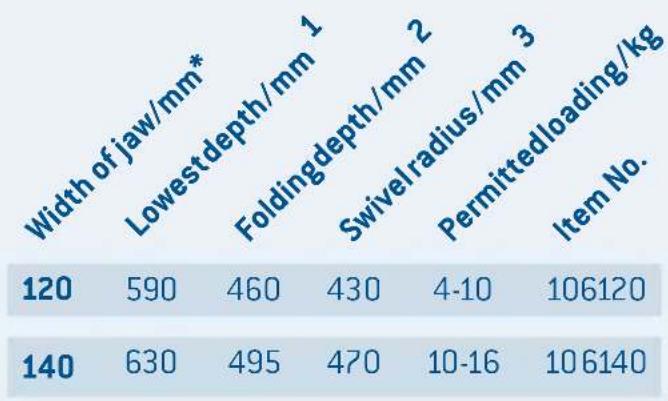
| Item | Width of jaw/mm* | Lowest depth/mm | Folding depth/mm | Swivel radius/mm | Permitted loading/kg | | :--- | :--- | :--- | :--- | :--- | :--- | | 120 | 590 | 460 | 430 | 4-10 | 106120 | | 140 | 630 | 495 | 470 | 10-16 | 106140 |1 From lower edge of workbench plate
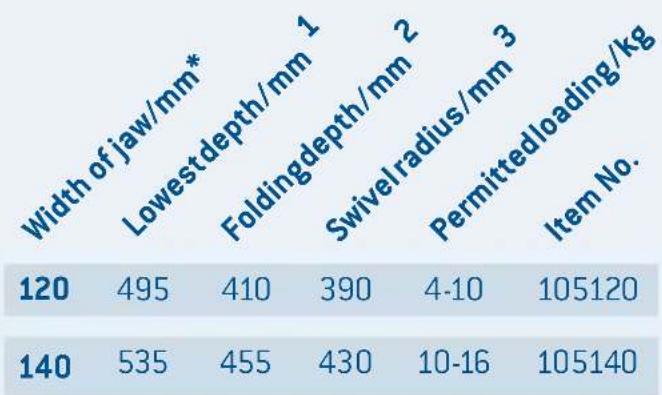
2 From front edge of workbench plate
^3 Around point of rotation (see diagram)
** only the HEUER collapsible-lift
other
| Item | Width of jaw/mm* | Lowest depth/mm 1 | Folding depth/mm 2 | Swivel radius/mm 3 | Permitted loading/kg | | :--- | :--- | :--- | :--- | :--- | :--- | | 120 | 495 | 410 | 390 | 4-10 | 105120 | | 140 | 535 | 455 | 430 | 10-16 | 105140 |* Data refers to HEUER Vices. Also suitable for other makes provided that permitted loading weights are observed. When ordering please do not forget details of make and size.
text_image
HEUER Quicklaunchtext_image
BG-PROFZERT HSM 10016 GS green-GPA Industrial Engineering
text_image
360° 200 mmtext_image
HEUER Quicklaunchel
text_image
HEUER Quicklaunch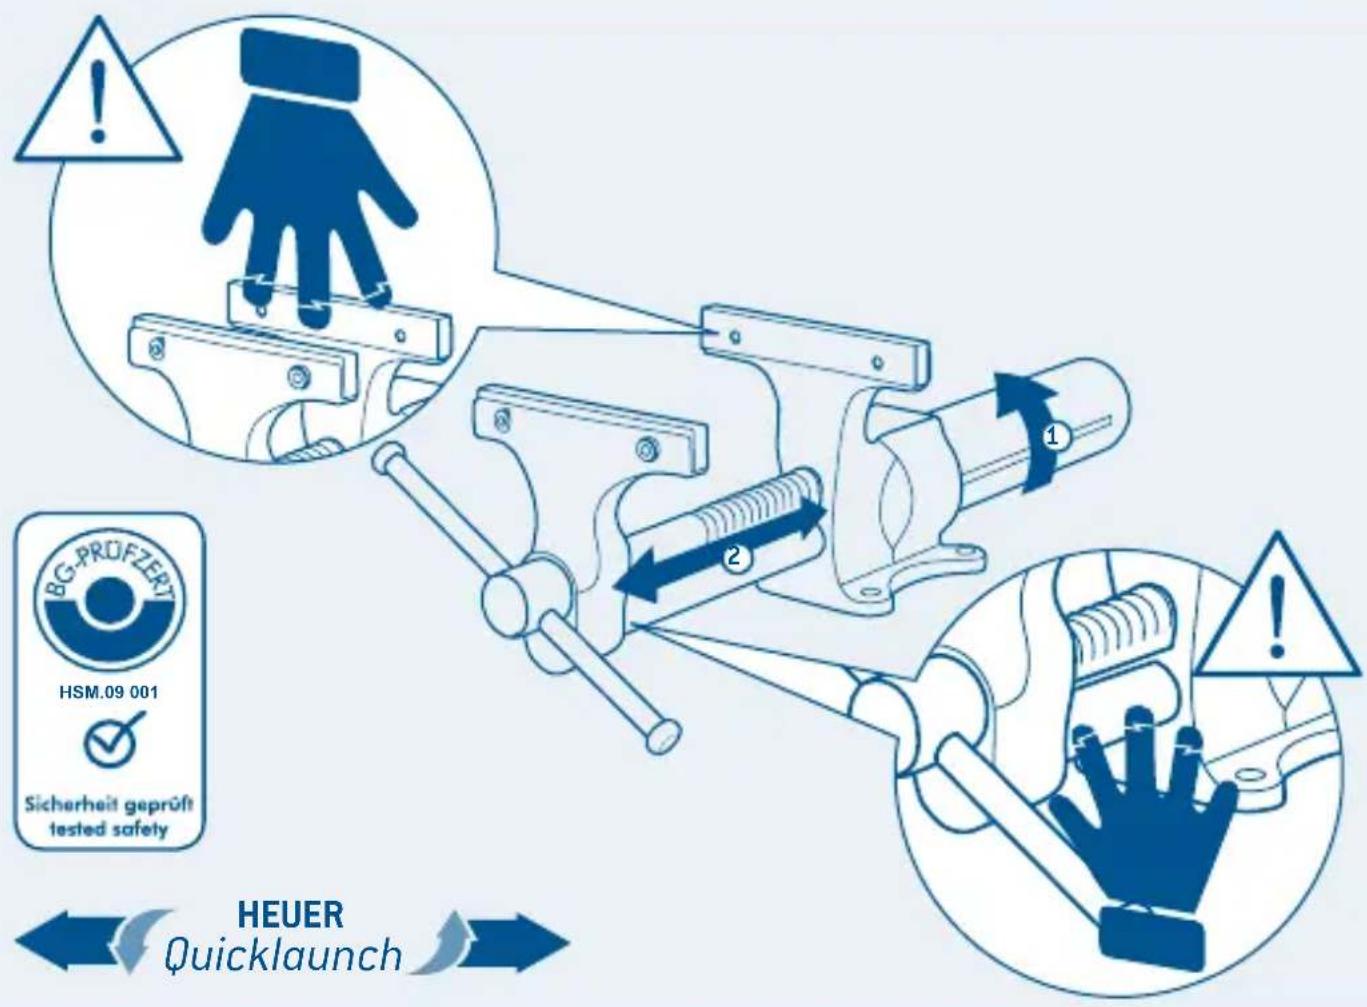
text_image
BG-PRÜFZERT HSM.09 001 Sicherheit geprüft tested safety HEUER Quicklaunchnl
text_image
HEUER QuicklaunchSV
text_image
HEUER Quicklaunch
text_image
HEUER Quicklaunchtext_image
BG-PROFZERT HSM 10016 GS green-GPA Industrial Engineering
text_image
360° 200 mmtext_image
HEUER Quicklaunchtext_image
HEUER Quicklaunchاستبideal القضيب