501-915 - Measuring equipment Klein Tools - Free user manual and instructions
Find the device manual for free 501-915 Klein Tools in PDF.

User questions about 501-915 Klein Tools
0 question about this device. Answer the ones you know or ask your own.
Ask a new question about this device
Download the instructions for your Measuring equipment in PDF format for free! Find your manual 501-915 - Klein Tools and take your electronic device back in hand. On this page are published all the documents necessary for the use of your device. 501-915 by Klein Tools.
USER MANUAL 501-915 Klein Tools
text_image
KLEIN TOOLS® 05/29/2020 07:30 55% CAT4UT VOP 68.3% Pair 1-2 0.0 ft Pair 3-6 0.0 ft Pair 4-5 0.0 ft Pair 7-8 0.0 ft Type Library Home Cable Length MeterCE UK CA
GENERAL SPECIFICATIONS
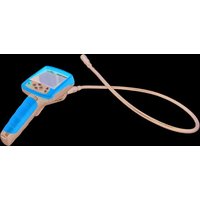
The Klein Tools Cable Length Meter is a portable time domain reflectometer (TDR) cable length meter. It measures cable length, calibrates Velocity of Propagation (VoP) values, finds faults in cables, and provides tone generation for cable tracing.
• Environment: Indoors
- Operating Altitude: 10000 ft. (3050 m)
• Relative Humidity: <90% non-condensing
- Operating Temperature: 32° to 122°F (0° to 50°C)
- Storage Temperature: -4° to 140°F (-20° to 60°C)
- Input Protection: 30V peak 50/60Hz AC or DC
- Common Cable Length Ranges: Coax: 0 to 2000' (0 to 610 m)
Data: 0 to 1500' (0 to 457 m) Electrical: 0 to 1000' (0 to 305 m)
• Measurement Method: Time Domain Reflectometry
• Measurement Units: Feet, meters
• VoP Range: 0 to 99.9%
- Accuracy: ± (2% + 3 ft. or 1 m) with known VoP and consistent cable parameters
- Tone Generation: Constant: 1200Hz, Alternating: 1000/1500 Hz
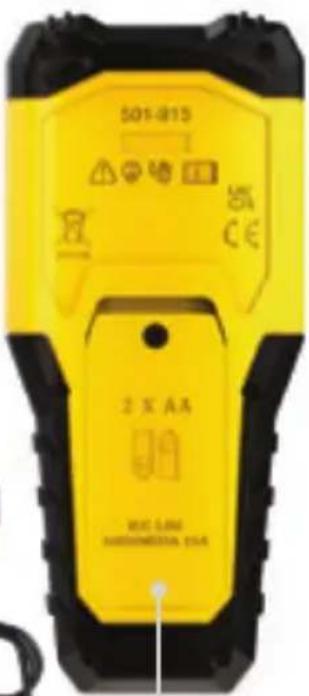
- Batteries: 2× AA alkaline
- Battery Low Level: Approx. 2.2V
- Battery Life: Active: Approx. 15 hours Standby: Approx. 3 years
- Auto Power Off (APO): Test Mode: 5 to 20 minutes (default = 10 min.)
Tone Mode: 60 minutes, not adjustable.
- Dimensions: 6.2" × 2.6" × 1.2" (15.7 × 6.6 × 3.0 cm)
• Weight: 12.0 oz. (340 grams) with batteries
Specifications subject to change.

WARNINGS
To ensure safe operation and service of the meter, follow these instructions. Failure to observe these warnings can result in severe injury or death.
- The Cable Length Meter should NOT be used on energized cabling systems.
- Internal components of the Cable Length Meter are protected up to 30V peak AC or DC. Connecting the meter to voltages above this range may pose a safety hazard to the user and the meter.
SYMBOLS ON METER
 | Warning: Potential for personal injury.Caution: Potential for damage or destruction to equipment. | |||
 | Always wear approved eye protection | Do NOT use on energized circuits  | Read Instructions | |
 | Do not place equipment and its accessories in the trash. Items must be properly disposed of in accordance with local regulations. | |||
 | UKCA - United Kingdom Conformity Assessment |  | Conformité Européenne.Conforms with European Economic Area directives. | [Battery type and orientation |
DEFINITIONS
Velocity of Propogation (VoP)
Velocity of Propagation (VOP) is the speed of an electrical signal traveling through a cable, measured as a percentage of the speed of light
BNC-Connector
A BNC Connector is a common connector for a coax cable, often associated with security systems
Time Domain Refl ectometry (TDR)
TDR technology, is a technology that uses VoP values to accurately measure cable lengths
FEATURE DETAILS
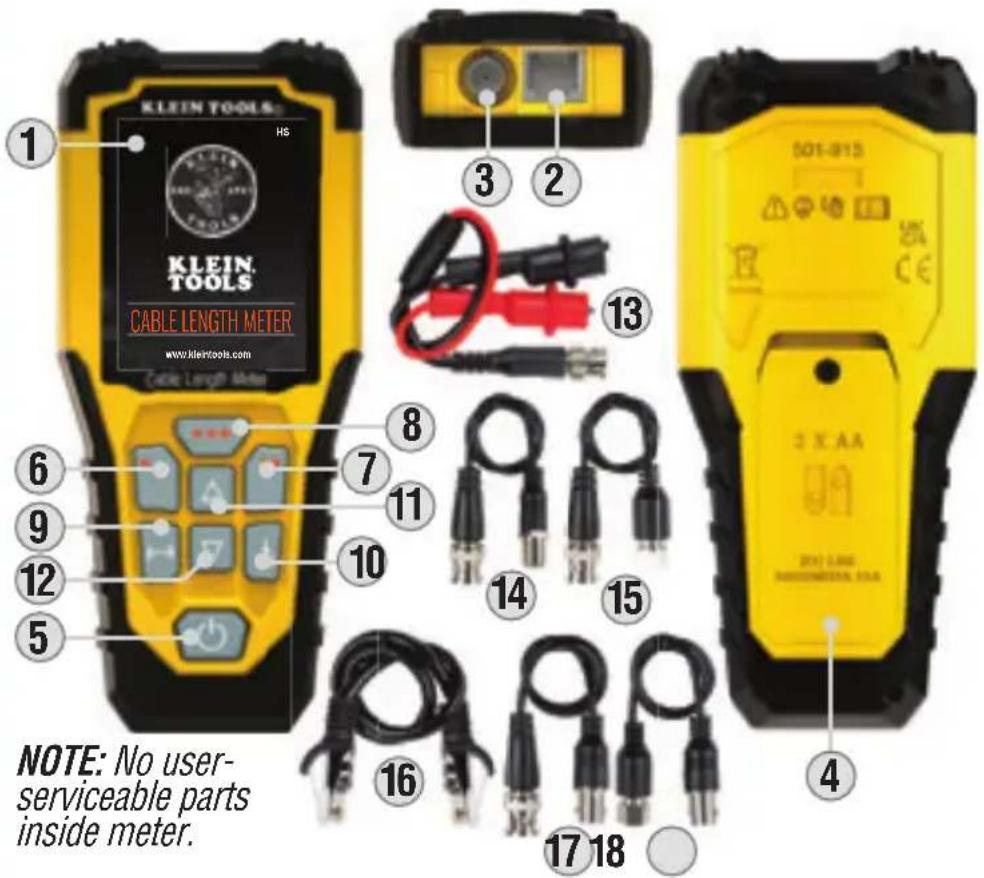
Front of Meter Back of MeterTop of Meter
text_image
KLEIN TOOLS CABLE LENGTH METER www.kleintools.com Cable Length Meter 1 2 3 4 5 6 7 8 9 10 11 12 13 14 15 16 17 18 NOTE: No user- serviceable parts inside meter. 501-0115 2 X AA 2012.2.2000 NAOHAWARDA SA- LCD Screen
- RJ45 Port
- BNC Port
- Battery Cover
- Power Button
- "One Dot" Button: Select, Library, Right Arrow
-
"Two Dot" Button: More, Edit, Cancel, No, On/Off
-
"Three Dot" Button - Type, Return, Home, Left Arrow, Yes
- Test Button
- Save Button
- Arrow Up Button
- Arrow Down Button
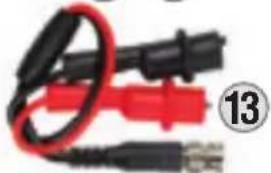
- Male Coax-BNC to Alligator Clips
- Male Coax-BNC to Female Coax-F
- Male Coax-BNC to Male Coax-F
- CAT-6 RJ45 to CAT-6 RJ45
- Female Coax-BNC to Male Coax-BNC
- Female Coax-BNC to Male Coax-F
OPERATING INSTRUCTIONS
POWERING ON/OFF
Power ON: Press the Power Button 5 to turn the unit on.
Power OFF: Press the Power Button 5 for two seconds to turn the unit off. NOTE: Screen will display "Powering Off, Saving Data" while it powers down.
Auto Power-OFF (APO): The Meter will automatically turn off after a period of inactivity in order to conserve battery power. The time until auto power off depends on which mode the unit is in:
Test Mode: User-adjustable from 5 to 20 minutes (default is 10 minutes).
Tone Mode: 60 minutes, not adjustable.
In either mode, the screen will dim after 1 minute of inactivity to conserve battery power.
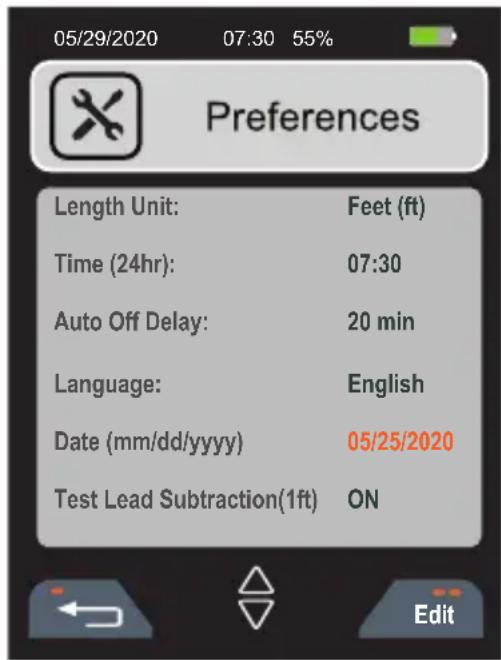
SETTING PREFERENCES
Editable preferences include: Length Display (feet or meters), Time, Auto Power-Off, Language (English, German, French, Spanish), Date, and Test Lead Length Subtraction (when using the included test leads).
- Press the Power button ⑤ to power-ON the meter.
- Press the "More" button (two dots) ⑦. The "Preferences" option will be highlighted.
- Press the "Select" button (three dots) 8.
- Use the Up 11 and Down 12 Arrow buttons to highlight the field you wish to edit. The
- Press the "Edit" button (two dots) ⑦.
- Use the Up 11 and Down 12 Arrow buttons to make changes. NOTE: When setting the time or date, use the Right (one dot) 6 and Left (three dots) 8 arrow buttons to select the parameter you wish to edit (i.e. hour/minute, month/day/year).
- Press the Save button 10 to save any changes.
- Press "Return" button (one dot) ⑥ to return to previous screen to perform testing.
NOTE: Turn ON the "Test Lead Subtraction" when using the included test leads.
NOTE: If changes to clock fail to save, an internal battery needs to be replaced. This is a separate battery from the AA batteries that power the unit and is NOT user-servicable. DO NOT attempt to replace. Contact Klein Tools at 1-800-553-4676 or customerservice@kleintools.com for further details.
text_image
05/29/2020 07:30 55% Preferences Length Unit: Feet (ft) Time (24hr): 07:30 Auto Off Delay: 20 min Language: English Date (mm/dd/yyyy) 05/25/2020 Test Lead Subtraction(1ft) ON EditOPERATING INSTRUCTIONS
MEASURING CABLES
⚠️ Important Safety Information
- The cable to be tested should be evaluated for the presence of voltage with a voltage measurement device by a qualified professional before beginning work with the Cable Length Meter. The cable should be disconnected from any voltage source before beginning work.
- The Cable Length Meter should NOT be used on energized cable systems.
NOTE: It is important that the included accessories be used correctly in order to ensure quick and accurate testing. The length of the included test leads is automatically excluded from the length measurement. If alternate test leads are used, the length must be manually deducted from the length displayed on the Cable Length Meter. See SETTING PREFERENCES section to disable this option.
Measuring Coax Cable
-
The cable to be tested can be terminated with a Coaxial BNC connector or BNC to F test lead, or BNC to F adapter or BNC to alligator clips lead. Connect the cable to be tested to the BNC port on the top of the Cable Length Meter by inserting the connector into the port and turning a quarter turn clockwise to lock in place. The opposite end of the cable to be tested should be left unterminated OR terminated but left unconnected.
-
Press the Power button ⑤ to power-ON the meter.
-
Use the Up 11 and Down 12 Arrow buttons to highlight the Coaxial option and press the "Select" key (three dots) 8.
-
Press the "Library" button (three dots) ⑧ to display stored cable manufacturers and styles. Use the Up ⑪ and Down ⑫ Arrow buttons to highlight the desired selection, and press the "Select" button (three dots) ⑧. NOTE: If the cable you are measuring is not in the library, refer to the Changing VoP Value / Adding New Cable Information section.
-
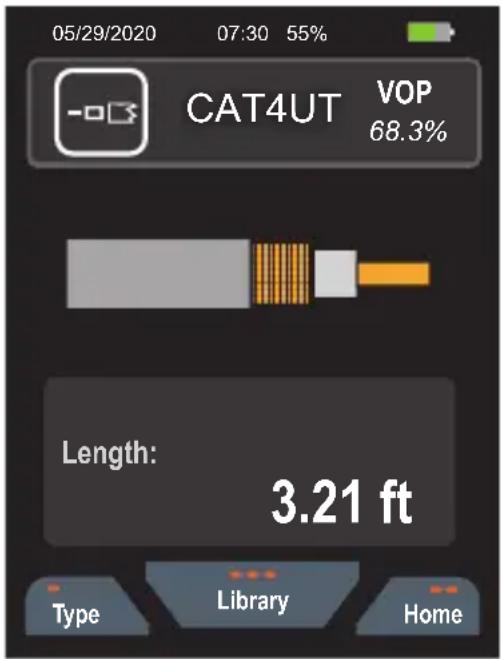
Press the Test Button 9 to measure the length of the cable. NOTE: Turn ON the "Test Lead Subtraction" when using the included test leads.
text_image
05/29/2020 07:30 55% CAT4UT VOP 68.3% Length: 3.21 ft Type Library HomeOPERATING INSTRUCTIONS
- To edit Library entries, use the Up 11 and Down 12 Arrow buttons to highlight the desired selection and press the "Edit" button (two dots) 7 to enter the cable information screen. Again, use the Up 11 and Down 12 Arrow buttons to highlight the desired field and press the "Edit" button (two dots) 7. Use the "Left Arrow" (one dot) 6 and "Right Arrow" (three dots) 8 buttons to move the cursor to the desired location and then use the Up 11 and Down 12 Arrow buttons to select the desired character. Press the Save button 10 to save the change or press the "Cancel" button (two dots) 7 to discard changes. Use the Up 11 and Down 12 Arrow buttons to select additional fields or press the "Go Back" button (one dot) 6 to return to the Library.
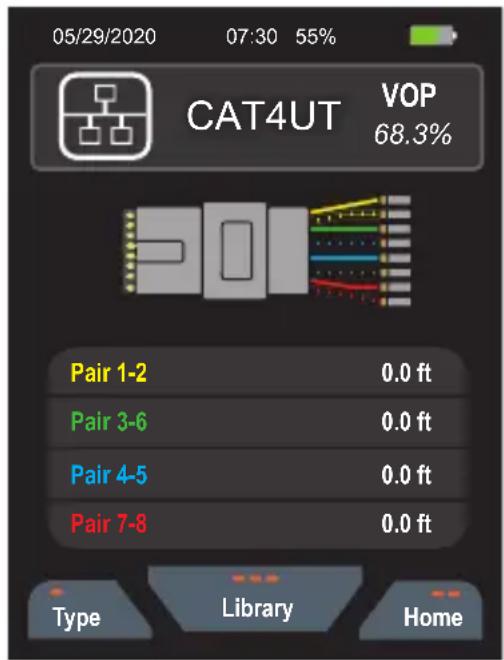
Measuring Twisted Pair (Category, Twisted Pair, Data) Cable
-
The cable to be measured must be terminated with an RJ45 plug on the end that will be attached to the Cable Length Meter. The opposite end of the cable to be tested should be left unterminated, or may be terminated with an RJ45 plug or jack, but left unconnected.
-
Insert the RJ45 plug into the RJ45 port ② in the Cable Length Meter.
-
Press the Power button ⑤ to power-ON the meter.
-
Use the Up 11 and Down 12
text_image
05/29/2020 07:30 55% CAT4UT VOP 68.3% Pair 1-2 0.0 ft Pair 3-6 0.0 ft Pair 4-5 0.0 ft Pair 7-8 0.0 ft Type Library HomeArrow buttons to highlight the Data Cable option and press the "Select" button (three dots) 8. The default Data cable choice will appear on the screen.
-
Press the "Library" button (three dots) ⑧ to display stored cable manufacturers and styles. Use the Up ⑪ and Down ⑫ Arrow buttons to highlight the desired selection, and press the "Select" button (three dots) ⑧. NOTE: If the cable you are measuring is not in the library, refer to the Changing VoP Value / Adding New Cable Information section.
-
To edit Library entries, use the Up 11 and Down 12 Arrow buttons to highlight the desired selection and press the "Edit" button (two dots) 7 to enter the cable information screen. Again, use the Up 11 and Down 12 Arrow buttons to highlight the desired field and press the "Edit" button (two dots) 7. Use the "Left Arrow" (one dot) 6 and "Right Arrow" (three dots) 8 buttons to move the cursor to the desired location, then use the Up 11 and Down 12 Arrow buttons to select the desired character. Press the Save button 10 to save the change or press the "Cancel" button (two dots) 7 to discard changes. Use the Up 11 and Down 12 Arrow buttons to select additional fields or press the "Go Back" button (one dot) 6 to return to the Library.
-
Press the Test Button 9 to measure the length of the cable. NOTE: Turn ON the "Test Lead Subtraction" when using the included test leads.
OPERATING INSTRUCTIONS
Measuring Length to Short Faults (Category, Twisted Pair, Data Cable)
- While measuring a twisted pair cable, if there is a short between twisted pin pairs (i.e. a short between wires 1-2, 3-6, 4-5 or 7-8), the tester will display "SHORT", with the distance to the short location.
- If there is a short between two even numbered wires (i.e. a short between wires 2, 4, 6, or 8), the tester will display "SHORT", but distance cannot be measured
- If there is a short between two odd numbered wires (i.e. a short between wires 1, 3, 5, or 7), the tester cannot detect a short
- If there is a short between an even and an odd numbered wire that is not a twisted pin pair (for example, a short between wires 1 and 4), the tester will display "SHORT", and the distance to the short location for the even wire only
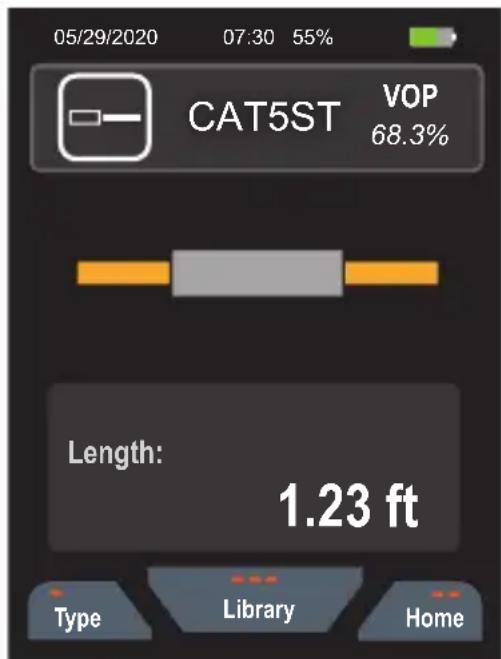
Measuring Two Conductor and Other Cable
- Connect the BNC-to-Alligator Clips test cable 13 to the BNC port on the top of the Cable length Meter.
- The cable to be measured should have a pair of exposed conductors that run side-by-side (this includes inner pairs on twisted pair cable). The opposite end of the cable to be tested should be left open (unconnected).
- Securely attach the alligator clips to the two exposed conductors of the cable to be tested.
- Press the Power button ⑤ to power-ON the meter.
- Use the Up 11 and Down 12 Arrow buttons to highlight "Other"
text_image
05/29/2020 07:30 55% CAT5ST VOP 68.3% Length: 1.23 ft Type Library Homeand press the "Select" button (three dots) 8. The default cable choice will appear on the screen. NOTE: If the cable you are measuring is not in the library, refer to the Changing VoP Value / Adding New Cable Information section.
- Use the "Library" button (three dots) ⑧ to select a different cable manufacturer or style with the correct VoP. The VoP value is displayed on the screen in the top description. NOTE: If the cable you are measuring is not in the library, refer to the section on calculating VoP.
- Press the Test Button ⑨ to measure the length of the cable. NOTE: Turn ON the "Test Lead Subtraction" when using the included test leads.
- To edit Library entries, use the Up 11 and Down 12 Arrow buttons to highlight the desired selection and press the "Edit" button (two dots) 7 to enter the cable information screen. Again, use the Up 11 and Down 12 Arrow buttons to highlight the desired field and press the "Edit" button (two dots) 7. Use the "Left Arrow" (one dot) 6 and "Right Arrow" (three dots) 8 buttons to move the cursor to the desired location and then use the Up 11 and Down 12 Arrow buttons to select the desired character. Press the Save button 10 to save the change or press the "Cancel" button (two dots) 7 to discard changes. Use the Up 11 and Down 12 Arrow buttons to select additional fields or press the back button (one dot) 6 to return to the Library.
OPERATING INSTRUCTIONS
Measuring Length to Short Faults (cables with 3 or more conductor wires)
While measuring a cable with 3 or more conductors, to accurately identify which wires are shorted and the distance to the short location, multiple measurements of different wire combinations should be measured. For example, if measuring NM 14/2 electrical cable, the steps for testing are as follows:
- Set up the tester as outlined in the MEASURING TWO CONDUCTOR AND OTHER CABLE section on previous page.
- Connect the HOT and NEUTRAL wires to the red alligator clip, and the GROUND wire to the black alligator clip. If "SHORT" is displayed, at least one of the HOT and NEUTRAL wires is shorted with GROUND. If "SHORT" is not displayed, there is no short between HOT or NEUTRAL and GROUND.
- Connect the HOT and GROUND wires to the red alligator clip, and the NEUTRAL wire to the black alligator clip. Similarly, if "SHORT" is displayed, at least one of the HOT and GROUND wires is shorted with NEUTAL. If "SHORT" is not displayed, there is no short between HOT or GROUND and NEUTRAL.
- Connect the NEUTRAL and GROUND wires to the red alligator clip, and the HOT wire to the black alligator clip. Similarly, if "SHORT" is displayed, at least one of the NEUTRAL and GROUND wires is shorted with HOT. If "SHORT" is not displayed, there is no short between NEUTRAL or GROUND and HOT.
OPERATING INSTRUCTIONS
Changing VoP Value / Adding New Cable Information
Always verify that the VoP of the cable you are measuring is stored in the Cable Length Meter. If it is not, check the cable box for the information or check the manufacturer's website. If the VoP can not be located, a value can be found using a known length of the cable in question (see Obtaining VoP Values section).
- Press the Power button ⑤ to power-ON the meter.
- Use the Up 11 and Down 12 Arrow buttons to highlight the cable type to be measured and press the "Select" button (three dots) 8.
- Press the the "Library" button (three dots) ⑧ and use the Up ⑪ and Down ⑫ Arrow buttons to highlight the row to be corrected. At the end of the list, "Add New" allows you to add a new cable without changing any of the existing default known cable values.
- Press the "Edit" button (two dots) 7.
- Use the Up 11 and Down 12 Arrow buttons to highlight the VoP and press the "Edit" button (two dots) 7.
- Use the "Left Arrow" (one dot) ⑥ and "Right Arrow" (three dots) ⑧ to highlight the numbers to be changed, and use the Up ⑪ and Down ⑫ Arrow buttons to increase or decrease the numbers until they display the value you have obtained.
- Enter/edit the Name, Manufacturer, and Impedance values as needed.
- Press the Save button 10 to save changes. "Save successful" will display on the screen.
- Press the "Return" button (three dots) ⑧ to return to testing.
Obtaining VoP Values
There are three ways to obtain VoP values for a cable:
- VoP values for the most common cable types are included in the Cable Length Meter. They can be estimated based on these values or using the chart on page 11.
- The VoP can usually be obtained by checking the cable specifications or contacting the manufacturer.
- The VoP can be found using a known length of the cable that will be used during testing (see Determining an Unknown VoP Value section).

text_image
05/29/2020 07:30 55% VOP Cable Must Be Connected Type: Coax Pair: 1 VOP: 70% Length: 5 Name: Manufacturer: CancelOPERATING INSTRUCTIONS
Determining an Unknown VoP Value
Follow these instructions to set the Length Constant based on a sample cable of known length. The Cable Length Meter can calculate a VoP from a test cable length of 25 to 1000 ft. (10 to 300 m). Longer cable lengths will give more accurate results. It is recommended to use at least 50' (20 m).
- Prepare a length of the same type of cable for which you need to determine the VoP.
- Determine the actual length of the test cable length using the markings on the cable, a tape measure, laser distance meter, etc.
- Connect the test cable length to the Cable Length Meter as described in "MEASURING CABLES" section.
- Press the Power button 5 to power-ON the meter.
- Press the "More" button (two dots) ⑦.
- Use the Up 11 and Down 12 Arrow buttons to highlight "Calibrate VoP/Length" and press the "Select button" (three dots) 8.
- Press the "Select" button (three dots) 8
- Press the "Edit" button (two dots) 7 and use the Up 11 and Down 12 Arrow buttons to select the cable type to be edited, and press the "Save" button 10.
- If testing data cable, use the Up 11 and Down 12 Arrow buttons to select the wire pair to be used for the test. Press the "Edit" button (two dots) 7 to change the pin pairs, then press the Save button 10 to complete the change. NOTE: For all other cable types, skip this step.
- Use the Up 11 and Down 12 Arrow buttons to select the VoP percentage value. Press the "Edit" button (two dots) 7 and the first digit will blink, indicating that is able to be changed. Change the VoP percentage value by using the Up 11, Down 12, Left (three dots) 9, and Right (one dot) 7 Arrow buttons until the value for the Length is the correct value, then press the Save button 10 to complete the change.
- Use the Up 11 and Down 12 Arrow buttons to select the Name and Manufacturer selections. Press the "Edit" button (two dots) 7 to create a name and assign a manufacturer to the new known VoP, then press the Save button 10 to complete the change.
Toning Data Cable
- Insert RJ45 cable into RJ45 Port ② or use Alligator Clips ⑬ to connect to wires in cable to be toned.
- Press the Power button 5 to power-ON the meter.
- Use the Up 11 and Down 12 Arrow buttons to select "Tone".
- Press the "Select" button (three dots) 8
- Use the Up 11 and Down 12 Arrow buttons to select "Data" and press the "Select" button (three dots) 8.
- Toning will default to "OFF" for each of the pairs. Use the Up 11 and Down 12 Arrow buttons to select the desired pair(s) and press the "Edit" button (two dots) 7 to scroll through OFF, 1200, 1000/1500Hz warble for each pair (multiple pairs can be toned at the same time by selecting a tone frequency for each pair to be tested).
- With toning turned on, use the Up 11 and Down 12 Arrow buttons to select 1200Hz or 1000/1500 Hz warble for each pair (multiple pairs can have tone enabled simultaneously; select desired tone frequency as described above).
Toning Coax and Other Cable
- Press the Power button 5 to power-ON the meter.
- Use the Up 11 and Down 12 Arrow buttons to select "Tone".
- Press the "Select" button (three dots) 8
- Use the Up 11 and Down 12 Arrow buttons to select "Coaxial" or "Other", and press the "Select" button (three dots) 8.
- Toning will default to "OFF". Press the "Edit" button (two dots) ⑦ to scroll through OFF, 1200Hz or 1000/1500 Hz warble.
OPERATING INSTRUCTIONS
PRE-LOADED CABLE VALUES
| CABLE TYPE | 6-DIGIT NAME | NVP | MANUFACTURER | 6-DIGIT MFG | |
| COAXIAL CABLE | |||||
 | CNT-195 CNT195 75.0 Comm scope COMSCP | ||||
| RG58 RG58 66.0 Belden BELDEN | |||||
| RG59 RG59 66.0 Belden BELDEN | |||||
| RG59 RG59 78.0 Southwire STHWRE | |||||
| RG6/U RG6 82.0 Belden BELDEN | |||||
| RG6/U RG6 80.0 Southwire STHWRE | |||||
| RG6/U RG6 82.0 Commscope COMSCP | |||||
| RG6 Quad Shield RG6Q 83.0 Belden BELDEN | |||||
| RG6 Quad Shield RG6Q 84.0 Commscope COMSCP | |||||
| RG11 RG11 82.0 Commscope COMSCP | |||||
| PHONE CABLE | |||||
 | CAT3 4-Pair CAT3 67.3 Southwire STHWRE | ||||
| CAT3 25,50,100 pair | CAT3 | 69.0 | Panduit | PNDUIT | |
| 24/25 Pair CAT3 | CAT3 | 64.0 | Commscope COMSCP | ||
| DATA CABLE | |||||
 | CAT5 | CAT5 | 75.0 | Farnell FRNELL | |
| CAT5e CMR | CAT5ER | 70.0 | Hitachi HTACHI | ||
| CAT5e CMP | CAT5EP | 68.0 | Hitachi HTACHI | ||
| CAT5e U/UTP | CAT5E | 70.0 | Mayflex | MAYFLX | |
| CAT5e CMP | CAT5EP | 66.0 | Panduit | PNDUIT | |
| CAT5e CMR | CAT5ER | 70.0 | Panduit | PNDUIT | |
| CAT5e | CAT5E | 73.1 | Commscope | COMSCP | |
| 24/25 Pair CAT5e | CAT5E | 71.0 | Commscope | COMSCP | |
| CAT6 F/UTP | CAT6 F | 70.0 | Hitachi | HTACHI | |
| CAT6 U/UTP | CAT6 | 65.0 | Panduit | PNDUIT | |
| CAT6 | CAT6 | 69.0 | Commscope | COMSCP | |
| CAT6 CMP CAT6 P 72.0 | Panduit | PNDUIT | |||
| CAT6 CMR | CAT6_R | 70.0 | Panduit | PNDUIT | |
| CAT6 | CAT6 | 65.0 | Panduit | PNDUIT | |
| CAT6 CMR | CAT6_R | 68.0 | Nextspeed | NXTSPD | |
| CAT6 CMP CAT6 P 70.0 | Nextspeed | NXTSPD | |||
| CAT6A | CAT6A | 64.0 | Belden | BELDEN | |
| CAT6A LSZH | CAT6A | 65.0 | Panduit | PNDUIT | |
| CAT6A CMR | CAT6AR | 70.0 | Panduit | PNDUIT | |
| CAT6A CMR | CAT6AR | 68.0 | Hitachi | HTACHI | |
| CAT6A CMP | CAT6AP | 70.0 | Hitachi | HTACHI | |
| CAT6A | CAT6A | 64.0 | Commscope | COMSCP | |
| CAT6E CMP | CAT6EP | 70.0 | Nextspeed | NXTSPD | |
| ELECTRICAL CABLE | |||||
 | 10/2 NM Coiled | 10/2_C | 68.8 | Southwire STHWRE | |
| 10/2 NM Uncoiled | 10/2_U | 71.2 | Southwire | STHWRE | |
| 12/2 NM Coiled | 12/2_C | 67.1 | Southwire STHWRE | ||
| 12/2 NM Uncoiled | 12/2_U | 73.2 | Southwire | STHWRE | |
| 12/3 NM Coiled | 12/3_C | 63.7 | Southwire STHWRE | ||
| 12/3 NM Uncoiled | 12/3_U | 70.6 | Southwire | STHWRE | |
| 12/3 NM Twisted Coiled | 12/3TC | 68.4 | Southwire | STHWRE | |
| 12/3 NM Twisted Uncoiled | 12/3TU | 68.4 | Southwire | STHWRE | |
| 14/2 NM Coiled | 14/2_C | 66.4 | Southwire STHWRE | ||
| 14/2 NM Uncoiled | 14/2_U | 71.9 | Southwire | STHWRE | |
| 14/3 NM Uncoiled | 14/3_U | 68.6 | Southwire | STHWRE | |
| SECURITY CABLE | |||||
 | 12/2 Fire | 12/2_F | 59.9 | Southwire STHWRE | |
| 16/2 Fire | 16/2_F | 65.9 | Southwire STHWRE | ||
| 18/4 Fire | 18/4_F | 60.4 | Southwire STHWRE | ||
| 18/6 Fire | 18/6_F | 61.6 | Southwire STHWRE | ||
| 14/2 Audio Cable | 14/2_A | 71.0 | Southwire STHWRE | ||
| OTHER CABLE | |||||
 | CAT5e | CAT5E | 73.1 | Commscope | COMSCP |
| CAT6 | CAT6 | 69.0 | Commscope | COMSCP | |
| CAT6A | CAT6A | 64.0 | Commscope | COMSCP | |
| CAT6A | CAT6A | 64.0 | Belden | BELDEN | |
| RG59 RG59 66.0 Belden BELDEN | |||||
| RG6/U RG6 82.0 Belden BELDEN | |||||
| RG7 | RG7 85 | 0 Belden BELDEN | |||
| RG11 RG11 82.0 Commscope COMSCP | |||||
BATTERY REPLACEMENT
- Loosen screw in Battery Cover ⑤ with #2 Phillips screwdriver and remove Battery Cover. NOTE: Screw is not removable from Battery Cover.
- Remove and recycle exhausted batteries.
- Install two new AA alkaline batteries into battery compartment, observing polarity marked inside case.
- Replace battery door and fasten screw. DO NOT OVERTIGHTEN.
CLEANING
Be sure meter is turned off and wipe with a clean, dry lint-free cloth. Do not use abrasive cleaners or solvents.
STORAGE
Remove the batteries when meter is not in use for a prolonged period of time. Do not expose to high temperatures or humidity. After a period of storage in extreme conditions exceeding the limits mentioned in the Specifications section, allow the meter to return to normal operating conditions before using.
WARRANTY
See this product's page at www.kleintools.com for FCC compliance information.
Canada ICES-003 (B) / NMB-003 (B)
DISPOSAL / RECYCLE
Do not place equipment and its accessories in the trash. Items must be properly disposed of in accordance with local regulations. Please see www.epa.gov/recycle for additional information.
CUSTOMER SERVICE
KLEIN TOOLS, INC.
450 Bond Street Lincolnshire, IL 60069 1-800-553-4676
customerservice@kleintools.com www.kleintools.com
ESPAÑOL
501-915
natural_image
Close-up of a yellow and black electronic device with two buttons (no visible text or symbols)3 2
natural_image
Close-up of black and red electrical clamps with a red ring, no visible text or symbols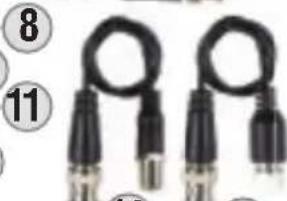
natural_image
Two black audio/video cables with metallic connectors, no visible text or symbols14 15
text_image
501-815 2 X AA WIC LIME MINTONOMESTA 2014natural_image
Coiled black cable with connector connectors, labeled with number 16 (no text or symbols on the cable itself)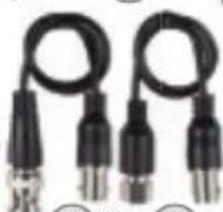
natural_image
Two black cable connectors with metallic pins, no visible text or symbols17 18