
ZV-1 II - Camera SONY - Free user manual and instructions
Find the device manual for free ZV-1 II SONY in PDF.
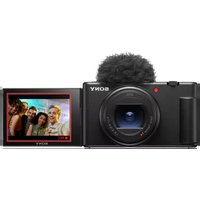


| Device Type | Compact Digital Camera |
| Brand | Sony |
| Model | ZV-1 II |
| Sensor | 1.0-type CMOS, 20.1 effective megapixels |
| Shooting Modes | Photos, movies, slow/quick motion |
| Video Recording | Up to 4K |
| Microphone | Built-in with supplied wind screen |
| Connections | USB Type-C, Wi-Fi, Bluetooth |
| Storage | SD / Memory Stick media |
| Battery | NP-BX1 rechargeable, 3.6 V |
| Power Supply | Via USB AC adapter or battery |
| Dimensions (W x H x D) | 105.5 x 60.0 x 46.7 mm |
| Weight | 292 g (with battery and media) |
| Operating Temperature | 0 to 40 °C |
| Supplied Accessories | Camera, NP-BX1 battery, wind screen with adapter, startup guide, reference guide |
| Cleaning | Use a dry cloth for the lens and screen |
| Safety | Do not expose the lens to sunlight, avoid shocks, do not use near medical devices, risk of low temperature burns with prolonged use |
| Repairability | Removable battery, removable memory card |
Frequently Asked Questions - ZV-1 II SONY
User questions about ZV-1 II SONY
0 question about this device. Answer the ones you know or ask your own.
Ask a new question about this device
Download the instructions for your Camera in PDF format for free! Find your manual ZV-1 II - SONY and take your electronic device back in hand. On this page are published all the documents necessary for the use of your device. ZV-1 II by SONY.
USER MANUAL ZV-1 II SONY
https://www.sony.net/SonyInfo/Support/
©2023 Sony Corporation
Printed in China
5049601810
SONY®
5-049-601-81(1)
ZV-1M2
"Help Guide" (Web manual)
Refer to "Help Guide" for in-depth instructions on the many functions of the camera.
https://rd1.sony.net/help/dc/2310/h_zz/
| Digital Camera / Startup Guide | EN |
| Appareil Numérique / Guide de démarrage | FR |
| Cámara Digital / Guía de inicio | ES |
| Fotocamera digitale / Guida di avvio | IT |
| Câmara Digital / Guia de início PT | |
| Digitalkamera / Einführungsanleitung DE | |
| Digitale camera / Beknopte gids NL | |
| Aparat cyfrowy / Przewodnik uruchamiania PL | |
| Digitální fotoaparát / Počáteční instrukce CZ | |
| Digitális fényképezőgép / Használatbavételi útmutató HU | |
| Digitálny fotoaparát / Návod na spustenie SK | |
| Цифровая камера / Руководство по началу работы RU | |
| Цифрова камера /Посібник із початку роботи UA | |
| Digitalkamera / Startguide SE | |
| Digitaalikamera / Aloitusopas FI | |
| Digitalkamera / Startveiledning NO | |
| Digitalkamera / Startvejledning DK |
ZV-1M2
About the "Help Guide"
For detailed instructions on using the camera, refer to the "Help Guide" (web manual). https://rd1.sony.net/help/dc/2310/h_zz/
ZV-1M2 Help Guide

Preparations
Checking the supplied items
The number in parentheses indicates the number of pieces.
- Camera (1)
- Rechargeable battery pack NP-BX1 (1) • Wind screen (1) (attached to the wind screen adaptor)
• Wind screen adaptor (1) - Startup Guide (this manual) (1) • Reference Guide (1)
Inserting the battery pack (supplied)/memory card (sold separately) into the camera
Open the battery/memory card cover, and insert the battery pack and a memory card into the camera. Then, close the cover.
Insert the battery pack while pressing the lock lever.
Ensure the notched corner faces correctly.
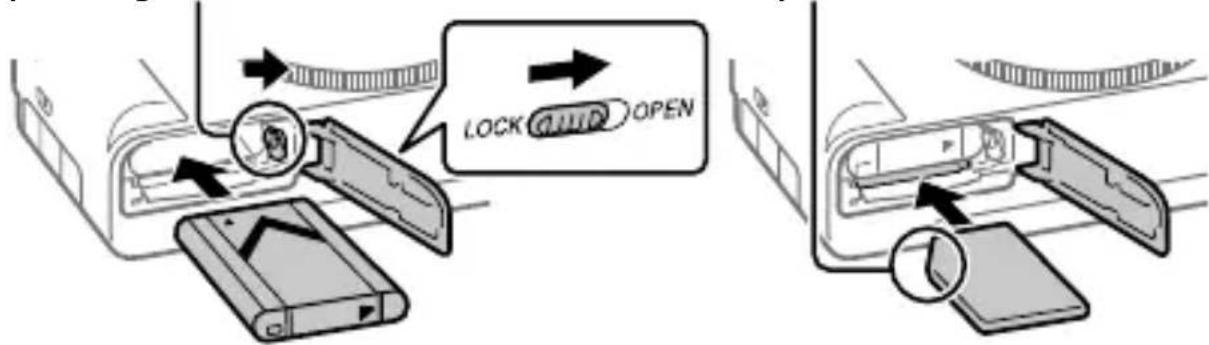
EN
This camera is compatible with SD memory cards or Memory Stick media.
When you use a memory card with this camera for the first time, format the card using the camera in order to stabilize the performance of the memory card.
Charging the battery pack
Charge lamp
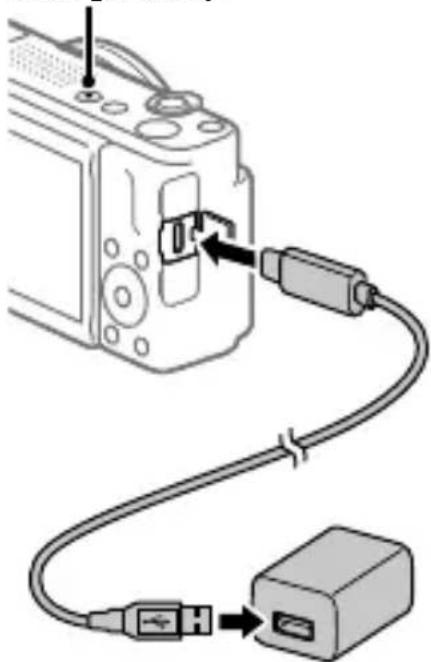
① Turn the power off.
- If the camera is turned on, the battery pack will not be charged.
② Using a commercially available USB Type-C cable, connect the USB Type-C terminal on the camera to an external power source, such as a commercially available USB AC adapter or mobile battery.
- The charge lamp will light up when charging starts. When the charge lamp turns off, charging is completed.
Performing initial setup for the camera
By establishing a Bluetooth connection (pairing) between the camera and a smartphone, you can perform initial camera setup such as date and time settings from the smartphone. Install the dedicated application on your smartphone in advance, and then follow steps ① to ④ under “Procedures for initial camera setup.”
Installing the dedicated smartphone application
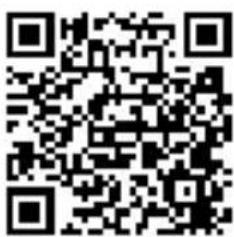
Install the application from the following website. Also, update to the latest version of the dedicated application. The specifications of the dedicated application may change without notice. https://www.sony.net/ca/
Procedures for initial camera setup
ON/OFF (Power) button
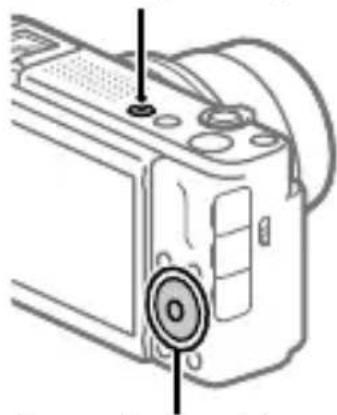
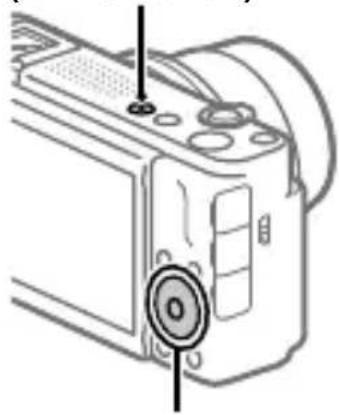
Control wheel/center button
① Press the ON/OFF (Power) button to turn on the camera. ② Select the desired language and then press the center of the control wheel.
- The privacy notice screen will appear. Read the privacy notice regarding biometrics by opening the link using your smartphone, etc.
③ Press the center of the control wheel. ④ Follow the instructions on the camera screen to connect the camera with your smartphone and perform the initial setup.
- You can also configure or change the initial settings later from the MENU of the camera.
Connecting (pairing) the camera with your smartphone later
For details on the connection method, refer to the following Help Guide URL:
https://rd1.sony.net/help/dc/2310_pairing/h_zz/
Shooting movies
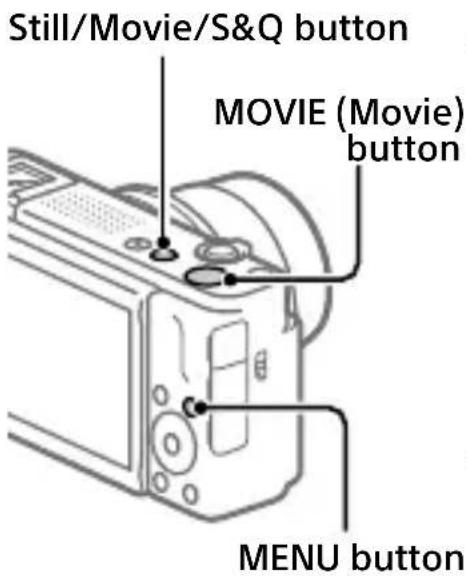
1. Press the Still/Movie/S&Q button to select the movie recording mode.
• Each time you press the button, the shooting mode switches in the order of still image shooting mode, movie recording mode, and slow-motion/quick-motion shooting mode.
2. Press the MENU button and select (Shooting) → [Shooting Mode] → [Shoot Mode] → the desired shooting mode. 3. Press the MOVIE (Movie) button to start recording. 4. Press the MOVIE (Movie) button again to stop recording.
Using the wind screen (supplied)
Wind screen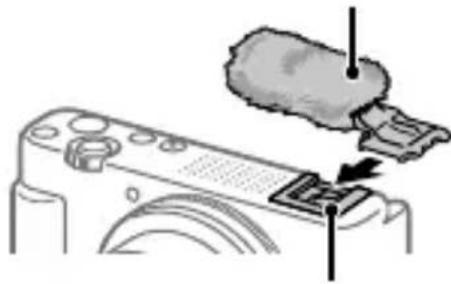
Multi Interface Shoe
Use the wind screen to reduce wind noise picked up by the internal microphone when recording a movie. Attach the wind screen to the Multi Interface Shoe.
Notes on use
Refer to "Precautions" in the "Help Guide" as well.
Notes on handling the product
- Do not leave the lens exposed to a strong light source such as sunlight. Because of the lens's condensing function, doing so may cause smoke, fire, or a malfunction inside the camera body or the lens.
- If sunlight or other strong light enters the camera through the lens, it may focus inside the camera and cause smoke or fire. When shooting with backlighting, keep the sun sufficiently far away from the angle of view. Even if it is slightly away from the angle of view, smoke or fire may still occur.
- This camera (including accessories) has magnet(s) which may interfere with pacemakers, programmable shunt valves for hydrocephalus treatment, or other medical devices. Do not place this camera close to persons who use such medical devices. Consult your doctor before using this camera if you use any such medical device.
- Increase the volume gradually. Sudden loud noises can damage your ears.
- Do not leave the camera, the supplied accessories, or memory cards within the reach of infants. They may be accidentally swallowed. If this occurs, consult a doctor immediately.
- If the monitor is damaged, stop using the camera immediately. The damaged parts may harm your hands, face, etc.
- When shooting still images continuously, the monitor may flash between the shooting screen and a black screen. If you keep watching the screen in this situation, you may experience uncomfortable symptoms such as feeling of unwellness. If you experience uncomfortable symptoms, stop using the camera, and consult your doctor as necessary.
- When recording or streaming for long periods of time or recording 4K movies, if the same part of your skin touches the camera for a long period of time while using the camera, even if the camera does not feel hot to you, it may cause symptoms of a low-temperature burn such as redness or blistering. Pay special attention in the following situations and use a tripod, etc.
- When using the camera in a high temperature environment
- When someone with poor circulation or impaired skin sensation uses the camera
- When using the camera with [Auto Power OFF Temp.] set to [High]
Sony accessories
Using this unit with products from other manufacturers may affect its performance, leading to accidents or malfunction.
How to turn off wireless network functions (Wi-Fi, etc.) temporarily
When you board an airplane, etc., you can turn off all wireless network functions temporarily using [Airplane Mode].
For Customers in the U.S.A. and Canada
This equipment complies with FCC radiation exposure limits set forth for an uncontrolled environment and meets the FCC radio frequency (RF) Exposure Guidelines. This equipment has very low levels of RF energy that is deemed to comply without testing of specific absorption rate (SAR).
The available scientific evidence does not show that any health problems are associated with using low power wireless devices. There is no proof, however, that these low power wireless devices are absolutely safe. Low power Wireless devices emit low levels of radio frequency energy (RF) in the microwave range while being used. Whereas high levels of RF can produce health effects (by heating tissue), exposure of low-level RF that does not produce heating effects causes no known adverse health effects. Many studies of low-level RF exposures have not found any biological effects. Some studies have suggested that some biological effects might occur, but such findings have not been confirmed by additional research.
This equipment has been tested and found to comply with ISED radiation exposure limits set forth for an uncontrolled environment and meets RSS-102 of the ISED radio frequency (RF) Exposure rules.
For Customers in the U.S.A.
For question regarding your product or for the Sony Service Center nearest you, call 1-800-222-SONY (7669).
Supplier's Declaration of Conformity
Trade Name : SONY
Model : WW198387
Responsible Party : Sony Electronics Inc.
Address : 16535 Via Esprillo, San
Diego, CA 92127 U.S.A.
Telephone Number: 858-942-2230
For Customers in Europe
Hereby, Sony Corporation declares that this equipment is in compliance with Directive 2014/53/EU.
The full text of the EU declaration of conformity is available at the following internet address:
https://www.compliance.sony.eu
Hereby, Sony Corporation declares that this equipment is in compliance with the UK relevant statutory requirements.
The full text of the declaration of conformity is available at the following internet address:
https://compliance.sony.co.uk
| IEEE802.11b/g/n | 2 400 MHz | < 60 mW e.i.r.p. |
| Bluetooth 2 | 400 MHz | < 10 mW e.i.r.p. |
Specifications
Camera
[System]
Camera Type: Digital Camera
[Image sensor]
Image format: 1.0 type, CMOS image sensor
Effective pixel number of camera: Approx. 20 100 000 pixels
Total pixel number of camera: Approx. 21,000,000 pixels
[General]
Rated input: 3.6 V = 1.9 W
Operating temperature: 0 to 40 °C (32 to 104 °F)
Storage temperature: -20 to 55 °C (-4 to 131 °F)
Dimensions (W/H/D) (Approx.): 105.5 × 60.0 × 46.7 mm (4 1/4 × 2 3/8 × 1 7/8 in.)
Mass (Approx.): 292 g (0 lb 10.3 oz) (including battery pack, SD Card)
[Wireless LAN]
Supported format: IEEE 802.11 b/g/n
Frequency band: 2.4 GHz
Rechargeable battery pack NP-BX1
Rated voltage: 3.6 V
Design and specifications are subject to change without notice.
Compatible iPhone/iPad models
iPhone SE (3rd generation), iPhone 13 Pro Max, iPhone 13 Pro, iPhone 13, iPhone 13 mini, iPhone 12 Pro Max, iPhone 12 Pro, iPhone 12, iPhone 12 mini, iPhone SE (2nd generation), iPhone 11 Pro Max, iPhone 11 Pro, iPhone 11, iPhone XS Max, iPhone XS, iPhone XR, iPhone X, iPhone 8 Plus, iPhone 8, iPhone 7 Plus, iPhone 7, iPhone SE, iPhone 6s Plus, iPhone 6s, iPad Air (3rd, 4th, and 5th generation), iPad (5th through 9th generation), iPad mini (6th generation), iPad Pro 12.9-inch (1st through 5th generation), iPad Pro 11-inch (3rd generation), iPad Pro 11-inch (2nd generation), iPad Pro 11-inch, iPad Pro 10.5-inch, iPad Pro 9.7-inch, iPad Air 2, iPad mini (5th generation), iPad mini 4 (As of September 2022)
Trademarks/Licenses
- Apple, iPhone and iPad are trademarks of Apple Inc., registered in the U.S. and other countries.
- USB Type-C® and USB-C® are registered trademarks of USB Implementers Forum.
- Wi-Fi, the Wi-Fi logo and Wi-Fi Protected Setup are registered trademarks or trademarks of the Wi-Fi Alliance.
- The Bluetooth® word mark and logos are registered trademarks owned by Bluetooth SIG, Inc. and any use of such marks by Sony Group Corporation and its subsidiaries is under license.
- QR Code is a trademark of Denso Wave Inc.
- In addition, system and product names used in this manual are, in general, trademarks or registered trademarks of their respective developers or manufacturers. However, the ™ or ® marks may not be used in all cases in this manual.
IMPORTANT – Read the End User Software License Agreement before using your Sony product.
Using your product indicates your acceptance of the End User Software License Agreement. The software license agreement between you and Sony is available at the following URL: (https://rd1.sony.net/help/di/el23/h_zz/)
- Use of the Made for Apple badge means that an accessory has been designed to connect specifically to the Apple product(s) identified in the badge, and has been certified by the developer to meet Apple performance standards. Apple is not responsible for the operation of this device or its compliance with safety and regulatory standards.
Made for
iPhone | iPad
Additional information on this product and answers to frequently asked questions can be found at our Customer Support Website.
https://www.sony.net/
EN

EN
https://rd1.sony.net/help/dc/2310/h_zz/
ZV-1M2 Help Guide

Preparations
https://www.sony.net/ca/
ON/OFF (Power) button
Multi Interface Shoe
https://rd1.sony.net/help/dc/2310/h_zz/
https://rd1.sony.net/help/dc/2310/h_zz/
ZV-1M2
Guide

Preparations
https://www.sony.net/ca/
https://rd1.sony.net/help/dc/2310/h_zz/
https://www.sony.net/ca/
Multi-Interface Shoe
https://www.sony.net/ca/
Control wheel/center button
Multi-Interface Shoe
https://rd1.sony.net/help/dc/2310/h_zz/
ZV-1M2 Help Guide

Preparations
https://www.sony.net/ca/
https://rd1.sony.net/help/dc/2310/h_zz/
① Turn off the power.
https://www.sony.net/ca/
Multi-Interface Shoe
https://rd1.sony.net/help/dc/2310/h_zz/
① Turn off the power.
https://www.sony.net/ca/
https://rd1.sony.net/help/dc/2310/h_zz/
ZV-1M2 Help Guide

Preparations
① Turn off the camera.
https://www.sony.net/ca/
https://www.sony.net/ca/
https://rd1.sony.net/help/dc/2310/h_zz/
ZV-1M2 Help Guide

Preparations
https://rd1.sony.net/help/dc/2310/h_zz/
ZV-1M2 Help Guide

Preparations
① Turn off the camera.
https://www.sony.net/ca/
Control wheel/center button
① Turn off the power.
Disc button/center button
If you want to know more about using the camera, see the "Help Guide" (Internet manual). https://rd1.sony.net/help/dc/2310/h_zz/
① Turn off the power.
https://www.sony.net/ca/

- SONY®
- ZV-1M
- ABOUT THE "HELP GUIDE
- PREPARATIONS
- CHECKING THE SUPPLIED ITEMS
- INSERTING THE BATTERY PACK (SUPPLIED)/MEMORY CARD (SOLD SEPARATELY) INTO THE CAMERA
- CHARGING THE BATTERY PACK
- PERFORMING INITIAL SETUP FOR THE CAMERA
- INSTALLING THE DEDICATED SMARTPHONE APPLICATION
- PROCEDURES FOR INITIAL CAMERA SETUP
- SHOOTING MOVIES
- USING THE WIND SCREEN (SUPPLIED)
- NOTES ON USE
- REFER TO "PRECAUTIONS" IN THE "HELP GUIDE" AS WELL
- NOTES ON HANDLING THE PRODUCT
- SONY ACCESSORIES
- HOW TO TURN OFF WIRELESS NETWORK FUNCTIONS (WI-FI, ETC.) TEMPORARILY
- FOR CUSTOMERS IN THE U.S.A. AND CANADA
- FOR CUSTOMERS IN THE U.S.A
- SUPPLIER'S DECLARATION OF CONFORMITY
- FOR CUSTOMERS IN EUROPE
- SPECIFICATIONS
- CAMERA
- [SYSTEM]
- [IMAGE SENSOR]
- [GENERAL]
- [WIRELESS LAN]
- RECHARGEABLE BATTERY PACK NP-BX
- COMPATIBLE IPHONE/IPAD MODELS
- TRADEMARKS/LICENSES
- IMPORTANT – READ THE END USER SOFTWARE LICENSE AGREEMENT BEFORE USING YOUR SONY PRODUCT
- ① TURN OFF THE CAMERA
Brand : SONY
Model : ZV-1 II
Category : Camera