Siesta - Vacuum Cleaner Prixton - Free user manual and instructions
Find the device manual for free Siesta Prixton in PDF.

| Brand | Prixton |
| Model | Siesta |
| Category | Vacuum cleaner |
| Product type | Robotic vacuum cleaner with mopping function |
| Dimensions (estimated) | Diameter 32 cm, height 8 cm |
| Weight (estimated) | 2.5 kg |
| Power supply | Rechargeable battery, mains adapter |
| Dust bin capacity (estimated) | 0.3 L |
| Water tank capacity (estimated) | 0.15 L |
| Runtime (estimated) | 90 minutes |
| Charging time | 5 to 6 hours (first charge: 8 hours) |
| Cleaning modes | Automatic, edge, zigzag, automatic charging |
| Mopping function | Yes, with water tank and cleaning cloth |
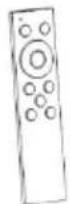
| Remote control | Yes, included |
| Smartphone app | Yes, compatible with Android and iOS |
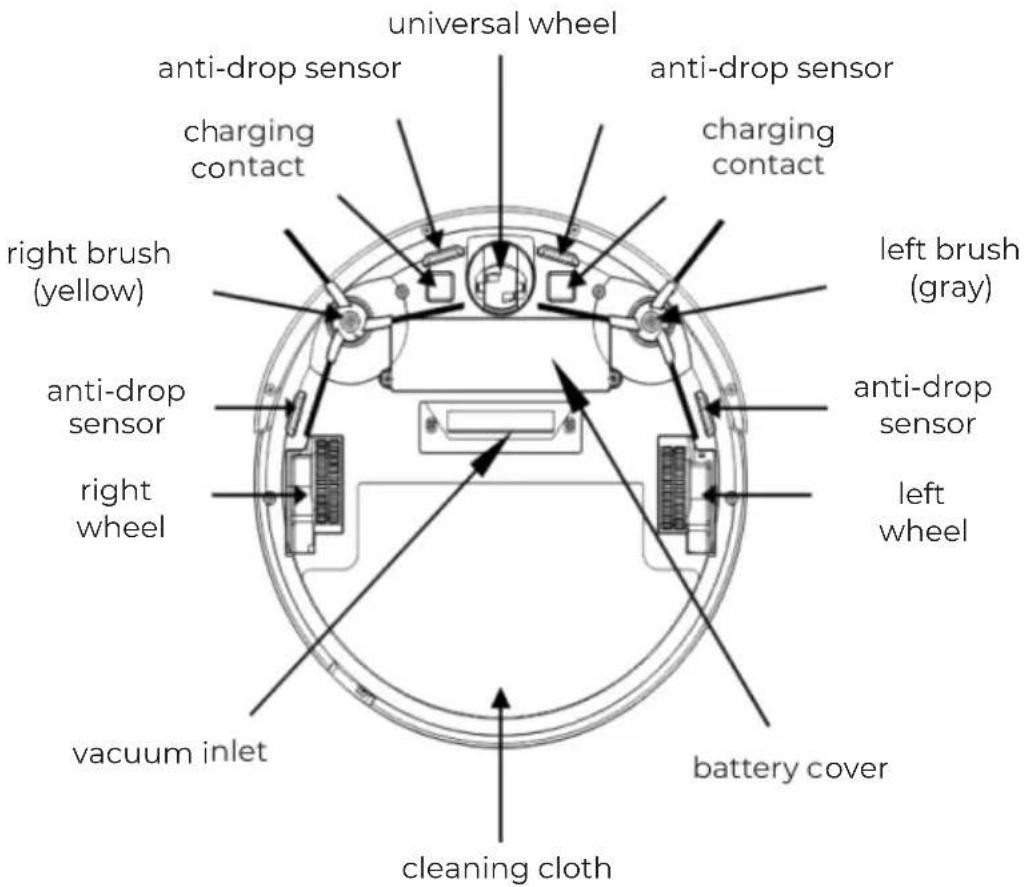
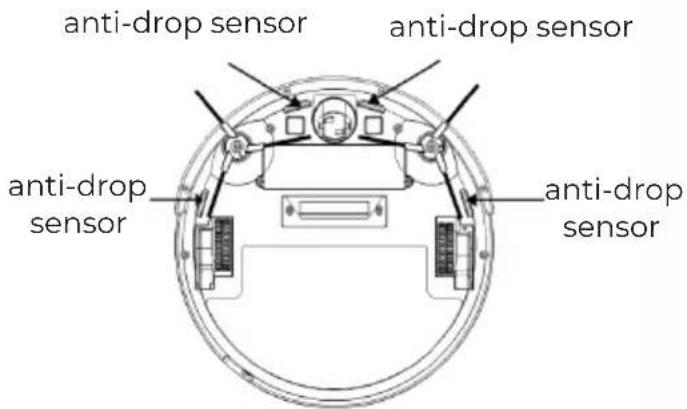
| Sensors | Anti-drop (3 sensors), front bumper |
| Side brushes | 2 brushes: right (yellow) and left (grey), not interchangeable |
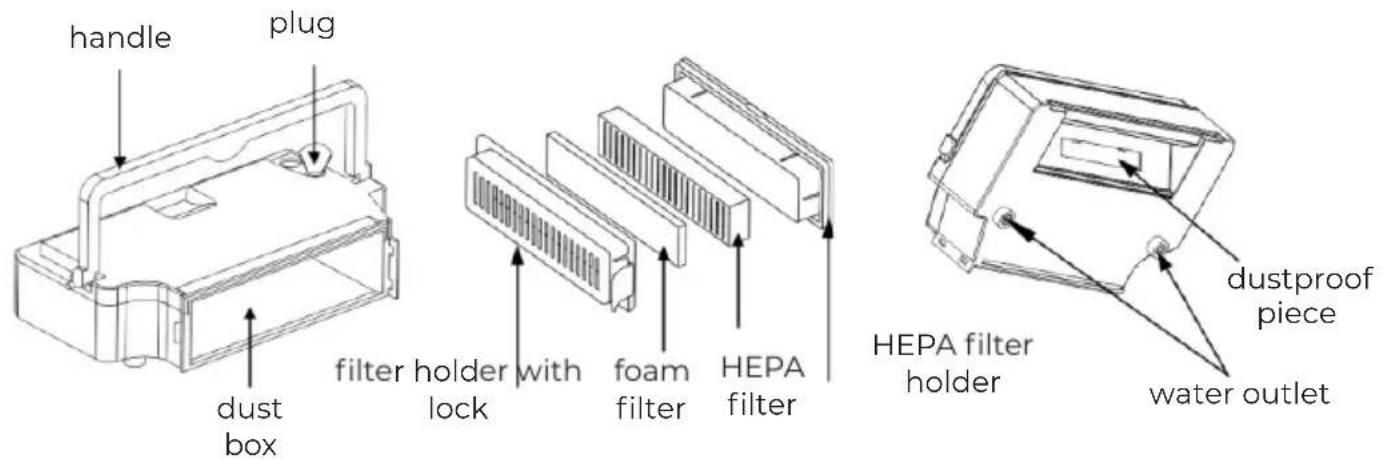
| Filters | Foam filter + HEPA filter |
| Noise level (estimated) | 65 dB |
| Warranty | 2 years from date of purchase |
Frequently Asked Questions - Siesta Prixton
User questions about Siesta Prixton
0 question about this device. Answer the ones you know or ask your own.
Ask a new question about this device
Download the instructions for your Vacuum Cleaner in PDF format for free! Find your manual Siesta - Prixton and take your electronic device back in hand. On this page are published all the documents necessary for the use of your device. Siesta by Prixton.
USER MANUAL Siesta Prixton
natural_image
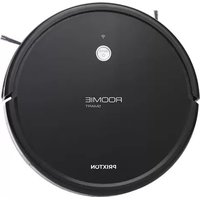
Simple line drawing of a circular mechanical component with a handle and base (no text or symbols)ROBOT ASPIRADOR
VACCUM CLEANER
natural_image
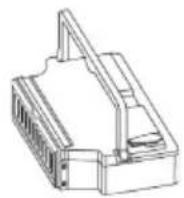
Line drawing of a circular device with a handle and internal components (no text or symbols)Cuerpo principal
natural_image
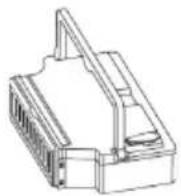
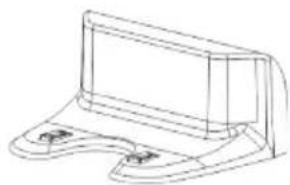
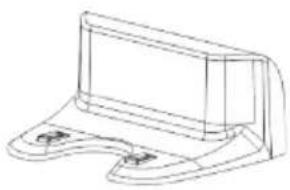
Technical line drawing of a mechanical bracket or support structure (no text or symbols)Base de carga
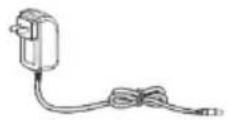
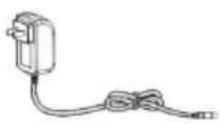
Adaptador

natural_image
Diagram showing a device connected to a cable and a switch, with arrows indicating connection direction (no text or symbols)
natural_image
Line drawing of a robotic vacuum cleaner with an inset showing the internal circuit switch (no text or symbols present)Apagado
Aviso:
natural_image
Diagram showing two mechanical components and a plastic cup with dotted lines indicating liquid or particles (no text or symbols)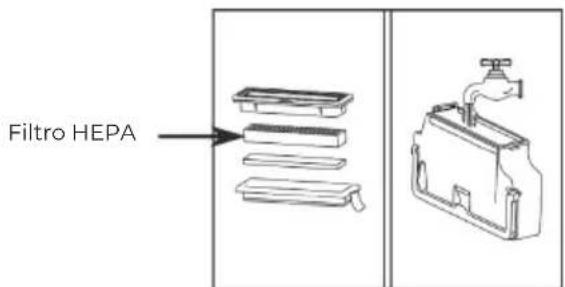
natural_image
Simple line drawings of a sun, a box, and a grid-like structure (no text or symbols)natural_image
Technical diagram of a circular mechanical or electronic component with internal components and no visible text or symbols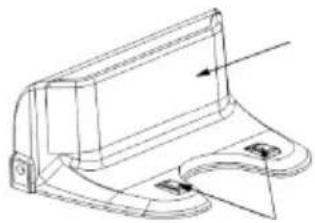
natural_image
Technical line drawing of a mechanical component with no visible text or symbolsventana de señales
contacto de carga
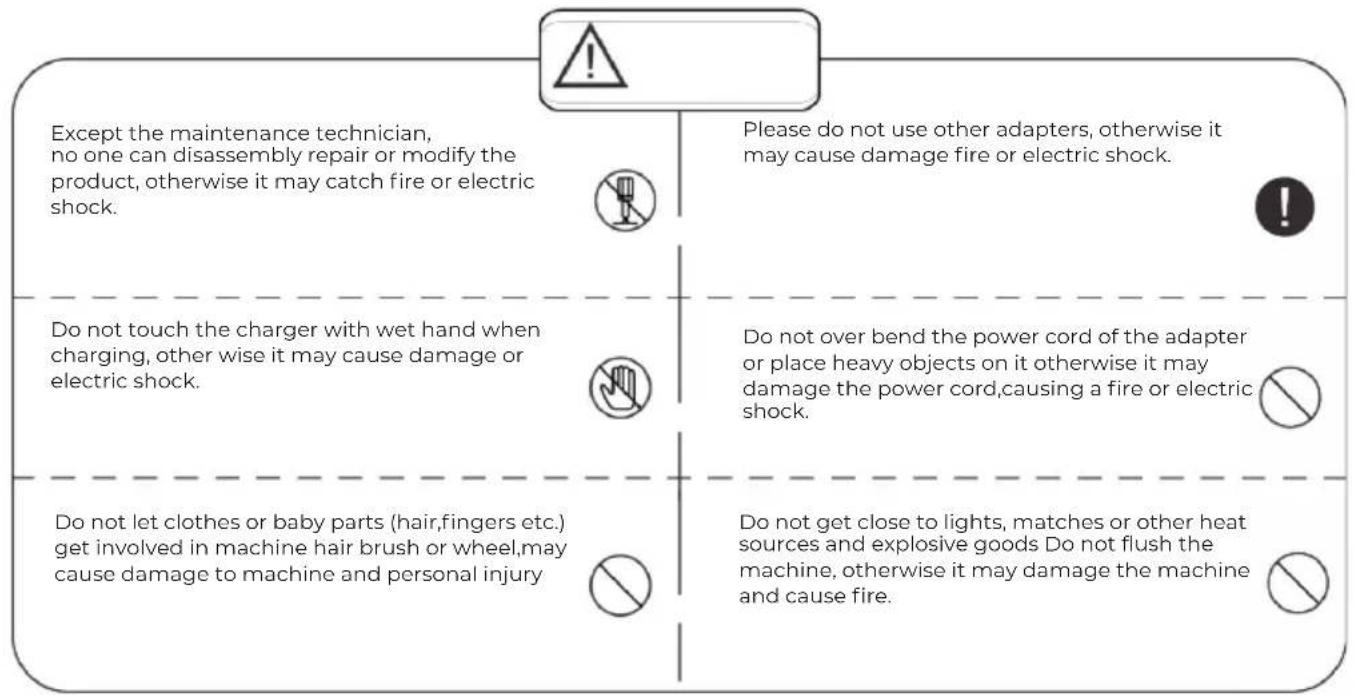
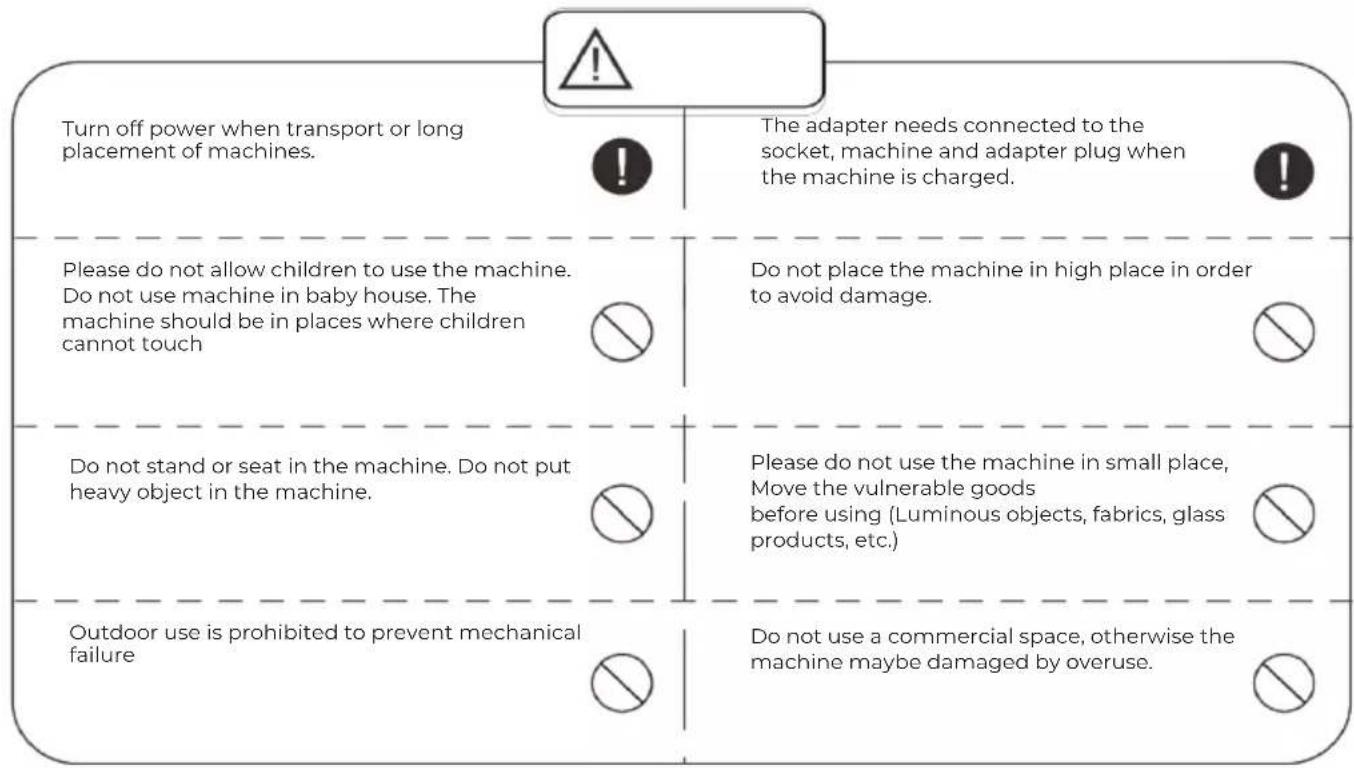
1. Security Specifications
The safety specification is intended to prevent users' personal or property damage. Please read the following notes carefully.
The following symbols represent the following meanings:
Warning
Violation of safety instructions will lead to personal injury
Attention
Violation of safety instructions may result in minor personal injury or product damage
2.Product Formation
2.1 Part Name
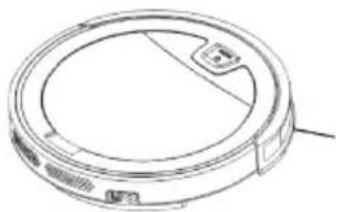
natural_image
Line drawing of a circular device with a handle and control panel (no text or symbols)Cuerpo principal
Dust Box
Water Tank
natural_image
Line drawing of a mechanical component with mounting base and side plate (no text or symbols)Charging Dock
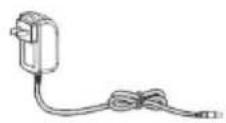
Adapter
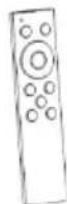
Remote Controller Cleaning Cloth
Manual
2.2 Structural Introduce
Main Body
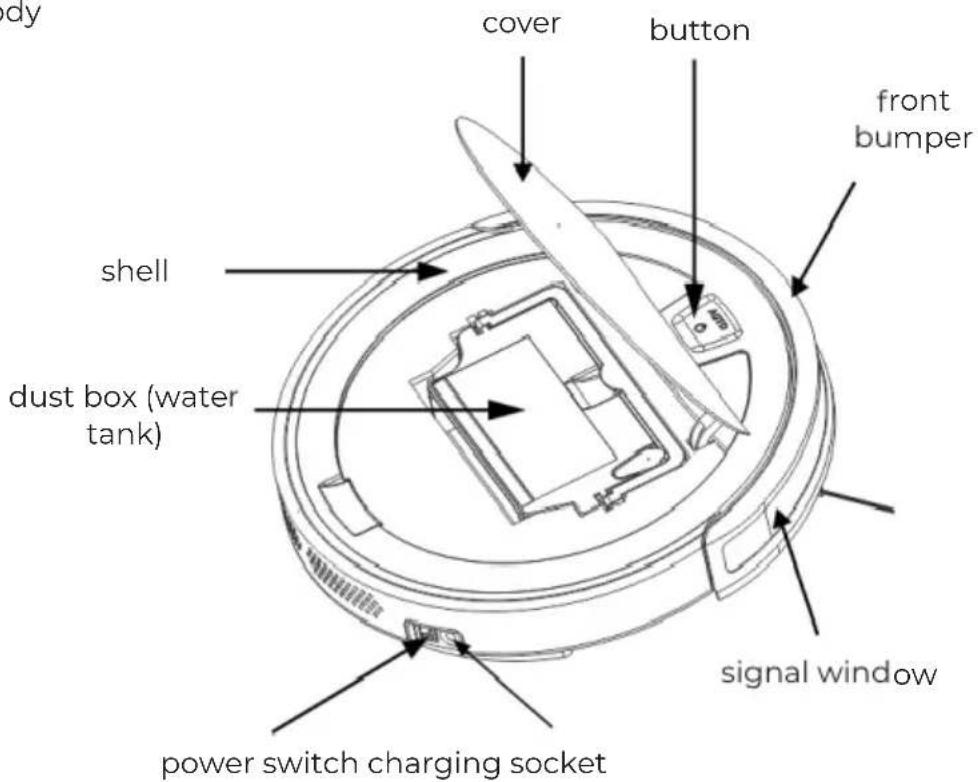
Dust Box(water tank)
Charging Dock

2.3 Technical Parameters
| Working voltage 14,8 V | |
| Rated input voltage 19,0 V | |
| Rated power 20 W | |
| Rated input current 0,6 A | |
| Charging Dock KCH 217 | |
| Input parameter 19,0 V | 0,6 A |
| Output parameter 19,0 V | 0,6 A |
| Battery Li-ion 2000mAh | |
Due to continuous improvement of product, if any technology or design change is required, no further notice will be informed.
3.Product Usage
3.1 Attention
- Please remove the power cord, thread and other debris scattered on the ground before using, avoid to trip or wind the machine.
- Objects with less than 6cm such as bed furniture bottom may cause stuck when using, please pay special attention to such areas when cleaning.
- Before using this product on the carpet, please remove the two side brushed and roll the carpet tassels.
- This product can be used on wood floor, tile floor and cement floor and short hair carpet(-less than 0.8cm)
3.2 Quick Actions
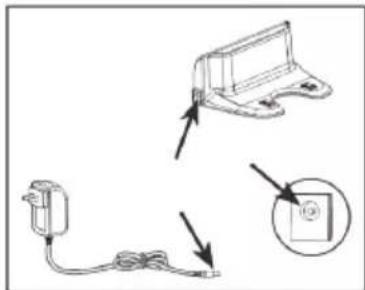
Main body charge (The machine has both manual and automatic charging modes)
Manual Charging
Adapter connects power and machine.
Start charging with green light flash.
Charging connection successfully.
Green light flashing, machine is in charging.
Green light steady, charging is complete.
Machine should be charged 8 hours at least for first time use.
Make sure water tank is empty before charging, otherwise the floor will be wet
Auto-recharging
Place charging dock flat against the wall edge insure side 0.5m, front 1.5m without any obstacle No strong reflective objects around. Adapter connects power and charging dock
When the machine's power is low, it will automatically find the charging dock for charging.
Users can also control the machine to find a charging dock by using the automatic charging function on the APP and remote control.
Turn on the machine
Turn on the machine power switch with an opening music and green light.
("I"turn,"O"turn off)
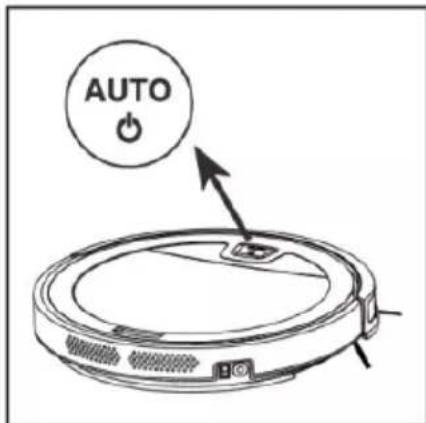
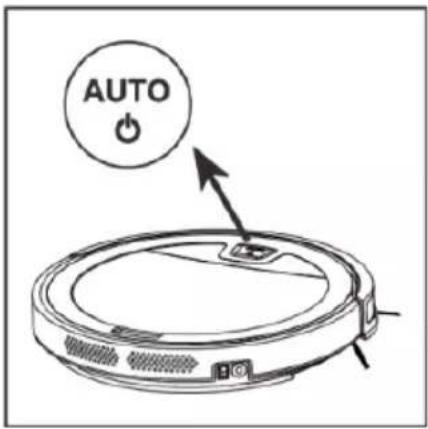
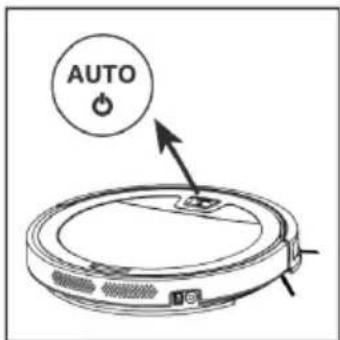
Start cleaning
Short press button ⚙ start with auto cleaning mode.
Stop working
Short press button ⏻ machine. will stop working.

natural_image
Diagram showing three connected components: a cable, a device housing, and a circular button (no text or symbols)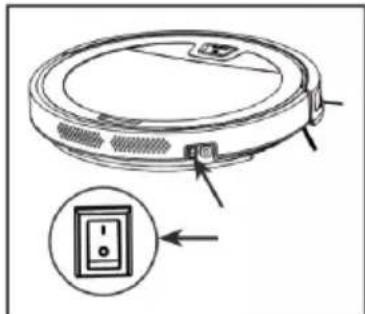
natural_image
Diagram of a circular vacuum cleaner with attached sensor and control panel (no text or symbols)Turn off
After stop working, turn off the
machine power switch.
If machine break off for a long time, please insure no water in water tank, otherwise the floor will be wet
3.3 APP Usage
APP download
Scan the qr code, download and install the product APP, more functions, please reference the APP interface.
Machine WIFI Setting:
Turn on the machine and press
about 5 seconds(or use remote controller
WIFI button), voice prompts enter WIFI
Settubg. After the machine enter WIFI
setting add device to the APP.
Interface and connect the WIFI distribution network.
Notice:
- When connect the APP successfully, no need to connect again, it need to be restarted when the wifi changed.
- This products supports remote control of mobile phone APP.
- The APP supports android and IOS users.

3.4 Mode Selection
This product has various cleaning modes, the users can select by remote controller or mobile APP.
Auto cleaning mode
The most commonly used cleaning mode, the main engine is automatically cleaning, in the event of obstacles to change directions.
Edge cleaning mode
Machine clean along the wall or furniture edge
Zigzag random cleaning mode
Random cleaning with small zigzag route
Auto-recharging mode
When the machine with low power, it will automatically back to charging dock for charging.
Schedulecleaningmode
Set any time on APP for the machine to start cleaning
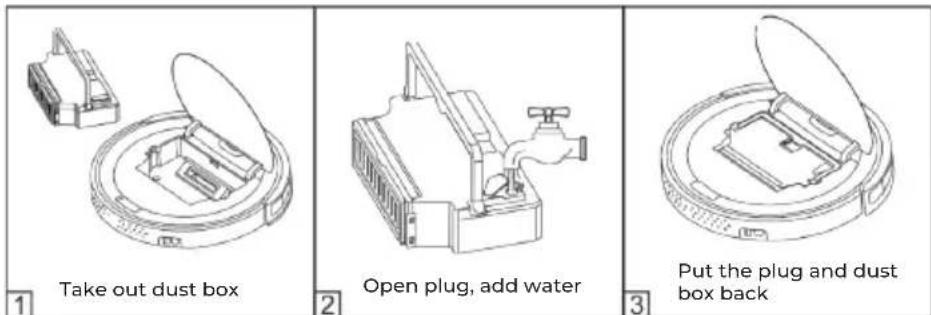
3.5 Mop Function
The machine has the function of mop, the design of dust box and water tank is adopted, the cloth will be attached to the bottom of machine when using, and water will be added to the water tank of the dust box.
Please wet the mop before using, for better cleaning.
Please dry the dust box after adding water, insure the surface is dry.
3.6 Remote Controller Usage
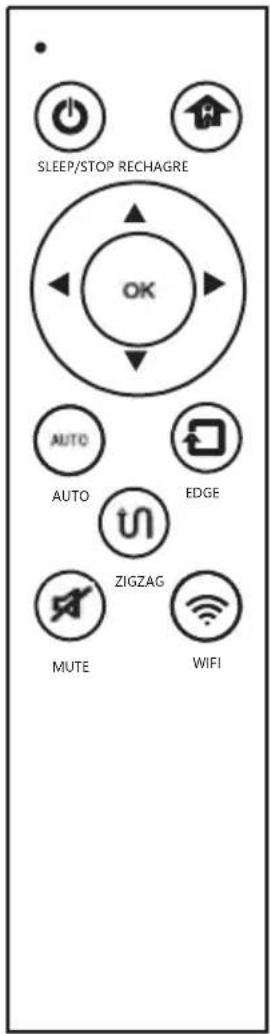
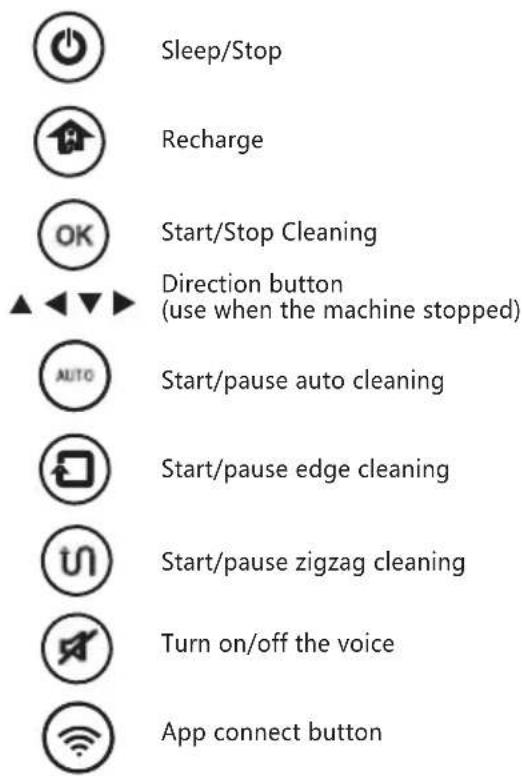
3.7 Usage of Side Brush
Side brush explanatory chart
Using instruction
- The right and left side brushes (as shown above in the center color) are not interchangeable.
- In order to ensure good use effect, users should clean the surrounding hair and other debris in time after using the machine for a period of time.
- The user should change the side brush according to the diagram left and right. (use a screwdriver to remove the fixed screw and side brush, then fix the side brush for replacement).
- Please use care in the areas with too much hair or other winding things.
4. Maintenance
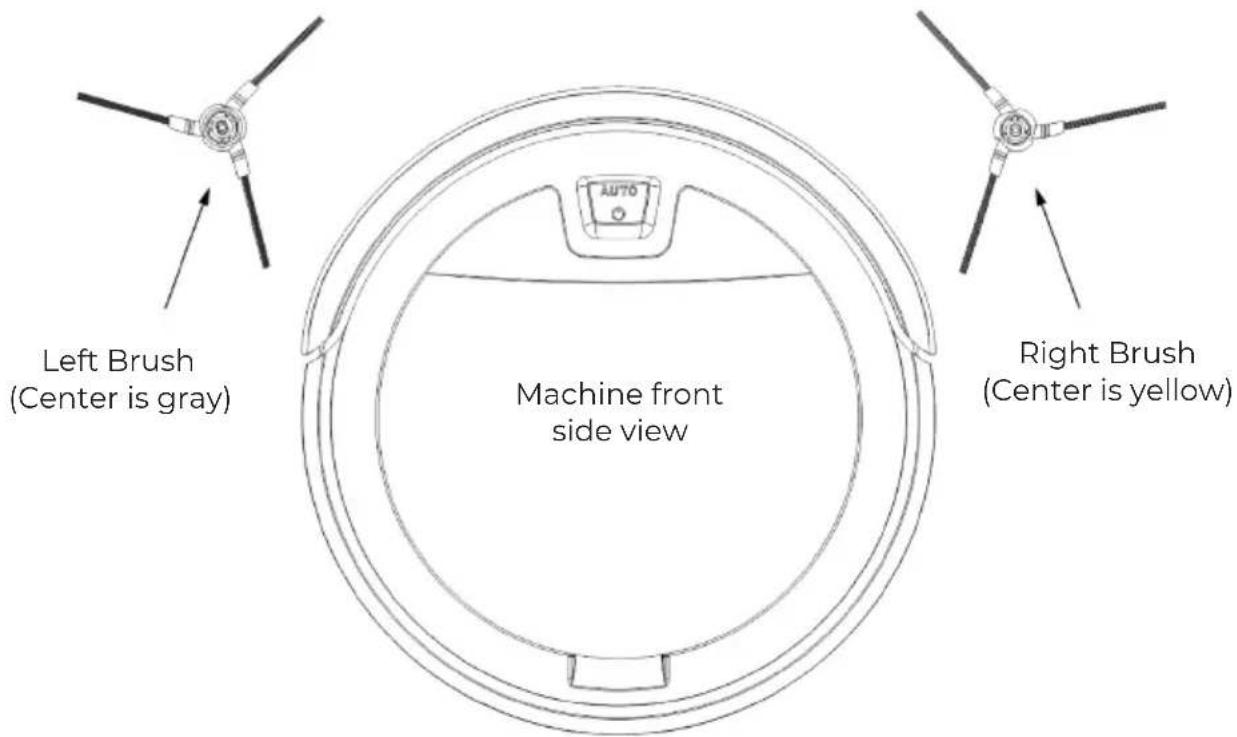
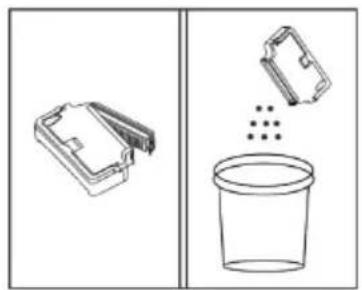
4.1 Dust Box & Filter Material
Remove the dust box and clean up the garbage.
Remove the filter components and wash them.
Note: HEPA filter is not washable, Just shake off the dust gently.
natural_image
Diagram showing two plastic containers and a container with particles, no text or symbols presentRemark: The user should clean the dust box and filter material in time to keep the machine in good condition
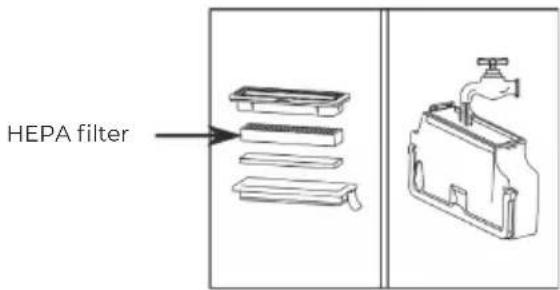
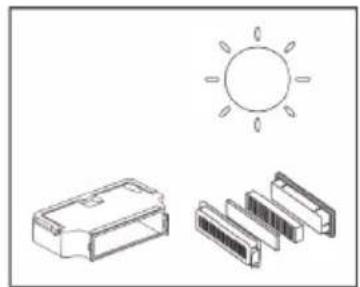
Sun-fire the dust box and filter material to ensure its use life
natural_image
Simple line drawing of a sun, a battery pack, and a grid of rectangular components (no text or symbols)4.2 Cleaning Cloth
Clean and dry the cleaning cloth after wet cleaning finished
4.3 Suction Inlet & Side Brush
Clean up the suction inlet when with too much dust. Please use cloth to clean it
Clean brushes: use a screwdriver to remove the side brushes, clean the foreign matter on the side brush
4.4 Other Parts
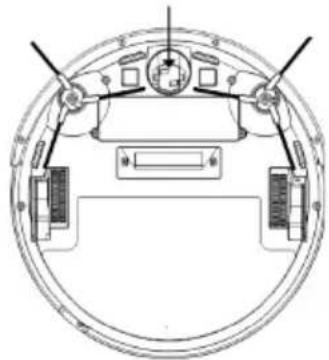
Clean the anti-drop sensor to keep the sensitivity of inductor.
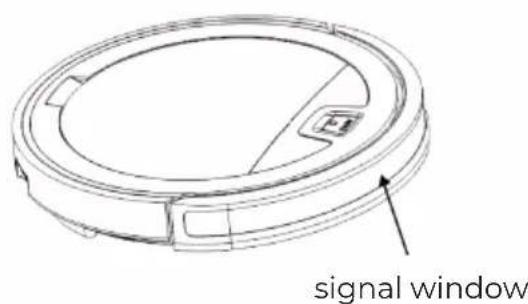
Clean the signal window for better avoidance.
Clean the wheel, reduce the noise and hair winding.
universal wheel
natural_image
Technical diagram of a circular mechanical or electrical component with no visible text, numbers, or symbols.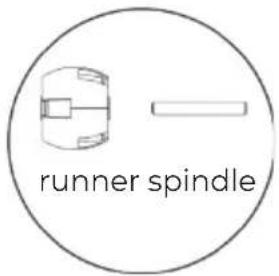
Remove the universal wheel and clean the runner and spindle.
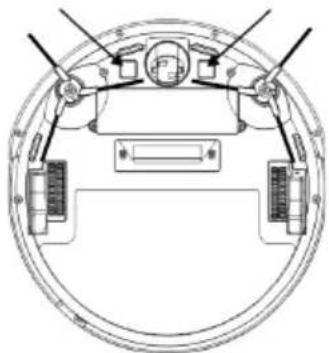
Clean the charging contact and signal window by the dry cloth, insure the automatic charging process of the machine fluently.
charging contact
charging contact
natural_image
Technical diagram of a circular mechanical component with internal components and mounting holes (no text or labels)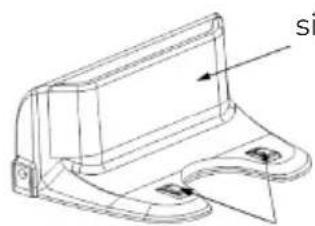
natural_image
Technical line drawing of a mechanical bracket or mounting bracket (no text or symbols)signal window
charging contact
5. Malfunction Elimination
If the machine breakdown, in the process of using, check below situation firstly
| NO | Situation Possible Cause | Solution | |
| Machine not work | Machine not turn on | Turn on the machine | |
| Battery run out | Charging the machine | ||
| Machine cannot charge | Charging contact is unreliable | Make sure the adapter is reliable | |
| Wipe charging contact on machine and charging dock | |||
| The machine is backing away | The anti-drop sensors are dirty | Use dry cloth wipe the sensors | |
| The machine is in circles | Signal window is dirty | Use dry cloth wipe the signal window |
| Left/right wheel error | The wheels were wound by something | Clean the wheel |
| Left/right brushes abnormal | Left/right side brushes setup error | Install the side brushes properly |
| Left/right side brushes were wound by something | Clean the side brushes | |
| Dust box abnormal | The dust box was not put in place | Put the dust box in place |
| Universal wheel abnormal | Universal wheel stuck with something | Clean the universal wheel |
Attention: if above investigation fails to solve the problem, please contact after-sales ser vice for help. Do not disassemble the machine by yourself
Warranty Policy
This product is guaranteed for 2 years from the date of purchase. When you have a problem that you can not solve, you must access the web www.prixton.com and click on the contact option to send us your assistance form.
These technical and electrical specifications are those of typical units and may be changed without prior notice in order to provide improved equipment.
Simplified EU Declaration of Conformity
We, La Trastienda Digital located in Avenida Cervantes 49, módulo 25, Basauri 48970, Bizkaia hereby declare that the following goods, imported and selling at European market:
| BRAND | MODEL DESCRIPTION | CATEGORY |
| PRIXTON | SIESTA | VACCUM CLEANER |
Are in compliance with the EC Council Directive of 2014/53/EU (EM DIRECTIVE) and harmonized standards and with the board of the 16th of April 2014.
The complete text of the UE Declaration of conformity is available anytime at this website address:
www.prixton.com
LA TRASTIENDA DIGITAL
natural_image
Line drawing of a circular mechanical component with a central slot and side connectors (no text or symbols)Corps principal
natural_image
Technical line drawing of a mechanical component or bracket (no text or symbols)Socle de chargement
Adaptateur
natural_image
Diagram showing three connected components: a battery, a switch, and a circular button (no text or symbols)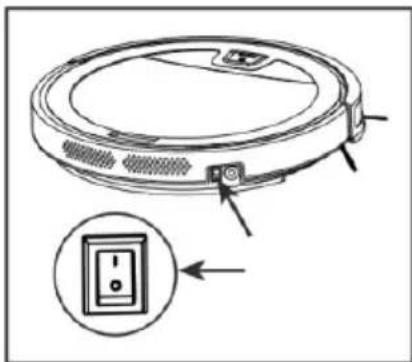
natural_image
Line drawing of a robotic vacuum cleaner with an inset showing the internal circuit switch (no text or symbols)Début du nettoyage
natural_image
Technical line drawing of a vacuum cleaner with internal components and housing (no text or symbols)natural_image
Line drawing of a water tap with handle and valve (no text or symbols)natural_image
Line drawing of a robotic vacuum cleaner with open lid and internal components (no text or symbols)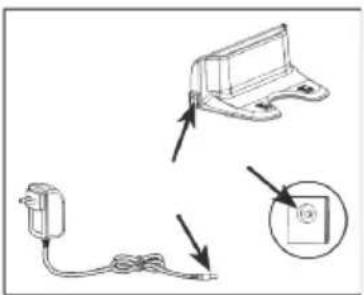
natural_image
Diagram showing a cable being inserted into an electronic device, with an inset close-up of the component (no text or symbols present)
natural_image
Line drawing of a robotic vacuum cleaner with an inset showing the control panel (no text or symbols)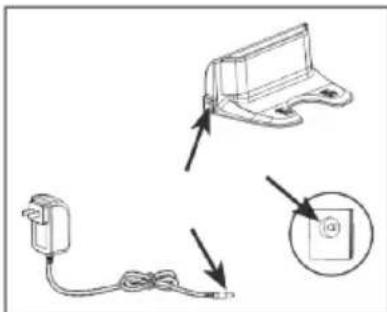
natural_image
Diagram showing three connected components: a cable, a switch, and a power outlet (no text or symbols present)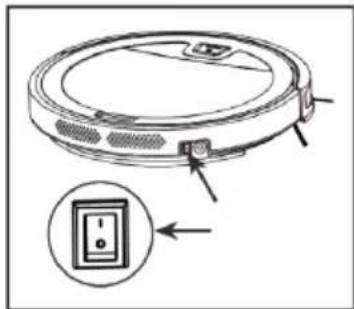
natural_image
Diagram of a robotic vacuum cleaner with an inset showing its control panel (no text or symbols present)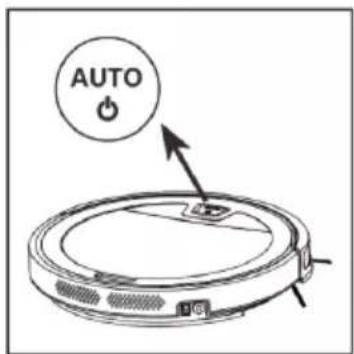
natural_image
Line drawing of a circular device with a handle and control panel (no text or symbols)Corpo principal
natural_image
Technical line drawing of a mechanical bracket or support structure (no text or symbols)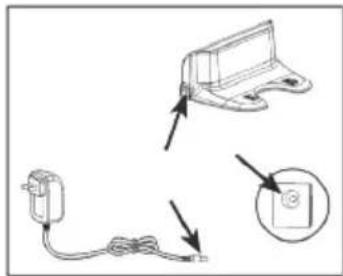
natural_image
Diagram showing a cable being inserted into a device, with an inset close-up of the cable (no text or symbols present)

natural_image
Line drawing of a circular mechanical component with a central slot and side ports (no text or symbols)Hoofdgedeelte
Stofcompartiment
Waterreservoir
natural_image
Technical line drawing of a mechanical bracket or support structure (no text or symbols)Oplaadbasis

Adapter
Afstands-
bediening
Reinigingsdoek
Handleiding
2. Structuur
Romp


natural_image
Diagram showing three connected components: a battery, a switch, and a wall-mounted device (no text or symbols present)
natural_image
Line drawing of a robotic vacuum cleaner with an inset showing a button labeled '1' (no text or symbols on the device itself)