Flex Ultimate - Vacuum Cleaner Prixton - Free user manual and instructions
Find the device manual for free Flex Ultimate Prixton in PDF.

| Product type | Cordless vacuum cleaner |
| Brand | Prixton |
| Model | Flex Ultimate |
| Dimensions (L x W x H) | 133 x 120 x 210 mm |
| Net weight | 1530 g |
| Power | 350 W |
| Rated voltage | DC 25.9 V |
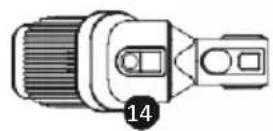
| Adapter | DC 32 V / 500 mA |
| Suction | ≥ 21 kPa |
| Dust bin capacity | 0.7 L |
| Runtime | Not specified |
| Charging time | Not specified |
| Battery type | Lithium-ion (built-in) |
| Speeds | 2 (minimum and maximum) |
| Charge indicator | 3 blue LEDs |
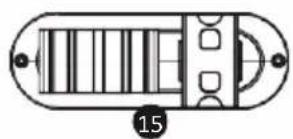
| Included accessories | Motorized floor brush, flexible hose, connecting accessory, combined connecting accessory, wall mount base |
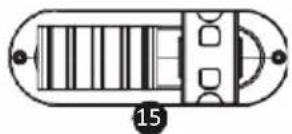
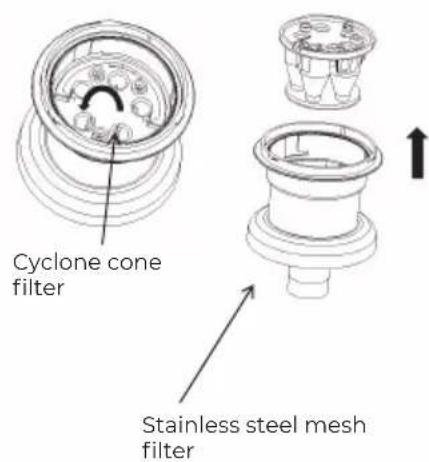
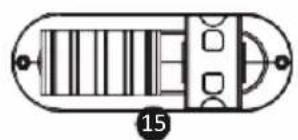
| Filters | HEPA air intake filter, HEPA air outlet filter, stainless steel mesh filter, cyclonic filter |
| Filter cleaning | Rinsable with water, drying required before reuse |
| Warranty | 2 years |
| Country of origin | Not specified |
Frequently Asked Questions - Flex Ultimate Prixton
User questions about Flex Ultimate Prixton
0 question about this device. Answer the ones you know or ask your own.
Ask a new question about this device
Download the instructions for your Vacuum Cleaner in PDF format for free! Find your manual Flex Ultimate - Prixton and take your electronic device back in hand. On this page are published all the documents necessary for the use of your device. Flex Ultimate by Prixton.
USER MANUAL Flex Ultimate Prixton
natural_image
Line drawing of a vacuum cleaner with extended handle and base (no text or symbols)ASPIRADOR VERTICAL
VACUUM CLEANER

Prefacio

natural_image
Technical line drawing of a mechanical valve assembly (no text or symbols)
natural_image
Pure mechanical component diagram without any text, numbers, or symbols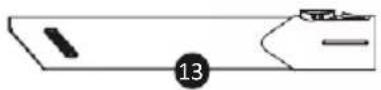
natural_image
Pure technical diagram of a mechanical component with no text or symbolsnatural_image
Line drawing of a portable air purifier device with no visible text or symbols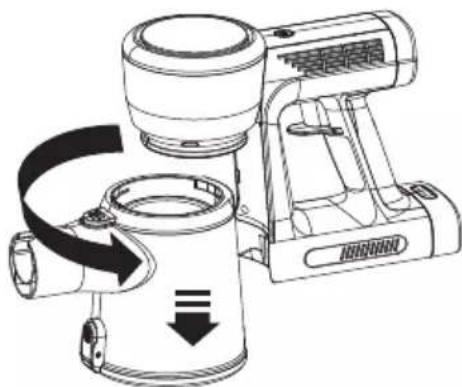
natural_image
Technical line drawing of a portable air conditioner unit with directional arrows indicating motion (no text or symbols)natural_image
Illustration of a hand holding a circular device with a pointer pointing to the center (no text or symbols visible)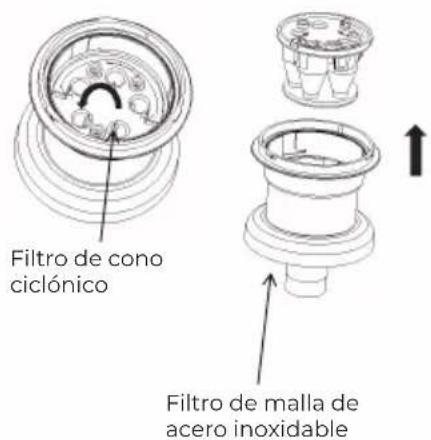
natural_image
Line drawing of a vacuum cleaner with attached cylindrical device (no text or symbols)This product uses DC power pool power supply for users to use

Safety Instructions
When using this product, please follow the following basic warnings:
Your vacuum cleaner is an electric appliance: it must be used under normal use conditions. Do not let the vacuum cleaner run alone and unattended.
- It is strictly prohibited to inhale the following objects, otherwise it may damage the vacuum cleaner and cause fire, causing personal injury and other accidents.
a. Hot objects, such as carbon fire, cigarette head, etc.
b. Large and sharp pieces, such as glass, etc.
c. Hazardous substances (solvents, corrosive agents,) corrosive agents (acids, cleaners) and water and other liquids.
d.flammable and explosive items such as gasoline or alcohol products.
e.Non-household waste, such as construction waste, cement, etc
-
When cleaning, repairing or temporarily not using the vacuum cleaner, the power supply must be cut off.
-
heck and confirm that the power adapter and use voltage of the vacuum cleaner must be consistent with the power supply voltage, and the special power adapter must be adopted
-
Do not immerse the vacuum cleaner in water to avoid getting close to the heating appliance or exposure to the sun to avoid fire.
-
Do not let the children play with it and operate the vacuum cleaner to avoid accidents.
-
Do not use a vacuum cleaner in the following situations:
a. Fall occurs and show obvious damage or abnormal operation.
b.Power supply adapter is damaged
To avoid danger, it must be replaced by the manufacturer, its maintenance department or similar department.
- Avoid running for a long time under the blocked suction mouth to avoid motor damage and deformation of the vacuum cleaner.

Warning
Some special groups are not suitable for using the product, such as children, people with disabilities, people with mental illness, or people who lack experience and relevant knowledge. Unless they use the product in supervised, safe conditions. Please make sure that children do not use the product as a toy.
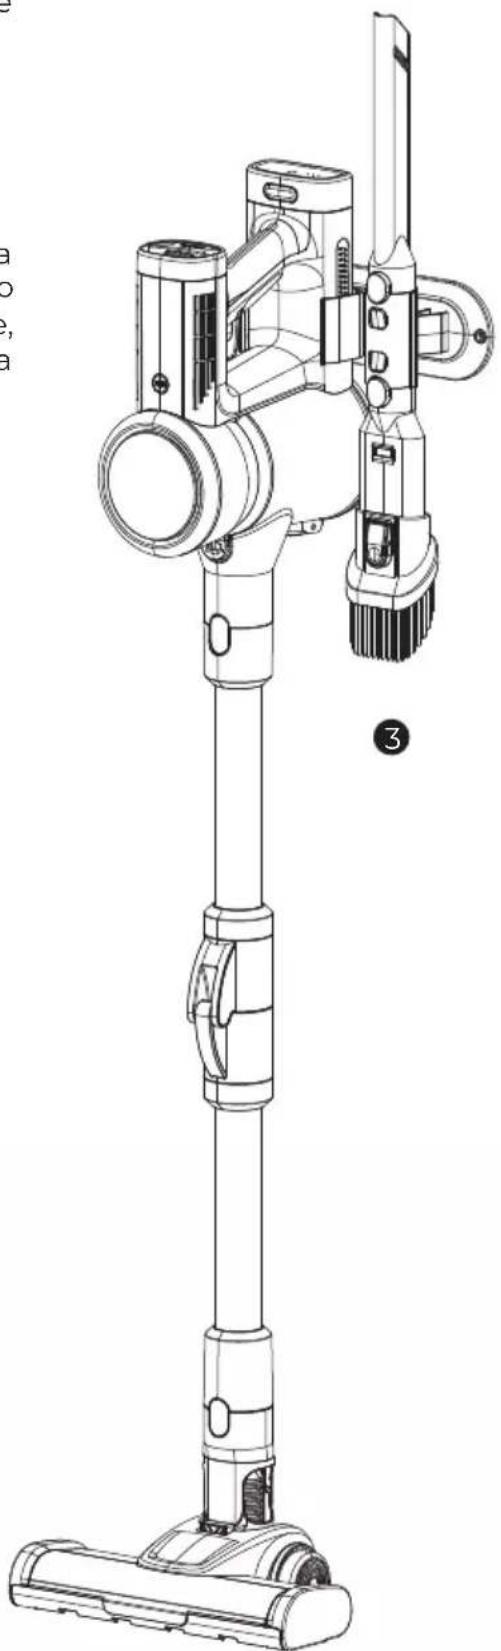
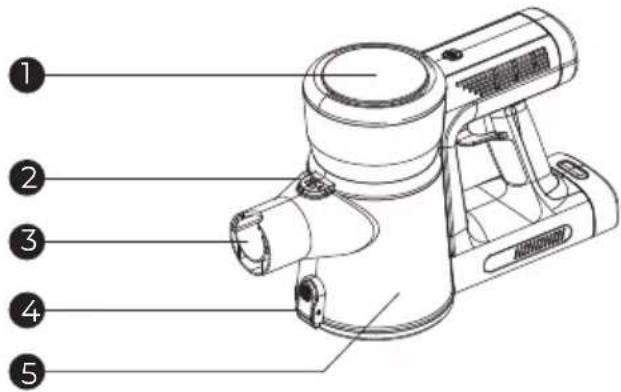
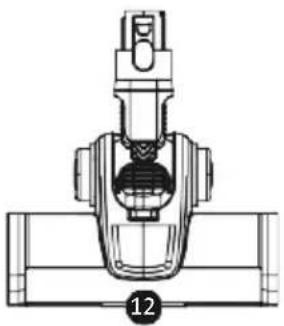
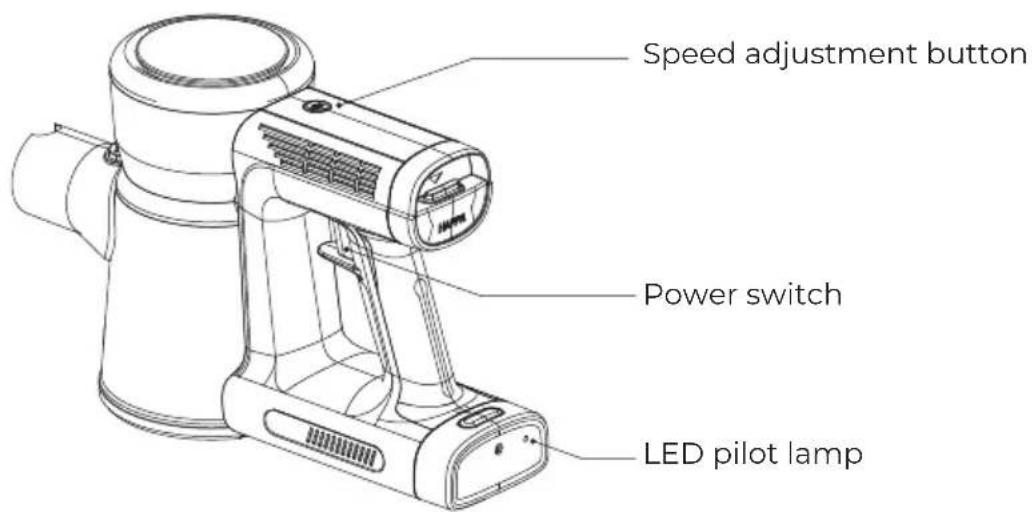
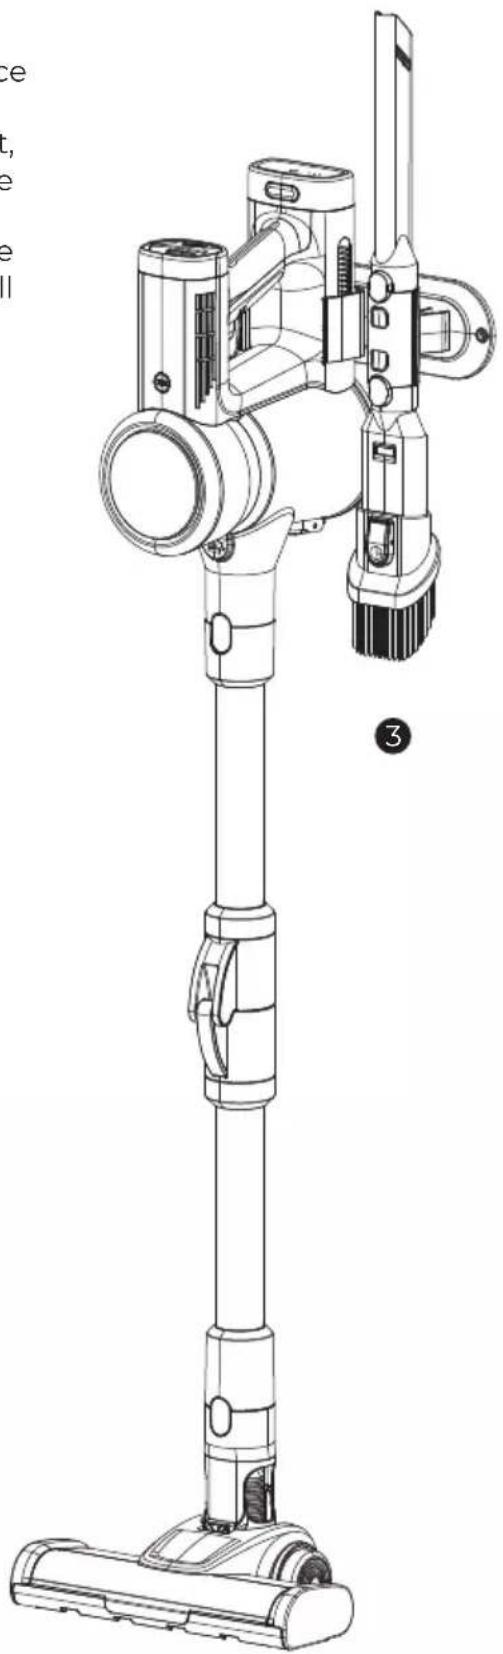
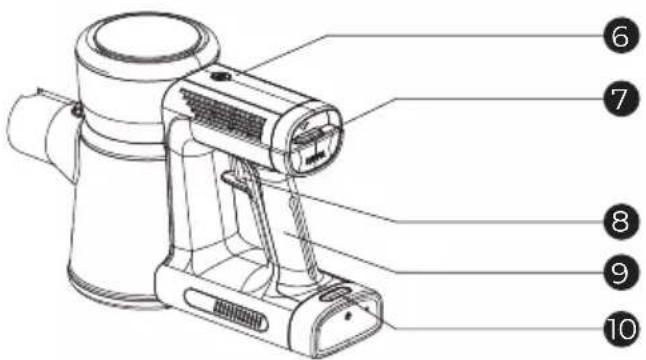
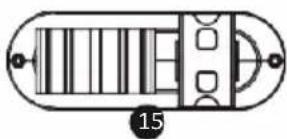
Product Parts
- Main body
- Dust cup unlock button
- Suction mouth
- Dust cup empty button
- Dust cup
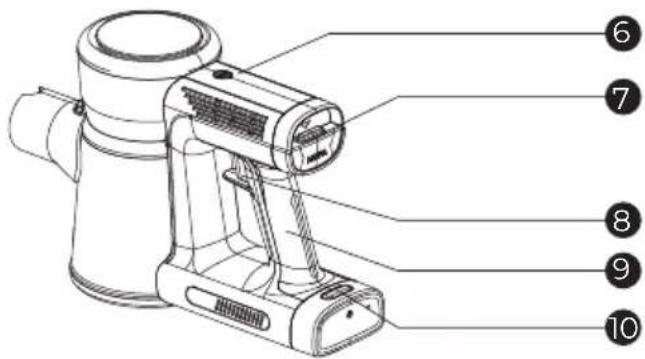
- Max speed button
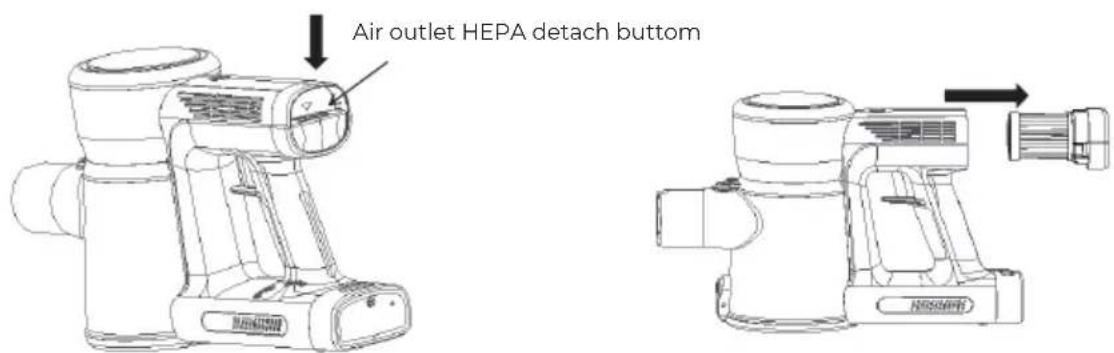
- Air outlet Hepa detach button
- Power switch
- Handle
- Battery pack release button
- Flex tube
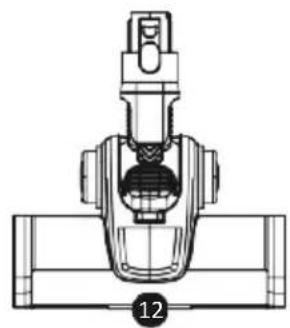
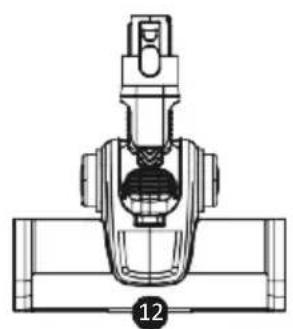
- Motorized floor brush
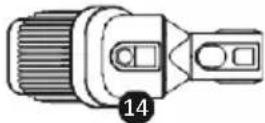
- Crevice tool
- Combo crevice tool
- Bracket base
natural_image
Technical line drawing of a mechanical valve assembly (no text or symbols)
natural_image
Pure mechanical assembly diagram without any text, numbers, or symbols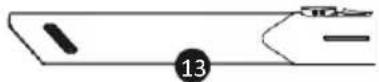
Product technical parameters
| Product model | Flex Ultimate | Rated power | 350W |
| Rated voltage | DC 25.9V | Power adapter | DC 32V 500mA |
| Vacuum | ≥21Kpa | Dust cup capacity | 0.7L |
| Unit size | 133*120*210 | Net weight | 1530g |
Operating instructions for the whole machine
Operation: press the power switch on the handle, the machine open, work in low speed gear, when need to press the power switch, vacuum cleaner stop working. After the vacuum cleaner is turned on, press the speed control button to make the machine switch in high and low gear. Note that the speed control button should not be pressed for a long time. Then the LED indicator on the battery pack will work on the machine, and the LED indicator will flash when the power is too low. The machine stops working and needs to be recharged.
Note:
The suction mouth must be unobstructed, and no foreign body blockage, otherwise it will cause motor overheating caused by accident
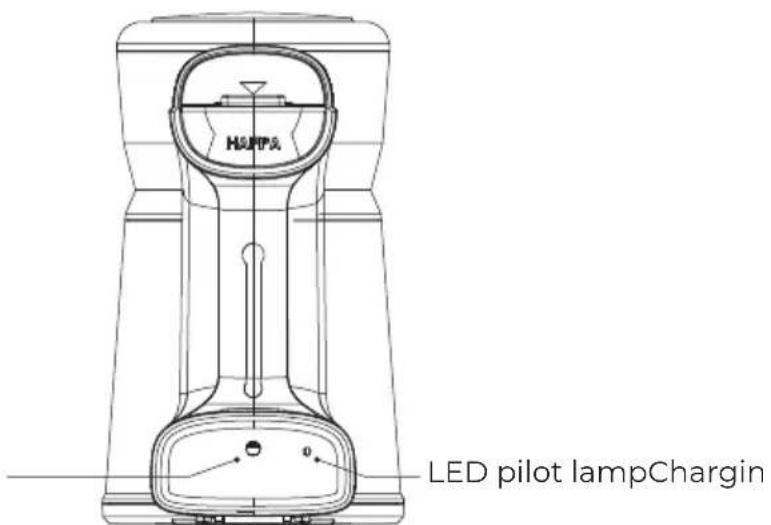
Charging: The local charging port is at the rear of the body. Keep the vacuum cleaner off, vacuum cleaner power adapter plug end, the round plug end into the charging jack on the vacuum cleaner battery bag, when the back of the vacuum cleaner after the LED indicator flashing, when the vacuum cleaner battery is fully charged, you can pull out the power adapter plug, the vacuum cleaner can be reused.
Note:
The power adapter must use the local configured adapter, unplug the power plug timely after charging, and do not connect with the power supply line for a long time
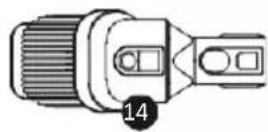
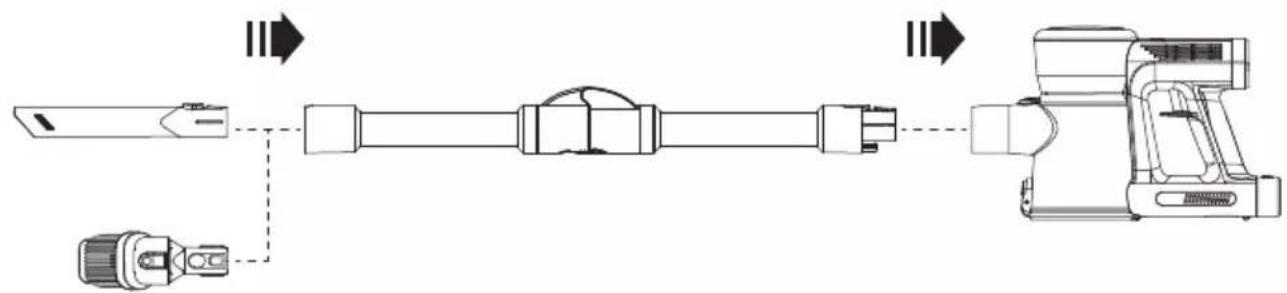
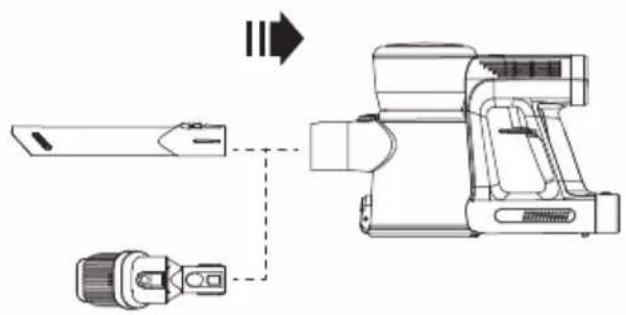
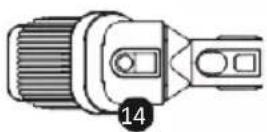
Operation instructions of handheld vacuum cleaner accessories
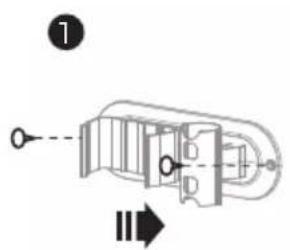
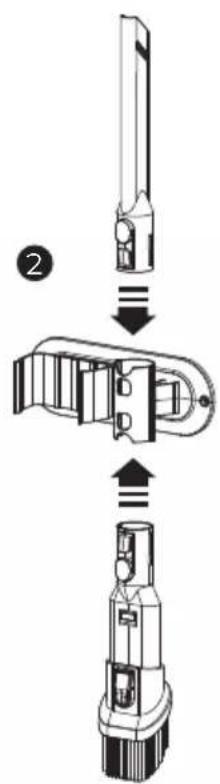
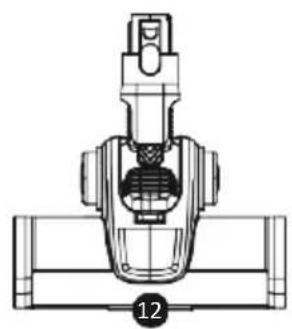
- According to the picture, insert the multi-function brush head into the front of the portable machine dust cup. After the current lock is played, the brush head is in place and can be used.
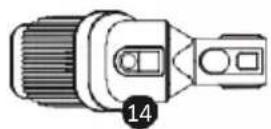
- Insert the takeover assembly in the front of the portable machine dust cup according to the picture. After the current lock pop up, the takeover is installed in place, and other accessories can be used.
- According to the drawing, after the takeover assembly is connected to the ground brush and the front lock of the local brush rises, the ground brush can be installed in place. Various accessories are needed for cleaning the floor / curtains and other items.

flowchart
graph LR
    A["Motor"] --> B["Switch"]
    B --> C["Load"]
    C --> D["Device"]
flowchart
graph LR
    A["Component 1"] --> B["Component 2"]
    B --> C["Component 3"]
    C --> D["Component 4"]
    D --> E["Output"]
Machine cleaning
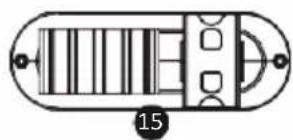
Clean the filter components regularly, because the mites in the absorbed cotton wool may not be killed, and will continue to reproduce. In order to avoid secondary pollution, the filter components should be cleaned, or replace the new filter components after cleaning.
-
Close the machine
-
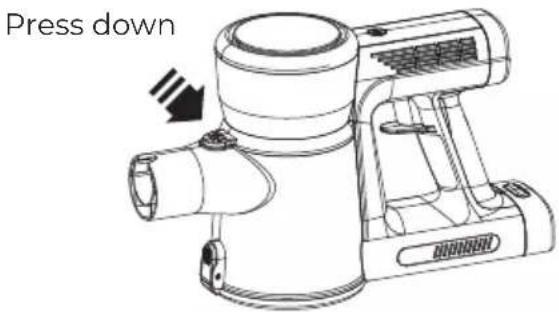
Grasp the machine handle with the right hand and the other hand press the dust cup down to remove the lock and rotate the dust cup clockwise. When the dust cup rotates clockwise, pull out the dust cup down.
natural_image
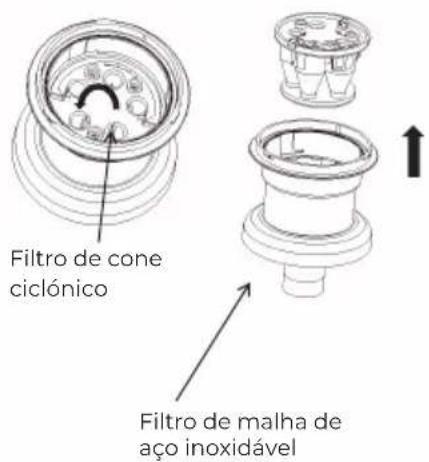
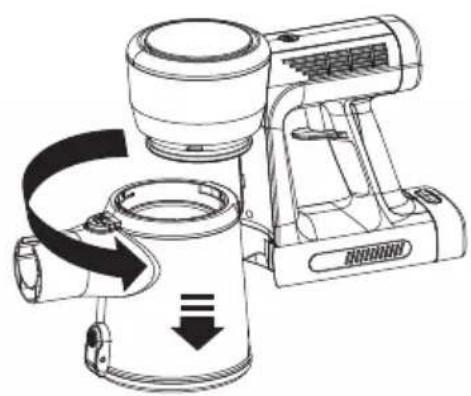
Technical line drawing of a portable air purifier with directional arrows indicating flow or movement (no text or symbols)- Hold the dust cup, press the arrow to take out the wind, press the open button to open the bottom cover of the dust cup to clean up the dust. Lift the filter hand and rotate the arrow clockwise to hear the click, take the filter button head down, rotate the cyclone cone counterclockwise out of the card slot, take the cyclone cone in the arrow direction upward, clean the dust, can rinse the filter components with water, filter element, dry.

Machine cleaning
4. Dust bucket reset:
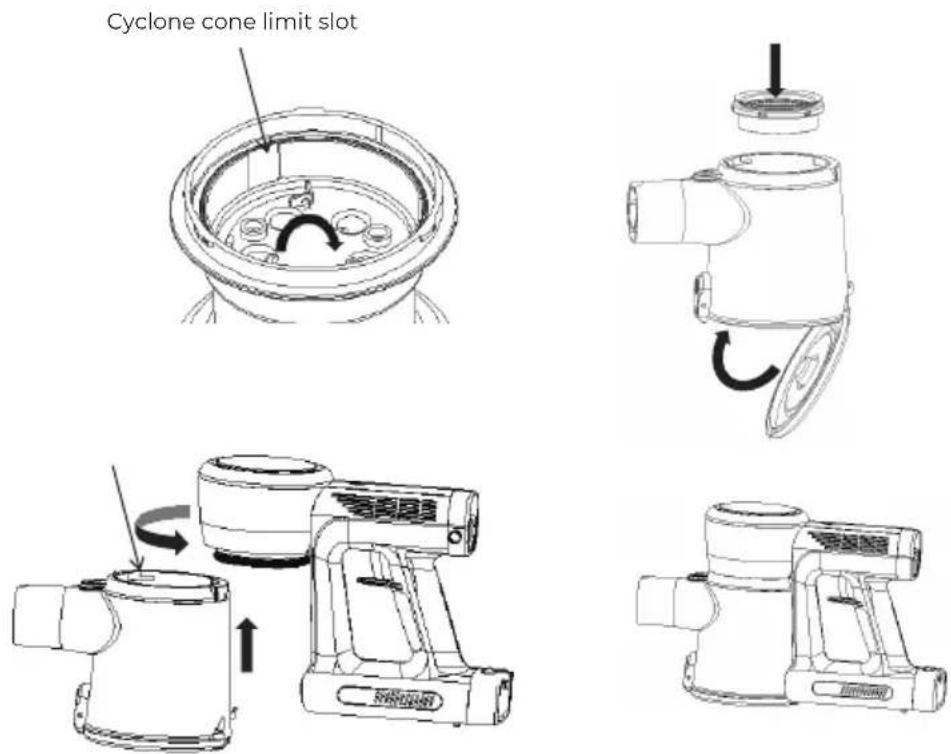
A. Turn the cyclone cone into the filter component clockwise, according to the direction of the arrow filter into the dust cup, filter component raised reinforcement positioning shape at the dust cup inlet positioning shape, counterclockwise rotation hear click installed in place, and then put the wind in the direction of the arrow dust cup in the direction of the arrow.
B. Hold the host, press the opposite direction of the removal dust cup assembly, align the dust cup limit slot on the dust cup at the host limit point, press the arrow dust cup up to the upper dust cup, rotate the dust cup counterclockwise and install in place.
- Clean out the wind: as shown in the triangle in the figure, press the button to install the wind wind, take it out in the direction of the arrow, clean the dust, rinse the filter components and filter elements with water, and dry.
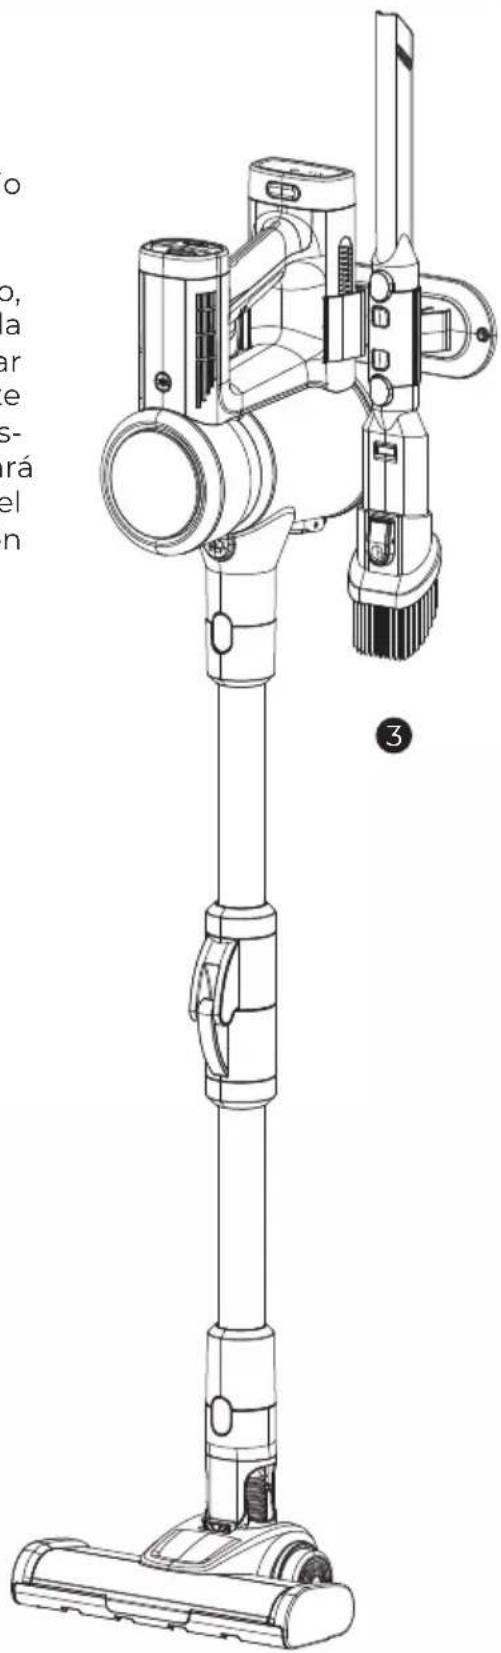
Flex tube use instruction
This folding design is for cleaning corner such as under the sofa or bed easily.
Please just press the folding swith bottom (as picture), open lock and bend it when you cleaning corner.
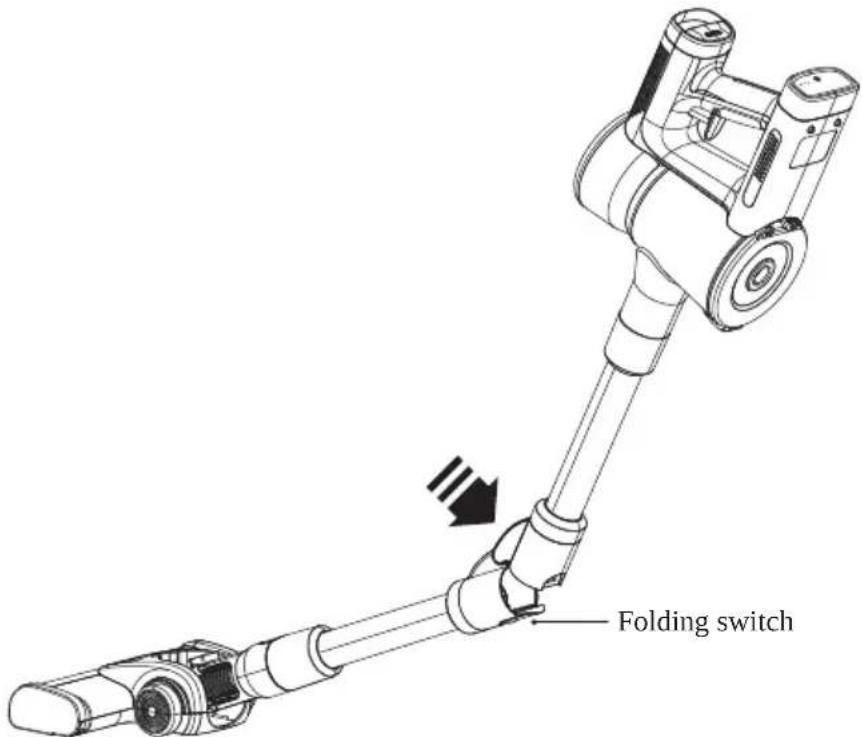
When you need to respore it, just press the tube straight. Until you hear a click indicating successful installation.
Note: please don't reverse bending, which will lead to tube damage.

- Attach the bracket base to the wall following the direction of the arrow at the appropriate height.
- Once the base is installed, the crevice tool and combo crevice tool could be attached.
- Holding the handle of the machine in you hand, place the floor brush on the floor and drag the machine to the bracket. The battery pack should face the bracket, check that the bracket is not loose, assemble the complete machine as shown in the figure to the right and the installation is complete. If you need to use the vacuum cleaner, hold the handle straight up and pull the machine out in the opposite direction.
natural_image
Technical line drawing of a vacuum cleaner with handle and base mount (no text or symbols)Daily maintenance and storage of products
- All routine maintenance and maintenance work must be carried out after the vacuum cleaner is turned off.
- Clean up dust in the dust cup regularly to avoid the failure of the vacuum cleaner.
- The surface of the vacuum cleaner can not be scrubbed with gasoline or oil, the application of soft cloth or neutral detergent scrub, scrub when the wipe cloth must be wrung dry, do not infiltrate the water into the electrical components of the vacuum cleaner.
- Keep the storage site dry.
- Heavy objects should not be piled up above the machine.
Troubles Shooting
In the following general problems, users can check:
Note: When the following problems are found, please Immediately turn off damage to the machine and causing other hazards
| Problem | Possible cause | Solution |
| Unable to boot | The battery has no electricityThe vaccum cleaner swith is not turned onInternal parts of the vaccum cleaner are damaged | RechargePush the switch slide to the on stateRemove the dust bucket and remove the garbage or blockage |
| The product makes an abnormal sound | Dust is full, or filtered too dirtyBattery power drops | Clean dust bucket and clean filter (cleaned filter should not be installed in the product until thoroughly dry to avoid damage to motor)Continue to use after recharging |
| Dust is blown out in use | Broken filter device in the dust bucketFilter components forget to install | Stop the use immediately and replace a new filterStop immediately and install the filter assembly in place |
| The vaccum cleaner is not charged | The power adapter is not power plugged inThe power adapter charging plug is not inserted into the machine charging holePower adapter is damagedInternal parts of the vacuum cleaner rare damaged | Insert the power adapter again into the power supplyThe power adapter charging plug is inserted into the charging hole of the machineReplace the power adapterReplace the vacuum cleaner |
WARRANTY POLICY
This product is guaranteed for 2 years from the date of purchase. When you have a problem that you can not solve, you must access the web www.prixton.com and click on the contact option to send us your assistance form.
These technical and electrical specifications are those of typical units and may be changed without prior notice in order to provide improved equipment.
SIMPLIFIED EU DECLARATION OF CONFORMITY
We, La Trastienda Digital located in Avenida Cervantes 49, módulo 25, Basauri 48970, Bizkaia hereby declare that the following goods, imported and selling at European market:
| BRAND | MODEL | DESCRIPTION | CATEGORY |
| Prixton | Flex Ultimate | Cordless stick vacuum cleaner | Home |
Are in compliance with the EC Council Directive of 2014/53/EU (EM DIRECTIVE) and harmonized standards and with the board of the 16th of April 2014.
The complete text of the UE Declaration of conformity is available anytime at this website address:
www.prixton.com
LA TRASTIENDA DIGITAL

natural_image
Technical line drawing of a mechanical valve assembly (no text or symbols)
natural_image
Pure mechanical component diagram without any text, numbers, or symbols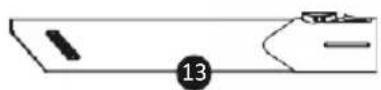
natural_image
Pure electrical circuit lines without any symbolsnatural_image
Line drawing of a portable air purifier with handle and control panel (no text or symbols)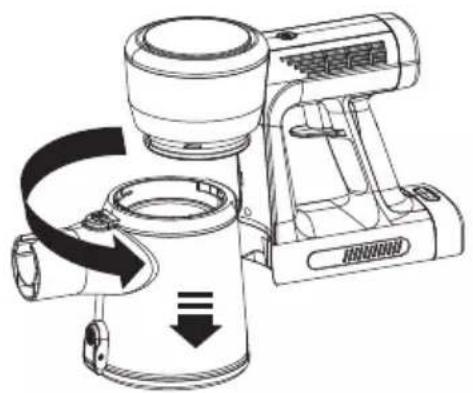
natural_image
Technical line drawing of a portable air purifier with directional arrows indicating flow or movement (no text or symbols)natural_image
Illustration of a hand holding a circular device with a pointer pointing to the top (no text or symbols)
natural_image
Technical line drawing of a mechanical device with no visible text or symbols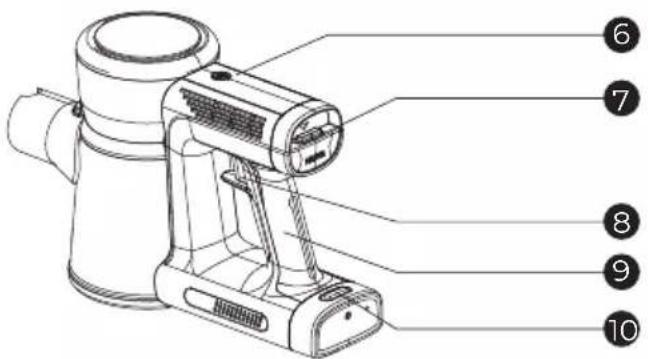
natural_image
Technical line drawing of a mechanical valve assembly (no text or symbols)
natural_image
Pure mechanical assembly diagram showing three connected components with no text or symbols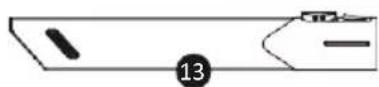
natural_image
Pure technical diagram of a mechanical component with no text or symbolsnatural_image
Line drawing of a handheld electric shaver with handle and control panel (no text or symbols)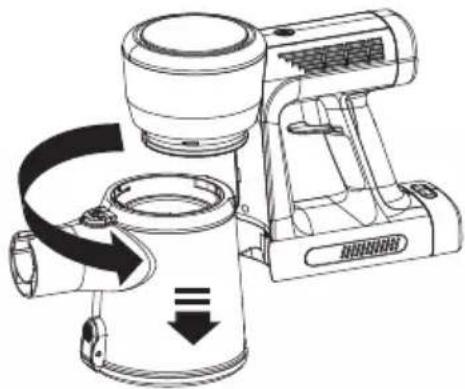
natural_image
Technical line drawing of a portable air purifier with directional arrows indicating flow or movement (no text or symbols)natural_image
Diagram of a mechanical device with arrows indicating parts of an assembly (no text or symbols)natural_image
Line drawing of a hand holding a circular gauge or dial (no text or symbols)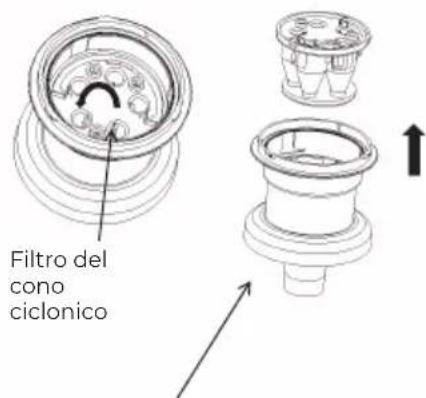

natural_image
Technical line drawing of a mechanical valve assembly (no text or symbols)
natural_image
Pure mechanical assembly diagram without any text, numbers, or symbols
natural_image
Pure electrical circuit lines without any symbolsnatural_image
Line drawing of a portable electric shaver with handle and control panel (no text or symbols)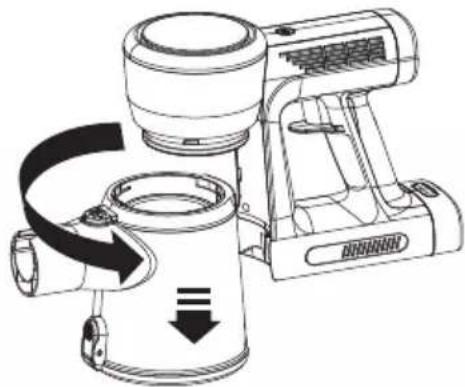
natural_image
Line drawing of a portable electric heater with directional arrows indicating motion (no text or symbols)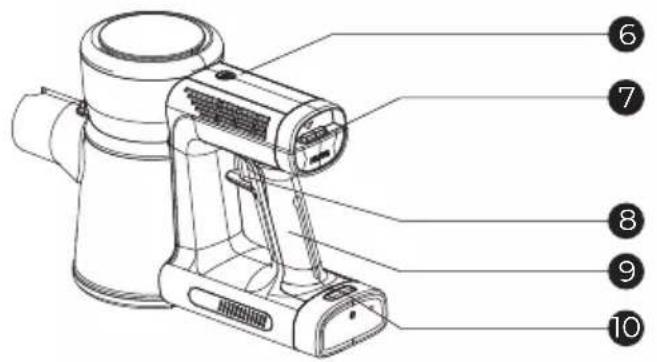
natural_image
Technical line drawing of a mechanical valve component (no text or symbols)
natural_image
Pure mechanical component diagram without any text, numbers, or symbols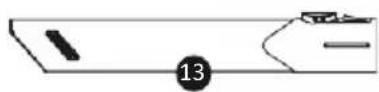
natural_image
Pure electrical circuit lines without any symbolsLimpeza da máquina
natural_image
Line drawing of a portable air purifier with handle and control panel (no text or symbols)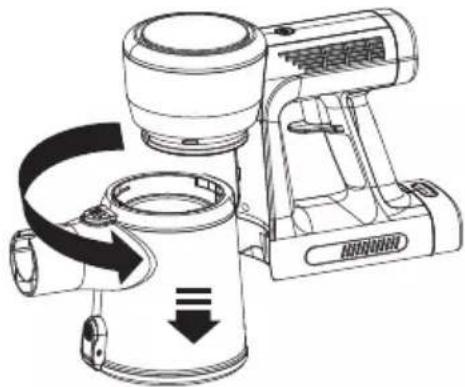
natural_image
Line drawing of a portable kitchen blender with scroll wheel and handle (no text or symbols)natural_image
Illustration of a hand holding a circular device with a pointer pointing to the lens (no text or symbols visible)