C60WHAL - Basket TAURUS - Free user manual and instructions
Find the device manual for free C60WHAL TAURUS in PDF.

| Brand | Taurus |
| Model | C60WHAL |
| Product Type | Range hood |
| Installation | Wall-mounted or under cabinet |
| Dimensions (W x D x H) | 60 x 50 x 15 cm (approx.) |
| Weight | Approximately 8 kg |
| Power supply | 220-240 V ~ 50 Hz |
| Motor power | 120 W (approx.) |
| Lighting | LED |
| Speeds | 3 speeds (switches) |
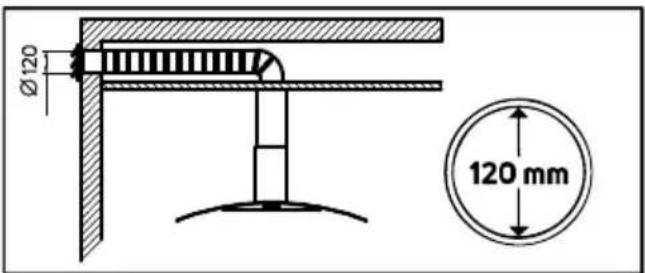
| Duct diameter | 120 mm |
| Grease filters | Aluminum, washable |
| Charcoal filter | Optional, replace every 3 months |
| Minimum safety distance | 65-75 cm above cooking surface |
| Operating mode | External evacuation or recirculation |
| Maintenance | Clean grease filters monthly |
| Warranty | Conforms to applicable legislation |
| Included accessories | Mounting kit, non-return valve |
| After-sales service | http://taurus-home.com/ |
Frequently Asked Questions - C60WHAL TAURUS
User questions about C60WHAL TAURUS
0 question about this device. Answer the ones you know or ask your own.
Ask a new question about this device
Download the instructions for your Basket in PDF format for free! Find your manual C60WHAL - TAURUS and take your electronic device back in hand. On this page are published all the documents necessary for the use of your device. C60WHAL by TAURUS.
USER MANUAL C60WHAL TAURUS
natural_image
Line drawing of a standard kitchen air conditioner unit with ventilation slots and a top cover (no text or symbols)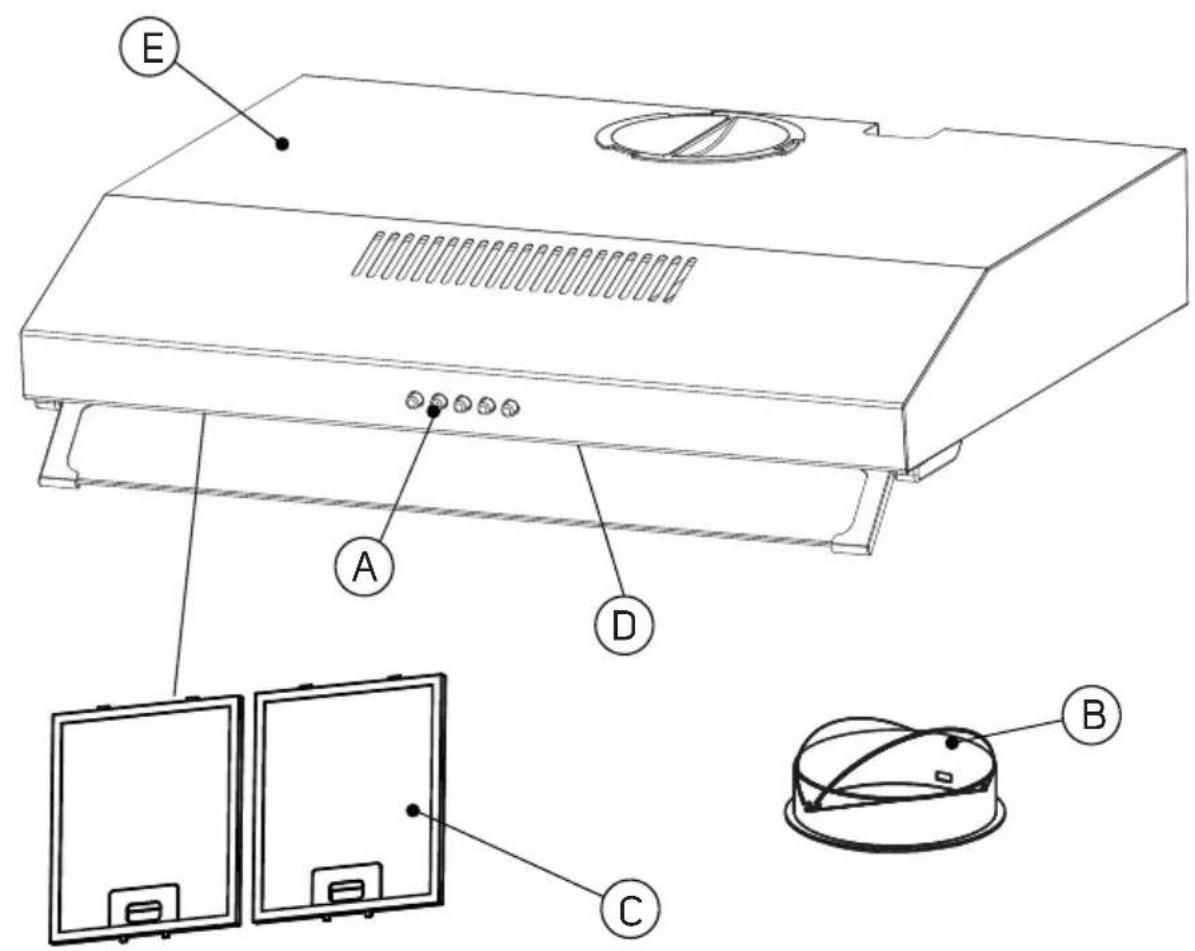
Fig.1
natural_image
Simple line drawing of a screw with a numbered circle and 'x6' label (no text or symbols on the screw itself)②
natural_image
Simple line drawing of a mechanical component with no text or symbols③
natural_image
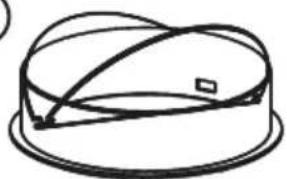
Simple line drawing of a dome-shaped object with curved lines and a small square marker on the side (no text or symbols)4
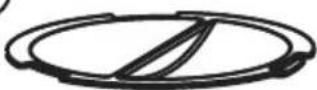
Fig.2
Español Campana extractora C60WHAL
Descripción
natural_image
Two-step diagram showing hand positioning of a rectangular object with arrows indicating rotation (no text or symbols)natural_image
Diagram of a ceiling-mounted device mounted on a brick wall, with arrows indicating direction (no text or symbols)natural_image
Isometric line drawing of a mechanical device with a central column and mounting base (no text or symbols)natural_image
Technical line drawing of a mechanical component with a central circular feature and an upward arrow, labeled 'A' (no text or symbols on the diagram itself)natural_image
Technical line drawing of a mechanical device with a circular component and directional arrow (no text or symbols)Ajuste de salida de aire
Salida al exterior:
natural_image
Technical line drawing of a mechanical component with a side view showing internal features (no text or symbols)Recirculación:
natural_image
Technical line drawing of a mechanical component with a close-up view showing internal structure and motion arrows (no text or symbols)natural_image
Diagram of a kitchen appliance with a fan and fan blade, showing internal components and a circular component (no text or symbols)Be sure to remove all packaging material from inside the appliance.
Make sure the air vented is not sent through the ducts used to vent fumes from other gas or fuel appliances.
Specific air venting regulations applicable must be complied with when installing the appliance.
Respect the legal provisions concerning safety distances from other elements such as pipes, electrical connections, etc.
The minimum distance between the support surface of the cooking elements and the lower part of the appliance is 65-75cm. (This distance can be greater if specified in the cooking elements' installation instructions).
Do not cover or obstruct any of the openings of the appliance.
The plug must be easily accessible so it can be disconnected in an emergency.
Do not add new sections to the extraction tube provided, as it could cause the appliance to malfunction.
Make sure you have the necessary elements for the installation before you start:
Impact drill
8 mm drill bit
6 mm drill bit
Philips screwdriver
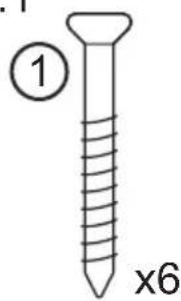
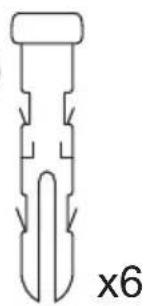
Elements contained in the box for installation (Fig.1):
- 4X30 mm screws (6 pcs.)
- Screw plug (6 pcs.)
- One-way valves and upper outlet
- Top cover
Assemblage
If you have an outlet to the outside, your hood can be connected as shown in the image below by means of an exhaust pipe (with an internal diameter of 120 mm).
NOTE: Before installation, turn the unit off and unplug it from the power outlet.
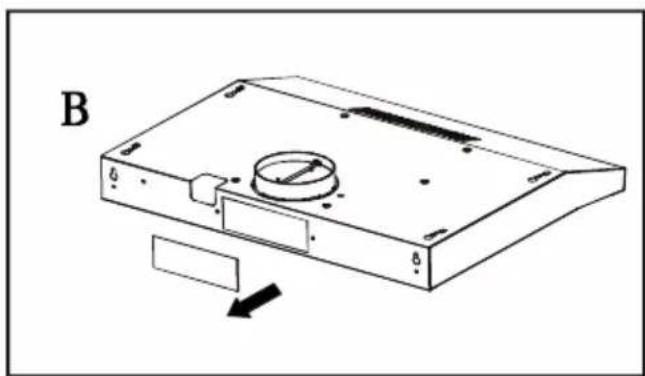
Before installation, you must remove the grease filters as shown below, you must press the lock and pull down:
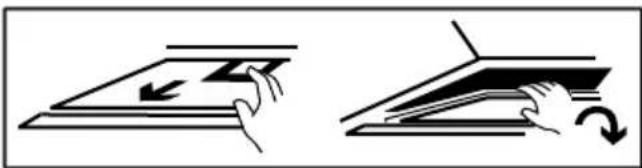
natural_image
Two-step diagram showing hand positioning of a rectangular object with an arrow indicating rotation (no text or symbols)There are two ways to install this cooker hood:
Mode 1:
To install onto the wall drill 2 holes of 8mm of diameter on a suitable place according to the center of the distance of hole in the back of the cooker hood.
Insert the nut into the holes.
Insert the screws into the nuts and tighten. Put the cooker hood onto the tighten screws.
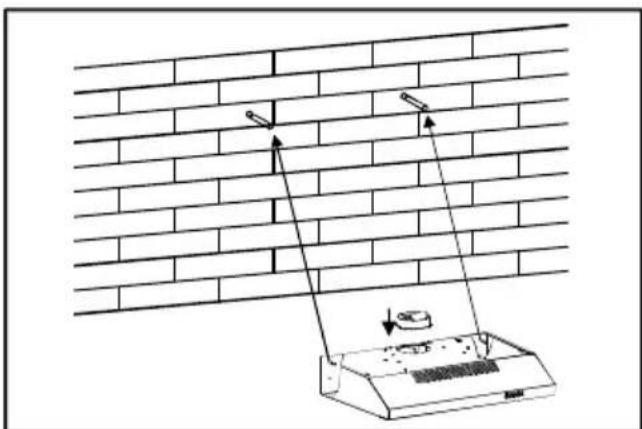
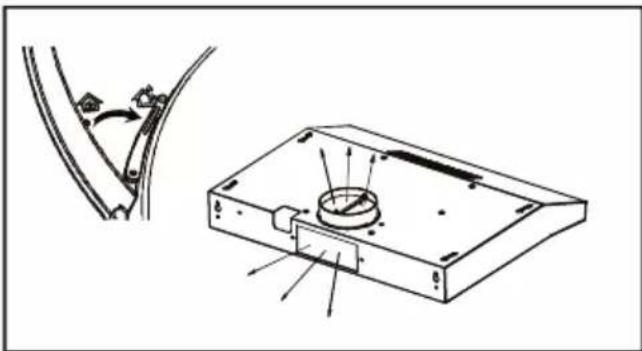
natural_image
Diagram of a mounted air vent or exhaust system against a brick wall, showing airflow direction and component placement (no text or symbols)Fix the cooker hood with safety screw. The two safety vents are positioned on the back casing, with a diameter of 6mm.
Put the one-way valve onto the cooker hood.
Mode 2:
Drill 4 holes of 6mm diameter at the bottom of the hanging cupboard.
Put the one-way valve on the cooker hood, then install the cooker hood on the bottom of the
hanging cupboard, tighten the hood with enclosed 4 screws.
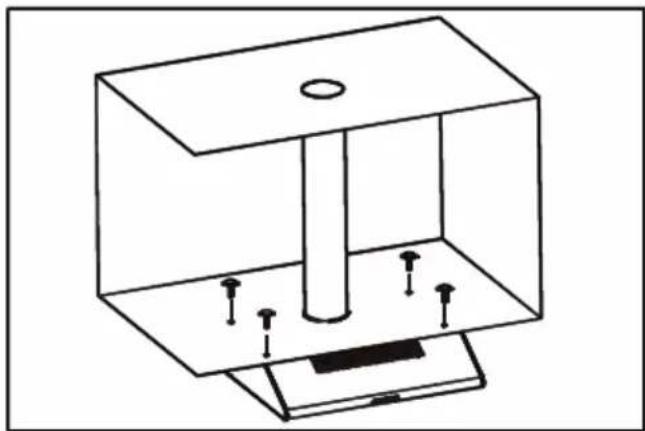
natural_image
Isometric line drawing of a mechanical device with a central column and mounting base (no text or symbols)NOTE: The extensible pipe is an optional accessory not supplied. Make sure you remove all the protection film before installation.
There are two ventilation methods, vertical and horizontal:
Vertical ventilation:
The air will be vented from the top of the hood, you have to install also the one-way valve.
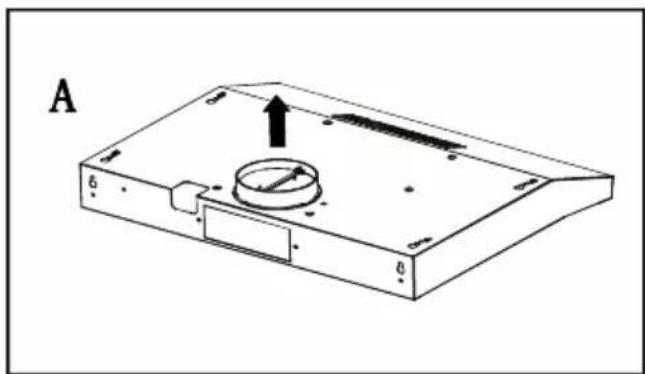
natural_image
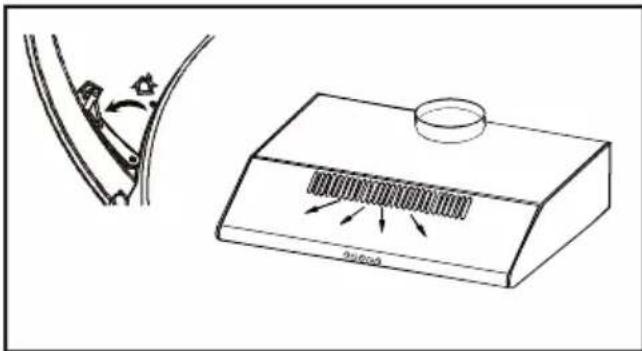
Technical line drawing of a mechanical component with a central circular feature and an upward arrow, labeled 'A' (no text or symbols on the diagram itself)Horizontal ventilation:
You can put the round cover in the upper outlet and remove the rear lid to vent from the back.
natural_image
Technical line drawing of a mechanical device with a circular component and directional arrow (no text or symbols)Air ventilation setting
Outdoor exhausting:
Turn the adjuster to outdoor position, install the outlet, turn on the cooker hood, then the air will be vented from the outside outlet.
natural_image
Technical line drawing of a mechanical assembly with a bracket and mounting bracket (no text or symbols)Recirculation:
The recirculation mode needs the carbon filter (accessory not supplied). You have to turn the adjuster to indoor position, install the outlet cover and then the air can be vented from the inside outlet.
natural_image
Technical illustration of a mechanical component with a close-up view showing internal structure and motion arrows (no text or symbols)The charcoal filter is mounted on the lower part of the motor housing and it must be changed once every three months or after 120 hours of use, it shouldn't be exposed to heat. It cannot be washed or recycled.
To install the carbon filter follow the instructions below:
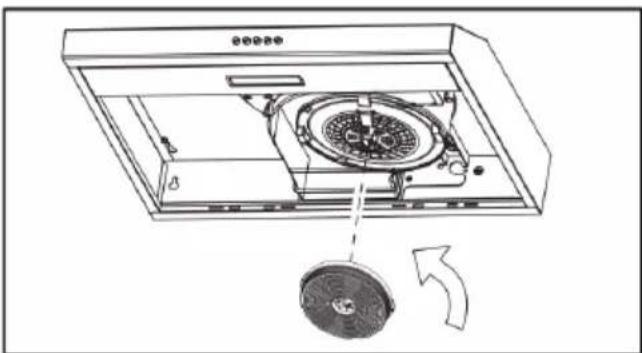
natural_image
Technical line drawing of a kitchen appliance with a circular component and directional arrow (no text or symbols)Make sure the filter is securely locked.
NOTE: When the carbon filter is connected, the suction will be lower.
Instructions for use
Before use:
Remove the appliance's protective film.
Make sure that all products' packaging has been removed.
Ensure that the selected tension on the voltage selector coincides with the tension of the mains.
Use:
Connect the appliance to the mains.
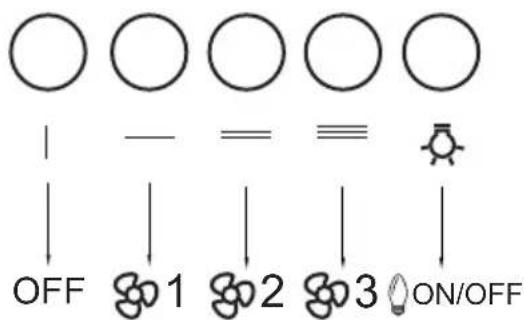
Turn the appliance on, by using one of the speed selection buttons (Fig.2).
Light function:
The appliance includes a light function, which illuminates the working area under the appliance (Fig.2).
Once you have finished using the appliance:
Stop the appliance by pressing the stop button (Fig.2).
Practical tips:
It is recommended to keep the filters clean, grease and dirt in the filters decreases the efficiency of the engine and increases its energy consumption.
Adjust the extraction speed according to the amount of smoke, working at high speeds with little smoke consumes more energy.
Cleaning
Disconnect the appliance from the mains and allow it to cool before undertaking any cleaning task.
Clean the equipment with a damp cloth with a few drops of washing-up liquid and then dry.
Do not use solvents, or products with an acid or base pH such as bleach, or abrasive products, for cleaning the appliance.
Do not let water or any other liquid get into the air vents to avoid damage to the inner parts of the appliance.
Remove the filters, clean in hot, soapy water or in a dishwasher. Replace parts correctly.
Cleaning is recommended every month.
NOTE: If you clean the filters in the dishwasher, they may change colour slightly.
Never submerge the appliance in water or any other liquid or place it under running water.
If the appliance is not maintained in good cleaning condition, its surface can degrade and inexorably affect the life of the appliance and lead to a dangerous situation.
Then dry all parts before its assembly and storage.
Changing the bulb/s:
LED
You must purchase the specific spare part for your model.
Steps to follow:
- Disconnect the hood from the mains.
- Press the LED to push towards the inside.
- Disconnect the connector.
- Introduce the new LED and push to place it in its place.
- Reconnect the connector.
Changing the filters:
For activated carbon filters (if applicable), it is advisable to replace them at least once a year or every 48 hours of operation.
In the case of permanent mesh filters, they do not need to be replaced.
Supplies
Supplies can be acquired from distributors and authorised establishments (such as filters, bulbs...) for your appliance model.
Always use original supplies, designed specifically for your appliance model.
Français Hotte aspirante C60WHAL
Description
natural_image
Two-step diagram showing hand positioning of a folded paper or sheet with arrows indicating movement (no text or symbols)natural_image
Isometric line drawing of a mechanical device with a central column and mounting base (no text or symbols)natural_image
Technical line drawing of a mechanical device with a central component and mounting holes (no text or symbols)natural_image
Technical line drawing of a mechanical device with a circular component and directional arrow (no text or symbols)natural_image
Technical diagram showing a mechanical assembly with a bracket and a separate view of a component (no text or symbols present)Recirculation :
natural_image
Technical illustration of a mechanical component with a side view showing a curved pipe and a labeled base (no text or symbols present)natural_image
Diagram of a kitchen appliance with a circular fan and fan blade, showing internal components and a rotating arrow (no text or symbols)natural_image
Two-step diagram showing hand positioning of a folded panel with arrows indicating direction (no text or symbols)natural_image
Isometric line drawing of a mechanical assembly with a central cylindrical component and mounting base (no text or symbols)natural_image
Technical line drawing of a mechanical component with a central circular feature and an upward arrow, labeled 'A' (no text or symbols on the diagram itself)natural_image
Technical line drawing of a mechanical device with a circular component and directional arrow (no text or symbols)Ajuste da saída de ar Saída para o exterior:
natural_image
Technical diagram showing a mechanical assembly with a bracket and a separate view of a component (no text or symbols present)Recirculação:
natural_image
Technical illustration of a mechanical component with a side view showing a curved pipe and a labeled base (no text or symbols present)natural_image
Technical line drawing of a kitchen appliance with a fan and fan blade assembly (no text or symbols)natural_image
Two-step diagram showing hand positioning of a rectangular object with an arrow indicating rotation (no text or symbols)natural_image
Diagram of a brick wall with an air purifier and directional arrows indicating airflow or movement (no text or symbols)natural_image
Isometric line drawing of a mechanical device with a central column and mounting base (no text or symbols)natural_image
Technical line drawing of a mechanical component with a central cylindrical feature and an upward arrow, labeled 'A' (no text or symbols on the diagram itself)natural_image
Technical line drawing of a mechanical device with a circular component and directional arrow (no text or symbols)natural_image
Technical line drawing of a mechanical assembly with a bracket and mounting bracket (no text or symbols)Recirculació:
natural_image
Technical illustration of a mechanical component with a circular top and internal striped structure, alongside a close-up of a curved pipe or cable (no text or symbols)natural_image
Technical line drawing of a kitchen appliance with a circular fan and fan blade (no text or symbols)natural_image
Two-step diagram showing hand positioning of a folded panel with arrows indicating direction (no text or symbols)natural_image
Isometric line drawing of a mechanical device with a central column and mounting base (no text or symbols)natural_image
Technical line drawing of a rectangular electronic device with a circular component and an arrow indicating direction (no text or symbols)natural_image
Technical line drawing of a mechanical device with a circular component and directional arrow (no text or symbols)natural_image
Technical line drawing of a mechanical component with a side view showing internal components and motion arrows (no text or symbols)Рециркулация:
natural_image
Technical line drawing of a mechanical component with a side view showing internal structure and airflow direction (no text or symbols)natural_image
Technical diagram of a mechanical device with a circular component and directional arrow indicating rotation (no text or symbols present)This product enjoys the recognition and protection of the legal guarantee in accordance with current legislation. To enforce your rights or interests you must go to any of our official technical assistance services.
You can find the closest one by accessing the following web link: http://taurus-home.com/
You can also request related information by contacting us.
You can download this instruction manual and its updates at http://taurus-home.com/
Français
GARANTIE ET ASSISTANCE TECHNIQUE
COUNTRY ADDRESS PHONE
| Algeria Zone d'Activite, N° 62, Constantine 213770777756 | ||
| Argentina Av. del Libertador 1298,(B1638BEY), Vicente López (Pcia. Buenos Aires) | 541153685223 | |
| Belgium Mariëndonkstraat 5, 5154 EG, Elshout 31620401500 | ||
| Benin 359 Av. Steinmetz, 1930, Cotonou 0299-21313798 | ||
| Bulgaria | 265,Okolovrasten Pat, Mladost 4, 1766, Sofia | 35929211120 / 35929211193 |
| Burkina Faso Avenue Bassawarga, 01 BP915, Ouagadougou 226 25301038 | ||
| Congo (Republic of) 98 Blvd General Charles de Gaulle, Pointe Noire 242066776656 | ||
| Cyprus | 20, Bethlehem Str. / P.O.Box 20430, 2033, Strovolos | 35722711300 |
| Czech Republic | Milady Horakove 357/4, 568 02, Svitavy | 420 461 540 130 |
| Democratic Republic of the Congo | AV. Pont Canale N° 3440, Kinshasa | 00243-991223232 |
| Equatorial Guinea | SN Av Patricio Lumumba y C/ Jesus B, Bata | 00240 333 082958 / 00240 333 082453 |
| Equatorial Guinea | Calle de las Naciones Unidas, PO box 762, Malabo | 240333082958 / 240333082453 |
| España Avda Barcelona, S/N, 25790 Oliana (Lleida) atencioncliente@taurus.es | 902 118 050 | |
| Ethiopia Lideta Sub City Kebele 10 H.NO 124, Addis Ababa | +251 11 5518300 | |
| France | Za les bas musats 18, 89100, Malay-le-Grand | 03 86 83 90 90 |
| Gabon | BP 574, Port-Gentil Centre-ville | 24101552689 / 24101560698 |
| Ghana | Ederick Place, Accra-Ghana | 302682448 / 302682404 |
| Gibraltar 11 Horse Barrack Lane, 54000, Gibraltar 00350 200 75397 / 00350 200 | ||
| 41023 | ||
| Greece Sapfous 7-9, 10553, Athens +30 21 0373 7000 | ||
| Guinea BP 206, GN, Conakry (224) 622204545 | ||
| Hong Kong Unit H,13/F., World Tech Centre, Hong kong (852) 2448 0116 / 9197 3519 | ||
| Hungary Késmárk utca 11-13, 1158, Budapest +36 1 370 4519 | ||
| India C-175, Sector-63, Noida, Gautam Budh Nagar - 201301, Delhi | (+91) 120 4016200 | |
| Ivory Coast 01 Rue Des Carrossiers-Zone 3, B.P 3747, Abidjan 01 (RCI) | 22521251820 / 225 21 353494 | |
| Jordan 28 Basman St Down town, Amman +962 6 46 222 68 | ||
| Kuwait | P.O. BOX 3379 hawally, 32034, Hawally | +965 2200 1010 |
| Lebanon Damascus Highway; Sciale Building, Jamhour | 9615922963 | |
| Luxembourg | Mariëndonkstraat 5, 5154 EG, Elshout 31620401500 | |
| Mali | BP E2900, Dravela Bolibana | 223227216 / 223227259 |
| Marruecos | Avenue 2 Mars, Résidence Nassrallah, Appt n° 2 1er, Casablanca | (+212) 522 86 30 95 |
| Mauritania | 134 Avenue Gamal Abdener Ilot D, Nouakchott | 2225254469 / 2225251258 |
| Mexico Rosas Moreno N° 4-203 Colonia de San Rafael C.P. 06470 – Delegación Cuauhtémoc, Ciudad de México | (+52) 55 55468162 | |
| Montenegro | Rastovac bb, 81400, Niksic | +382 40 217 055 |
| Netherlands | Mariëndonkstraat 5, 5154 EG, Elshout 31620401500 | |
| Nigeria 8, Isaac; John Str,G.R.A Ikeja Lagos | 23408023360099 | |
| Paraguay | Denis Roa 155 c/ Guido Spano, Asunción | 21665100 |
| Peru | Calle los Negocios 428, Surquillo, Lima | (511) 421 6047 |
| Portugal Avenida Rainha D. Amélia, n°12-B, 1600-677, Lisboa | +351 210966324 | |
| Romania | Dudesti Pantelimon 23, 410554, Bucharest | 031.805.49.58 |
| Serbia | Rastovac bb, 81400, Niksic | +382 40 217 055 |
| Slovakia Milady Horakove 357/4, 568 02, Svitavy | 420 461 540 130 | |
| Southafrica | Unit 25 & 26, San Croy Office Park, Die Agora Road, Croydon, Kempton Park, 1619, Johannesburg | (+27) 011 392 5652 |
| Tunisia | 2, Rue de Turquie, Tunis | 21671333066 |
| Ukraine | Block 6, Ap Housing Estate Topol-2, B, 49000, Dnepropetrovsk | 380563704161 / 380563704161 |
| United Arab Emirates | P.O.BOX 8543, Dubai | 14506246200 |
| Uruguay | Luis Alberto de Herrera 3468, 11600, Montevideo | 598 2209 28 00 |
| Vietnam Lot 7 Ind. Zone for, Ha Noi | 84437658111 / 84437658110 | |