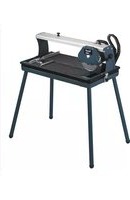
FSG 2000 - Saw Herkules - Free user manual and instructions
Find the device manual for free FSG 2000 Herkules in PDF.


| Brand | Herkules |
| Model | FSG 2000 |
| Product type | Tile saw (tile cutter) |
| Motor power | 800 W |
| Voltage / Frequency | 230 V ~ 50 Hz |
| Rotation speed | 2950 min⁻¹ |
| Insulation class | Class B |
| Protection type | IP 54 |
| Cutting length | 520 mm |
| Cutting height at 90° | max. 30 mm |
| Cutting height at 45° | max. 25 mm |
| Table dimensions | 790 x 395 mm |
| Diamond cutting disc | ∅ 200 x 25.4 mm |
| Sound pressure level (LPA) | 72.2 dB(A) (operation) / 60.6 dB(A) (idle) |
| Sound power level (LWA) | 85.2 dB(A) (operation) / 73.6 dB(A) (idle) |
| Cooling | Integrated cooling water pump |
| Table material | Aluminum |
| Delivery contents | Machine, water tank, water pump, angle stop, frame |
| Main functions | 90° cut, 45° diagonal cut, 45° longitudinal cut (Jolly) |
| Safety devices | Blade guard, on/off switch, transport lock |
| Spare parts and repairability | Replaceable diamond disc, spare parts available on order |
| Maintenance and cleaning | Regular cleaning with cloth or brush, lubrication of moving parts |
Frequently Asked Questions - FSG 2000 Herkules
User questions about FSG 2000 Herkules
0 question about this device. Answer the ones you know or ask your own.
Ask a new question about this device
Download the instructions for your Saw in PDF format for free! Find your manual FSG 2000 - Herkules and take your electronic device back in hand. On this page are published all the documents necessary for the use of your device. FSG 2000 by Herkules.
USER MANUAL FSG 2000 Herkules
3



1. Description of the machine (Fig. 1/2)
-
Base frame
-
Diamond wheel
-
Trough
-
Aluminium table
-
Angle stop
-
Rail fence
-
Guide rail
-
Safety hood for the cutting wheel
-
Handle
-
Star grip screw for setting the angle
-
Star grip screw for securing during transportation
-
Base frame
-
Cooling water pump
-
Hose
-
Motor
-
ON/OFF switch
-
Angle scale
2. Items supplied
- Tile cutting machine
● Trough (3)
● Cooling water pump (13)
● Angle stop (5)
● Base frame (1)
3. Intended use
The tile cutting machine is designed for the standard cutting of small and medium-size tiles (glazed tiles, ceramic tiles or similar) which can be accommodated by the size of the machine. It is designed for DIY applications and craft businesses in particular. It should never be used for the cutting of wood or metal. The machine should be used exclusively
for its intended purpose. No other use is permitted and the manufacturer will not accept liability for any damages or injury resulting from any such use; responsibility rests with the user/operator in any such case. Only use cutting wheels which are suitable for the machine. Saw blades should never be used. Compliance with the safety instructions, the assembly instructions, and advice and instructions on operation contained in the operating instructions also falls under the terms of intended use. All persons operating or carrying out maintenance work on the machine must be acquainted with the above and be aware of all potential dangers. In addition, strict compliance with the accident prevention regulations in force in your area, as well as all other general rules of health and safety at work, is imperative. The manufacturer's liability shall be deemed void if the machine is modified in any way and the manufacturer shall therefore accept no liability for any damages arising as a result of modifications. Even if the machine is used as intended, certain residual risk factors cannot be completely eliminated. For reasons of design and the construction of the machine, the following eventualities are possible:
- Contact with the diamond cutting wheel where it is not covered.
- Contact with the diamond cutting wheel while it is turning.
● Defective diamond tips flying off the cutting wheel.
● Workpieces or parts of workpieces kicking back.
● Damage to hearing if the ear-muffs specified are not used.
4. Important instructions
4.1. General
Please read this manual carefully and pay particular attention to the instructions contained within it. Use this information to get to know the machine, its correct operation and safety regulations (see supplementary sheet) before using for the first time.
4.2. Additional safety instructions
- Set up the machine on a level, non-slip floor.
Make sure that the machine does not wobble. - Check that the voltage on the rating plate is the same as your supply voltage. Only then are you to insert the power plug in the socket-outlet.
● Wear safety goggles.
● Wear ear-muffs.
● Wear safety gloves.
● Never use cracked diamond cutting wheels.
GB
Replace immediately.
● Never use segmented cutting wheels.
- Caution! The cutting wheel runs on after the machine is switched off!
● Never apply side pressure to the diamond cutting wheel in order to bring it to a halt.
- Caution! The diamond cutting wheel must be cooled with water at all times.
● Always pull out the power plug before changing the cutting wheel.
● Use only suitable diamond cutting wheels.
● Never leave the machine unattended in rooms with children.
● Always pull out the power plug before examining the electric motor compartment system.
5. Technical data
Motor rating 800 W
Motor speed 2950 rpm
A.c. motor 230 V - 50 Hz
Insulation material class Class B
Insulation IP54
Cut length 520 mm
Jolly length 520 mm
Cut height 90° max. 30 mm
Cut height 45° max. 25 mm
Cutting table:
Dimensions 790 x 395 mm
Diamond cutting wheel o 200 x o 25.4
Noise emission levels
● The noise emitted by this saw is measured in accordance with EN ISO 3744; EN ISO 11201 The noise at the workplace may exceed 85 db (A). The user will require noise protection measures if this is the case. (Wear ear-muffs!)
With-load
No-Load
operation
operation
Sound pressure level 72.2 dB(A) 60.6 dB(A)
Sound power level 85.2 dB(A) 73.6 dB(A)
6. Before using for the first time
● The machine must be set up so that it stands firmly, i.e. it must be securely screwed to a work bench, the base frame supplied in delivery, or similar.
● All covers and safety devices must be correctly attached before the machine is used for the first
time.
● The cutting wheel must rotate smoothly.
- Check that the voltage on the rating plate is the same as your supply voltage before you connect the machine to the power supply.
7. Assembly and operation
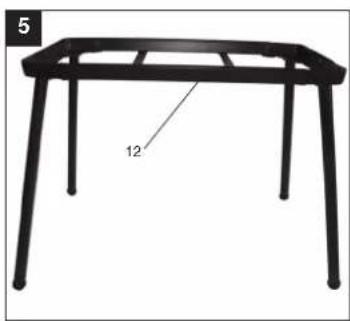
7.1 Assembly of the base frame and cooling water pump (Fig. 2-5)
● Fasten the feet (18) to the base frame (12) with the screws (19).
● Turn the base frame upright (see Fig. 5).
● Place the trough (3) in the base frame (12).
● Place the cooling water pump (13) in the trough (3).
● Fill with water until the pump (13) is full.
● Place the complete tile cutting machine in the trough (3) (see Fig. 2).
● Unscrew the star grip screw (11) (for securing during transportation!).
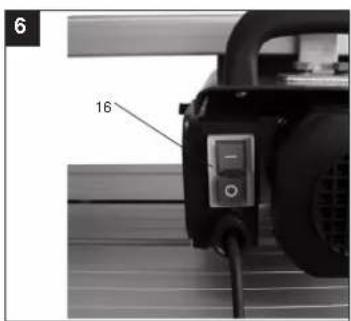
7.2 ON/OFF switch (Fig. 6)
● To switch on, press the "1" on the ON/OFF switch (16).
● Before you begin cutting, wait until the cutting wheel has reached maximum speed and the cooling water pump (13) has started supplying the cutting wheel with water.
● To switch off, press the "0" on the switch (16).
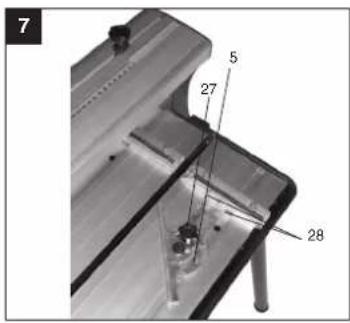
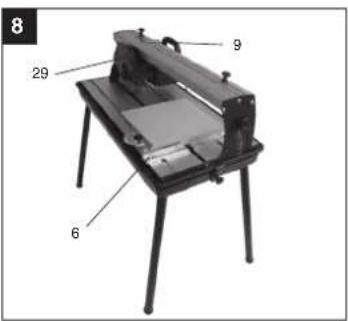
7.3 90° Cutting (Fig. 7/8)
● Loosen the star grip screw (27).
- Set the angle stop (5) to 90° and retighten the star grip screw (27).
● Retighten the screws (28) to fasten the angle stop (5).
- Move the machine head (29) to the far end with the handle (9).
- Position the tile against the rail fence (6) on the angle stop (5).
● Switch on the tile cutting machine.
● Caution: Always wait until the cooling water has reached the cutting wheel (2) first.
- Move the machine head (29) slowly and smoothly forward through the tile with the handle (9).
- Switch off the tile cutting machine after completion of cutting.
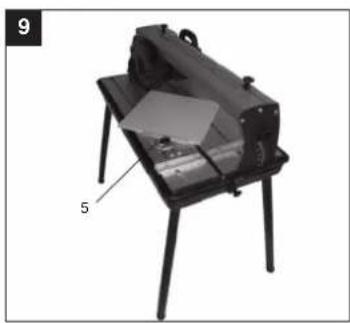
7.4 45° Diagonal cut (Fig. 9)
- Set the angle stop (5) to 45°.
GB
● Cut as described in 7.3.
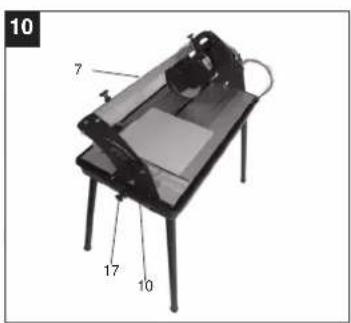
7.5 45° Lengthwise cut, "jolly cut" (Fig.10)
● Loosen the star grip screw (10).
● Tilt the guide rail (7) to the left to 45° on the angle scale (17).
● Retighten the star grip screw (10).
● Cut as described in 7.3
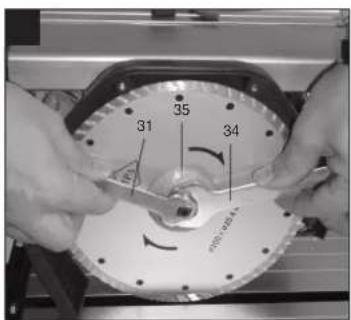
7.6 Changing the diamond cutting wheel (Fig. 11/12)
● Pull out the power plug.
● Unscrew the four screws (30) and remove the safety hood (8) for the blade.
● Place the wrench (31) on the motor shaft and hold.
- Using the wrench (34), loosen the flange nut in the direction of rotation of the cutting wheel (2). (Caution: Left-hand screw-thread.)
- Remove the outer flange (35) and cutting wheel (2).
● Clean the mounting flange thoroughly before fitting the new cutting wheel.
● Fit the new cutting wheel by following the above procedures in reverse and then tighten.
Caution: Pay attention to the direction of rotation of the cutting wheel!
● Mount the safety hood (8) for the blade again.
- Maintenance
● Clean off all dust and soiling from the machine at regular intervals, preferably with a cloth or a brush.
● Lubricate all moving parts at regular intervals.
- Do not use any aggressive cleaning agents to clean plastic parts.
- Clean off any soiling on the trough (3) and cooling agent pump (13) at regular intervals, otherwise the diamond cutting wheel (2) may not be cooled as required.
- Ordering of replacement parts
When ordering replacement parts, please provide the following information:
● Machine type
● Article number of the machine
● Identification number of the machine
● Replacement part number of the part to be replaced
GB EC Declaration of Conformity
The undersigned declares in the name of the company that the product is in compliance with the following guidelines and standards.
The image contains no text or characters. It is a blank rectangular box.
97/23/EG
×
89/336/EWG
□
90/396/EWG
[NO TEXT]
89/686/EWG
ISC GmbH
Eschenstraße 6
D-94405 Landau/Isar
EN 61029-1; prEN 61029-2-7; EN 12418; EN 60825-1; EN 55014-1; EN 55014-2; EN 61000-3-2; EN 61000-3-3
The product described in these instructions comes with a 5-year warranty
covering defects. This 5-year warranty period begins with the passing of risk or
when the customer receives the product
For warranty claims to be trippost, the price has to receive the credit
maintenance and be put in the proper note as described in the operating
115.10.015.
Your statutory rights of warranty are naturally unaffected during these 5
years
This warranty applies in January, or in the respective country of the
manufacturing > main regional sales partner, in a supplier of local
Agreements. Please time the details for collecting the customer service times otherwise for government or the service already listed below.
RESPONSIVE FOR YOUR ROUND OF THE SERVICE SHARE & SHARE OF 100%
E CERTIFICADO DE GARANTIA
For at a time of time, we are in the following: at a time of time.
bleve: d. hennigl vengenbener, Nellenin in drijfings-ejeelingels avvishinger,
ferrill.
of the figure, trichurmandel an inch-clampin, that transverse and far are in de
In Mio. 1980, 2003, 16:45:17, 16:45:17, 16:45:17, 16:45:17, 16:45:17, 16:45:17, 16:45:17, 16:45:17, 16:45:17, 16:45:17, 16:45:18
Digital products in class
©ZÁRUČNÍ LIST
Na pristoj oursiševy v nisztu masktujame ziraku. 5 lat, pro ten prijed, 2= by
In this case, the following results are:
ZAKORSKI PROJESI. NICINE VAS NA 03 ANTE PAZIJO NA VASA KOMIAK OSSO
nadrežne servisne službo u regi(III) na dočie navodemu srdosu servise.
TG GARANTI BELGESI
Unit 5 Morcelb Wharf
Twelve Quava
Bidenhead.
CH 41 1NG
Tel. 0151 6491500. Fax 0151 6491501
H Global Insurance Ltd
Einnel Hungana Ltd.
Vajda Peter 12
H-1089 Budarces T-1 24 0705/04
Tel. 01 3539401. Fax 01 2101178
TR Semak
makina ticaret ve sanayi led. sti
Allay Cesans irah, Yasmin Sok, No: 19
TR 34843 Maltepe - Istanbul
Tel. 0216 4594865. Fax 0216 4429325
Voblar s.r.o
Zupná 4
SK-95301 Zlate Moravce
Tel. 37 6426255, Fax 37 26256
KZ Turkestan
Investitions- Baugesellschaft
Christofor Stefanidi
Bolinskij-102
KZ-1860008 st. Chimkent
Tel/Fax 03252 242414
(10) Novatech Srl
Sc. A. AP 9 Sector 1
80-75121 Bucuresti
Tel. 021 4104800, Fax 021 4103566
©2 Poker Plus S.H.O.
Ámal yu Berbayire
Budava 10 B
CZ-19011 Prahe - Bechovice 911
© Stav GmbH
Mihail Koloni str. 18 W
BG-9000 Varna
Tel. 052 605254
© Einhell Croatia d.o.o.
Velika Ves 2
HR-49224 Lepalci
Tel 049 342 444, Fax 049 342 392
©GMA-Elektromechanika d.u.o
Cesta Andreia Bitenca 115
SLO 1000 Llubllana
Tel 01/5838304, Fax 01/5193603
GR An Mayofidopulas S A
Technical & Commercial Company
- Papastratou & Asklipou Str.
GR 18545 Pirăue
Tel 0210 4136155. Fax 0210 4137692
①15 Berman
Halai Trading Co. LLC
POB 9262, Nakheel Rd. Deira, Shop No. 15
UAE-Dubai
Tel. 04 2279554, Fax 04 2217686
(1) Alborz Abzar Co. Ltd.
No. 111, Bastan Passage, Imam Khomeini Ave.
IR-11146 Techeran
Tel 021 6716072, Fax 021 6727177
Einhell
Poslowni Cantar 96
BA-72250 Vitcz
(24) Eursa Industrial and Automotive Supply
Bessemar
Duncanville
ZA-Vereenlging 1930
Tel 16 455 571 2. Fax 16 455 571 6
D
The reprinting or reproduction by any other means, in whole or in part, of documentation and papers accompanying products is permitted only with the express consent of ISC GmbH.
F


Brand : Herkules
Model : FSG 2000
Category : Saw