AquaTrio Cordless XW9385 - Vacuum Cleaner PHILIPS - Free user manual and instructions
Find the device manual for free AquaTrio Cordless XW9385 PHILIPS in PDF.

User questions about AquaTrio Cordless XW9385 PHILIPS
0 question about this device. Answer the ones you know or ask your own.
Ask a new question about this device
Download the instructions for your Vacuum Cleaner in PDF format for free! Find your manual AquaTrio Cordless XW9385 - PHILIPS and take your electronic device back in hand. On this page are published all the documents necessary for the use of your device. AquaTrio Cordless XW9385 by PHILIPS.
USER MANUAL AquaTrio Cordless XW9385 PHILIPS
natural_image
Icon of an open book with a lowercase 'i' inside, symbolizing information (no text or symbols present)
natural_image
Exterior view of a black and white vacuum cleaner with attached circuit board (no text or symbols visible)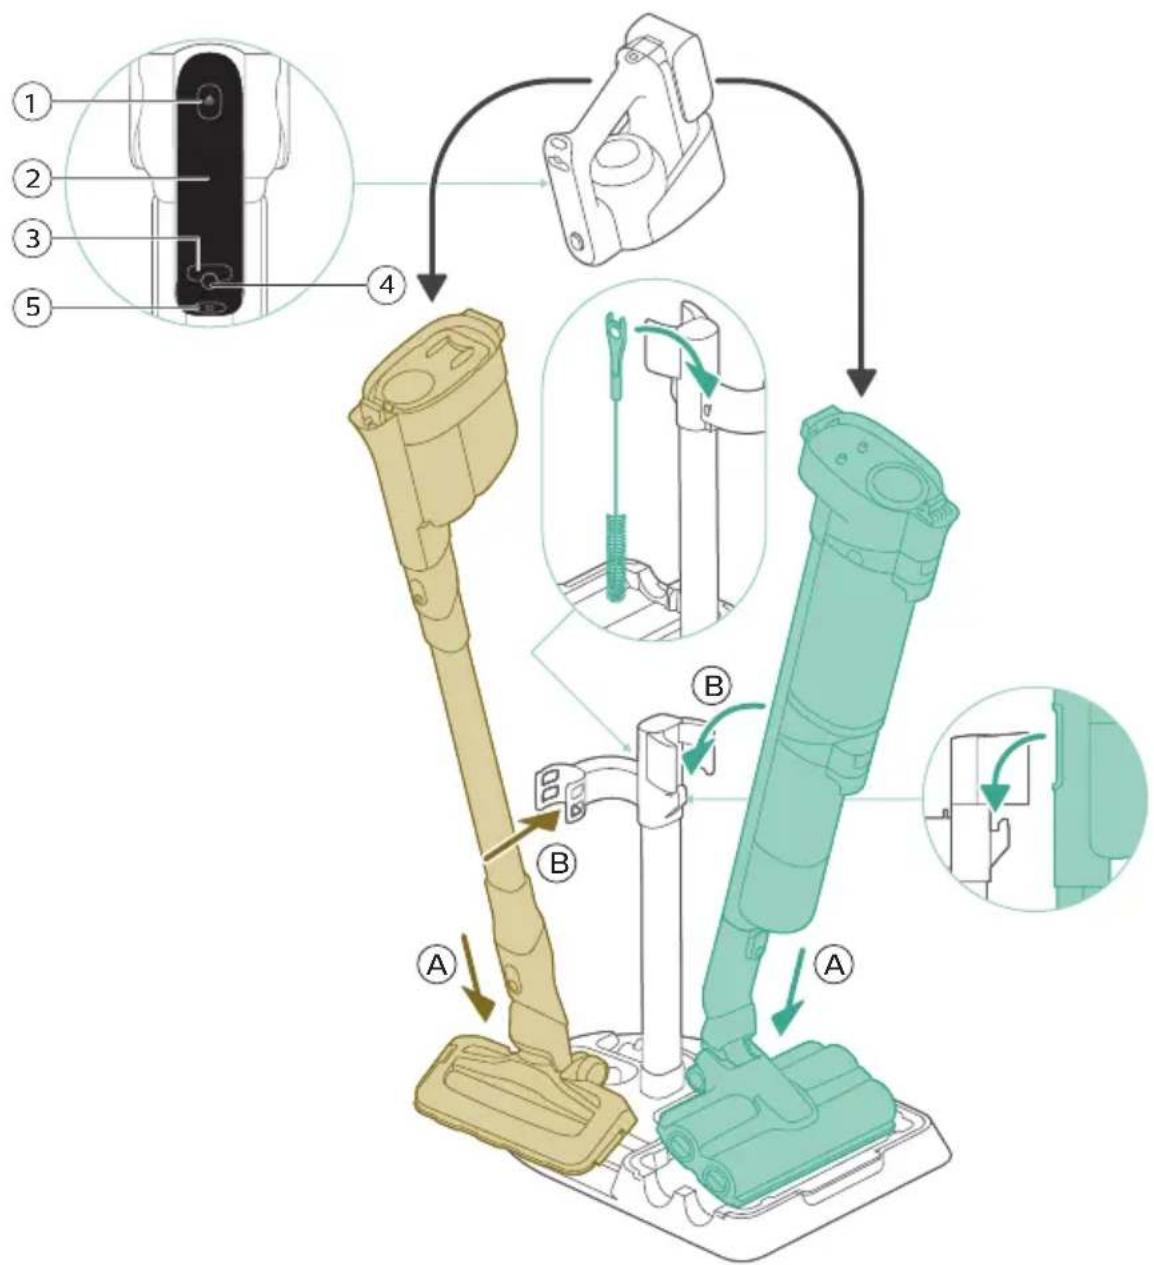
text_image
Diagram illustrating the assembly steps of a vacuum cleaner, labeled with components A, B, and numbered parts.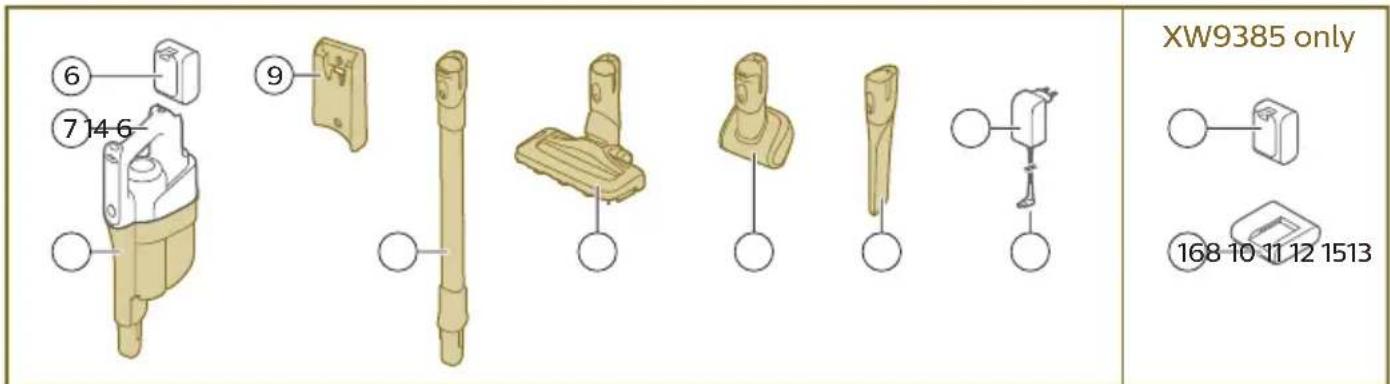
text_image
6 7 14 6 9 XW9385 only 168 10 11 12 1513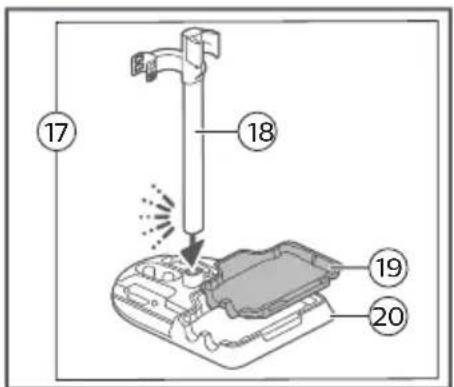
text_image
Diagram of a device with numbered parts, showing a mechanical assembly and a highlighted component.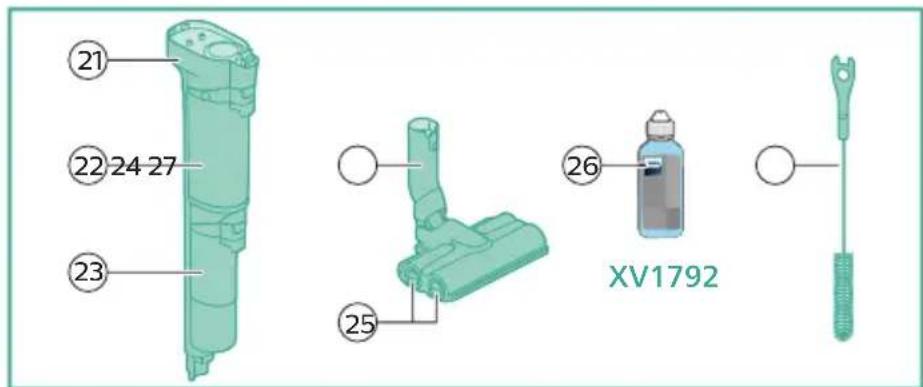
text_image
21 22 24 27 23 25 26 XV1792English 6
Čeština 53
Dansk 98
Deutsch 143
Eesti 191
Français 236
Hrvatski 282
Italiano 328
Latviešu 374
Lietuviškai 420
Magyar 465
Nederlands 511
Norsk 558
Polski 603
Română 650
Slovenščina 696
Slovensky 740
Srpski 786
Suomi 832
Svenska 877
Türkçe 923
Български 969
Contents
Introduction 6
General description 6
Before first use 7
Charging 10
Vacuuming and mopping hard floors 11
Vacuuming soft and hard floors 16
Cleaning the Vacuum & Mop set-up 21
Cleaning the Vacuum only set-up 30
Display icons and their meaning 39
Replacement 42
Troubleshooting 42
Using the Vacuum only set-up 48
Introduction
Thanks for buying this Philips product! To fully benefit from the support that Philips offers, register your product at www.philips.com/myvacuum9000s.
General description
1 Dust bucket release button
2 Display
3 Cleaning mode button
4 Middle button (AUTOCLEAN)
5 On/off button
6 Battery
7 3-in-1 handheld
8 Dust bucket
9 Wall mount
10 Tube
11 LED nozzle
12 Mini Turbo brush
13 Long crevice tool
14 Adapter
15 Power plug
16 Extra charger (XW9385 only)
17 After-Clean & Storage station
18 Appliance holder
19 After-Clean tray
20 Baseplate
21 Wet module
22 Dirty water tank
23 Clean water tank
24 AquaSpin nozzle
25 Microfiber brushes
26 Philips Floor Cleaner XV1792
27 Cleaning brush
Before first use
Assembling the After-Clean & Storage station

In order to use the AUTOCLEAN function or store and charge the appliance on the After-Clean & Storage station, you need to first assemble the station by clicking the appliance holder into the baseplate.
Tip: It is possible to slide the holder for Vacuum only set-up and put it back upside down if you want to place the Vacuum only set-up on the other side of the After-Clean & Storage station.
i Note: Make sure that the After-Clean tray is placed in the baseplate and that the temperature in the room where the appliance is stored, charged and cleaned is between 5 °C and 35 °C.
Tip: You can hang the cleaning brush on the hook of the appliance holder.
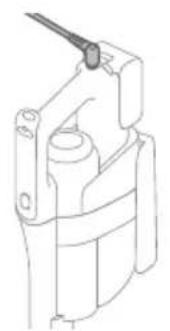
Installing the wall mount

text_image
140-150 cm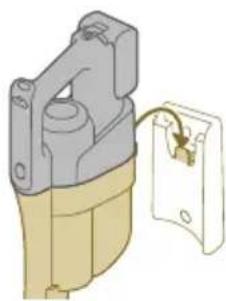
natural_image
3D illustration of a mechanical component with a separate view showing a pin inserted into a housing (no text or symbols)If you want to store and charge the Vacuum only set-up on the wall mount, fasten the wall mount to the wall with the screws supplied. Make sure the wall mount is 140 - 150 cm above the floor.
i Note: It is not possible to store the Vacuum & Mop set-up on the wall-mount. It is only possible to store the Vacuum only set-up on the wall mount.
i Note: Make sure that the temperature in the room where the appliance is stored or charged is between 5 °C and 35 °C.
Caution: Be careful when you drill holes in the wall to fasten the wall mount, to avoid the risk of electric shock.
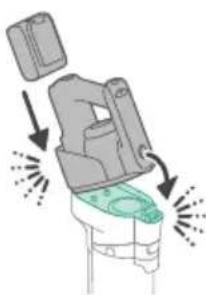
Assembling the Vacuum & Mop set-up
natural_image
Illustration of a hand holding a spray gun with arrows indicating motion (no text or symbols)1 To assemble the Vacuum & Mop set-up, insert the battery and attach the 3-in-1 handheld to the wet module ('click').

natural_image
Illustration of a medical or laboratory procedure showing a device with a downward arrow and green laser beam (no text or symbols)2 Attach the wet module to the AquaSpin nozzle ('click').

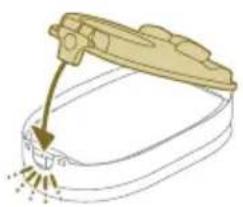
text_image
Diagram showing a vacuum cleaner's internal structure with labeled parts and directional arrows indicating assembly or operation.3 To store the Vacuum & Mop set-up, you can place it in the After-Clean & Storage station.
i Note: It is not possible to store the Vacuum & Mop set-up on the wall-mount. It is only possible to store the Vacuum only set-up on the wall mount.
Assembling the Vacuum only set-up

natural_image
Diagram of a mechanical device with a highlighted component and motion arrow (no text or symbols)1 To assemble the Vacuum only set-up, attach the 3-in-1 handheld to the dust bucket ('click').

natural_image
Illustration of a medical or laboratory procedure showing a tool tip and a magnified view of a device with light reflections (no text or symbols)2 Attach the dust bucket to the tube ('click').

natural_image
Illustration of a hand holding a cylindrical object with an arrow indicating downward motion, next to a base device (no text or symbols)3 Insert the tube into the LED nozzle.

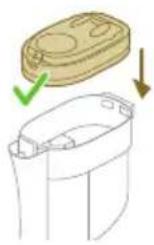
text_image
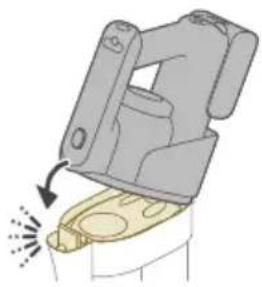
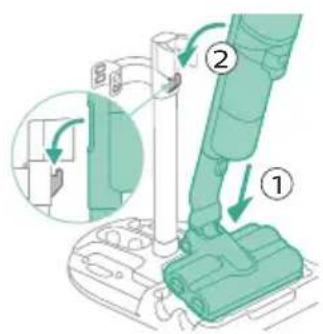
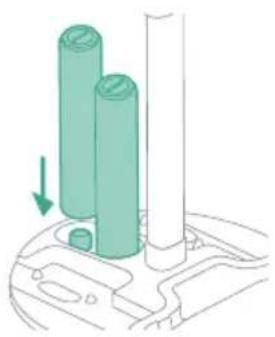
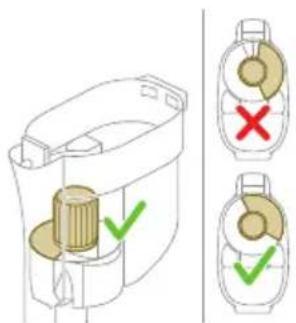
Diagram showing a mechanical assembly with labeled parts, including a lever and a base structure.4 To store the Vacuum only set-up, place it in the After-Clean & Storage station by first placing the LED nozzle onto the long side of the baseplate and then pressing the tube into the holder.

natural_image
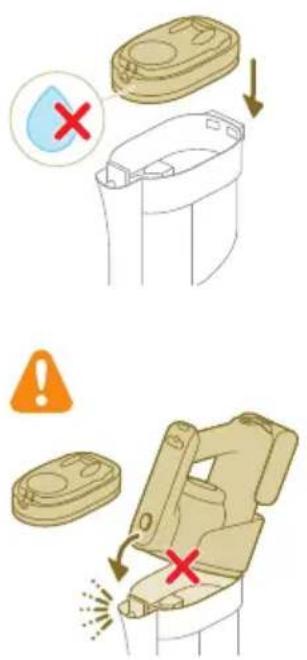
Diagram showing two mechanical assembly steps with arrows indicating direction (no text or symbols)Tip: It is possible to slide the holder for the Vacuum only set-up and put it back upside down if you want to place the Vacuum only set-up on the other side of the After-Clean & Storage station.

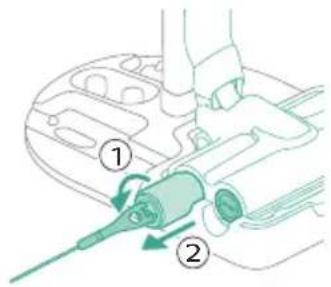
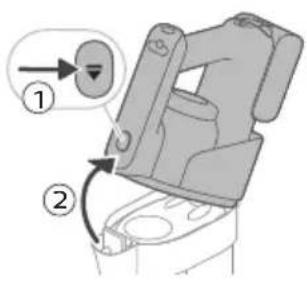
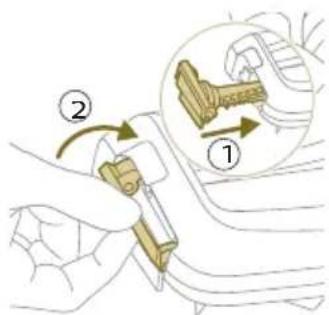
text_image
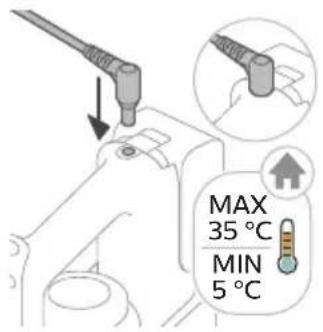
Technical diagram showing mechanical assembly with labeled parts ① and ②, likely illustrating a gear or switch mechanism.Charging
text_image
MAX 35 °C MIN 5 °C
natural_image
Illustration of a plug with a cable and a wall socket, no text or symbols present
text_image
100%The appliance is equipped with a 25 V Li-Ion battery. Charging takes 4 hours.
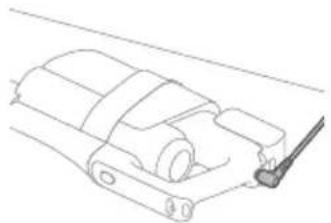
1 To charge the appliance, insert the power plug into the socket on the back of the appliance. Then insert the adapter into the wall socket.
2 A value between 0% and 90% flashes on the screen to indicate that the appliance is charging.
3 When the appliance is fully charged, the value 100% lights up on the screen. After a few minutes, the display will switch off.
Warning: Store and charge the appliance at a temperature above 5 °C and below 35 °C.
natural_image
Technical line drawing of a mechanical component with no visible text or symbols
Tip: You can charge the appliance when it is attached to the wall mount.
Tip: You can charge the appliance in the After-Clean & Storage station.
Tip: You can charge the appliance separately in a place that suits you best.
natural_image
Technical line drawing of a mechanical component with no visible text or symbolsVacuuming and mopping hard floors
Using the Vacuum & Mop set-up
The clean water tank and the dirty water tank are already attached to the appliance upon delivery. With the wet module attached to the AquaSpin nozzle, you can clean hard floors.
i Note: This Vacuum & Mop set-up is suitable for vacuuming and mopping at the same time. It is not necessary to vacuum the floor before mopping. The Vacuum & Mop set-up is suitable for vacuuming and mopping all types of hard floors, except uncoated wooden floors (see 'Usage restrictions').
English

1 To assemble the Vacuum & Mop set-up, insert the battery and attach the 3-in-1 handheld to the wet module ('click').
2 Attach the wet module to the AquaSpin nozzle ('click').
3 Push the button to unlock the clean water tank and remove the clean water tank.
4 Remove the cap from the clean water tank.
5 Add 10 ml of the XV1792 Philips Floor Cleaner to the clean water tank.

text_image
MAX MAX 50 °CCaution: Philips has only tested this appliance with XV1792 Philips Floor Cleaner. Other detergents may lead to excessive foaming, which reduces performance and may cause the appliance to malfunction. XV1792 Philips Floor Cleaner is available in selected markets. When using any other suitable liquid floor cleaner, add a maximum of 10 ml to the clean water tank.
6 Fill the clean water tank with cold or lukewarm tap water up to the MAX indication.
Caution: The tap water that is poured into the clean water tank must not be warmer than 50°C.
7 Place the cap back on the clean water tank.
8 Place the clean water tank back into the appliance.
9 To switch on the appliance, press the on/off button and wait until the appliance is ready for use.
text_image
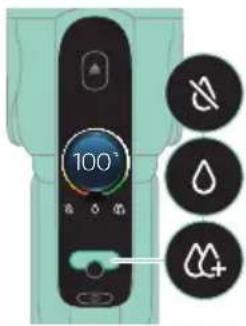
100° A O +10 Use the cleaning mode button to choose between three different settings:
- Normal wet mode
- Intense wet mode
- Water absorption mode
By selecting the normal water mode, you can use the appliance for regular wet cleaning. The intense wet mode is for cleaning extra stubborn stains.
If there are wet spots on the floor after cleaning, you can select absorption mode to clean them up. We also recommend using it when lifting the appliance over a threshold, carpet or stairs (see 'Tips and other important information').
If you select water absorption mode, the appliance will stop supplying water and increase suction power for 45 seconds to absorb any water on the floor.
i Note: older models feature normal wet mode and intense wet mode, but not water absorption mode.
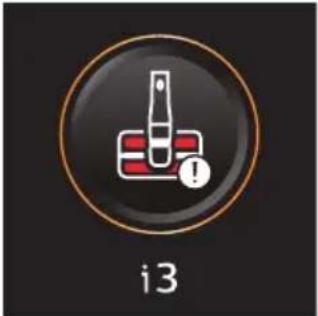
Active protection system
- This appliance is equipped with an active protection system. This active protection system has been designed to recognize when a foreign object other than dirt or liquid is picked up from the floor.
- When the system is activated, the appliance switches off and the i3 message appears on the display (see 'Display icons and their meaning'). The active protection system can also be activated when the microfiber brushes are too wet, when you move the appliance over a carpet or a rug, or when you move it over flooring that is not properly affixed.
Tips and other important information
- It is not necessary to vacuum the floor before mopping, as the Vacuum & Mop set-up actively wet-cleans your hard floor to capture all kinds of dirt, including liquids and stains. On carpets and rugs, use the Vacuum only set-up.
- If your hard floors do not need mopping, simply use the vacuum only set-up which features LED lights and PowerCyclone 12 technology for precise and powerful dirt pick-up.
- You can move the appliance just as quickly as a vacuum cleaner. To remove difficult stains, click the cleaning mode button to activate the intense wet mode and move the appliance slowly over the stains.
- The appliance can leave a small puddle of water on the floor if you do not move the appliance while switching it off. You can reduce the size of the puddle by moving the appliance while switching it off. If needed, you can remove the last drops with a cloth.
- It is recommended to activate the water absorption mode when lifting the appliance over a threshold, carpet or stairs during cleaning. This will prevent dirty water from dripping out of the AquaSpin nozzle.
- When moving the appliance, it is recommended to stretch your arm to reduce unnecessary tension on the muscles. In this position, you have the best control over the appliance when cleaning, and it will be the most comfortable.
i Note: When you use the water absorption mode, no more water comes out of the appliance and the suction power increases. After 45 seconds, if you
do not take any action, the appliance automatically switches back to normal wet mode
Note: older models feature normal wet mode and intense wet mode, but not water absorption mode. For these models, move the appliance while switching it off to reduce the amount of water left on the floor. It is also recommended to leave the appliance on when lifting it over a threshold, carpet or stairs during cleaning. This will prevent dirty water from dripping out of the AquaSpin nozzle.
Usage restrictions
- The Vacuum & Mop set-up is suitable for vacuuming and mopping all types of hard floors, except uncoated wooden floors.
- The Vacuum & Mop set-up is intended for regular cleaning of hard floors. Always follow the cleaning instructions for your hard floor when you use this appliance.
- If you want to add a liquid floor cleaner other than XV1792 Philips Floor Cleaner to the water in the clean water tank, make sure that you use a low-foaming or non-foaming liquid floor cleaner that can be diluted in water like XV1792 Philips Floor Cleaner.
- As the clean water tank has a capacity of 400ml, you only have to add a few drops (max 10ml) of liquid floor cleaner to the water.
- If you use the Vacuum & Mop set-up on linoleum floors, only do so on linoleum floors that are properly affixed to prevent linoleum from being drawn into the AquaSpin nozzle.
- Do not use the Vacuum & Mop set-up to clean carpets.
- If you move/lift the appliance over a carpet or rug when it is switched off, wastewater droplets may end up on your carpet or rug.
- Do not push the appliance over the floor grilles of convector heaters. As the appliance cannot pick up water that comes out of the nozzle when you move it over the grille, water ends up at the bottom of the convector pit.
- While cleaning, do not lift the AquaSpin nozzle from the floor or move the AquaSpin nozzle sideways, and do not make strong turns, as this leaves water traces. Only move forwards and backwards.
i Note: The operating time depends on the power level used during cleaning.
i Note: older models only feature normal wet mode and intense wet mode, but not water absorption mode
Vacuuming soft and hard floors
Using the Vacuum only set-up
natural_image
Illustration of a mechanical device with a highlighted component and motion arrow (no text or symbols)1 To vacuum soft or hard floors, attach the 3-in-1 handheld to the dust bucket ('click').
text_image
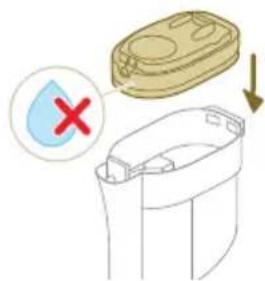
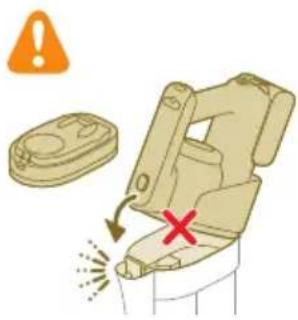
Safety warning illustration showing a toilet with a warning symbol and a red X mark indicating hazard or failure.Caution: Do not attach the 3-in-1 handheld to the dust bucket without the filter case being inserted in the dust bucket.

natural_image
Illustration of a mechanical device with a downward arrow and emitting sparks, next to a cylindrical component (no text or symbols)2 Attach the dust bucket to the tube ('click').
natural_image
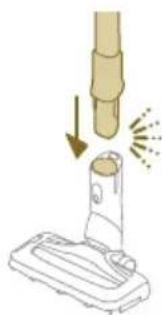
Illustration of a vacuum cleaner emitting exhaust smoke from a cylindrical component (no text or symbols)3 Insert the tube into the LED nozzle.
natural_image
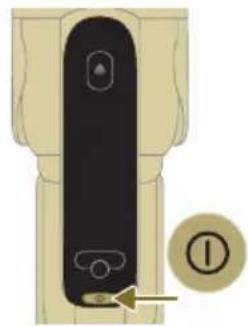
Diagram of a door handle with a circular button labeled ①, showing no text or symbols beyond the number and an arrow pointing to the handle area.4 To switch on the appliance, press the on/off button and wait until the appliance is ready for use.

text_image
100° - +5 Use the buttons on the left and right to choose between the two different power settings.
text_image
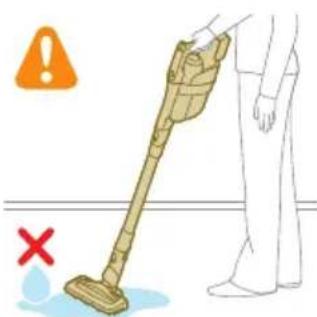
Safety warning illustration showing a hand holding a vacuum cleaner with warning symbols and a red 'X' indicating failure.Tip: The LEDs in the LED nozzle make it easier to see dirt on the floor. The tube and LED nozzle allow you to reach under low furniture without the need to twist the appliance.
Warning: Do not vacuum up water or other liquids.

text_image
Safety warning illustration showing a spray nozzle spraying liquid with an eye and a hand holding a tool, accompanied by warning symbols.Caution: Do not look directly into the LEDs of the LED nozzle or point the LEDs at someone's eyes. The LED light is very bright.
Using the tube
You can attach the tube to the handheld and use it without a nozzle to vacuum tight spaces between or behind pieces of furniture with the end of the tube.
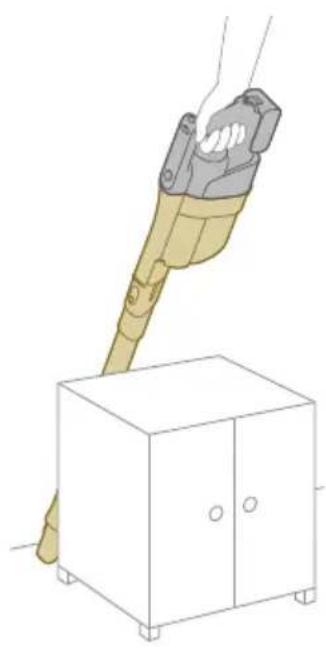
natural_image
Illustration of a hand holding a handheld device above a cabinet (no text or symbols visible)

Tip: It is also possible to attach the Mini Turbo brush to the tube.
Tip: It is also possible to attach the long crevice tool to the tube.
Using the handheld
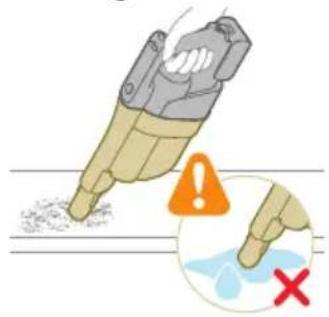
text_image
Diagram showing a hand using a tool to mark a defect or damage, with warning symbols and a red 'X' indicating failure.Without the nozzle and tube, you can use the handheld to clean small patches of dust and dirt, such as spilled breadcrumbs, or to vacuum staircases and shelves.
Warning: Do not vacuum up water or other liquids.
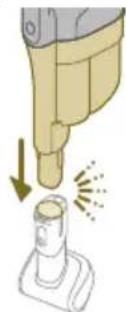
Using the LED nozzle

natural_image
Diagram showing a hand holding a tool above a device with a flame symbol, no text or labels presentYou can use the LED nozzle to clean areas, such as the steps of a staircase, to vacuum up dirt in corners or on narrow ledges, or to clean small patches of dirt, such as spilled breadcrumbs.
1 To attach the LED nozzle, insert the tube or the handheld into the nozzle.
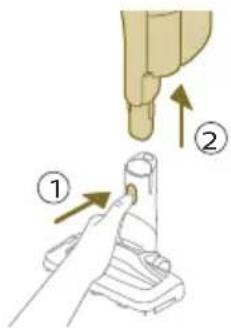
text_image
Diagram illustrating a step in a medical procedure involving a tool and a foot, labeled with arrows and numbered steps.2 To detach the LED nozzle, press the release button (1) and pull the tube or handheld out of the nozzle (2).
Warning: Do not vacuum up water or other liquids.
Using the Mini Turbo brush
natural_image
Illustration of a mechanical device with a downward arrow and sparkles, no text or symbols present1 To attach the Mini Turbo brush, insert the tube of the handheld into the Mini Turbo brush.
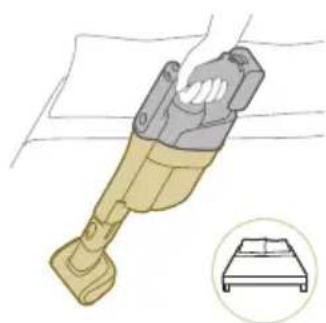
natural_image
Illustration of a mechanical device with a bed icon, no text or symbols present2 You can use the Mini Turbo brush for standard cleaning, for instance of soft areas such as beds and couches. You can adjust the power setting to suit your cleaning needs.
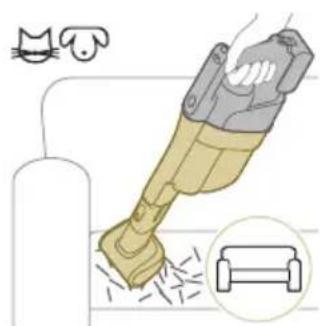
natural_image
Illustration of a hairdryer with a cat and dog nearby, showing spray effect (no text or symbols)3 You can use the Mini Turbo brush for extra thorough cleaning, for instance to vacuum up pet hair, or to clean small patches of dirt, such as spilled breadcrumbs. You can adjust the power setting to suit your cleaning needs.
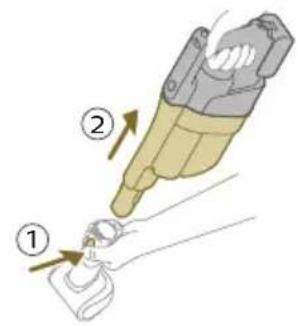
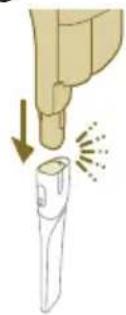
text_image
Diagram showing a hand holding a small object with two labeled steps (① and ②) indicating a procedure or step in a process.4 To detach the Mini Turbo brush, press the release button (1) and pull the handheld out of the Mini Turbo brush (2).

natural_image
Illustration of a mechanical device with water droplets and warning symbols (no text or labels)Warning: Do not vacuum up water or other liquids.
Using the long crevice tool
natural_image
Illustration of a hand holding a flashlight with a downward arrow and light effect (no text or symbols)1 To attach the long crevice tool, insert the tube or handheld into the long crevice tool.
natural_image
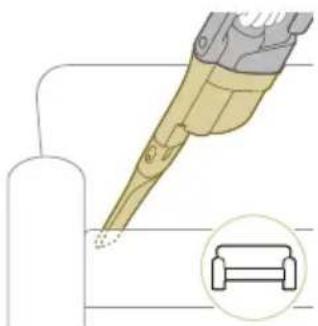
Illustration of a dental implant tool interacting with a cylindrical component, with an inset showing a simple chair (no text or symbols present)2 You can use the long crevice tool to clean narrow corners or hard-to-reach places. You can adjust the power setting to suit your cleaning needs.
text_image
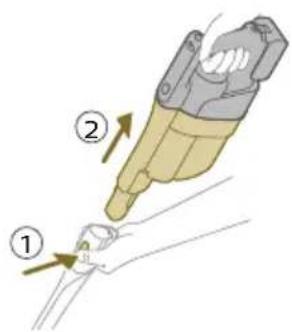
Diagram showing a tool interacting with a cable, labeled with parts 1 and 2 indicating different states or functions.3 To detach the long crevice tool, press the release button (1) and pull the tube or handheld out of the long crevice tool (2).

natural_image
Illustration of a mechanical tool with a red X mark and warning symbol (no text or labels)Warning: Do not vacuum up water or other liquids.
Cleaning the Vacuum & Mop set-up
AUTOCLEAN after every use
text_image
Diagram showing a vacuum cleaner's internal structure with labeled parts and directional arrows indicating assembly steps.To prevent odors and scale deposits, use the AUTOCLEAN function after every use. The AUTOCLEAN mode helps you to clean your full appliance in approximately 4 minutes.
1 Place the Vacuum & Mop set-up in the After-Clean & Storage station.

text_image
Diagram illustrating a mechanical or electrical component with three circular indicators (red, green, and black) indicating failure or status conditions.i Note: If the dirty water level is below the AUTOCLEAN level, it is not necessary to empty the tank before starting the AUTOCLEAN program. You can skip the following steps and move forward to step 6.
natural_image
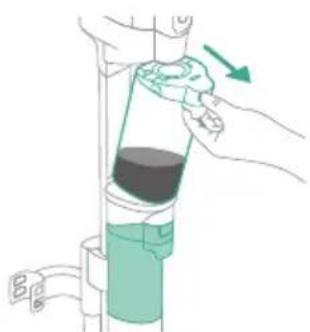
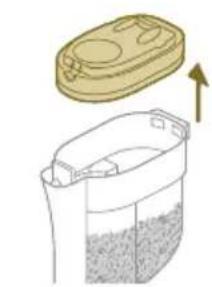
Illustration of a hand pouring liquid into a vertical pipe with a green arrow indicating direction (no text or symbols)2 Push the button to unlock the dirty water tank and remove it.

flowchart
graph TD
    A["Step 1: Insert liquid"] --> B["Step 2: Insert liquid"]
    B --> C["Step 3: Insert liquid"]
    C --> D["Step 4: Insert liquid"]
    D --> E["Step 5: Insert liquid"]
    E --> F["Step 6: Insert liquid"]
3 Remove the wet filter from the dirty water tank.
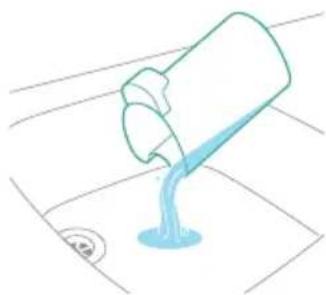
4 Pour the water out of the dirty water tank into the sink.
5 Place the wet filter back on the dirty water tank.
6 Place the empty dirty water tank back into the appliance and take out the clean water tank.
7 Remove the cap from the clean water tank.
natural_image
Simple line drawing of a bucket pouring liquid into a basin (no text or symbols)
text_image
MAX 50 °C
text_image
Diagram illustrating a process with checkmarks and a red X mark, showing steps to process liquid or container with directional arrows.
natural_image
Illustration of a hand holding a cylindrical device with a green arrow pointing to the handle (no text or symbols present)
text_image
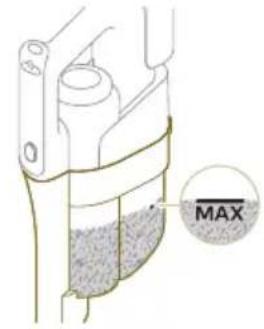
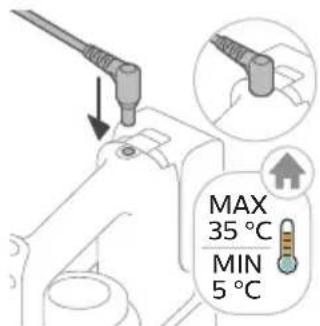
MAX 35 °C MIN 5 °C8 Pour any remaining detergent liquid from the clean water tank into the sink.
9 Fill the clean water tank with cold or lukewarm tap water at least up to the AUTOCLEAN indication.
Caution: The tap water that is poured into the clean water tank must not be warmer than 50°C.
Caution: Do not use detergent for the AUTOCLEAN as this might lead to excessive foaming.
10 Place the clean water tank back into the appliance.
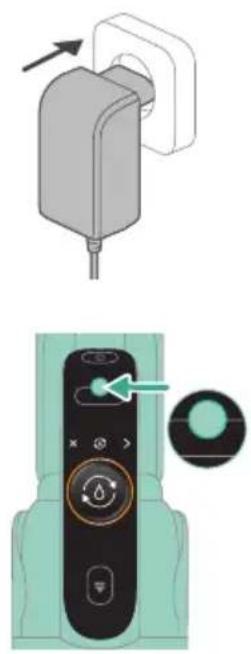
11 Charge the appliance. Insert the power plug into the socket on the back of the appliance. Then insert the adapter into the wall socket.
natural_image
Illustration of a remote control device with a switch and navigation knob (no text or symbols)
text_image
AUTOCLEAN 4 min
natural_image
Illustration of a hand pouring liquid into a vertical pipe with a green arrow indicating direction (no text or symbols)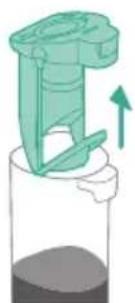
natural_image
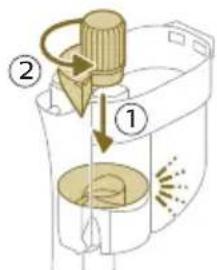
Illustration of a green mechanical device with an upward arrow, partially submerged in liquid (no text or symbols)12 To start the AUTOCLEAN cycle, press the middle button. If you see a black screen, press the on/off button first to activate the screen.
13 The appliance performs the AUTOCLEAN cycle.
i Note: The Autoclean cycle lasts approx. 4 minutes. For best results, let the appliance run through the AUTOCLEAN cycle completely. You can pause or cancel the AUTOCLEAN cycle at any time.
i Note: If you cancel the AUTOCLEAN program, the appliance will suck up the remaining water in the After-clean tray for about 10 seconds.
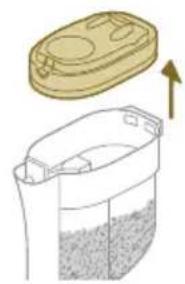
14 Push the button to unlock the dirty water tank and remove it.
15 Remove the wet filter from the dirty water tank.
natural_image
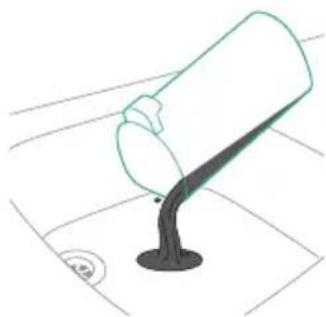
Simple line drawing of a cup pouring liquid into a stand (no text or symbols)16 Pour the water out of the dirty water tank into the sink.

natural_image
Illustration of a faucet pouring liquid into a water-filled container with swirling lines indicating flow (no text or symbols)17 Clean the dirty water tank under the tap.

natural_image
Illustration of a faucet releasing water into a green leafy container on a tiled floor (no text or symbols)18 Clean the wet filter under the tap.

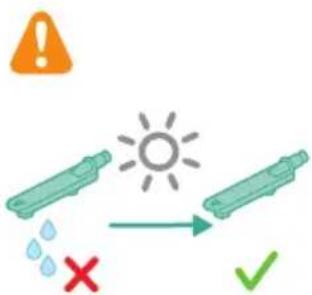
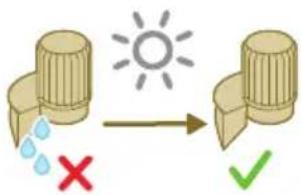
19 Let the wet filter of the dirty water tank and its water flow element dry completely before putting it back on the dirty water tank.

text_image
Diagram illustrating the process of a water drop and sun, showing water droplets falling and sunlight transforming to a green checkmark.
natural_image
Diagram of a mechanical device with a downward arrow indicating force or direction (no text or symbols present)20 Place the wet filter back on the dirty water tank.

natural_image
Illustration of a hand holding a green cylindrical object with an arrow indicating direction (no text or symbols)21 Place the dirty water tank back into the appliance.

text_image
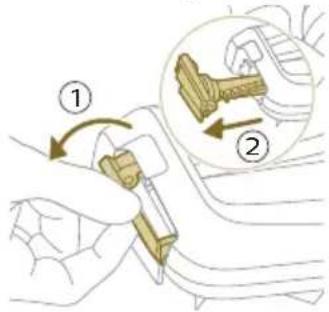
Diagram showing a mechanical component with numbered parts and green arrows indicating motion or force direction.22 Turn the microfiber brushes counterclockwise (1) and remove them from the AquaSpin nozzle (2).
text_image
Diagram showing a hand holding a tool with labeled parts, including numbered callouts ① and ②.Tip: In case a microfiber brush is difficult to remove, you can use the cleaning brush handle to unlock the microfiber brush.
natural_image
Diagram showing three cylindrical components with a downward arrow, no text or symbols present23 To allow the microfiber brushes to dry, place the open ends of the brushes on the designated holders of the After-Clean & Storage station.
i Note: Drying can take approximately 24 hours.
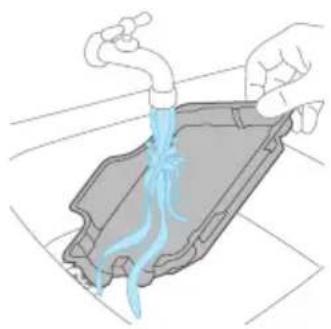
Cleaning the After-Clean tray

natural_image
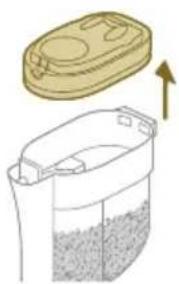
Technical line drawing of a mechanical component with an upward arrow indicating motion (no text or symbols)If the After-Clean tray gets dirty, you can clean it by following the steps below.
1 Remove the After-Clean tray from the storage station.
natural_image
Illustration of hands holding a pipe with blue liquid flowing through a container (no text or symbols)2 Rinse the After-Clean tray under the tap and let it dry before placing it back in the Storage station.

3 Make sure to always put the After-Clean tray back in the Storage station. The After-Clean tray is essential to perform the AUTOCLEAN correctly.
Cleaning the AquaSpin nozzle

text_image
Diagram showing a mechanical component with numbered parts and green arrows indicating motion or force direction.1 Turn the microfiber brushes counterclockwise (1) and remove them from the AquaSpin nozzle (2).

text_image
Diagram showing a tool interacting with a device, labeled with parts ① and ② indicating different components or functions.Tip: In case a microfiber brush is difficult to remove, you can use the cleaning brush handle to unlock the microfiber brush.
natural_image
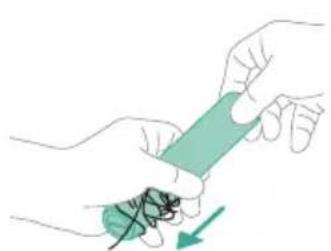
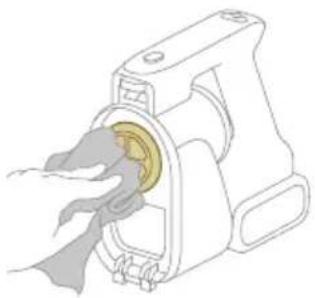
Illustration of two hands holding a green object with a downward arrow indicating motion (no text or symbols)2 You can remove entangled hair or threads from the microfiber brushes by sliding down the microfiber brushes with one hand.
natural_image
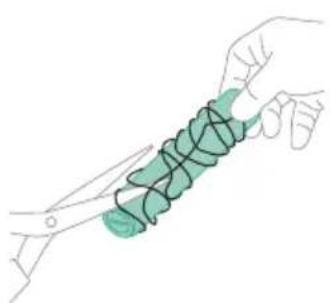
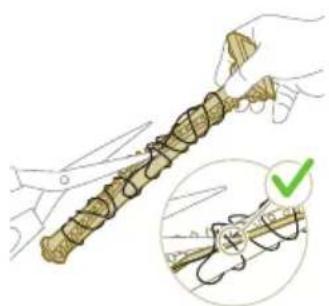
Illustration of two hands holding a coiled green object, no text or symbols presentTip: You can also use a pair of scissors to cut hairs and threads that have become entangled around the microfiber brushes.
Removing blockages from the Vacuum & Mop set-up
The Vacuum & Mop set-up may become clogged. You may notice this when more water gets on the floor than usual or when bigger dirt particles are no longer sucked up and fall back on the floor. Below you can find the instructions to remove blockages from different parts of the Vacuum & Mop set-up.
Clearing blockages from the wet module

natural_image
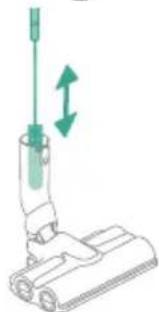
Diagram of a syringe with green arrows indicating direction (no text or labels)If there is a blockage in the wet module, first switch off the appliance and remove the AquaSpin nozzle and the 3-in-1 handheld. Then remove the blockage by moving the cleaning brush in the suction channel of the wet module up and down.
Clearing blockages from the AquaSpin nozzle
natural_image
Illustration of a vacuum cleaner with green arrows indicating motion direction (no text or symbols)If there is a blockage in the AquaSpin nozzle, it can be removed by moving the cleaning brush up and down in the suction channel of the AquaSpin nozzle.
Clearing blockages from the wetting strips of the AquaSpin nozzle
After long and frequent use of the appliance, the wetting strips of the AquaSpin nozzle may become clogged at some point. Follow the steps below to clear the blockage of the wetting strips of the AquaSpin nozzle.
natural_image
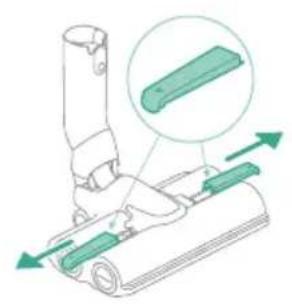
Diagram of a mechanical device with green components and an inset showing a green tool (no text or symbols)1 Remove the wetting strip covers from the AquaSpin nozzle by moving them sideways.
natural_image
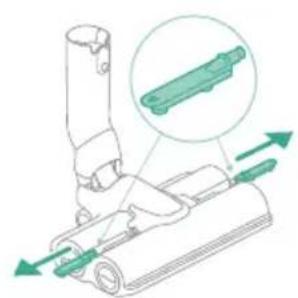
Diagram of a mechanical device with green arrows indicating motion or force direction (no text or symbols)2 Remove the wetting strips from the AquaSpin nozzle by pulling them out sideways.

natural_image
Line drawing of a hand using a green tool to clean or wash a blue faucet (no text or symbols)3 Rinse the wetting strips under the tap.
text_image
!4 Let the wetting strips dry before placing them back in the AquaSpin nozzle.
Cleaning the Vacuum only set-up
Emptying the dust bucket
text_image
MAXRegularly empty the dust bucket and make sure that the dirt never exceeds the 'Max' indication. This prevents accelerated filter clogging.

text_image
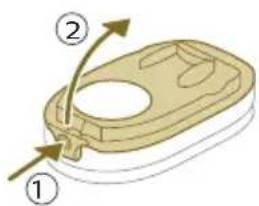
Technical diagram showing a mechanical component with labeled parts and directional arrows indicating motion or assembly.1 Press the release button (1) to release the 3-in-1 handheld of the dust bucket and then lift the 3-in-1 handheld off the appliance (2).
natural_image
Illustration of a container with liquid and an upward arrow, no text or symbols present2 Pull the filter case off the dust bucket.

natural_image
Illustration of a wooden tool pouring granular material into a container (no text or symbols)3 Empty the dust bucket into a waste bin.

4 Put the filter case back onto the dust bucket.
5 Reconnect the 3-in-1 handheld to the dust bucket. Make sure that you connect the rear part first, then connect the front part so it locks into place with a click.
Cleaning the dust bucket
natural_image
Illustration of a container with liquid and an upward arrow, no text or symbols present1 To clean the dust bucket and the cyclone, remove the filter case.

natural_image
Illustration of a wooden tool pouring granular material into a cylindrical container (no text or symbols)2 Empty the dust bucket into a waste bin.
3 Remove and clean the cyclone if necessary (see 'Cleaning the cyclone').
text_image
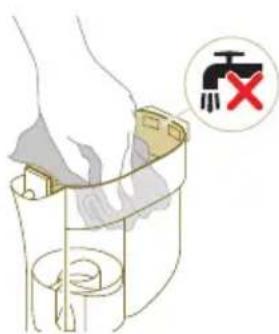
Diagram showing a hand holding a bag with a warning symbol indicating no liability or failure.4 If you want, you can use a wet or dry cloth to clean the inside of the dust bucket.
i Note: do not let the electronic connectors get wet. If the electronic connectors do get wet, please allow them to dry before using the device again. Always use the appliance with dry electronic connectors. This prevents the appliance from malfunctioning over time.
Warning: Do not clean the dust bucket in the dishwasher.
Warning: Do not rinse the dust bucket under the tap.
5 Reattach the filter case back in when the dust bucket is dry.
6 Reconnect the 3-in-1 handheld to the dust bucket.
Caution: Do not reconnect the 3-in-1 handheld to the dust bucket without the filter case being inserted in the dust bucket.
Cleaning the cyclone
text_image
Diagram of a mechanical device with labeled parts and directional arrows indicating motion or movement.1 Turn the cyclone clockwise (1) and remove it from the dust bucket (2).
2 Remove hair and dirt that is stuck in and under the cyclone.
natural_image
Illustration of a hand pouring liquid into a container with a faucet (no text or symbols)3 If desired, you can rinse the cyclone under the tap.

text_image
Weather forecast diagram showing sun and rain symbols with a checkmark indicating completioni Note: Always let the cyclone dry completely before placing it back into the dust bucket.
text_image
Diagram illustrating a device's internal components with numbered parts and directional arrows indicating rotation or assembly.4 Replace the cyclone (1) and turn it counterclockwise (2) to secure it back into the dust bucket.
text_image
Diagram showing a device with green checkmark indicators and two circular components, one marked with red X and one with green checkmark.Caution: Make sure to fully tighten the cyclone when placing it back. Rotate the cyclone until the cyclone cannot rotate any further and is fully secured.
Cleaning the filter

natural_image
Circular icon with a stylized white hand and exclamation mark inside a black circle (no text or symbols)When the filter needs to be cleaned, the filter cleaning icon appears on the screen.
natural_image
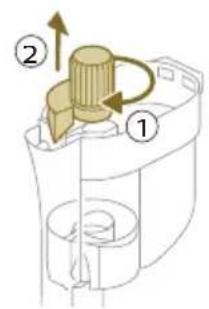
Illustration of a plastic container with an upward arrow indicating growth or movement (no text or symbols present)1 Pull the filter case off the dust bucket.
text_image
Diagram of a device with labeled parts, showing directional arrows and numbered callouts.
natural_image
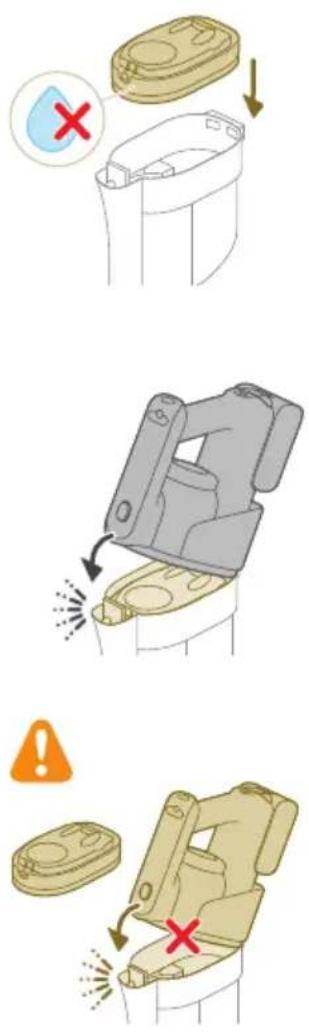
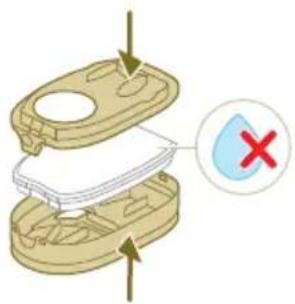
3D diagram of a mechanical device with a switch symbol and red X mark (no text or labels)2 Press the release button to release the lid of the filter case and remove the foam filter.
Caution: Make sure that the filter case lid does not get wet during cleaning.
natural_image
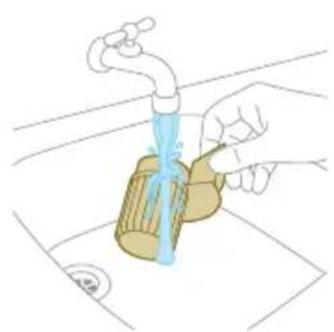
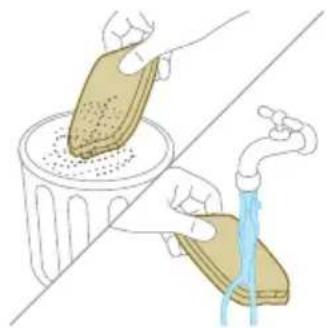
Illustration of hands cleaning a trash bin with a water tap (no text or symbols)3 Shake the foam filter over a waste bin to remove the layer of dirt on top of the foam filter. Then rinse the foam filter under a tap.

natural_image
Illustration of a hand holding a rectangular object with curved arrows indicating rotation or motion (no text or symbols)4 Squeeze the foam filter to remove the water.

natural_image
Illustration of hands pouring liquid into a trash bin (no text or symbols)5 Shake the filter case and lid over a waste bin to remove dust.

text_image
Illustration showing a hand using a tool to clean or repair a device, with a warning symbol indicating no error.6 Clean the filter holder with a damp cloth.
Caution: Do not clean the white material of the filter case lid with a normal vacuum cleaner or a brush. Do not clean the white material of the filter case lid with water or any cleaning agent. It will damage the material. The white material can be tapped over a bin.
text_image
Diagram showing a device with a water droplet and a red X mark indicating a defect or warning symbol.7 Let the foam filter dry and make sure that it is completely dry before you put it back into the filter case.
text_image
Diagram showing a device with a lid and two labeled parts, marked with red 'X' and green checkmarks.Caution: Make sure that the foam filter is correctly placed in the filter case.
natural_image
Illustration of a hand pouring liquid into a container with a spray bottle (no text or symbols)8 Close the filter case.

natural_image
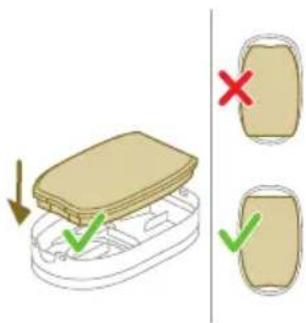
Diagram showing a container with a lid and a handle, marked with red X and green downward arrow (no text or symbols)9 Put the filter case including the foam filter back into the dust bucket.
Caution: Make sure the white material of the filter case lid is facing up.
text_image
Illustration showing three steps of removing a trash can into a toilet, with warning symbols and red X marks indicating removal or disassembly.Caution: Make sure that the filter case including the foam filter are completely dry before you put them back into the dust bucket.
10 Reconnect the 3-in-1 handheld to the dust bucket.
Caution: Do not reconnect the 3-in-1 handheld to the dust bucket without the filter case being inserted in the dust bucket.
i Note: Replace the filter every 6 months to ensure maximum performance. Replacement filters are available under part number XV1791 (see 'Replacement').
Cleaning the motor inlet filter
The 3-in-1 handheld has a filter that may become blocked with dust. This can reduce the suction power over time. To clean the motor inlet filter, follow these steps:
1 Press the release button (1) to release the 3-in-1 handheld of the dust bucket and then lift the 3-in-1 handheld off the appliance (2).
text_image
Technical diagram of a mechanical component with labeled parts and directional arrows indicating motion or assembly.2 Clean the inlet filter with a cloth or with the cleaning brush.
natural_image
Diagram of a mechanical assembly with a central component and surrounding parts (no text or symbols)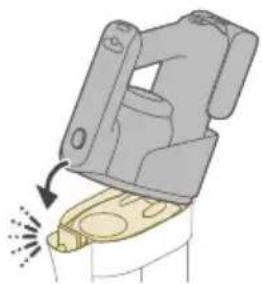
natural_image
Illustration of a mechanical device with a highlighted component and motion arrow (no text or symbols)3 Reconnect the 3-in-1 handheld to the dust bucket. Make sure that you connect the rear part first, then connect the front part so it locks into place with a click.
Cleaning the roller brush
text_image
Diagram illustrating a mechanical or electrical component being inserted into a device, with labeled parts and directional arrows.1 Pull down the locking lever on the side of the LED nozzle (1) and slide the roller brush out of the LED nozzle (2). You can remove entangled hair or threads from the roller brush by sliding down the roller brush with one hand.
natural_image
Illustration of hands holding a coiled string with a magnified inset showing a green checkmark (no text or symbols)Tip: You can also move one blade of a pair of scissors through the groove on the roller brush to cut hairs and threads that have become entangled around the roller brush.
text_image
Diagram illustrating a mechanical or electrical component being adjusted, labeled with parts ① and ②.2 Slide the roller brush back into the LED nozzle (1) and push up the locking lever to lock the roller brush in the LED nozzle ('click').
Cleaning the Mini Turbo brush

1 Unlock the release button on the side of the Mini Turbo brush (1) and lift the roller brush out of the Mini Turbo brush (2).
2 Remove the hairs and dirt entangled around the roller brush.
Tip: You can also move one blade of a pair of scissors through the groove on the roller brush to cut hairs and threads that have become entangled around the roller brush.
3 Press one side of the roller brush back into the Mini Turbo brush (1) and push down the other side of the roller brush to lock the roller brush in the Mini Turbo brush ('click').
Display icons and their meaning
Error code Cause Solution

text_image
E1There is a system error. An E1 error code means that your Philips
AquaTrio 9000 series Vacuum Cleaner has a system error.
To solve this, please try one or both of the following options:
- Remove the battery from the appliance and then reinsert the battery. Then try to restart the appliance.
- Disconnect the 3-in-1 handheld from the appliance and press the on/off button Ⓤ on the handheld. If you still see the E1 error on your display, please contact the Consumer Care Center. If you do not see the E1 error and the appliance does still not work, there might be a communication problem with the tube or nozzle. Please contact the Consumer Care Center.
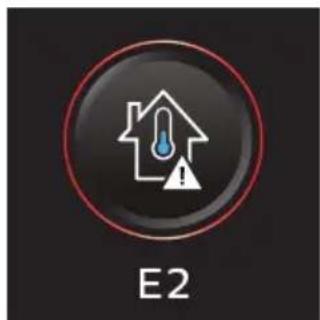
text_image
E2The temperature is too low. Make sure the temperature in the room where the appliance is used, stored, or charged is above 5 °C.
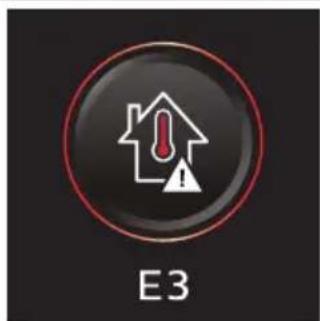
natural_image
Circular icon with a house silhouette and exclamation mark, labeled 'E3' below (no text or symbols on the icon itself)The temperature is too high. Make sure the temperature in the room where the appliance is used, stored, or charged is below 35 °C. Do not expose the device to direct sunlight or high temperatures (near hot stoves, in microwave ovens, or on induction cookers). Batteries may explode if overheated.

natural_image
Circular icon with battery symbol and question mark, labeled E5 (no text or symbols beyond label)The battery is half inserted. Make sure that the battery is inserted correctly (see 'Assembling the Vacuum & Mop set-up').
Information code Cause Solution
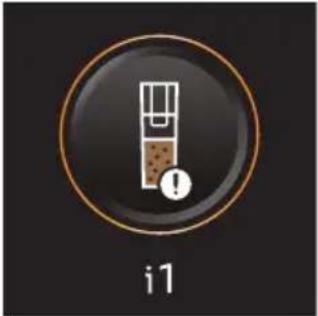 | The dirty water tank is full. Empty the dirty water tank. | |
 | The AquaSpin nozzle is not connected (properly). | Connect the AquaSpin nozzle. |
 | The AquaSpin nozzle is stuck. This is a safety cut-off if something is stuck in the nozzle (for instance, a power cable or a toy). | Check the brushes, bearings, motor parts, and caps for hair or other obstacles and remove them. If there are no obstacles, switching the appliance off and on might solve the problem. |
 | The LED nozzle is stuck. This is a safety cut-off if something is stuck in the nozzle (for instance, a power cable or a toy). | Check the roller brush and the rest of the nozzle for hair or other obstacles and remove them (see 'Cleaning the roller brush'). If there are no obstacles, switching the appliance off and on might solve the problem. |
 | The air inlet openings are blocked. | Check the air inlet openings for blockages and remove them. If this does not solve the problem, check the whole air passage for blockages and remove them. For the Vacuum only set-up, this refers to the nozzle, tube, filter, vortex finder, long crevice tool, and Mini turbo brush. For the Vacuum & Mop set-up, this refers to the nozzle, tube, and the wet filter. |
Information code Cause Solution
 | Unplug for use. Unplug the appliance for use. Otherwise, it will not switch on. Only during AUTOCLEAN is it possible to have the appliance plugged in. | |
 | The wrong charger is connected. | Only charge the appliance with the adapter supplied. Only use 34V adapter S036-1A340100HE. The corresponding adapter number can be found on the adapter. |
 | The battery is not inserted. Make sure that the battery is inserted (see 'Assembling the Vacuum & Mop set-up'). | |
| Icons Meaning | ||
| AUTOCLEAN | ||
 | Reminder to clean the filter (see 'Cleaning the filter') | |
Icons Meaning
Icons Meaning

natural_image
Circular icon with warning symbol and mechanical components (no text or numbers)Microfiber brush replacement needed

natural_image
Icon of a white footwheel with mesh pattern inside a circular frame (no text or symbols)Filter replacement needed
Replacement
To buy accessories or spare parts, visit www.philips.com/parts-and-accessories or go to your Philips dealer. You can also contact the Philips Consumer Care Center in your country (see the international warranty leaflet for contact details).
Replacement parts and type numbers:
- Replacement filter XV1791
- Philips Floor Cleaner XV1792
- Replacement microfiber brushes XV1793
- Lithium-Ion Battery pack 25.2V XV1797
Replace the filter and the microfiber brushes every 6 months to ensure maximum performance.
i Note: You can dispose of the old filter and the microfiber brushes with the normal household waste.
Troubleshooting
This chapter summarizes the most common problems you could encounter with the appliance. If you are unable to solve the problem with the information below, visit www.philips.com/support for a list of frequently asked questions or contact the Consumer Care Center in your country.
Using the Vacuum & Mop set-up
Problem Possible cause Solution
| The appliance does not work when I push the on/off button. | The battery is not connected. Connect the battery to the 3-in-1 Handheld. | |
| The battery is empty. To charge the battery, connect the 3-in-1 Handheld with the charger (see 'Charging'). | ||
| You did not take the appliance out of the After-Clean & Storage station. | Take the Vacuum & Mop set-up out of the After-Clean & Storage station before switching on the appliance. | |
| You pushed the on/off button more than one time. | Wait a few seconds and push the on/off button again one more time. | |
| You did not connect the 3-in-1 Handheld to the appliance correctly. | Place the lower body of the appliance on the After-Clean & Storage station. Then connect the 3-in-1 Handheld to it. | |
| The appliance is clogged. Switch the appliance off and remove the battery or 3-in-1 handheld. Then locate and remove the cause of the blockage (see 'Removing blockages from the Vacuum & Mop set-up'). After that, restart the appliance. If you cannot identify the cause of the blockage, restart the appliance. This might already solve the problem. | ||
| The microfiber brushes are stuck. | Take the microfiber brushes out and place them back (see 'Cleaning the AquaSpin nozzle').Tip: In case a microfiber brush is difficult to remove, you can use the cleaning brush handle to unlock the microfiber brush (see 'Cleaning the AquaSpin nozzle'). | |
| The appliance stopped working. | You accidentally touched the on/off button with your hand. | Switch on the appliance by pushing the on/off button. |
| The dirty water tank may be full. In this case, there is an information icon shown on the screen (see 'Display icons and their meaning'). | Empty the dirty water tank (see 'AUTOCLEAN after every use'). | |
| The appliance is clogged. Switch the appliance off and remove the battery or 3-in-1 handheld. Then locate and remove the cause for the blockage (see 'Removing blockages from the Vacuum & Mop set-up'). After that, restart the appliance. If you do not identify the cause | ||
Problem Possible cause Solution
| for the blockage, just restart the appliance. This might already solve the problem. | ||
| The floor is less wet than usual. | The wetting strips are blocked. | Remove the two microfiber brushes, fill some water into the clean water tank and switch the appliance on. Make small forward and backward movements on the same position for around 15 seconds. You should be able to see four water stripes on the floor. If this is not the case, or if one or more water stripes only consist out of a few droplets, the wetting strips are partially or fully blocked and you can rinse them under the tap (see 'Clearing blockages from the wetting strips of the AquaSpin nozzle'). If that does not help, you can try to carefully open the holes with a needle. |
| One side of the floor under the nozzle is less wet than the other one. | One of the two wetting strips is blocked. | Remove the two microfiber brushes, fill the clean water tank with some water, and switch the appliance on. Make small forward and backward movements on the same position for around 15 seconds. You should be able to see four water stripes on the floor. If this is not the case, or if one or more water stripes only consist out of a few droplets, the wetting strips are partially or fully blocked and you can rinse them under the tap (see 'Clearing blockages from the wetting strips of the AquaSpin nozzle'). If that does not help,you can try to carefully open the holes with a needle. |
| There is no water on the floor. | The clean water tank is empty. | Refill the clean water tank (see 'Using the Vacuum & Mop set-up'). |
| The wetting strips are blocked. | Remove the two microfiber brushes,fill the clean water tank with some water, and switch the appliance on. Make small forward and backward movements on the same position for around 15 seconds. You should be able to see four water stripes on the floor. If this is not the case, or if one or more water stripes only consist out of a few droplets, the wetting strips are partially or fully blocked and you can rinse them under the tap (see 'Clearing blockages from the wetting strips of the Aqua Spin nozzle'). If that does not help,you can try to carefully open the holes with a needle. | |
| If you have checked the above and there is still no water on the floor,take the appliance to a Philips service center or contact the Consumer Care Center. |
Problem Possible cause Solution
| There is more water on the floor or in the After-Clean tray than usual. | The water channel of the wet module and/or AquaSpin nozzle is polluted or blocked. | Use the cleaning brush and clean the water channel of the wet module and/or AquaSpin nozzle (see 'Removing blockages from the Vacuum & Mop set-up'). |
| The dirty water tank is not placed correctly. | Place the dirty water tank into the appliance properly (see 'AUTOCLEAN after every use'). It is closed correctly when you can hear a 'click' sound. | |
| The appliance leaves water traces on the floor. | You have moved the appliance sideways. | To prevent water traces on the floor, try to make less strong turns with your AquaTrio 9000 Series and avoid moving the appliance sideways. You can activate the water absorption mode by pressing the cleaning mode button. All the remaining water on your floor will be absorbed. |
| You made strong turns with the appliance. | To prevent water traces on the floor, try to make less strong turns with your AquaTrio 9000 Series and avoid moving the appliance sideways. You can activate the water absorption mode by pressing the cleaning mode button. All the remaining water on your floor will be absorbed. | |
| You have lifted the appliance over a threshold, carpet or stairs. | Make sure the microfiber brushes stay in contact with the floor. Make sure water absorption mode is switched on before you lift the appliance over a threshold, carpet or stairs to prevent water traces on the floor or to prevent water from splashing from the AquaSpin nozzle (see 'Usage restrictions'). | |
| You lifted the appliance up from the floor immediately after you switched it off. | Switch on water absorption mode to absorb any remaining water. Move the appliance forwards and backwards a few times with water absorption mode engaged before switching it off. If you switch off the appliance and lift it up immediately afterwards, the water that was present between the brushes leaves a trace of water on the floor (see 'Usage restrictions'). | |
| The wheels are blocked. Check the condition of the wheels. Remove the dirt that blocks the wheels. | ||
| The appliance does not clean as well as it used to. | The clean water tank is empty. Refill the clean water tank (see 'Using the Vacuum & Mop set-up'). | |
| The water strips are blocked. Remove the two microfiber brushes, fill the clean water tank with some water, and switch the appliance on. Make small | ||
Problem Possible cause Solution
| forward and backward movements on the same position for around 15 seconds. You should be able to see four water stripes on the floor. If this is not the case, or if one or more water stripes only consist out of a few droplets, the water strips are partially or fully blocked and you can rinse them under the tap (see 'Clearing blockages from the wetting strips of the AquaSpin nozzle'). If that does not help, you can try to carefully open the holes with a needle. | ||
| The inside of the AquaSpin nozzle is too dirty. | Run the AUTOCLEAN program before returning to cleaning. If there is dirt accumulation in the edges of the nozzle, remove it. Make sure to use the AUTOCLEAN function after each use (see 'AUTOCLEAN after every use'). | |
| The microfiber Brushes are not present. | Place the microfiber brushes in the AquaSpin nozzle (see 'AUTOCLEAN after every use'). | |
| If you have checked the above and the appliance still does not clean well, take it to a Philips service center or contact the Consumer Care Center. | ||
| Bigger dirt particles are not sucked up anymore and fall back on the floor. | The water channel of the wet module and/or AquaSpin nozzle is polluted or blocked. | Use the cleaning brush and clean the water channel of the wet module and/or AquaSpin nozzle (see 'Removing blockages from the Vacuum & Mop set-up'). |
| The floor dries with stripes. You may have used too much detergent. | Make sure to use the right amount of detergent (see 'Using the Vacuum & Mop set-up'). | |
| The wheels are dirty. Remove the dirt from the wheels. | ||
| There is too much foam while cleaning, but also during AUTOCLEAN. | You may have used too much detergent. | Make sure to use the right amount of detergent (see 'Using the Vacuum & Mop set-up'). |
| There are still detergent residues on the floor. | Clean the floor without detergent several times. Wait a moment before going over the same stain again. | |
| It is difficult to clean stains. You may have used too little water or taken too little time to clean the stain. | Apply water and wait a moment. For example you can go with the appliance over the stain to apply water and come back to the same stain in the end of the cleaning session. | |
| The sound of the appliance changed while cleaning. | There might be hairs or other obstacles entangled around the microfiber brushes | Remove the microfiber brushes and check for obstacles and remove them (see 'Cleaning the AquaSpin nozzle'). |
Problem Possible cause Solution
| The display indicates that the dirty water tank is full (code: i1) and shuts down, although the dirty water tank is not full yet. | There may be foam or contamination of the dirty water tank. | Restart the appliance. If that does not solve the problem, clean the dirty water tank. If foaming is the issue, make sure you do not use more than the recommended amount of detergent (see 'Using the Vacuum & Mop set-up'). |
| Water drips out of the appliance after it is switched off. | The appliance leaves a puddle on the floor because you did not move it while switching it off. This is normal. | The appliance can leave a small puddle of water on the floor if you do not move the appliance while switching it off. You can reduce the size of the puddle by moving the appliance while switching it off. When you switch off the appliance, it will switch to water absorption mode for 4 seconds to clean up any water remaining in the nozzle. If needed, you can remove the last drops with a cloth. |
| The appliance is dripping when carrying it over the floor (holding it in the air). | While cleaning, do not lift the AquaSpin nozzle from the floor, as this leaves water traces. Only move forwards and backwards. | |
| Water leaks from the clean water tank because you overfilled the clean water tank. | Do not fill the clean water tank beyond the MAX indication. If you do, water may spill from the clean water tank when you fasten the cap (see 'Using the Vacuum & Mop set-up'). | |
| There is a crack in one of the tanks. | If one of the tanks is damaged, take it to a Philips service center or contact the Consumer Care Center. | |
| I cannot remove the microfiber brushes. | Hair and/or dirt is entangled in the microfiber brushes. | Use the cleaning brush handle to remove the microfiber brushes from the AquaSpin nozzle. Remove entangled hair or dirt (see 'Cleaning the AquaSpin nozzle'). If it is difficult to pull the brushes out, you can give them a push from below the AquaSpin nozzle. |
| I cannot move the appliance forward or backward. | One or more wheels may be blocked by a small object. | Switch off the appliance and remove the nozzle. Then check the small and the big wheels for blockage. Remove any object that could block the wheel(s). Put the appliance upright again and resume cleaning. |
| The appliance has a lower suction power than usual. | The water channel of the wet module and/or AquaSpin nozzle is polluted or blocked. | Use the cleaning brush and clean the water channel of the wet module and/or AquaSpin nozzle (see 'Removing blockages from the Vacuum & Mop set-up'). |
| The mesh in the dirty water tank was not dry enough before being used again. | Clean and dry the dirty water tank. |
Problem Possible cause Solution
| Hair entanglement on the microfiber brushes. | Switch the appliance off and remove the hair from the microfiber brushes (see 'Cleaning the AquaSpin nozzle'). | |
| The dirty water tank is not placed correctly. | Place the dirty water tank into the appliance properly (see 'AUTOCLEAN after every use'). It is closed correctly when you can hear a 'click' sound. | |
| The microfiber brushes do not turn anymore | The microfiber brushes are clogged with hair or dirt. | Clean the microfiber brushes with a pair of scissors or by hand (see 'Cleaning the AquaSpin nozzle'). |
| The microfiber brushes pop out. | The microfiber brushes are not locked correctly. | Place the microfiber brushes back in the right position and lock them. |
| The appliance is not charging. | The power plug is not connected properly to the socket or the adapter is not inserted into the wall socket properly. | Make sure that the power plug is connected properly to the socket and that the adapter is inserted into the wall socket properly. |
| The battery is not in. Please insert the battery. | ||
| The battery is not completely inserted. | Please insert the battery until you hear a click sound. | |
| Wrong adapter connected. Please use the original adapter. | ||
| If you have checked the above and the appliance still does not charge, take it to a Philips service center or contact the Consumer Care Center. | ||
| When I use my vacuum cleaner I sometimes feel static electricity shocks. | Your vacuum cleaner builds up static electricity. The lower the air humidity, the more static electricity the appliance builds up. | Make sure to touch the metal pin with your hand while holding the appliance. |
| You vacuumed up dust and dirt. This also causes static electricity. | Make sure to touch the metal pin with your hand while holding the appliance. | |
Using the Vacuum only set-up
Problem Possible cause Solution
| The appliance does not work when I push the on/off button. | You did not connect the battery. | Connect the battery to the 3-in-1 Handheld. |
| The battery is empty. To charge the battery, connect the 3-in-1 Handheld with the charger (see 'Charging'). | ||
Problem Possible cause Solution
| You pushed the on/off button more than one time. | Wait a few seconds and push the on/off button again one more time. | |
| You did not connect the 3-in-1 Handheld to the appliance correctly. | Connect the 3-in-1 handheld correctly to the dust bucket. | |
| The appliance is clogged. Switch the appliance off and remove the battery or powerhouse. Then locate and remove the cause for the blockage. After that, restart the appliance. If you cannot identify the cause of the blockage, restart the appliance. This might already solve the problem. | ||
| The roller brush is stuck. Take the roller brush out and remove any hair around the brush and the motor and place it back (see 'Cleaning the roller brush'). | ||
| It is not possible, to connect the 3-in-1 Handheld to the dust bucket. | The filter case is assembled upside down. | Invert the filter case. The round opening should be visible (see 'Cleaning the dust bucket'). |
| The filter case is not closed properly. | Make sure you hear a click when closing the filter case. If it is difficult to close, the foam filter is probably placed upside down. | |
| The appliance stopped working. | You accidentally touched the on/off button with your hand. | Switch on the appliance by pushing the on/off button. |
| The appliance is clogged. Switch the appliance off and remove the battery or powerhouse. Then locate and remove the cause for the blockage. After that, restart the appliance. If you cannot identify the cause of the blockage, restart the appliance. This might already solve the problem. | ||
| The sound of the appliance changed while cleaning. | There might be hairs or other obstacles entangled around the roller brush. | Please check for obstacles and remove them (see 'Cleaning the roller brush'). |
| Obstacles are blocking the cyclone. | Check the cyclone for obstacles and remove them (see 'Cleaning the cyclone'). | |
| The appliance has a lower suction power than usual. | The filter and/or the cyclone are dirty. | Empty the dust bucket. Clean the filter and the cyclone. Make sure that you remove any hair and dirt that is stuck in the cyclone. You can remove the cyclone for easy maintenance (see 'Cleaning the cyclone'). Make sure that you wash the filter at least once a month if you use the appliance regularly (see 'Cleaning the filter'). |
Problem Possible cause Solution
| Something is blocking the cyclone. | Check the cyclone for objects stuck in it and remove any object that is blocking the cyclone. Make sure that you remove any hair and dirt that is stuck in the cyclone (see 'Cleaning the cyclone'). | |
| The suction channel behind the roller brush is clogged. | Remove the roller brush and check the suction channel for obstacles and remove them. | |
| You have not attached the filter case properly to the dust bucket or you have not attached the dust bucket properly to the appliance. In both cases, there will be a loss of suction power. | Make sure that you attach the filter case to the dust bucket and the dust bucket to the appliance properly (see 'Cleaning the dust bucket'). | |
| The brush is clogged with hair or dirt. | Switch the appliance off and clean the roller brush with a pair of scissors or by hand (see 'Cleaning the roller brush'). | |
| Dust escapes from the appliance. | The foam filter is not present in the filter case, or the top cover is missing. | Make sure that the filter is in the appliance and assembled correctly (see 'Cleaning the filter'). |
| Dust escapes when opening the dust bucket. | This is normal behavior due to underpressure. | If possible, open the appliance outside. |
| The filter cleaning icon is shown on the display and the device shuts down. | The filter may be dirty. We advise you to clean the filter. If you cleaned the filter recently, you can disregard this icon. To continue vacuuming, click the arrow icon. | |
| The appliance does not move smoothly across the floor when I am cleaning a carpet. | You selected a too high suction power. | Reduce the suction power by choosing setting 1 or move more slowly over the carpet. |
| The roller brush does not turn anymore. | The roller brush is clogged with hair or dirt. | Clean the roller brush with a pair of scissors or by hand (see 'Cleaning the roller brush'). |
| The roller brush may stop turning when it encounters too much resistance from high-pile carpet. | Switch off the appliance and then switch it back on again. | |
| You have not assembled the roller brush into the nozzle properly after cleaning. | Follow the instructions in this user manual to slide the roller brush into the nozzle properly (see 'Cleaning the roller brush'). Secure the roller brush inside the nozzle by snapping the locking lever in place. | |
| The LEDs in the nozzle do not turn on. | You have not attached the nozzle to the tube or appliance properly. | Attach the nozzle to the tube or appliance properly. If this does not help, please take it |
Problem Possible cause Solution
| to a Philips service center or contact the Consumer Care Center. | ||
| The appliance is not charging. | The plug is not connected properly to the socket-outlet or the adapter is not inserted into the wall socket properly. | Make sure that the plug is connected properly to the socket-outlet and that the adapter is inserted into the wall socket properly. |
| The battery is not in. Please insert the battery. | ||
| The battery is not completely inserted. | Please insert the battery until you hear a click sound. | |
| Wrong adapter connected. Please use the original adapter. | ||
| If you have checked the above and the appliance still does not charge, take it to a Philips service center or contact the Consumer Care Center. | ||
| The Mini Turbo brush does not function properly. | The roller brush is blocked. Remove hairs from the brush with a pair of scissors (see 'Cleaning the Mini Turbo brush'). | |
| The roller brush is blocked by fabric or surfaces during cleaning. | Keep the mini Turbo brush aligned with the surface and do not push the Turbo brush into soft surfaces. | |
| The roller brush is not properly inserted into the nozzle. | Make sure the roller brush is properly inserted into the nozzle and that there is no gap between the parts (see 'Cleaning the Mini Turbo brush'). | |
| When I use my vacuum cleaner I sometimes feel static electricity shocks. | Your vacuum cleaner builds up static electricity. The lower the air humidity, the more static electricity the appliance builds up. | Make sure to touch the metal pin with your hand while holding the appliance. |
| You vacuumed up dust and dirt. This also causes static electricity. | Make sure to touch the metal pin with your hand, while holding the appliance. | |
| Error code 'E2' appears on the display. | The temperature is too low. Make sure the temperature in the room where the appliance is used, stored, or charged is above 5 °C. | |
| Error code 'E3' appears on the display. | The temperature is too high. Make sure the temperature in the room where the appliance is used, stored, or charged is below 35 °C. Do not expose the device to direct sunlight or high temperatures (near hot stoves, in microwave ovens, or on induction cookers). Batteries may explode if overheated. | |
Problem Possible cause Solution
| If you have checked the above and the appliance still does not charge, take it to a Philips service center or contact the Consumer Care Center. |
Obsah
Úvod 53
Všeobecný popis 53
www.philips.com/myvacuum9000s.
Všeobecný popis
natural_image
Diagram of a mechanical assembly with a vertical rod inserted into a base component (no text or symbols)natural_image
Diagram showing two mechanical components with directional arrows indicating movement or assembly (no text or symbols)natural_image
Illustration of a green tool with a curved arrow indicating motion or force, mounted on a vertical support structure (no text or symbols)natural_image
3D illustration of a mechanical component with a separate view showing a pin inserted into a housing (no text or symbols)natural_image
Illustration of a hand holding a spray gun with arrows indicating motion (no text or symbols)natural_image
Illustration of a spray gun dispensing liquid into a rubber roller (no text or symbols)text_image
Diagram showing a vacuum cleaner's internal structure with labeled parts and directional arrows indicating assembly or operation.natural_image
Diagram of a mechanical device with a highlighted component and motion arrow (no text or symbols)natural_image
Illustration of a medical or laboratory procedure showing a tool tip and a magnified view of a device with light reflections (no text or symbols)natural_image
Illustration of a hand holding a cylindrical object with an arrow indicating downward motion, next to a base device (no text or symbols)text_image
Diagram showing a mechanical assembly with labeled parts, including a lever and a base structure.natural_image
Diagram showing two mechanical assembly steps with arrows indicating direction (no text or symbols)text_image
Technical diagram showing mechanical assembly with labeled parts ① and ②, likely illustrating a gear or switch mechanism.Nabíjení
text_image
MAX 35 °C MIN 5 °C
natural_image
Illustration of a plug with an arrow indicating direction (no text or symbols)
text_image
100%natural_image
Technical line drawing of a mechanical component with no visible text or symbols
natural_image
Technical line drawing of a mechanical component with no visible text or symbolsnatural_image
Illustration of a mechanical device with a highlighted component and motion arrow (no text or symbols)text_image
Safety warning illustration showing a device with warning symbol and red X mark indicating failure or hazardnatural_image
Illustration of a mechanical device emitting exhaust smoke from a cylindrical component (no text or symbols)natural_image
Illustration of a vacuum cleaner emitting exhaust smoke from a cylindrical component (no text or symbols)natural_image
Illustration of a hand holding a handheld device above a white cabinet (no text or symbols)

text_image
Diagram illustrating a hand using a tool to mark a defect or damage, with warning symbols and a red 'X' indicating failure.natural_image
Illustration of a hand holding a cylindrical object with a downward arrow and sparkles, next to a base device (no text or symbols)text_image
Diagram illustrating a step in a medical procedure involving a tool and a foot, labeled with arrows and numbered steps.natural_image
Illustration of a mechanical device with a downward arrow and sparkles, no text or symbols presentnatural_image
Illustration of a handheld device with a circular inset showing a bed (no text or symbols)natural_image
Illustration of a hairdryer with a cat and dog nearby, showing mechanical components and a close-up of the bed (no text or symbols)text_image
Diagram showing a hand holding a small object with labeled parts, including numbered arrows indicating steps ① and ②.natural_image
Illustration of a hand holding a device with a warning symbol and a red 'X' indicating failure or absence (no text or symbols present)natural_image
Illustration of a hand holding a flashlight with a downward arrow and radiating lines indicating light (no text or symbols)natural_image
Illustration of a dental implant tool interacting with a cylindrical device (no text or symbols present)text_image
Diagram showing a tool interacting with a cable, labeled with parts 1 and 2, indicating a process or procedure.natural_image
Illustration of a mechanical tool with a red X mark and warning symbols (no text or labels)text_image
Diagram showing a vacuum cleaner's internal structure with labeled parts and directional arrows indicating assembly steps.text_image
Diagram illustrating a mechanical or electrical component with three circular indicators (✓, +, -) indicating inspection or status.natural_image
Illustration of a hand pouring liquid into a vertical pipe with a green arrow indicating direction (no text or symbols)natural_image
Simple line drawing of a bucket pouring liquid into a container (no text or symbols)
text_image
MAX 50 °C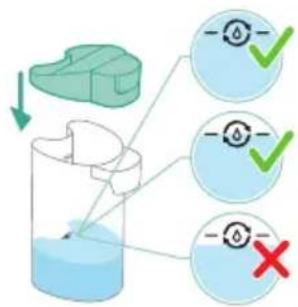
text_image
Diagram illustrating a process with three circular indicators (green check, red X) and arrows indicating direction of action or completion.
natural_image
Illustration of a hand holding a green cylindrical device with an arrow indicating motion (no text or symbols)
text_image
MAX 35 °C MIN 5 °Cnatural_image
Illustration of a remote control device with a switch and circular dial (no text or symbols)
text_image
AUTOCLEAN 4 min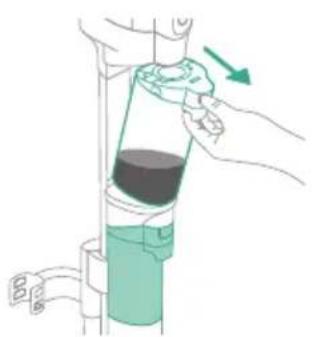
natural_image
Illustration of a hand using a tool to lift a cylindrical device (no text or symbols visible)
natural_image
Illustration of a mechanical device with a green handle and arrow indicating upward motion (no text or symbols)natural_image
Simple line drawing of a pouring cup into a stand, no text or symbols presentnatural_image
Simple line drawing of a faucet pouring liquid into a container with motion lines indicating flow (no text or symbols)natural_image
Illustration of a faucet with a green leaf-shaped container inserted into a basin (no text or symbols)text_image
Diagram illustrating the environmental change from a trash bin to a sun, with a red 'X' indicating no change and a green checkmark indicating completion.
natural_image
Illustration of a mechanical component with a green arrow indicating downward motion (no text or symbols)natural_image
Illustration of a hand holding a green cylindrical device with a green arrow indicating direction (no text or symbols)text_image
Diagram showing a mechanical assembly with numbered parts and green directional arrows indicating motion or movement.text_image
Diagram showing a hand using a tool to adjust or install a component, labeled with parts ① and ②.natural_image
Diagram showing two vertical cylindrical components with a downward arrow, mounted on a base (no text or symbols)natural_image
Technical line drawing of a mechanical component with an arrow indicating direction (no text or symbols)natural_image
Illustration of a hand pouring liquid into a container with a blue flame (no text or symbols)text_image
Diagram showing a mechanical component with numbered parts and green arrows indicating motion or force direction.text_image
Diagram showing a hand holding a tool with two labeled parts (① and ②) indicating different components or states.natural_image
Illustration of two hands holding a green object with a downward arrow indicating motion (no text or symbols)natural_image
Illustration of a hand holding a coiled green object, no text or symbols presentnatural_image
Diagram of a mechanical component with directional arrows indicating motion or force (no text or symbols)natural_image
Illustration of a vacuum cleaner with green arrows indicating motion direction (no text or symbols)natural_image
Diagram of a mechanical device with green components and directional arrows indicating movement (no text or symbols)natural_image
Technical diagram of a mechanical assembly with green arrows indicating direction (no text or symbols)natural_image
Illustration of a hand using a blue faucet to clean a green object on a surface (no text or symbols)text_image
Safety warning symbol showing water droplets and sun with warning indicatorstext_image
Diagram of a mechanical device with labeled parts and directional arrows indicating motion or assembly stepsnatural_image
Illustration of a container with liquid and an upward arrow, no text or symbols presentnatural_image
Illustration of a wooden tool pouring granular material into a cylindrical container (no text or symbols)text_image
Diagram showing a hand holding a container with a warning symbol indicating no liability or failure.text_image
Diagram of a mechanical device with labeled parts and directional arrows indicating motion or movement.natural_image
Illustration of a hand pouring liquid into a bottle with a faucet (no text or symbols)text_image
Diagram illustrating sunlight and water droplets, showing a sun icon transforming into a droplet with water droplets and a checkmark.text_image
Diagram illustrating a device's internal components with numbered parts and directional arrows indicating rotation or assembly.text_image
Diagram showing two views of a device with green checkmarks indicating approval or rejection, alongside a magnified view of the device's internal components.natural_image
Circular icon with a stylized white hand and exclamation mark inside a black circle (no text or symbols)natural_image
Illustration of a plastic container with an upward arrow indicating growth or movement (no text or symbols present)text_image
Diagram of a device component with numbered parts and directional arrows indicating movement or assembly.
natural_image
3D diagram of a mechanical device with a switch symbol and red X mark (no text or labels)natural_image
Illustration of hands cleaning a trash bin with a water tap (no text or symbols)natural_image
Illustration of a hand holding a rectangular object with curved arrows indicating rotation or motion (no text or symbols)natural_image
Illustration of hands pouring liquid into a trash bin (no text or symbols)text_image
Illustration showing a hand using a tool to clean a small object, with a warning symbol indicating no text or symbols.text_image
Diagram showing a device with a water droplet and a red X mark indicating a failure or absence.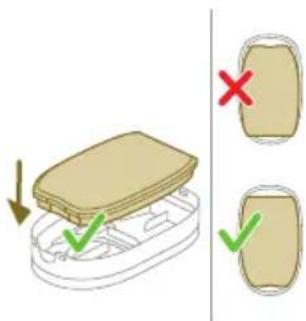
text_image
Diagram showing a device with a lid and two labeled parts, marked with red 'X' and green checkmarks.natural_image
Diagram of a mechanical component with a lever and base, showing motion direction (no text or symbols)text_image
Diagram showing a container with a lid and a cross mark indicating failure, alongside a schematic diagram of the container's internal structure.text_image
Diagram illustrating a water drop symbol with a container and directional arrow, indicating water flow or discharge.text_image
Safety warning illustration showing a device with warning symbol and red X mark indicating failure or hazardtext_image
Diagram illustrating a mechanical assembly or tool operation with labeled steps ① and ②, showing hand positioning and component insertion.natural_image
Illustration of hands tying a rope knot with scissors, showing a checkmark (no text or symbols present)text_image
Diagram illustrating a mechanical assembly or tool operation with labeled steps ① and ②, showing hand positioning and tool path.text_image
Diagram of a device with labeled parts and directional arrows indicating movement or forcenatural_image
Illustration of hands manipulating a mechanical component with a directional arrow (no text or symbols)text_image
Diagram showing a mechanical device with labeled parts and directional arrows indicating motion or assembly.natural_image
Circular icon with a document and question mark, labeled E5 (no text or symbols beyond the icon)natural_image
Circular icon with a stylized pen and wrench symbol, no text or numbers presentnatural_image
Circular icon with a white hand-painted object and circular arrow, no text or symbols present.www.philips.com/myvacuum9000s.
Generel beskrivelse
natural_image
Diagram of a mechanical assembly with a vertical rod inserted into a housing (no text or symbols)natural_image
Diagram showing two mechanical assembly states: one with upward arrows and one with downward arrows, no text or symbols present.natural_image
Illustration of a green screwdriver holding a vertical pole next to a bracket with a hand adjusting the handle (no text or symbols)natural_image
Mechanical component diagram showing a bracket with attached pin and housing (no text or symbols)natural_image
Illustration of a hand holding a device with arrows indicating motion or force (no text or symbols)natural_image
Illustration of a hand holding a cylindrical object with a downward arrow, next to a rolled document or paper (no text or symbols)text_image
Diagram showing a mechanical assembly with labeled parts and directional arrows indicating motion or assembly steps.natural_image
Diagram of a mechanical device with a highlighted component and motion arrow (no text or symbols)natural_image
Illustration of a mechanical device with a downward arrow and emitting sparks, next to a cylindrical component (no text or symbols)natural_image
Illustration of a hand holding a cylindrical object with an arrow indicating compression or disassembly (no text or symbols)text_image
Diagram showing a mechanical assembly with labeled parts, including a lever and adjustment mechanism.natural_image
Diagram showing two mechanical assembly steps with arrows indicating direction (no text or symbols)text_image
Technical diagram showing mechanical assembly with labeled parts ① and ②, likely illustrating a gear or switch mechanism.Opladning

text_image
MAX 35 °C MIN 5 °C
natural_image
Illustration of a plug with an arrow indicating direction (no text or symbols)
text_image
100%natural_image
Technical line drawing of a mechanical component with no visible text or symbols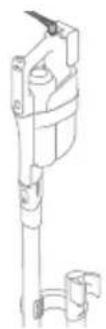
natural_image
Technical line drawing of a mechanical component with no visible text or symbolsnatural_image
Illustration of a mechanical device with a highlighted component and motion arrow (no text or symbols)text_image
Safety warning illustration showing a device with warning symbol and red X mark indicating failure or hazardnatural_image
Illustration of a mechanical device emitting exhaust smoke from a cylindrical component (no text or symbols)natural_image
Illustration of a vacuum cleaner emitting exhaust smoke from a cylindrical tube (no text or symbols)natural_image
Diagram of a door handle with a circular button labeled ①, showing no text or symbols beyond the number and an arrow pointing to the handle area.text_image
Safety warning illustration showing a person using a vacuum cleaner with water leakage, marked by an orange warning symbol and a red 'X' indicating no leakage.text_image
Safety warning illustration showing a spray nozzle spraying liquid with an eye and a bad object, accompanied by warning symbols.natural_image
Illustration of a handheld device mounted on a cabinet (no text or symbols visible)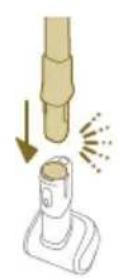
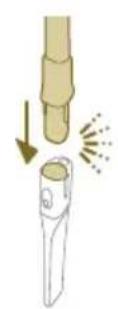
text_image
Diagram showing a hand using a tool to mark a defect or damage, with warning symbols and a red 'X' indicating failure.natural_image
Illustration of a vacuum cleaner emitting exhaust smoke from a cylindrical component (no text or symbols)text_image
Diagram illustrating a step in a medical procedure involving a tool and a foot, labeled with arrows and numbered steps.natural_image
Illustration of a handheld device with a circular inset showing a bed (no text or symbols)natural_image
Illustration of a hairdryer with a cat and dog nearby, showing spray effect (no text or symbols)text_image
Diagram showing a hand holding a small object with two labeled steps (① and ②) indicating a procedure or step in a process.natural_image
Illustration of a mechanical device with water droplets and warning symbols (no text or labels)natural_image
Illustration of a hand holding a flashlight with a downward arrow and light effect (no text or symbols)natural_image
Illustration of a dental implant tool interacting with a cylindrical component, with an inset showing a simple chair (no text or symbols present)text_image
Diagram showing a tool interacting with a wire, labeled with parts 1 and 2, indicating a process or procedure.natural_image
Illustration of a mechanical tool with a water droplet and warning symbols (no text or labels)text_image
Diagram showing a vacuum cleaner's internal structure with labeled parts and directional arrows indicating assembly steps.text_image
Diagram illustrating a mechanical or electrical setup with three circular indicators (✓, +, -) and a green downward arrow indicating direction.natural_image
Illustration of a hand pouring liquid into a vertical pipe with a green arrow indicating direction (no text or symbols)natural_image
Simple line drawing of a bucket pouring liquid into a basin (no text or symbols)
text_image
MAX 50 °C
text_image
Diagram illustrating a process with checkmarks and a red X mark, showing steps to process liquid or container with directional arrows.
natural_image
Illustration of a hand holding a cylindrical device with a green arrow pointing to the handle (no text or symbols present)
text_image
MAX 35 °C MIN 5 °Cnatural_image
Illustration of a remote control device with a switch and control knob (no text or symbols)natural_image
Illustration of a hand using a tool to lift a cylindrical device (no text or symbols visible)natural_image
Illustration of a mechanical device with a green handle and upward arrow, no text or symbols presentnatural_image
Simple line drawing of a cup pouring liquid into a stand (no text or symbols)natural_image
Illustration of a faucet pouring liquid into a water-filled container with swirling lines indicating flow (no text or symbols)17 Skyl tanken til snavset vand under vandhanen.
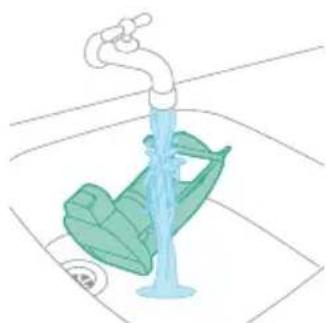
natural_image
Illustration of a faucet releasing water into a green leafy container on a tiled floor (no text or symbols)text_image
Diagram illustrating the process of a sun-drying system, showing water droplets and a checkmark with red and green symbols.
natural_image
Diagram of a mechanical device with a downward arrow indicating force or direction (no text or symbols present)natural_image
Illustration of a hand holding a green cylindrical device with a green arrow indicating direction (no text or symbols)text_image
Diagram showing a mechanical component with numbered parts and directional arrows indicating motion or flow.text_image
Diagram showing a hand holding a tool with two labeled parts (① and ②) indicating different components or functions.natural_image
Diagram showing three vertical cylindrical components with a downward arrow, mounted on a base (no text or symbols)natural_image
Technical line drawing of a mechanical component with an arrow indicating direction (no text or symbols)natural_image
Illustration of a hand pouring liquid into a container with a blue flame (no text or symbols)text_image
Diagram showing a mechanical component with numbered parts and green arrows indicating motion or force direction.text_image
Diagram showing a hand holding a tool with two labeled parts (① and ②) indicating different components or states.natural_image
Illustration of two hands holding a green object with a green arrow indicating direction (no text or symbols)natural_image
Illustration of a hand holding a coiled green object, no text or symbols presentnatural_image
Diagram of a syringe with directional arrows indicating motion (no text or labels)natural_image
Illustration of a vacuum cleaner with green arrows indicating motion direction (no text or symbols)natural_image
Diagram of a mechanical device with green components and directional arrows indicating movement (no text or symbols)natural_image
Technical diagram of a mechanical assembly with green arrows indicating direction (no text or symbols)natural_image
Illustration of a hand cleaning a faucet with a green tool on the handle (no text or symbols)text_image
Technical diagram showing a mechanical component with labeled parts and directional arrows indicating motion or assembly.natural_image
Illustration of a container with liquid and an upward arrow, no text or symbols presentnatural_image
Illustration of a wooden tool pouring granular material into a container (no text or symbols)3 Tøm støvbeholderen i skraldespanden.

natural_image
Illustration of a container with liquid and an open lid, showing a 3D view (no text or symbols)natural_image
Illustration of a mechanical component pouring granular material into a cylindrical container (no text or symbols)2 Tøm støvbeholderen i skraldespanden.
text_image
Diagram showing a hand holding a container with a warning symbol indicating no liability or failure.text_image
Diagram of a mechanical device with labeled parts and directional arrows indicating motion or movement.natural_image
Illustration of a hand pouring liquid into a container with a faucet (no text or symbols)text_image
Diagram illustrating a device's internal components with numbered parts and directional arrows indicating rotation or assembly.text_image
Diagram showing a device with green checkmark indicators and two circular components, one marked with red X and one with green checkmark.natural_image
Circular icon with a stylized white object and exclamation mark inside, set against a dark background (no text or symbols)natural_image
Illustration of a plastic container with an upward arrow indicating growth or movement (no text or symbols present)text_image
Diagram of a device with labeled parts, showing directional arrows and numbered callouts.
natural_image
3D diagram of a mechanical device with a switch symbol and red X mark (no text or labels)natural_image
Illustration of hands cleaning a trash bin with a water tap (no text or symbols)natural_image
Illustration of two hands holding a rectangular object with curved arrows indicating rotation or motion (no text or symbols)natural_image
Illustration of hands pouring liquid into a trash bin (no text or symbols)5 Ryst filterkabinettet og låget over en skraldespand for at fjerne støvet.
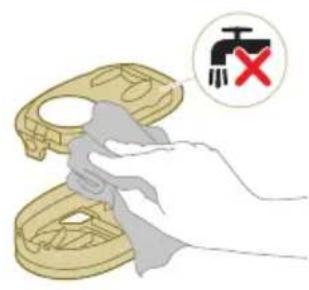
text_image
Illustration showing a hand cleaning a small mechanical component with a warning symbol and red X marktext_image
Diagram showing a device with a water droplet and a red X mark indicating a specific component or failure.text_image
Diagram showing a device with a lid and two labeled parts, marked with red 'X' and green checkmarks.natural_image
Illustration of a hand holding a small object with arrows indicating motion or force (no text or symbols)8 Luk filterkabinettet.


text_image
Diagram showing a container with a lid and a cross mark indicating failure, alongside a hand-drawn sketch of the container's side view.text_image
Diagram showing a plastic container with a water droplet symbol and an arrow indicating a drop, alongside a schematic of its internal structure.text_image
Safety warning illustration showing a device with warning symbol and red X mark indicating failure or hazardtext_image
Diagram illustrating a mechanical device with labeled parts and directional arrows, showing step 1 and step 2 of motion.natural_image
Illustration of hands holding a coiled plant stem with scissors, accompanied by a magnified inset showing a hand holding a branch (no text or symbols present)text_image
Diagram illustrating a mechanical or electrical component being adjusted, labeled with parts ① and ②.2 Skub rullebørsten tilbage i LED-mundstykket (1), og skub låseklemmen op for at låse rullebørsten i LED-mundstykket ("klik").
text_image
Diagram of a device with labeled parts and directional arrows indicating movement or assemblynatural_image
Illustration of a hand holding a coiled cable or wire, with an arrow indicating upward motion (no text or symbols present)text_image
Diagram of a mechanical device with labeled parts and directional arrows indicating motion or assembly.natural_image
Diagram of a mechanical assembly with a vertical rod inserted into a housing (no text or symbols)natural_image
Diagram showing two mechanical assembly states with arrows indicating direction of movement (no text or symbols)natural_image
Illustration of a green tool with a curved arrow indicating motion or force, next to a vertical support structure (no text or symbols)natural_image
Mechanical component diagram showing a housing assembly with a clamped bracket (no text or symbols)natural_image
Diagram of a device with arrows indicating motion or force, showing a mechanical component and a green base (no text or symbols)natural_image
Illustration of a mechanical device with a downward arrow and green emission cone (no text or symbols)text_image
Diagram showing a vacuum cleaner's internal structure with labeled parts and directional arrows indicating assembly steps.natural_image
Diagram of a mechanical device with a highlighted component and motion arrow (no text or symbols)natural_image
Illustration of a mechanical device with a downward arrow and emitting sparks, next to a cylindrical component (no text or symbols)natural_image
Illustration of a hand holding a cylindrical object with an arrow indicating compression or disassembly (no text or symbols)text_image
Diagram showing a mechanical assembly with labeled parts, including a lever and adjustment mechanism.natural_image
Diagram showing two mechanical assembly steps with arrows indicating direction (no text or symbols)text_image
Technical diagram showing mechanical assembly with labeled parts 1 and 2, likely illustrating a gear or mechanism assembly.Aufladen

text_image
MAX 35 °C MIN 5 °C
natural_image
Illustration of a plug with an arrow indicating direction (no text or symbols)
text_image
100%natural_image
Technical line drawing of a mechanical component with no visible text or symbols
natural_image
Technical line drawing of a mechanical component or assembly (no text or symbols)text_image
100° A O +natural_image
Diagram of a mechanical device with a highlighted component and directional arrow (no text or symbols)text_image
Safety warning illustration showing a toilet with a warning symbol and a red X mark indicating explosion or damage.natural_image
Illustration of a mechanical device emitting powder from a cylindrical component (no text or symbols)natural_image
Illustration of a handheld device mounted on a cabinet, with no visible text or symbols.text_image
Diagram illustrating a hand using a tool to mark a defect or damage, with an inset showing warning symbols and a red 'X' indicating failure.natural_image
Illustration of a vacuum cleaner emitting exhaust smoke from a nozzle (no text or symbols)text_image
Diagram showing a hand holding a nail with two labeled steps (① and ②) indicating step-by-step application or procedure.natural_image
Illustration of a mechanical device with a downward arrow and sparkles, no text or symbols presentnatural_image
Illustration of a handheld vacuum cleaner with a bed outline (no text or symbols)natural_image
Illustration of a hairdryer with a cat and a dog nearby, showing powder and cleaning process (no text or symbols)text_image
Diagram showing a hand holding a small object with two labeled steps (① and ②) indicating a procedure or step in a process.natural_image
Illustration of a mechanical device with water droplets and warning symbols (no text or labels)natural_image
Illustration of a dental implant tool interacting with a cylindrical device (no text or symbols present)text_image
Diagram showing a tool interacting with a cable, labeled with parts 1 and 2, indicating a process or procedure.natural_image
Illustration of a mechanical tool with a red X mark and warning symbols (no text or labels)text_image
Technical diagram showing a mechanical assembly with labeled parts and directional arrows indicating motion or assembly.text_image
Diagram illustrating a mechanical or electrical component with three circular checkmarks indicating failure or rejection states.natural_image
Illustration of a hand pouring liquid into a cylindrical container with a green handle (no text or symbols)natural_image
Simple line drawing of a bucket pouring liquid into a container (no text or symbols)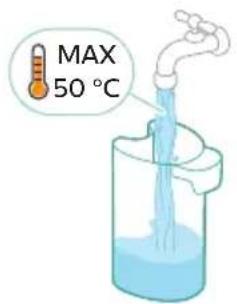
text_image
MAX 50 °C
text_image
Diagram illustrating a process with three checkmarks and a red X mark, showing steps to process liquid or container.
natural_image
Illustration of a hand holding a green cylindrical device with an arrow indicating motion (no text or symbols)
text_image
MAX 35 °C MIN 5 °Cnatural_image
Illustration of a remote control device with a handle and control panel (no text or symbols)
text_image
AUTOCLEAN 4 min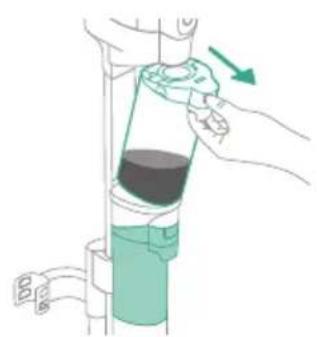
natural_image
Illustration of a hand pouring liquid into a vertical pipe with a green arrow indicating direction (no text or symbols)
natural_image
Illustration of a mechanical device with a green handle and upward arrow, no text or symbols presentnatural_image
Simple line drawing of a pouring cup into a stand, no text or symbols presentnatural_image
Illustration of a faucet pouring liquid into a container with motion lines indicating flow (no text or symbols)natural_image
Illustration of a faucet with a green leaf-shaped container inserted into the drain, placed on a tiled floor (no text or symbols)text_image
Safety warning illustration showing water drop and sun symbol with checkmark indicatorsnatural_image
Illustration of a mechanical component with a downward arrow indicating motion (no text or symbols)natural_image
Illustration of a hand holding a green cylindrical device with a blue handle, mounted on a vertical pipe (no text or symbols)text_image
Diagram showing a mechanical assembly with numbered parts and green directional arrows indicating motion or force directions.text_image
Diagram showing a tool interacting with a device, labeled with parts ① and ② indicating different components or functions.natural_image
Diagram showing three vertical cylindrical components with a downward arrow, mounted on a base (no text or symbols)natural_image
Technical line drawing of a mechanical component with an arrow indicating direction (no text or symbols)natural_image
Illustration of a hand pouring liquid into a container with a blue flame (no text or symbols)text_image
Diagram showing a mechanical component with numbered parts and green arrows indicating motion or force direction.text_image
Diagram showing a hand operating a tool with labeled parts, including numbered callouts ① and ②.natural_image
Illustration of two hands holding a green object with a black tool, showing a downward arrow (no text or symbols)natural_image
Illustration of a hand holding a coiled green object, no text or symbols presentnatural_image
Diagram of a syringe with directional arrows indicating motion (no text or labels)natural_image
Diagram of a vacuum cleaner with green arrows indicating motion direction (no text or symbols)natural_image
Diagram of a mechanical device with green components and directional arrows indicating movement (no text or symbols)natural_image
Technical illustration of a mechanical assembly with green arrows indicating motion direction (no text or symbols)natural_image
Illustration of a hand holding a green tool interacting with a blue water tap (no text or symbols)text_image
Warning Sun X ✓text_image
Diagram of a mechanical device with labeled parts and directional arrows indicating motion or assembly stepsnatural_image
Illustration of a container with liquid and an upward arrow, no text or symbols presentnatural_image
Illustration of a hand pouring granular material into a container (no text or symbols)natural_image
Diagram showing a container with a lid and an arrow indicating downward motion (no text or symbols)natural_image
Illustration of a mechanical device with a highlighted component and motion arrow (no text or symbols)natural_image
Illustration of a container with liquid and an upward arrow, no text or symbols presentnatural_image
Illustration of a wooden tool pouring granular material into a cylindrical container (no text or symbols)text_image
Diagram showing a hand using a tool to clean or store items, with a warning symbol indicating no liability.text_image
Diagram showing a water drop symbol with an arrow and checkmark indicating incorrect water level, alongside a container illustration.natural_image
Illustration of a mechanical device with a highlighted component and motion arrow (no text or symbols)
text_image
Safety warning illustration showing a device with warning symbol and red X mark indicating explosion or damagetext_image
Diagram illustrating a mechanical device with labeled parts and a hand holding a water tap, showing step-by-step assembly.text_image
Diagram illustrating a mechanical or electrical device with labeled parts ① and ②, showing directional arrows and components.text_image
Diagram showing two views of a water dispenser with checkmarks and a red X symbol indicating failure or rejection.natural_image
Circular icon with a stylized white plug or connector symbol and an exclamation mark, set against a dark background (no text or symbols)text_image
Diagram illustrating two steps of a food storage or cleaning process, labeled ① and ②, showing step ① with a lid and step ② with a container.natural_image
3D diagram of a mechanical device with a highlighted switch symbol (no text or labels)natural_image
Illustration of a hand pouring liquid into a trash bin with a water tap nearby (no text or symbols)natural_image
Illustration of a hand holding a small object with curved arrows indicating rotation or motion (no text or symbols)natural_image
Illustration of hands pouring liquid into a trash bin (no text or symbols)text_image
Illustration showing a hand holding a valve with a red 'X' symbol, indicating no text or symbols on the valve itself.text_image
Diagram showing a device with a water droplet symbol and red X, indicating a water droplet failure.
text_image
Diagram showing a device with a lid and two labeled boxes, one marked with a red X and green checkmark, indicating selection or confirmation.natural_image
Illustration of a dental implant or dental implant device with a tool inserted into a cup (no text or symbols present)text_image
Diagram showing a container with a lid and a cross mark indicating failure, alongside a schematic of the container's internal structure.
text_image
Diagram illustrating a water drop symbol with a container and directional arrow, accompanied by a blue droplet icon.text_image
Safety warning illustration showing a device with warning symbol and red X mark indicating failure or hazardtext_image
Diagram illustrating a mechanical or electrical component being inserted into a device, with labeled parts and directional arrows.natural_image
Illustration of hands holding a coiled metal object with a green checkmark indicating inspection (no text or symbols present)text_image
Medical illustration showing a hand holding a tool with two labeled steps (① and ②) indicating step-by-step instructions.text_image
Diagram of a device with labeled parts and directional arrows indicating movement or forcenatural_image
Illustration of hands connecting wires to a mechanical component (no text or symbols)text_image
Diagram showing a mechanical device with labeled parts, including numbered callouts ① and ②.www.philips.com/myvacuum9000s.
Üldine kirjeldus
1 Tolmukambri vabastusnupp
2 Ekraan
3 Puhastusrežiimi nupp
4 Keskmine nupp (AUTOCLEAN)
5 Toitenupp
6 Aku
7 Kolm-ühes käsitolmuimeja
8 Tolmukamber
9 Seinakinnitus
10 Toru
11 LED-tuledega otsak
12 Väike turbohari
13 Pikk piluotsak
14 Adapter
15 Toitepistik
16 Lisalaadija (ainult XW9385)
17 Puhastamisjärgne ja hoiustamisjaam
18 Seadme hoidik
19 Puhastamisjärgne alus
20 Alusplaat
21 Märgmoodul
22 Musta vee paak
23 Puhta vee paak
24 AquaSpini otsak
25 Mikrokiudharjad
26 Põrandapesuvedelik Philips Floor Cleaner XV1792
27 Puhastusharjake
natural_image
Diagram of a mechanical assembly with a vertical rod inserted into a housing (no text or symbols)natural_image
Diagram showing two mechanical assembly states with arrows indicating direction of movement (no text or symbols)natural_image
Illustration of a green tool with a curved arrow indicating motion, mounted on a vertical support structure (no text or symbols)natural_image
Mechanical component diagram showing a bracket with mounting holes and a separate housing (no text or symbols)natural_image
Illustration of a hand holding a spray gun with arrows indicating motion (no text or symbols)natural_image
Illustration of a vacuum cleaner emitting exhaust smoke from a cylindrical component (no text or symbols)text_image
Diagram showing a vacuum cleaner's internal structure with labeled parts and directional arrows indicating assembly steps.natural_image
Diagram of a mechanical device with a highlighted component and motion arrow (no text or symbols)natural_image
Illustration of a medical or laboratory procedure showing a tool tip and a magnified view of a device with light reflections (no text or symbols)natural_image
Illustration of a hand holding a cylindrical object with an arrow indicating downward motion, next to a base device (no text or symbols)3 Pange toru LED otsakusse.
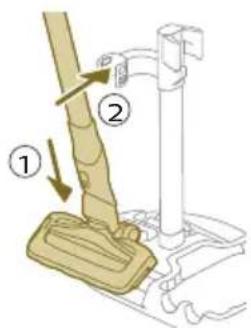
text_image
Diagram showing a mechanical assembly with labeled parts, including a lever and a base structure.natural_image
Diagram showing two mechanical assembly steps with arrows indicating direction (no text or symbols)text_image
Technical diagram showing mechanical assembly with labeled parts ① and ②, likely illustrating a gear or switch mechanism.Laadimine

text_image
MAX 35 °C MIN 5 °C
natural_image
Illustration of a plug with a cable and a wall socket, no text or symbols present
text_image
100%natural_image
Technical line drawing of a mechanical clamp or bracket component (no text or symbols)
natural_image
Technical line drawing of a mechanical component with no visible text or symbolstext_image
100° A O +natural_image
Diagram of a mechanical device with a highlighted component and motion arrow (no text or symbols)text_image
Safety warning illustration showing a device with warning symbol and red X mark indicating failure or hazardnatural_image
Illustration of a medical procedure showing a hand holding a needle and a tube with fluid flow (no text or symbols)natural_image
Illustration of a vacuum cleaner emitting exhaust smoke from a cylindrical component (no text or symbols)3 Pange toru LED otsakusse.
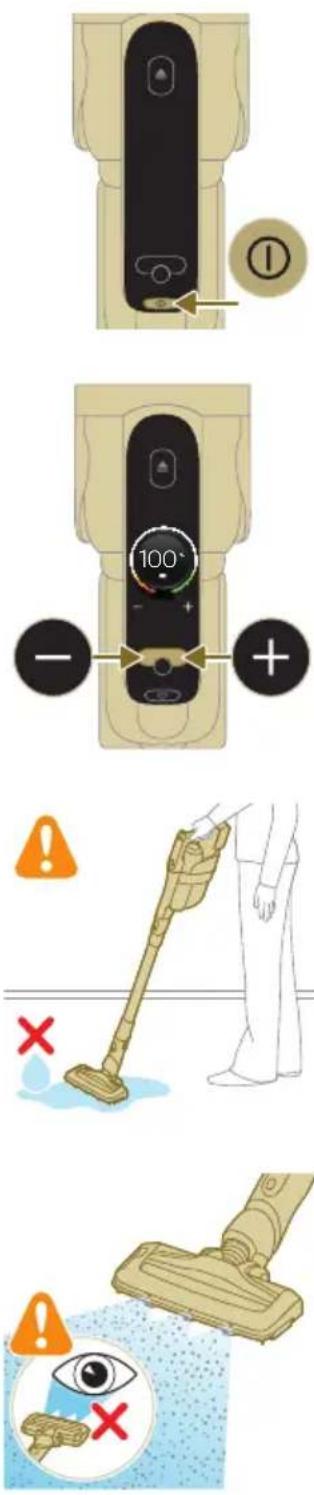
natural_image
Illustration of a hand holding a handheld device above a white cabinet (no text or symbols)

text_image
Diagram illustrating a hand using a tool to mark a defect or damage, with warning symbols and a red 'X' indicating failure.natural_image
Illustration of a hand holding a tool above a device with a flame symbol (no text or symbols present)text_image
Diagram illustrating a step in a medical procedure involving a finger insertion or manipulation, labeled with steps ① and ②.natural_image
Illustration of a mechanical device with a downward arrow and sparkles, no text or symbols presentnatural_image
Illustration of a handheld vacuum cleaner with a bed outline (no text or symbols)natural_image
Illustration of a hairdryer with a cat and a dog nearby, showing powder and cleaning process (no text or symbols)text_image
Diagram showing a hand holding a small object with labeled parts, including numbered arrows indicating steps ① and ②.natural_image
Illustration of a mechanical device with water droplets and warning symbols (no text or labels)natural_image
Illustration of a hand holding a flashlight with a downward arrow and light effect (no text or symbols)natural_image
Illustration of a medical or laboratory procedure showing a tool interacting with a cylindrical object and a separate view of a bench (no text or symbols present)text_image
Diagram showing a tool interacting with a connector, labeled with parts 1 and 2.natural_image
Illustration of a mechanical tool with a red X mark and warning symbols (no text or labels)text_image
Technical diagram showing a mechanical assembly with labeled parts and directional arrows indicating motion or assembly.text_image
Diagram illustrating a mechanical assembly with checkmarks and a magnified view of the component, likely for inspection or testing purposes.natural_image
Illustration of a hand pouring liquid into a vertical cylindrical container with a green arrow indicating direction (no text or symbols)natural_image
Simple line drawing of a bucket pouring liquid into a container (no text or symbols)
text_image
MAX 50 °C
text_image
Diagram illustrating a process with three circular indicators (green check, red X) and arrows indicating direction of action or completion.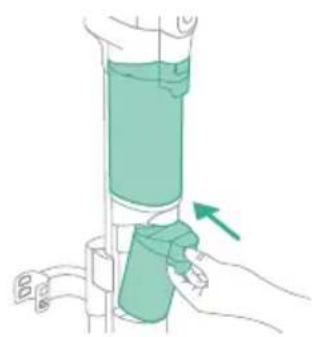
natural_image
Illustration of a hand holding a green cylindrical device with an arrow indicating motion (no text or symbols)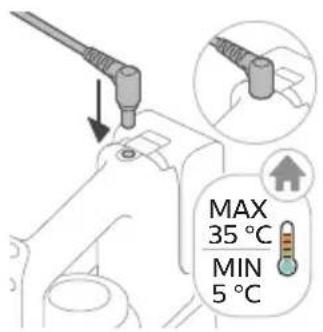
text_image
MAX 35 °C MIN 5 °Cnatural_image
Illustration of a remote control device with a handle and control panel (no text or symbols)
text_image
AUTOCLEAN 4 min
natural_image
Illustration of a hand pouring liquid into a vertical pipe with a green arrow indicating direction (no text or symbols)
natural_image
Illustration of a green mechanical device with an upward arrow, no text or symbols presentnatural_image
Simple line drawing of a pouring container into a stand, no text or symbols present16 Valage vesi musta vee paagist kraanikaussi.

natural_image
Illustration of a faucet pouring liquid into a container with motion lines indicating flow (no text or symbols)17 Puhastage musta vee paak kraani all.
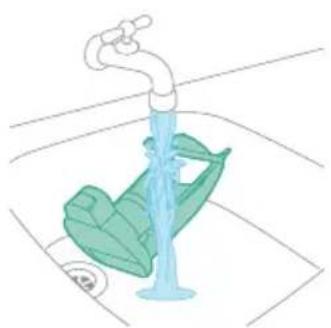
natural_image
Illustration of a faucet with a green leaf-shaped container inserted into a basin (no text or symbols)text_image
Diagram illustrating the environmental change from a trash bin to a sun, with a red 'X' indicating water level change and a green checkmark indicating recovery.
natural_image
Illustration of a mechanical component with a green arrow indicating downward motion (no text or symbols)natural_image
Illustration of a hand holding a green cylindrical device with a green arrow indicating direction (no text or symbols)21 Pange musta vee paak tagasi seadmesse.
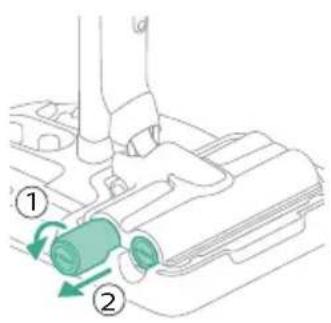
text_image
Diagram showing a mechanical assembly with numbered parts and green directional arrows indicating motion or movement.text_image
Diagram showing a hand using a tool to adjust or install a component, labeled with parts ① and ②.natural_image
Diagram showing three vertical cylindrical objects on a base with a green arrow indicating direction (no text or symbols)natural_image
Technical line drawing of a mechanical component with an arrow indicating direction (no text or symbols)natural_image
Illustration of a hand pouring liquid into a container with a blue flame (no text or symbols)text_image
Diagram showing a mechanical component with numbered parts and green arrows indicating motion or force direction.text_image
Diagram showing a hand holding a tool with two labeled parts (① and ②) indicating different components or states.natural_image
Illustration of two hands holding a green object with a downward arrow indicating motion (no text or symbols)natural_image
Illustration of a hand holding a coiled green object, no text or symbols presentnatural_image
Diagram of a mechanical component with directional arrows indicating motion or force (no text or symbols)natural_image
Illustration of a vacuum cleaner with green arrows indicating motion direction (no text or symbols)natural_image
Diagram of a mechanical device with green components and directional arrows indicating movement (no text or symbols)natural_image
Technical diagram of a mechanical assembly with green arrows indicating direction (no text or symbols)natural_image
Illustration of a hand holding a blue faucet with a green handle, placed on a surface (no text or symbols)3 Loputage niisutusribasid kraani all.

text_image
Diagram illustrating sunlight interaction with water droplets and a checkmark, showing red X and green ✓ symbols.text_image
Technical diagram showing a mechanical component with labeled parts and directional arrows indicating motion or assembly.natural_image
Illustration of a container with liquid and an upward arrow, no text or symbols presentnatural_image
Illustration of a wooden tool pouring granular material into a container (no text or symbols)3 Tühjendage tolmukambri sisu prügikasti.
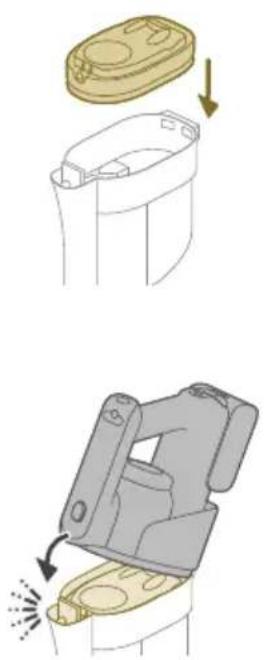
4 Kinnitage filtrikarp tagasi tolmukambrile.
natural_image
Illustration of a container with liquid and an open lid, showing a 3D view (no text or symbols)natural_image
Illustration of a wooden tool pouring granular material into a cylindrical container (no text or symbols)2 Tühjendage tolmukambri sisu prügikasti.
text_image
Diagram showing a hand holding a container with a warning symbol indicating no liability or failure.text_image
Diagram of a mechanical device with labeled parts and directional arrows indicating motion or movement.natural_image
Illustration of a hand pouring liquid into a bottle with a faucet (no text or symbols)text_image
Diagram illustrating sunlight and water droplets, showing a sun icon transforming into a droplet with water droplets and a checkmark.text_image
Diagram illustrating a device's internal components with numbered parts and directional arrows indicating rotation or assembly.text_image
Diagram showing two views of a device with green checkmarks indicating approval or rejection, alongside a magnified view of the device's internal components.natural_image
Circular icon with a stylized white object and exclamation mark inside, set against a dark background (no text or symbols)natural_image
Illustration of a container with liquid and an upward arrow, no text or symbols presenttext_image
Diagram of a device component with labeled parts ① and ②, showing directional arrows indicating movement or flow.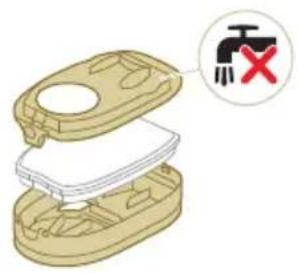
text_image
Diagram of a device with a switch symbol and red prohibition sign, indicating no protection or disapproval.natural_image
Illustration of a hand pouring liquid into a trash bin while another hand swashes it, separated by a diagonal line (no text or symbols)natural_image
Illustration of a hand holding a rectangular object with curved arrows indicating rotation or motion (no text or symbols)4 Vee eemaldamiseks pigistage vahtplastfiltrit.
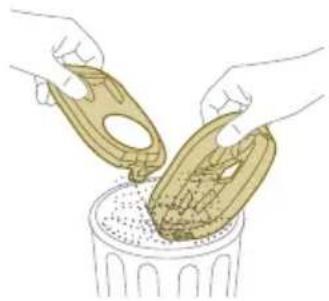
natural_image
Illustration of hands pouring liquid into a trash bin (no text or symbols)text_image
Illustration showing a hand using a tool to clean or repair a mechanical component, with a red 'X' symbol indicating no text.6 Puhastage filtrihoidikut niiske lapiga.
text_image
Diagram showing a device with a water droplet and a red X mark indicating a defect or failure.text_image
Diagram showing a device with a lid and two labeled parts, marked with red 'X' and green checkmarks.natural_image
Illustration of a hand pouring liquid into a container with a spray bottle (no text or symbols)8 Sulgege filtrikarp.


text_image
Diagram showing a device with a cross mark indicating failure, and a separate outline of a container with arrows.9 Pange filtrikarp koos vahtplastfiltriga tagasi tolmukambrisse.
text_image
Diagram illustrating a water drop symbol and its impact on a container with a red X, indicating water release or discharge.text_image
Safety warning illustration showing a device with warning symbol and red X mark indicating explosion or damagetext_image
Diagram illustrating a mechanical or electrical component being inserted into a device, labeled with parts ① and ②.natural_image
Illustration of hands holding a coiled plant stem with scissors, accompanied by a magnified inset showing a hand holding a branch (no text or symbols present)text_image
Diagram illustrating a mechanical or electrical component being inserted into a motor, with labeled parts and directional arrows.text_image
Diagram of a device with labeled parts and directional arrows indicating movement or forcenatural_image
Illustration of hands tying a knot around a mechanical component (no text or symbols)text_image
Diagram of a robotic arm with labeled parts, showing motion and assembly stepsnatural_image
Circular icon with battery symbol and question mark, labeled E5 (no text or symbols beyond label)Installation du support mural
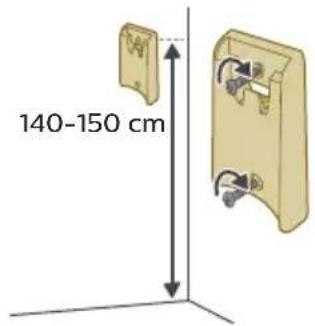
text_image
140-150 cm
natural_image
Illustration of a mechanical component with a separate view showing a pin inserted into a housing (no text or symbols present)natural_image
Illustration of a hand holding a spray gun with arrows indicating motion (no text or symbols)natural_image
Illustration of a medical or laboratory procedure showing a device with a downward arrow and green laser beam (no text or symbols)text_image
Diagram showing a vacuum cleaner's internal structure with labeled parts and directional arrows indicating assembly or operation.natural_image
Diagram of a mechanical device with a highlighted component and motion arrow (no text or symbols)natural_image
Illustration of a medical or laboratory procedure showing a tool tip and a magnified view of a device with light reflections (no text or symbols)natural_image
Illustration of a hand holding a cylindrical object with an arrow indicating downward motion, next to a base device (no text or symbols)text_image
Diagram showing a mechanical assembly with labeled parts, including a lever and a base structure.natural_image
Diagram showing two mechanical assembly steps with arrows indicating direction (no text or symbols)text_image
Technical diagram showing mechanical assembly with labeled parts ① and ②, likely illustrating a gear or tool mechanism.Charge

text_image
MAX 35 °C MIN 5 °C
natural_image
Illustration of a plug with a cable and a wall socket, no text or symbols present
text_image
100%natural_image
Technical line drawing of a mechanical component with no visible text or symbolsnatural_image
Technical line drawing of a mechanical component with no visible text or symbolstext_image
100° A O +natural_image
Illustration of a mechanical device with a highlighted component and motion arrow (no text or symbols)text_image
Safety warning illustration showing a device with warning symbol and red X mark indicating failure or hazardnatural_image
Illustration of a mechanical device with a downward arrow and emitting sparks, next to a cylindrical component (no text or symbols)natural_image
Illustration of a vacuum cleaner emitting exhaust smoke from a cylindrical tube (no text or symbols)natural_image
Diagram of a door handle with a circular button labeled ①, showing no text or symbols beyond the number and an arrow pointing to the handle area.text_image
Safety warning illustration showing a person using a vacuum cleaner with warning symbols and a red 'X' indicating failure.text_image
Safety warning illustration showing a spray nozzle spraying water with an eye and a red X mark indicating no need.natural_image
Illustration of a hand holding a handheld device above a cabinet (no text or symbols visible)

text_image
Diagram illustrating a hand using a tool to mark a defect or damage, with warning symbols and a red 'X' indicating failure.natural_image
Illustration of a hand using a tool to press or install a device, with no visible text or symbols.text_image
Diagram illustrating a step in a medical procedure involving a tool and a device, labeled with arrows and numbered steps.natural_image
Illustration of a mechanical device with a downward arrow and sparkles, no text or symbols presentnatural_image
Illustration of a handheld device with a circular inset showing a bed (no text or symbols)natural_image
Illustration of a hairdryer with a cat and dog nearby, showing no text or symbolstext_image
Diagram showing a hand holding a small object with two labeled steps (① and ②) indicating a process or procedure.natural_image
Illustration of a mechanical device with water droplets and warning symbols (no text or labels)natural_image
Illustration of a dental implant tool interacting with a cylindrical device (no text or symbols present)text_image
Diagram showing a tool interacting with a wire, labeled with parts 1 and 2, indicating a step in the process.natural_image
Illustration of a mechanical tool with a water droplet and warning symbols (no text or labels)text_image
Diagram showing a vacuum cleaner's internal structure with labeled parts and directional arrows indicating assembly steps.text_image
Diagram illustrating a mechanical or electrical component with three circular indicators (red, green, black) and checkmarks indicating failure or completion.natural_image
Illustration of a hand pouring liquid into a vertical pipe with a green arrow indicating direction (no text or symbols)flowchart
graph TD
    A["Step 1: Insert liquid into a container"] --> B["Step 2: Insert liquid into a container"]
    B --> C["Step 3: Insert liquid into a container"]
    C --> D["Step 4: Insert liquid into a container"]
    D --> E["Step 5: Insert liquid into a container"]
natural_image
Simple line drawing of a bucket pouring liquid into a basin (no text or symbols)
text_image
MAX 50 °C
text_image
Diagram illustrating a process with checkmarks and a red X mark, showing steps to process liquid or container with directional arrows.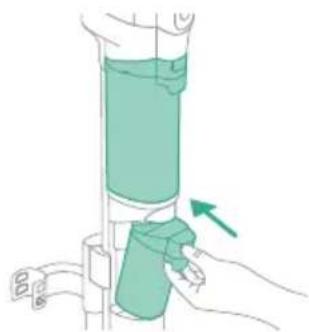
natural_image
Illustration of a hand holding a cylindrical device with a green arrow pointing to the handle (no text or symbols present)
text_image
MAX 35 °C MIN 5 °Cnatural_image
Illustration of a remote control device with a switch and circular dial (no text or symbols)
text_image
AUTOCLEAN 4 min
natural_image
Illustration of a hand pouring liquid into a vertical pipe with a green arrow indicating direction (no text or symbols)
natural_image
Illustration of a mechanical device with an upward arrow, no text or symbols presentnatural_image
Simple line drawing of a pouring container into a stand, no text or symbols presentnatural_image
Illustration of a faucet pouring liquid into a water-filled container with swirling lines indicating flow (no text or symbols)natural_image
Illustration of a faucet releasing water into a green leafy container on a tiled floor (no text or symbols)text_image
Diagram illustrating the process of a water drop system with sunlight, showing water droplets and a checkmark.
natural_image
Diagram of a mechanical component with a downward arrow indicating force or direction (no text or symbols)natural_image
Illustration of a hand holding a green cylindrical device with a green arrow indicating motion (no text or symbols)text_image
Diagram showing a mechanical assembly with numbered parts and green directional arrows indicating motion or force directions.text_image
Diagram showing a hand holding a device with labeled parts, including numbered callouts ① and ②.natural_image
Diagram showing two vertical cylindrical components with a downward arrow, mounted on a base (no text or symbols)natural_image
Technical line drawing of a mechanical component with an arrow indicating direction (no text or symbols)1 Retirez le plateau post-nettoyage de la station.

natural_image
Illustration of a hand pouring liquid into a container with a blue flame (no text or symbols)text_image
Diagram showing a mechanical device with two labeled parts (① and ②) indicating directional movement or assembly.text_image
Diagram showing a hand holding a tool with labeled parts, including numbered callouts ① and ②.natural_image
Illustration showing two steps of a hand holding a green object, with a magnified view of the cable being twisted (no text or symbols present)natural_image
Diagram of a syringe with green arrows indicating direction (no text or labels)natural_image
Illustration of a vacuum cleaner with green arrows indicating motion direction (no text or symbols)natural_image
Diagram of a mechanical assembly with green components and directional arrows, no text or symbols presentnatural_image
Diagram of a mechanical device with green arrows indicating movement or force direction (no text or symbols)natural_image
Illustration of a hand using a green tool to clean or wash a blue faucet (no text or symbols)text_image
Weather symbol and weather indicator diagram showing sun, raindrops, and checkmark symbolstext_image
Technical diagram showing a mechanical component with labeled parts and directional arrows indicating motion or assembly.natural_image
Illustration of a container with liquid and an upward arrow, no text or symbols presentnatural_image
Illustration of a wooden tool pouring granular material into a container (no text or symbols)natural_image
Illustration of a container with liquid and an upward arrow, no text or symbols presentnatural_image
Illustration of a container with granular material being poured into a cylindrical container (no text or symbols)text_image
Diagram showing a hand holding a tool in a container with a warning symbol indicating no liability or failure.text_image
Diagram illustrating a water drop symbol and its impact on a container with an arrow indicating reduction.natural_image
Diagram of a mechanical device with a highlighted component and motion arrow (no text or symbols)text_image
Safety warning illustration showing a device with warning symbol and red X mark indicating explosion or damagetext_image
Diagram of a mechanical device with labeled parts and directional arrows indicating motion or flownatural_image
Illustration of a hand pouring liquid into a container with a faucet, no text or symbols presenttext_image
Diagram illustrating sunlight interaction with a container, showing water droplets and a sun symbol leading to a container with a checkmark.text_image
Diagram illustrating a device's internal components with numbered parts and directional arrows indicating motion or assembly.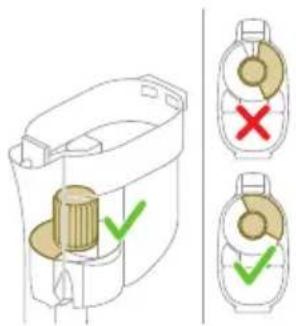
text_image
Diagram showing a device with green checkmark indicators and two labeled cross-sectional views of a device.natural_image
Circular icon with a stylized white figure and exclamation mark, set against a dark background (no text or symbols)text_image
Diagram of a device with a switch symbol and red X mark indicating no change or error
natural_image
Illustration of hands cleaning a trash bin with a water tap, showing the process (no text or symbols)
natural_image
Illustration of a hand holding a small object with curved arrows indicating rotation or movement (no text or symbols)natural_image
Illustration of hands pouring liquid into a trash bin (no text or symbols)text_image
Illustration showing a hand cleaning a small mechanical component with a warning symbol indicating no text or symbols.text_image
Diagram showing a device with a water droplet and a red X mark indicating a failure or absence.text_image
Diagram showing a device with a lid and two labeled parts, marked with red 'X' and green checkmarks.natural_image
Illustration of a hand tool interacting with a device (no text or symbols visible)natural_image
Diagram showing a container with a lid and a side view of its internal structure, marked with red X and downward arrow (no text or symbols)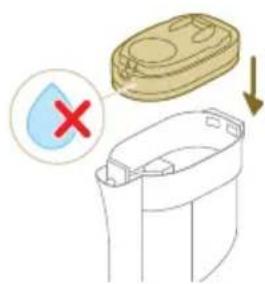
text_image
Diagram showing a container with a lid and a drop labeled with red X, indicating a warning or rejection point.text_image
Safety warning illustration showing a toilet with warning symbol and red X mark indicating explosion or damagetext_image
Diagram illustrating a mechanical device with labeled parts and directional arrows, showing step 1 and step 2 of motion.natural_image
Illustration of hands holding a coiled string with a green checkmark indicating a detail (no text or symbols present)text_image
Diagram illustrating a mechanical or electrical process with labeled steps ① and ②, showing hand positioning and component insertion.text_image
Diagram of a device with labeled parts and directional arrows indicating movement or forcenatural_image
Illustration of a hand performing a rope knot or manipulation technique (no text or symbols present)text_image
Diagram of a robotic hand holding a mechanical device with labeled parts ① and ②, showing motion direction.natural_image
Circular icon with a document and question mark, labeled E5 (no text or symbols beyond the label)natural_image
Diagram of a mechanical assembly with a vertical rod inserted into a housing (no text or symbols)Kako biste upotrebljavali funkciju samočišćenja AUTOCLEAN ili pohranili i napunili uređaj na stanici za postavljanje poslije čišćenja i pohranu, prvo morate sastaviti stanicu tako da utisnete držač uređaja na osnovnu ploču.

natural_image
Diagram showing two mechanical assembly states with arrows indicating direction of movement (no text or symbols)Savjet: držač za položaj za usisavanje može se pogurnuti i okrenuti naopako ako usisivač želite postaviti s druge strane stanice za postavljanje poslije čišćenja i pohranu.

i Napomena: provjerite je li ladica za uporabu poslije čišćenja postavljena na osnovnu ploču i je li temperatura u prostoriji u kojoj se uređaj pohranjuje, puni i čisti između 5 °C i 35 °C.
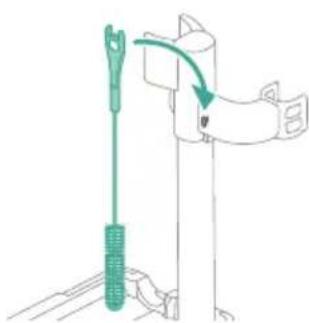
natural_image
Illustration of a green screwdriver holding a vertical pole with a hand strap, no text or symbols presentnatural_image
Mechanical component diagram showing a bracket with attached pin and housing (no text or symbols)Ako na zidnom nosaču želite pohraniti i puniti samo usisavač, pričvrstite zidni nosač na zid isporučenim vijcima. Provjerite je li zidni nosač 140 cm – 150 cm iznad poda.
i Napomena: na zidni nosač nije moguća pohrana uređaja u položaju za usisavanje i brisanje. Na zidni nosač moguće je pohraniti samo uređaj u položaju za usisavanje.
i Napomena: pobrinite se da temperatura u prostoriji u kojoj je aparat pohranjen ili se tamo puni bude između 5 °C i 35 °C.
natural_image
Illustration of a hand holding a device with arrows indicating motion or force (no text or symbols)1 Za sastavljanje uređaja u položaj za usisavanje i brisanje umetnite bateriju i pričvrstite držak 3-u-1 na modul za mokro čišćenje („klik“).
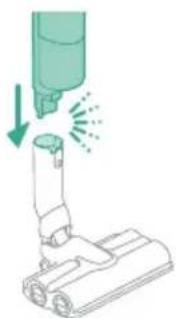
natural_image
Illustration of a hand holding a cylindrical object with a downward arrow, next to a rolled document or paper (no text or symbols)2 Pričvrstite modul za mokro čišćenje na mlaznicu AquaSpin („klik“).
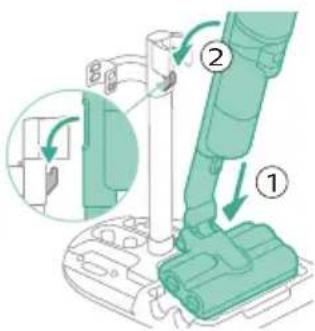
text_image
Diagram showing a mechanical assembly with labeled parts and directional arrows indicating motion or assembly steps.3 Kako biste pohranili uredaj u položaju za usisavanje i brisanje, možete ga staviti u stanicu za postavljanje poslije čišćenja i pohranu.
i Napomena: na zidni nosač nije moguća pohrana uređaja u položaju za usisavanje i brisanje. Na zidni nosač moguće je pohraniti samo uređaj u položaju za usisavanje.
Sastavljanje uređaja u položaj za usisavanje

natural_image
Diagram of a mechanical device with a highlighted component and motion arrow (no text or symbols)1 Za sastavljanje uredaja u položaj samo za usisavanje pričvrstite držak 3-u-1 na spremnik za prašinu („klik“).

natural_image
Illustration of a medical or laboratory procedure showing a tool tip and a magnified view of a device with light reflections (no text or symbols)2 Pričvrstite spremnik za prašinu na cijev („klik“).

natural_image
Illustration of a hand holding a cylindrical object with an arrow indicating downward motion, next to a base device (no text or symbols)text_image
Diagram showing a mechanical assembly with labeled parts, including a lever and a base structure.4 Kako biste pohranili uređaj u položaju samo za usisavanje, stavite ga u stanicu za postavljanje poslije čišćenja i pohranu tako da prvo postavite LED mlaznicu na dulju stranu osnovne ploče, a zatim utisnete cijev u držač.
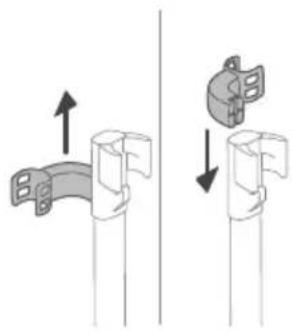
natural_image
Diagram showing two mechanical assembly steps with arrows indicating direction (no text or symbols)Savjet: držač za položaj za usisavanje može se pogurnuti i okrenuti naopako ako usisivač želite postaviti s druge strane stanice za postavljanje poslije čišćenja i pohranu.

text_image
Technical diagram showing mechanical assembly with labeled parts ① and ②, likely illustrating a gear or tool mechanism.Punjenje

text_image
MAX 35 °C MIN 5 °C
natural_image
Illustration of a plug with a cable and a wall socket, no text or symbols present
text_image
100%natural_image
Technical line drawing of a mechanical component with no visible text or symbols
natural_image
Technical line drawing of a mechanical component with no visible text or symbolsnatural_image
Illustration of a mechanical device with a highlighted component and motion arrow (no text or symbols)1 Za usisavanje podova od mekih ili tvrdih materijala pričvrstite držak 3-u-1 na spremnik za prašinu („klik“).

text_image
Safety warning illustration showing a device with warning symbol and red X mark indicating failure or hazardnatural_image
Illustration of a mechanical device with a downward arrow and emitting sparks, next to a cylindrical component (no text or symbols)2 Pričvrstite spremnik za prašinu na cijev („klik“).

natural_image
Illustration of a vacuum cleaner emitting exhaust smoke from a cylindrical tube (no text or symbols)natural_image
Diagram of a door handle with a black clip and circular button labeled ① (no text or symbols on the diagram itself)4 Za uključivanje uređaja pritisnite gumb za uključivanje/isključivanje pričekajte da uredaj bude spreman za uporabu.

text_image
100° - +text_image
Safety warning illustration showing a person using a vacuum cleaner with water leakage, marked by an orange warning symbol and a red 'X' indicating failure.Savjet: LED diode u LED mlaznici olakšavaju uočavanje prljavštine na podu. Cijev i LED mlaznica omogućuju vam da dosegnete ispod niskog namještaja bez potrebe za okretanjem uređaja.
text_image
Safety warning illustration showing a spray nozzle spraying liquid with an eye and a warning symbolnatural_image
Illustration of a hand holding a handheld device above a white cabinet (no text or symbols)

text_image
Diagram showing a hand operating a tool with warning symbols and a water droplet, indicating incorrect operation or damage.natural_image
Illustration of a hand holding a tool above a device with a flame symbol (no text or symbols present)text_image
Diagram illustrating a step in a medical procedure involving a tool and a foot, labeled with arrows and numbered steps.2 Za odvajanje LED mlaznice pritisnite gumb za otpuštanje (1) i izvucite cijev ili držak iz mlaznice (2).
natural_image
Illustration of a mechanical device with a downward arrow and sparkles, no text or symbols present1 Kako biste pričvrstili četku Mini Turbo, umetnite cijev drška u četku Mini Turbo.
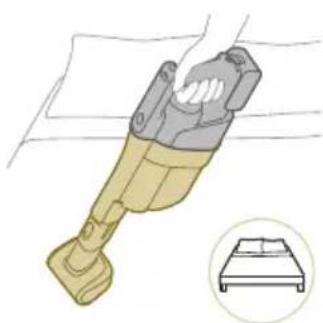
natural_image
Illustration of a handheld device with a circular inset showing a bed (no text or symbols)natural_image
Illustration of a hairdryer with a cat and dog nearby, showing no text or symbolstext_image
Diagram showing a hand holding a small object with two labeled steps (① and ②) indicating a process or procedure.4 Za odvajanje četke Mini Turbo pritisnite gumb za otpuštanje (1) i izvucite držak iz četke Mini Turbo (2).

natural_image
Illustration of a mechanical device with water droplets and warning symbols (no text or labels)natural_image
Illustration of a dental implant tool interacting with a cylindrical device (no text or symbols present)text_image
Diagram showing a tool interacting with a wire, labeled with parts 1 and 2, indicating a process or procedure.3 Za odvajanje dugačkog nastavka za uske površine pritisnite gumb za otpuštanje (1) i iz njega izvucite cijev ili držak (2).

natural_image
Illustration of a mechanical tool with a water droplet and warning symbols (no text or labels)text_image
Diagram showing a vacuum cleaner's internal structure with labeled parts and directional arrows indicating assembly steps.Kako biste spriječili neugodne mirise i naslage kamenca, nakon svake uporabe upotrijebite funkciju samočišćenja AUTOCLEAN. Način rada AUTOCLEAN pomaže vam da potpuno očistite svoj uređaj za približno 4 minute.
1 Uređaj u položaju za usisavanje i brisanje postavite u stanicu za postavljanje poslije čišćenja i pohranu.

text_image
Diagram illustrating a mechanical or electrical component with three circular indicators (red, green, black) and checkmarks indicating failure or completion.natural_image
Illustration of a hand pouring liquid into a vertical cylindrical container with a green arrow indicating direction (no text or symbols)natural_image
Simple line drawing of a bucket pouring liquid into a basin (no text or symbols)
text_image
MAX 50 °C
text_image
Diagram illustrating a process with checkmarks and a red X mark, showing steps to process liquid or container with directional arrows.
natural_image
Illustration of a hand holding a cylindrical device with a green arrow pointing to the handle (no text or symbols present)
text_image
MAX 35 °C MIN 5 °C8 Izlijte sav preostali tekući deterdžent iz spremnika za čistu vodu u odvod.
9 Napunite spremnik za čistu vodu hladnom ili mlakom vodom iz slavine barem do oznake AUTOCLEAN.
A Oprez: voda iz slavine koja se ulijeva u spremnik za čistu vodu ne smije biti toplija od 50 °C.
A Oprez: nemojte upotrebljavati deterdžent za funkciju AUTOCLEAN jer bi to moglo dovesti do prekomjernog pjenjenja.
natural_image
Illustration of a remote control device with a handle and control panel (no text or symbols)
text_image
AUTOCLEAN 4 min
natural_image
Illustration of a hand pouring liquid into a vertical pipe with a green arrow indicating direction (no text or symbols)
natural_image
Illustration of a green mechanical device with an upward arrow, no text or symbols present12 Kako biste pokrenuli funkciju AUTOCLEAN, pritisnite srednji gumb 🚙Ako je zaslon crn, najprije pritisnite gumb za uključivanje/isključivanje 🚙kako biste aktivirali zaslon.
13 Uređaj izvršava ciklus AUTOCLEAN.
i Napomena: ciklus Autoclean traje približno 4 minute. Za najbolje rezultate pustite da uredaj potpuno prođe kroz ciklus AUTOCLEAN. Ciklus AUTOCLEAN možete pauzirati ili otkazati u bilo kojem trenutku.
i Napomena: ako otkažete program AUTOCLEAN, uređaj će za oko 10 sekundi usisati preostalu vodu u ladici za uporabu poslije čišćenja.
natural_image
Simple line drawing of a pouring container into a stand (no text or symbols)16 Izlijte vodu iz spremnika za prljavu vodu u odvod.

natural_image
Illustration of a faucet pouring liquid into a water-filled container with swirling lines indicating flow (no text or symbols)17 Spremnik za čistu vodu operite pod mlazom vode iz slavine.

natural_image
Illustration of a faucet releasing water into a green leafy container on a tiled floor (no text or symbols)18 Mokri filtar operite pod mlazom vode iz slavine.

19 Pustite da se vlažni filtar spremnika za prljavu vodu i njegov element za protok vode potpuno osuše prije nego što ih vratite na spremnik za prljavu vodu.
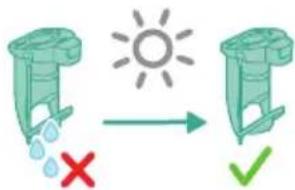
text_image
Diagram illustrating the process of a sun-drying system, showing water drop and checkmark with red X and green checkmark.
natural_image
Diagram of a mechanical device with a downward arrow indicating force or direction (no text or symbols present)20 Vratite mokri filtar u spremnik za prljavu vodu.

natural_image
Illustration of a hand holding a green cylindrical object with an arrow indicating direction (no text or symbols)21 Vratite spremnik za prljavu vodu u uređaj.
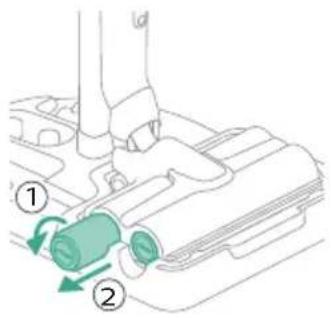
text_image
Diagram showing a mechanical component with numbered parts and green arrows indicating motion or force direction.text_image
Diagram showing a tool interacting with a device, labeled with parts ① and ② indicating different components or functions.natural_image
Diagram showing three vertical cylindrical components with a downward arrow, mounted on a base (no text or symbols)23 Kako biste omogućili da se četke od mikrovlakana osuše, stavite otvorene krajeve četki na predviđene držače stanice za postavljanje poslije čišćenja i pohranu.
i Napomena: sušenje može trajati približno 24 sata.
natural_image
Technical line drawing of a mechanical component with an arrow indicating direction (no text or symbols)1 Uklonite ladicu za uporabu poslije čišćenja iz stanice za pohranu.

natural_image
Illustration of a hand pouring liquid into a container with a blue flame (no text or symbols)2 Isperite ladicu za uporabu poslije čišćenja pod mlazom vode iz slavine i ostavite da se osuši prije nego što je vratite u stanicu za pohranu.
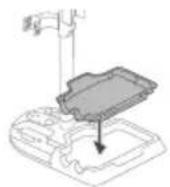
text_image
Diagram showing a mechanical component with numbered parts and green arrows indicating motion or flow direction.text_image
Diagram showing a hand using a tool to adjust or install a component, labeled with parts ① and ②.natural_image
Illustration of two hands holding a green object with a downward arrow indicating motion (no text or symbols)natural_image
Illustration of a hand holding a coiled green object, no text or symbols presentnatural_image
Diagram of a mechanical component with directional arrows indicating movement or force (no text or symbols)Ako je modul za mokro čišćenje začepljen, najprije isključite uredaj i uklonite mlaznicu AquaSpin i držak 3-u-1. Zatim uklonite začepljenje pomicanjem četke za čišćenje u usisnom kanalu modula za mokro čišćenje gore-dolje.
Čišćenje začepljenja iz mlaznice AquaSpin
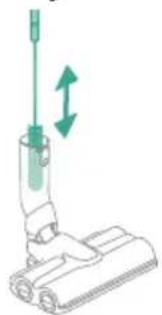
natural_image
Illustration of a vacuum cleaner with green arrows indicating motion direction (no text or symbols)Ako je mlaznica AquaSpin začepljena, to se može ukloniti pomicanjem četke za čišćenje gore-dolje u usisnom kanalu mlaznice AquaSpin.
Čišćenje začepljenja s traka za vlaženje mlaznice AquaSpin
Nakon duge i česte uporabe uredaja trake za vlaženje mlaznice AquaSpin mogu se u nekom trenutku začepiti. Slijedite korake u nastavku kako biste uklonili začepljenje s traka za vlaženje mlaznice AquaSpin.
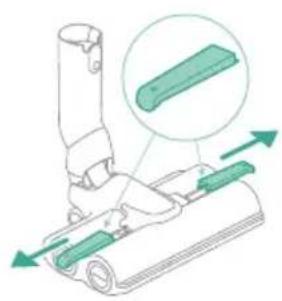
natural_image
Diagram of a mechanical device with green components and directional arrows indicating movement (no text or symbols)1 Uklonite poklopce traka za vlaženje s mlaznice AquaSpin tako da ih pomaknete u stranu.
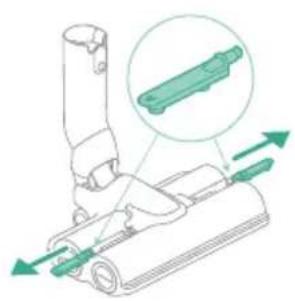
natural_image
Technical diagram of a mechanical assembly with green arrows indicating direction (no text or symbols)2 Uklonite trake za vlaženje s mlaznice AquaSpin tako da ih povučete na stranu.
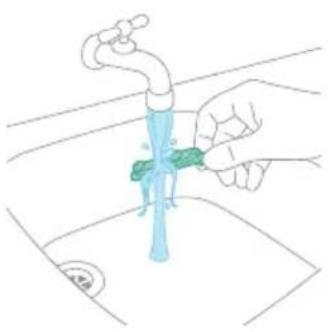
natural_image
Illustration of a hand holding a blue faucet with a green handle, placed on a surface (no text or symbols)text_image
Safety warning symbol showing water droplets and sun with checkmark indicating failure4 Ostavite trake za vlaženje da se osuše prije nego što ih vratite u mlaznicu AquaSpin.
Čišćenje uređaja u položaju samo za usisavanje
Pražnjenje spremnika za prašinu
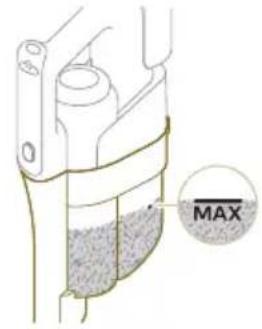
text_image
MAXRedovito praznite spremnik za prašinu i pazite da prljavština nikada ne prijeđe oznaku „Max“. Time se sprječava ubrzano začepljenje filtra.

text_image
Technical diagram showing a mechanical component with labeled parts and directional arrows indicating motion or assembly.natural_image
Illustration of a container with liquid and an upward arrow, no text or symbols presentnatural_image
Illustration of a wooden tool pouring granular material into a container (no text or symbols)3 Ispraznite spremnik za prašinu u kantu za otpad.

natural_image
Illustration of a container with liquid and an upward arrow, no text or symbols present1 Za čišćenje spremnika za prašinu i ciklonske komore uklonite kućište filtra.

natural_image
Illustration of a container with granular material being poured into a cylindrical container (no text or symbols)2 Ispraznite spremnik za prašinu u kantu za otpad.
3 Ako je potrebno, uklonite i očistite ciklonsku komoru (vidi 'Čišćenje ciklonske komore').

text_image
Diagram showing a hand holding a container with a warning symbol indicating no liability or failure.text_image
Diagram illustrating a water drop symbol and its impact on a container with an arrow indicating reduction.natural_image
Diagram of a mechanical device with a highlighted component and directional arrow (no text or symbols)6 Vratite držak 3-u-1 na spremnik za prašinu.
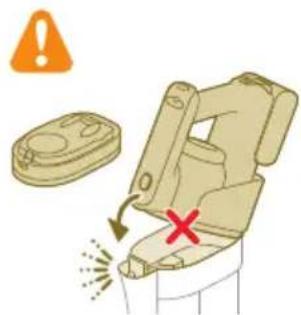
text_image
Safety warning illustration showing a device with warning symbol and red X mark indicating failure or hazardA Oprez: nemojte ponovno pričvršćivati držak 3-u-1 na spremnik za prašinu ako u njega nije umetnuto kućište filtra.
Čišćenje ciklonske komore
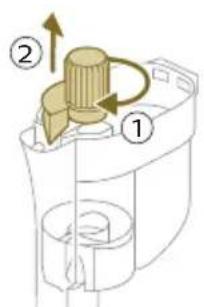
text_image
Diagram of a mechanical device with labeled parts and directional arrows indicating motion or flow1 Okrenite ciklonsku komoru u smjeru kretanja kazaljke na satu (1) i odvojite je od spremnika za prašinu (2).
2 Uklonite dlake i prljavštinu koja se zaglavila u ciklonskoj komori i ispod nje.
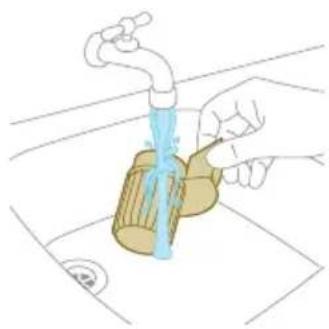
natural_image
Illustration of a hand using a pipette to lift a cup, with no text or symbols present.text_image
Safety warning illustration showing a warning symbol with an orange exclamation mark, a sun icon, and a checkmark indicating failure.i Napomena: uvijek ostavite ciklonsku komoru da se u potpunosti osuši prije nego što je vratite u spremnik za prašinu.
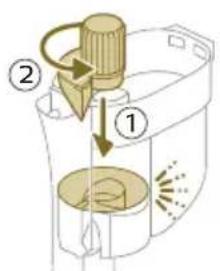
text_image
Diagram illustrating a device's internal components with numbered parts and directional arrows indicating motion or assembly.text_image
Diagram showing a toilet with green checkmark indicators and two side-view views of the toilet's internal components.natural_image
Circular icon with a stylized white figure inside a black border, enclosed in a gold ring (no text or symbols)Kada filtar treba očistiti, na zaslonu se pojavljuje ikona za čišćenje filtra.
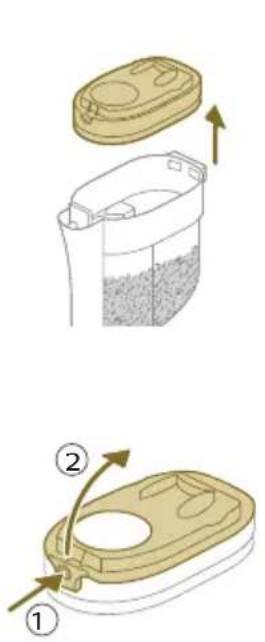
text_image
Diagram illustrating two steps of a container with arrows indicating movement, labeled ① and ②.natural_image
3D diagram of a mechanical device with a highlighted switch symbol (no text or labels)natural_image
Illustration of hands cleaning a trash bin with a water tap, showing the process (no text or symbols)3 Protresite pjenasti filtar iznad kante za otpad kako biste uklonili sloj prljavštine s vrha filtra od pjene. Zatim isperite filtar od pjene pod mlazom vode iz slavine.

natural_image
Illustration of a hand holding a small object with curved arrows indicating rotation or movement (no text or symbols)natural_image
Illustration of hands removing plastic slippers into a trash bin (no text or symbols)5 Protresite kućište filtra i poklopac iznad kante za otpad kako biste uklonili prašinu.
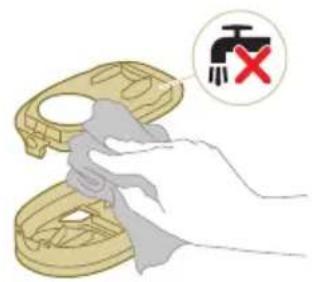
text_image
Diagram showing a hand holding a tool interacting with a device, with a red 'X' symbol indicating no text or symbols.6 Očistite držač filtra vlažnom krpom.
A Oprez: nemojte čistiti bijeli materijal poklopca kućišta filtra uobičajenim usisavačem ili četkom. Nemojte čistiti bijeli materijal poklopca kućišta filtra vodom ili nekim sredstvom za čišćenje. To će oštetiti materijal. Bijeli materijal može se otresti iznad kante za otpad.

text_image
Diagram showing a device with a water droplet and a red X mark indicating a failure or absence.text_image
Diagram showing a device with a lid and two labeled parts, marked with green checkmarks and red X.8 Zatvorite kućište filtra.
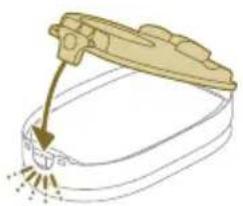
natural_image
Illustration of a hand tool interacting with a device (no text or symbols visible)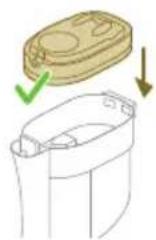
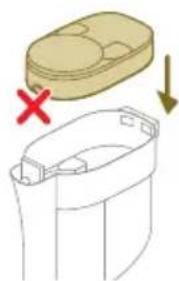
natural_image
Diagram showing a container with a lid and a side view of its internal structure, marked with red X and downward arrow (no text or symbols)
text_image
Diagram showing a container with a lid and a drop labeled with red X, indicating a warning or rejection point.9 Vratite kućište filtra zajedno s filtrom od pjene natrag u spremnik za prašinu.
A Oprez: pazite da bijeli materijal poklopca kućišta filtra bude okrenut prema gore.
A Oprez: provjerite jesu li kućište filtra i filtar od pjene potpuno suhi prije nego što ih vratite u spremnik za prašinu.
10 Vratite držak 3-u-1 na spremnik za prašinu.

text_image
Safety warning illustration showing a toilet with warning symbol and red X mark indicating explosion or damageA Oprez: nemojte ponovno pričvršćivati držak 3-u-1 na spremnik za prašinu ako u njega nije umetnuto kućište filtra.
text_image
Diagram illustrating a mechanical device with labeled parts and directional arrows, showing step 1 and step 2.1 Povucite prema dolje polugu za zaključavanje na bočnoj strani LED mlaznice (1) i izvucite valjkastu četku iz LED mlaznice (2). Zapetljane dlake ili niti možete ukloniti s valjkaste četke povlačenjem preko četke jednom rukom.

natural_image
Illustration of hands holding a coiled string with a green checkmark indicating a detail (no text or symbols present)text_image
Diagram illustrating a mechanical or electrical process with labeled steps ① and ②, showing hand positioning and component insertion.2 Gurnite valjkastu četku natrag u LED mlaznicu (1) i podignite polugu za zaključavanje kako biste zaključali valjkastu četku u LED mlaznicu („klik“).
text_image
Diagram of a device with labeled parts and directional arrows indicating movement or force1 Otključajte gumb za otpuštanje na bočnoj strani četke Mini Turbo (1) i izvucite valjkastu četku iz četke Mini Turbo (2).

natural_image
Illustration of a hand holding a tool with a curved line and directional arrow, no text or symbols present2 Uklonite dlake i prljavštinu zapetljane oko valjkaste četke.
text_image
Diagram of a robotic device with labeled parts, showing motion and assembly steps3 Pritisnite jednu stranu valjkaste četke natrag u četku Mini Turbo (1) i gurnite prema dolje drugu stranu valjkaste četke kako biste je učvrstili u četku Mini Turbo („klik“).
natural_image
Circular icon with a house silhouette and exclamation mark, labeled 'E3' below (no text or symbols on the icon itself)Temperatura je previsoka. Pobrinite se da temperatura u prostoriji u kojoj se uređaj upotrebljava, pohranjuje ili puni bude ispod 35 °C. Uređaj nemojte izlagati izravnoj sunčevoj svjetlosti ni visokim temperaturama (npr. u blizini vrućih peći, mikrovalnih pećnica ili indukcijskih kuhala). Baterije mogu eksplodirati ako se pregriju.

natural_image
Circular icon with battery symbol and question mark, labeled E5 (no text or symbols beyond label)Baterija je napola umetnuta. Provjerite je li baterija ispravno umetnuta (pogledajte odjeljak „Sastavljanje uređaja u položaj za usisavanje i brisanje“).
Šifre informacija Uzrok Rješenje
natural_image
Circular icon with a stylized white tool and red components, no text or symbols present.natural_image
Icon of a white hand-painted glove with a circular frame and refresh arrow, set against a dark background (no text or symbols)25 Spazzole in microfibra
natural_image
Diagram of a mechanical assembly with a vertical rod inserted into a housing (no text or symbols)natural_image
Diagram showing two mechanical assembly states: one with upward arrows and one with downward arrows, no text or symbols present.natural_image
Illustration of a green screwdriver holding a vertical pole with a hand adjusting its arm (no text or symbols)natural_image
Mechanical component diagram showing a bracket with mounting holes and a separate view of a clamped part (no text or symbols)natural_image
Illustration of a hand holding a device with arrows indicating motion or force (no text or symbols)natural_image
Illustration of a hand holding a cylindrical object with a downward arrow, next to a rolled document or paper (no text or symbols)text_image
Diagram showing a mechanical assembly with labeled parts and directional arrows indicating motion or assembly steps.natural_image
Illustration of a mechanical device with a highlighted component and motion arrow (no text or symbols)natural_image
Illustration of a medical or laboratory procedure showing a tool tip and a magnified view of a device with light reflections (no text or symbols)natural_image
Illustration of a hand holding a cylindrical object with an arrow indicating downward motion, next to a base device (no text or symbols)text_image
Diagram showing a mechanical assembly with labeled parts, including a lever and a base structure.natural_image
Diagram showing two mechanical assembly steps with arrows indicating direction (no text or symbols)text_image
Technical diagram showing mechanical assembly with labeled parts ① and ②, likely illustrating a gear or switch mechanism.natural_image
Illustration of a plug with an arrow indicating direction (no text or symbols)
text_image
100%natural_image
Technical line drawing of a mechanical component with no visible text or symbolsnatural_image
Technical line drawing of a mechanical component with no visible text or symbolsnatural_image
Illustration of a mechanical device with a highlighted component and motion arrow (no text or symbols)text_image
Safety warning illustration showing a device with warning symbol and red X mark indicating failure or hazardnatural_image
Illustration of a medical or laboratory procedure showing a tool tip and a magnified view of a test tube with spikes (no text or symbols)natural_image
Illustration of a vacuum cleaner emitting exhaust smoke from a cylindrical component (no text or symbols)natural_image
Diagram of a door handle with a circular button labeled ①, showing no text or symbols beyond the number and an arrow pointing to the handle area.text_image
Safety warning illustration showing a person using a vacuum cleaner with water leakage, marked by an orange warning symbol and a red 'X' indicating no damage.text_image
Safety warning illustration showing a spray nozzle spraying liquid with an eye and a red X mark indicating no protection.natural_image
Illustration of a hand holding a handheld device above a white cabinet (no text or symbols)

text_image
Diagram illustrating a hand using a tool to mark a defect or damage, with warning symbols and a red 'X' indicating failure.natural_image
Illustration of a hand using a tool to press down a cylindrical object, with no text or symbols present.text_image
Diagram showing a hand holding a nail being inserted, labeled with step ① and step ②.natural_image
Illustration of a mechanical device with a downward arrow and sparkles, no text or symbols presentnatural_image
Illustration of a handheld device with a circular inset showing a bed (no text or symbols)natural_image
Illustration of a hairdryer with a cat and dog nearby, showing no text or symbolstext_image
Diagram showing a hand holding a small object with two labeled steps (① and ②) indicating a process or procedure.natural_image
Illustration of a mechanical device with water droplets and warning symbols (no text or labels)natural_image
Illustration of a dental implant tool interacting with a small object, showing no text or symbols.text_image
Diagram showing a tool interacting with a wire, labeled with parts 1 and 2, indicating a step in the process.text_image
Safety warning illustration showing a tool with water droplets and an orange warning symboltext_image
Diagram showing a vacuum cleaner's internal structure with labeled parts and directional arrows indicating assembly steps.text_image
Diagram illustrating a mechanical or electrical component with three circular indicators (red, green, black) and checkmarks indicating failure or completion.natural_image
Illustration of a hand pouring liquid into a vertical pipe with a green arrow indicating direction (no text or symbols)natural_image
Simple line drawing of a bucket pouring liquid into a basin (no text or symbols)
text_image
MAX 50 °C
text_image
Diagram illustrating a process with checkmarks and a red X mark, showing steps to process liquid or container with directional arrows.
natural_image
Illustration of a hand holding a cylindrical device with a green arrow pointing to the handle (no text or symbols present)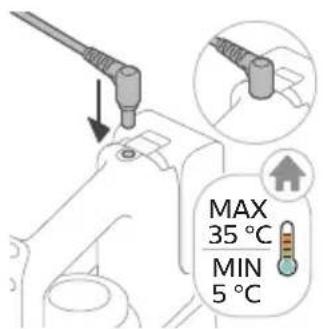
text_image
MAX 35 °C MIN 5 °Cnatural_image
Illustration of a remote control device with a switch and navigation knob (no text or symbols)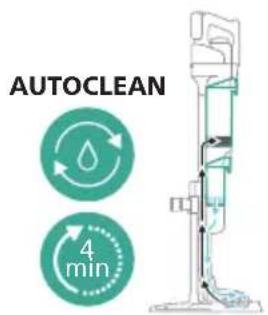
text_image
AUTOCLEAN 4 min
natural_image
Illustration of a hand using a tool to lift a cylindrical device with a black component, no text or symbols present
natural_image
Illustration of a green mechanical device with an upward arrow, no text or symbols presentnatural_image
Simple line drawing of a pouring container into a stand (no text or symbols)natural_image
Illustration of a faucet pouring liquid into a water-filled container with swirling lines indicating flow (no text or symbols)natural_image
Illustration of a faucet releasing water into a green leafy container on a tiled floor (no text or symbols)text_image
Diagram illustrating the process of a sun-drying system, showing water droplets and sunlight with checkmark indicators.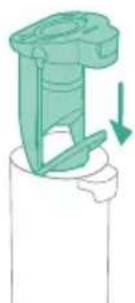
natural_image
Mechanical component diagram showing a lever mechanism with a downward arrow indicating motion (no text or symbols)natural_image
Illustration of a hand holding a green cylindrical object with an arrow indicating direction (no text or symbols)text_image
Diagram showing a mechanical component with numbered parts and green arrows indicating motion or force direction.text_image
Diagram showing a tool interacting with a device, labeled with parts ① and ②natural_image
Diagram showing three cylindrical components with a downward arrow, no text or symbols presentnatural_image
Technical line drawing of a mechanical component with an arrow indicating direction (no text or symbols)natural_image
Illustration of a hand pouring liquid into a container with a blue flame (no text or symbols)text_image
Diagram showing a mechanical component with numbered parts and green arrows indicating motion or force direction.text_image
Diagram showing a hand using a tool to adjust or install a component, labeled with parts ① and ②.natural_image
Illustration of two hands holding a green object with a green arrow indicating direction (no text or symbols)natural_image
Illustration of two hands holding a coiled green object, no text or symbols presentnatural_image
Diagram of a syringe with green arrows indicating direction (no text or labels)natural_image
Illustration of a vacuum cleaner with green arrows indicating motion direction (no text or symbols)text_image
Technical diagram showing a mechanical component with labeled parts and directional arrows indicating motion or assembly.natural_image
Illustration of a container with liquid and an upward arrow, no text or symbols presentnatural_image
Illustration of a wooden tool pouring granular material into a container (no text or symbols)natural_image
Illustration of a container with liquid and an upward arrow, no text or symbols presentnatural_image
Illustration of a wooden tool pouring granular material into a cylindrical container (no text or symbols)text_image
Diagram showing a hand holding a container with a warning symbol indicating no liability or failure.text_image
Diagram illustrating a water drop symbol and its impact on a container with a downward arrow, accompanied by a red X mark.natural_image
Diagram of a mechanical device with a highlighted component and motion arrow (no text or symbols)text_image
Safety warning illustration showing a device with warning symbol and red X mark indicating explosion or damagetext_image
Diagram of a mechanical device with labeled parts and directional arrows indicating motion or flownatural_image
Illustration of a hand pouring liquid into a container with a faucet, no text or symbols presenttext_image
Safety warning illustration showing a warning symbol, sun icon, and two mechanical components with water droplets and red/green checkmarks indicating failure or failure.text_image
Diagram illustrating a device's internal components with numbered parts and directional arrows indicating motion or assembly.text_image
Diagram showing a toilet with green checkmark indicators and two side-view views of the toilet's internal components.natural_image
Circular icon with a stylized white figure and exclamation mark inside a black circle (no text or symbols)text_image
Diagram showing a device with a switch and a red X symbol indicating no change or error
natural_image
Illustration of hands cleaning a trash bin with a water tap, showing the process (no text or symbols)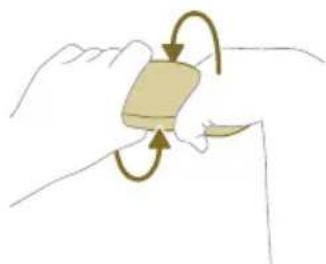
natural_image
Illustration of a hand holding a rectangular object with curved arrows indicating rotation or motion (no text or symbols)natural_image
Illustration of hands pouring liquid into a trash bin (no text or symbols)text_image
Illustration showing a hand cleaning a small mechanical component with a warning symbol indicating no text or symbols.text_image
Diagram showing a device with a water droplet and a red X mark indicating a defect or failure.text_image
Diagram showing a device with a lid and two labeled parts, marked with red 'X' and green checkmarks.natural_image
Illustration of a hand tool interacting with a device (no text or symbols visible)natural_image
Diagram showing a container with a lid and a side view of its interior, marked with red X and green downward arrow (no text or symbols)
text_image
Diagram illustrating a water drop symbol and its impact on a container with a downward arrow, accompanied by a red 'X' indicating the water level.text_image
Safety warning illustration showing a device with warning symbol and a red X mark indicating explosion or damage.text_image
Diagram illustrating a mechanical or electrical component being adjusted, with labeled parts and directional arrows indicating motion.natural_image
Illustration of hands holding a coiled string with scissors, accompanied by a magnified inset showing a green checkmark (no text or symbols)text_image
Diagram illustrating a mechanical or electrical process with labeled steps ① and ②, showing hand positioning and component insertion.text_image
Diagram of a device with labeled parts and directional arrows indicating movement or forcenatural_image
Illustration of a hand performing a rope knot or manipulation technique (no text or symbols present)text_image
Diagram of a robotic hand holding a mechanical device with labeled parts ① and ②, showing motion direction.natural_image
Circular icon with a stylized white tool and red components, no text or symbols present.natural_image
Icon of a white hand-painted glove with a circular frame and refresh arrow, set against a dark background (no text or symbols)natural_image
3D illustration of a mechanical component with a separate view showing a pin inserted into a housing (no text or symbols)natural_image
Illustration of a hand holding a spray gun with arrows indicating motion (no text or symbols)natural_image
Illustration of a spray gun dispensing liquid into a cylindrical container (no text or symbols)2 Tad AquaSpin uzgalim pievienojiet mitro moduli (atskan klikškis).

text_image
Diagram showing a vacuum cleaner's internal structure with labeled parts and directional arrows indicating assembly or operation.natural_image
Illustration of a mechanical device with a highlighted component and motion arrow (no text or symbols)natural_image
Illustration of a medical or laboratory procedure showing a tool tip and a magnified view of a device with light reflections (no text or symbols)natural_image
Illustration of a hand holding a cylindrical object with an arrow indicating downward motion, next to a base device (no text or symbols)text_image
Diagram showing a mechanical assembly with labeled parts, including a lever and a base structure.natural_image
Diagram showing two mechanical assembly steps with arrows indicating direction (no text or symbols)text_image
Technical diagram showing mechanical assembly with labeled parts ① and ②, likely illustrating a gear or tool mechanism.Uzlāde

text_image
MAX 35 °C MIN 5 °C
natural_image
Illustration of a plug with an arrow indicating direction (no text or symbols)
text_image
100%natural_image
Technical line drawing of a mechanical component with no visible text or symbols
natural_image
Technical line drawing of a mechanical component with no visible text or symbolsnatural_image
Illustration of a mechanical device with a highlighted component and motion arrow (no text or symbols)text_image
Safety warning illustration showing a device with warning symbol and red X mark indicating failure or hazardnatural_image
Illustration of a medical procedure showing a hand holding a needle and a tube with fluid flow arrows (no text or symbols)2 Pievienojiet putekjsukšanas spaini caurulei (atskan klikškis).
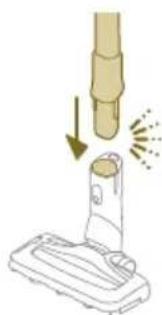
natural_image
Illustration of a vacuum cleaner emitting exhaust smoke from a cylindrical component (no text or symbols)natural_image
Diagram of a door handle with a circular button labeled ①, showing no text or symbols beyond the number and an arrow pointing to the handle area.text_image
Illustration showing a person using a vacuum cleaner with warning symbols and a red 'X' indicating water release.text_image
Safety warning illustration showing a spray nozzle spraying liquid with an eye and a tool, accompanied by warning symbols.natural_image
Illustration of a hand holding a handheld device above a white cabinet (no text or symbols)

text_image
Diagram illustrating a hand operating a tool with warning symbols and a water droplet, indicating incorrect operation or damage.natural_image
Illustration of a hand holding a tool with an arrow pointing downward, next to a device with a flame (no text or symbols)text_image
Diagram illustrating a step in a medical procedure involving a finger insertion and a tool, labeled with arrows and numbered steps.natural_image
Illustration of a mechanical device with a downward arrow and sparkles, no text or symbols presentnatural_image
Illustration of a mechanical device with a circular inset showing a bed (no text or symbols)natural_image
Illustration of a hairdryer with a cat and dog nearby, showing mechanical components and a simple furniture diagram (no text or symbols)text_image
Diagram showing a tool being inserted into a container, labeled with steps 1 and 2.natural_image
Illustration of a mechanical device with water droplets and warning symbols (no text or labels)natural_image
Illustration of a hand holding a flashlight with a downward arrow and light effect (no text or symbols)natural_image
Illustration of a dental implant tool interacting with a cylindrical device (no text or symbols present)text_image
Diagram showing a tool interacting with a cable, labeled with parts 1 and 2, indicating a process or procedure.natural_image
Illustration of a mechanical tool with a red X mark and warning symbol (no text or labels)text_image
Diagram showing a robotic arm with labeled parts and directional arrows indicating movement or assembly.text_image
Diagram illustrating a mechanical or electrical component with three circular icons labeled with checkmarks and a red 'X' indicating failure.natural_image
Illustration of a hand holding a cylindrical device with a green handle, showing fluid flow direction (no text or symbols)natural_image
Simple line drawing of a bucket pouring liquid into a basin (no text or symbols)
text_image
MAX 50 °C
text_image
Diagram illustrating a process with three circular indicators (green check, green check, red X) pointing to a container with liquid and a plastic container, likely for safety or inspection.
natural_image
Illustration of a hand holding a cylindrical device with a green arrow pointing to the handle (no text or symbols present)
text_image
MAX 35 °C MIN 5 °Cnatural_image
Illustration of a remote control device with a handle and control panel (no text or symbols)
text_image
AUTOCLEAN 4 min
natural_image
Illustration of a hand pouring liquid into a vertical pipe with a green arrow indicating direction (no text or symbols)
natural_image
Illustration of a green mechanical device with an upward arrow, no text or symbols presentnatural_image
Simple line drawing of a pouring container into a stand (no text or symbols)16 Izlejiet üdeni no netirā üdens tvertnes izlietnē.

natural_image
Illustration of a faucet pouring liquid into a water-filled container with swirling lines indicating flow (no text or symbols)natural_image
Illustration of a faucet releasing water into a green leafy container on a tiled floor (no text or symbols)18 Noskalojiet mitro filtru zem krāna ūdens.

text_image
Diagram illustrating the process of a sun-drying system, showing water droplets and a checkmark with red and green symbols.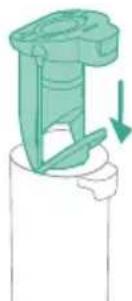
natural_image
Diagram of a mechanical component with a downward arrow indicating force or direction (no text or symbols present)20 Uzlieciet mitro filtru atpakal netirā ūdens tvertnei.

natural_image
Illustration of a hand holding a green cylindrical object with an arrow indicating direction (no text or symbols)text_image
Diagram showing a mechanical component with numbered parts and directional arrows indicating motion or flow.text_image
Diagram showing a hand holding a tool with two labeled parts (① and ②) indicating different components or functions.natural_image
Diagram showing three vertical cylindrical components with a downward arrow, mounted on a base (no text or symbols)natural_image
Technical line drawing of a mechanical component with an arrow indicating direction (no text or symbols)natural_image
Illustration of a hand pouring liquid into a container with a blue flame (no text or symbols)text_image
Diagram showing a mechanical component with numbered parts and green arrows indicating motion or force direction.text_image
Diagram showing a hand holding a tool with two labeled parts (① and ②) indicating different components or states.natural_image
Illustration of two hands holding a green object with a downward arrow, no text or symbols presentnatural_image
Illustration of a hand holding a coiled green object, possibly a medical or mechanical component (no text or symbols)natural_image
Diagram of a syringe with directional arrows indicating motion (no text or labels)natural_image
Diagram of a vacuum cleaner with green directional arrows indicating motion (no text or symbols)natural_image
Diagram of a robotic vacuum cleaner with green sensor components and directional arrows indicating motion (no text or symbols)natural_image
Diagram of a mechanical device with green arrows indicating movement or force direction (no text or symbols)natural_image
Illustration of a hand using a green tool to clean or wash a blue water tap (no text or symbols)text_image
Diagram illustrating sunlight interaction with water droplets and a checkmark, showing red X and green ✓ symbolstext_image
Diagram of a mechanical device with labeled parts and directional arrows indicating motion or assembly stepsnatural_image
Illustration of a container with liquid and an upward arrow, no text or symbols present2 Nonemiet filtra pârsegu nost no puteklu tvertnes.

natural_image
Illustration of a hand pouring granular material into a container (no text or symbols)natural_image
Diagram showing a container with a lid and an arrow indicating downward motion (no text or symbols)natural_image
Illustration of a mechanical device with a highlighted component and motion arrow (no text or symbols)natural_image
Illustration of a container with liquid and an upward arrow, no text or symbols present1 Iznemiet filtra apvalku, lai notīritu putekļu tvertni un ciklonisko daju.
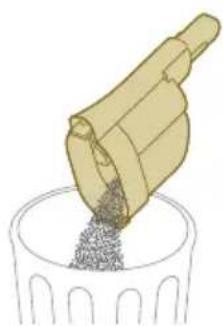
natural_image
Illustration of a wooden tool pouring granular material into a cylindrical container (no text or symbols)text_image
Diagram showing a hand holding a container with a warning symbol indicating no liability or failure.text_image
Diagram illustrating a water drop symbol and its impact on a container with a red X, indicating water release or discharge.natural_image
Illustration of a mechanical device with a highlighted component and motion arrow (no text or symbols)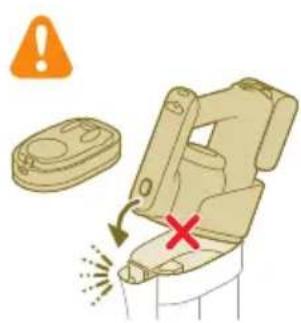
text_image
Safety warning illustration showing a device with warning symbol and red X mark indicating explosion or damagenatural_image
Circular icon with a stylized white object resembling a keyhole or plug, enclosed in a golden ring (no text or symbols)text_image
Diagram illustrating two steps of a food storage or processing device, labeled ① and ②, showing step ① with internal components and step ② with directional arrows.1 Nonemiet filtra pârsegu nost no puteklu tvertnes.

natural_image
3D diagram of a mechanical device with a switch symbol (no text or labels)natural_image
Illustration of a hand pouring liquid into a trash bin with a water tap, no text or symbols presentnatural_image
Illustration of a hand holding a rectangular object with curved arrows indicating rotation or motion (no text or symbols)4 Saspiediet putu filtru, lai izspiestu üdeni.

natural_image
Illustration of hands pouring liquid into a trash bin (no text or symbols)text_image
Illustration showing a hand cleaning a device with a valve symbol and red X mark indicating no change or error.text_image
Diagram showing a device with a water droplet symbol and red X, indicating a water droplet failure.
text_image
Diagram showing a device with a lid and two labeled parts, marked with red 'X' and green checkmarks.natural_image
Illustration of a hairpin with a lever and base, showing no text or symbols8 Aizveriet filtra apvalku.
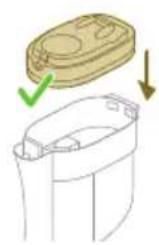
natural_image
Diagram showing a container with a lid and a green checkmark indicating a drop, alongside an arrow pointing downward (no text or symbols)
natural_image
Diagram showing a container with a lid and a cross mark indicating failure, alongside a separate view of the container with arrows (no text or symbols)
text_image
Diagram illustrating a water drop symbol and a container with a downward arrow, indicating environmental hazard or discharge.9 lelieciet filtra apvalku ar putu filtru atpakal puteklu tvertnē.
text_image
Safety warning illustration showing a toilet seat with an orange warning symbol and a red X mark indicating explosion or damage.text_image
Diagram illustrating a mechanical assembly or tool operation with labeled steps ① and ②, showing hand positioning and component insertion.natural_image
Illustration of hands holding a coiled metal object with a green checkmark indicating inspection (no text or symbols present)text_image
Diagram illustrating a mechanical or electrical process with labeled steps ① and ②, showing hand positioning and component insertion.text_image
Diagram of a device with labeled parts and directional arrows indicating movement or forcenatural_image
Illustration of hands connecting a cable to a mechanical component (no text or symbols)text_image
Diagram showing a mechanical device with labeled parts, including numbered callouts ① and ②.natural_image
Circular icon with a house silhouette and thermometer symbol, labeled E2 (no text or numbers beyond the label)natural_image
Diagram of a mechanical assembly with a vertical rod inserted into a housing (no text or symbols)natural_image
Diagram showing two mechanical assembly states with arrows indicating direction of movement (no text or symbols)natural_image
Illustration of a green tool with a curved arrow indicating motion, next to a vertical support structure (no text or symbols)natural_image
3D illustration of a mechanical component with a separate view showing a pin inserted into a housing (no text or symbols)natural_image
Illustration of a hand holding a spray gun with arrows indicating motion (no text or symbols)natural_image
Illustration of a vacuum cleaner emitting exhaust smoke from a cylindrical component (no text or symbols)2 Prie „AquaSpin“ antgalio pritvirtinkite drégnojo valymo modulj (išgirsite spragtelėjimą).
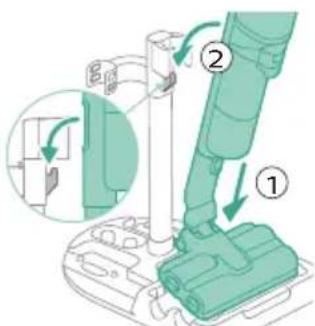
text_image
Diagram showing a vacuum cleaner's internal structure with labeled parts and directional arrows indicating assembly steps.natural_image
Illustration of a mechanical device with a highlighted component and motion arrow (no text or symbols)natural_image
Illustration of a medical or laboratory procedure showing a tool tip and a magnified view of a device with motion lines (no text or symbols)natural_image
Illustration of a hand holding a cylindrical object with an arrow indicating compression or disassembly (no text or symbols)text_image
Diagram showing a mechanical assembly with labeled parts, including a lever and a base structure.natural_image
Diagram showing two mechanical assembly steps with arrows indicating direction (no text or symbols)text_image
Technical diagram showing mechanical assembly with labeled parts ① and ②, likely illustrating a gear or tool mechanism.Ikrovimas

text_image
MAX 35 °C MIN 5 °C
natural_image
Illustration of a plug with a cable and a wall socket, no text or symbols present
text_image
100%natural_image
Technical line drawing of a mechanical component with no visible text or symbolsnatural_image
Technical line drawing of a mechanical component or assembly (no text or symbols)natural_image
Illustration of a mechanical device with a highlighted component and motion arrow (no text or symbols)text_image
Safety warning illustration showing a device with warning symbol and red X mark indicating failure or hazardnatural_image
Illustration of a medical or laboratory procedure showing a tool tip and a magnified view of a device (no text or symbols present)natural_image
Illustration of a vacuum cleaner emitting exhaust smoke from a cylindrical component (no text or symbols)natural_image
Diagram of a door handle with a circular button labeled ①, showing no text or symbols beyond the number and an arrow pointing to the handle area.text_image
Safety warning illustration showing a person using a vacuum cleaner with a red 'X' indicating water leakage and an orange warning symbol.text_image
Safety warning illustration showing a spray nozzle spraying liquid with an eye and a red X mark indicating no need.natural_image
Illustration of a hand holding a handheld device above a white cabinet (no text or symbols)

text_image
Diagram illustrating a hand using a tool to mark a defect or damage, with warning symbols and a red 'X' indicating failure.natural_image
Illustration of a vacuum cleaner emitting exhaust smoke from a cylindrical component (no text or symbols)text_image
Diagram illustrating a step in a medical procedure involving a tool and a foot, labeled with arrows and numbered steps.natural_image
Illustration of a mechanical device with a downward arrow and sparkles, no text or symbols presentnatural_image
Illustration of a mechanical device with a bed icon, no text or symbols presentnatural_image
Illustration of a hairdryer with a cat and dog nearby, showing powder and cleaning process (no text or symbols)text_image
Diagram showing a hand holding a small object with two labeled steps (① and ②) indicating a process or procedure.natural_image
Illustration of a mechanical device with water droplets and warning symbols (no text or labels)natural_image
Illustration of a dental implant tool interacting with a small object, showing no text or symbols.text_image
Diagram showing a tool interacting with a wire, labeled with parts 1 and 2, indicating a process or procedure.text_image
Safety warning illustration showing a tool with water droplets and an orange warning symboltext_image
Diagram showing a vacuum cleaner's internal structure with labeled parts and directional arrows indicating assembly steps.text_image
Diagram illustrating a mechanical or electrical component with three circular indicators (red, green, and black) indicating failure or status conditions.natural_image
Illustration of a hand pouring liquid into a vertical pipe with a green arrow indicating direction (no text or symbols)natural_image
Simple line drawing of a bucket pouring liquid into a basin (no text or symbols)
text_image
MAX 50 °C
text_image
Diagram illustrating a process with checkmarks and a red X mark, showing steps to process liquid or container with directional arrows.
natural_image
Illustration of a hand holding a cylindrical device with a green arrow pointing to the handle (no text or symbols present)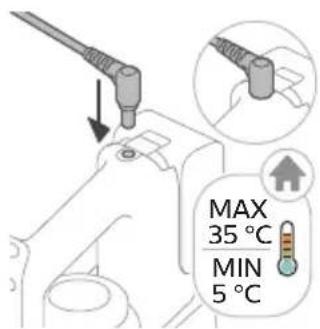
text_image
MAX 35 °C MIN 5 °Cnatural_image
Illustration of a remote control device with a handle and control panel (no text or symbols)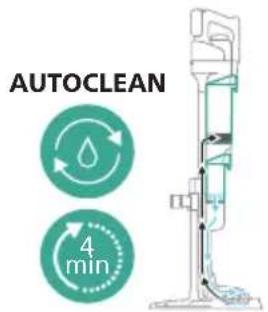
text_image
AUTOCLEAN 4 min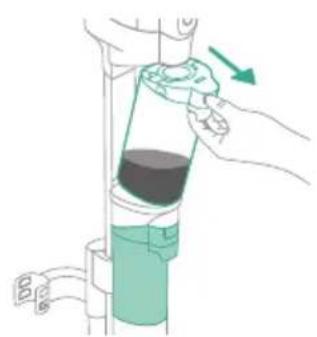
natural_image
Illustration of a hand pouring liquid into a vertical pipe with a green arrow indicating direction (no text or symbols)
natural_image
Illustration of a mechanical device with a green handle and upward arrow, no text or symbols presentnatural_image
Simple line drawing of a pouring container into a stand (no text or symbols)natural_image
Illustration of a faucet pouring liquid into a water-filled container with swirling lines indicating flow (no text or symbols)natural_image
Illustration of a faucet releasing water into a green leafy container on a tiled floor (no text or symbols)text_image
Diagram illustrating the process of a water drop system with sunlight, showing water droplets and a checkmark.
natural_image
Diagram of a mechanical device with a downward arrow indicating force or direction (no text or symbols present)natural_image
Illustration of a hand holding a green cylindrical object with an arrow indicating direction (no text or symbols)text_image
Diagram showing a mechanical assembly with numbered parts and green directional arrows indicating motion or movement.text_image
Diagram showing a hand using a tool to adjust or install a component, labeled with parts ① and ②.natural_image
Diagram showing three vertical cylindrical components with a downward arrow, mounted on a base (no text or symbols)natural_image
Technical line drawing of a mechanical component with an upward arrow indicating motion (no text or symbols)natural_image
Illustration of a hand pouring liquid into a container with a blue flame (no text or symbols)text_image
Diagram showing a mechanical component with numbered parts and green arrows indicating motion or flow direction.text_image
Diagram showing a hand holding a tool with two labeled parts (① and ②) indicating different components or states.natural_image
Illustration of two hands holding a green object with a downward arrow indicating motion (no text or symbols)natural_image
Illustration of a hand holding a coiled green object, no text or symbols presentnatural_image
Diagram of a mechanical device with directional arrows indicating motion or force (no text or symbols)natural_image
Illustration of a vacuum cleaner with green arrows indicating force direction (no text or symbols)natural_image
Diagram of a mechanical assembly with green components and directional arrows, no text or symbols presentnatural_image
Technical illustration of a mechanical device with green arrows indicating motion or assembly (no text or symbols)natural_image
Illustration of a hand washing a blue faucet with a green handle, no text or symbols presenttext_image
Diagram illustrating sunlight interaction with two containers, showing raindrops and a sun symbol with red X and green checkmark.Tik siurblio sąrankos valymas
text_image
Technical diagram showing a mechanical component with labeled parts and directional arrows indicating motion or assembly.natural_image
Illustration of a container with liquid and an upward arrow, no text or symbols presentnatural_image
Illustration of a wooden tool pouring granular material into a container (no text or symbols)natural_image
Illustration of a container with liquid and an open lid, showing a 3D view (no text or symbols)natural_image
Illustration of a wooden tool pouring granular material into a cylindrical container (no text or symbols)text_image
Diagram showing hand holding a device with a warning symbol indicating no liability or failuretext_image
Diagram of a mechanical device with labeled parts and directional arrows indicating motion or flownatural_image
Illustration of a hand pouring liquid into a container with a faucet (no text or symbols)text_image
Weather forecast diagram showing solar and rain symbols with a red 'X' indicating no rain and a green checkmark for confirmation.text_image
Diagram illustrating a device's internal components with numbered parts and directional arrows indicating motion or assembly.text_image
Diagram showing two views of a device with green checkmarks indicating approval or rejection, alongside a magnified view of the device's internal components.natural_image
Circular icon with a stylized white object and exclamation mark inside a black ring (no text or symbols)natural_image
Illustration of a plastic container with an upward arrow indicating growth or movement (no text or symbols present)text_image
Diagram of a device component with numbered parts and directional arrows indicating flow or movement.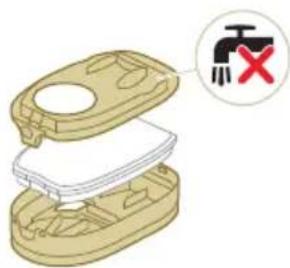
text_image
Diagram showing a device with a switch symbol and red X mark indicating no change or errornatural_image
Illustration of hands cleaning a trash bin with a water tap (no text or symbols)natural_image
Illustration of two hands holding a rectangular object with curved arrows indicating rotation or motion (no text or symbols)natural_image
Illustration of hands pouring liquid into a trash bin (no text or symbols)text_image
Illustration showing a hand using a tool to clean or repair a device, with a warning symbol indicating no error.text_image
Diagram showing a device with a water droplet and a red X mark indicating a defect or warning symbol.text_image
Diagram showing a device with a lid and two labeled boxes, one marked with red X and green checkmark, indicating selection or status.natural_image
Illustration of a hand pouring liquid into a container with a spray bottle (no text or symbols)natural_image
Illustration of a beige plastic container with a red X mark and downward arrow, alongside a smaller outline of its side panel (no text or symbols)text_image
Illustration showing two steps to reduce a trash bin, with water droplets and warning symbols indicating inspection or damage.text_image
Diagram illustrating a mechanical device with labeled parts and directional arrows, showing step 1 and step 2 of motion.natural_image
Illustration of hands holding a coiled string with scissors, accompanied by a magnified inset showing a hand holding a branch (no text or symbols present)text_image
Diagram illustrating a mechanical or electrical component being adjusted, labeled with parts ① and ②.text_image
Diagram of a device with labeled parts and directional arrows indicating movement or assembly.natural_image
Illustration of a hand connecting a cable to a mechanical component (no text or symbols)text_image
Diagram showing a robotic arm with labeled parts, including numbered callouts (1 and 2) indicating different states or functions.natural_image
Circular icon with a stylized vehicle or device symbol, no readable text or labelsnatural_image
Technical line drawing of a mechanical assembly with a vertical rod and base component (no text or symbols)natural_image
Diagram showing two mechanical assembly states with arrows indicating direction of movement (no text or symbols)natural_image
Illustration of a green tool with a curved arrow indicating motion, next to a vertical support structure (no text or symbols)natural_image
3D illustration of a mechanical component with a separate view showing a pin inserted into a housing (no text or symbols)natural_image
Illustration of a hand holding a spray gun with arrows indicating motion (no text or symbols)natural_image
Illustration of a vacuum cleaner emitting exhaust smoke from a cylindrical component (no text or symbols)text_image
Diagram showing a vacuum cleaner's internal structure with labeled parts and directional arrows indicating assembly or operation.natural_image
Illustration of a mechanical device with a highlighted component and motion arrow (no text or symbols)natural_image
Illustration of a medical or laboratory procedure showing a tool tip and a magnified view of a device with motion arrows (no text or symbols)natural_image
Illustration of a hand holding a cylindrical object with an arrow indicating compression or disassembly (no text or symbols)text_image
Diagram showing a mechanical assembly with labeled parts, including a lever and a base structure.natural_image
Diagram showing two mechanical assembly steps with arrows indicating direction (no text or symbols)text_image
Technical diagram showing mechanical assembly with labeled parts ① and ②, likely illustrating a lever mechanism or assembly.Töltés

text_image
MAX 35 °C MIN 5 °C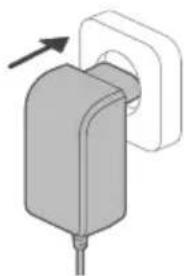
natural_image
Illustration of a plug with an arrow indicating direction (no text or symbols)
text_image
100%natural_image
Technical line drawing of a mechanical component with no visible text or symbols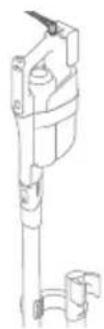
natural_image
Technical line drawing of a mechanical component with no visible text or symbolsnatural_image
Diagram of a mechanical device with a highlighted component and directional arrow (no text or symbols)text_image
Safety warning illustration showing a device with warning symbol and red X mark indicating failure or hazardnatural_image
Illustration of a mechanical device with a downward arrow and emitting sparks, next to a cylindrical component (no text or symbols)natural_image
Illustration of a vacuum cleaner emitting exhaust smoke from a cylindrical component (no text or symbols)natural_image
Diagram of a door handle with a circular button labeled ①, showing no text or symbols beyond the number and an arrow pointing to the handle area.text_image
Safety warning illustration showing a person using a handheld vacuum cleaner with water leakage, accompanied by an orange warning symbol and a red 'X' indicating no leakage.text_image
Safety warning illustration showing a spray nozzle spraying liquid with an eye and a tool, accompanied by warning symbols.natural_image
Illustration of a hand holding a handheld device above a white cabinet (no text or symbols)

text_image
Diagram illustrating a hand using a tool to mark a defect or damage, with warning symbols and a red 'X' indicating failure.natural_image
Illustration of a vacuum cleaner emitting exhaust smoke from a cylindrical component (no text or symbols)text_image
Diagram illustrating a step in a medical procedure involving a finger insertion and a foot positioning technique.natural_image
Illustration of a mechanical device with a downward arrow and sparkles, no text or symbols presentnatural_image
Illustration of a handheld vacuum cleaner with a bed icon below (no text or symbols)natural_image
Illustration of a hairdryer with a cat and a dog nearby, showing mechanical components and a close-up of the bed (no text or symbols)text_image
Diagram showing a hand holding a small object with two labeled steps (① and ②) indicating a procedure or step in a process.natural_image
Illustration of a hand holding a device with water droplets and a warning symbol (no text or labels)natural_image
Illustration of a dental implant tool interacting with a small object, showing no text or symbols.text_image
Diagram showing a tool interacting with a cable, labeled with parts 1 and 2, indicating a process or procedure.natural_image
Illustration of a mechanical tool with a red X mark and warning symbols (no text or labels)text_image
Technical diagram showing a mechanical assembly with labeled parts and directional arrows indicating motion or assembly.text_image
Diagram illustrating a mechanical assembly with checkmark indicators and directional arrows, showing three circular icons with symbols.natural_image
Illustration of a hand pouring liquid into a vertical cylindrical container with a green arrow indicating direction (no text or symbols)natural_image
Simple line drawing of a bucket pouring liquid into a container (no text or symbols)
text_image
MAX 50 °C
text_image
Diagram illustrating a process with three circular indicators (green check, red X) and arrows indicating direction of action or measurement.
natural_image
Illustration of a hand holding a green cylindrical device with an arrow indicating motion (no text or symbols)
text_image
MAX 35 °C MIN 5 °Cnatural_image
Illustration of a remote control device with a handle and control panel (no text or symbols)
text_image
AUTOCLEAN 4 min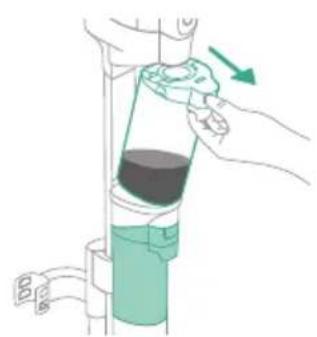
natural_image
Illustration of a hand pouring liquid into a vertical pipe with a green arrow indicating direction (no text or symbols)
natural_image
Illustration of a mechanical device with a green handle and upward arrow, no text or symbols presentnatural_image
Simple line drawing of a pouring container into a stand, no text or symbols presentnatural_image
Illustration of a faucet pouring liquid into a container with motion lines indicating flow (no text or symbols)natural_image
Illustration of a faucet with a green leafy bag inserted into the drain, placed on a tiled floor (no text or symbols)text_image
Diagram illustrating the environmental change from a trash bin to a sun, with a red 'X' indicating water level change and a green checkmark indicating recovery.natural_image
Illustration of a mechanical component with a green arrow indicating downward motion (no text or symbols)
natural_image
Illustration of a hand holding a green cylindrical device with a blue handle, mounted on a vertical pipe (no text or symbols)text_image
Diagram showing a mechanical assembly with numbered parts and green directional arrows indicating motion or force directions.text_image
Diagram showing a hand holding a device with labeled parts, including numbered callouts ① and ②.natural_image
Diagram showing three cylindrical components with a downward arrow, no text or symbols presentnatural_image
Technical line drawing of a mechanical component with an upward arrow indicating motion (no text or symbols)natural_image
Illustration of hands holding a pipe with blue liquid flowing through a container (no text or symbols)text_image
Diagram showing a mechanical component with numbered parts and green arrows indicating motion or force direction.text_image
Diagram showing a tool interacting with a device, labeled with parts ① and ② indicating different components or functions.natural_image
Illustration of two hands holding a green object with a downward arrow indicating motion (no text or symbols)natural_image
Illustration of a hand holding a coiled spring or rope, with no text or symbols present.natural_image
Diagram of a syringe with directional arrows indicating motion (no text or labels)natural_image
Illustration of a vacuum cleaner with green directional arrows indicating motion (no text or symbols)natural_image
Diagram of a mechanical device with green components and an inset showing a green cylindrical component (no text or symbols)natural_image
Technical diagram of a mechanical assembly with green arrows indicating direction (no text or symbols)natural_image
Illustration of a hand washing a blue faucet with a green tool, no text or symbols presenttext_image
Technical diagram showing a mechanical component with labeled parts and directional arrows indicating motion or assembly.natural_image
Illustration of a container with liquid and an upward arrow, no text or symbols presentnatural_image
Illustration of a wooden tool pouring granular material into a container (no text or symbols)natural_image
Illustration of a container with liquid and an open lid, showing a 3D view (no text or symbols)natural_image
Illustration of a container with granular material being poured into it, no text or symbols presenttext_image
Diagram showing a hand holding a container with a warning symbol indicating no liability or failure.text_image
Diagram of a mechanical device with labeled parts and directional arrows indicating motion or movement.natural_image
Illustration of a hand pouring liquid from a water bottle into a container (no text or symbols)text_image
Diagram illustrating sunlight and water droplets, showing a sun icon transforming into a droplet with water droplets and a checkmark.text_image
Diagram illustrating a mechanical or electrical process with labeled components and directional arrows indicating rotation or movement.text_image
Diagram showing two views of a device with green checkmarks indicating approval or rejection, alongside a magnified view of the device's internal components.natural_image
Circular icon with a stylized white hand and exclamation mark inside a black circle (no text or symbols)natural_image
Illustration of a container with liquid and an upward arrow, no text or symbols presenttext_image
Diagram of a device component with numbered parts and directional arrows indicating flow or movement.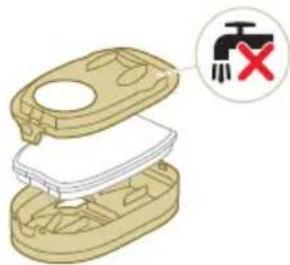
text_image
Diagram showing a device with a switch and red X symbol indicating no change or failurenatural_image
Illustration of a hand pouring liquid into a trash bin while another hand swashes down a faucet (no text or symbols)natural_image
Illustration of a hand holding a rectangular object with curved arrows indicating rotation or motion (no text or symbols)natural_image
Illustration of hands pouring liquid into a trash bin (no text or symbols)text_image
Illustration showing a hand using a tool to clean or repair a mechanical component, with a red 'X' symbol indicating no text.text_image
Diagram showing a device with a water droplet and a red X mark indicating a defect or failure.
text_image
Diagram showing a device with a lid and two labeled parts, marked with red 'X' and green checkmarks.natural_image
Illustration of a robotic arm gripping a small mechanical component (no text or symbols)natural_image
Illustration of a container with a lid and a green checkmark indicating a drop, alongside a smaller outline (no text or symbols)
natural_image
Diagram showing a container with a lid and a handle, marked with red X and downward arrow (no text or symbols)text_image
Diagram illustrating a water drop symbol and its impact on a plastic container with a red X mark indicating the water level.text_image
Safety warning illustration showing a device with warning symbol and red X mark indicating explosion or damagetext_image
Diagram illustrating a mechanical device with labeled parts and directional arrows, showing step 1 and step 2 of motion.natural_image
Illustration of hands holding a coiled string with scissors, accompanied by a magnified inset showing a green checkmark (no text or symbols)text_image
Diagram illustrating a mechanical or electrical component being inserted into a motor, with labeled parts ① and ②.natural_image
Circular icon with a house silhouette and thermometer symbol, labeled 'E2' below (no text or numbers on the icon itself)natural_image
Circular icon with a battery symbol and a question mark, labeled 'E5' below (no text or symbols on the icon itself)natural_image
Diagram of a mechanical assembly with a vertical rod inserted into a base component (no text or symbols)natural_image
Diagram showing two mechanical assembly states with arrows indicating direction of movement (no text or symbols)natural_image
Illustration of a green tool with a curved arrow indicating motion or force, next to a vertical support structure (no text or symbols)natural_image
Mechanical component diagram showing a bracket with mounting holes and a separate housing with a handle (no text or symbols)natural_image
Diagram of a mechanical device with arrows indicating motion or force direction (no text or symbols)natural_image
Illustration of a mechanical device with a downward arrow and sparkles, no text or symbols presenttext_image
Diagram showing a vacuum cleaner's internal structure with labeled parts and directional arrows indicating assembly or operation.natural_image
Illustration of a mechanical device with a highlighted component and motion arrow (no text or symbols)natural_image
Illustration of a medical or laboratory procedure showing a tool tip and a magnified view of a device with light reflections (no text or symbols)2 Bevestig de stofemmer op de slang ('klik').
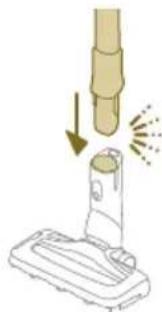
natural_image
Illustration of a vacuum cleaner emitting exhaust smoke from a cylindrical pipe (no text or symbols)text_image
Diagram showing a mechanical assembly with labeled parts, including a lever and pivot mechanism.natural_image
Diagram showing two mechanical assembly steps with arrows indicating direction (no text or symbols)text_image
Technical diagram showing mechanical assembly with labeled parts ① and ②, likely illustrating a gear or tool mechanism.Opladen

text_image
MAX 35 °C MIN 5 °C
natural_image
Illustration of a plug with a cable and a wall socket, no text or symbols present
text_image
100%natural_image
Technical line drawing of a mechanical component with no visible text or symbols
natural_image
Technical line drawing of a mechanical component with no visible text or symbolstext_image
100° A O +natural_image
Illustration of a mechanical device with a highlighted component and motion arrow (no text or symbols)text_image
Safety warning illustration showing a device with warning symbol and red X mark indicating failure or hazardnatural_image
Illustration of a mechanical device with a downward arrow and emitting sparks, next to a cylindrical component (no text or symbols)2 Bevestig de stofemmer op de slang ('klik').

natural_image
Illustration of a vacuum cleaner emitting exhaust smoke from a cylindrical component (no text or symbols)natural_image
Diagram of a door handle with a black panel and circular button labeled ① (no text or symbols on the main diagram)text_image
Safety warning illustration showing a person using a handheld vacuum cleaner with water leakage, accompanied by an orange warning symbol and a red 'X' indicating failure.text_image
Safety warning illustration showing a spray nozzle spraying liquid with an eye and a hand holding a tool, accompanied by warning symbols.natural_image
Illustration of a hand holding a handheld device above a white cabinet (no text or symbols)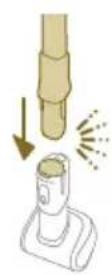

text_image
Diagram illustrating a hand using a tool to mark a defect or damage, with warning symbols and a red 'X' indicating failure.natural_image
Illustration of a vacuum cleaner emitting exhaust smoke from a cylindrical tool (no text or symbols)text_image
Diagram showing a hand holding a nail with two labeled steps (① and ②) indicating step-by-step application or procedure.natural_image
Illustration of a mechanical device with a downward arrow and sparkles, no text or symbols presentnatural_image
Illustration of a handheld device with a circular inset showing a bed (no text or symbols)natural_image
Illustration of a hairdryer with a cat and dog nearby, showing mechanical components and a close-up of the bed (no text or symbols)text_image
Diagram showing a hand holding a small object with two labeled steps (① and ②) indicating a procedure or step in a process.natural_image
Illustration of a mechanical device with water droplets and warning symbols (no text or labels)natural_image
Illustration of a dental implant tool interacting with a cylindrical device (no text or symbols present)text_image
Diagram showing a device being inserted into a cable, labeled with parts 1 and 2.natural_image
Illustration of a mechanical tool with a red X mark and warning symbols (no text or labels)text_image
Diagram showing a vacuum cleaner's internal structure with labeled parts and directional arrows indicating assembly or operation.text_image
Diagram illustrating a mechanical or electrical setup with three circular indicators (✓, +, -) and a downward arrow indicating direction.natural_image
Illustration of a hand pouring liquid into a vertical pipe with a green arrow indicating direction (no text or symbols)flowchart
graph TD
    A["Step 1: Insert liquid into a container"] --> B["Step 2: Insert liquid into a container"]
    B --> C["Step 3: Insert liquid into a container"]
    C --> D["Step 4: Insert liquid into a container"]
    D --> E["Step 5: Insert liquid into a container"]
natural_image
Simple line drawing of a bucket pouring liquid into a container (no text or symbols)
text_image
MAX 50 °C
text_image
Diagram illustrating a process with three checkmarks and a red X mark, showing steps to process liquid or container.
natural_image
Illustration of a hand holding a green cylindrical object with an arrow indicating motion (no text or symbols)
text_image
MAX 35 °C MIN 5 °Cnatural_image
Illustration of a remote control device with a switch and circular dial (no text or symbols)
text_image
AUTOCLEAN 4 min
natural_image
Illustration of a hand pouring liquid into a vertical pipe with a green arrow indicating direction (no text or symbols)
natural_image
Illustration of a mechanical device with a green handle and upward arrow, no text or symbols presentnatural_image
Simple line drawing of a pouring cup into a stand, no text or symbols presentnatural_image
Illustration of a faucet pouring liquid into a container with motion lines indicating flow (no text or symbols)natural_image
Illustration of a faucet with a green leaf-shaped container inserted into the drain, placed on a tiled floor (no text or symbols)text_image
Diagram illustrating the environmental change from a trash bin to a sun, with a red 'X' indicating no change and a green checkmark indicating completion.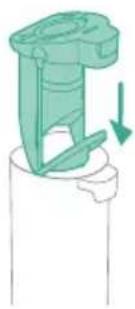
natural_image
Illustration of a mechanical component with a green arrow indicating downward motion (no text or symbols)natural_image
Illustration of a hand holding a green cylindrical device with a blue handle, mounted on a vertical pipe (no text or symbols)text_image
Diagram showing a mechanical assembly with numbered components and directional arrows indicating motion or force directions.text_image
Diagram showing a tool interacting with a device, labeled with parts ① and ② indicating different components or functions.natural_image
Diagram showing three vertical cylindrical components with a downward arrow, mounted on a base (no text or symbols)natural_image
Technical line drawing of a mechanical component with an arrow indicating direction (no text or symbols)natural_image
Illustration of a hand pouring liquid into a container with a blue flame (no text or symbols)text_image
Diagram showing a mechanical component with numbered parts and green arrows indicating motion or force direction.text_image
Diagram showing a hand operating a tool with labeled parts, including numbered callouts ① and ②.natural_image
Illustration of two hands holding a green object with a green arrow indicating direction (no text or symbols)natural_image
Illustration of a hand holding a coiled green object, no text or symbols presentnatural_image
Diagram of a syringe with green arrows indicating direction (no text or labels)natural_image
Illustration of a vacuum cleaner with green arrows indicating motion direction (no text or symbols)natural_image
Diagram of a mechanical device with green components and directional arrows indicating movement (no text or symbols)natural_image
Technical diagram of a mechanical assembly with green arrows indicating direction (no text or symbols)natural_image
Illustration of a hand holding a blue faucet with a green handle, placed on a surface (no text or symbols)text_image
Diagram illustrating sunlight interaction with water droplets and a sun, showing red X and green checkmarktext_image
Diagram of a mechanical device with labeled parts and directional arrows indicating motion or assembly stepsnatural_image
Illustration of a container with liquid and an upward arrow, no text or symbols presentnatural_image
Illustration of a wooden tool pouring granular material into a glass bowl (no text or symbols)text_image
Diagram showing a hand holding a container with a warning symbol indicating no liability or failure.text_image
Diagram illustrating sunlight and water droplets, showing a sun icon transforming into a droplet with water droplets and a checkmark.text_image
Diagram illustrating a device's internal components with numbered parts and directional arrows indicating rotation or assembly.text_image
Diagram showing two views of a device with green checkmarks indicating approval or rejection, alongside a magnified view of the device's internal components.natural_image
Circular icon with a stylized white hand and exclamation mark inside a black circle (no text or symbols)natural_image
Illustration of a container with liquid and an upward arrow, no text or symbols presenttext_image
Diagram of a device component with numbered parts and directional arrows indicating movement or assembly.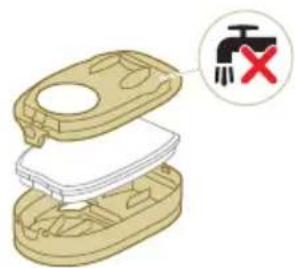
natural_image
3D diagram of a mechanical device with a switch symbol and red X mark (no text or labels)natural_image
Illustration of hands cleaning a trash bin with a water tap (no text or symbols)natural_image
Illustration of a hand holding a rectangular object with curved arrows indicating rotation or motion (no text or symbols)natural_image
Illustration of hands pouring liquid into a trash bin (no text or symbols)text_image
Illustration showing a hand using a tool to clean or repair a mechanical component, with a red 'X' symbol indicating no text.text_image
Diagram showing a device with a water droplet and a red X mark indicating a defect or failure.text_image
Diagram showing a device with a lid and two labeled parts, marked with red 'X' and green checkmarks.natural_image
Illustration of a hand pouring liquid into a container with a spray bottle (no text or symbols)8 Sluit de filterbehuizing.
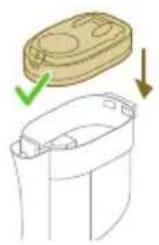

natural_image
Diagram showing a container with a lid and a cross mark, alongside a downward arrow indicating process (no text or symbols)text_image
Diagram showing a plastic container with a water droplet symbol and an arrow indicating a drop, accompanied by a magnified view of the container's internal structure.text_image
Safety warning illustration showing a device with warning symbol and red X mark indicating failure or hazardtext_image
Diagram illustrating a mechanical device with labeled parts and directional arrows, likely illustrating a tool or assembly process.natural_image
Illustration of hands holding a coiled rope with scissors, accompanied by a magnified inset showing a hand holding a branch (no text or symbols present)text_image
Diagram illustrating a mechanical or electrical process with labeled steps ① and ②, showing hand positioning and component assembly.natural_image
Circular icon with a house silhouette and thermometer symbol, labeled 'E2' below (no text or numbers on the icon itself)natural_image
Circular icon with a battery symbol and a question mark, labeled 'E5' below (no text or symbols on the icon itself)natural_image
Circular icon with a stylized pen and wrench symbol, no text or numbers presentVervanging microvezelborstel nodig

natural_image
Icon of a white hand-painted glove with a circular frame and refresh symbol (no text or numbers)Vervanging filter nodig
Vervanging
www.philips.com/myvacuum9000s.
4 Midtre knapp (AUTOCLEAN)
5 Av/på-knapp
6 Batteri
natural_image
Diagram of a mechanical assembly with a vertical rod inserted into a housing (no text or symbols)natural_image
Diagram showing two mechanical components with directional arrows indicating movement or assembly (no text or symbols present)natural_image
Illustration of a green tool with a curved arrow indicating motion, mounted on a vertical support structure (no text or symbols)natural_image
Mechanical component diagram showing a housing assembly with a clamped part attached (no text or symbols)natural_image
Illustration of a hand holding a device with arrows indicating motion or force (no text or symbols)natural_image
Illustration of a vacuum cleaner emitting exhaust smoke from a cylindrical component (no text or symbols)text_image
Diagram showing a robotic arm with labeled parts and directional arrows indicating motion or assembly steps.natural_image
Illustration of a mechanical device with a highlighted component and motion arrow (no text or symbols)natural_image
Illustration of a medical or laboratory procedure showing a tool tip and a magnified view of a device with light reflections (no text or symbols)natural_image
Illustration of a hand holding a cylindrical object with an arrow indicating downward motion, next to a base device (no text or symbols)text_image
Diagram showing a mechanical assembly with labeled parts, including a lever and a base structure.natural_image
Diagram showing two mechanical assembly steps with arrows indicating direction (no text or symbols)text_image
Technical diagram showing mechanical assembly with labeled parts ① and ②, likely illustrating a gear or tool mechanism.Lading

text_image
MAX 35 °C MIN 5 °C
natural_image
Illustration of a plug with an arrow indicating direction (no text or symbols)
text_image
100%natural_image
Technical line drawing of a mechanical component with no visible text or symbols
natural_image
Technical line drawing of a mechanical component with no visible text or symbolsnatural_image
Diagram of a mechanical device with a highlighted component and motion arrow (no text or symbols)text_image
Safety warning illustration showing a device with warning symbol and red X mark indicating failure or hazardnatural_image
Illustration of a mechanical device with a downward arrow and emitting sparks, next to a cylindrical component (no text or symbols)natural_image
Illustration of a vacuum cleaner emitting exhaust smoke from a cylindrical component (no text or symbols)natural_image
Illustration of a hand holding a handheld device above a cabinet (no text or symbols visible)
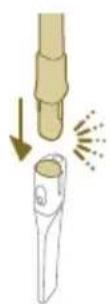
Tips: Det er også mulig å feste mini turbobørsten til slangen.
text_image
Diagram illustrating a hand operating a tool with warning symbols and a water droplet, indicating incorrect operation or damage.natural_image
Illustration of a vacuum cleaner emitting exhaust smoke from a cylindrical component (no text or symbols)text_image
Diagram illustrating a step in a medical procedure involving a tool and a foot, labeled with arrows and numbered steps.natural_image
Illustration of a mechanical device with a downward arrow and sparkles, no text or symbols presentnatural_image
Illustration of a handheld device with a circular inset showing a bed (no text or symbols)natural_image
Illustration of a hairdryer with a cat and dog nearby, showing no text or symbolstext_image
Diagram showing a hand holding a small object with two labeled steps (① and ②) indicating a procedure or step in a process.natural_image
Illustration of a hand holding a device with a warning symbol and a red 'X' indicating failure or absence (no text or symbols present)Advarsel: Ikke sug opp vann eller andre væsker.
natural_image
Illustration of a hand holding a flashlight with a downward arrow and light effect (no text or symbols)natural_image
Illustration of a dental implant tool interacting with a cylindrical component, with a close-up inset showing a bench (no text or symbols)text_image
Diagram showing a tool interacting with a connector, labeled with parts 1 and 2.natural_image
Illustration of a mechanical tool with a water droplet and warning symbols (no text or labels)Advarsel: Ikke sug opp vann eller andre væsker.
text_image
Diagram showing a vacuum cleaner's internal structure with labeled parts and directional arrows indicating assembly or operation.text_image
Diagram illustrating a mechanical or electrical setup with three circular indicators (✓, +, -) and a green downward arrow indicating direction.natural_image
Illustration of a hand pouring liquid into a vertical pipe with a green arrow indicating direction (no text or symbols)natural_image
Simple line drawing of a bucket pouring liquid into a basin (no text or symbols)
text_image
MAX 50 °C
text_image
Diagram illustrating a process with checkmarks and a red X mark, showing steps to process liquid or container with directional arrows.
natural_image
Illustration of a hand holding a cylindrical device with a green arrow pointing to the handle (no text or symbols present)
text_image
MAX 35 °C MIN 5 °C8 Hell ut resterende flytende vaskemiddel fra rentvannsbeholderen i vasken.
natural_image
Illustration of a remote control device with a switch and control panel (no text or symbols)12 For å starte AUTOCLEAN-syklusen trykker du på knappen i midten. Hvis du ser en svart skjerm, trykker du på av/på-knappen först for å aktivere skjermen.
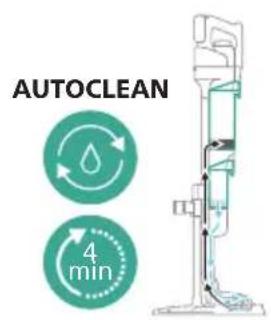
text_image
AUTOCLEAN 4 minnatural_image
Illustration of a hand pouring liquid into a vertical pipe with a green arrow indicating direction (no text or symbols)natural_image
Illustration of a mechanical device with a green handle and upward arrow, no text or symbols presentnatural_image
Simple line drawing of a cup pouring liquid into a stand (no text or symbols)16 Hell vannet ut av spillvannsbeholderen i vasken.
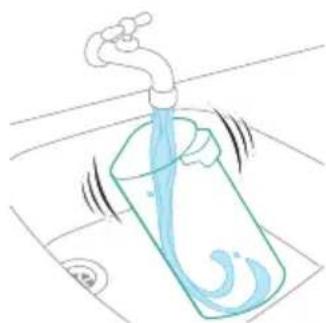
natural_image
Illustration of a faucet pouring liquid into a water-filled container with swirling lines indicating flow (no text or symbols)natural_image
Illustration of a faucet releasing water into a green leafy container on a tiled floor (no text or symbols)text_image
Diagram illustrating the process of a water drop and sun, showing water droplets falling and sunlight transforming to a green checkmark.natural_image
Mechanical component diagram showing a lever mechanism with a downward arrow indicating motion (no text or symbols)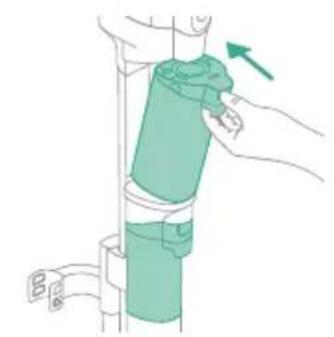
natural_image
Illustration of a hand holding a green cylindrical object with an arrow indicating direction (no text or symbols)21 Sett spillvannsbeholderen tilbake i apparatet.
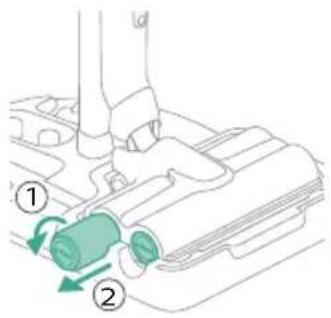
text_image
Diagram showing a mechanical component with numbered parts and directional arrows indicating motion or flow.text_image
Diagram showing a hand holding a tool with two labeled parts (① and ②) indicating different components or functions.natural_image
Diagram showing three vertical cylindrical components with a downward arrow, mounted on a base (no text or symbols)natural_image
Technical line drawing of a mechanical component with an upward arrow indicating motion (no text or symbols)natural_image
Illustration of a hand pouring liquid into a container with a blue flame (no text or symbols)text_image
Diagram showing a mechanical component with numbered parts and green arrows indicating motion or force direction.text_image
Diagram showing a hand holding a tool with two labeled parts (① and ②) indicating different components or states.natural_image
Illustration of two hands holding a green object with a green arrow indicating direction (no text or symbols)natural_image
Illustration of a hand holding a coiled green object, no text or symbols presentnatural_image
Diagram of a mechanical component with directional arrows indicating motion or force (no text or symbols)natural_image
Illustration of a vacuum cleaner with green arrows indicating force direction (no text or symbols)natural_image
Diagram of a mechanical device with green components and directional arrows indicating movement (no text or symbols)natural_image
Diagram of a mechanical device with green arrows indicating movement or force direction (no text or symbols)3 Skyll fuktstripene under springen.

natural_image
Illustration of a hand using a blue faucet to clean a green object on a surface (no text or symbols)text_image
Diagram illustrating sunlight interaction with water droplets and a checkmark, showing red X and green ✓ symbols.text_image
Technical diagram showing a mechanical component with labeled parts and directional arrows indicating motion or assembly.natural_image
Illustration of a container with liquid and an upward arrow, no text or symbols presentnatural_image
Illustration of a wooden tool pouring granular material into a container (no text or symbols)3 Tøm støvbeholderen i søppelkassen.

text_image
Diagram showing hand holding a device with a warning symbol indicating no liability or failuretext_image
Diagram of a mechanical device with labeled parts and directional arrows indicating motion or flownatural_image
Illustration of a hand pouring liquid into a container with a faucet (no text or symbols)text_image
Diagram illustrating a device's internal components with numbered parts and directional arrows indicating rotation or assembly.text_image
Diagram showing a device with green checkmark indicators and two circular components, one marked with red X and one with green checkmark.natural_image
Circular icon with a stylized white object and exclamation mark, no text or symbols present.natural_image
Illustration of a container with liquid and an upward arrow, no text or symbols presenttext_image
Diagram of a device with labeled parts, showing directional arrows and numbered callouts.
natural_image
3D diagram of a mechanical device with a switch symbol and red X mark (no text or labels)natural_image
Illustration of hands cleaning a trash bin with a water tap (no text or symbols)3 Rist skumfilteret over søppelkassen for å fjerne smusslaget på toppen av skumfilteret. Skyll deretter skumfilteret under springen.

natural_image
Illustration of a hand holding a rectangular object with curved arrows indicating rotation or motion (no text or symbols)natural_image
Illustration of hands pouring liquid into a trash bin (no text or symbols)text_image
Illustration showing a hand using a tool to clean or repair a device, with a warning symbol indicating no error.text_image
Diagram showing a device with a water droplet and a red X mark indicating a failure or absence.text_image
Diagram showing a device with a lid and two labeled parts, marked with red 'X' and green checkmarks.natural_image
Illustration of a hand holding a small object with arrows indicating motion or force (no text or symbols)8 Lukk filterhylsen.


natural_image
Illustration of a container with a lid and a handle, showing a red X mark and a downward arrow (no text or symbols)9 Sett filterhylsen, inkludert skumfilteret, tilbake i støvbeholderen.
text_image
Diagram illustrating a water drop symbol and its impact on a plastic container with a red X mark indicating the water level.text_image
Safety warning illustration showing a device with warning symbol and red X mark indicating failure or hazardtext_image
Diagram illustrating a mechanical device with labeled parts and directional arrows, showing step 1 and step 2 of motion.natural_image
Illustration of hands holding a coiled plant stem with scissors, accompanied by a magnified inset showing a hand holding a branch (no text or symbols present)text_image
Diagram illustrating a mechanical or electrical component being adjusted, labeled with parts ① and ②.natural_image
Diagram of a mechanical component with a vertical rod and base, no text or symbols presentnatural_image
Diagram showing two mechanical components with arrows indicating motion, no text or symbols presentnatural_image
Illustration of a green screwdriver holding a vertical pole with a curved arrow indicating motion (no text or symbols)natural_image
Illustration of a mechanical component with a close-up view showing a clip attached to a housing (no text or symbols present)natural_image
Illustration of a mechanical device with arrows indicating motion or force direction (no text or symbols)natural_image
Illustration of a medical or laboratory procedure showing a tool tip and tubing with a downward arrow (no text or symbols)text_image
Diagram showing a vacuum cleaner assembly with labeled parts and directional arrows indicating motion or assembly steps.natural_image
Illustration of a mechanical device with a highlighted lever and sparkles (no text or symbols)natural_image
Illustration of a mechanical device with a downward arrow and emitting sparks, next to a cylindrical component (no text or symbols)natural_image
Illustration of a vacuum cleaner emitting exhaust smoke from a cylindrical component (no text or symbols)text_image
Diagram showing a mechanical assembly with labeled parts, including a lever and a clamp mechanism.text_image
Technical diagram showing mechanical assembly steps with labeled components and directional arrowsnatural_image
Illustration of a plug with an attached socket and cable, showing no text or symbolsnatural_image
Technical line drawing of a mechanical clamp or bracket component (no text or symbols)natural_image
Technical line drawing of a mechanical component or assembly (no text or symbols)natural_image
Diagram of a mechanical device with arrows indicating motion or force direction (no text or symbols)natural_image
Illustration of a medical or laboratory procedure showing a needle inserted into a tube with arrows indicating direction (no text or symbols)natural_image
Illustration of a hand holding a green cylindrical device with a blue liquid, showing a force or pressure application (no text or symbols present)natural_image
Diagram showing a green plastic container with an upward arrow, alongside a white cylindrical container (no text or symbols)text_image
XV1792 10mlnatural_image
Illustration of a green plastic container with a downward arrow indicating flow or change (no text or symbols)natural_image
Illustration of a hand holding a green cylindrical device with an arrow indicating motion (no text or symbols)natural_image
Diagram of a door handle with a circular button labeled ①, showing no text or symbols beyond the number and an arrow pointing to the handle area.text_image
100° A B C D E F Gnatural_image
Illustration of a mechanical device with a highlighted component and motion arrow (no text or symbols)text_image
Safety warning illustration showing a toilet with warning symbol and red X mark indicating no neednatural_image
Illustration of a medical or laboratory procedure showing a tool tip interacting with a test tube, with arrows indicating motion (no text or symbols present)natural_image
Illustration of a vacuum cleaner emitting exhaust smoke from a cylindrical component (no text or symbols)natural_image
Illustration of a hand holding a handheld device above a white cabinet (no text or symbols)

text_image
Diagram showing a hand using a tool to mark a defect or damage, with an orange warning symbol and a red 'X' indicating failure.natural_image
Illustration of a hand using a tool to press down a cylindrical object, with no visible text or symbols.text_image
Diagram illustrating a step in a medical procedure involving a tool and a foot, labeled with arrows and numbered steps.natural_image
Illustration of a mechanical device with a downward arrow and sparkles, no text or symbols presentnatural_image
Illustration of a mechanical device with a bed icon, no text or symbols presentnatural_image
Illustration of a hairdryer with a cat and dog nearby, showing mechanical components and a close-up of the bed (no text or symbols)text_image
Diagram showing a hand holding a small object with labeled parts, marked as ① and ②.natural_image
Illustration of a hand holding a device with a warning symbol and a red 'X' indicating failure or absence (no text or symbols present)natural_image
Illustration of a hand holding a flashlight with a downward arrow and light effect (no text or symbols)natural_image
Illustration of a medical or laboratory procedure showing a tool interacting with a cylindrical object and a separate diagram of a bench (no text or symbols present)text_image
Diagram showing a tool interacting with a connector, labeled with parts 1 and 2.natural_image
Illustration of a mechanical tool with a red X mark and warning symbols (no text or labels)text_image
Diagram showing a vacuum cleaner's internal structure with labeled parts and directional arrows indicating assembly or operation.text_image
Diagram illustrating a mechanical or electrical setup with three circular indicators (✓, +, -) and a green valve component, likely for safety or inspection.natural_image
Illustration of a hand pouring liquid into a vertical pipe with a green arrow indicating direction (no text or symbols)natural_image
Simple line drawing of a bucket pouring liquid into a container (no text or symbols)
text_image
MAX 50 °C
text_image
Diagram illustrating a process with three circular indicators (green check, red X) and arrows indicating direction of action or measurement.
natural_image
Illustration of a hand holding a green cylindrical device with an arrow indicating motion (no text or symbols)
text_image
MAX 35 °C MIN 5 °Cnatural_image
Illustration of a remote control device with a switch and control panel (no text or symbols)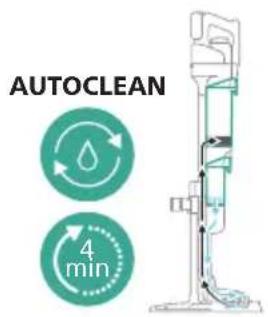
text_image
AUTOCLEAN 4 min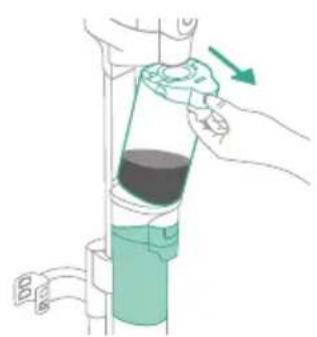
natural_image
Illustration of a hand pouring liquid into a vertical pipe with a green arrow indicating direction (no text or symbols)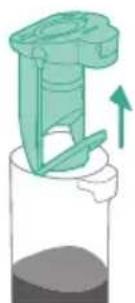
natural_image
Illustration of a mechanical device with a green handle and upward arrow, no text or symbols presentnatural_image
Simple line drawing of a pouring container into a stand, no text or symbols presentnatural_image
Illustration of a faucet pouring liquid into a container with motion lines indicating flow (no text or symbols)natural_image
Illustration of a faucet with a green leafy bag inserted into the drain, placed on a tiled floor (no text or symbols)text_image
Diagram illustrating the environmental change from a trash bin to a sun, with a red 'X' indicating no change and a green checkmark indicating completion.
natural_image
Illustration of a mechanical component with a green arrow indicating downward motion (no text or symbols)natural_image
Illustration of a hand holding a green cylindrical device with a green arrow indicating direction (no text or symbols)text_image
Diagram showing a mechanical assembly with numbered parts and green directional arrows indicating motion or force directions.text_image
Diagram showing a hand using a tool to adjust or install a component, labeled with parts ① and ②.natural_image
Diagram showing two vertical cylindrical components with a downward arrow, mounted on a base (no text or symbols)natural_image
Technical line drawing of a mechanical component with an arrow indicating upward motion (no text or symbols)natural_image
Illustration of a hand pouring liquid into a container with a blue flame (no text or symbols)text_image
Diagram showing a mechanical component with numbered parts and green arrows indicating motion or force direction.text_image
Diagram showing a hand holding a tool with two labeled parts (① and ②) indicating different components or states.natural_image
Illustration of two hands holding a green object with a green arrow indicating direction (no text or symbols)natural_image
Illustration of a hand holding a coiled green object, no text or symbols presentnatural_image
Diagram of a mechanical device with directional arrows indicating motion or force (no text or symbols)natural_image
Illustration of a vacuum cleaner with green arrows indicating force direction (no text or symbols)natural_image
Diagram of a mechanical device with green components and directional arrows indicating movement (no text or symbols)natural_image
Technical diagram of a mechanical assembly with directional arrows indicating movement (no text or symbols)natural_image
Illustration of a hand holding a blue faucet with a green handle, placed on a surface (no text or symbols)text_image
Diagram illustrating sunlight interaction with water droplets and a checkmark, showing red X and green ✓ symbols.text_image
Technical diagram showing a mechanical component with labeled parts and directional arrows indicating motion or assembly.natural_image
Illustration of a container with liquid and an upward arrow, no text or symbols presentnatural_image
Illustration of a wooden tool pouring granular material into a container (no text or symbols)natural_image
Illustration of a container with liquid and an upward arrow, no text or symbols presentnatural_image
Illustration of a wooden tool pouring granular material into a cylindrical container (no text or symbols)text_image
Diagram showing a hand holding a container with a warning symbol indicating no liability or failure.text_image
Diagram of a mechanical device with labeled parts and directional arrows indicating motion or movement.natural_image
Illustration of a hand pouring liquid into a bottle with a faucet (no text or symbols)text_image
Warning Sun ✓ Xtext_image
Diagram of a device with labeled parts and directional arrows indicating motion or operationtext_image
Diagram showing two views of a device with green checkmarks indicating approval or rejection, alongside a magnified view of the device's internal components.natural_image
Circular icon with a stylized white hand and exclamation mark inside a black circle (no text or symbols)natural_image
Illustration of a container with liquid and an upward arrow, no text or symbols presentnatural_image
Diagram of a mechanical component with numbered parts (1, 2), no text or symbols present
text_image
Diagram showing a device with a switch and red X symbol indicating no change or failurenatural_image
Illustration of hands cleaning a trash bin with a water tap (no text or symbols)natural_image
Illustration of a hand holding a rectangular object with curved arrows indicating rotation or motion (no text or symbols)natural_image
Illustration of hands pouring liquid into a trash bin (no text or symbols)text_image
Illustration showing a hand using a tool to clean or repair a mechanical component, with a red 'X' symbol indicating no text.text_image
Diagram showing a device with a water droplet and a red X mark indicating a defect or failure.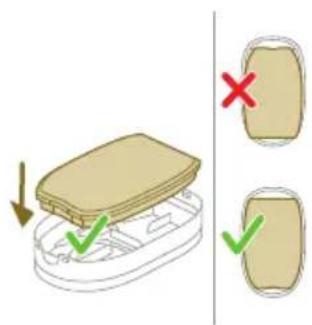
text_image
Diagram showing a device with a lid and two labeled parts, marked with red 'X' and green checkmarks.natural_image
Illustration of a robotic arm interacting with a mechanical component (no text or symbols)natural_image
Illustration of a beige plastic container with a green checkmark and downward arrow, shown in two views (no text or symbols)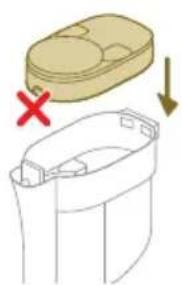
natural_image
Diagram showing a container with a lid and a handle, marked with red X and downward arrow (no text or symbols)text_image
Diagram illustrating a water drop symbol and its impact on a container with a red X, indicating water release or discharge.text_image
Safety warning illustration showing a device with warning symbol and red X mark indicating failure or hazardtext_image
Diagram illustrating a mechanical device with labeled parts and directional arrows, showing step 1 and step 2 of operation.natural_image
Illustration of hands holding a coiled plant stem with scissors, accompanied by a magnified inset showing a hand holding a branch (no text or symbols present)text_image
Diagram illustrating a mechanical or electrical component being inserted into a motor, with labeled parts and directional arrows.natural_image
Icon of a house with a thermometer and warning sign, labeled E2 (no text or symbols beyond the icon itself)natural_image
Circular icon with battery symbol and question mark, labeled E5 (no text or symbols beyond label)natural_image
Circular icon with a stylized pen and wrench symbol, enclosed in a golden border (no text or numbers)natural_image
Circular icon with a stylized white hand-painted object and circular arrow, no text or symbols present.www.philips.com/myvacuum9000s.
Descriere generală
natural_image
Mechanical component diagram showing a bracket with attached pin and housing (no text or symbols)natural_image
Illustration of a hand holding a spray gun with arrows indicating motion (no text or symbols)natural_image
Illustration of a spray gun dispensing liquid into a rubber roller (no text or symbols)text_image
Diagram showing a mechanical assembly with labeled parts and directional arrows indicating motion or assembly steps.natural_image
Illustration of a mechanical device with a highlighted component and motion arrow (no text or symbols)natural_image
Illustration of a medical or laboratory procedure showing a tool tip and a magnified view of a device with light reflections (no text or symbols)natural_image
Illustration of a hand holding a cylindrical object with an arrow indicating downward motion, next to a base device (no text or symbols)text_image
Diagram showing a mechanical assembly with labeled parts, including a lever and a base structure.natural_image
Diagram showing two mechanical assembly steps with arrows indicating direction (no text or symbols)text_image
Technical diagram showing mechanical assembly with labeled parts ① and ②, likely illustrating a gear or tool mechanism.Încărcare

text_image
MAX 35 °C MIN 5 °C
natural_image
Illustration of a plug with a cable and a wall socket, no text or symbols present
text_image
100%natural_image
Technical line drawing of a mechanical component with no visible text or symbolsnatural_image
Technical line drawing of a mechanical component with no visible text or symbolstext_image
100° d d c+natural_image
Illustration of a mechanical device with a highlighted component and motion arrow (no text or symbols)text_image
Safety warning illustration showing a device with warning symbol and red X mark indicating failure or hazardnatural_image
Illustration of a medical or laboratory procedure showing a tool tip and a magnified view of a device (no text or symbols present)natural_image
Illustration of a vacuum cleaner emitting exhaust smoke from a cylindrical tube (no text or symbols)natural_image
Diagram of a door handle with a circular button labeled ①, showing no text or symbols beyond the number and an arrow pointing to the handle area.text_image
Safety warning illustration showing a person using a vacuum cleaner with water leakage, accompanied by an orange warning symbol and a red 'X' indicating no damage.text_image
Safety warning illustration showing a spray nozzle spraying liquid with an eye and a hand holding a tool, accompanied by warning symbols.natural_image
Illustration of a handheld device mounted on a cabinet (no text or symbols visible)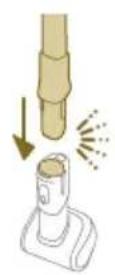
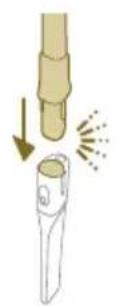
text_image
Diagram illustrating a hand using a tool to mark a defect or damage, with warning symbols and a red 'X' indicating failure.natural_image
Diagram showing a hand holding a cylindrical object with a downward arrow and a flame symbol, next to a rectangular device (no text or labels)text_image
Diagram showing a hand holding a pen-like object with two labeled steps (① and ②) indicating step-by-step instructions.natural_image
Illustration of a mechanical device with a downward arrow and sparkles, no text or symbols presentnatural_image
Illustration of a handheld device with a bed icon below (no text or symbols)natural_image
Illustration of a hairdryer with a cat and dog nearby, showing no text or symbolstext_image
Diagram showing a tool being inserted into a container, labeled with steps 1 and 2.natural_image
Illustration of a mechanical device with water droplets and warning symbols (no text or labels)natural_image
Illustration of a dental implant tool interacting with a small object, showing no text or symbols.text_image
Diagram showing a tool interacting with a wire, labeled with parts 1 and 2, indicating a step in the process.natural_image
Illustration of a mechanical tool with a water droplet and warning symbols (no text or labels)text_image
Diagram showing a vacuum cleaner's internal structure with labeled parts and directional arrows indicating assembly steps.text_image
Diagram illustrating a mechanical or electrical component with three circular indicators (✓, +, -) indicating inspection or status.natural_image
Illustration of a hand pouring liquid into a vertical cylindrical container with a green arrow indicating direction (no text or symbols)natural_image
Simple line drawing of a bucket pouring liquid into a basin (no text or symbols)
text_image
MAX 50 °C
text_image
Diagram illustrating a process with checkmarks and a red X mark, showing steps to process liquid or container with directional arrows.
natural_image
Illustration of a hand holding a cylindrical device with a green arrow pointing to the handle (no text or symbols present)
text_image
MAX 35 °C MIN 5 °Cnatural_image
Illustration of a remote control device with a handle and control panel, showing no text or symbols.
text_image
AUTOCLEAN 4 min
natural_image
Illustration of a hand pouring liquid into a vertical pipe with a green arrow indicating direction (no text or symbols)
natural_image
Illustration of a mechanical device with a green handle and upward arrow, no text or symbols presentnatural_image
Simple line drawing of a pouring container into a stand (no text or symbols)natural_image
Illustration of a faucet pouring liquid into a water-filled container with swirling lines indicating flow (no text or symbols)natural_image
Illustration of a faucet releasing water into a green leafy container on a tiled floor (no text or symbols)text_image
Safety warning illustration showing a sun symbol with water droplets and a checkmark, indicating environmental hazard.natural_image
Diagram of a mechanical device with a downward arrow indicating motion (no text or symbols)natural_image
Illustration of a hand holding a green cylindrical object with a directional arrow, no text or symbols presenttext_image
Diagram showing a mechanical component with numbered parts and green arrows indicating motion or force direction.text_image
Diagram showing a hand holding a tool with labeled parts, including numbered callouts ① and ②.natural_image
Diagram showing three vertical cylindrical components with a downward arrow, mounted on a base (no text or symbols)natural_image
Mechanical assembly diagram showing a component with an arrow indicating direction (no text or symbols)natural_image
Illustration of hands holding a pipe with blue liquid flowing through a container (no text or symbols)
text_image
Diagram showing a mechanical component with numbered parts and green arrows indicating motion or force direction.text_image
Diagram showing a tool interacting with a device, labeled with parts ① and ② indicating different components or functions.natural_image
Illustration of two hands holding a green object with a downward arrow indicating motion (no text or symbols)natural_image
Illustration of two hands holding a coiled green object, no text or symbols presentnatural_image
Diagram of a syringe with green arrows indicating direction (no text or labels)natural_image
Illustration of a medical or robotic device with green arrows indicating movement or force direction (no text or symbols)natural_image
Diagram of a mechanical device with green components and an inset showing a green tool (no text or symbols)natural_image
Diagram of a mechanical device with green arrows indicating motion or force direction (no text or symbols)natural_image
Illustration of a hand holding a blue faucet with a green handle, placed on a surface (no text or symbols)text_image
! Sun X ✓text_image
Technical diagram showing a mechanical component with labeled parts and directional arrows indicating motion or assembly.natural_image
Illustration of a container with liquid and an upward arrow, no text or symbols presentnatural_image
Illustration of a wooden tool pouring granular material into a container (no text or symbols)natural_image
Illustration of a container with liquid and an open lid, showing a 3D view (no text or symbols)natural_image
Illustration of a wooden tool pouring granular material into a cylindrical container (no text or symbols)text_image
Diagram showing a hand holding a tool in a container with a warning symbol indicating no liability or failure.text_image
Diagram illustrating a water drop symbol and its impact on a container with a red X, indicating water release or discharge.natural_image
Diagram of a mechanical device with a highlighted component and motion arrow (no text or symbols)text_image
Safety warning illustration showing a device with warning symbol and red X mark indicating failure or hazardtext_image
Diagram of a mechanical device with labeled parts and directional arrows indicating motion or flownatural_image
Illustration of a hand pouring liquid into a container with a faucet, no text or symbols presenttext_image
Diagram illustrating sunlight interaction with water droplets, showing red X and green checkmarktext_image
Diagram illustrating a device's internal components with numbered parts and directional arrows indicating rotation or assembly.
text_image
Diagram showing a device with green checkmark indicators and two labeled cross-sectional views of a container or housing.natural_image
Circular icon with a stylized white symbol inside a black ring, no text or numbers present.text_image
Diagram of a device with a switch symbol and red X mark indicating no change or error
natural_image
Illustration of a hand pouring liquid into a trash bin while another hand swashes down a pipe (no text or symbols)
natural_image
Illustration of a hand holding a small object with curved arrows indicating rotation or motion (no text or symbols)natural_image
Illustration of hands pouring liquid into a trash bin (no text or symbols)text_image
Illustration showing a hand cleaning a device with a warning symbol indicating no readable text or symbols.text_image
Diagram showing a device with a water droplet and a red X mark indicating a defect or failure.text_image
Diagram showing a device with a lid and two labeled parts, marked with red 'X' and green checkmarks.natural_image
Illustration of a hand tool interacting with a device (no text or symbols visible)natural_image
Diagram showing a container with a lid and a side view of its internal structure, marked with red X and green downward arrow (no text or symbols)
text_image
Diagram illustrating a water drop symbol and its impact on a container with a downward arrow, accompanied by a red 'X' indicating the water level.text_image
Safety warning illustration showing a device with warning symbol and red X mark indicating explosion or damagetext_image
Diagram illustrating a mechanical assembly or tool operation with labeled steps ① and ②, showing hand positioning and component insertion.natural_image
Illustration of hands holding a coiled string with scissors, accompanied by a magnified inset showing a green checkmark (no text or symbols)text_image
Diagram illustrating a mechanical or electrical process with labeled steps ① and ②, showing hand positioning and component insertion.text_image
Diagram of a device with labeled parts and directional arrows indicating movement or forcenatural_image
Illustration of a hand performing a rope knot with a wooden stick (no text or symbols)text_image
Diagram of a robotic device with labeled parts and motion arrows indicating movement or forcenatural_image
Circular icon with a house silhouette and thermometer symbol, labeled 'E2' below (no text or symbols on the icon itself)natural_image
Circular icon with a battery symbol and a question mark, labeled 'E5' below (no text or symbols on the icon itself)natural_image
Circular icon with a stylized pen and wrench symbol, no text or numbers presentnatural_image
Icon of a white foot covering with a grid pattern and circular arrow, enclosed in a golden circle (no text or symbols)www.philips.com/myvacuum9000s.
Splošni opis
natural_image
Mechanical component diagram showing a bracket with mounting holes and a separate view of a door with a handle (no text or symbols)Če želite shraniti in polniti sklop samo za sesanje na stenskem nosilcu, pritrdite stenski nosilec na steno s priloženimi vijaki. Prepričajte se, da je stenski nosilec 140–150 cm nad tlemi.
natural_image
Illustration of a hand holding a device with arrows indicating motion or force (no text or symbols)natural_image
Illustration of a vacuum cleaner emitting exhaust smoke from a cylindrical component (no text or symbols)2 Mokri modul namestite na nastavek AquaSpin (zasliši se klik).

text_image
Diagram showing a robotic arm with labeled parts and directional arrows indicating movement or assembly.3 Nastavek za sesanje in mokro čiščenje shranite tako, da ga postavite na postajo za po čiščenju in za shranjevanje.
natural_image
Illustration of a mechanical device with a highlighted component and motion arrow (no text or symbols)natural_image
Illustration of a medical or laboratory procedure showing a tool tip and a magnified view of a device with light reflections (no text or symbols)natural_image
Illustration of a hand holding a cylindrical object with a downward arrow, next to a base device (no text or symbols)3 Cev vstavite v nastavek LED.

text_image
Diagram showing a mechanical assembly with labeled parts, including a lever and a base structure.4 Če želite sklop samo za sesanje shraniti, ga postavite na postajo za po čiščenju in za shranjevanje, in sicer tako, da na daljšo stran podstavka najprej postavite nastavek LED, nato pa cev pritisnete v nosilec.

natural_image
Diagram showing two mechanical assembly steps with arrows indicating direction (no text or symbols)text_image
Technical diagram showing mechanical assembly with labeled parts ① and ②, likely illustrating a gear or tool mechanism.Polnjenje

text_image
MAX 35 °C MIN 5 °C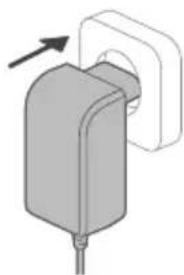
natural_image
Illustration of a plug with a cable and a wall socket, no text or symbols present
text_image
100%Aparatu je priložena 25-voltna litij-ionska baterija. Polnjenje traja 4 ure.
natural_image
Technical line drawing of a mechanical component with no visible text or symbols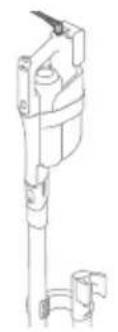
natural_image
Technical line drawing of a mechanical component with no visible text or symbolsnatural_image
Illustration of a mechanical device with a highlighted component and motion arrow (no text or symbols)text_image
Safety warning illustration showing a person using a vacuum cleaner with a red 'X' indicating water leakage and an orange warning symbol.text_image
Safety warning illustration showing a hand cleaning a spray bottle with an eye and a red X mark indicating no protection.natural_image
Illustration of a handheld device mounted on a cabinet, with no visible text or symbols.natural_image
Illustration of a hand holding a tool with warning symbols and a water droplet, no text or labels presentnatural_image
Illustration of a hand holding a brush above a vacuum cleaner (no text or symbols present)text_image
Diagram illustrating a step in a medical procedure involving a tool and a foot, labeled with arrows and numbered steps.natural_image
Illustration of a mechanical device with a close-up inset showing a bed (no text or symbols)natural_image
Illustration of a hairdryer with a cat and dog nearby, showing no text or symbolstext_image
Diagram showing a tool being inserted into a device, labeled with parts 1 and 2 indicating different states or functions.natural_image
Illustration of a mechanical device with water droplets and warning symbols (no text or labels)natural_image
Illustration of a dental implant tool interacting with a wall-mounted device (no text or symbols present)text_image
Diagram showing a mechanical device with labeled parts and directional arrows indicating motion or assembly.natural_image
Illustration of a mechanical device with a water droplet and warning symbols (no text or labels)text_image
Diagram showing a robotic arm with labeled parts, including numbered callouts (① and ②) indicating different components.1 Nastavek za sesanje in mokro čiščenje postavite na postajo za po čiščenju in za shranjevanje.
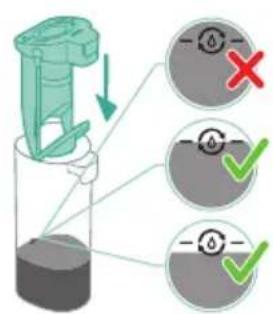
text_image
Diagram illustrating a mechanical assembly with checkmarks and a warning symbol, showing three states of inspection or testing.natural_image
Illustration of a hand pouring liquid into a vertical pipe with a green arrow indicating direction (no text or symbols)2 Pritisnite gumb, da odklenete zbiralnik za umazano vodo in ga odstranite.

natural_image
Illustration of a mechanical device with a green handle and upward arrow, no text or symbols present3 Mokri filter odstranite iz zbiralnika za umazano vodo.
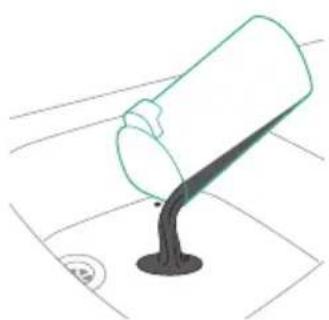
natural_image
Simple line drawing of a cup pouring liquid into a stand (no text or symbols)4 Vodo iz zbiralnika za umazano vodo izlijte v korito.

5 Mokri filter namestite nazaj na zbiralnik za umazano vodo.
6 Prazen zbiralnik za umazano vodo namestite nazaj v aparat in vzemite ven zbiralnik za čisto vodo.
7 Odstranite pokrovček z zbiralnika za čisto vodo.
8 Morebitno preostalo tekočino z detergentom izlijte iz zbiralnika za čisto vodo v pomivalno korito.
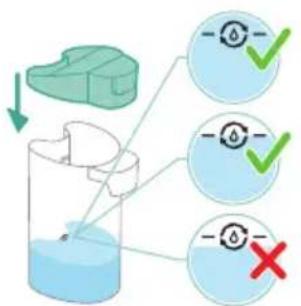
text_image
Diagram illustrating a chemical reaction or filtration process with three labeled steps and checkmarks indicating detection or rejection outcomes.9 Zbiralnik za čisto vodo napolnite s hladno ali mlačno vodo iz pipe vsaj do oznake AUTOCLEAN.
A Opozorilo: Temperatura vode iz pipe, ki jo natakate v zbiralnik za čisto vodo, ne sme preseči 50 °C.
A Opozorilo: Za program AUTOCLEAN ne uporabite detergenta, saj bi se voda lahko preveč penila.
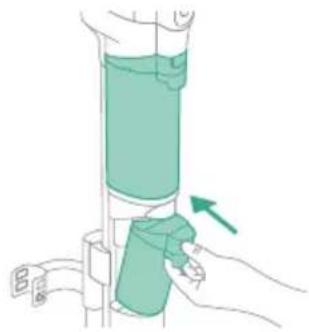
natural_image
Illustration of a hand holding a vertical tube with a green arrow pointing to the tube (no text or symbols)10 Zbiralnik za čisto vodo nato vstavite nazaj v aparat.
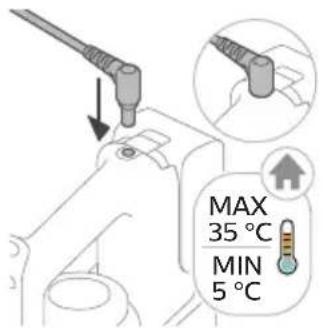
text_image
MAX 35 °C MIN 5 °Cnatural_image
Illustration of a plug with a cable and a wall socket, no text or symbols present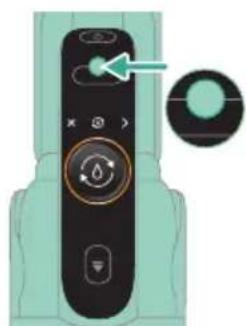
natural_image
Illustration of a remote control device with a circular dial and an arrow pointing to the button (no text or symbols)natural_image
Illustration of a hand pouring liquid into a vertical pipe with a green container, no text or symbols present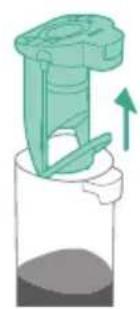
natural_image
Illustration of a mechanical device with an upward arrow, no text or symbols present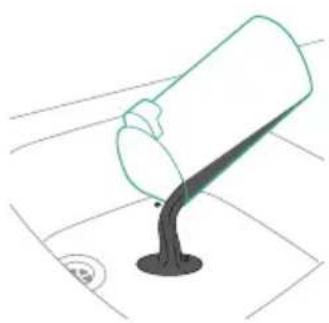
natural_image
Simple line drawing of a cup pouring liquid into a stand (no text or symbols)
natural_image
Simple line drawing of a faucet pouring liquid into a container with wavy lines indicating flow (no text or symbols)13 Aparat izvede cikel AUTOCLEAN.
i Opomba: Cikel Autoclean traja približno 4 minute. Za čim boljše rezultate pustite aparat delovati skozi celoten cikel AUTOCLEAN. Cikel AUTOCLEAN lahko kadar koli zaustavite ali prekličete.
natural_image
Illustration of a faucet with a green leaf inside, placed on a tiled floor (no text or symbols)18 Mokri filter očistite pod tekočo vodo.

text_image
Safety warning illustration showing a water drop with a sun symbol and checkmark indicating failure or rejection.19 Mokri filter zbiralnika za umazano vodo in njegov element za pretok vode naj se popolnoma posušita, preden filter namestite nazaj na zbiralnik za umazano vodo.
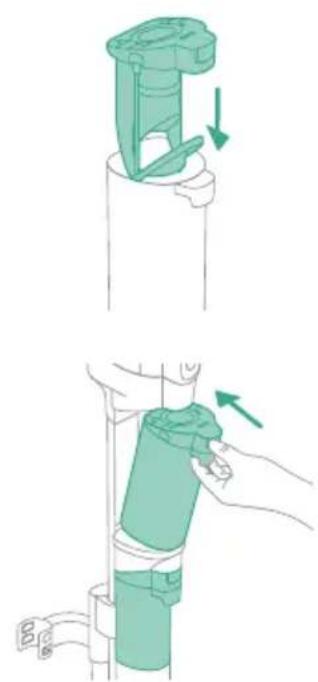
natural_image
Two-step diagram showing a mechanical device being adjusted, with no visible text or symbols.20 Mokri filter namestite nazaj na zbiralnik za umazano vodo.

text_image
Diagram showing a mechanical component with numbered parts and directional arrows indicating motion or assembly.21 Zbiralnik za umazano vodo nato vstavite nazaj v aparat.
22 Ščetki iz mikrovlaken obrnite v nasprotni smeri urnega kazalca (1) in ju odstranite iz nastavka AquaSpin (2).
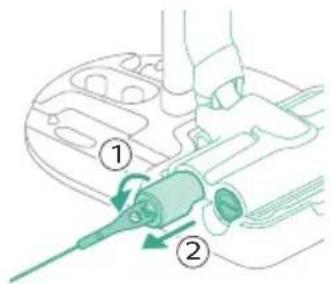
text_image
Diagram showing a hand holding a tool with labeled parts, including numbered callouts ① and ②.natural_image
Diagram of three cylindrical components with a downward arrow indicating rotation or movement (no text or symbols)natural_image
Technical line drawing of a mechanical component with an upward arrow indicating assembly or force (no text or symbols present)natural_image
Illustration of hands using a faucet to lift a blue liquid in a container (no text or symbols)text_image
Diagram showing a mechanical component with numbered parts and green arrows indicating motion or force direction.1 Ščetki iz mikrovlaken obrnite v nasprotni smeri urnega kazalca (1) in ju odstranite iz nastavka AquaSpin (2).
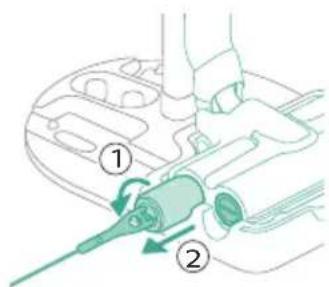
text_image
Diagram showing a hand operating a tool with labeled parts, including numbered callouts ① and ②.natural_image
Illustration of hands holding a green object with a green arrow indicating direction (no text or symbols)natural_image
Illustration of two hands holding a coiled green object, no text or symbols presentnatural_image
Diagram of a mechanical device with directional arrows indicating movement or force (no text or symbols)natural_image
Illustration of a vacuum cleaner with green directional arrows indicating motion (no text or symbols)natural_image
Diagram of a mechanical assembly with green components and directional arrows, no text or symbols presentnatural_image
Technical diagram of a mechanical assembly with directional arrows and a magnified inset showing a component (no text or symbols)natural_image
Illustration of a hand washing a blue faucet with a green handle, no text or symbols presenttext_image
Weather symbol and weather icons showing sun, raindrops, and checkmark indicatorstext_image
Diagram showing a mechanical device with labeled parts and directional arrows indicating motion or assembly.natural_image
Illustration of a container with liquid and an upward arrow, no text or symbols present1 Ko želite očistiti komoro za prah in ciklonski element, odstranite ohišje filtra.

natural_image
Illustration of a wooden tool pouring granular material into a cylindrical container (no text or symbols)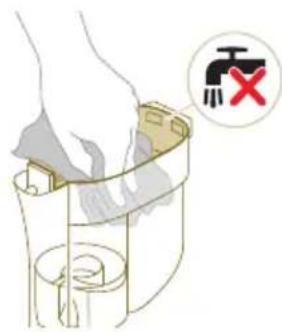
text_image
Diagram showing a hand holding a tool in a container with a warning symbol indicating no hazard or failure.
text_image
Diagram illustrating a water drop symbol and its impact on a container with a red X, indicating water release or discharge.
natural_image
Illustration of a mechanical device with a lever and base, showing motion or force direction (no text or symbols)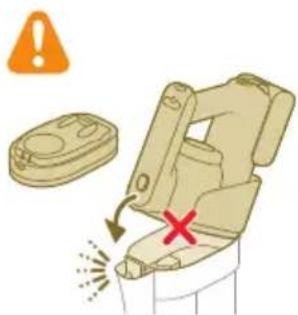
text_image
Safety warning illustration showing a device with warning symbol and red X mark indicating failure or hazardnatural_image
Circular icon with a stylized white plug or connector symbol and an exclamation mark, set against a dark background (no text or symbols)text_image
Diagram illustrating two steps of a food storage or packaging process, labeled ① and ②, showing step ① with internal components and directional arrows.1 Izvlecite ohišje filtra s komore za prah.

natural_image
Illustration of a mechanical device with a switch symbol (no text or labels)natural_image
Illustration of a hand pouring liquid into a trash bin while another hand swashes down a pipe (no text or symbols)3 Penasti filter stresite nad smetnjakom, da s površine odstranite plast prahu. Penasti filter nato operite pod tekočo vodo.
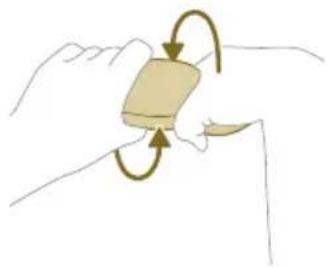
natural_image
Illustration of a hand holding a small object with curved arrows indicating rotation or motion (no text or symbols)4 Penasti filter stisnite, da iztisnete vodo.
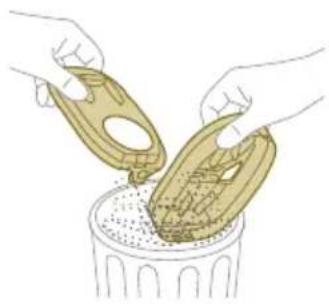
natural_image
Illustration of hands pouring liquid into a trash bin (no text or symbols)5 Ohišje filtra in pokrov stresite nad smetnjakom, da odstranite prah.
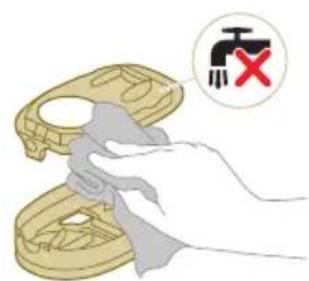
text_image
Illustration showing a hand holding a valve with a red 'X' symbol, indicating no text or symbols on the valve itself.6 Nosilec filtra očistite z vlažno krpo.
A Opozorilo: Belega materiala na pokrovu ohišja filtra ne čistite z običajnim sesalnikom ali krtačo. Belega materiala na pokrovu ohišja filtra ne čistite z vodo ali čistilnim sredstvom. S tem boste poškodovali material. Beli material potapkajte nad smetnjakom.

text_image
Diagram showing a device with a water droplet and a warning symbol indicating no need for cleaning or repair.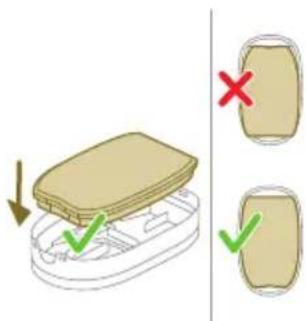
text_image
Diagram showing a device with a lid and two labeled boxes, one marked with red X and green checkmark, indicating selection or status.7 Penasti filter se mora popolnoma posušiti, preden ga spet namestite v ohišje filtra.
natural_image
Illustration of a hairpin with a lever and base, showing mechanical components (no text or symbols)8 Zaprite ohišje filtra.


natural_image
Illustration of a container with a lid and a cross mark, showing a downward arrow and a magnified view below (no text or symbols)
text_image
Diagram showing a container with a water droplet and a drop, indicating a warning or failure condition.9 Ohišje filtra s penastim filtrom vstavite nazaj v komoro za prah.
A Opozorilo: Prepričajte se, da je beli material na pokrovu ohišja filtra obrnjen navzgor.
A Opozorilo: Ohišje filtra in penasti filter morata biti popolnoma suha, preden ju spet namestite v komoro za prah.
text_image
Safety warning illustration showing a device with warning symbol and red X mark indicating explosion or damagetext_image
Medical diagram showing a hand holding a tool with two labeled steps (① and ②) indicating different positions or states of the device.natural_image
Illustration of hands holding a coiled metal object with a green checkmark indicating inspection (no text or symbols present)text_image
Diagram illustrating a mechanical assembly or tool operation with labeled steps ① and ②, showing hand positioning and tool path.2 Krtačni valj nato potisnite nazaj v nastavek LED (1) in potisnite zaklepni vzdov navzgor, da zaklenete krtačni valj v nastavek LED (zasliši se klik).
text_image
Diagram of a device with numbered parts and directional arrows indicating movement or processnatural_image
Illustration of a hand connecting wires to a mechanical component (no text or symbols)2 Odstranite lase in umazanijo, ki so se navili na krtačni valj.
text_image
Diagram showing a mechanical device with labeled parts, including numbered callouts ① and ②.natural_image
Circular icon with a stylized container and warning symbol, labeled 'i1' at bottom (no text or numbers on icon itself)Zbiralnik za umazano vodo je poln.
natural_image
Circular icon with a stylized white lever and orange base, labeled 'i2' below (no text or symbols on the diagram itself)Nastavek AquaSpin ni (pravilno) priključen.
natural_image
Circular icon with a warning symbol and exclamation mark, labeled 'i3' below (no text or numbers on the icon itself)V nastavku AquaSpin se je nekaj zataknilo. To je varnostna zaustavitev, če se kaj zatakne v nastavku (na primer napajalni kabel ali igrača).
natural_image
Circular icon with a stylized device symbol and exclamation mark, labeled 'i4' below (no text or numbers on the device itself)V nastavku LED se je nekaj zataknilo. To je varnostna zaustavitev, če se kaj zatakne v nastavku (na primer napajalni kabel ali igrača).
natural_image
Circular icon with a stylized white figure inside a black border, no text or symbols present.natural_image
Circular icon with a stylized pen and wrench symbol, enclosed in a golden border (no text or numbers)natural_image
Circular icon with a white foot covering and a circular arrow, no text or symbols present.natural_image
Illustration of a mechanical component with a separate view showing a pin inserted into a housing (no text or symbols present)natural_image
Illustration of a hand holding a spray gun with arrows indicating motion (no text or symbols)1 Ak chcete zostavit' zostavu vysávača a mopu, zasuňte batériu a upevnite ručný vysávač 3 v 1 k modulu na mokré vysávanie („zacvaknutie“).
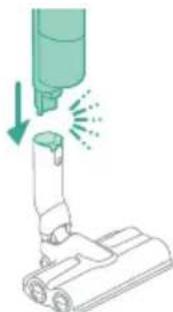
natural_image
Illustration of a vacuum cleaner emitting exhaust smoke from a cylindrical device (no text or symbols)2 Upevnite modul na mokré vysávanie k hubici AquaSpin („zacvaknutie“).
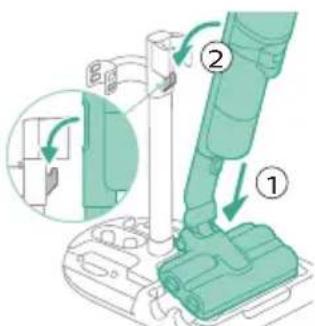
text_image
Diagram showing a vacuum cleaner's internal structure with labeled parts and directional arrows indicating assembly steps.natural_image
Diagram of a mechanical device with a highlighted component and motion arrow (no text or symbols)natural_image
Illustration of a hand holding a tool with an arrow indicating compression or disassembly (no text or symbols present)natural_image
Illustration of a hand holding a cylindrical object with a downward arrow, next to a base device (no text or symbols)3 Trubicu vložte do LED hubice.

text_image
Diagram showing a mechanical assembly with labeled parts, including a lever and a base structure.natural_image
Diagram showing two mechanical assembly steps with arrows indicating direction (no text or symbols)text_image
Technical diagram showing mechanical assembly with labeled parts ① and ②, likely illustrating a gear or tool mechanism.Nabíjanie

text_image
MAX 35 °C MIN 5 °C
natural_image
Illustration of a plug with a cable and a wall socket, no text or symbols present
text_image
100%Zariadenie je vybavené 25 V lítium-iónovou batériou. Nabíjanie trvá 4 hodiny.
natural_image
Technical line drawing of a mechanical component with no visible text or symbolsnatural_image
Technical line drawing of a mechanical component or assembly (no text or symbols)natural_image
Illustration of a mechanical device with a highlighted component and motion arrow (no text or symbols)text_image
Safety warning illustration showing a device with warning symbol and red X mark indicating failure or hazardnatural_image
Illustration of a mechanical device with a downward arrow and emitting sparks, next to a cylindrical component (no text or symbols)natural_image
Illustration of a vacuum cleaner emitting exhaust smoke from a cylindrical tube (no text or symbols)3 Trubicu vložte do LED hubice.
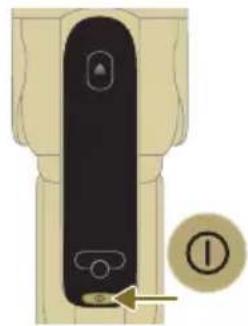
natural_image
Diagram of a door lock mechanism with a circular button labeled ① (no text or symbols on the lock itself)text_image
Safety warning illustration showing a person using a vacuum cleaner with a red 'X' indicating water leakage and an orange warning symbol.text_image
Safety warning illustration showing a spray nozzle spraying liquid with an eye and a hand holding a tool, accompanied by warning symbols.natural_image
Illustration of a hand holding a handheld device above a cabinet (no text or symbols visible)

text_image
Diagram illustrating a hand operating a tool with warning symbols and a water droplet, indicating incorrect operation or damage.natural_image
Illustration of a hand using a handheld device to press or install a cylindrical component, with no visible text or symbols.text_image
Diagram illustrating a step in a medical procedure involving a tool and a device, labeled with arrows and numbered steps.natural_image
Illustration of a mechanical device with a downward arrow and sparkles, no text or symbols present1 Ak chcete malú turbokefu nasadit, zasuňte trubicu ručného vysávača do malej turbokefy.
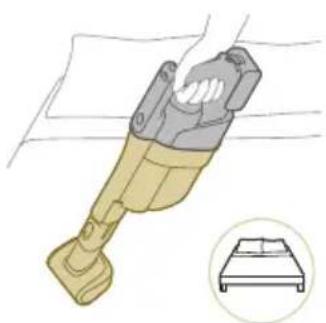
natural_image
Illustration of a handheld device with a bed icon below (no text or symbols)natural_image
Illustration of a hairdryer with a cat and dog nearby, showing mechanical components and a simple bed outline (no text or symbols)text_image
Diagram showing a hand holding a small object with two labeled steps (① and ②) indicating a procedure or step in a process.4 Ak chcete malú turbokefu zložit, stlačte tlačidlo na uvol'nenie (1) a vytiahnite ručný vysávač z malej turbokefy (2).
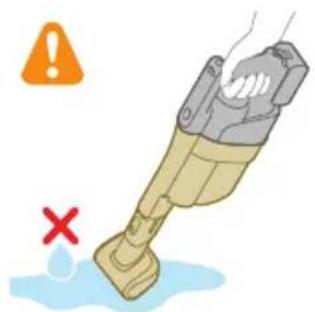
natural_image
Illustration of a mechanical device with water droplets and warning symbols (no text or labels)Varovanie: Nevysávajte vodu ani iné kvapaliny.
natural_image
Illustration of a dental implant tool interacting with a cylindrical device (no text or symbols present)text_image
Diagram showing a tool interacting with a wire, labeled with parts 1 and 2, indicating a step in the process.natural_image
Illustration of a mechanical tool with a water droplet and warning symbols (no text or labels)Varovanie: Nevysávajte vodu ani iné kvapaliny.
text_image
Diagram showing a vacuum cleaner's internal structure with labeled parts and directional arrows indicating assembly steps.text_image
Diagram illustrating a mechanical or electrical component with three circular indicators (red, green, black) and checkmarks indicating failure or completion.natural_image
Illustration of a hand pouring liquid into a vertical cylindrical container with a green arrow indicating direction (no text or symbols)natural_image
Simple line drawing of a bucket pouring liquid into a basin (no text or symbols)
text_image
MAX 50 °C
text_image
Diagram illustrating a process with checkmarks and a red X mark, showing steps to process liquid or container with directional arrows.
natural_image
Illustration of a hand holding a cylindrical device with a green arrow pointing to the handle (no text or symbols present)
text_image
MAX 35 °C MIN 5 °Cnatural_image
Illustration of a remote control device with a switch and control panel (no text or symbols)
text_image
AUTOCLEAN 4 min
natural_image
Illustration of a hand pouring liquid into a vertical pipe with a green arrow indicating direction (no text or symbols)
natural_image
Illustration of a green mechanical device with an upward arrow, partially submerged in liquid (no text or symbols)natural_image
Simple line drawing of a pouring container into a stand (no text or symbols)natural_image
Illustration of a faucet pouring liquid into a water-filled container with swirling lines indicating flow (no text or symbols)natural_image
Illustration of a faucet releasing water into a green leafy container on a tiled floor (no text or symbols)18 Mokrý filter vyčistite pod tečúcou vodou.

text_image
Diagram illustrating the process of a sun-drying system, showing water drop and checkmark with red X and green checkmark.
natural_image
Diagram of a mechanical device with a downward arrow indicating force or direction (no text or symbols present)natural_image
Illustration of a hand holding a green cylindrical object with a tool, mounted on a vertical pipe (no text or symbols visible)text_image
Diagram showing a mechanical component with numbered parts and directional arrows indicating motion or assembly.text_image
Diagram showing a hand using a tool to adjust or install a component, labeled with parts ① and ②.natural_image
Diagram showing two vertical cylindrical components with a downward arrow, mounted on a base (no text or symbols)23 Aby kefky z mikrovlákien mohli riadne uschnút, položte otvorené konce kefiek na určené držiaky v stanici na odloženie po použití a skladovanie.
natural_image
Technical line drawing of a mechanical component with an arrow indicating assembly or force (no text or symbols)1 Vyberte podnos z odkladacej stanice.
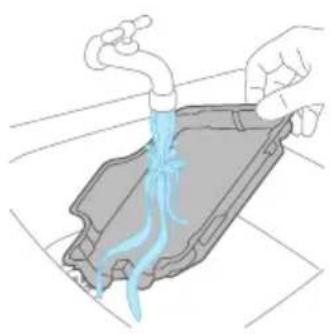
natural_image
Illustration of a hand pouring liquid into a container with a blue flame (no text or symbols)2 Opláchnite podnos pod tečúcou vodou a nechajte ho uschnút. Až potom ho vložte spät do odkladacej stanice.

text_image
Diagram showing a mechanical component with numbered parts and green arrows indicating motion or flow direction.text_image
Diagram showing a hand holding a tool with two labeled parts (① and ②) indicating different components or states.natural_image
Illustration of two hands holding a green object with a downward arrow, no text or symbols presentnatural_image
Illustration of a hand holding a coiled green object, possibly a medical or mechanical component (no text or symbols present)natural_image
Diagram of a mechanical component with directional arrows indicating motion or force (no text or symbols)natural_image
Illustration of a vacuum cleaner with green arrows indicating force direction (no text or symbols)Ak je hubica AquaSpin upchatá, možno ju odblokovat pohybom čistiacej kefky hore-dolu v sacom kanáli hubice AquaSpin.
natural_image
Diagram of a mechanical device with green components and directional arrows indicating movement (no text or symbols)natural_image
Technical diagram of a mechanical assembly with green arrows indicating direction (no text or symbols)2 Odstráňte zvlhčovacie pásiky z hubice AquaSpin tak, že ich vysuniete nabok.
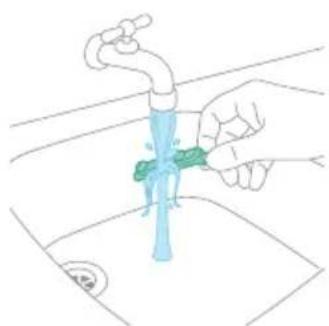
natural_image
Illustration of a hand cleaning a faucet with a green tool on the handle (no text or symbols)3 Očistite zvlhčovacie pásiky pod tečúcou vodou.
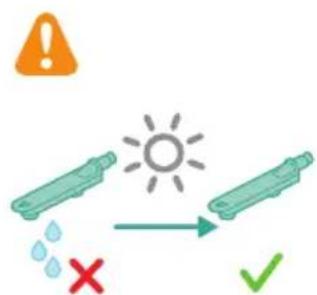
text_image
!text_image
Technical diagram showing a mechanical component with labeled parts and directional arrows indicating motion or assembly.natural_image
Illustration of a container with liquid and an upward arrow, no text or symbols presentnatural_image
Illustration of a wooden tool pouring granular material into a container (no text or symbols)natural_image
Illustration of a container with liquid and an upward arrow, no text or symbols presentnatural_image
Illustration of a wooden tool pouring granular material into a cylindrical container (no text or symbols)text_image
Diagram showing a hand holding a tool in a container with a warning symbol indicating no text or symbols.text_image
Diagram of a mechanical device with labeled parts and directional arrows indicating motion or movement.natural_image
Illustration of a hand pouring liquid into a bottle with a faucet (no text or symbols)text_image
Diagram illustrating a device's internal components with numbered parts and directional arrows indicating rotation or assembly.text_image
Diagram showing two views of a device with green checkmarks indicating approval or rejection, alongside a magnified view of the device's internal components.natural_image
Circular icon with a stylized white hand and exclamation mark inside a black circle (no text or symbols)natural_image
Illustration of a container with liquid and an upward arrow, no text or symbols presenttext_image
Diagram of a device with labeled parts, showing directional arrows and numbered callouts.
natural_image
3D diagram of a mechanical device with a switch symbol and red X mark (no text or labels)natural_image
Illustration of hands cleaning a trash bin with a water tap (no text or symbols)natural_image
Illustration of two hands holding a rectangular object with curved arrows indicating rotation or motion (no text or symbols)natural_image
Illustration of hands pouring liquid into a trash bin (no text or symbols)text_image
Illustration showing a hand using a tool to clean or repair a device, with a warning symbol indicating no error.6 Vyčistite držiak filtra navlhčenou handričkou.
text_image
Diagram showing a device with a water droplet and a red X mark indicating a failure or absence.text_image
Diagram showing a device with a lid and a crosshair indicating failure, alongside a separate view of a padlock with a red X and green checkmark.natural_image
Illustration of a hand holding a tool above a container with liquid, no text or symbols present8 Zatvorte puzdro filtra.

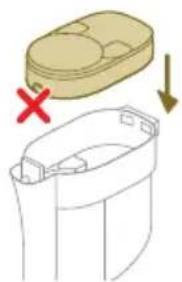
text_image
Diagram showing a container with a lid and a cross mark indicating failure, alongside a magnified view of the container's internal structure.text_image
Diagram illustrating a water drop mechanism with labeled components and a red X mark indicating the defect or failure.text_image
Safety warning illustration showing a device with warning symbol and red X mark indicating explosion or damagetext_image
Diagram illustrating mechanical assembly steps with numbered instructions and magnified detail viewnatural_image
Illustration of hands tying a rope knot with scissors, showing a magnified inset (no text or symbols)text_image
Diagram illustrating a mechanical assembly or tool operation with labeled steps ① and ②, showing hand positioning and tool path.text_image
Diagram of a device with labeled parts and directional arrows indicating movement or force1 Uvolnite tlačidlo na uvolnenie na boku malej turbokefy (1) a vytiahnite rotačnú kefku z malej turbokefy (2).

natural_image
Illustration of hands manipulating a mechanical component with a directional arrow (no text or symbols)text_image
Diagram showing a mechanical device with labeled parts and directional arrows indicating motion or assembly.natural_image
Icon of a house with a thermometer and warning triangle, labeled E2 (no text or symbols beyond the label)natural_image
Circular icon with a house silhouette and warning symbol, labeled 'E3' below (no text or numbers on the icon itself)natural_image
Circular icon with battery symbol and question mark, labeled E5 (no text or symbols beyond label)natural_image
Circular icon with a stylized pen and wrench symbol, no text or numbers presentnatural_image
Icon of a hand-painted object with a circular frame and refresh symbol (no text or numbers)natural_image
Diagram of a mechanical assembly with a vertical rod inserted into a housing (no text or symbols)Da biste koristili funkciju AUTOCLEAN (samočišćenje) ili odložili i napunili uređaj na stanici za postavljanje posle čišćenja i odlaganje, prvo morate da sastavite stanicu tako što ćete pritisnuti držač uređaja na osnovnu ploču.

natural_image
Diagram showing two mechanical components with directional arrows indicating movement or assembly (no text or symbols present)Savet: Moguće je pomeriti držač u položaj samo za usisivanje i vratiti ga naopako ako usisivač želite da postavite sa druge strane stanice za postavljanje nakon čišćenja i odlaganje.
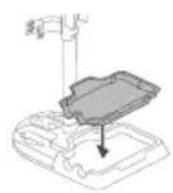
i Napomena: Uverite se da je posuda za posle čišćenja postavljena na osnovnu ploču i da je temperatura u prostoriji u kojoj se uređaj odlaže, puni i čisti između 5 °C i 35 °C.
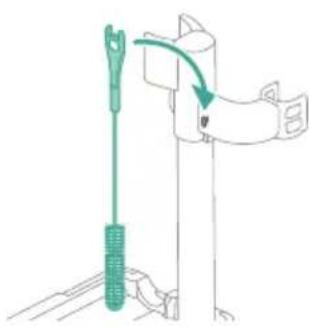
natural_image
Illustration of a green tool with a curved arrow indicating motion or force, next to a vertical support structure (no text or symbols)natural_image
Mechanical component diagram showing a bracket with attached pin and housing (no text or symbols)Ako na zidnom nosaču želite da odlažete i punite samo usisivač, pričvrstite zidni nosač na zid isporučenim vijcima. Proverite da li je zidni nosač 140 cm – 150 cm iznad poda.
i Napomena: Na zidni nosač nije moguće odlaganje uređaja u položaju za usisavanje i brisanje. Na zidni nosač je moguće odložiti uređaj samo u položaju za usisavanje.
i Napomena: Vodite računa da temperatura prostorije u kojoj se čuva ili puni aparat bude između 5 °C i 35 °C.
A Oprez: Budite oprezni prilikom bušenja rupa u zidu za pričvršćivanje zidnog nosača kako biste izbegli opasnost od strujnog udara.
Sastavljanje uređaja u položaj za usisavanje i brisanje
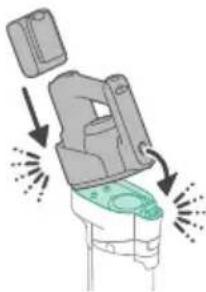
natural_image
Illustration of a hand holding a spray gun with arrows indicating motion (no text or symbols)1 Za sastavljanje uređaja u položaj za usisavanje i brisanje, umetnite bateriju i pričvrstite dršku 3-u-1 na modul za mokro čišćenje („klik“).

natural_image
Illustration of a vacuum cleaner emitting exhaust smoke from a cylindrical component (no text or symbols)2 Pričvrstite modul za moro čišćenje na mlaznicu AquaSpin („klik“).

text_image
Diagram showing a mechanical assembly with labeled parts and directional arrows indicating motion or assembly steps.3 Da biste odložili uredaj u položaju za usisavanje i brisanje, možete ga staviti u stanicu za postavljanje nakon čišćenja i odlaganje.
i Napomena: Na zidni nosač nije moguće odlaganje uređaja u položaju za usisavanje i brisanje. Na zidni nosač je moguće odložiti uređaj samo u položaju za usisavanje.
Sastavljanje uređaja u položaj samo za usisavanje

natural_image
Illustration of a mechanical device with a highlighted component and motion arrow (no text or symbols)1 Za sastavljanje uredaja u položaj samo za usisavanje, pričvrstite dršku 3-u-1 na posudu za prašinu („klik“).
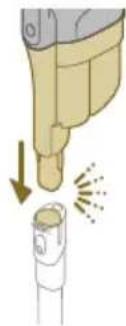
natural_image
Illustration of a medical or laboratory procedure showing a tool tip and a magnified view of a device with light reflections (no text or symbols)natural_image
Illustration of a hand holding a cylindrical object with an arrow indicating downward motion, next to a base device (no text or symbols)3 Umetnite cev u LED mlaznicu.

text_image
Diagram showing a mechanical assembly with labeled parts, including a lever and pivot mechanism.4 Da biste odložili uredaj u položaju samo za usisavanje, stavite ga u stanicu za postavljanje nakon čišćenja i odlaganje tako što ćete prvo postaviti LED mlaznicu na dužu stranu osnovne ploče, a zatim pritisnuti cev u držač.

natural_image
Diagram showing two mechanical assembly steps with arrows indicating direction (no text or symbols)Savet: Moguće je pomeriti držač u položaj samo za usisivanje i vratiti ga naopako ako usisivač želite da postavite sa druge strane stanice za postavljanje nakon čišćenja i odlaganje.
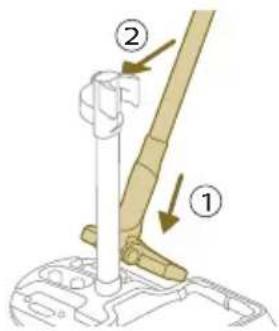
text_image
Technical diagram showing mechanical assembly with labeled parts ① and ②, likely illustrating a gear or tool mechanism.Punjenje

text_image
MAX 35 °C MIN 5 °C
natural_image
Illustration of a plug with an arrow indicating direction (no text or symbols)
text_image
100%natural_image
Technical line drawing of a mechanical component with no visible text or symbols
natural_image
Technical line drawing of a mechanical component with no visible text or symbolsnatural_image
Illustration of a mechanical device with a highlighted component and motion arrow (no text or symbols)1 Za usisavanje podova od mekih ili tvrdih materijala, pričvrstite dršku 3-u-1 na posudu za prašinu („klik“).
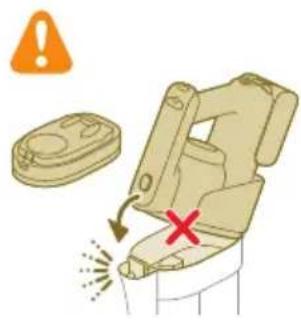
text_image
Safety warning illustration showing a device with warning symbol and red X mark indicating failure or hazardA Oprez: Nemojte pričvršćivati dršku 3-u-1 na posudu za prašinu ako u nju nije umetnuto kućište filtera.
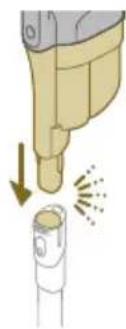
natural_image
Illustration of a mechanical device with a downward arrow and emitting sparks, next to a cylindrical component (no text or symbols)natural_image
Illustration of a vacuum cleaner emitting exhaust smoke from a cylindrical tube (no text or symbols)3 Umetnite cev u LED mlaznicu.

natural_image
Diagram of a door handle with a circular button labeled ①, showing no text or symbols beyond the number and an arrow pointing to the handle area.4 Za uključivanje uređaja pritisnite dugme za uključivanje/isključivanje sačekajte da uređaj bude spreman za upotrebu.

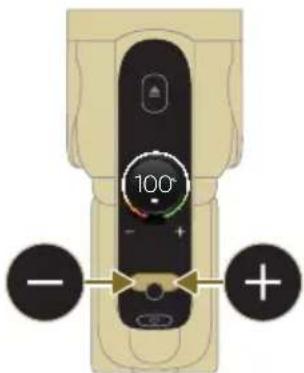
text_image
100° - +text_image
Illustration showing a person using a vacuum cleaner with warning symbols and a red 'X' indicating water release.Savet: LED diode u LED mlaznici olakšavaju uočavanje prljavštine na podu. Cev i LED mlaznica vam omogućavaju da dosegnete ispod niskog nameštaja bez potrebe da okrećete uređaj.
Upozorenje: Nemojte usisavati vodu niti neku drugu tečnost.
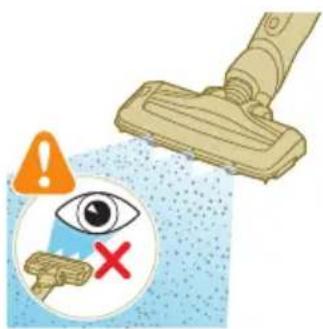
text_image
Safety warning illustration showing a spray nozzle spraying liquid with an eye and a red X mark indicating no protection.A Oprez: Nemojte gledati direktno u LED diode LED mlaznice niti usmeravati LED diode u nečije oči. LED svetlo je vrlo blještavo.
Upotreba cevi
natural_image
Illustration of a hand holding a handheld device above a white cabinet (no text or symbols)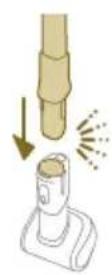

text_image
Diagram showing a hand operating a tool with warning symbols and a water droplet, indicating incorrect operation or damage.Dršku bez mlaznice i cevi možete koristiti za čišćenje malih mrlja od prašine i prljavštine, kao što su prosute mrvice hleba ili za usisavanje stepeništa i polica.
A Upozorenje: Nemojte usisavati vodu niti neku drugu tečnost.
natural_image
Diagram showing a hand holding a tool above a device with a flame symbol, no text or labels presenttext_image
Diagram illustrating a step in a medical procedure involving a tool and a foot, labeled with arrows and numbered steps.2 Za odvajanje LED mlaznice pritisnite dugme za otpuštanje (1) i izvucite cev ili dršku iz mlaznice (2).
Upozorenje: Nemojte usisavati vodu niti neku drugu tečnost.
Upotreba četke Mini Turbo

natural_image
Illustration of a mechanical device with a downward arrow and sparkles, no text or symbols present1 Da biste pričvrstili četku Mini Turbo, umetnite cev drške u četku Mini Turbo.

natural_image
Illustration of a handheld device with a circular inset showing a bed (no text or symbols)2 Četku Mini Turbo možete koristiti za standardno čišćenje, na primer, mekih površina poput kreveta i kauča. Postavku snage možete prilagoditi tako da odgovara vašim potrebama za čišćenje.

natural_image
Illustration of a hairdryer with a cat and dog nearby, showing powder and cleaning process (no text or symbols)3 Četku Mini Turbo možete koristiti za dodatno temeljno čišćenje, na primer za usisavanje dlaka kućnih ljubimaca ili za čišćenje malih mrlja prljavštine, poput prosutih mrvica hleba. Postavku snage možete prilagoditi tako da odgovara vašim potrebama za čišćenje.
800 Srpski
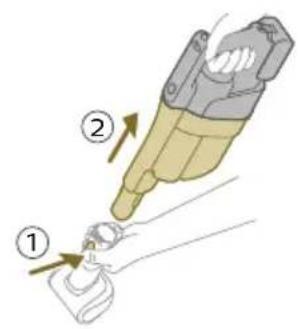
text_image
Diagram showing a hand holding a small object with two labeled steps (① and ②) indicating a procedure or step in a process.4 Za odvajanje četke Mini Turbo pritisnite dugme za otpuštanje (1) i izvucite dršku iz četke Mini Turbo (2).

natural_image
Illustration of a hand holding a device with a warning symbol and a red 'X' indicating failure or absence (no text or symbols present)Upozorenje: Nemojte usisavati vodu niti neku drugu tečnost.
Upotreba dugačkog nastavka za uske površine
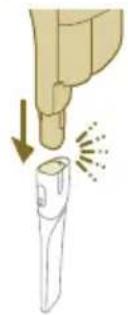
natural_image
Illustration of a hand holding a flashlight with a downward arrow and light effect (no text or symbols)1 Za pričvršćivanje dugačkog nastavka za uske površine umetnite u njega cev ili dršku.
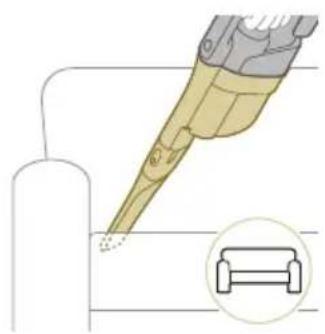
natural_image
Illustration of a medical or laboratory procedure showing a tool interacting with a cylindrical object and a separate diagram of a bench (no text or symbols present)2 Dugački nastavak za uske površine možete koristiti za čišćenje uskih uglova ili teško dostupnih mesta. Postavku snage možete prilagoditi tako da odgovara vašim potrebama za čišćenje.
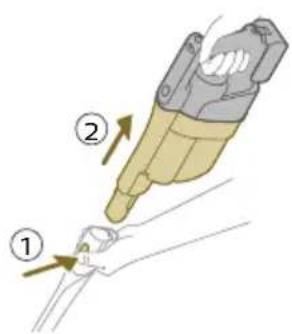
text_image
Diagram showing a tool interacting with a connector, labeled with parts 1 and 2.3 Za odvajanje dugačkog nastavka za uske površine pritisnite dugme za otpuštanje (1) i iz njega izvucite cev ili dršku (2).
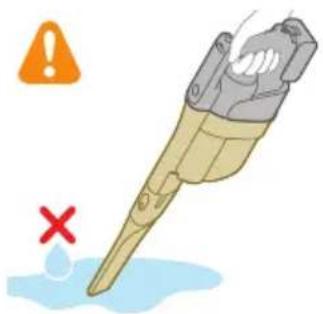
natural_image
Illustration of a mechanical tool with a red X mark and warning symbols (no text or labels)Upozorenje: Nemojte usisavati vodu niti neku drugu tečnost.
text_image
Diagram showing a vacuum cleaner's internal structure with labeled parts and directional arrows indicating assembly steps.1 Uređaj postavite u stanicu za postavljanje posle čišćenja i odlaganje u položaju za usisavanje i brisanje.
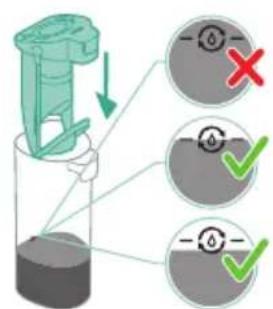
text_image
Diagram illustrating a mechanical or electrical setup with three circular indicators (✓, +, -) and a green downward arrow indicating direction.natural_image
Illustration of a hand pouring liquid into a cylindrical container with a green arrow indicating direction (no text or symbols)2 Pritisnite dugme da biste otključali i uklonili rezervoar za prljavu vodu.

flowchart
graph TD
    A["Step 1: Insert liquid"] --> B["Step 2: Insert liquid"]
    B --> C["Step 3: Insert liquid"]
    C --> D["Step 4: Insert liquid"]
    D --> E["Step 5: Insert liquid"]
    E --> F["Step 6: Insert liquid"]
natural_image
Simple line drawing of a bucket pouring liquid into a basin (no text or symbols)
text_image
MAX 50 °C
text_image
Diagram illustrating a process with checkmarks and a red X mark, showing steps to process liquid or container with directional arrows.
natural_image
Illustration of a hand holding a cylindrical device with a green arrow pointing to the handle (no text or symbols present)
text_image
MAX 35 °C MIN 5 °C8 Prospite sav preostali tečni deterdžent iz rezervoara za čistu vodu u sudoperu.
9 Napunite rezervoar za čistu vodu hladnom ili mlakom vodom iz slavine barem do oznake AUTOCLEAN.
A Oprez: Voda iz slavine koja se uliva u rezervoar za čistu vodu ne sme biti toplija od 50 °C.
A Oprez: Nemojte koristiti deterdžent za funkciju AUTOCLEAN jer bi to moglo dovesti do prekomernog stvaranja pene.
10 Vratite rezervoar za čistu vodu u uredaj.
11 Napunite aparat. Umetnite utikač za napajanje u utičnicu na zadnjoj strani uredaja. Zatim umetnite adapter u zidnu utičnicu.
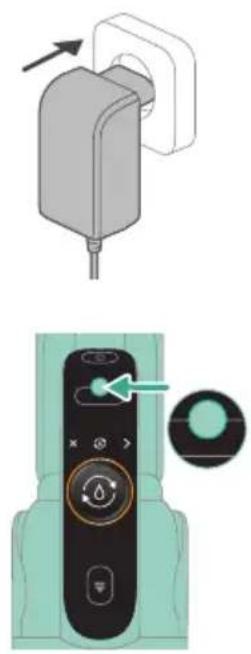
natural_image
Illustration of a remote control device with a handle and control panel (no text or symbols)
text_image
AUTOCLEAN 4 min
natural_image
Illustration of a hand using a tool to lift a cylindrical device with a black liquid, no text or symbols present
natural_image
Illustration of a green mechanical device with an upward arrow, no text or symbols present12 Da biste pokrenuli funkciju AUTOCLEAN pritisnite srednje dugme. Ako želite da isključite ekran crne boje, najpre pritisnite dugme za uključivanje/isključivanje da biste aktivirali ekran.
13 Uređaj obavlja ciklus AUTOCLEAN.
i Napomena: Ciklus Autoclean traje približno 4 minuta. Za najbolje rezultate, pustite da uređaj potpuno prođe kroz ciklus AUTOCLEAN. Ciklus AUTOCLEAN možete pauzirati ili otkazati u bilo kom trenutku.
natural_image
Simple line drawing of a pouring container into a stand (no text or symbols)16 Prospite vodu iz rezervoara za prljavu vodu u sudoperu.

natural_image
Illustration of a faucet pouring liquid into a water-filled container with swirling lines indicating flow (no text or symbols)natural_image
Illustration of a faucet releasing water into a green leafy container on a tiled floor (no text or symbols)18 Filter za mokro čišćenje operite pod mlazom vode iz slavine.
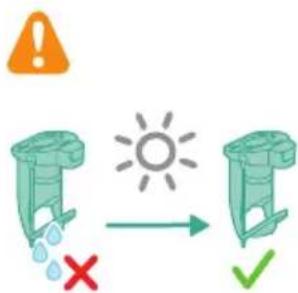
text_image
Safety warning illustration showing a sun symbol with water droplets and a checkmark, indicating environmental hazard.natural_image
Diagram of a mechanical device with a downward arrow indicating motion (no text or symbols)20 Vratite filter za mokro čišćenje u rezervoar za prljavu vodu.

natural_image
Illustration of a hand holding a green cylindrical device with a green arrow indicating motion (no text or symbols)text_image
Diagram showing a mechanical assembly with numbered parts and green directional arrows indicating motion or movement.22 Okrenite četke od mikrovlakana u smeru suprotnom od smera kretanja kazaljke na satu (1) i odvojite ih od mlaznice AquaSpin (2).
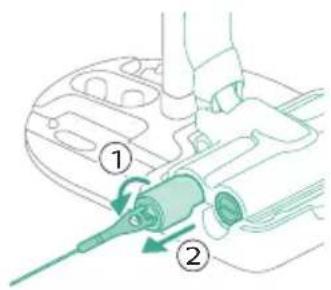
text_image
Diagram showing a hand holding a device with labeled parts, including numbered callouts ① and ②.Savet: U slučaju da je četku od mikrovlakana teško ukloniti, možete koristiti ručku četke za čišćenje da biste otključali četku od mikrovlakana.
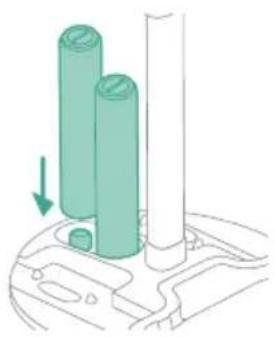
natural_image
Diagram showing two vertical cylindrical components with a downward arrow, mounted on a base (no text or symbols)23 Da biste omogućili da se četke od mikrovlakana osuše, stavite otvorene krajeve četki na predviđene držače stanice za postavljanje posle čišćenja i odlaganje.
i Napomena: Sušenje može trajati približno 24 sata.
natural_image
Technical line drawing of a mechanical component with an upward arrow indicating motion (no text or symbols)1 Uklonite posudu za posle čišćenja sa stanice za odlaganje.

natural_image
Illustration of a hand pouring liquid into a container with a blue flame (no text or symbols)text_image
Diagram showing a mechanical device with two labeled parts (① and ②) indicating directional movement or assembly.1 Okrenite četke od mikrovlakana u smeru suprotnom od smera kretanja kazaljke na satu (1) i odvojite ih od mlaznice AquaSpin (2).
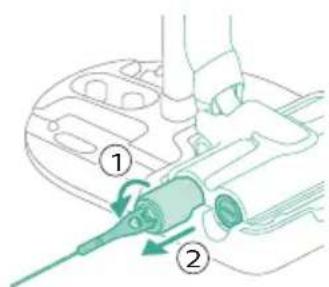
text_image
Diagram showing a hand holding a tool with labeled parts, including numbered callouts ① and ②.Savet: U slučaju da je četku od mikrovlakana teško ukloniti, možete koristiti ručku četke za čišćenje da biste otključali četku od mikrovlakana.
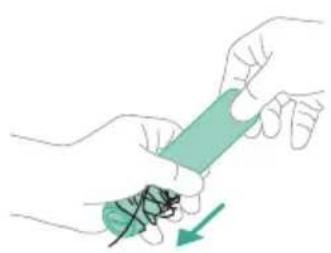
natural_image
Illustration of two hands holding a green object with a downward arrow, no text or symbols present2 Možete ukloniti zapetljane dlake ili niti sa četki od mikrovlakana klizanjem niz četke od mikrovlakana jednom rukom.

natural_image
Illustration of a hand holding a coiled green object, possibly a medical or mechanical component (no text or symbols)natural_image
Diagram of a syringe with directional arrows indicating motion (no text or labels)Ako je začepljen modul za mokro čišćenje, najpre isključite uređaj i uklonite mlaznicu AquaSpin i dršku 3-u-1. Zatim uklonite začepljenje pomeranjem četke za čišćenje u usisnom kanalu modula za mokro čišćenje gore-dole.
Čišćenje začepljenja iz mlaznice AquaSpin
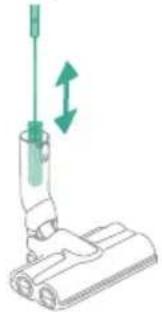
natural_image
Illustration of a vacuum cleaner with green arrows indicating motion direction (no text or symbols)Ako je zapušena mlaznica AquaSpin, to se može ukloniti pomeranjem četke za čišćenje gore-dole u usisnom kanalu mlaznice AquaSpin.
Čišćenje začepljenja sa traka za vlaženje mlaznice AquaSpin
Nakon duge i česte upotrebe uređaja, trake za vlaženje mlaznice AquaSpin mogu se u nekom trenutku zapušiti. Sledite korake u nastavku kako biste očistili začepljenje traka za vlaženje mlaznice AquaSpin.
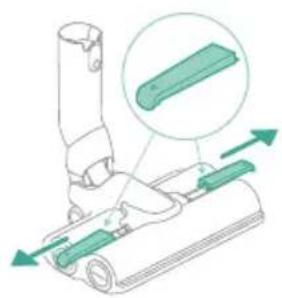
natural_image
Diagram of a robotic arm with green tool handle and green guide rails, showing mechanical assembly (no text or symbols)1 Uklonite poklopce traka za vlaženje sa mlaznice AquaSpin tako što ćete ih pomeriti u stranu.
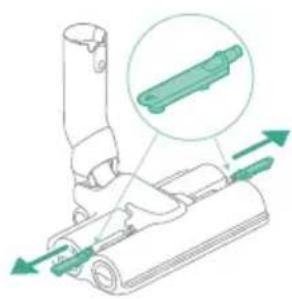
natural_image
Technical diagram of a mechanical assembly with green arrows indicating direction (no text or symbols)2 Uklonite trake za vlaženje sa mlaznice AquaSpin tako što ćete ih povući na stranu.
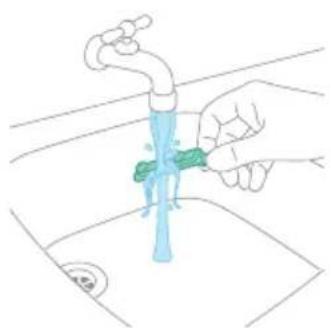
natural_image
Line drawing of a hand holding a blue faucet with a green handle, placed on a surface (no text or symbols)text_image
Weather symbol diagram showing sun, raindrops, and checkmark with red X and green checkmarkČišćenje uređaja u položaju samo za usisavanje
Pražnjenje posude za prašinu
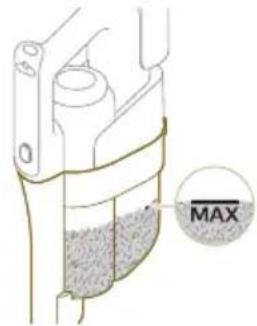
text_image
MAXRedovno praznite posudu za prašinu i pazite da prljavština nikada ne pređe oznaku „Max”. Time se sprečava ubrzano začepljenje filtera.

text_image
Technical diagram showing a mechanical component with labeled parts and directional arrows indicating motion or assembly.1 Pritisnite dugme za otpuštanje (1) kako biste oslobodili dršku 3-u-1 iz posude za prašinu, a zatim podignite sa uređaja (2) dršku 3-u-1.
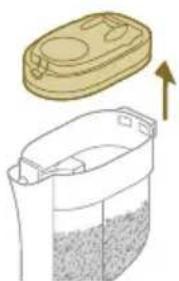
natural_image
Illustration of a container with liquid and an upward arrow, no text or symbols present2 Izvucite kućište filtera iz posude za prašinu.
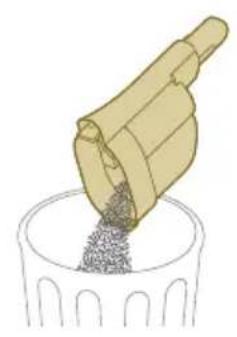
natural_image
Illustration of a hand pouring granular material into a cylindrical container (no text or symbols)3 Ispraznite posudu za prašinu u kantu za otpatke.
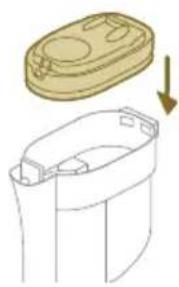
natural_image
Diagram showing a container with a lid and an arrow indicating downward motion (no text or symbols)4 Vratite kućište filtera u posudu za prašinu.
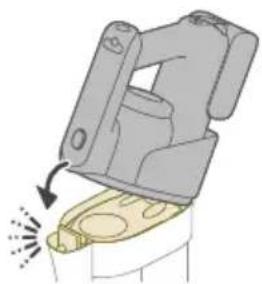
natural_image
Illustration of a mechanical device with a highlighted component and motion arrow (no text or symbols)5 Ponovo spojite dršku 3-u-1 na posudu za prašinu. Proverite da li ste prvo spojili zadnji deo, a zatim spojite prednji deo tako da nalegne na mesto uz zvuk klika.
Čišćenje posude za prašinu
1 Za čišćenje posude za prašinu i ciklonske komore uklonite kućište filtera.

natural_image
Illustration of a container with liquid and an upward arrow, no text or symbols present
natural_image
Illustration of a wooden tool pouring granular material into a cylindrical container (no text or symbols)2 Ispraznite posudu za prašinu u kantu za otpatke.
3 Izvadite i očistite ciklonsku komoru ako je neophodno (pogledajte 'Čišćenje ciklonske komore').
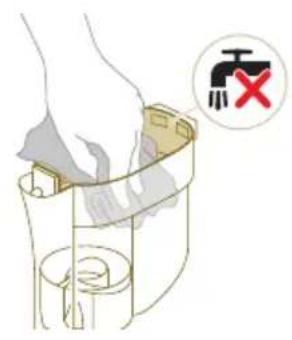
text_image
Diagram showing a hand holding a device with a warning symbol indicating no liability or failure.4 Ako želite, koristite mokru ili suvu krpu za čišćenje unutrašnjosti posude za prašinu.
i Napomena: elektronski konektori ne smeju da se pokvase. Ako se elektronski konektori pokvase, ostavite ih da se osuše pre ponovne upotrebe uređaja. Uvek koristite uredaj sa suvim elektronskim konektorima. Time se sprečava kvar uređaja tokom vremena.
text_image
Diagram illustrating a recycling bin with a water drop symbol and a downward arrow, indicating waste disposal or recycling.6 Ponovo spojite dršku 3-u-1 na posudu za prašinu.

natural_image
Diagram of a mechanical device with a highlighted component and motion arrow (no text or symbols)
text_image
Safety warning illustration showing a device with warning symbol and red X mark indicating failure or hazardA Oprez: Nemojte ponovo pričvršćivati dršku 3-u-1 na posudu za prašinu ako u njega nije umetnuto kućište filtera.
Čišćenje ciklonske komore

1 Okrenite ciklonsku komoru u smeru kretanja kazaljke na satu (1) i odvojite je od posude za prašinu (2).
2 Uklonite dlake i prljavštinu koja se zaglavila u ciklonskoj komori i ispod nje.
natural_image
Circular icon with a stylized white plug or connector symbol and an exclamation mark, set against a dark background (no text or symbols)Kada filter treba očistiti, na ekranu se pojavljuje ikona za čišćenje filtera.
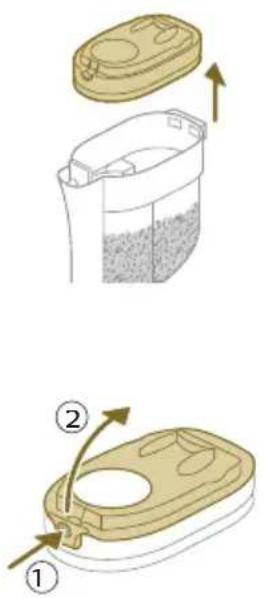
text_image
Diagram illustrating two steps of a food storage or packaging process, labeled ① and ②, showing step 1 with a lid and step ② with a container.1 Izvucite kućište filtera iz posude za prašinu.
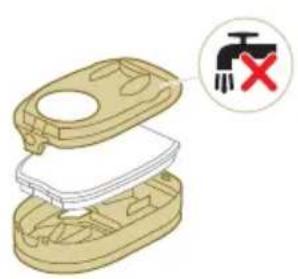
natural_image
3D diagram of a mechanical device with a magnified inset showing a switch symbol (no text or labels present)natural_image
Illustration of hands cleaning a trash bin with a water tap, showing the process (no text or symbols)3 Protresite penasti filter iznad kante za otpatke kako biste uklonili sloj prljavštine sa vrha filtera od pene. Zatim isperite filter od pene pod mlazom vode iz slavine.
4 Stisnite filter od pene da biste uklonili vodu.

natural_image
Illustration of a hand holding a small object with curved arrows indicating rotation or motion (no text or symbols)5 Protresite kućište filtera i poklopac iznad kante za otpatke da biste uklonili prašinu.

natural_image
Illustration of hands pouring liquid into a trash bin (no text or symbols)6 Očistite držač filtera vlažnom krpom.
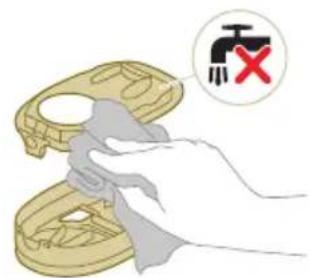
text_image
Illustration showing a hand using a tool to clean a device with a wrench and a red X symbol, indicating no text or symbols.text_image
Diagram showing a device with a water droplet symbol and red X, indicating a water droplet failure.7 Ostavite filter od pene da se osuši i pazite da bude potpuno suv pre nego što ga vratite u kućište filtera.

text_image
Diagram showing a device with a lid and two labeled boxes, one marked with red X and green checkmark, indicating selection or status.A Oprez: Proverite da li je filter od pene pravilno postavljen u kućište filtera.
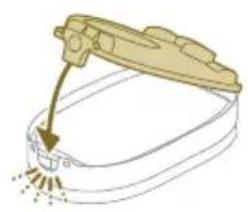
natural_image
Illustration of a hand tool interacting with a device, showing motion lines and no text or symbols8 Zatvorite kućište filtera.

natural_image
Diagram showing a container with a lid and a green checkmark indicating a drop, alongside an arrow pointing downward (no text or symbols)
natural_image
Diagram showing a container with a lid and a cross mark, alongside a separate outline of its interior (no text or symbols)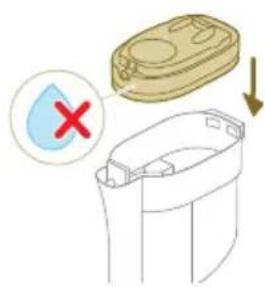
text_image
Diagram showing a container with a lid and a drop symbol, indicating a warning or rejection in the process.9 Vratite kućište filtera zajedno sa filterom od pene nazad u posudu za prašinu.
text_image
Safety warning illustration showing a device with warning symbol and red X mark indicating explosion or damagei Napomena: Očistite filter svakih 6 meseci kako biste osigurali maksimalne performanse. Filteri za zamenu su dostupni pod brojem dela XV1791 (pogledajte 'Zamena').
Čišćenje valjkaste četke
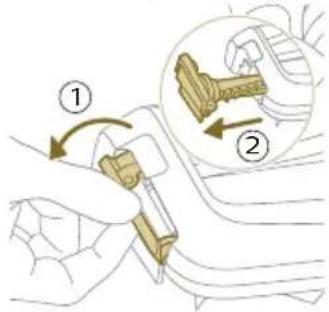
text_image
Diagram illustrating a mechanical or electrical component with labeled parts and directional arrows indicating motion or assembly.1 Povucite nadole polugu za zaključavanje na strani LED mlaznice (1) i izvucite valjkastu četku iz LED mlaznice (2). Možete ukloniti zapetljane dlake ili niti sa valjkaste četke klizanjem niz valjkastu četku jednom rukom.
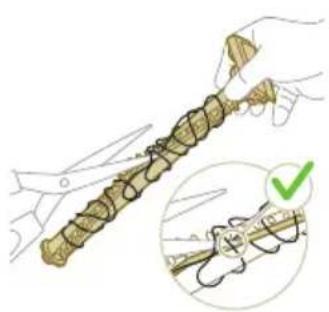
natural_image
Illustration of hands holding a coiled metal object with a green checkmark indicating inspection (no text or symbols present)text_image
Diagram illustrating a mechanical or electrical component being adjusted, labeled with parts 1 and 2.2 Gurnite valjkastu četku nazad u LED mlaznicu (1) i podignite polugu za zaključavanje kako biste zaključali valjkastu četku u LED mlaznicu („klik“).
text_image
Diagram of a device with labeled parts and directional arrows indicating movement or force1 Otključajte dugme za otpuštanje sa strane četke Mini Turbo (1) i izvucite valjkastu četku iz četke Mini Turbo (2).

natural_image
Illustration of hands tying a knot around a mechanical component (no text or symbols)2 Uklonite dlake i prljavštinu zapetljane oko valjkaste četke.
text_image
Diagram showing a mechanical device with labeled parts, including numbered callouts ① and ②.3 Pritisnite jednu stranu valjkaste četke natrag u četku Mini Turbo (1) i gurnite nadole drugu stranu valjkaste četke kako biste zaključali valjkastu četku u četku Mini Turbo („klik“).
4 Keskipainike (AUTOCLEAN)
5 Virtapainike
6 Paristo
7 3-in-1-rikkaimuri
8 Pölysäiliö
9 Seinäkiinnike
10 Putki
11 LED-suutin
12 Miniturboharja
13 Pitkä rakosuutin
14 Verkkolaite
15 Pistoke
16 Lisälaturi (vain XW9385)
natural_image
Diagram of a mechanical assembly with a vertical rod inserted into a housing (no text or symbols)natural_image
Diagram showing two mechanical components with directional arrows indicating movement or assembly (no text or symbols)natural_image
Illustration of a green tool with a curved arrow indicating motion or force, next to a vertical support structure (no text or symbols)natural_image
Mechanical component diagram showing a housing assembly with a separate clamped part (no text or symbols)natural_image
Illustration of a hand holding a spray gun with arrows indicating motion (no text or symbols)natural_image
Illustration of a spray gun dispensing liquid into a rubber roller (no text or symbols)text_image
Diagram showing a vacuum cleaner's internal structure with labeled parts and directional arrows indicating assembly or operation.natural_image
Illustration of a mechanical device with a highlighted component and motion arrow (no text or symbols)natural_image
Illustration of a medical or laboratory procedure showing a tool tip and a magnified view of a device with light reflections (no text or symbols)natural_image
Illustration of a hand holding a cylindrical object with an arrow indicating downward motion, next to a base device (no text or symbols)text_image
Diagram showing a mechanical assembly with labeled parts, including a lever and a base structure.natural_image
Diagram showing two mechanical assembly steps with arrows indicating direction (no text or symbols)text_image
Technical diagram showing mechanical assembly with labeled parts ① and ②, likely illustrating a gear or tool mechanism.Lataaminen

text_image
MAX 35 °C MIN 5 °C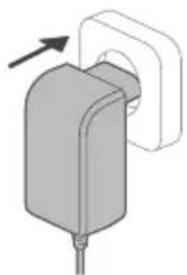
natural_image
Illustration of a plug with a cable and a wall socket, no text or symbols present
text_image
100%natural_image
Technical line drawing of a mechanical component with no visible text or symbols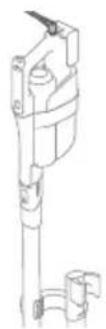
natural_image
Technical line drawing of a mechanical component with no visible text or symbolstext_image
100° A O +natural_image
Illustration of a mechanical device with a highlighted component and motion arrow (no text or symbols)text_image
Safety warning illustration showing a device with warning symbol and red X mark indicating failure or hazardnatural_image
Illustration of a mechanical device with a downward arrow and emitting sparks, next to a cylindrical component (no text or symbols)natural_image
Illustration of a vacuum cleaner emitting exhaust smoke from a cylindrical tube (no text or symbols)natural_image
Diagram of a door handle with a circular button labeled ①, showing no text or symbols beyond the number and an arrow pointing to the handle area.text_image
Safety warning illustration showing a person using a vacuum cleaner with water leakage, accompanied by an orange warning symbol and a red 'X' indicating no damage.text_image
Safety warning illustration showing a spray nozzle spraying liquid with an eye and a red X symbol indicating no protection.natural_image
Illustration of a hand holding a handheld device above a white cabinet (no text or symbols)

text_image
Diagram illustrating a hand using a tool to mark a defect or damage, with warning symbols and a red 'X' indicating failure.natural_image
Diagram showing a hand holding a tool above a device with a flame symbol, no text or labels presenttext_image
Diagram showing a hand holding a tool with labeled parts, including a finger and a base, with arrows indicating motion or force.natural_image
Illustration of a mechanical device with a downward arrow and sparkles, no text or symbols presentnatural_image
Illustration of a handheld device with a circular inset showing a bed (no text or symbols)natural_image
Illustration of a hairdryer with a cat and dog nearby, showing mechanical components and a close-up of the bed (no text or symbols)text_image
Diagram showing a hand holding a small object with two labeled steps (① and ②) indicating a process or procedure.natural_image
Illustration of a hand holding a device with a water droplet and a red X mark, no text or symbols present.natural_image
Illustration of a hand holding a flashlight with a downward arrow and light effect (no text or symbols)natural_image
Illustration of a dental implant tool interacting with a cylindrical device (no text or symbols present)text_image
Diagram showing a tool interacting with a cable, labeled with parts ① and ② indicating different states or functions.natural_image
Illustration of a mechanical tool with a red X mark and warning symbols (no text or labels)text_image
Diagram showing a vacuum cleaner's internal structure with labeled parts and directional arrows indicating assembly steps.text_image
Diagram illustrating a mechanical or electrical component with three circular indicators (✓, +, -) indicating inspection or status.natural_image
Illustration of a hand pouring liquid into a vertical cylindrical container with a green arrow indicating direction (no text or symbols)natural_image
Simple line drawing of a bucket pouring liquid into a basin (no text or symbols)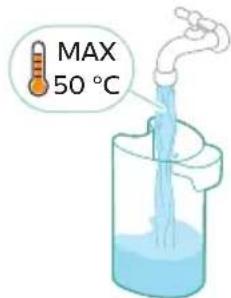
text_image
MAX 50 °C
text_image
Diagram illustrating a process with checkmarks and a red X mark, showing steps to process liquid or container with directional arrows.
natural_image
Illustration of a hand holding a cylindrical device with a green arrow pointing to it, no text or symbols present.
text_image
MAX 35 °C MIN 5 °Cnatural_image
Illustration of a remote control device with a handle and control panel (no text or symbols)natural_image
Illustration of a hand using a tool to lift a cylindrical device with a green handle (no text or symbols)natural_image
Illustration of a mechanical device with a green handle and upward arrow, no text or symbols presentnatural_image
Simple line drawing of a cup pouring liquid into a stand (no text or symbols)natural_image
Illustration of a faucet pouring liquid into a water-filled container with swirling lines indicating flow (no text or symbols)natural_image
Illustration of a faucet releasing water into a green leafy container on a tiled floor (no text or symbols)text_image
Diagram illustrating the process of a sun-drying system, showing water droplets and a checkmark with red and green symbols.
natural_image
Diagram of a mechanical component with a downward arrow indicating force or direction (no text or symbols present)natural_image
Illustration of a hand holding a green cylindrical device with a green arrow indicating direction (no text or symbols)text_image
Diagram showing a mechanical assembly with numbered parts and green directional arrows indicating motion or movement.text_image
Diagram showing a hand using a tool to adjust or install a component, labeled with parts ① and ②.natural_image
Diagram showing two vertical cylindrical components with a downward arrow, mounted on a base (no text or symbols)natural_image
Technical line drawing of a mechanical component with an arrow indicating direction (no text or symbols)natural_image
Illustration of a hand pouring liquid into a container with a blue flame (no text or symbols)text_image
Diagram showing a mechanical component with numbered parts and green arrows indicating motion or force direction.text_image
Diagram showing a hand holding a tool with two labeled parts (① and ②) indicating different components or states.natural_image
Illustration of two hands holding a green object with a black tool, showing a downward arrow (no text or symbols)natural_image
Illustration of two hands holding a coiled green object, no text or symbols presentnatural_image
Diagram of a mechanical component with directional arrows indicating motion or force (no text or symbols)natural_image
Illustration of a vacuum cleaner with green arrows indicating motion direction (no text or symbols)natural_image
Diagram of a mechanical device with green components and directional arrows indicating movement (no text or symbols)natural_image
Technical diagram of a mechanical assembly with green arrows indicating direction (no text or symbols)natural_image
Illustration of a hand holding a blue faucet with a green clip, placed on a surface (no text or symbols)text_image
Diagram illustrating sunlight interaction with water droplets and a checkmark, showing red X and green ✓ symbols.text_image
Technical diagram showing a mechanical component with labeled parts and directional arrows indicating motion or assembly.natural_image
Illustration of a container with liquid and an upward arrow, no text or symbols presentnatural_image
Illustration of a wooden tool pouring granular material into a container (no text or symbols)natural_image
Illustration of a container with a lid and a downward arrow indicating compression or disassembly (no text or symbols)natural_image
Diagram of a mechanical device with a highlighted component and directional arrow (no text or symbols)natural_image
Illustration of a container with liquid and an upward arrow, no text or symbols presentnatural_image
Illustration of a container with granular material being poured into a cylindrical container (no text or symbols)text_image
Diagram showing a hand holding a container with a warning symbol indicating no liability or failure.text_image
Diagram of a mechanical device with labeled parts and directional arrows indicating motion or movement.natural_image
Illustration of a hand pouring liquid into a container with a faucet (no text or symbols)text_image
Diagram illustrating sunlight and water droplets, showing a sun icon transforming into a droplet with water droplets and a checkmark.text_image
Diagram illustrating a device's internal components with numbered parts and directional arrows indicating rotation or assembly.text_image
Diagram showing two views of a device with green checkmarks indicating approval or rejection, alongside a magnified view of the device's internal components.natural_image
Circular icon with a stylized white figure and exclamation mark inside, set against a dark background (no text or symbols)natural_image
Illustration of a container with liquid and an upward arrow, no text or symbols presentnatural_image
Diagram of a mechanical component with labeled parts (1, 2), showing directional arrows and no readable text or symbols.
text_image
Diagram of a device with a switch symbol and red X mark indicating no change or errornatural_image
Illustration of a hand pouring liquid into a trash bin while another hand swashes down a faucet (no text or symbols)natural_image
Illustration of a hand holding a rectangular object with curved arrows indicating rotation or motion (no text or symbols)natural_image
Illustration of hands pouring liquid into a trash bin (no text or symbols)text_image
Illustration showing a hand using a tool to clean or repair a device, with a warning symbol indicating no error.text_image
Diagram showing a device with a water droplet symbol and red X mark indicating a failure or hazard.text_image
Diagram showing a device with a lid and two labeled parts, marked with red 'X' and green checkmarks.natural_image
Illustration of a hand holding a tool above a mechanical component (no text or symbols)8 Sulje suodatinkotelo.
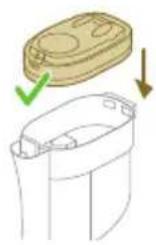
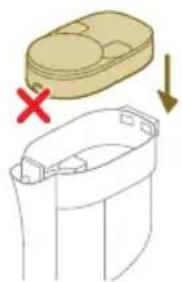
natural_image
Illustration of a container with a lid and a handle, showing a red X mark indicating a defect or failure (no text or symbols present)text_image
Diagram illustrating a water drop mechanism with labeled components and a red X mark indicating the defect or failure.text_image
Safety warning illustration showing a device with warning symbol and red X mark indicating explosion or damagetext_image
Diagram illustrating mechanical assembly steps with numbered instructions and magnified detail viewnatural_image
Illustration of hands tying a rope knot with scissors, showing a magnified inset (no text or symbols)text_image
Diagram illustrating a mechanical assembly or tool operation with labeled steps ① and ②, showing hand positioning and tool path.text_image
Diagram of a device with labeled parts and directional arrows indicating movement or forcenatural_image
Illustration of hands manipulating a mechanical component with a spring (no text or symbols)text_image
Diagram of a mechanical device with labeled parts and directional arrows indicating motion or assembly.natural_image
Circular icon with document and question mark, labeled E5 (no text or symbols beyond label)www.philips.com/myvacuum9000s.
Allmän beskrivning
4 Mittknapp (AUTOCLEAN)
5 På/av-knapp
6 Batteri
7 3-i-1-handdammsugare
8 Dammbehållare
9 Väggfäste
10 Rör
11 LED-munstycke
12 Miniturboborste
natural_image
Diagram of a mechanical assembly with a vertical rod inserted into a housing (no text or symbols)natural_image
Diagram showing two mechanical components with directional arrows indicating movement or assembly (no text or symbols)natural_image
Illustration of a green tool with a curved arrow indicating motion or force, next to a vertical support structure (no text or symbols)natural_image
Mechanical component diagram showing a housing assembly with a separate clamped part (no text or symbols)natural_image
Illustration of a hand holding a spray gun with arrows indicating motion (no text or symbols)natural_image
Illustration of a spray gun dispensing liquid into a rubber roller (no text or symbols)text_image
Diagram showing a vacuum cleaner's internal structure with labeled parts and directional arrows indicating assembly or operation.natural_image
Illustration of a mechanical device with a highlighted component and motion arrow (no text or symbols)natural_image
Illustration of a medical or laboratory procedure showing a tool tip and a magnified view of a device with light reflections (no text or symbols)natural_image
Illustration of a hand holding a cylindrical object with an arrow indicating downward motion, next to a base device (no text or symbols)text_image
Diagram showing a mechanical assembly with labeled parts, including a lever and pivot mechanism.natural_image
Diagram showing two mechanical assembly steps with arrows indicating direction (no text or symbols)text_image
Technical diagram showing mechanical assembly with labeled parts ① and ②, likely illustrating a gear or tool mechanism.Laddning

text_image
MAX 35 °C MIN 5 °C
natural_image
Illustration of a plug with a cable and a wall socket, no text or symbols present
text_image
100%natural_image
Technical line drawing of a mechanical component with no visible text or symbols
natural_image
Technical line drawing of a mechanical component with no visible text or symbolsnatural_image
Illustration of a mechanical device with a highlighted component and motion arrow (no text or symbols)text_image
Safety warning illustration showing a device with warning symbol and red X mark indicating failure or hazardnatural_image
Illustration of a mechanical device with a downward arrow and emitting sparks, next to a cylindrical component (no text or symbols)natural_image
Illustration of a vacuum cleaner emitting exhaust smoke from a cylindrical tube (no text or symbols)natural_image
Illustration of a hand holding a handheld device above a white cabinet (no text or symbols)

text_image
Diagram illustrating a hand operating a tool with warning symbols and a water droplet, indicating incorrect operation or damage.natural_image
Illustration of a hand holding a tool above a device with a flame symbol (no text or symbols present)text_image
Diagram illustrating a step in a medical procedure involving a tool and a foot, labeled with arrows and numbered steps.natural_image
Illustration of a mechanical device with a downward arrow and sparkles, no text or symbols presentnatural_image
Illustration of a handheld device with a circular inset showing a bed (no text or symbols)natural_image
Illustration of a hairdryer with a cat and dog nearby, showing mechanical components and a close-up of the bed (no text or symbols)text_image
Diagram showing a hand holding a tool with labeled parts, including step 1 and step 2.natural_image
Illustration of a mechanical device with water droplets and warning symbols (no text or labels)natural_image
Illustration of a dental implant tool interacting with a cylindrical device (no text or symbols present)text_image
Diagram showing a tool interacting with a wire, labeled with parts 1 and 2, indicating a process or procedure.natural_image
Illustration of a mechanical tool with a red X mark and warning symbols (no text or labels)text_image
Diagram showing a vacuum cleaner's internal structure with labeled parts and directional arrows indicating assembly steps.text_image
Diagram illustrating a mechanical or electrical setup with three circular indicators (✓, +, -) and a green downward arrow indicating direction.natural_image
Illustration of a hand pouring liquid into a cylindrical container with a green arrow indicating direction (no text or symbols)natural_image
Simple line drawing of a bucket pouring liquid into a container (no text or symbols)
text_image
MAX 50 °C
text_image
Diagram illustrating a process with three circular indicators (green check, red X) and arrows indicating direction of action or measurement.
natural_image
Illustration of a hand holding a green cylindrical device with an arrow indicating motion (no text or symbols)
text_image
MAX 35 °C MIN 5 °Cnatural_image
Illustration of a remote control device with a handle and control panel (no text or symbols)
text_image
AUTOCLEAN 4 min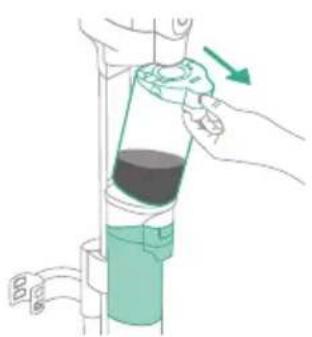
natural_image
Illustration of a hand using a tool to lift a cylindrical device (no text or symbols visible)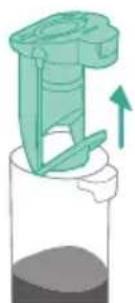
natural_image
Illustration of a green mechanical device with an upward arrow, no text or symbols presentnatural_image
Simple line drawing of a pouring cup over a surface, no text or symbols presentnatural_image
Illustration of a faucet pouring liquid into a container with swirling lines indicating flow (no text or symbols)natural_image
Illustration of a faucet releasing water into a basin with a leaf cover (no text or symbols)text_image
Diagram illustrating the process of a sun-drying system, showing water drop and checkmark with red X and green checkmark.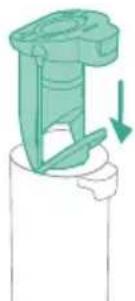
natural_image
Illustration of a mechanical component with a downward arrow indicating motion (no text or symbols)natural_image
Illustration of a hand holding a green cylindrical device with a green arrow indicating direction (no text or symbols)text_image
Diagram showing a mechanical assembly with numbered parts and green directional arrows indicating motion or movement.text_image
Diagram showing a hand using a tool to adjust or install a component, labeled with parts ① and ②.natural_image
Diagram showing two vertical cylindrical components with a downward arrow, mounted on a base (no text or symbols)natural_image
Technical line drawing of a mechanical component with an arrow indicating direction (no text or symbols)natural_image
Illustration of a hand pouring liquid into a container with a blue flame (no text or symbols)text_image
Diagram showing a mechanical component with numbered parts and green arrows indicating motion or force direction.text_image
Diagram showing a hand holding a tool with two labeled parts (① and ②) indicating different components or states.natural_image
Illustration of two hands holding a green object with a downward arrow indicating motion (no text or symbols)natural_image
Illustration of a hand holding a coiled green object, no text or symbols presentnatural_image
Diagram of a mechanical device with directional arrows indicating motion or force (no text or symbols)natural_image
Illustration of a vacuum cleaner with green arrows indicating motion direction (no text or symbols)text_image
Technical diagram showing a mechanical component with labeled parts and directional arrows indicating motion or assembly.natural_image
Illustration of a container with liquid and an upward arrow, no text or symbols presentnatural_image
Illustration of a wooden tool pouring granular material into a container (no text or symbols)natural_image
Illustration of a container with liquid and an open lid, showing a 3D view (no text or symbols)natural_image
Illustration of a wooden tool pouring granular material into a cylindrical container (no text or symbols)text_image
Diagram showing a hand using a tool to clean or store items, with a warning symbol indicating no need.text_image
Diagram of a mechanical device with labeled parts and directional arrows indicating motion or movement.natural_image
Illustration of a hand pouring liquid into a bottle with a faucet (no text or symbols)text_image
Diagram illustrating sunlight and water droplets, showing a sun icon transforming into a droplet with water droplets and a checkmark.text_image
Diagram illustrating a device's internal components with numbered parts and directional arrows indicating rotation or assembly.text_image
Diagram showing two views of a device with green checkmarks indicating approval or rejection, alongside a magnified view of the device's internal components.natural_image
Circular icon with a stylized white figure and exclamation mark inside, set against a dark background (no text or symbols)natural_image
Illustration of a container with liquid and an upward arrow, no text or symbols presenttext_image
Diagram of a device component with numbered parts and directional arrows indicating flow or movement.
text_image
Diagram of a device with a switch symbol and red X mark indicating no change or errornatural_image
Illustration of a hand pouring liquid into a trash bin while another hand swashes it, separated by a diagonal line (no text or symbols)natural_image
Illustration of a hand holding a rectangular object with curved arrows indicating rotation or motion (no text or symbols)natural_image
Illustration of hands pouring liquid into a trash bin (no text or symbols)text_image
Illustration showing a hand using a tool to clean or repair a mechanical component, with a red 'X' symbol indicating no text.text_image
Diagram showing a device with a water droplet and a red X mark indicating a failure or absence.
text_image
Diagram showing a device with a lid and two labeled parts, marked with red 'X' and green checkmarks.natural_image
Diagram of a dental implant or dental implant device with a tool inserted into a jaw (no text or symbols present)natural_image
Illustration of a container with a lid and a green checkmark indicating selection, alongside a smaller outline (no text or symbols)
natural_image
Diagram showing a container with a lid and a handle, marked with red X and downward arrows (no text or symbols)text_image
Diagram illustrating a water drop symbol and its impact on a plastic container with a red X mark indicating the water level.text_image
Safety warning illustration showing a device with warning symbol and red X mark indicating failure or hazardtext_image
Diagram illustrating a mechanical device with labeled parts and directional arrows, showing component positioning.natural_image
Illustration of hands holding a coiled cable with a green checkmark indicating inspection (no text or symbols present)text_image
Diagram illustrating a mechanical or electrical component being inserted into a device, labeled with parts ① and ②.natural_image
Circular icon with a house silhouette and exclamation mark, labeled 'E3' below (no text or symbols on the icon itself)natural_image
Circular icon with battery symbol and question mark, labeled E5 (no text or symbols beyond label)natural_image
Circular icon with a stylized tool and refresh symbol, no text or numbers presentnatural_image
Icon of a footset with a circular arrow and refresh symbol, no text or numbers presentnatural_image
Diagram of a mechanical assembly with a vertical rod inserted into a base component (no text or symbols)natural_image
Diagram showing two mechanical assembly states with arrows indicating direction of movement (no text or symbols)natural_image
Illustration of a green tool with a curved arrow indicating motion or force, mounted on a vertical support structure (no text or symbols)natural_image
Mechanical component diagram showing a housing assembly with a clamped bracket (no text or symbols)natural_image
Illustration of a mechanical device with arrows indicating motion or force direction (no text or symbols)natural_image
Illustration of a mechanical device with a downward arrow and green emission lines, no text or symbols present.text_image
Diagram showing a vacuum cleaner's internal structure with labeled parts and directional arrows indicating assembly steps.natural_image
Diagram of a mechanical device with a highlighted component and motion arrow (no text or symbols)natural_image
Illustration of a medical or laboratory procedure showing a tool tip and a magnified view of a device with light reflections (no text or symbols)natural_image
Illustration of a vacuum cleaner emitting exhaust smoke from a cylindrical pipe (no text or symbols)text_image
Diagram showing a mechanical assembly with labeled parts, including a lever and pivot mechanism.natural_image
Diagram showing two mechanical assembly steps with arrows indicating direction (no text or symbols)text_image
Technical diagram showing mechanical assembly with labeled parts ① and ②, likely illustrating a gear or tool mechanism.Şarj etme
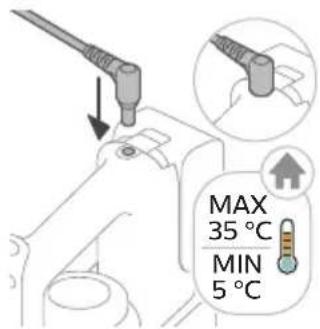
text_image
MAX 35 °C MIN 5 °C
natural_image
Illustration of a plug with a cable and a wall socket, no text or symbols present
text_image
100%natural_image
Technical line drawing of a mechanical component with no visible text or symbols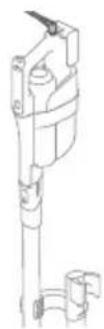
natural_image
Line drawing of a mechanical component with a tool inserted (no text or symbols)natural_image
Illustration of a mechanical device with a highlighted component and motion arrow (no text or symbols)text_image
Safety warning illustration showing a device with warning symbol and red X mark indicating failure or hazardnatural_image
Illustration of a mechanical device with a downward arrow and emitting sparks, next to a cylindrical component (no text or symbols)natural_image
Illustration of a vacuum cleaner emitting exhaust smoke from a cylindrical component (no text or symbols)natural_image
Illustration of a hand holding a handheld device above a white cabinet (no text or symbols)

text_image
Diagram showing a hand using a tool to mark a defect or damage, with an orange warning symbol and a red 'X' indicating failure.natural_image
Illustration of a vacuum cleaner emitting exhaust smoke from a cylindrical component (no text or symbols)text_image
Diagram illustrating a step in a medical procedure involving a tool and a foot, labeled with arrows and numbered steps.natural_image
Illustration of a mechanical device with a circular inset showing a bed (no text or symbols)natural_image
Illustration of a hairdryer with a cat and dog nearby, showing spray effect (no text or symbols)text_image
Diagram showing a hand holding a tool with labeled parts, including step 1 and step 2.natural_image
Illustration of a mechanical device with water droplets and warning symbols (no text or labels)natural_image
Illustration of a dental implant tool interacting with a cylindrical device (no text or symbols present)text_image
Diagram showing a tool interacting with a wire, labeled with parts 1 and 2, indicating a process or procedure.natural_image
Illustration of a mechanical tool with a red X mark and warning symbols (no text or labels)text_image
Diagram showing a robotic arm with labeled parts and directional arrows indicating motion or assembly steps.text_image
Diagram illustrating a mechanical device with three circular indicators (red, green, black) and checkmarks indicating failure or completion.natural_image
Illustration of a hand pouring liquid into a vertical pipe with a green container, no text or symbols presentnatural_image
Simple line drawing of a bucket pouring liquid into a container (no text or symbols)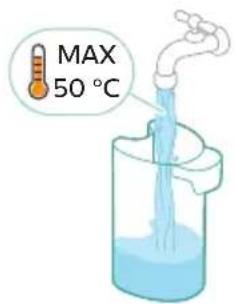
text_image
MAX 50 °C
text_image
Diagram illustrating a process with three circular indicators (green check, red X) and arrows indicating direction of action or measurement.
natural_image
Illustration of a hand holding a green cylindrical device with an arrow indicating motion (no text or symbols)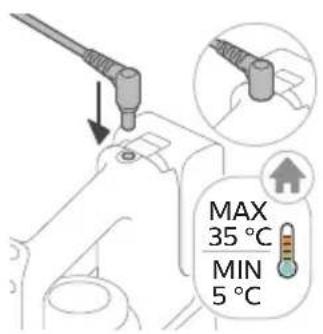
text_image
MAX 35 °C MIN 5 °Cnatural_image
Illustration of a remote control device with a handle and control panel (no text or symbols)
text_image
AUTOCLEAN 4 min
natural_image
Illustration of a hand pouring liquid into a vertical pipe with a green arrow indicating direction (no text or symbols)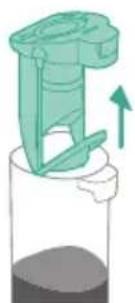
natural_image
Illustration of a green mechanical device with an upward arrow, no text or symbols presentnatural_image
Simple line drawing of a pouring cup into a stand, no text or symbols presentnatural_image
Illustration of a faucet pouring liquid into a container with motion lines indicating flow (no text or symbols)natural_image
Illustration of a faucet with a green leaf-shaped container inserted into the drain, placed on a tiled floor (no text or symbols)text_image
Safety warning illustration showing water drop and sun symbol with checkmark indicating failurenatural_image
Illustration of a mechanical component with a downward arrow indicating force or direction (no text or symbols)natural_image
Illustration of a hand holding a green cylindrical device with a green arrow indicating direction (no text or symbols)text_image
Diagram showing a mechanical assembly with numbered parts and green directional arrows indicating motion or movement.text_image
Diagram showing a hand using a tool to adjust or install a component, labeled with parts ① and ②.natural_image
Diagram showing three vertical cylindrical components with a downward arrow, mounted on a base (no text or symbols)natural_image
Technical line drawing of a mechanical component with an arrow indicating direction (no text or symbols)natural_image
Illustration of a hand pouring liquid into a container with a blue flame (no text or symbols)text_image
Diagram showing a mechanical device with two labeled parts (① and ②) indicating directional movement or assembly.text_image
Diagram showing a hand holding a tool with labeled parts, including numbered callouts ① and ②.natural_image
Illustration of two hands holding a green object with a downward arrow indicating a change or motion (no text or symbols)natural_image
Illustration of a hand holding a coiled green object, no text or symbols presentnatural_image
Diagram of a syringe with directional arrows indicating motion (no text or labels)natural_image
Diagram of a vacuum cleaner with green directional arrows indicating motion (no text or symbols)natural_image
Diagram of a robotic arm with green tool pins and directional arrows indicating movement (no text or symbols)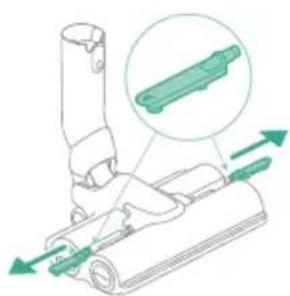
natural_image
Diagram of a mechanical device with green arrows indicating motion or force direction (no text or symbols)natural_image
Line drawing of a hand using a green tool to clean or wash a blue water tap (no text or symbols)text_image
Warning Sun X ✓text_image
Technical diagram showing a mechanical component with labeled parts and directional arrows indicating motion or assembly.natural_image
Illustration of a container with liquid and an upward arrow, no text or symbols presentnatural_image
Illustration of a hand pouring granular material into a trash bin (no text or symbols)natural_image
Diagram showing a container with a lid and an arrow indicating downward motion (no text or symbols)natural_image
Illustration of a mechanical device with a highlighted component and motion arrow (no text or symbols)natural_image
Illustration of a container with liquid and an upward arrow, no text or symbols presentnatural_image
Illustration of a wooden tool pouring granular material into a cylindrical container (no text or symbols)text_image
Diagram showing a hand holding a container with a warning symbol indicating no liability or failure.text_image
Diagram illustrating a water drop mechanism with labeled components and a red X mark indicating the failure point.natural_image
Diagram of a mechanical device with a highlighted component and directional arrow (no text or symbols)
text_image
Safety warning illustration showing a device with warning symbol and red X mark indicating failure or hazardtext_image
Diagram of a mechanical device with labeled parts and directional arrows indicating motion or movement.natural_image
Illustration of a hand pouring liquid into a container with a faucet, no text or symbols presenttext_image
Diagram illustrating sunlight interaction with water droplets, showing red X and green checkmarktext_image
Diagram illustrating a device's internal components with numbered parts and directional arrows indicating motion or assembly.
text_image
Diagram showing a device with green checkmark indicators and two labeled cross-sectional views of a container.natural_image
Circular icon with a stylized white badge and exclamation mark, set against a dark background (no text or symbols)text_image
Diagram showing a device with a switch and a red X symbol indicating no change or error
natural_image
Illustration of hands cleaning a trash bin with a water tap, showing the process (no text or symbols)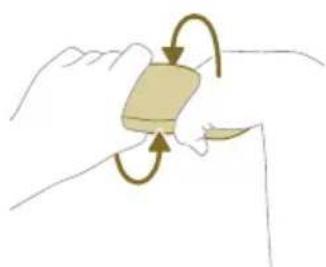
natural_image
Illustration of a hand holding a small object with curved arrows indicating rotation or motion (no text or symbols)natural_image
Illustration of hands removing a plastic bag into a trash bin (no text or symbols)text_image
Illustration showing a hand cleaning a small mechanical component with a warning symbol indicating no text or symbols.text_image
Diagram showing a device with a water droplet and a red X mark indicating a failure or absence.text_image
Diagram showing a device with checkmarks and a red X mark indicating failure or rejection, alongside a separate view of a container with a plus sign.natural_image
Illustration of a hand tool interacting with a device (no text or symbols visible)natural_image
Diagram showing a container with a lid and a cross mark, alongside a separate outline of its interior (no text or symbols)
text_image
Diagram showing a container with a lid and a drop labeled with red X, alongside a hand-drawn illustration of a container with a handle.text_image
Safety warning illustration showing a toilet with warning symbol and red X mark indicating explosion or damagetext_image
Diagram illustrating a mechanical device with labeled parts and directional arrows, showing step 1 and step 2 of motion.natural_image
Illustration of hands holding a coiled plant stem with scissors, accompanied by a magnified inset showing a green checkmark (no text or symbols)text_image
Diagram illustrating a mechanical or electrical process with labeled steps ① and ②, showing hand positioning and component insertion.text_image
Diagram of a device with labeled parts and directional arrows indicating movement or forcenatural_image
Illustration of a hand holding a tool with a curved line and directional arrow, no text or symbols presenttext_image
Diagram of a mechanical device with numbered components and directional arrows indicating motion or assembly.natural_image
Circular icon with a house silhouette and exclamation mark, labeled 'E3' below (no text or symbols on the icon itself)natural_image
Circular icon with a battery symbol and a question mark, labeled 'E5' below (no text or symbols on the icon itself)natural_image
Circular icon with a stylized tool and refresh symbol, no text or numbers presentnatural_image
Circular icon with a stylized white hand-painted object and circular arrow, no text or symbols present.natural_image
Technical line drawing of a mechanical assembly with a vertical rod inserted into a housing (no text or symbols)natural_image
Diagram showing two mechanical assembly steps with arrows indicating direction (no text or symbols)natural_image
Diagram of a green tool inserted into a mechanical bracket with a green arrow indicating direction (no text or symbols)natural_image
Illustration of a mechanical component with a separate piece attached (no text or symbols visible)natural_image
Illustration of a mechanical device with arrows indicating motion or force direction (no text or symbols)natural_image
Illustration of a mechanical device with a downward arrow and sparkles, no text or symbols presenttext_image
Diagram showing a vacuum cleaner's internal structure with labeled parts and directional arrows indicating assembly steps.natural_image
Illustration of a mechanical device with a highlighted component and motion arrow (no text or symbols)natural_image
Illustration of a mechanical device emitting exhaust smoke from a cylindrical component (no text or symbols)natural_image
Illustration of a vacuum cleaner emitting exhaust smoke from a cylindrical component (no text or symbols)text_image
Diagram showing a mechanical device with labeled parts, including a lever and adjustment mechanism.text_image
Technical diagram showing mechanical assembly steps with labeled components and directional arrowsnatural_image
Illustration of a plug with an arrow indicating direction (no text or symbols)natural_image
Technical line drawing of a mechanical component with no visible text or symbolsnatural_image
Technical line drawing of a mechanical component or assembly (no text or symbols)natural_image
Illustration of a hand holding a small device with arrows indicating motion or force (no text or symbols)natural_image
Illustration of a hand holding a cylindrical object with a downward arrow, next to a rolled-up sheet (no text or symbols)natural_image
Illustration of a hand holding a green cylindrical device with a downward arrow indicating motion (no text or symbols)text_image
XV1792 10ml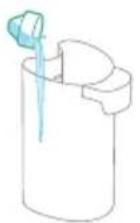
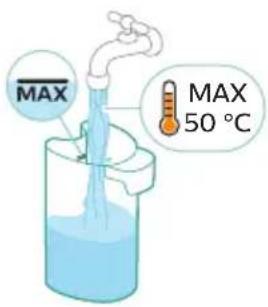
text_image
MAX MAX 50 °C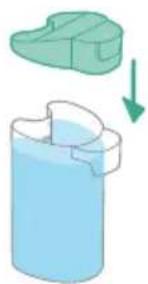
natural_image
Illustration of a green plastic container with a downward arrow indicating flow or change (no text or symbols)
natural_image
Illustration of a hand holding a green cylindrical device with an arrow indicating motion (no text or symbols)natural_image
Close-up of a black door handle with a circular button labeled ①, no text or symbols present.text_image
Illustration showing three-step safety warning: disassembly of a device into a device, removing it with a red X mark, and using a tool to prevent damage.natural_image
Illustration of a handheld device mounted on a cabinet, with no visible text or symbols.text_image
Diagram illustrating a hand operating a tool with warning symbols and a water droplet, indicating incorrect operation or damage.natural_image
Illustration of a vacuum cleaner emitting exhaust smoke from a cylindrical component (no text or symbols)text_image
Diagram illustrating a step in a medical procedure involving a tool and a foot, labeled with arrows and numbered steps.natural_image
Illustration of a mechanical device with a circular inset showing a bed (no text or symbols)natural_image
Illustration of a hand using a handheld tool to clean or store items, with a cat and dog nearby (no text or symbols)text_image
Diagram showing a hand holding a small object with two labeled steps (① and ②) indicating a procedure or step in a process.natural_image
Illustration of a handheld device with water droplets and warning symbols (no text or labels)natural_image
Illustration of a hand holding a flashlight with a downward arrow and light effect (no text or symbols)natural_image
Illustration of a medical or laboratory procedure showing a tool interacting with a cylindrical object and a separate diagram of a bench (no text or symbols present)text_image
Diagram showing a tool interacting with a cable, labeled with parts 1 and 2 indicating different states or functions.natural_image
Illustration of a mechanical tool with a red 'X' indicating failure or damage, no text or symbols presenttext_image
Diagram showing a robotic arm with labeled parts and directional arrows indicating motion or assembly steps.text_image
Diagram illustrating a mechanical or electrical component with three circular indicators (red, gray, green) and checkmarks indicating selection or confirmation steps.natural_image
Illustration of a hand pouring liquid into a vertical tube with a green arrow indicating direction (no text or symbols)natural_image
Simple line drawing of a bucket pouring liquid into a container (no text or symbols)
text_image
MAX 50 °C
text_image
Diagram illustrating a process with three checkmarks and a red X mark, showing steps to process liquid or container.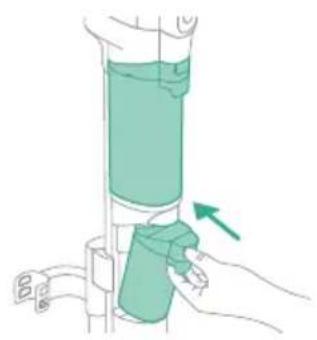
natural_image
Illustration of a hand holding a green cylindrical device with an arrow indicating motion (no text or symbols)
text_image
MAX 35 °C MIN 5 °Cnatural_image
Illustration of a remote control device with a switch and control panel (no text or symbols)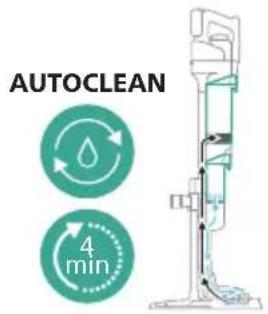
text_image
AUTOCLEAN 4 min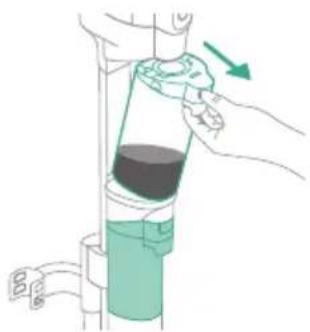
natural_image
Illustration of a hand holding a bottle with a green arrow indicating direction (no text or symbols)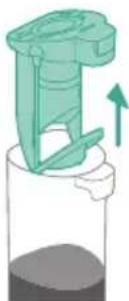
natural_image
Illustration of a mechanical device with a green handle and upward arrow, no text or symbols presentnatural_image
Simple line drawing of a pouring container with a base, no text or symbols presentnatural_image
Illustration of a faucet pouring liquid into a container with swirling lines indicating flow (no text or symbols)natural_image
Illustration of a faucet releasing water into a basin with a leaf cover (no text or symbols)text_image
Diagram illustrating the process of a sun-drying system, showing water drop and checkmark with red X and green checkmark.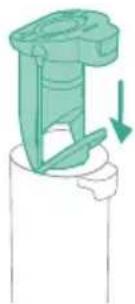
natural_image
Diagram of a mechanical component with a downward arrow indicating force or direction (no text or symbols)natural_image
Illustration of a hand holding a green cylindrical device with a blue handle, mounted on a vertical pipe (no text or symbols)text_image
Diagram showing a mechanical assembly with numbered components and directional arrows indicating motion or force directions.text_image
Diagram showing a hand holding a tool with labeled parts, including numbered callouts ① and ②.natural_image
Diagram showing three vertical cylindrical components with a downward arrow, mounted on a base (no text or symbols)natural_image
Technical line drawing of a mechanical component with an arrow indicating direction (no text or symbols)natural_image
Illustration of a hand holding a pipe flowing through a container with blue liquid, no text or symbols presenttext_image
Diagram showing a mechanical component with numbered parts and green arrows indicating motion or flow direction.text_image
Diagram showing a hand using a tool to adjust or install a component, labeled with parts ① and ②.natural_image
Illustration of two hands holding a green object with a black tool, showing a downward arrow (no text or symbols)natural_image
Illustration of a hand holding a coiled green object, no text or symbols presentnatural_image
Diagram of a syringe with directional arrows indicating motion (no text or labels)natural_image
Diagram of a vacuum cleaner with green directional arrows indicating motion (no text or symbols)natural_image
Diagram of a mechanical device with green components and directional arrows indicating movement (no text or symbols)natural_image
Diagram of a mechanical device with green arrows indicating movement or force direction (no text or symbols)natural_image
Illustration of a hand holding a blue faucet with a green handle, placed on a surface (no text or symbols)text_image
Warning Sun X ✓text_image
Technical diagram showing a mechanical component with labeled parts and directional arrows indicating motion or assembly.natural_image
Illustration of a container with liquid and an upward arrow, no text or symbols presentnatural_image
Illustration of a hand pouring granular material into a cylindrical container (no text or symbols)natural_image
Diagram showing a container with a lid and an arrow indicating downward motion (no text or symbols)natural_image
Illustration of a mechanical device with a highlighted lever and sparkles, no text or symbols presentnatural_image
Illustration of a container with liquid and an upward arrow, no text or symbols presentnatural_image
Illustration of a wooden tool pouring granular material into a cylindrical container (no text or symbols)text_image
Diagram showing a hand holding a device with a warning symbol indicating no protection or disapproval.text_image
Diagram illustrating a water drop symbol and its impact on a container with a downward arrow, accompanied by a red 'X' indicating the water level.natural_image
Mechanical assembly diagram showing a clamping mechanism with an arrow indicating motion (no text or symbols present)
text_image
Safety warning illustration showing a toilet with warning symbols and a red X mark indicating hazard or failure.text_image
Diagram illustrating a mechanical device with labeled parts and a hand holding a tool, showing step-by-step assembly.text_image
Diagram of a device with labeled parts showing a rotating knob and a base with heat emission, likely illustrating a mechanical or electrical process.text_image
Diagram showing a device with green checkmark indicators and two labeled circular components with red X and green checkmarks.natural_image
Circular icon with a stylized white plug or connector symbol and an exclamation mark, set against a dark background (no text or symbols)text_image
Diagram illustrating two steps of a food storage or cleaning process, labeled ① and ②, showing step ① with a container and step ② with a lid.natural_image
3D diagram of a mechanical device with a switch symbol and red X mark (no text or labels)natural_image
Illustration of a hand pouring liquid into a trash bin while another hand swashes it, separated by a diagonal line (no text or symbols)natural_image
Illustration of a hand holding a small object with curved arrows indicating rotation or motion (no text or symbols)natural_image
Illustration of hands pouring liquid into a trash bin (no text or symbols)text_image
Illustration showing a hand cleaning a device with a valve symbol and red X mark indicating no change or error.text_image
Diagram showing a device with a water droplet symbol and red X, indicating a water droplet failure.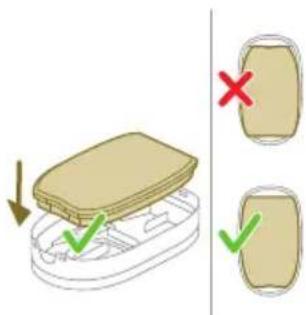
text_image
Diagram showing a device with a lid and two labeled parts, marked with green checkmarks and red X.natural_image
Illustration of a dental implant or dental implant device with a tool inserted into a cup (no text or symbols present)text_image
Diagram showing a container with a lid and a cross mark indicating failure, alongside a schematic diagram of the container with arrows.