Band 360 - Bluetooth speaker GRUNDIG - Free user manual and instructions
Find the device manual for free Band 360 GRUNDIG in PDF.

| Product Type | Bluetooth Portable Speaker |
| Brand | Grundig |
| Model | Band 360 |
| Dimensions (L x W x H) | 105 x 105 x 215 mm |
| Net Weight | 0.8 kg |
| Power Supply | Integrated lithium-ion battery 3.7 V, 6000 mAh (22.2 Wh) |
| Charging | USB-C (5 V, 2 A) |
| Charging Time | Approximately 4 to 5 hours |
| Battery Life | Up to 19 hours (at 50% volume) |
| Output Power | 12 W RMS (3% distortion) |
| Frequency Response | 80 Hz – 20 kHz |
| Bluetooth | Version 5.3, range 20 m (open space) |
| Radio Modes | DAB/DAB+, FM (30 presets each) |
| Water Resistance | IPX5 (splash resistant) |
| Powerbank Function | Yes, output 5 V / 1 A |
| Connectivity | 3.5 mm auxiliary input, USB-C |
| Display | OLED screen |
| Additional Functions | Synchronized clock, TWS (wireless stereo pairing of two speakers), alarm clock |
| Included Accessories | USB-C cable |
| Maintenance | Clean with a soft dry cloth, do not use abrasive products |
| Safety | Do not open, do not immerse, keep out of reach of children, use only indoors |
| Repairability | No user-repairable parts; integrated battery not replaceable |
Frequently Asked Questions - Band 360 GRUNDIG
User questions about Band 360 GRUNDIG
0 question about this device. Answer the ones you know or ask your own.
Ask a new question about this device
Download the instructions for your Bluetooth speaker in PDF format for free! Find your manual Band 360 - GRUNDIG and take your electronic device back in hand. On this page are published all the documents necessary for the use of your device. Band 360 by GRUNDIG.
USER MANUAL Band 360 GRUNDIG
natural_image
Black musical note symbol on white background (no text or numbers)Band 360
DE - EN - ES - FR
| DEUTSCH | 4-33 |
| ENGLISH | 34-57 |
| ESPAÑOL | 58-82 |
| FRANÇAIS | 83-109 |
natural_image
Line drawing of a portable refrigerator with a handle and front panel (no text or symbols)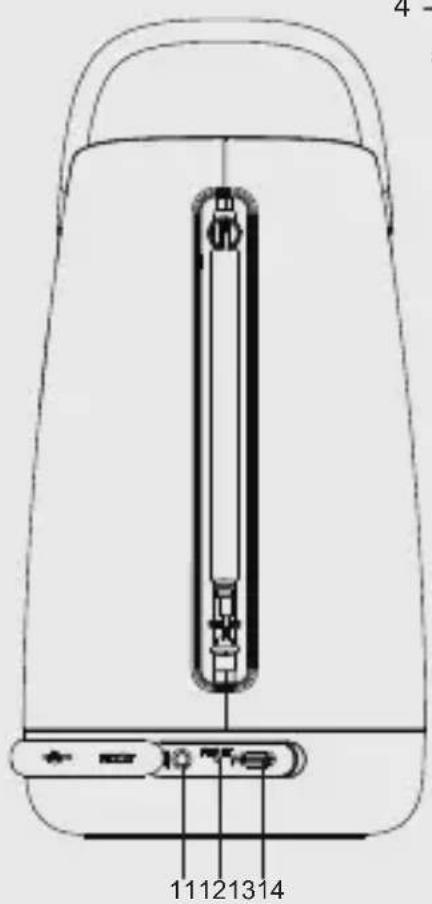

natural_image
Simple line drawing of a U-shaped cable with two USB connectors (no text or symbols)natural_image
Symbol of a trash bin with crossed lines indicating no waste or discharge, and a solid black rectangle below (no text or labels)natural_image
Recycling symbol with three chasing arrows forming a triangle (no text or labels)natural_image
Simple line drawing of a trash bin with crossed lines indicating no waste or prohibition (no text or symbols)| 1. Number key 1-5 | •Short press 1(2,3,4,5), your favorite stations will play if it was saved as preset.•Long press 1(2,3,4,5) to preset stations, screen will show preset stored. |
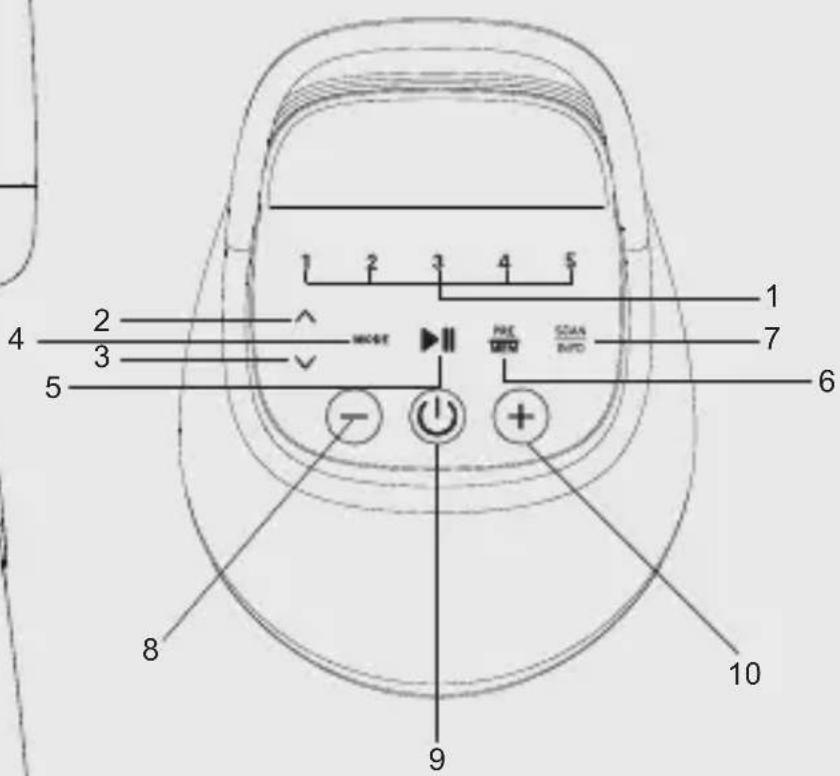
| 2. Next (^) | •Skip to next song by short press in BT mode•Short press for 0.05MHz frequency change, and long press will scan to available station in FM mode•Short press to show station list and skip to next station in DAB mode |
| 3. Previous (√) | •Skip to previous song by short press in BT mode•Short press for 0.05MHz frequency change, and long press will scan to available station in FM mode•Short press to show station list and skip to previous station in DAB mode |
| 4. MODE | •Short press to switch the source (DAB+ / FM / BT / AUX)•Long press to enter manual time setting (hour/ minute/day/month/year),short press “^” or “√” to choose correct time,short press ▶to confirm |
| 5. Play/Pause - ▶II | •Play or Pause the playback by short press in BT mode•Disconnect BT by long press in BT mode•Mute by short press in DAB/ FM and AUX mode |
| 6. Preset and memoryPRE MEM | •Short press to see the preset recall list, short press “^” or “√” to choose station which you want and press ▶tb confirm. 30 FM and 30 DAB stored stations can be choose.•Long press to see the presto store list, short press “^” or “√” to choose station number which you want and press ▶tb confirm. 30 FM and 30 DAB stations can be stored. |
| 7. SCAN/INFO | • Long press to scan all available DAB/FM stations•Short press to see the station information in DAB/FM mode•Long press 3s to enter TWS in BT mode |
| 8. Vol (-) Decreases volume on speaker by short press | |
| 9. Power - ⏻ | Power On/off product by short press |
| 10. Vol (+) Increases volume on speaker by short press | |
| 11. AUX IN For audio input | |
| 12. Reset Button Factory reset | |
| 13. DC out/DC in (Type C USB) | USB-C Charging DC in 5.0 V =2.0 APower Bank DC out 5.0 V =1.0 A |
| 14. USB-C Cable | |
natural_image
Three-step diagram of a portable water heater with handle and lever mechanism (no text or symbols)USB-Buchse: Power Bank DC out 5.0 V =1.0 A
Wasserdicht IPX5
Please read this user manual first!
Dear Valued Customer,
Thank you for preferring this Grundig appliance. We hope that you get the best results from your appliance which has been manufactured with high quality and state-of-the-art technology. For this reason, please read this entire user manual and all other accompanying documents carefully before using the appliance and keep it as a reference for future use. If you handover the appliance to someone else, give the user manual as well. Follow the instructions by paying attention to all the information and warnings in the user manual.
Remember that this user manual may also apply to other models. Differences between models are explicitly described in the manual.
Meanings of the Symbols
Following symbols are used in various sections of this user manual:

Important information and useful hints about usage.

WARNING: Warnings against dangerous situations concerning the security of life and property.
Please note the following instructions:
Before using this product, read and follow all warnings and instructions.
•This product is not intended for use by young children. Young children should be properly supervised.
- This product is intended for household use only and not for commercial or industrial use.
- No naked flame sources, such as lighted candles, should be placed on the product.
- Ventilation should not be impeded by covering ventilation openings with items such as newspapers,
table cloths, curtains and the like.
- Make sure the unit is adjusted to a stable position. Damage caused by using this product in an uns-table position or by failure to follow any other warning or precaution contained within this user manual will not be covered by warranty.
•The device has waterproof design of IPX5 and can be used in a gentle water jets environment, but do not let the device partially or fully submerged into the water. If the liquid is spilled into the surface of the device, please immediately shut down the device.
- Do not place objects filled with
liquids,such as vases on or near the product.
- Do not use or store this product in a place where it is subject to direct sunlight, heat, excessive dust or vibration.
- Do not block or cover the slots and holes in the product.
- Do not push foreign objects into the slots or holes in the product.
- Do not attempt to open this product yourself. There are no user serviceable parts inside.
- Do not allow children access to plastic bags.

Build-in Rechargeable Battery CAUTION:
- Risk of explosion if the battery is replaced by an incorrect type.
- Disposal of a battery into fire or a hot oven, or mechanically crushing or cutting of a battery, that can result in an explosion.
•Leaving a battery in an extremely high temperature surrounding environment that can result in an explosion or the leakage of flammable liquid or gas.
•A battery subjected to extremely low air pressure that may result in an explosion or the leakage of flammable liquid or gas.
Compliance with WEEE Directive and Disposing of Waste Product:
This product complies with EU WEEE Directive (2012/19/EU). This product bears a classification symbol for waste electrical and electronic equipment (WEEE).
natural_image
Simple line drawing of a trash bin with no text or symbolsThis symbol indicates that this product shall not be disposed with other household wastes at the end of its service life. Used device must be returned to official collection point for recycling of electrical and electronic devices. To find these collection systems please contact to your local authorities or retailer where the product was purchased. Each household performs important role in recovering and recycling of old appliance. Appropriate disposal of used appliance helps prevent potential negative consequences for the environment and human health.
Compliance with RoHS Directive
The product you have purchased complies with EU RoHS Directive (2011/65/EU). It does not contain harmful and prohibited materials specified in the Directive.
Package Information

natural_image
Recycling symbol icon (three chasing arrows) inside a square frame, no text or labels present.Packaging materials of the product are manufactured from recyclable materials in accordance with our National Environment Regulations. Do not dispose of the packaging materials together with the domestic or other wastes. Take them to the packaging material collection points designated by the local authorities.
Information on Waste Batteries

natural_image
Symbol of a trash bin with crossed lines indicating no waste or restriction (no text or labels)This symbol on rechargeable batteries/batteries or on the packaging indicates that the rechargeable battery/battery may not be disposed of with regular house hold rubbish. For certain rechargeable batteries/batteries, this symbol may be supplemented by a chemical symbol. Symbols for mercury (Hg) or lead (Pb) are provided if the rechargeable batteries/batteries contain more than 0,0005 % mercury or more than 0,004 % lead.
Rechargeable batteries/batteries, including those which do not contain heavy metal, may not be disposed of with household waste. Always dispose of used batteries in accordance with local environmental regulations. Make enquiries about the applicable disposal regulations where you live.
Controls and Parts
Grundig Band 360
| 1. Number key 1-5 | •Short press 1(2,3,4,5), your favorite stations will play if it was saved as preset.•Long press 1(2,3,4,5) to preset stations, screen will show preset stored. |
| 2. Next (^) | •Skip to next song by short press in BT mode•Short press for 0.05MHz frequency change, and long press will scan to available station in FM mode•Short press to show station list and skip to next station in DAB mode |
| 3. Previous (√) | •Skip to previous song by short press in BT mode•Short press for 0.05MHz frequency change, and long press will scan to available station in FM mode•Short press to show station list and skip to previous station in DAB mode |
| 4. MODE | •Short press to switch the source (DAB+ / FM / BT / AUX)•Long press to enter manual time setting (hour/ minute/day/month/year),short press “^” or “√” to choose correct time,short press ▶to confirm |
| 5. Play/Pause - ▶II | •Play or Pause the playback by short press in BT mode•Disconnect BT by long press in BT mode•Mute by short press in DAB/ FM and AUX mode |
| 6. Preset and memoryPRE MEM | ·Short press to see the preset recall list, short press “^” or “√” to choose station which you want and press ▶tb confirm. 30 FM and 30 DAB stored stations can be choose.·Long press to see the presto store list, short press “^” or “√” to choose station number which you want and press ▶tb confirm. 30 FM and 30 DAB stations can be stored. |
| 7. SCAN/INFO | ·Long press to scan all available DAB/FM stations·Short press to see the station information in DAB/FM mode·Long press 3s to enter TWS in BT mode |
| 8. Vol (-) Decreases volume on speaker by short press | |
| 9. Power - ⏻ | Power On/off product by short press |
| 10. Vol (+) Increases volume on speaker by short press | |
| 11. AUX IN For audio input | |
| 12. Reset Button Factory reset | |
| 13. DC out/DC in (Type C USB) | USB-C Charging DC in 5.0 V =2.0 APower Bank DC out 5.0 V =1.0 A |
| 14. USB-C Cable | |
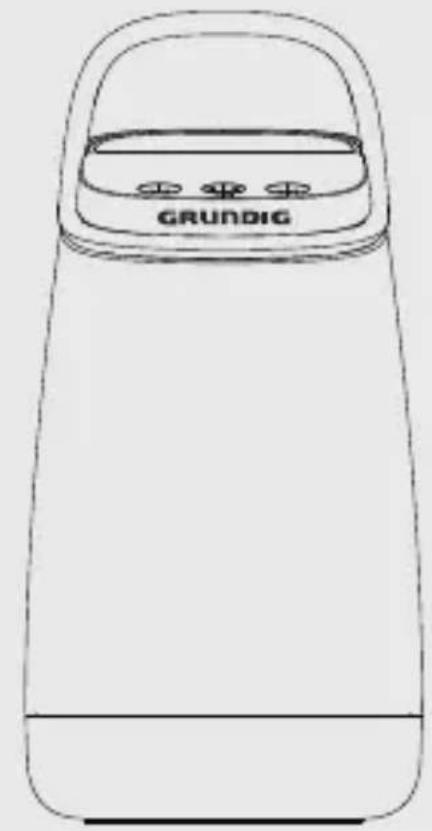
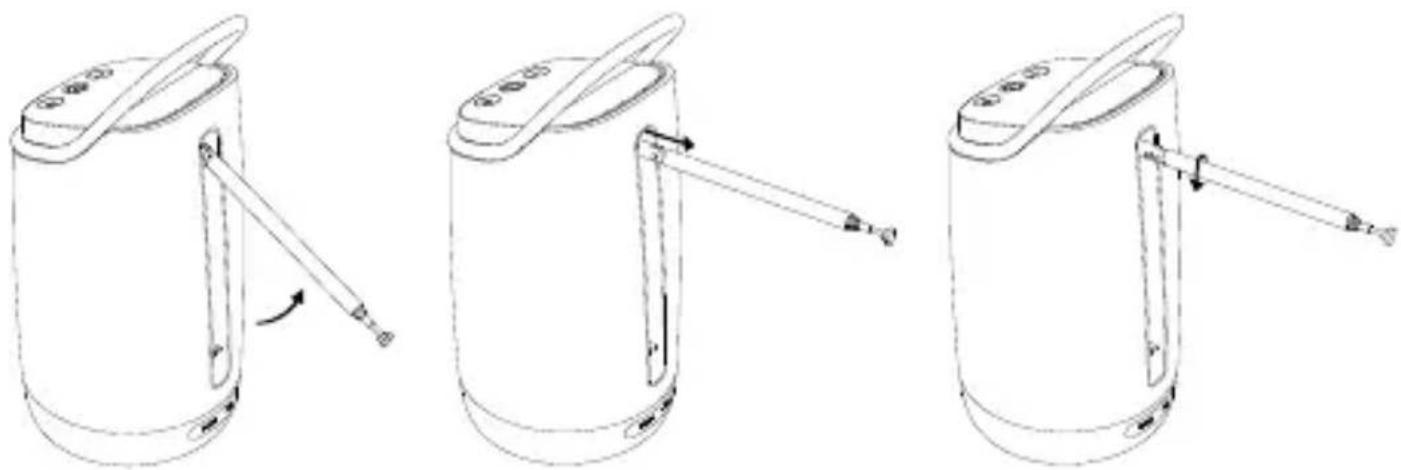
ADJUSTING / FIXING THE TELESCOPIC ANTENNA \_\_\_\_
The number and quality of broadcast stations depends on the reception conditions at the location of the device as well as the radio antenna. Optimum reception can be achieved with the telescopic antenna when it fixed and placed at the right position.
- To improve the DAB/FM reception, pull up the hidden part (Figure 1)
- Extend the telescopic antenna to the full length.(Figure 2)
- Alter the telescopic antenna position according your thoughts. (Figure 3)
natural_image
Three-step diagram of a portable water heater with handle and lever mechanism (no text or symbols)Figure 1 Figure 2 Figure 3
- When the reception is still not better after extending the antenna, move the radio to another position/room.
- Bad weather conditions may influence the reception.
This speaker has an internal non-user-replaceable battery. For best results, the first time you use this speaker, let it charge for 2-3 hours.
For maintain the battery life and performance, if speaker isn't used for a while, the battery might need to be recharged. Charge the battery at least once every month.
If you charge the battery while listening to the radio, there may be noise interference in the radio.
Use the Type-C Socket
Use your own adaptor (not include in the box) and Type C cable to charge the speaker with DC in (Type-C) socket. Then the battery charging icon is displayed in the upper right corner of the screen. The charging icon will become full when the battery is fully charged.
Type-C USB Power output
Before use the power output function, please make sure that the speaker's internal battery is full charged, or it's recommended to make sure it has enough power, about 50 \~ 75% or more, to charge the external device.
To charge your mobile device:
- Plug the Type-C USB cable in the speaker's type-C socket and connect the other end of USB cable to the external device. The device's charge output function will turn on automatically and provide 5.0 V = 1.0 A rated power to the external device.
- After fully charge the external device, please remove the USB cable, the charge output supply will be cut off accordingly within 1 minute.

- The Power Bank function may not be activated if the battery level is lower than 25% even you try to turn on the power bank's charge output function.
- If the power bank function is not automatically turned on, please short press the ⏻ button to activate the power bank function.
- When charging external device, please make sure that the external device can support the Type-C interface protocol, otherwise it may not support the power bank function.
POWER ON/OFF AND STANDBY MODE \_\_
- Short press the ⏻ button or charge this device to power on. It will automatically go to your last used mode.(Device will go into Standby mode when the device is charging)
- Short press the ⏻button again to power off the device.(Device will go into Standby mode when the device is charging)
- In power off, OLED display is turned off and Time will be disappeared. but time can be synced automatically via DAB or FM-RDS station in next power on. In Standby(charging or power supply by adapter), Time is memorized.
MODE SWITCHING
You can switch mode between BT/FM/DAB and Auxiliary Input by short press the "MODE" button.
TIME SETTING
Long press “MODE” to enter manual time setting (hour/minute/day/month/year), short press “^” or “√” to choose correct time, short press ▶to confirm.
BLUETOOTH OPERATION
For best Bluetooth performance, make sure your Bluetooth device and your speaker are in open area and within 20m. Keep other wireless equipment at least 1 m away from your speaker.
Select BT mode
- Short press the ⏻ button or charge this device to power on.
- Short press the “MODE” button to switch to BT mode. The device will automatically find and pair the last paired device within 5 seconds, if this device cannot find any paired devices, it will automatically enter search mode. The screen will show: “BT searching”.
Connecting Bluetooth devices
- After select BT mode, enable the Bluetooth function on your mobile device and search for new Bluetooth devices. Select the device name "Grundig Band 360".
- Wait for a few seconds and you will see the connected message in your mobile device. (For some Bluetooth devices, you may
BLUETOOTH OPERATION
need to input "0000" as pairing password).Display shows: "BT connected"
- Then, you can start to music play by the music player program from the mobile device.

- The Bluetooth range is 20m (open area), it will also be disconnected when your device is moved beyond the operational range.
- In Bluetooth mode, if no external Bluetooth device is connected or no operation activity, this device will automatically power off.(Screen will display full battery icon).
Music play
- In Bluetooth mode, when playing music, press ▶ button to pause the music. To resume the music, press it again.
- Press once the “+” button to increase the volume level.
-
Press once the “-” button to decrease the volume level.
-
Press and hold the “^” button to go to next music.
- Press and hold the “√” button to go to previous music.

Set the external device's volume to maximum, then use the volume button on the Band 360 as main volume.
Auto-Re-connect/disconnect with Paired devices and new Paring
- Short press the "MODE" button to switch to BT mode.
- It will firstly search for the mobile device which has been paired
BLUETOOTH OPERATION
previously. The device will re-connect the last connected mobile device as priority if that one is in Bluetooth search mode.
- If you want to disconnect with the paired mobile device and start a new paring, long press the ▶ button to disconnect the Bluetooth connection directly. The device will enter Bluetooth pairing mode.
- Now you can process for new mobile device pair. (refer to Connecting Bluetooth devices)
TWS MODE
- Short press the ⏻ button or charge this device to power on.
- Short press the “MODE” button to switch to BT mode. The device will automatically find and pair the last paired device within 5 seconds, if this device cannot find any paired devices, it will automatically enter search mode. The screen will show: “BT searching”.
- Long press “SCAN/INFO” button, it will automatically enter the TWS connection state, when the connection is successful, the display screen of the two devices will display “Bluetooth TWS”, and the device will automatically connect after turning it off and on.
- In TWS Mode, Long press "SCAN/INFO" button to disconnect the TWS connection, and long press the "SCAN/INFO" button again to reconnect to the previously TWS device.
- When there two Bluetooth speakers are connected. The first Bluetooth speaker will become master speaker. The second Bluetooth Speaker will become slave speaker.
Power on and enter FM mode
- Short press the ⏻ button or charge this device to power on.
- Short press the "MODE" button to switch to FM mode.
Adjust the Volume
- Press once the "+" button to increase the volume level.
- Press once the “-” button to decrease the volume level.
- Short press the button to Muted/Restore playback.
Adjust the frequency
Short press the “^” or “√” button to fine tune FM frequency (Each short press will adjust 0.05MHz of the FM frequency; Long press
the “^” or “√” button to auto-search and tune-/+ FM frequency until found a FM station
Auto scanning
- Press and hold the “SCAN/INFO” button. Then the screen will display: “scanning...” and automatically scans for available FM stations.
- When you use the auto scan function, all next setting of preset recall and preset store will be deleted.
- After you use the auto scan function, all available radio stations will be stored in order from P1 to P30.
- You will automatically enter the station that first searched, then you can switch FM station by press the “^” button and the “√” button.
Preset store
- Press and hold the "PRE/MEM" button to call preset store.
- Short press the “^” button and “√” button to select store location (P1 to P30) and short press the ▶b store the station to the predetermined location.

If there is already a FM station stored in the preset you have selected, the new station will replace it.
Preset recall
- Short press the "PRE/MEM" button to call preset recall. You will find your stored stations here (P1 to P30).
- Short press the “^” button and “√” button to select the station that you like to listen. Short press the ▶button to confirm the selection.

You need to make sure the predetermined location have saved a FM station before use the preset recall function, if not screen will display e. g. "<1: (empty) >".
- Short press one of the “1, 2, 3, 4, or 5” Shortcut button to directly access the FM stations that stored in presets memory;
- Long press one of the "1, 2, 3, 4, or 5" Shortcut button to directly store the current FM stations;

When short press the “Shortcut button (3)” and the “Shortcut button (3)” not saved FM station, the screen will display “Preset Empty”.
Displaying FM station information
Short press the „SCAN/INFO“ button to switch the current FM station information display on the screen, then you will see “Radio Text/Information from the provider (e. g. the title of the song, the e-mail address)/station name/ Stereo/mono”.
DAB RADIO
Power on and enter DAB mode
- Short press the ⏻ button or charge this device to power on.
- Short press the "MODE" button to switch to DAB mode.
Adjust the Volume
- Short press the “+” button to turn up the volume. Long press the “+” button to continuously turn up the volume.
- Short press the “-” button to turn down the volume. Long press the “-” button to continuously turn down the volume.
- Short press the ▶ button to Muted/Restore playback.
Switch the DAB station
- Short press the “^” button to switch to next station.
- Short press the “√” button to switch to previous station.
Auto scanning
- Press and hold the “SCAN/INFO” button, then the screen will display: “Scanning...” and automatically scans for available DAB stations.
- After the automatic station search, all available radio stations are update on the list.
- You will automatically enter the station that first searched, then you can switch DAB station by press the “^” button and “√” button.

Update the list will not clean the next setting of preset recall and preset store.
Preset store
- Press and hold the "PRE/MEM" button to call preset store.
- Short press the “^” button and “√” button to select store location (P1 to P30) and short press the ▶button to store the station to the predetermined location.

If there is already a DAB station stored in the predetermined location, the new station will replace it.
Preset recall
- Short press the "PRE/MEM" button to call preset recall. You will find your stored stations here (P1 to P30).
- Short press the “^” button and “√” button to select the station that you like to listen. Short press the ▶button to confirm the selection.

You need to make sure the predetermined location have saved a DAB station before use the preset recall function, if not screen will display e. g. "<1: (empty) >".
Shortcut button
- Short press one of the "1, 2, 3, 4, or 5" Shortcut button to directly access the DAB stations that stored in presets memory;
- Long press one of the "1, 2, 3, 4, or 5" Shortcut button to directly store the current DAB stations;

When short press the "1, 2, 3, 4, or 5" Shortcut button and the Shortcut button(1)" not saved DAB station, the screen will display "Preset Empty".
Displaying DAB station information
Short press the „SCAN/INFO“ button to switch the current DAB station information display on the screen, then you will see “Information from the provider (e. g. the title of the song, the e-mail address)/signal strength/genre/station name (e.g.BR Bayern)/current channel and frequency/Signal error:/bit rate”
AUX IN MUSIC PLAYBACK
- Short press the ⏻ button or charge this device to power on.
- Short press the "MODE" button to switch to Auxiliary Input mode.
- Connect the device' "Aux in hole" with your mobile device through line in cable.
- Now, you can start to music play from the mobile device by its music player program.
- Short press the ▶ button to Muted/Restore playback.
- Pull out the line in cable from the device to end this using.
RESET THE DEVICE
In some circumstances the device's function may hanging and need to reset. To reset the speaker:
- Use a 0.8 \~ 1 mm stick or similar object and carefully insert into the "Reset" hole. The device is reset, and it will turn off automatically.
- After that, short press the “💡” button turn on the speaker.

Do not reset the device if it is properly working.
TECHNICAL INFORMATION
Technical Information
This device is noise-suppressed according to the applicable EU directives. This product fulfils the European directives 2014/53/EU and 2011/65/EU.
You can find the CE declaration of conformity for the device in the form of a pdf file on the Grundig Homepage www.grundig.com/downloads/doc.
The type plate is located on the underside of the device.
Output Power
RMS 12 W, 3% THD
Bluetooth
Frequency Range 2.402 GHz-2.480GHz
Maximum transmitted power <6 dBm
Version 5.3
Open area operation range: 20m (BT) / 15m (TWS)
DAB/DAB+
Tuning range: 174.928MHz-239.200MHz
Preset memory: 30 stations
FM
Tuning range: 87.5MHz-108MHz
Preset memory: 30 stations
Rechargeable Li-ion Battery
Build in, 3.7 V = 6000 mAh, 22.2 Wh
Playback time: 19+ hours (50% volume)
TECHNICAL INFORMATION
Charge time: 4-5 hours
Power Supply
USB Socket: USB-C Charging DC in 5.0 V =2.0 A
USB Socket: Power Bank DC out 5.0 V =1.0 A
Waterproof IPX5
AUX IN
Stereo 3.5 mm Jack
Frequency Response 80Hz-20kHz
Product Dimensions/Weight
Technical and design modifications are reserved.
TROUBLESHOOTING
If a fault occurs, first see whether you can resolve the problem yourself. You might find this overview useful.

Risk of injury: Opening the device can cause injuries.
| Fault Possible cause/Action | |
| No function | ·If the device has been disrupted by a thunderstorm, a static charge or another external factor, follow this procedure to resolve the problem: Power off this device and power on it again 10 seconds later. If it still doesn't work, try pressing the RESET button to restore the factory settings and then turn it on again.·Disconnect the adapter and then plug it in again. |
| No sound | ·The volume may be set too low or in mute mode.·In Bluetooth mode: Set the volume of the external device to the maximum and then control the volume by using the "+" button. |
| No / DAB radio reception | ·If necessary, select another location to improve the radio signal.·Adjust the telescopic antenna to optimize the radio reception. |
| No Bluetooth connection | ·Take care to ensure that all settings have been made correctly on all devices. The Bluetooth function may be deactivated on the external device. Reactivate this, if necessary.·Check whether the device to be connected is switched on and is in search mode. |
| 00:00 flashing | ·Long press "SCAN/INFO" button and do DAB full scan in DAB mode. time can be synced automatically by DAB station.·If there are no any DAB or FM-RDS station available, Time have to set manually by long press"MODE" button. |
natural_image
Recycling symbol icon (three chasing arrows) inside a square frame, no text or labels present.natural_image
Symbol of a trash bin crossed out by two diagonal lines (no text or labels)| 1. Number key 1-5 | •Short press 1(2,3,4,5), your favorite stations will play if it was saved as preset.•Long press 1(2,3,4,5) to preset stations, screen will show preset stored. |
| 2. Next (^) | •Skip to next song by short press in BT mode•Short press for 0.05MHz frequency change, and long press will scan to available station in FM mode•Short press to show station list and skip to next station in DAB mode |
| 3. Previous (√) | •Skip to previous song by short press in BT mode•Short press for 0.05MHz frequency change, and long press will scan to available station in FM mode•Short press to show station list and skip to previous station in DAB mode |
| 4. MODE | •Short press to switch the source (DAB+ / FM / BT / AUX)•Long press to enter manual time setting (hour/ minute/day/month/year),short press “^” or “√” to choose correct time,short press ▶to confirm |
| 5. Play/Pause - ▶II | •Play or Pause the playback by short press in BT mode•Disconnect BT by long press in BT mode•Mute by short press in DAB/ FM and AUX mode |
| 6. Preset and memoryPRE MEM | ·Short press to see the preset recall list, short press “^” or “√” to choose station which you want and press ▶tb confirm. 30 FM and 30 DAB stored stations can be choose.·Long press to see the presto store list, short press “^” or “√” to choose station number which you want and press ▶tb confirm. 30 FM and 30 DAB stations can be stored. |
| 7. SCAN/INFO | ·Long press to scan all available DAB/FM stations·Short press to see the station information in DAB/FM mode·Long press 3s to enter TWS in BT mode |
| 8. Vol (-) Decreases volume on speaker by short press | |
| 9. Power - ⏻ | Power On/off product by short press |
| 10. Vol (+) Increases volume on speaker by short press | |
| 11. AUX IN For audio input | |
| 12. Reset Button Factory reset | |
| 13. DC out/DC in (Type C USB) | USB-C Charging DC in 5.0 V =2.0 APower Bank DC out 5.0 V =1.0 A |
| 14. USB-C Cable | |
natural_image
Three-step line drawing of a cylindrical device with a handle, showing a tool interacting with the lid and a separate panel (no text or symbols)Figura 1 Figura 2 Figura 3
natural_image
Recycling symbol with three chasing arrows forming a triangle (no text or labels)natural_image
Symbol of a trash bin crossed with two crossed lines, no text or numbers present| 1. Number key 1-5 | •Short press 1(2,3,4,5), your favorite stations will play if it was saved as preset.•Long press 1(2,3,4,5) to preset stations, screen will show preset stored. |
| 2. Next (^) | •Skip to next song by short press in BT mode•Short press for 0.05MHz frequency change, and long press will scan to available station in FM mode•Short press to show station list and skip to next station in DAB mode |
| 3. Previous (√) | •Skip to previous song by short press in BT mode•Short press for 0.05MHz frequency change, and long press will scan to available station in FM mode•Short press to show station list and skip to previous station in DAB mode |
| 4. MODE | •Short press to switch the source (DAB+ / FM / BT / AUX)•Long press to enter manual time setting (hour/ minute/day/month/year),short press “^” or “√” to choose correct time,short press ▶to confirm |
| 5. Play/Pause - ▶II | •Play or Pause the playback by short press in BT mode•Disconnect BT by long press in BT mode•Mute by short press in DAB/ FM and AUX mode |
| 6. Preset and memoryPRE MEM | •Short press to see the preset recall list, short press “^” or “√” to choose station which you want and press ▶tb confirm. 30 FM and 30 DAB stored stations can be choose.•Long press to see the presto store list, short press “^” or “√” to choose station number which you want and press ▶tb confirm. 30 FM and 30 DAB stations can be stored. |
| 7. SCAN/INFO | • Long press to scan all available DAB/FM stations•Short press to see the station information in DAB/FM mode•Long press 3s to enter TWS in BT mode |
| 8. Vol (-) Decreases volume on speaker by short press | |
| 9. Power - ⏻ | Power On/off product by short press |
| 10. Vol (+) Increases volume on speaker by short press | |
| 11. AUX IN For audio input | |
| 12. Reset Button Factory reset | |
| 13. DC out/DC in (Type C USB) | USB-C Charging DC in 5.0 V =2.0 APower Bank DC out 5.0 V =1.0 A |
| 14. USB-C Cable | |
RÉGLAGE / FIXATION DE L'ANTENNE TÉ- LESCOPIQUE
natural_image
Three-step line drawing of a portable water heater with handle and arm, showing mechanical assembly (no text or symbols)Figure 1 Figure 2 Figure 3
Informations technique
Batterie Li-Ion rechargeable
Prise USB : Power Bank DC out 5,0 V =1,0 A