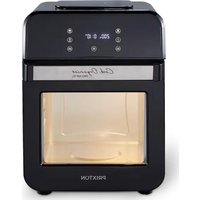
Cook Organics Compact Pro - Deep fryer Prixton - Free user manual and instructions
Find the device manual for free Cook Organics Compact Pro Prixton in PDF.

| Product type | Air fryer |
| Brand | Prixton |
| Model | Cook Organics Compact Pro |
| Power | 2000 W |
| Basket capacity | 5 L |
| Temperature range | 80 °C – 200 °C |
| Timer | 0 – 60 minutes |
| Supply voltage | 220-240 V ~ 50 Hz |
| Number of preset programs | 8 (fries, meat, snacks, etc.) |
| Control type | Touch control panel with On/Off, temperature, time and preset buttons |
| Housing material | Heat-resistant plastic |
| Basket and tank coating | Non-stick (do not use metal utensils) |
| Approximate weight | 5 kg |
| Dimensions (W x H x D) | Not specified in the manual |
| Maintenance | Clean the tank and basket by hand with a non-abrasive sponge after each use |
| Included accessories | Removable basket with handle and release button |
| Safety | Automatic timer shut-off, cool-touch handle, hot surfaces indicated |
| Warranty | 2 years (see website www.prixton.com) |
Frequently Asked Questions - Cook Organics Compact Pro Prixton
User questions about Cook Organics Compact Pro Prixton
0 question about this device. Answer the ones you know or ask your own.
Ask a new question about this device
Download the instructions for your Deep fryer in PDF format for free! Find your manual Cook Organics Compact Pro - Prixton and take your electronic device back in hand. On this page are published all the documents necessary for the use of your device. Cook Organics Compact Pro by Prixton.
USER MANUAL Cook Organics Compact Pro Prixton
natural_image
Line drawing of a mechanical component with a circular top and rectangular base (no text or symbols)FREIDORA DE AIRE AIR FRYER
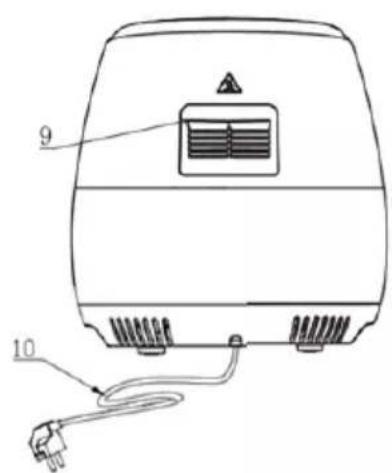
Fig.1
Uso del aparato
flowchart
graph LR
    A["Fig.2: Air Fryer"] --> B["Step 1: Air Fryer with Heating"]
    B --> C["Step 2: Air Fryer with Heating"]
    C --> D["Step 3: Air Fryer with Heating"]
    D --> E["Step 4: Air Fryer with Heating"]
    E --> F["Step 5: Air Fryer with Heating"]
    F --> G["Step 6: Air Fryer with Heating"]
SAFETY INSTRUCTIONS - General
- Please read these instructions carefully and retain them for future reference.
- Use this appliance solely in accordance with these instructions.
- This appliance is not intended for use by persons (including children) with reduced physical,
sensory or mental capabilities, or lack of experience and knowledge, unless they have been given
supervision or instruction concerning use of the appliance by a person responsible for their safety.
- Children should be supervised to ensure that they do not play with the appliance.
- Cleaning and maintenance must not be done by children, except if they are older than 8 years
and supervised.
- Keep the appliance and the cable out of reach of children under 8 years.
- Have any repairs carried out solely by a qualified electrician. Never try to repair the appliance yourself.
The device is not suitable to be installed in an area that can be used where water spray.
Do not clean the device by spraying water.
In the event of any malfunction or damage in one of the parts. Do not repair the device by yourself, please visit the nearest Certified service center or specialized experts.
The appliances are not intended to be operated by means of an external timer or separate remote-control system.
This appliance is intended to be used in household and similar applications such as:– staff kitchen areas in shops, offices and other working environments;
- farm houses;
– by clients in hotels, motels and other residential type environments; - bed and breakfast type environments.
This appliance can be used by children aged from 8 years and above and persons with reduced physical, sensory or mental capabilities or lack of experience and knowledge if they have
been given supervision or instruction concerning use of the appliance in a safe way and understand the hazards involved. Children shall not play with the appliance. Cleaning and user
maintenance shall not be made by children unless they are older than 8 and supervised.
16- Keep the appliance and its cord out of reach of children less than 8 years.
SAFETY INSTRUCTIONS - Electricity and heat
Certain parts of the machine may be hot. Do not touch it to avoid burns.
- Verify that the mains voltage is the same as that indicated on the type plate on the appliance before use.
- Make sure that you always use an grounded wall socket to connect the appliance.
• Always remove the plug from the socket when the appliance is not in use. - Make sure that the appliance, the power cord and plug do not make contact with water.
- Remove the plug from the wall socket by pulling the plug, not the power cord.
- Check the appliance's power cord regularly to make sure it is not damaged.
Do not use the appliance if the power cord is damaged. Have a damaged power cord replaced by a qualified repair service.
- When using an extension lead always make sure that the entire cable is unwound from the reel.
- Use solely approved extension leads.
- Certain parts of the appliance may get hot. Do not touch these parts to prevent burning yourself.
- The appliance needs space to allow heat to escape, thereby preventing the risk of fire. Make sure that the appliance has sufficient space around it, and does not come in contact with flammable material. The appliance must not be covered. Make sure the air vents are not covered or blocked.
- Never use the appliance in the vicinity of flammable materials.
- Make sure that the appliance, the power cord or the plug do not make contact with hot surfaces, such as a hot hob or naked flame.
SAFETY INSTRUCTIONS - Use
- Never use the appliance outdoors.
- Never use the appliance in humid rooms.
- Place the appliance on a stable, flat, heat-resistant surface where it can't fall.
- Do not let the power cord hang over the edge of the draining board, worktop or table.
• Make sure that your hands are dry when you touch the appliance, the power cord or the plug.
- Do not pick up the appliance if it falls into water. Remove the plug from the wall socket immediately. Do not use the appliance any more.
- Switch off the appliance and remove the plug from the wall socket in the event of a malfunction during use, and before cleaning the appliance, fitting or removing an accessory, or
storing the appliance after use.
- Never leave the appliance unattended when in use.
- Never immerse the housing, the power cord or the plug in water or other liquids.
• Make sure that the appliance has sufficient ventilation whilst in use.
- Never move the appliance when it is switched on or is still hot. Switch off the appliance and
wait until it has cooled down before moving it.
- Do not put too much food in the frying basket at one time.
• Thoroughly clean the exterior of the appliance after use.
- This appliance may not be used through an external timer or by means of a remote control.
- Do not fill the appliance with food during pre-heating.
General description (Fig.1)
-
Control panel
-
Top cap
-
Upper housing
-
Air fryer
-
Basket
-
Basket release button
-
Basket handle
-
Outer pot
-
Power cord
-
Air outlet
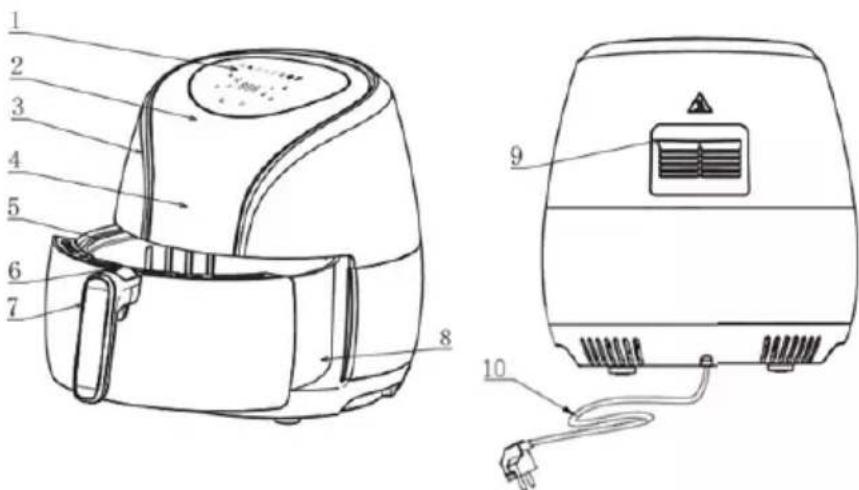
Fig.1
Using the appliance
The air fryer can prepare a large range of ingredients.
Hot air frying
- Connect the mains plug into an earthed wall socket.
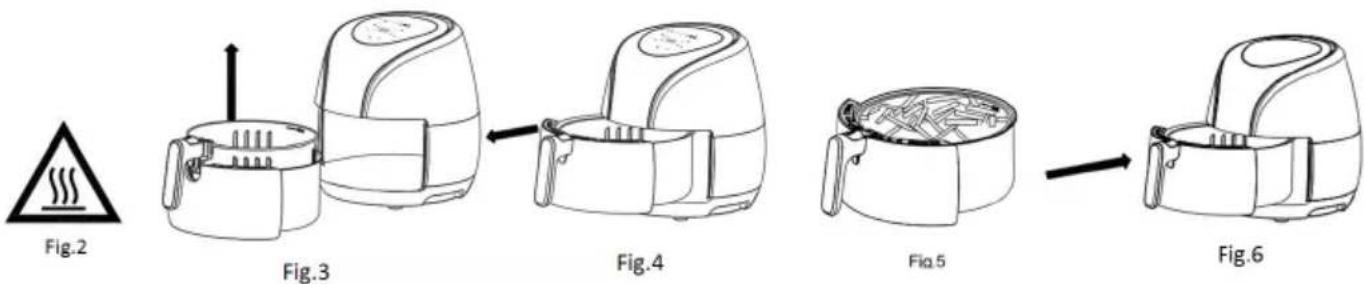
- Carefully pull the pan out of the Hot-air fryer (Fig.6)
- Put the ingredients in the basket. (Fig.5)
- Slide the pan back into the Hot-air fryer (Fig 4)
Noting to carefully align with the guides in the body of the fryer.
Never use the pan without the basket in it.
Caution: Do not touch the pan during and some time after use, as it gets very hot. Only hold the pan by the handle.
-
Determine the required preparation time for the ingredient (see section 'Settings' in this chapter).
-
Some ingredients require shaking halfway through the preparation time (see section "Settings" in this chapter). To shake the ingredients, pull the pan out of the appliance by the handle and shake it. Then slide the pan back into the I fryer
flowchart
graph LR
    A["Fig.2"] --> B["Image of air fryer with heat dissipation"]
    B --> C["Fig.3"]
    C --> D["Image of air fryer with heat dissipation"]
    D --> E["Fig.4"]
    E --> F["Image of air fryer with heat dissipation"]
    F --> G["Fig.5"]
    G --> H["Image of air fryer with heat dissipation"]
    H --> I["Fig.6"]
caution: Do not press the button the handle during shaking. (Fig.3)
Tip: To reduce the weight, you can remove the basket from the pan and shake the basket only. To do so, pull the pan out of the appliance, place it on a heat-resistant surface and press the button of handle. and lift the basket out of the pan
Tip: If you set the timer to half the preparation time, you hear the timer bell when you have to shake the ingredients. However, this means that you have to set the timer again to the remaining preparation time after shaking.
- When you hear the timer bell, the set preparation time has elapsed. Pull the pan out of the appliance and place it on a the trial framework.
Note: You can also switch off the appliance manually. To do this, turn the time control knob to 0.
- Check if the ingredients are ready.
If the ingredients are not ready yet, simply slide the pan back into the appliance and set the timer to a few extra minutes.
- To remove ingredients (e.g. fries), pull the pan out of the Hot-air fryer and place it on trial framework, and press the basket release button and lift the basket out of the pan.
Do not turn the basket upside down with the pan still attached to it, as any excess oil that has collected on the bottom of the pan will leak onto the ingredients.
the pan and the ingredients are hot and hot fryer. Depending on the type of the ingredients in the I fryer, steam may escape from the pan.
- Empty the basket into a bowl or onto a plate.
Tip: To remove large or fragile ingredients, lift the ingredients out of the basket by a pair of tongs
- When a batch of ingredients is ready, the Hot-air fryer is instantly ready for preparing another batch.
Control panel instructions
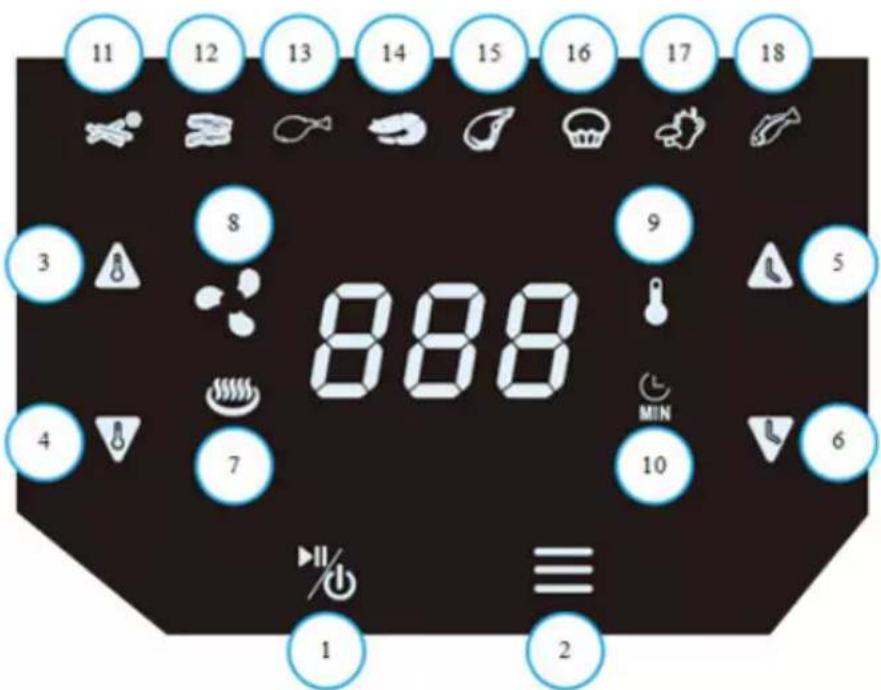
Operation Instructions:
Button 1 -Power Button
Once the Outer Basket and Fry Basket are properly placed in the main Unit housing, the Power Button will be illuminated. Selecting the power button for 3 seconds will make the unit's default temperature 200, while the cooking time will be set to 15 minutes. Selecting the Power Button a second time will start the cooking process. Pressing the power button for 3 seconds to close the entire device during cooking. All the lights go out, the fan stops working.
Note: During cooking, you can touch the button to control the pause and start of cooking.
Button 2 - Preset Button
Selecting the “☐” Preset Button enables you to scroll through the 8 popular food choices. Once selected, the predetermined time and cooking temperature function begins.
Button 3&4 -Temperature Control Buttons
The + and – symbols enable you to add or decrease cooking temperature 5°C at a time. Keeping the button held down will rapidly change the temperature. Temperature Control range: 80°C-200°C.
Button 5&6 -Timer Control Buttons
The + and – symbols enable you to add or decrease cooking time, one minute at a time. Keeping the button held down will rapidly change the time.
Indicator light "7"
Heating indicator
Indicator light "8"
Fan indicator
Indicator light "9"
Temperature indicator
Indicator light "10"
Timer indicator
Indicator light "11-18"
Recipe indicator
Settings
This table below will help you to select the basic settings for the ingredients.
Note: Keep in mind that these settings are indications. As ingredients differ in origin, size, shape as well as brand, we cannot guarantee the best setting for your ingredients.
Because the Rapid Air technology instantly reheats the air inside the appliance instantly Pull the pan briefly out of the appliance during hot air frying barely disturbs the process. Tips
-Smaller ingredients usually require a slightly shorter preparation time than larger ingredients.
-A larger amount of ingredients only requires a slightly longer preparation time, a smaller amount of ingredients only requires a slightly shorter preparation time.
-Shaking smaller ingredients halfway through the preparation time optimizes the end result and can help prevent unevenly fried ingredients.
-Add some oil to fresh potatoes for a crispy result. Fry your ingredients in the Hot-air fryer within a few minutes after you added the oil.
-Do not prepare extremely greasy ingredients such as sausages in the Hot-air fryer.
-Snacks that can be prepared in a oven can also be prepared in the Hot-air fryer
-The optimal amount for preparing crispy fries is 500 grams.
-Use pre-made dough to prepare filled snacks quickly and easily. Pre-made dough also requires a shorter preparation time than home-made dough.
-Place a baking tin or oven dish in the Hot-air fryer basket if you want to bake a cake or quiche or if you want to fry fragile ingredients or filled ingredients
-You can also use the Hot-air fryer to reheat ingredients. To reheat ingredients, set the temperature to 150^ C for up to 10 minutes.
| Min-max Amount (g) | Time (min.) | Temperature (°C) | Shake | Extra information | |
| Potato & fries | |||||
| Thin frozen fries | 400-500 | 18-20 | 200 | shake | |
| Thick frozen fries | 400-500 | 20-25 | 200 | shake | |
| Potato gratin | 600 | 20-25 | 200 | shake | |
| Meat & Poultry | |||||
| Steak | 100-600 | 10-15 | 180 | ||
| Pork chops | 100-600 | 10-15 | 180 | ||
| Hamburger | 100-600 | 10-15 | 180 | ||
| Sausage roll | 100-600 | 13-15 | 200 | ||
| Drumsticks | 100-600 | 25-30 | 180 | ||
| Chicken breast | 100-600 | 15-20 | 180 | ||
| Snacks | |||||
| Spring rolls | 100-500 | 8-10 | 200 | shake | Use oven-ready |
| Frozen chicken nuggets | 100-600 | 6-10 | 200 | shake | Use oven-ready |
| Frozen fish fingers | 100-500 | 6-10 | 200 | Use oven-ready | |
| Frozen bread crumbed cheese snacks | 100-500 8-10 180 | Use oven-ready | |||
| Stuffed vegetables | 100-500 | 10 | 160 | ||
| Baking | |||||
| Cake | 400 | 20-25 | 160 | Use baking tin | |
| Quiche 500 20-22 180 | Use baking tin/oven dish | ||||
| Muffins | 400 | 15-18 | 200 | Use baking tin | |
| Sweet snacks 500 20 160 | Use baking tin/oven dish | ||||
Note: Add 3 minutes to the preparation time when you start frying while the Hot-air fryer is still cold.
Care & Cleaning
Clean the appliance after every use.
The pot, basket and grill net(optional) have a coating. Do not use metal kitchen utensils or abrasive cleaning materials to clean them, as this may damage the coating.
1- Remove the mains plug from the wall socket and let the appliance cool down.
Note: Remove the pot to let the fryer cool down more quickly.
2- Wipe the outside of the appliance with a moist cloth.
3- Clean the pot, basket with hot water, some washing-up liquid and a non-abrasive sponge. You can use a degreasing liquid to remove any remaining dirt.
Note: The pot and basket are dishwasher-proof.
Tip: If dirt is stuck to the basket, or the bottom of the pot, fill the pot with hot water with some washing-up liquid. Put the basket in the pot and let the pot and the basket soak for approximately 10 minutes.
4- Clean the inside of the appliance with hot water and a non-abrasive sponge.
5- Clean the heating element with a cleaning brush to remove any food residues.
6- Make sure all parts are clean and dry.
7- Remove the power cord and store it with the fryer.
Troubleshooting Guide
| Problem | Potential Cause | Possible Solution |
| The Air Fryer will not turn ON | The Air Fryer is not plugged in correctly. | Plug the Air Fryer in to the mains power source and switch ON. |
| A circuit breaker has been tripped. | Check and reset the circuit breaker. | |
| The food has not been cooked thoroughly | Food capacity has been exceeded. | Remove some of the food and cook again in separate batches. This will cook food more evenly and thoroughly. |
| The temperature was set too low. | Manually increase set temperature. | |
| The cooking time was not long enough. | Manually increase set cooking time. | |
| The food has been cooked unevenly | Certain types of food may need to be shaken mid - way through the cooking process. | Refer to the cooking guidelines section and if require shake food mid-way through the cooking process. |
| The Pan Assembly will not slide back into the housing properly | Too much food in the basket. | If there is too much food in the basket, please remove some of the food and retry. |
| Pan not aligned correctly. | Correctly align the pot with the grooves located on the inside of the Air Fryer housing. | |
| White smoke is being emitted during cooking | The food contained within may be quite greasy or fatty. | Greasy or fatty food will emit fat/oil into the pot of the Air Fryer and when heated it may emit a white smoke. Try to avoid cooking greasy/fatty foods in the Air Fryer. The white smoke does not affect the cooking process. |
| The pot may still contain fat/oil from previous use. | Ensure that the pot is thoroughly cleaned after each use. | |
| Chips are not cooking evenly in the Fryer | Chips were not rinsed adequately before cooking. | Rinse chips thoroughly (to remove starch) and allow them to dry before cooking. |
| Chips are not crispy | There may be a lack of oil or too much water. | Ensure chips are dried after rinsing with water. Possibly add a little more oil to the chips before cooking. |
| Chip size may be too large. | Try cutting the potato into smaller pieces for a crispier result. | |
| You may be using incorrect type of potato. | When making home-made chips/fries, the best type of potato to use are the floury varieties (Kennebec, King Edward, Golden Delight or Sebago). |
Specification & Feature:
Voltage:220-240V\~50Hz
Wattage: 2000 Watts
Capacity of basket:5.0Litre
Adjustable temperature:80°C—200°C
Timer (0-60 min)

The environment
- Dispose of packaging material, such as plastic and boxes, in the appropriate waste containers.
- When this product reaches the end of its useful life do not dispose of it by putting it in a dustbin; hand it in at a collection point for the reuse of electrical and electronic equipment. Please refer to the symbols on the product, the user's instructions or the packing.
- The materials can be re-used as indicated. Your help in the re-use, recycling or other means of
making use of old electrical equipment will make an important contribution to the protection of the environment.
- This marking indicates that this product should not be disposed with other household wastes. To prevent possible harm to the environment or human health from uncontrolled waste disposal, recycle it responsibly to promote the sustainable reuse of material resources. To return your used device, please use the return and collection systems or contact the retailer where the product was purchased. They can take this product fro the environmental safe recycling.
Warranty Policy
This product is guaranteed for 2 years from the date of purchase. When you have a problem that you can not solve, you must access the web www.prixton.com and click on the contact option to send us your assistance form.
These technical and electrical specifications are those of typical units and may be changed without prior notice in order to provide improved equipment.
Simplified EU Declaration of Conformity
We, La Trastienda Digital located in Avenida Cervantes 49, módulo 25, Basauri 48970, Bizkaia hereby declare that the following goods, imported and selling at European market:
| BRAND | MODEL | DESCRIPTION | CATEGORY |
| Prixton | Cook Organics Compact Pro 5l | Air fryer | Home |
Are in compliance with the EC Council Directive of 2014/53/EU (EM DIRECTIVE) and harmonized standards and with the board of the 16th of April 2014.
The complete text of the UE Declaration of conformity is available anytime at this website address:
www.prixton.com
LA TRASTIENDA DIGITAL
Fig.1
flowchart
graph LR
    A["Warning Symbol"] --> B["Step 1: Air Fryer with Heat Exchanger"]
    B --> C["Step 2: Air Fryer with Heat Exchanger"]
    C --> D["Step 3: Air Fryer with Heat Exchanger"]
    D --> E["Step 4: Air Fryer with Heat Exchanger"]
    E --> F["Step 5: Air Fryer with Heat Exchanger"]
    F --> G["Step 6: Air Fryer with Heat Exchanger"]
Fig.1
flowchart
graph LR
    A["Fig.2: Air Fryer"] --> B["Fig.3: Oven with Heat Exchanger"]
    B --> C["Fig.4: Dish jar with Cover"]
    C --> D["Fig.5: Oven with Basketry"]
    D --> E["Fig.6: Oven with Plateau"]
Fig.1
flowchart
graph LR
    A["Fig.2"] --> B["Step 1: Air Fryer with Heat Exchanger"]
    B --> C["Step 2: Air Fryer with Heat Exchanger"]
    C --> D["Step 3: Air Fryer with Heat Exchanger"]
    D --> E["Step 4: Air Fryer with Heat Exchanger"]
    E --> F["Step 5: Air Fryer with Heat Exchanger"]
    F --> G["Step 6: Air Fryer with Heat Exchanger"]
Fig.1
flowchart
graph LR
    A["Fig.2"] --> B["Step 1: Air Fryer with Pressure Gauge"]
    B --> C["Step 2: Pressing into air fryer"]
    C --> D["Step 3: Pressing into air fryer"]
    D --> E["Step 4: Pressing into air fryer"]
    E --> F["Step 5: Pressing into air fryer"]
    F --> G["Step 6: Pressing into air fryer"]