WB-100 - Thermal camera VOLTCRAFT - Free user manual and instructions
Find the device manual for free WB-100 VOLTCRAFT in PDF.
| Product Type | Thermal Camera |
| Brand | Voltcraft |
| Model | WB-100 |
| Temperature Measurement Range | -20 °C to +600 °C |
| Measurement Accuracy | ±2 % ±2 °C (at +25 °C) |
| Infrared Sensor Resolution | 32 x 32 pixels (48608 pixels) |
| Infrared Spectrum | 8 – 14 μm |
| Frame Rate | 9 Hz |
| Thermal Sensitivity (NETD) | ≤100 mK |
| Field of View (FOV) | 33° x 33° |
| Minimum Focus Distance | 0.5 m |
| Display | 2.2 inches (5.6 cm), resolution 320 x 240 pixels |
| Power Supply | Li-Ion battery 3.7 V / 1400 mAh; mains adapter 100-240 V, 5 V/1 A |
| Image Storage | MicroSDHC card (8 GB included) in BMP format |
| Adjustable Emissivity | 0.10 to 1.00 in 0.01 steps |
| Main Functions | Non-contact measurement, heat flow visualization, image capture, high/low alarms, emissivity adjustment, color palette, date/time, brightness, background temperature compensation |
| Weight | Approx. 494 g |
| Dimensions (L x W x H) | 125 x 58 x 205 mm |
| Operating Temperature | 0 °C to +50 °C (10 % to 90 % RH) |
| Storage Temperature | -20 °C to +60 °C (10 % to 90 % RH) |
| Cleaning | Clean, lint-free, antistatic cloth |
| Package Contents | Thermal camera, Li-Ion battery, USB cable, MicroSDHC 8 GB card, MicroSD adapter, power adapter, tripod, carrying case, instruction manual |
| Safety | Do not use in explosive atmospheres or strong magnetic fields; do not look directly into the laser; observe safety instructions |
Frequently Asked Questions - WB-100 VOLTCRAFT
User questions about WB-100 VOLTCRAFT
0 question about this device. Answer the ones you know or ask your own.
Ask a new question about this device
Download the instructions for your Thermal camera in PDF format for free! Find your manual WB-100 - VOLTCRAFT and take your electronic device back in hand. On this page are published all the documents necessary for the use of your device. WB-100 by VOLTCRAFT.
USER MANUAL WB-100 VOLTCRAFT
© Copyright 2020 by Conrad Electronic SE.

Legal Notice
This is a publication by Conrad Electronic SE, Klaus-Conrad-Str. 1, D-92240 Hirschau (www.conrad.com). All rights including translation reserved. Reproduction by any method, e.g. photocopy, microfilming, or the capture in electronic data processing systems require the prior written approval by the editor. Reprinting, also in part, is prohibited. This publication represents the technical status at the time of printing.
© Copyright 2020 by Conrad Electronic SE.

Information légales
© Copyright 2020 by Conrad Electronic SE.

Colofon
© Copyright 2020 by Conrad Electronic SE. V1_0820_02_jh
VOLTCRAFT®
WB-100 THERMAL IMAGING CAMERA
WB-100 THERMAL IMAGING CAMERA
GB OPERATING INSTRUCTIONS PAGE 23 - 42
WB-100 CAMÉRA THERMIQUE
F MODE D'EMPLOI PAGE 43 - 63
WB-100 WARMTEBEELDCAMERA
text_image
QR code image containing encoded data, no visible human-readable texttext_image
Labeled diagram of a handheld medical or scientific device with numbered parts for identification.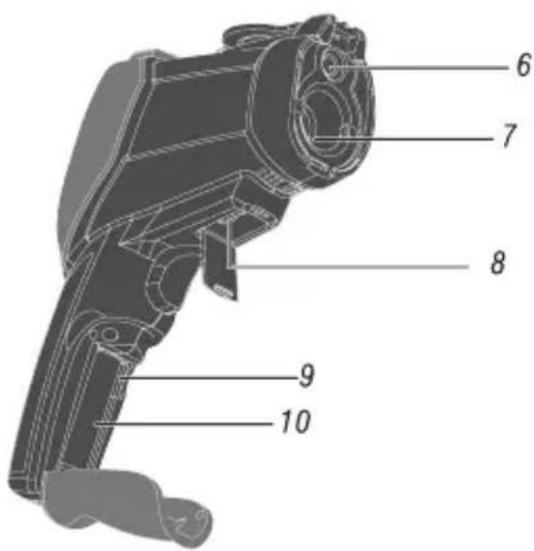
text_image
6 7 8 9 10
text_image
a b c d f e7. VORBEREITUNGEN
text_image
ε=0.97 13:55 SET EMS 0.97 > UNIT °C > MXMN ✓ > PLT RGB > DATE >
text_image
ε=0.95 16:56 SET MEMORY > BGT 25.0°C > ALARM > DISPLAY > DIST >text_image
MXMN £=0.97 13:55 MXMN MXMNe) PLT-Menü (Farbpalette)
text_image
Date £=0.97 13:55 Time Date Time
text_image
Date Set 2013 8 4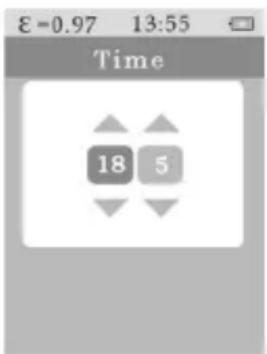
text_image
Time 18 5text_image
BGT 24°C £=0.97 13:55 BackGroundTemp 76.6i) ALARM-Menü
text_image
ALARM £=0.97 13:55 ALARM High > Low >
text_image
Hi Alarm Hi Alarm ✓ 61.1 Lo Alarm Lo Alarm ✗ 0.0j) DISPLAY-Menü (LED Helligkeit)
text_image
£=0.97 13:55 Brightnessk) DIST-Menü
text_image
ε=0.95 16:56 Unit m ft- Introduction......25
- Intended Use 25
- Scope of Delivery....26
- Explanation of Symbols 26
- Safety Information ....27
- Operating Elements ......29
a) Meter 29
b) Operating Buttons....29
- Preparations ....30
a) Inserting the SD Card....30
b) Charging the Rechargeable Battery 30
- Switching on the Meter 31
- Operation of the Menus ....31
a) Main Menu....32
b) EMS Menu (Emission Value)....33
c) Unit Menu (Temperature Unit) 34
d) MXMN Menu (Maximum/Minimum)....34
e) PLT Menu (Colour Pallet) 34
f) DATE Menu (Date/Time) 35
g) MEMORY Menu (Saved Pictures)....35
h) BGT Menu (Background Temperature)....36
i) ALARM Menu 36
j) BTNESS Menu (LED Brightness)....37
k) DIS Menu (Image Apertures)......37
- Performing the Measurement 38
- Recording Images....39
a) Single Image Recording....39
b) Calling and Deleting Photographs....39
-
Troubleshooting....40
-
Cleaning 40
- Disposal....41
a) General Information....41
b) Batteries 41
- Technical Data 42
a) Meter 42
b) USB mains unit....42
1. INTRODUCTION
Dear customer,
Thank you for making the excellent decision to purchase this Voltcraft® product.
You have acquired a quality product from a brand family which has distinguished itself in the fields of measuring, charging and grid technology thanks to its particular expertise and its continuous innovation.
With Voltcraft ^® , you will be able to handle difficult tasks, either as an ambitious hobbyist or as a professional user. Voltcraft ^® offers reliable technology and a great price-performance-ratio.
We are positive: Starting to work with Voltcraft will also be the beginning of a long, successful relationship.
Enjoy your new Voltcraft® product.
If there are any technical questions, please contact: www.conrad.com/contact
2. INTENDED USE
The thermal imaging camera:
- permits contact-free temperature measurement of surfaces in the range of -20 °C to +600 °C
- serves to visualise heat progressions that can be stored on the enclosed SD card
- possible uses include quality control, maintenance and early error recognition
Measurement under unfavourable ambient conditions is not permitted.
Unfavourable ambient conditions are: Dust and flammable gases, fumes or solvents, thunderstorms or thunderstorm conditions like strong electrostatic fields, etc.
For safety reasons, use only measuring accessories which are adjusted to the specifications of the meter when measuring.
Any use other than that described above will lead to damage to the product and involves additional risks such as, for example, short circuit, fire, electric shock, etc.
No part of this product must be modified or converted!
Read the operating instructions carefully and keep them for later reference.
Always observe the safety information!
3. SCOPE OF DELIVERY
• Thermal imaging camera
• 3.7 V Li-Ion rechargeable battery
- USB cable
- Micro SDHC card (8 GB)
- Micro SD adapter
- Plug-in power adapter
- Tripod
- Case
- Operating instructions
→ Up-to-date operating instructions:
- Openwww.conrad.com/downloads in a browser or scan the displayed QR code.
- Select document type and language and enter the item number into the search field. After submitting the query you can download displayed records.

text_image
QR code image containing encoded data, no visible human-readable text4. EXPLANATION OF SYMBOLS

An exclamation mark in a triangle shows important notes in these operating instructions that must be strictly observed.
→ The arrow symbol indicates that special advice and notes on operation are provided.
CE This device is CE-compliant and meets the applicable European directives.
5. SAFETY INFORMATION

Please read the operating instructions completely before taking the device into operation. They contain important information for correct operation. The guarantee/warranty will expire if damage is incurred resulting from non-compliance with the operating instructions! We do not assume any liability for consequential damage!
We do not assume any liability for property damage or personal injury caused by improper use or non-compliance with the safety instructions! In such cases the warranty/guarantee is voided.
This device left the manufacturer's factory in safe and perfect condition. To maintain this condition and to ensure safe operation, the user must observe the safety information and warning notes in these operating instructions.
- For safety and approval reasons, unauthorised conversion and/or modification of the device are not permitted.
- Consult an expert when in doubt as to the operation, the safety or the connection of the device.
- Meters and accessories are not toys and have no place in the hands of children!
- In commercial institutions, the accident prevention regulations of the Employer's Liability Insurance Associations for Electrical Systems and Operating Materials are to be observed.
- In schools, training centres, computer and self-help workshops, handling of meters must be supervised by trained personnel in a responsible manner.
- Check the meter for damage before each measurement. Never carry out any measurements if the protecting insulation is defective (torn, ripped off, broken, etc.).
- Avoid operation in direct proximity of strong magnetic or electromagnetic fields, transmitter aerials or HF generators. This could affect the measurement.
- If you have reason to assume that safe operation is no longer possible, disconnect the device immediately and secure it against inadvertent operation. It can be assumed that safe operation is no longer possible if:
- the device shows visible damage
- the device is longer working
- the device has been stored under unfavourable conditions for an extended period of time
-
the device has been subjected to heavy stress during transport
-
Do not switch the meter on immediately after it was taken from a cold to a
warm environment. The condensation that forms might destroy your device. Let the device reach room temperature before switching it on. - When measuring highly reflective surfaces, observe that these may be hotter than indicated in the measurement.
- Do not leave packaging material unattended. It may become a dangerous toy for children.
- If there are any questions that are not answered in this operating manual, contact our technical support or another expert.
- Also observe the safety information in each chapter of these instructions.
- The mains unit is constructed pursuant to protection class II.
- The mains socket for the mains unit must be close to the device and easily accessible.
- The mains unit is only suitable for dry, closed rooms. Do not expose it to direct sunlight, heat, cold, dampness or wetness; otherwise, it will be damaged.
• Moreover, there is a risk of a fatal electric shock! - Do not pull the mains unit from the mains socket by pulling the cable.
- If the mains unit is damaged, do not touch it. Danger to life from electric shock!
- First deactivate all sides of the mains socket to which the mains unit is connected (e.g. switch off the respective fuse or turn out the fuse. Then deactivate the associated FI protection switch). Only then pull the mains unit from the mains socket and take the product to a specialist workshop.
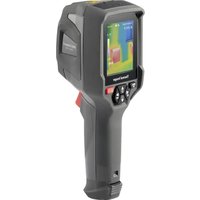
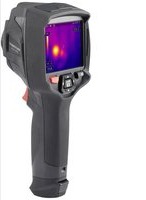
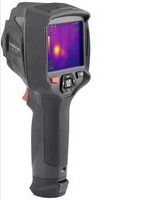
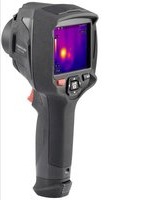
6. OPERATING ELEMENTS
a) Meter
1 Display
2 Operating keys
3 Rechargeable battery compartment cover
4 Measuring button
5 Camera lens cover

text_image
Labeled diagram of a handheld device with numbered parts for identification6 Optical camera
7 Thermal imaging camera
8 Micro-USB socket
9 Micro-SD card slot
10 Rechargeable battery compartment

text_image
6 7 8 9 10b) Operating Buttons
a ▲ Up button
b ⏻ Menu / on-off button
c Left button
d ▼ Down button
e ▶ Right button
f "Enter"-button

text_image
a b c d f e7. PREPARATIONS
a) Inserting the SD Card
Open the battery cover (3) and insert the Micro-SD card into the card slot (9).
b) Charging the Rechargeable Battery

- Before you can work with the meter, you first need to charge the rechargeable battery completely with the enclosed mains unit. For full capacity of the rechargeable battery, please charge at room temperature only.
- Do not leave rechargeable batteries lying around carelessly. They could be swallowed by children or pets. If swallowed, consult a doctor immediately.
- Remove the rechargeable battery if the device is not used for extended periods of time to prevent leaking.
- Leaking or damaged rechargeable batteries may cause alkali burns if they come in contact with the skin. Therefore, use suitable protective gloves.
- Do not disassemble any rechargeable batteries, do not short-circuit them and do not throw them into fire. Danger of explosion.
Please open the battery compartment cover (3), connect the plug of the rechargeable battery to the connection socket, insert it into the battery compartment (10) and close the battery compartment cover (3).
To charge the rechargeable battery, connect the enclosed mains unit to the Mini-USB socket (8) of the meter. Once charging commences, a plug appears in the rechargeable battery symbol. The current charge condition can be read at the display based on the battery icon. The rechargeable battery should be charged for 3 to 4 hours before first commissioning. Disconnect the mains unit from the camera once the battery symbol is full.
8. SWITCHING ON THE METER
The meter can be turned on and off using the menu/on-off button (b). Push the button briefly once to switch the meter on. Always turn the meter off when it is not in use. To switch it off, keep the button pushed for approx. 2 seconds.
The home screen appears after activation.

text_image
Set emission Cover removal Centre Temperature value Current image Centre Temperature Measured value max. temperature ε=0.95 10:00 lm 0.5m 35.7 °C Set Time Battery charging state Min. temperature Icon Max. temperature Icon Set Colour pallet Measured value Min. temperature □x=38.6 □n=28.0The device is operated only menu-guided. There are essentially the same operating processes each time. The menu button (b) opens the menu; the up- (a)/down (d)-buttons select the desired setting and the Enter button (f) switches to the submenu.
a) Main Menu
The main menu provides access to the further functions of the device. It is opened with the menu button (b):

text_image
ε=0.97 13:55 SET EMS 0.97 > UNIT °C > MXMN ✓ > PLT RGB > DATE >
text_image
ε=0.95 16:56 SET MEMORY > BGT 25.0°C > ALARM > DISPLAY > DIST >| Menu Description | |
| EMS Set emission value | |
| UNIT Set temperature value | |
| MXMIN Set max. and min. values | |
| PLT Set colour pallet | |
| DATE Set date/time | |
| MEMORY Set saved pictures | |
| BGT Setting the background temperature | |
| ALARM Setting and switching the high- and low-alarm on and off | |
| DISPLAY Setting LED brightness | |
| DIST Setting the image aperture distance |
b) EMS Menu (Emission Value)
- To get to the menu, push the menu button (b).
- Push the up (a) or down (d) button until EMS has a blue background.
- Confirm the selection with the Enter button (f).
- Set the desired value with the up (a) or down (d) buttons and confirm with the Enter button (f).
- You are now back in the main menu.
- You can now make the next setting or leave the menu with the menu button (b).

text_image
EMS 0.97 E=0.97 13:55 Emissivity 0.97| Material Emission Material Emission | ||
| Aluminium, blank 0.1 Asphalt 0.90 -0.98 | ||
| Concrete 0.94 Dark clothing 0.98 | ||
| Stainless steel 0.14 Iron, oxidised 0.8 | ||
| Earth 0.93 Glass 0.98 | ||
| Rubber (black) 0.94 Skin (human) 0.98 | ||
| Wood 0.85 Plastic 0.80 - 0.95 | ||
| Copper, oxidised 0.78 Paint layer 0.9 | ||
| Paint layer, matte 0.97 Masonry 0.75 | ||
| Brass, blank 0.06 Paper 0.70 - 0.94 | ||
| Plaster, gypsum 0.85 Sand 0.9 | ||
| Snow 0.83 Textiles 0.85 | ||
| Water 0.92 - 0.96 Cement 0.96 |
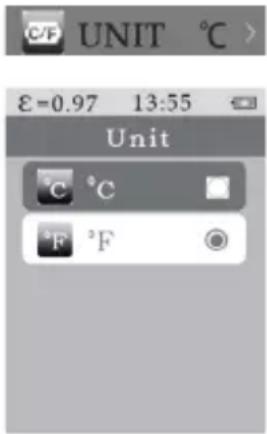
c) Unit Menu (Temperature Unit)
- To get to the menu, push the menu button (b).
- Push the up (a) or down (d) button until UNIT has a blue background.
- Confirm the selection with the Enter button (f).
- Select the desired unit (blue background) with the up (a) or down (d) buttons and confirm with the Enter button (f).
- You are now back in the main menu.
- You can now make the next setting or leave the menu with the menu button (b).
text_image
UNIT °C > £=0.97 13:55 Unit °C °C °F °Fd) MXMN Menu (Maximum/Minimum)
- To get to the menu, push the menu button (b).
- Push the up (a) or down (d) button until MXMN has a blue background.
- Confirm the selection with the Enter button (f)
- Use the Enter button (f) to switch the display of the maximum and minimum temperature measuring point on or off.
- To return to the main menu, push the menu button (b).
- You can now make the next setting or leave the menu with the menu button (b).
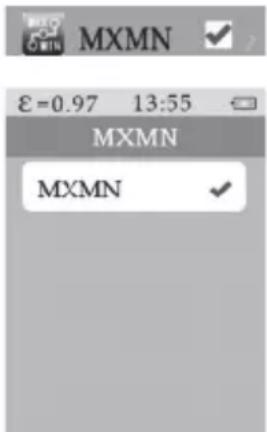
text_image
MXMN £=0.97 13:55 MXMN MXMNe) PLT Menu (Colour Pallet)
- To get to the menu, push the menu button (b).
- Push the up (a) or down (d) button until PLT has a blue background.
- Confirm the selection with the Enter button (f).
- Select the desired colour pallet (blue background) with the up (a) or down (d) buttons and confirm with the Enter button (f).
- You are now back in the main menu.
- You can now make the next setting or leave the menu with the menu button (b).
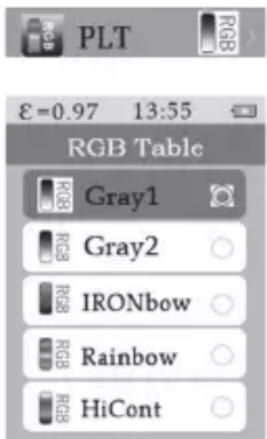
text_image
PLT €=0.97 13:55 RGB Table RGB1 Gray2 IRONbow Rainbow HiContf) DATE Menu (Date/Time)
- To get to the menu, push the menu button (b).
- Push the up (a) or down (d) button until DATE has a blue background.
- Confirm the selection with the Enter button (f).
- Use the up (a) or down (d) buttons to select if you want to set the date or time (blue background) and confirm with the Enter button (f).
- In the date menu, use the up (a) or down (d) button to first set the year, then the month and last the day. Confirm each selection with the Enter button (f) to get to the next input field.
- Use the menu button (b) to get to the superordinate menu.
- In the time menu, use the up (a) or down (d) button to first set the hour and then the minutes. Confirm each selection with the Enter button (f) to get to the next input field.
- Use the menu button (b) to get to the superordinate menu.
- To get to the main menu, push the menu button (b).
- You can now make the next setting or leave the menu with the menu button (b).
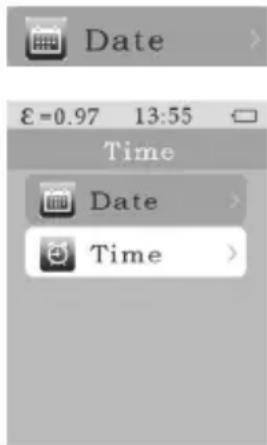
text_image
Date £=0.97 13:55 Time Date Time
text_image
Date Set 2013 8 4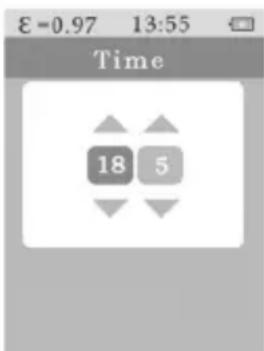
text_image
Time 18 5g) MEMORY Menu (Saved Pictures)
- The Memory menu is explained in chapter 10. "Recording Pictures".
h) BGT Menu (Background Temperature)
- To get to the menu, push the menu button (b).
- Push the up (a) or down (d) button until BGT has a blue background.
- Confirm the selection with the Enter button (f).
- Set the desired value with the up (a) or down (d) button.
- To get to the main menu, push the menu button (b).
- You can now make the next setting or leave the menu with the menu button (b).

text_image
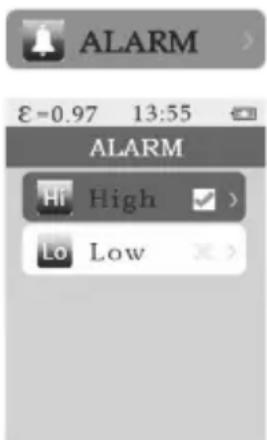
BGT 24°C £=0.97 13:55 BackGroundTemp 76.6i) ALARM Menu
- To get to the menu, push the menu button (b).
- Push the up (a) or down (d) button until ALARM has a blue background.
- Confirm the selection with the Enter button (f)
- Use the up (a) or down (d) buttons to select if you want to set the high or low alarm (blue background) and confirm with the Enter button (f).
- In the menu, use the up (a) or down (d) button to set the desired temperature and the Enter button (f) to switch the alarm on and off.
text_image
ALARM £=0.97 13:55 ALARM High > Low >- To confirm your input and get to the superordinate menu, push the Menu button (b).
- To get to the main menu, push the menu button (b).
- You can now make the next setting or leave the menu with the menu button (b).

text_image
Hi Alarm Hi Alarm ✓ 61.1 Lo Alarm Lo Alarm ✗ 0.0j) DISPLAY Menu (LED Brightness)
• To get to the menu, push the menu button (2).
- Push the up (a) or down (d) button until DISPLAY has a blue background.
- Confirm the selection with the Enter button (f).
- Set the desired value with the up (a) or down (d) button.
• To get to the main menu, push the menu button (b).
- You can now make the next setting or leave the menu with the menu button (b).

text_image
E=0.97 13:55 Brightnessk) DIST Menu
- To get to the menu, push the menu button (b).
- Push the up (a) or down (d) button until DIST has a blue background.
- Confirm the selection with the Enter button (f).
- Select the desired distance unit with the up (a) or down (d) buttons and confirm with the Enter button (f).
- You are now back in the main menu.
- You can now make the next setting or leave the menu with the menu button (b).

text_image
ε=0.95 16:56 Unit m ft10. PERFORMING THE MEASUREMENT
Open the camera lens cover (5) and point the thermal imaging camera at the object to be measured.
Use the up (a) or down (d) button to adjust transparency of the overlay between the optical camera and the thermal imaging camera.
→ Notes on temperature measurement
All objects radiate heat energy in the infra-red range. The amount of energy depends on the surface temperature and the surface emission (emission value) of the material. This energy is recorded by the sensor of the meter and calculated based on an emission value matching the material. It is then displayed as a measured value. Most materials, such as painted metals, wood, water, skin and clothing are easy to measure due to their surface properties. Their emission factor is usually above 0.90. This is different for very glossy, reflective surfaces, such as uncoated metals. They have strongly deviating emission factors of less than 0.60. Their reflective surfaces make precise measurements difficult. To get precise measuring results, the emission value must therefore be corrected depending on material and surface properties.
→ Compensation of the reflection temperature (RTC)
The heat energy recorded by the camera contains not only the actual heat radiation emitted by the measured object, but also the reflection of the ambient radiation (degree of reflection). To get precise measuring results, they must be compensated. Measured objects with emission factors down to approx. 0.60 have a low degree of reflection; objects with low emission factors, in contrast, have a high degree of reflection that must be compensated for. The ratio between ambient temperature and measured object temperature must be observed as well. The higher this difference, the larger the deviation of the measurement and the compensation need. Under such conditions, a multiple measurement should be performed to achieve precise measured values as well.
11. RECORDING IMAGES
The thermal imaging camera permits recording of images. The photographs of the optical and IR cameras are saved in a .bmp-image with a resolution of 48608 pixels.
The recordings saved on the SD-card may be viewed in the camera or transferred to the PC.
a) Single Image Recording
Push the measuring button (4); the recording is displayed as a still image.
To save the image, push the Enter button (f); to reject it, push the Menu button (b).
b) Calling and Deleting Photographs
Push the menu button (b).
Push the up (a) or down (d) button until MEMORY has a blue background.
Confirm the selection with the Enter button (f).
Use the up (a) or down (d) button to view images.
To delete an image, push the Enter button (f).
A waste bin icon will appear in the display. Pushing the Enter button (f) will delete the image.
To get to the main menu, push the menu button (b).
Push the menu button (b) to leave the menu.
12. TROUBLESHOOTING
With this measuring device, you have purchased a product built to the latest state of the art and operationally safe.
Nevertheless, problems or errors may occur.
For this reason, the following is a description of how you can easily remove possible malfunctions yourself.
| Error Cause Solution | ||
| Device does not start. No rechargeable battery in the device | chargeable battery in the device | Insert rechargeable battery and charge it |
| Rechargeable battery defective/flat | Replace/charge rechargeable battery | |
| The device keeps switching itself off. | Rechargeable battery defective/flat | Replace/charge rechargeable battery |
| No IR image Lens cover closed Open | lens cover | |
13. CLEANING
Apart from occasionally requiring cleaning the product, it is maintenance free; do not dismantle it.
Switch off the product before cleaning it. Disconnect it from the mains unit and pull the mains unit out of the mains outlet.
Do not use any aggressive cleaning agents or petrol, alcohol or the like to clean the product. They will damage the surface of the meter. Furthermore, the fumes are hazardous to your health and explosive. Also do not use any sharp-edged tools, such as screwdrivers, metal brushes, etc. for cleaning.
Use a clean, lint-free and antistatic cleaning cloth for cleaning the device or the display.
14. DISPOSAL
a) General Information

The product does not belong in the household waste.
e of the product according to the statutory provisions at the end of its service life.
b) Batteries
You as the end user are required by law (Battery Ordinance) to return all used batteries. Disposing of them in the household waste is prohibited.

Batteries containing hazardous substances are marked with the adjacent symbol to indicate that disposal in the household waste is prohibited. The descriptions for the respective heavy metals are: Cd = cadmium, Hg = mercury, Pb = lead. You can return your used batteries free of charge to collection points in your municipality and anywhere where batteries/rechargeable batteries are sold.
15. TECHNICAL DATA
Measurement tolerances
Statement of accuracy in ± (% of reading + display error in counts (= number of smallest points)).
The accuracy is valid for one year at a temperature of +23 °C ± 5 °C, and at a relative humidity of less than 80%, non-condensing.
a) Meter
Focus.... Fixed focus
Field of vision FOV 33^ × 33^
Minimum focal distance 0.5 m
Resolution of the IR temperature measurement ... 32 x 32 pixel
Thermal sensitivity /NETD ....≤100 mK
Infrared spectrum 8 – 14 μm
Image frequency....9 Hz
Temperature measuring range ...... -20 °C to +600 °C
Temperature measuring tolerance.... ±2% ±2 °C (at +25 °C)
Emission factor....0.1 to 1.00
Detector type .... uncooled pyro-electrical ceramics
Internal voltage supply.... Li-Ion rechargeable battery (3.7 V, 1400 mAh)
Display.... 2.2" (5.6 cm), 320 x 240 pixels resolution
Working conditions 0 °C to +50 °C
(10% to 90% relative humidity)
Storage temperature....-20 °C to +60 °C
(10% to 90% relative humidity)
Weight .... approx. 494 g
Dimensions (L x W x H)....125 x 58 x 205 mm
b) USB mains unit
Operating voltage 100 - 240 V/AC, 50 - 60 Hz
Output voltage 5 V/DC
Output current.... 1 A
Protection class ...... II
Page
France (email): technique@conrad-france.fr
text_image
QR code image containing encoded data, no visible human-readable text4. EXPLICATION DES SYMBOLES

text_image
Labeled diagram of a handheld device with numbered parts for identificationtext_image
Technical diagram of a handheld device with numbered parts labeled 6 through 10text_image
£=0.97 13:55 SET EMS 0.97 > UNIT °C > MXMN ✓ > PLT RGB > DATE >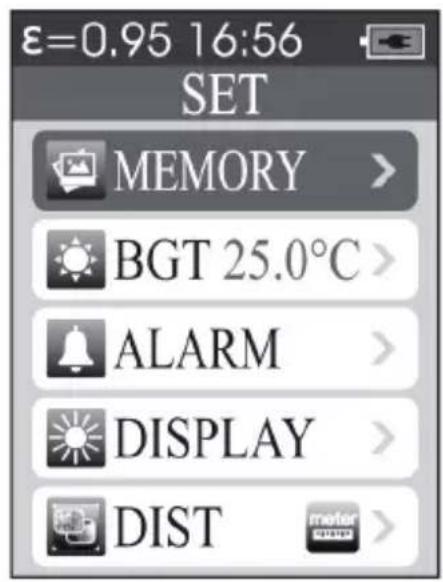
text_image
ε=0.95 16:56 SET MEMORY > BGT 25.0°C > ALARM > DISPLAY > DIST >text_image
MXMN £=0.97 13:55 MXMN MXMNe) Menu PLT (nuancier)
text_image
Date £=0.97 13:55 Time Date Time
text_image
Date Set 2013 8 4 Time 18 5 ε=0.97 13:55 ε=0.97 13:55g) Menu MEMORY (Images stockées)
text_image
BGT 24°C £=0.97 13:55 BackGroundTemp 76.6i) Menu ALARM
text_image
ALARM £=0.97 13:55 ALARM High > Low >
text_image
Hi Alarm Hi Alarm ✓ 61.1 Lo Alarm Lo Alarm ✗ 0.0text_image
£=0.97 13:55 Brightnessk) Menu DIST
text_image
ε=0.95 16:56 Unit m ft10. EXÉCUTION D'UNE MESURE
text_image
QR code image containing encoded data, no visible human-readable text4. VERKLARING VAN SYMBOLEN

text_image
Labeled diagram of a handheld device with numbered parts for identification6 Optische camera
7 Thermische camera
8 Micro-USB-bus
9 Micro-SD-kaartgleuf
10 Accuvak

text_image
6 7 8 9 10b) Bedientoetsen
a ▲ Up-toets
b ⏻ Menu / Aan-/uittoets
c ◀ Links-toets
d ▼ Down-toets
e ▶ Rechts-toets
f "Enter"-toets

text_image
a b c d e f7. VOORBEREIDINGEN
8. MEETAPPARAAT INSCHAKELEN
text_image
ε=0.97 13:55 SET EMS 0.97 > UNIT °C > MXMN ✓ > PLT RGB > DATE >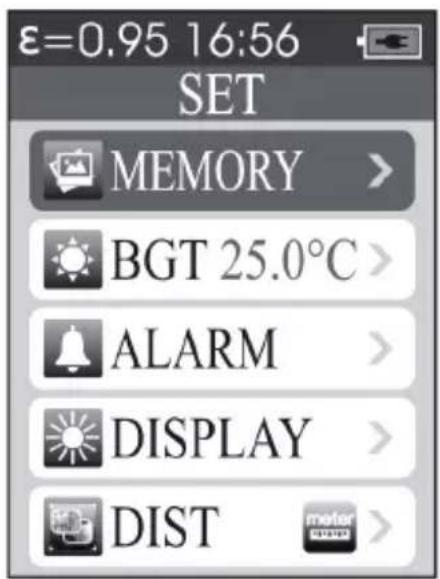
text_image
ε=0.95 16:56 SET MEMORY > BGT 25.0°C > ALARM > DISPLAY > DIST >text_image
MXMN £=0.97 13:55 MXMN MXMNe) PLT-menu (kleurpalet)
text_image
Date £=0.97 13:55 Time Date Time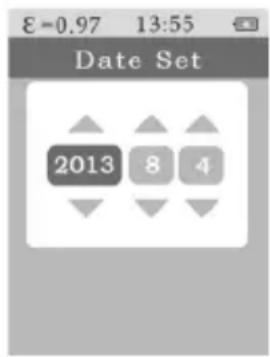
text_image
Date Set 2013 8 4
text_image
Time 18 5text_image
BGT 24°C £=0.97 13:55 BackGroundTemp 76.6i) ALARM-menu
text_image
ALARM £-0.97 13:55 ALARM Hi High > Lo Low >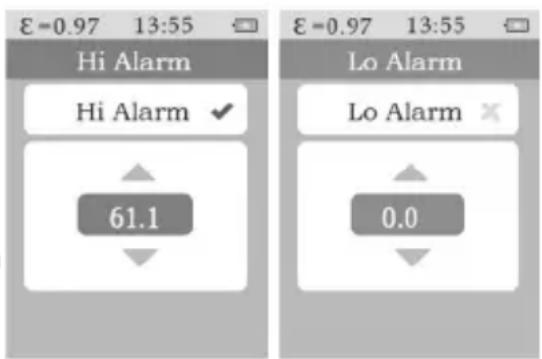
text_image
Hi Alarm Hi Alarm ✓ 61.1 Lo Alarm Lo Alarm ✗ 0.0j) DISPLAY-menu (helderheid van de LED)
text_image
ε=0.95 16:56 Unit m ft ft10. METING UITVOEREN
Focus......Vaste focus
Gezichtsveld FOV....33° x 33°
Minimale focusafstand....0,5 m