WBP-110 - Thermal camera VOLTCRAFT - Free user manual and instructions
Find the device manual for free WBP-110 VOLTCRAFT in PDF.
User questions about WBP-110 VOLTCRAFT
0 question about this device. Answer the ones you know or ask your own.
Ask a new question about this device
Download the instructions for your Thermal camera in PDF format for free! Find your manual WBP-110 - VOLTCRAFT and take your electronic device back in hand. On this page are published all the documents necessary for the use of your device. WBP-110 by VOLTCRAFT.
USER MANUAL WBP-110 VOLTCRAFT
GB Operating Instructions Thermal imaging camera WBP-110 Item No. 2825497 Page 30 - 57
text_image
QR code image containing encoded data, no visible human-readable texttext_image
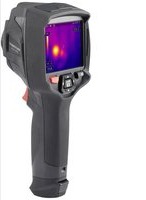
°C ME=0.95 13.58 S:33.8 36.9 Thermal imagetext_image
°C ME=0.95 13:58 S:33.6 35.5 Setting Setting Device Setting > Measure Setting > Reset >text_image
Device Setting Brightness 100%Zeit Datum
text_image
Time/Date Year 2023 Month May Day 16 Hour 11 Minute 55Sprache
other
Emissivity | Material | Emissivity | |---|---| | Water | 0.96 | | Stainless steel | 0.14 | | Aluminum plate | 0.09 | | Asphalt | 0.96 | | Concrete | 0.97 |Alarm-Modus
text_image
C M E=0.95 13:58 S:33.8 37.0 33.0 MANUAL14.1 Manuel-Modus
1 Table of contents....30
2 Introduction....32
3 Explanation of symbols....32
4 Intended use....33
5 Scope of supply 33
6 Latest product information ....34
7 Features and functions ....34
8 Safety instructions ....34
8.1 General information ....34
8.2 LiPo batteries....35
9 Operating and display elements 36
9.1 Thermal imaging camera 36
9.2 Display indicators....37
10 Setting up....38
10.1 Charging the battery 38
10.2 MicroSD 38
11 Getting started 39
11.1 Switching the device on/off 39
11.2 Temperature calibration....39
11.3 Setting the emissivity value....39
11.4 Capturing a photo/video....40
11.4.1 Photo....40
11.4.2 Video....40
12 Menu navigation 40
30
13 Menu settings 42
13.1 Gallery 42
13.2 Alarm....42
13.3 Parameter menu 42
13.3.1 Ambient temperature 42
13.3.2 Reflected temperature 43
13.3.3 Humidity....43
13.3.4 Infrared compensation....43
13.3.5 Distance....43
13.3.6 Emissivity value 43
13.4 Image mode....44
13.5 Palette....44
13.6 Settings....45
13.6.1 Device settings 45
13.6.2 Measurement setup....48
13.6.3 Reset 50
14 Image customisation....52
14.1 Manual mode....52
14.2 Auto mode and Histogram mode 52
15 Software....53
16 Emissivity value....53
17 Cleaning and care....55
18 Disposal....56
19 Technical data ....57
2 Introduction
Dear customer,
Thank you for purchasing this product.
This product complies with the statutory national and European requirements.
To maintain this status and to ensure safe operation, you as the user must observe these operating instructions!
These operating instructions are part of this product. They contain important information on setting up and using the product. Also consider this if you pass on the product to any third party. Therefore, retain these operating instructions for reference!
If there are any technical questions, please contact: www.conrad.com/contact
3 Explanation of symbols
The following symbols appear on the product/device or in the text:

This symbol warns of hazards that can lead to personal injury or property damage.
4 Intended use
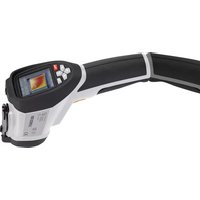
The product is a pocket-sized thermal imaging camera. It can be used to find hidden hot spots, energy leaks, structural defects, pipe jams, HVAC faults and other problems that can be discovered through thermal surface imaging. The device can display temperatures up to 550 °C and show results on an LCD screen in real time. Data can be recorded and saved to a microSD card.
Contact with moisture must be avoided under all circumstances.
For safety and approval purposes, do not rebuild and/or modify this product.
If you use the product for purposes other than those described above, the product may be damaged. In addition, improper use can result in other hazards.
Read the instructions carefully and store them in a safe place. Make this product available to third parties only together with its operating instructions.
All company and product names contained herein are trademarks of their respective owners.s
All rights reserved.
USB4 ^® , USB Type-C ^® and USB-C ^® are registered trademarks of USB Implementers Forum.
5 Scope of supply
Thermal imaging camera
USB-C® cable
SD card
Micro SD adapter
Carrying bag, strap
Operating instructions
6 Latest product information
Use the link www.conrad.com/downloads (alternatively scan the QR code) to download the complete operating instructions (or new/current versions if available). Follow the instructions on the web page.

text_image
QR code image containing encoded data, no visible human-readable text7 Features and functions
High and low temperature alarms
Photo and video recording
■ Display size 2.8" (58 x 43 mm)
Display resolution 320 x 240 pixels
8 Safety instructions

Read the operating instructions carefully and especially observe the safety information. If you do not follow the safety instructions and information on proper handling, we assume no liability for any resulting personal injury or damage to property. Such cases will invalidate the warranty/guarantee.
8.1 General information
This product is not a toy. Keep it out of the reach of children and pets.
Do not leave packaging material lying around carelessly. It may become a dangerous plaything for children.
Protect the product from extreme temperatures, direct sunlight, strong jolts, high humidity, moisture, flammable gases, steam and solvents.
Do not place the product under any mechanical stress.
If it is no longer possible to operate the product safely, take it out of operation and protect it from any accidental use. Safe operation can no longer be guaranteed if the product
– is visibly damaged,
– is no longer working properly,
– has been stored in adverse ambient conditions for extended periods,
Consult an expert when in doubt about the operation, safety or connection of the device.
Maintenance, modifications and repairs must only be completed by a technician or an authorised repair centre.
If you have questions which remain unanswered by these operating instructions, contact our technical support service or other technical personnel.
8.2 LiPo batteries
The rechargeable battery is permanently built into the product and cannot be replaced.
Never damage the battery. Damaging the casing of the rechargeable battery might cause an explosion or a fire! Unlike conventional batteries/rechargeable batteries (e.g. AA or AAA type), the casing of the LiPo rechargeable battery does not consist of a thin sheet but rather a sensitive plastic film only.
Never short-circuit the contacts of the battery. Do not throw the battery or the product into fire. There is a danger of fire and explosion!
Charge the rechargeable battery regularly, even if you are not using the product. Due to the rechargeable battery technology being used, you do not need to discharge the rechargeable battery first.
Do leave the battery unattended when it is charging.
When charging, place the product on a surface that is not heat-sensitive. Normally, a certain amount of heat is generated during charging.
9 Operating and display elements
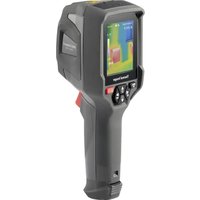
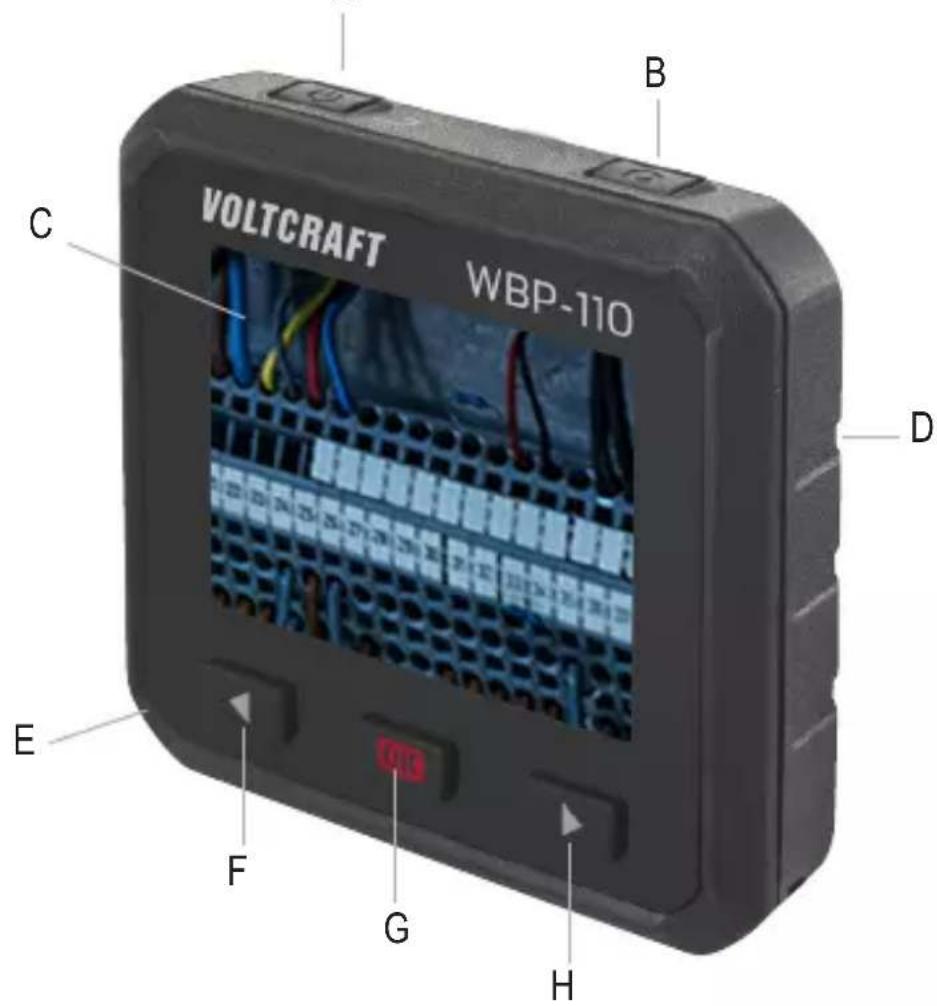
9.1 Thermal imaging camera
text_image
VOLTCRAFT WBP-110 C B D E F G HA. Power button
(press and hold to turn the device ON or OFF) / Back button
B. Photo/video button
C. Display
D. Rear side:
- Thermal sensor
- Camera
- LED
E. Bottom side: - Dust cap - MicroSD card slot - USB-C® port (charging port/data transfer)
F. Left ◀ button
G. OK button/selection button
H. Right ▶ button
9.2 Display indicators

text_image
°C ME=0.95 13:45 S: 16.6 H: 23.6 C: 14.9 25.2 8 9 13.3 10 ②③④ ⑥①⑦ ⑤①②⑪- Battery level status
- Temperature unit
- Distance unit
- Emissivity value
- Center/maximum/minimum point temperature measurements
- SD card
- Time
- Maximum temperature of current scene
- Colour bar
- Minimum temperature of current scene
- Main menu
- Image display area
10 Setting up
10.1 Charging the battery
Be sure to charge the battery before using the thermal imaging camera for the first time.
Open the dust cap (E) to access the USB-C® port.
Plug one end of the USB cable (included) into the USB-C® port of the device and the other end into a suitable USB-A power supply.
Short press the power button (A) to display the battery charge status.
Allow the battery to charge until the full battery status ( ) and then disconnect the USB charging cable.
10.2 MicroSD
First, open the dust cap (E) to access the microSD card slot.
Insert the microSD card in the direction shown on the cap. You should hear a click if you have done this correctly.
Close the cap again.
You may need to restart the device by switching it off and on again so it can recognise the SD card.
You may need to format the SD card before using it for the first time.
More information can be found in section 13.6 "Settings" under the menu item "Reset" and in section 19 "Technical data".
Note:
Photos and videos can also be stored in the internal memory.
11 Getting started
11.1 Switching the device on/off
Press and hold the power button (A) for about 3 seconds to switch on the thermal imaging camera.
The screen lights up, and the device takes a few seconds to complete calibration. After a short time, the display shows a thermal image.
Note:
Once switched on, the thermal imaging camera requires sufficient warm-up time to ensure the most accurate temperature measurements and the best image quality.
Press and hold the power button (A) for about 5 seconds to switch off the thermal imaging camera.
11.2 Temperature calibration
The inherent temperature drift of the thermal sensor can affect the accuracy of measurements.
Therefore, you should calibrate the sensor by pressing and holding the OK button (G) and then releasing it. You will then hear a click.
11.3 Setting the emissivity value
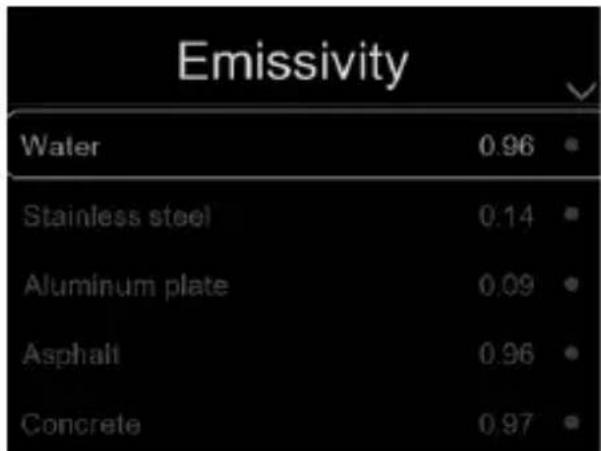
For accurate temperature readings, it is important to select an emissivity value to match the emissivity of the surface being measured. More information on how to change the emissivity value can be found in section 13.3 "Parameter menu" under the menu item "Emissivity value" as well as in section 13.6 "Settings" under the menu item "Emissivity value". Also, refer to section 16 "Emissivity value" for a list of the emissivity values of the common objects for surface temperature measurements.
11.4 Capturing a photo/video
11.4.1 Photo
Pressing the photo button (B) captures the thermal image shown on the display (C) with the relevant temperature data.
Press the OK button (G) to save the picture.
Press the photo button (B) again to discard the image.
11.4.2 Video
Pressing and holding the photo button (B) for about 2 seconds captures the thermal image shown on the display (C) with the relevant temperature data.
Press the photo button (B) again to stop recording.
12 Menu navigation
| Button Function | |
| OK button (G) | Press to enter menu and submenus.Press to confirm a selection. |
| ◀ button (F) Press to move left. | |
| ▶ button (H) Press to move right. | |
| Power button (A) Press to return to the previous menu. | |

text_image
°C M E=0.95 13:58 S: 16.6 H: 23.6 C: 14.9 25.2 13.3
Gallery: Enter the picture view

Alarm setting: High/low temperature alarm settings

Parameters: Set the temperature calculation parameters.

Image mode: Set the image source to be displayed on the thermal aging camera's LCD screen.
The page contains three options: infrared image, visual image and fusion.

Palette: Set the type of colour bar.

Settings Set the language, time/date, reen brightness
13 Menu settings
13.1 Gallery
- From the main menu, press the left ◀ (F) or right ▶ (H) button to highlight "Gallery".
- Briefly press the OK button (G) to confirm.
- Briefly press the power button (A) to hide the menu.
- Use the left ◀ (F) and right ▶ (H) buttons to navigate to the desired screenshot/video.
- After that, press the OK button (G) to select the image of choice. This submenu allows you to edit the image (parameters/image mode/palette).
Refer to items 13.3, 13.4 and 13.5 below.
To save the changes, select the check mark symbol.
To discard the changes, select the x symbol.
13.2 Alarm
From the main menu, press the left ◀ (F) or right ▶ (H) button to highlight "Alarm". Briefly press the OK button (G) to confirm. This submenu allows you to set the lower and upper alarms.
To do this, use the left ◀ (F) and right ▶ (H) buttons and confirm your selection by pressing the OK button (G).
To exit the alarm setup menu, briefly press the power button (A).
13.3 Parameter menu
From the main menu, press the left ◀ (F) or right ▶ (H) button to highlight "Parameters". After that, briefly press the OK button (G) to display the submenu "Parameters".
Use the left ◀ (F) and right ▶ (H) buttons to navigate in this submenu, and press the OK button (G) to enter this menu. Here you can make the following settings:
13.3.1 Ambient temperature
The ambient temperature affects the thermal imaging camera's measurement. The permissible temperature range is between -10 and 50 degrees Celsius.
13.3.2 Reflected temperature
The reflected temperature is an important factor for radiometric temperature measurements. The thermal imaging camera has a reflected temperature compensation feature. It is necessary to accurately set the reflected temperature for a more accurate temperature measurement. For most applications, the reflected temperature is the same as the ambient temperature.
The reflected temperature only needs to be set when there are much hotter objects that produce strong emissions near the target to be measured.
13.3.3 Humidity
Airborne water droplets can absorb infrared radiation. Humid air can affect the accuracy of the temperature measurement. You can set humidity compensation between 0% and 100%.
13.3.4 Infrared compensation
The delta temperature value directly affects the measurement.
13.3.5 Distance
Lots of airborne substances can absorb infrared radiation. That said, the object's infrared radiation attenuates as the distance increases. You can set the distance between 0 - 2000 metres.
13.3.6 Emissivity value
This option allows you to set the emissivity value of the object. You can choose a value between 0.01 and 1.00. Refer to section 16 “Emissivity value”.
To exit this submenu and thus the Parameter menu, briefly press the power button (A).
13.4 Image mode

text_image
C ME=0.95 13.58 S:33.8 36.9 Thermal imageFrom the main menu, press the left ◀ (F) or right ▶ (H) button to highlight the "Image mode" symbol. Briefly press the OK button (G) to enter the submenu with three image modes.

Thermal image: shows only the infrared image

Camera: shows only the visible image

AUF:Auto Fusion mode, compare the centre area temperature with full screen. The unit automatically calculates the mixing ratio of infrared to visible images.
To exit the "Image mode" menu, briefly press the power button (A).
13.5 Palette
From the main menu, press the left ◀ (F) or right ▶ (H) button to highlight “Palette”. Confirm your selection by briefly pressing the OK button (G) to enter the submenu. This submenu allows you to change the false colour display of the displayed or captured infrared images. You can choose from a variety of palettes for specific applications. The default palettes offer a uniform, linear colour display for optimal presentation of details.
Default palette
The submenu offers 8 options to choose from:

Iron

Rainbow

White hot

Black hot

Brown hot

lue red Ho

cold Feather

Use the left ◀ (F) and right ▶ (H) buttons to select the required palette.
To exit the palette selection menu, briefly press the power button (A).
13.6 Settings
From the main menu, press the left ◀ (F) or right ▶ (H) button to highlight "Setting". After that, briefly press the OK button (G) to call up the submenu.
Briefly press the power button (A) to exit the Settings menu.

text_image
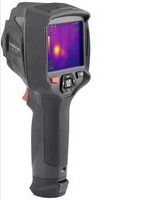
°C ME=0.95 13:58 S:33.6 35.5 Setting Setting Device Setting > Measure Setting > Reset >The menu offers the following settings:
13.6.1 Device settings
The device settings contain seven submenus. Press the left ◀ (F) or right ▶ (H) button to move to the next page or return to the previous page.
USB mode
- PC connection: Connect the device to the PC with a USB cable and switch it to mass storage mode.
The thermal imaging camera appears as a mass storage device. - PC camera: Connect the device to the PC with a USB cable and switch it to UVC camera mode. The thermal imaging camera appears as a camera.
Flashlight
Press the OK button (G) to switch the LED lamp on and off.
Brightness
Use the OK button (G) to change the screen brightness. Use the left ◀ (F) and right ▶ (H) buttons to adjust the brightness of the LCD screen.

text_image
Device Setting Brightness 100%Time/date
Use the OK button (G) to change the setting. Use the left ◀ (F) and right ▶ (H) buttons to adjust the item value.

text_image
Time/Date Year 2023 Month May Day 16 Hour 11 Minute 55Language
Use the OK button (G) to change the setting. Use the left ◀ (F) and right ▶ (H) buttons to select the language of choice.

text_image
Language English Deutsch Español Français ItalianoAutomatic power-off
The automatic power-off menu has four options: "OFF", "5 min", "10 min", "15 min" and "30 min". Choose the required automatic power-off time or disable the automatic power-off function by selecting "OFF".

text_image
Auto Power Off OFF 5Min 10Min 15Min 30MinInfo
The Info menu contains all information about the product, such as software version, serial number, etc.

text_image
About Model WBP-110 Serial Number 220110402 Software V2.97 Storage 3.5G13.6.2 Measurement setup
The Measurement setup menu has eight options:
Enable max/min temperature
Use the left ◀ (F) or right ▶ (H) button to highlight the maximum/minimum temperature, and then press the OK button (G) to enable or disable the max/min point measurement.
Distance unit
This option allows you to change the distance unit between “m” (metre) and “ft” (foot).
1 ft = 0.3048 m;
1 m = 3.2808399 ft.
Temperature unit
Select the temperature unit °C, °F and K.
Conversion relationship: °F=1.8*°C+32, K=273.15+°C.

text_image
Temp. Unit Celsius (°C) Fahrenheit (°F) Kelvin (K)Temperature range
You can choose between the temperature ranges “-20 to 150 °C” and “0 to 550 °C”. The “-20 to 150 °C” option enables a more accurate overlapping temperature of the two ranges.

text_image
Temp. Range -20~150°C 0~550°CEmissivity value
Use the table below to quickly set the emissivity:
other
Emissivity | Material | Emissivity | |---|---| | Water | 0.96 | | Stainless steel | 0.14 | | Aluminum plate | 0.09 | | Asphalt | 0.96 | | Concrete | 0.97 |Alarm mode
This menu allows you to set the following alarm modes:
Off / Above alarm / Below alarm / Zone alarm
13.6.3 Reset
Format memory
The “Format memory” option formats the entire image gallery without affecting the device settings.
Factory defaults
The thermal imaging camera has the following factory defaults:
| Item Parameter Value | ||
| Measurement Centre | spot measurementHot spot measurementCold spot measurement | OnOffOff |
| Measurement parameters | Emissivity valueReflected temperature | 0.9525 °C |
| Image Mode | PaletteSetting | InfraredIronAutomatic |
| System settings Language | Lamp | EnglishOff |
14 Image customisation
There are three image customisation modes: Histogram, Auto and Manual.
Briefly press the power button (A) to enter the normal measurement mode and hide the submenus.

text_image
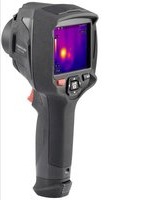
C ME=0.95 S:33.8 13:58 37.0 33.0 MANUAL14.1 Manual mode
To enter the Manual mode, press the right ▶ button (H).
This mode allows you to set the minimum or maximum level by pressing and holding the left ◀ (F) or right ▶ (H) button, respectively.
Briefly press the left ◀ (F) and right ▶ (H) buttons to set the desired value.
To exit the submenu, press the power button (A).
14.2 Auto mode and Histogram mode
Auto mode: The thermal image of the minimum and maximum temperatures determines the level and range. The relationship between temperature and colour is linear.
Histogram mode: The thermal image is enhanced by the histogram algorithm. The relationship between temperature and colour is not linear. Some parts of the image are enhanced.
15 Software
Download the software using the link www.conrad.com/downloads.
The software allows you to manage files, tag images, and analyse data.
Connect the device to your computer by plugging one end of the USB cable (included) into the USB-C® port (E) (underneath the dust cap) of the device and the other end into a vacant USB-A port on your computer.
16 Emissivity value
When using the thermal imaging camera, always consider the emissivity of the target surface the temperature sensor is pointing at.
Emissivity is a measure of how well an object radiates the heat, which affects how accurate the temperature measurement reflected off that object is.
Emissivity values range from 0 (reflects all energy) to 1.0 (perfectly absorbs and reflects all energy).
An object can be cool to the touch but look hot if it reflects a nearby source of heat. Or it can be warm to the touch but appear cooler than other surfaces of the same temperature.
Emissivity of common objects
| Material Emissivity value | |
| Water 0.96 | |
| Stainless steel 0.14 | |
| Aluminium plate 0.09 | |
| Asphalt 0.96 | |
| Concrete 0.97 | |
| Cast iron 0.81 | |
| Rubber 0.95 | |
| Wood 0.85 | |
| Brick 0.75 | |
| Adhesive tape 0.96 | |
| Brass plate 0.06 | |
| Human skin 0.98 | |
| PVC plastic 0.93 | |
| Polycarbonate 0.80 | |
| Oxidised copper 0.73 | |
| Rust | 0.80 |
| Paint | 0.90 |
| Soil | 0.93 |
17 Cleaning and care
Important:
- Do not use aggressive cleaning agents, rubbing alcohol or other chemical solutions. They can damage the housing and can cause the product to malfunction.
- Never immerse the product in water or expose it to wetness or increased humidity.
Before cleaning the product, always disconnect it from the power supply by unplugging the USB-C ^® cable.
Use a slightly damp cloth or sponge to clean the camera.
18 Disposal
Product

This symbol must appear on any electrical and electronic equipment placed on the EU market. This symbol indicates that this device should not be disposed of as unsorted municipal waste at the end of its service life.
Owners of WEEE (Waste from Electrical and Electronic Equipment) shall dispose of it separately from unsorted municipal waste. Spent batteries and accumulators, which are not enclosed by the WEEE, as well as lamps that can be removed from the WEEE in a non-destructive manner, must be removed by end users from the WEEE in a non-destructive manner before it is handed over to a collection point.
Distributors of electrical and electronic equipment are legally obliged to provide free take-back of waste. Conrad provides the following return options free of charge (more details on our website):
in our Conrad offices
at the Conrad collection points
at the collection points of public waste management authorities or the collection
points set up by manufacturers or distributors within the meaning of the ElektroG End users are responsible for deleting personal data from the WEEE to be disposed of.
It should be noted that different obligations about the return or recycling of WEEE may apply in countries outside of Germany.
19 Technical data
Charging voltage ....5 V/DC via USB
Temperature range ......-20 to +150 °C / 0 to 550 °C
Measurement accuracy ....±2 °C or 2% (Environment temperature 10 to 35°C object temperature > 0°C )
Resolution 0.1 °C
Emissivity value 0.01 to 1.00
NETD....50 mk
IR sensor resolution....160 x 120 bolometer (matrix)
Image frequency .....25 Hz
FOV 34^ × 23^
Display 2.8" / 320 x 240 pixels
Image modes......IR image, visual image, auto fusion
Colour palettes .... iron, rainbow, white hot, black hot, brown hot, blue red, hot cold, feather
Image format ......JPG 320 x 240 pixels and Hir (for analysis)
Video format ......MPEG-4, 320 x 240 @ 30 fps
Memory ....3.5 GB EMMC integrated / max. 32 GB microSD card
Supported operating systems....Windows® 7 or later (32 and 64 bit variations)
Automatic power-off.....Off, 5, 10, 15, 30 minutes
Drop-proof from ....max. 2 m
Operating conditions....-15 to +50 °C, 10 to 90% RH (non-condensing)
Storage conditions.... -40 to +70 °C, 10 to 90% RH (non-condensing)
Dimensions (L x W x H)....90 x 85 x 25 mm
Weight 168 g
13.3.5 Distance....71
Cher cliente, cher client
France (email): technique@conrad-france.fr
text_image
QR code image containing encoded data, no visible human-readable texttext_image
C ME=0.95 13:58 S:33.8 36.9 Thermal imagetext_image
°C M E=0.95 13:58 S:33.6 35.5 Setting Setting Device Setting > Measure Setting > Reset >text_image
Device Setting Brightness 100%Heure/Date
text_image
Time/Date Year 2023 Month May Day 16 Hour 11 Minute 55Langue
other
Emissivity | Material | Emissivity | |---|---| | Water | 0.96 | | Stainless steel | 0.14 | | Aluminum plate | 0.09 | | Asphalt | 0.96 | | Concrete | 0.97 |Mode d'alarme
text_image
C ME=0.95 S:33.8 13:58 37.0 33.0 MANUAL14.1 Mode manuel
text_image
QR code image containing encoded data, no visible human-readable texttext_image
°C ME=0.95 13:58 S:33.8 36.9 Thermal imagetext_image
°C ME=0.95 13:58 S:33.6 35.5 Setting Setting Device Setting > Measure Setting > Reset >text_image
Device Setting Brightness 100%Tijd Datum
text_image
Time/Date Year 2023 Month May Day 16 Hour 11 Minute 55Taal
$$ 1 (m) = 3, 2 8 0 8 3 9 9 (f t) $$