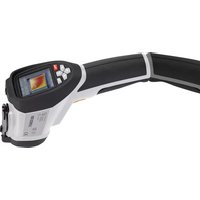
WBP-90 - Thermal camera VOLTCRAFT - Free user manual and instructions
Find the device manual for free WBP-90 VOLTCRAFT in PDF.
| Product type | Pocket thermal camera |
| Brand | Voltcraft |
| Model | WBP-90 |
| Dimensions (L x W x H) | 76 x 76 x 24 mm |
| Weight | Approx. 125 g |
| Power supply | Li-Po battery 3.7 V, 1350 mAh, 4.995 Wh (integrated) |
| IR sensor resolution | 120 x 90 pixels (bolometer array) |
| Display resolution | 320 x 240 pixels |
| LCD screen size | 48 x 36 mm |
| Temperature range | -20 to +400 °C |
| Measurement accuracy | ±3.5 °C or ±3.5% |
| Temperature resolution | 0.1 °C |
| Adjustable emissivity | 0.01 to 0.99 (default 0.95) |
| NETD | ≤60 mK |
| Geometric resolution (IFOV) | 7.3 mrad, field of view 50° (H) x 38° (V) |
| Frame rate | ≤25 Hz |
| Color palettes | Iron, rainbow, gray |
| Storage | micro SD card up to 32 GB (32 GB included) |
| Main functions | High and low temperature alarm, center point tracking, image capture, rapid thermal tracking |
| Connectivity | Micro USB for charging and data transfer |
| Supplied software | Downloadable from conrad.com (image management and analysis) |
| Maintenance and cleaning | Clean with a dry, lint-free cloth; do not use aggressive cleaners |
| Safety | Integrated non-replaceable Li-Po battery; avoid moisture and extreme temperatures |
| Drop resistance | Up to 1 m |
| Place of manufacture | Conrad Electronic SE, Germany |
Frequently Asked Questions - WBP-90 VOLTCRAFT
User questions about WBP-90 VOLTCRAFT
0 question about this device. Answer the ones you know or ask your own.
Ask a new question about this device
Download the instructions for your Thermal camera in PDF format for free! Find your manual WBP-90 - VOLTCRAFT and take your electronic device back in hand. On this page are published all the documents necessary for the use of your device. WBP-90 by VOLTCRAFT.
USER MANUAL WBP-90 VOLTCRAFT
GB Operating Instructions
WBP-90 Pocket Thermal Camera
Item No. 2524231 Page 29 - 51
F Mode d'emploi
text_image
QR code image containing encoded data, no visible human-readable texttext_image
Warning symbol with exclamation mark inside a trianglenatural_image
Technical line drawing of a mechanical component with labeled part '2' (no text or symbols beyond label)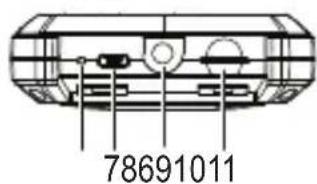
text_image
78691011
natural_image
Technical line drawing of a mechanical component with two circular features and a central hub (no text or symbols)
text_image
ABC 19.1 °C DEFGH
heatmap
| Location | Value | | -------- | ------ | | I | 26.1 °C | | J | 30.4 °C | | KLM | 21.4 °C |Wärmebildkamera
text_image
24.0 °C 50.2 17.5a) Temperature unit selection 41
b) Center point position and high/low temperature tracking 41
c) Colour palette selection....42
d) View saved images/image data.... 43
e) Settings 44
- Software 46
-
Emissivity 46
-
Care and cleaning 48
- Disposal 49
- Technical data 50
1. Introduction
Dear customer,
Thank you for purchasing this product.
This product complies with the statutory national and European requirements.
To maintain this status and to ensure safe operation, you as the user must observe these operating instructions!

These operating instructions are part of this product. They contain important notes on commissioning and handling. Also consider this if you pass on the product to any third party. Therefore, retain these operating instructions for reference!
If there are any technical questions, please contact: www.conrad.com/contact
2. Explanation of symbols

The symbol with the exclamation mark in the triangle is used to indicate important information in these operating instructions. Always read this information carefully.

The arrow symbol indicates special information and advice on operation.
3. Intended use
The product is a pocket-sized thermal imager. It can be used to find hidden hot spots, energy leaks, structural defects, pipe jams, HVAC faults and other problems that can be discovered through thermal surface imaging. It can display temperatures up to 400 °C and show results on an LCD screen in real time. Data can be recorded and saved to a microSD card.
Contact with moisture must be avoided under all circumstances.
For safety and approval purposes, you must not rebuild and/or modify this product. If you use the product for purposes other than those described above, the product may be damaged. In addition, improper use can result in other hazards. Read the instructions carefully and store them in a safe place. Make this product available to third parties only together with its operating instructions.
All company names and product names are trademarks of their respective owners. All rights reserved.
4. Delivery content
- Thermal camera
-
USB cable
• 32 GB Micro SD card -
Storage pouch
- Operating instructions
Up-to-date operating instructions
Download the latest operating instructions at www.conrad.com/downloads or scan the QR code shown. Follow the instructions on the website.

text_image
QR code image containing encoded data, no visible human-readable text5. Features and functions
• High and low temperature alarms
- Capture data
- 320 x 240 pixel resolution
- 48 x 36 mm LCD
6. Safety instructions

text_image
Warning symbol with exclamation mark inside a triangleRead the operating instructions carefully and especially observe the safety information. If you do not follow the safety instructions and information on proper handling in this manual, we assume no liability for any resulting personal injury or damage to property. Such cases will invalidate the warranty/guarantee.
a) General information
- The device is not a toy. Keep it out of the reach of children and pets.
-
Do not leave packaging material lying around carelessly. This may become dangerous playing material for children.
-
Protect the device from extreme temperatures, direct sunlight, strong jolts, high humidity, moisture, flammable gases, steam and solvents.
- Do not place the product under any mechanical stress.
- If it is no longer possible to operate the product safely, take it out of operation and protect it from any accidental use. Safe operation can no longer be guaranteed if the product:
- is visibly damaged,
- is no longer working properly,
- has been stored for extended periods in poor ambient conditions or
-
has been subjected to any serious transport-related stresses.
-
Consult an expert when in doubt operation, safety or connection of the device.
- Maintenance, modifications and repairs only be completed by a technician or an authorised repair centre.
- If you have questions which remain unanswered by these operating instructions, contact our technical support service or other technical personnel.
b) LiPo batteries
- The rechargeable battery is permanently built into the product and cannot be replaced.
- Never damage the rechargeable battery. Damaging the casing of the rechargeable battery might cause an explosion or a fire! Unlike conventional batteries/rechargeable batteries (e.g. AA or AAA type), the casing of the LiPo rechargeable battery does not consist of a thin sheet but rather a sensitive plastic film only.
about the short-circuit the contacts of the rechargeable battery. Do not throw the battery or the product into fire. There is a danger of fire and explosion!
- Charge the rechargeable battery regularly, even if you do are not using the product. Due to the rechargeable battery technology being used, you do not need to discharge the rechargeable battery first.
- Never charge the rechargeable battery of the product unattended.
- When charging, place the product on a surface that is not heat-sensitive. It is normal that a certain amount of heat is generated during charging!
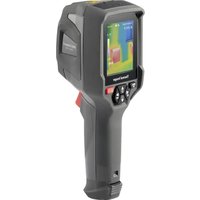
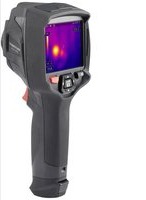
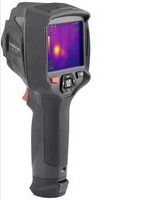
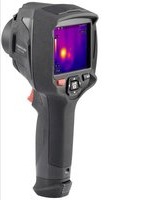
7. Operating and display elements

text_image
1 345 78691011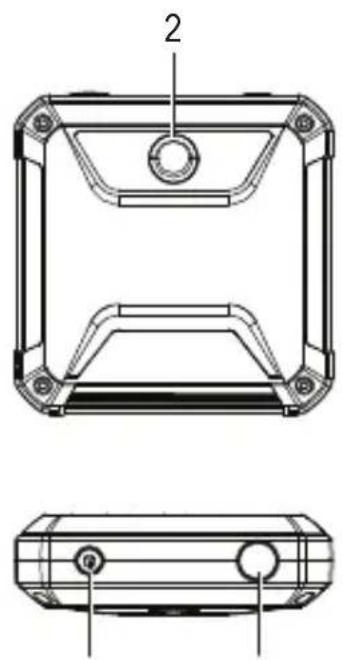
natural_image
Technical line drawing of a mechanical component with two views (top and side), no text or symbols present.
text_image
ABC 19.1 °C DEFGH 26.1 °C KLM J 30.4 21.4Thermal camera
1 Display
2 Thermal sensor
3 ◀: Left/temperature calibration button
4 OK: Selection button
5 ▶ : Right/fast thermal tracking button
6 LED charging indicator
7 Micro USB port (charging/data transfer)
8 Tripod mount
9 Micro SD card slot
10 Power button (long press to turn ON/OFF)
11 Take photo/back button
Display elements
A Measured temperature
B Thermal image display area
C Battery level
D Temperature unit selection
E Temperature tracking options
F Colour palette selection
G View saved images/data
H General settings
I Low temperature tracking indicator
J High temperature
K High temperature tracking indicator
L Centre point
M Low temperature
8. Setting up
a) Charge the battery
- Lift the cover flap marked to access the micro USB port (7).
- Using the included cable, connect one end to the micro USB port and the other end to a suitable USB-A power source.
- The LED charging indicator (6) and the display (1) will show the battery status. Charging (red)/fully charged (green)
b) MicroSD
- Lift the cover flap marked to access microSD card slot (9).
- Insert the card in the direction shown on the cover. It should "click" into place.
- Replace the cover.

You may need to restart the device for the SD card to register. When using an SD card the first time please format it. For further details see sections 11. e) "Settings", "Format SD" and 16. "Technical data".
9. Getting started
a) Power on/off
Press and hold the power button (10) to turn the power on or off.
b) Temperature calibration
The inherent temperature drift of the thermal sensor can affect the accuracy of measurements.
To calibrate the sensor, turn the power on (10) then press the left button ◀ (3). The display will show "calibrating" to indicate that the temperature has been calibrated.
c) Set the emissivity value
For accurate temperature readings, it is important to select an emissivity value to match the emissivity of the surface being measured.
See section 11. e) "Settings", "Emissivity" for how to change emissivity values.
See section 13. "Emissivity" for a list of values for common objects.
d) Capture screen image
Press the photo button (11) to capture the image and data shown on the display (1).
- Press the right ▶ button (5) to save the image.
- Press the left ◀ button (3) to discard the image
It is recommended not to store more than 5000 images as this may affect the image storage speed.
10. Navigating menus
| Button Action | |
| OK | Press to enter menu and submenus.Press to confirm a selection. |
| ◀ Press to move left. | |
| ▶ Press to move right. | |
| Back (11) | Press to return to the previous menu. |

text_image
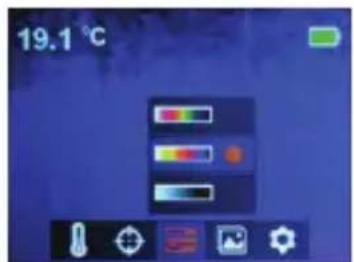
Screenshot of a software toolbar with icons and labels for saving images and settings11. Menu Settings
a) Temperature unit selection
Navigate to the temperature unit selection (D) menu ⚙, then choose °C or °F units of measurement.
b) Center point position and high/low temperature tracking
Navigate to the temperature tracking options (E) menu ⏻. You can activate one or both options at the same time.
- Center point : The target in the middle of the screen is where the temperature is being measured. The value is shown at the top left of the display.
- High/low temperature tracking The highest and lowest temperature values on the screen are marked by dynamic indicators: [H] High, [L] Low
The bar on the right shows high/low values and the corresponding colour.
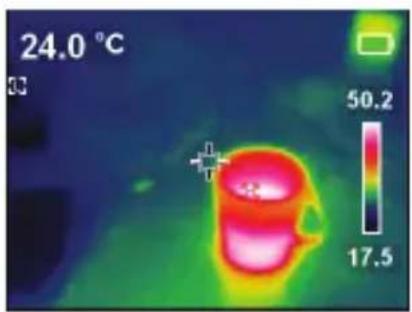
text_image
24.0 °C 50.2 17.5c) Colour palette selection
- Navigate to the colour palette selection (F) menu, then select between iron red, rainbow, and grey.
- If the colour palette does not change, check that you have not activated "fast thermal tracking" (see below).
text_image
19.1 °C→ Fast thermal tracking visually increases the contrast between high and low temperatures. From the main page, press the right ▶ button (5) to toggle between the selected colour palette and "fast thermal tracking".

text_image
21.8 °C 25.7 14.1 22.0 °C 26.0 14.d) View saved images/image data
Navigate to the view saved images (G) menu 📋, then scroll left ◀/right ▶ to find the desired image. Press OK (4) to select the image.
- Select to view image data.
- Select to delete the selected image
- Press ▶ to delete, ◀ to keep

text_image
20. Picture Name: IMG190103111722.bmp Date: 2019-01-03 Time: 11:17:22 Emissivity: 0.95 Temperature: Center : 20.9 °C Max : 22.5 °C Min : 11.5 °C Resolution:320x240 1/2 22.5 11.5
text_image
20.9 °C 22.5 11.5e) Settings
- Navigate to the general settings (H) menu and press OK to enter.
- Scroll up ◀/down ▶ to find the desired setting.
- Press OK to make a selection and the back button (11) to return to the previous menu.
| Menu Description | |
| Temp Bar Show or hide the high/low temperature bar on the main display. | |
| Time&Date Set time format, date, and time. | |
| Emissivity | Change the emissivity value (0.01 to 0.99), the default value is 0.95.→ For accurate temperature readings, it is important to select an emissivity value to match the emissivity of the surface being measured. Please refer to section 12. “Emissivity” for a list of values for common objects. |
| Auto Power Off | Set the auto power off interval (5, 10, 30 min).Set to “Off” to deactivate auto power off. |
| Brightness Adjust the screen brightness (low, medium, high). | |
| Menu Description | |
| HI/LO alert | Turn the high or low temperature alert ON/OFFSet the temperature threshold that triggers the alert. When a threshold is reached, an alert icon will appear on the display: H=High, L=Low. When a threshold is reached, an alert icon will appear on the display: H=High, L=Low. |
| Local Info View | the SD card capacity (MB). |
| Recovery Return all settings to factory defaults. | |
| Format SD | Format the SD card. Make sure to backup any important files before formatting. Formatting the card will erase all images and other files on the card Make sure to backup any important files before formatting. Formatting the card will erase all images and other files on the card |
12. Software
- Download the software from www.conrad.com/downloads.
- Use the software to manage files, mark images up, and analyze data.
• Use the included cable to connect the micro USB port (7) to an available USB-A port on your computer.
13. Emissivity
When using the thermal camera, always consider the emissivity of what you are looking at.
Emissivity is a measure of how well an object radiates the heat, which affects how accurate the temperature measurement reflected off that object is.
Emissivity values range from 0 (reflects all energy) to 1 (perfectly absorbs and reflects all energy).
An object can be cool to the touch but look hot if it reflects a nearby source of heat, or feel warm but appear cooler than other surfaces of the same temperature.
Emissivity of common objects
| Material Emissivity | Material Emissivity | ||
| Wood 0.85 Black paper | 0.86 | ||
| Water 0.96 Polycarbonate | 0.80 | ||
| Brick 0.75 Concrete | 0.97 | ||
| Stainless steel 0.14 Copper oxide | 0.78 | ||
| Tape 0.96 Cast iron | 0.81 | ||
| Adhesive tape 0.09 Rust | 0.80 | ||
| Copper plate 0.06 Gypsum | 0.75 | ||
| Dark aluminium | 0.95 Paint | 0.90 | |
| Human skin 0.98 Rubber | 0.95 | ||
| Asphalt | 0.96 Soil | 0.93 | |
| PVC material 0.93 | |||
14. Care and cleaning

Do not use any aggressive cleaning agents, rubbing alcohol or other chemical solutions as they can cause damage to the housing and malfunctioning.
- Disconnect the USB cable before each cleaning.
- Clean the product with a dry, fibre-free cloth.
15. Disposal

This symbol must appear on any electrical and electronic equipment placed on the EU market. This symbol indicates that this device should not be disposed of as unsorted municipal waste at the end of its service life.
Owners of WEEE (Waste from Electrical and Electronic Equipment) shall separately from unsorted municipal waste. Spent batteries and accumulators, which are not enclosed by the WEEE, as well as lamps that can be removed from the WEEE in a non-destructive manner, must be removed by end users from the WEEE in a non-destructive manner before it is handed over to a collection point.
Distributors of electrical and electronic equipment are legally obliged to provide free take-back of waste. Conrad provides the following return options free of charge (more details on our website):
• in our Conrad offices
• at the Conrad collection points
- at the collection points of public waste management authorities or the collection points set up by manufacturers or distributors within the meaning of the ElektroG
End users are responsible for deleting personal data from the WEEE to be disposed of.
It should be noted that different obligations about the return or recycling of WEEE may apply in countries outside of Germany.
16. Technical data
Charging voltage/current 5 V/DC via USB
Battery Li-Po 3.7 V, 1350 mAh, 4.995 Wh
Operating current consumption .... 300 mA
Temperature range ...... -20 to +400 °C
Accuracy.... ±3.5 °C or 3.5 %
Resolution....0.1 °C
Emissivity...... Default: 0.95
Adjustable: 0.01 - 0.99
NETD ....≤60 mk
Geometric resolution (IFOV)....7.3 mrad
IR sensor resolution....120 x 90 bolometer matrix
Auto shut off 5, 10, 30 mins
Palettes....Iron, rainbow, grey
FOV 50° (H) × 38° (V)
Image frequency....≤ 25 Hz
Image...... Bitmap (BMP), 320 x 240 pixels
LCD size 48 x 36 mm
Storage card.... max. 32 GB Micro SD card
Operating altitude 0 - 2000 m
Supported OS......Windows® 7 or above (32 and 64 bit variations)
Drop proof....max. 1 m
Operating conditions.... 0 to 50 °C, <85 % RH (non-condensing)
Storage conditions....-20 to +60 °C, <85 % RH (non-condensing)
Dimensions (L x W x H)....76 x 76 x 24mm
Weight .... approx. 125 g
Table des matières

Page
France (email): technique@conrad-france.fr
Suisse: www.conrad.ch ____
2. Explication des symboles

text_image
QR code image containing encoded data, no visible human-readable texttext_image
Warning symbol with exclamation mark inside a trianglenatural_image
Technical line drawing of a mechanical component with labeled part '2' (no text or symbols beyond label)
text_image
78691011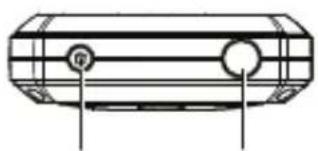
natural_image
Technical line drawing of a mechanical component with two circular features and a central hub (no text or symbols)
text_image
ABC 19.1 °C DEFGH
heatmap
| Location | Value | | -------- | ------ | | I | 26.1 °C | | J | 30.4 | | KLM | 21.4 |Caméra thermique
1 Écran
2 Capteur thermique
text_image
24.0 °C 30 50.2 17.5Tension/courant de charge .... 5 V/CC, via micro USB
text_image
QR code image containing encoded data, no visible human-readable textnatural_image
Technical line drawing of a mechanical component with labeled part 2 (no text or symbols beyond label)
text_image
78691011
natural_image
Technical line drawing of a mechanical component with two circular features and a central hub (no text or symbols)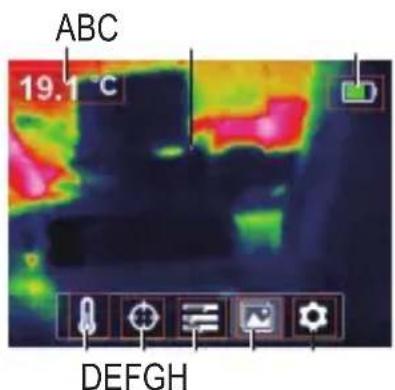
text_image
ABC 19.1 °C DEFGH
heatmap
| Location | Value | | -------- | ------ | | I | 26.1 °C | | J | 30.4 | | KLM | 21.4 |Warmtecamera
text_image
24.0 °C 33 50.2 17.5Copyright 2022 by Conrad Electronic SE.

This is a publication by Conrad Electronic SE, Klaus-Conrad-Str. 1, D-92240 Hirschau (www.conrad.com).
All rights including translation reserved. Reproduction by any method, e.g. photocopy, microfilming, or the capture in electronic data processing systems require the prior written approval by the editor. Reprinting, also in part, is prohibited. This publication represents the technical status at the time of printing.
Copyright 2022 by Conrad Electronic SE.

Copyright 2022 by Conrad Electronic SE.

Copyright 2022 by Conrad Electronic SE.