
HFW7918EIMP - Fridge HAIER - Free user manual and instructions
Find the device manual for free HFW7918EIMP HAIER in PDF.
| Product type | Fridge-freezer |
| Brand | Haier |
| Model | HFW7918EIMP |
| Dimensions (H x W x D) | 1775 x 908 x 750 mm |
| Total volume | 601 L |
| Fridge volume | 323 L |
| Freezer volume | 186 L |
| My Zone XL volume | 80 L |
| Energy efficiency class | E |
| Annual energy consumption | 357 kWh/year |
| Power supply | 220-240 V ~/50 Hz, 2 A |
| Refrigerant | R600a (isobutane) |
| Freezing capacity | 9 kg/24 h |
| Ice-making capacity | 1.4 kg/24 h |
| Water and ice dispenser | Yes (water, ice cubes, crushed ice) |
| Automatic ice maker | Yes (built into door) |
| Water filter | Yes (replacement every 6 months, model HRXWF) |
| Built-in Wi-Fi | Yes (hOn app) |
| LED lighting | Yes (fridge, freezer, My Zone XL, handle, projector) |
| Special functions | Super-Cool, Super-Freeze, Auto Set mode, Holiday mode, My Zone (Fruit & Veg., Quick Cool, 0°C Fresh), Panel lock, Presence sensor |
| Defrost | Automatic |
| Climate class | SN, N, ST (10°C to 38°C) |
| Noise level | 35 dB(A) (class B) |
| Maintenance and cleaning | Clean every 4 weeks with a soft cloth and neutral detergent. Do not use hard brushes or abrasive products. Automatic defrost. Replace water filter every 6 months. |
| Safety | Panel lock, door open alarm, use of flammable refrigerant R600a (follow safety instructions) |
| Spare parts and repairability | Spare parts available for at least 7 years for electronic components, 10 years for door seals. Legal warranty 2 years (EU). |
Frequently Asked Questions - HFW7918EIMP HAIER
User questions about HFW7918EIMP HAIER
0 question about this device. Answer the ones you know or ask your own.
Ask a new question about this device
Download the instructions for your Fridge in PDF format for free! Find your manual HFW7918EIMP - HAIER and take your electronic device back in hand. On this page are published all the documents necessary for the use of your device. HFW7918EIMP by HAIER.
USER MANUAL HFW7918EIMP HAIER
natural_image
Interior view of a modern refrigerator with open doors and glass bottles (no visible text or symbols)| RefrigeratorUser Guide |
| KühlschrankBenutzerhandbuch |
| FrigoríficoGuía del usuario |
| RéfrigérateurManuel d’utilisation |
| FrigoriferoGuida per l’utente |
| KoelkastGebruiksaanwijzing |
| KøleskabBrugervejledning |
| JääkaappiKäyttöopas |
| KjøleskapBrukerhåndboken |
| KylskåpHandbok |
| ChladničkaUživatelská příručka |
| ChladničkaPríručka používatela |
| KülmikKasutusjuhend |
| ŠaldytuvasNaudotojo vadovas |
| LedusskapisLietotāja rokasgrāmata |
GB
DE
ES
FR
IT
NL
DA
FI
NO
SV
CS
SK
ET
LT
LV
EN WARNING: Risk of fire/flammable material.
The symbol indicates there is a risk of fire since flammable materials are used. Take care to avoid causing a fire by igniting flammable material.
Thank you for purchasing a Haier Product.
Please read these instructions carefully before using this appliance. The instructions contain important information which will help you get the best out of the appliance and ensure safe and proper installation, use and maintenance.
Keep this manual in a convenient place so you can always refer to it for the safe and proper use of the appliance.
If you sell the appliance, give it away, or leave it behind when you move house, make sure you also pass this manual so that the new owner can become familiar with the appliance and safety warnings.

Legend
Warning – Important Safety information

General information and tips

Environmental information
natural_image
Symbol of a trash bin crossed with no text or labels, representing waste sorting or disposal (no text present)Disposal
Help protect the environment and human health. Put the packaging in applicable containers to recycle it. Help to recycle waste of electrical and electronic appliances. Do not dispose appliances marked with this symbol with the household waste. Return the product to your local recycling facility or contact your municipal office.
WARNING!
Risk of injury or suffocation!
Refrigerants and gases must be disposed of professionally. Ensure that the tubing of the refrigerant circuit is not damaged before being properly disposed of. Disconnect the appliance from the mains supply. Cut off the mains cable and dispose of it. Remove the trays and drawers as well as the door catch and seals, to prevent children and pets to get closed in the appliance.
Safety information ....4
Product description.... 10
Control panel....11
Use 12
Equipment 30
Care and cleaning 33
Troubleshooting 35
Installation....40
Technical data....44
Customer service....46
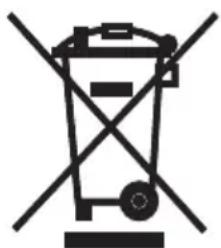
Accessories
Check the accessories and literature in accordance with this list:
Water pipe
Water connector
Energy lable
Warranty card
User manual "OK" Sticker User manual
Before switching on the appliance for the first time read the following safety hints!:

WARNING!
Before first use
▶ Make sure there is no transport damage.
Remove all packaging and keep out of children's reach.
▶ Wait at least two hours before installing the appliance in order to ensure the refrigerant circuit is fully efficient.
- Handle the appliance always with at least two persons because it is heavy.
Installation
▶ The appliance should be placed in a well-ventilated place. Ensure a space of at least 10 cm above and around the appliance.
▶ Never place the appliance in a damp area or location where it might be splashed with water. Clean and dry water splashes and stains with a soft clean cloth.
▶ Do not install the appliance in direct sunlight or in the near of heat sources(e.g. stoves, heaters).
▶ Install and level the appliance in an area suitable for its size and use.
▶ WARNING: Keep ventilation openings in the appliance or in the in-built structure clear of obstruction.
▶ Make sure that the electrical information on the rating plate agrees with the power supply. If it does not, contact an electrician.
The appliance is operated by a 220-240 VAC/50 Hz power supply. Abnormal voltage fluctuation may cause the appliance to fail to start, or damage to the temperature control or compressor, or there may be an abnormal noise when operating. In such case, an automatic regulator shall be mounted.
▶ Do not use multi-plug adapters and extension cables.
▶ WARNING: Do not locate multiple portable socket-outlets or portable power supplies at the rear of the appliance.
▶ WARNING: When positioning the appliance, ensure the supply cord is not trapped or damaged.
▶ Do not step on the power cable.
▶ Use a separate earthed socket for the power supply which is easy accessible. The appliance must be earthed.

RNING!
Only for UK: The appliance's power cable is fitted with 3-cord (grounding) plug that fits a standard 3-cord (grounded) socket. Never cut off or dismount the third pin (grounding). After the appliance is installed, the plug should be accessible.
▶ WARNING: Do not damage the refrigerant circuit. Daily use
This appliance can be used by children aged from 8 years and above and persons with reduced physical, sensory or mental capabilities or lack of experience and knowledge if they have been given supervision or instruction concerning use of the appliance in a safe way and understand the hazards involved.
▶ Children shall not play with the appliance.
▶ Children aged from 3 to 8 years are allowed to load and unload refrigerating appliances, but not allowed to clean and install the refrigerating appliances.
- Keep away children under 3 years of age from the appliance unless they are constantly supervised.
▶ Cleaning and user maintenance shall not be made by children without supervision.
▶ The appliance must be positioned so that the plug is accessible.
If coal gas of other inflammable gas is leaking into vicinity of the appliance, turn off the valve of the leaking gas, open the doors and windows and do not unplug the power cable of the refrigerator/freezer or any other appliance.
- Notice that the appliance is set for operation at the specific ambient range between 10 and 38°C. The appliance may not work properly if it is left for a long period at a temperature above or below the indicated range.
- Do not place unstable articles (heavy objects, containers filled with water) on top of the refrigerator/freezer, to avoid personal injury caused by falling or electric shock caused by contact with water.
▶ Do not pull on the door shelves. The door may be pulled slant, the bottle rack may be pulled away, or the appliance may topple.
▶ Open and close the door only with handles. The gap between the door and the cabinet is very narrow. Do not put your hands in these ares to avoid pinching your fingers. Open or close the refrigerator/freezer doors only when there are no children standing within the range of door movement.

WARNING!
▶ To avoid contamination of food, please respect the following instructions:
- Opening the door for long periods can cause a significant increase of the temperature in the compartments of the appliance.
- Clean regularly surfaces that can come in contact with food and accessible drainage systems.
- Clean water tanks if they have not been used for 48 h; flush the water system connected to a water supply if water has not been drawn for 5 days.
- Store raw meat and fish in suitable containers in the refrigerator, so that it is not in contact with or drip onto other food.
- Two-star frozen-food compartments are suitable for storing pre-frozen food, storing or making ice-cream and making ice cubes.
- One-, two- and three-star compartments are not suitable for the freezing of fresh food.
- If the refrigerating appliance is left empty for long periods, switch off, defrost, clean, dry, and leave the door open to prevent mould developing within the appliance.
▶ Never store bottled beer or beverages, liquids in bottles or cans (besides high percentage spirits) especially carbonated beverages in the freezer, as these will burst during freezing.
▶ Do not store explosive substances such as aerosol cans with a flammable propellant in this appliance.
▶ Do not store medicines, bacteria or chemical agents in the appliance. This appliance is a household appliance. It is not recommended to store materials that require strict temperatures.
▶ Check the condition of food if a warming in the freezer has taken place.
▶ Do not set unnecessarily low temperature in the refrigerator compartment. Minus temperatures may occur at high settings. Attention: Bottles can burst
▶ Do not touch frozen goods with wet hands (wear gloves). Especially do not eat ice lollies immediately after removal from the freezer compartment. There is the risk to freeze or the formation of frost blisters. FIRST aid: keep immediately under running cold water. Do not pull away!
▶ Do not touch the inside surface of the freezer storage compartment when in operation, especially with wet hands, as your hands may freeze onto the surface.

RNING!
▶ Unplug the appliance in the event of a power interruption or before cleaning. Allow at least 7 minutes before restarting the appliance, as frequent starting may damage the compressor.
▶ WARNING: Do not use electrical appliances inside the food storage compartments of the appliance, unless they are of the type recommended by the manufacturer.
Maintenance / cleaning
▶ Make sure children are supervised if they carry out cleaning and maintenance.
- Disconnect the appliance from the electrical supply before undertaking any routine maintenance. Allow at least 5 minutes before restarting the appliance, as frequent starting may damage the compressor.
▶ Hold the plug, not the cable, when unplugging the appliance.
- Do not clean the appliance with hard brushes, wire brushes, detergent powder, petrol, amyl acetate, acetone and similar organic solutions, acid or alkaline solutions. Please clean with special refrigerator/freezer detergent to avoid damage. Eventually use warm water and baking soda solution - about a tablespoon of baking soda to a litre/quart of water. Rinse thoroughly with water and wipe dry. Do not use cleaning powders or other abrasive cleaners. Do not wash removable parts in a dishwasher.
▶ Do not scrape off frost and ice with sharp objects. Do not use sprays, electric heaters like heater, hair dryer, steam cleaners or other sources of heat in order to avoid damage to the plastic parts.
▶ WARNING: Do not use mechanical devices or other means to accelerate the defrosting process, other than those recommended by the manufacturer.
If the supply cord is damaged, it must be replaced by the manufacturer, its service agent or similarly qualified persons in order to avoid a hazard.
- Do not try to repair, disassemble or modify the appliance by yourself. In case of repair please contact our customer service.
If the illuminating lamps are damaged, it must be replaced by the manufacturer, its service agent or similarly qualified persons in order to avoid a hazard.
▶ Eliminate the dust on the back of the unit at least once in the year to avoid hazard by fire, as well as increased energy consumption.

WARNING!
▶ Do not spray or flush the appliance during cleaning.
▶ Do not use water spray or steam to clean the appliance.
▶ Do not clean the cold glass shelves or glass door with hot water. Sudden temperature change may cause the glass to break.
▶ If you leave your appliance out of use for an extended period, leave it open to prevent odour and unpleasant smells building up inside.
Refrigerant gas information

WARNING!
The appliance contains the flammable refrigerant ISOBUTANE (R600a). Make sure the refrigerant circuit is not damaged during transportation or installation. Leaking refrigerant may cause eye injuries or ignite. If a damage has occurred, keep away open fire sources, thoroughly ventilate the room, do not plug or unplug the power cords of the appliance or any other appliance. Inform the customer service.
In case of eyes get into contact with the refrigerant, rinse immediately it under running water and call immediately the eye specialist. WARNING: The refrigeration system is under high pressure. Do not tamper with it. Since the flammable refrigerants are used, please install, handle and service the appliance strictly according to the instruction and contact the professional agent or our after-sales service to dispose of the appliance.

WARNING!
For refrigerators with ice-water function, please pay attention to the following warning:
For appliances not intended to be connected to the water supply:
WARNING: fill with portable water only.
For appliances intended to be connected to the water supply:
WARNING: connect to potable water supply only.
If you want to clean the water system, please refer to the User Manual. If you have any questions, please contact the after-sales service.
Intended use
This appliance is intended for cooling and freezing food. It has been designed exclusively for use in household and similar applications such as staff kitchen areas in shops, offices and other working environments; farm houses and by clients in hotels, motels and other residential type environments as well as in bed-and-breakfast and catering business. It is not intended for commercial or industrial use. Changes or modifications to the device are not allowed. Unintended use may cause hazards and loss of warranty claims.
Standards and directives CE and UK CA
This product meets the requirements of all applicable EC directives with the corresponding harmonised standards and UK standards, which provide for CE and UKCA marking.

CAUTION!
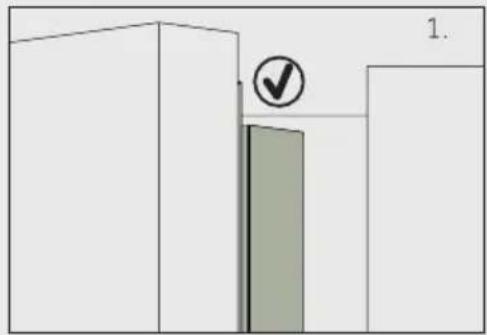
When you close the door, the vertical door strip on the fridge left door should be bent inside (1).
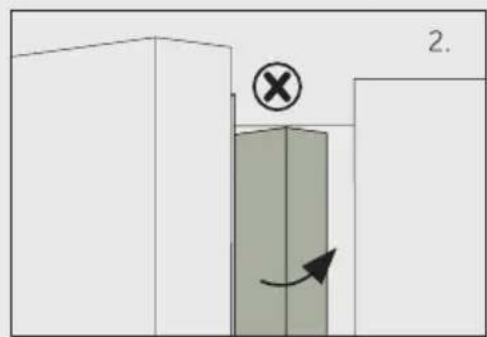
If you try to close the left door and the vertical door strip is unbent (2), you should bend it firstly, otherwise the door strip will hit the fixing shaft or right door. Thus a damage to the door slip or a leak will occur.
There is a heating thread inside the frame. The temperature of the surface will rise a little, which is normal and won't affect the function of appliance.

Notice
Due to technical changes and different models, some of the illustrations in this manual may differ from your model.
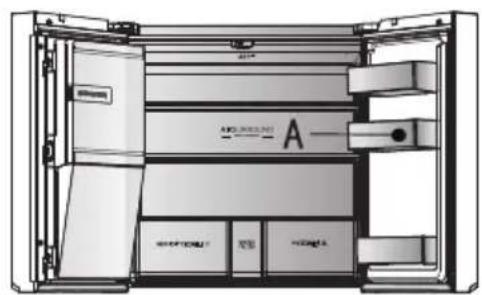
Model (HFW7918EIMP/HFW7918EIMB/HFW7918EIMP(UK))
(With Icemaker in door)
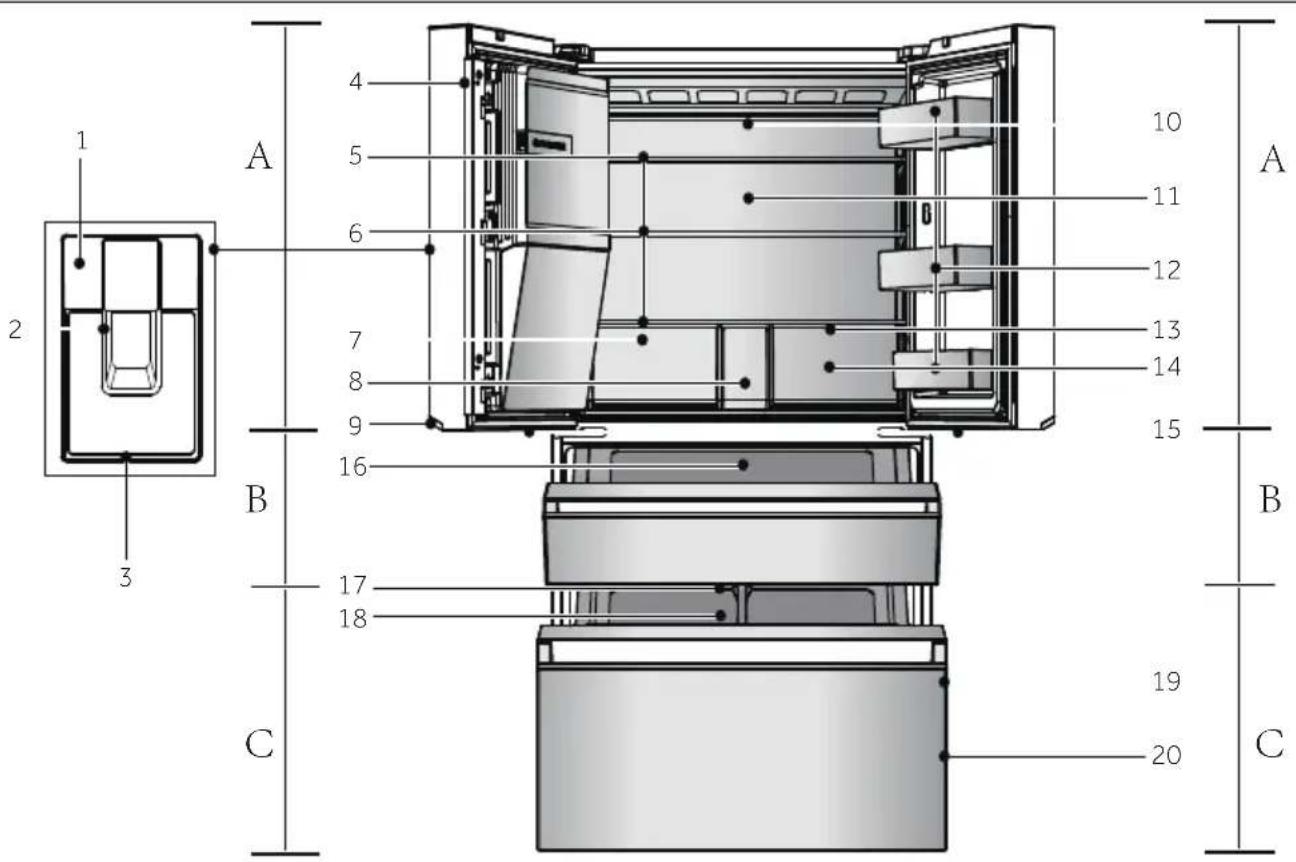
A: Fridge compartment
1 Control panel
2 Dispenser paddle
3 Drop tray
4 Vertical beam
5 Automatic Icemaker
6 Glass shelves
7 Humidity zone drawer
8 Water Filter cover
9 Handle lamp
10 Air duct and sensor (behind panel)
11 Back lamp
12 Door rack
13 Air duct (behind drawers)
14 My Zone drawer
15 My Zone XL lamp
B: My Zone XL compartment
16 My Zone XL drawer
C:Freezer compartment
17 Freezer lamp
18 Sliding tray
19 Door rack
20 Freezer drawer
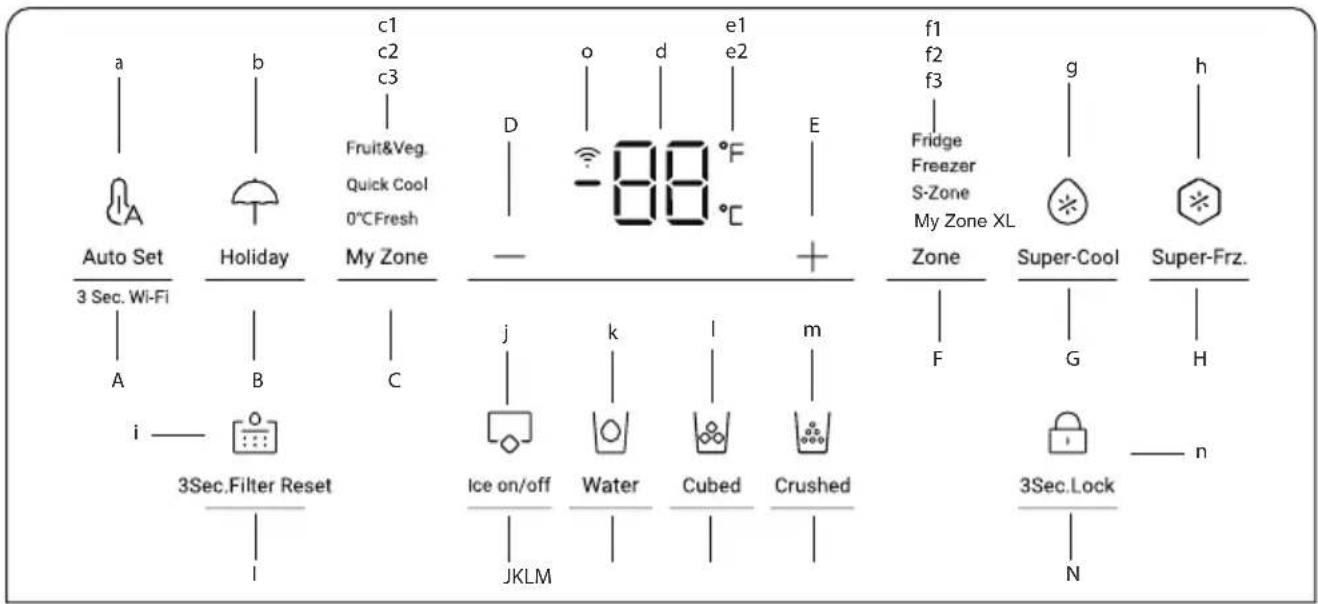
Control panel (HFW7918EIMP/HFW7918EIMB/HFW7918EIMP(UK))
flowchart
graph TD
    A["Auto Set"] --> B["3 Sec. Wi-Fi"]
    B --> C["A"]
    C --> D["i"]
    D --> E["3Sec.Filter Reset"]
    E --> F["I"]
    G["Holiday"] --> H["b"]
    H --> I["C"]
    I --> J["B"]
    J --> K["My Zone"]
    K --> L["d"]
    L --> M["-88°C"]
    M --> N["e1"]
    N --> O["E"]
    P["Zone"] --> Q["f1"]
    Q --> R["f2"]
    R --> S["f3"]
    S --> T["Fridge Freezer S-Zone My Zone XL"]
    T --> U["g"]
    U --> V["Super-Cool"]
    V --> W["H"]
    X["Super-Frz."] --> Y["n"]
    Y --> Z["3Sec.Lock"]
    Z --> AA["N"]
Buttons:
A Auto Set mode selector 3 Sec. Wi-Fi setting
B Holiday mode selector
C My Zone drawer selector
D Temperature adjustment button "-"
E Temperature adjustment button "+"
F Zone selector
G Super-Cool selector
H Super-Freeze selector
I Filter reset function selector
J Ice maker mode selector
K Water intake function selector
L Cubed ice function selector
M Crushed ice function selector
N Panel lock selector
Indicators:
a Auto Set mode
b Holiday mode
c1 Fruit & Vegetable mode c2 Quick Cool mode
c3 0°C Fresh mode
d Temperature display e1 Degrees Fahrenheit e2 Degrees Celsius
f1 Fridge indicator
f2 Freezer indicator
f3 S-Zone (My Zone XL) indicator
g Super-Cool function h Super-Freeze function i Filter reset function
j Ice maker mode
k Water intake function
I Cubed ice function
m Crushed ice function
n Panel lock
o Wi-Fi function
Sensor keys
The buttons on the control panel are sensor keys, which already respond when lightly touched with the finger.
Switch on /of the appliance
The appliance is in operation as soon as it is connected to the power supply.
When the refrigerator is powered on for the first time, the indicator "d" (Temperature display) illuminates. The fridge temperature, S-Zone temperature and freezer temperature are automatically set to 5°C, 5°C and -18°C respectively. Maybe the panel lock is active.

Notice
When the appliance is switched on after disconnection from the main power supply, it may take up to 12 hours for the correct temperatures to be reached.
Empty the appliance before switching off. To switch off the appliance, pull the power cord out off the power socket.
Lock/unlock panel
▶ Automatic lock: When the fridge door, freezer door and S-Zone door are closed and there is no key operation within 30 seconds, the display screen will be automatically extinguished and locked.

▶ Manual lock: When the display screen is unlocked, press the button "N" (Panel lock selector) and hold for 3 seconds, the buzzer rings once, the indicator "n" (Panel lock) illuminates, and the display is locked.
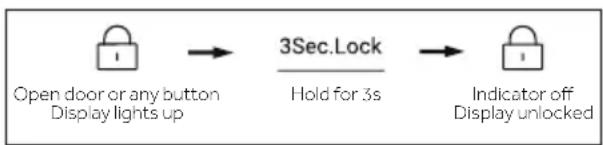
flowchart
graph LR
    A["Open door or any button<br>Display lights up"] --> B["3Sec.Lock"]
    B --> C["Hold for 3s"]
    C --> D["Indicator off<br>Display unlocked"]
Adjust the temperature
The indoor temperatures are influenced by the following factors:
▶ Ambient temperature
▶ Frequency of door opening
▶ Amount of stored foods
▶ Installation of the appliance
Adjust the temperature for fridge
- When the display screen is unlocked, press the button "F" (Zone selector). The buzzer rings once, the indicator "f1" (Fridge indicator) flashes, and then here comes the temperature setting mode of the fridge.
- Press the button "D" (Temperature adjustment button "-") every time, the buzzer rings once, the set temperature of the fridge will be reduced by 1. The fridge temperature will display in the sequence of "9°C ->8°C->7°C ->6°C ->5°C ->4°C ->3°C-
$$
2 ^ {\circ} \mathrm{C} - > 1 ^ {\circ} \mathrm{C} ^ {\prime \prime}. $$
- Press the button "E" (Temperature adjustment button "+") every time, the buzzer rings once, the set temperature of the fridge will be increased by 1. The fridge temperature will display in the sequence of "1°C ->2°C ->3°C ->4°C ->5°C ->6°C ->7°C ->8°C ->9°C".

Notice
After setting the temperature, if there is no operation within 5 seconds, the system will be automatically determined and save the set temperature.
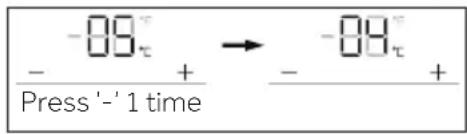
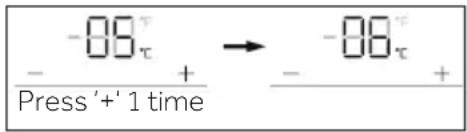
Adjust the temperature for freezer
- When the display screen is unlocked, press the button "F" (Zone selector). The buzzer rings once, the indicator "f2" (Freezer indicator) flashes, and then here comes the temperature setting mode of the freezer.
- Press the button "D" (Temperature adjustment button "-") every time, the buzzer rings once, the set temperature of the freezer will be reduced by 1. The freezer temperature will display in the sequence of "-14°C ->-15°C->-16°C ->-17°C ->-18°C ->-19°C ->-20°C->-21°C ->-22°C ->-23°C ->-24°C".
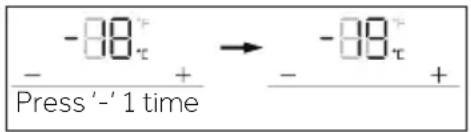
- Press the button "E" (Temperature adjustment button "+" every time, the buzzer rings once, the set temperature of the freezer will be increased by 1. The freezer temperature will display in the sequence of "-24°C ->-23°C ->-22°C ->-21°C ->-20°C ->-19°C ->-18°C ->-17°C ->-16°C ->-15°C ->-14°C".

Notice
After setting the temperature, if there is no operation within 5 seconds, the system will be automatically determined and save the set temperature.
Adjust the temperature for My Zone XL (S-Zone)
When the display screen is unlocked, press the button "F" (Zone selector). The buzzer rings once, the indicator "f3" (S-Zone indicator) flashes, and then here comes the temperature setting mode of the S-zone.
- Press the button "D" (Temperature adjustment button "-") every time, the buzzer rings once, the set temperature of the S-zone will be reduced by 1. The S-zone temperature will display in the sequence of "5°C ->4°C ->3°C->2°C ->1°C ->0°C ->-1°C ->-2°C->-3°C->-4°C->-5°C".
- Press the button "E" (Temperature adjustment button "+" every time, the buzzer rings once, the set temperature of the S-zone will be increased by 1. The S-zone temperature will display in the sequence of "-5°C->-4°C->-3°C->-2°C->-1°C->0°C->1°C->2°C->3°C->4°C->5°C".

Notice
After setting the temperature, if there is no operation within 5 seconds, the system will be automatically determined and save the set temperature.
Super-Cool function
- When the display screen is unlocked, press the button "G" (Super-Cool selector), the buzzer rings once, the indicator "g" (Super-Cool function) illuminates, and then the Super-Cool function will be turned on.
- When the indicator "g" (Super-Cool function) illuminates, press the button "G" (Super-Cool selector), the buzzer rings once, the indicator "g" (Super-Cool function) goes off, and then the Super-Cool function will be turned off.
- After the Super-Cool function is turned on, the refrigerator will automatically turn off the function when it has lasted for more than 4 hours. If you want to exit manually, you can press the button "G" (Super-Cool selector) to turn it off.

flowchart
graph LR
    A["Indicator off"] --> B["Super-Cool Press 1 time"]
    B --> C["Indicator on"]
    C --> D["Super-Cool Press 1 time"]
    D --> E["Indicator off"]

Notice
Under Super-cool state, the fridge temperature cannot be adjusted. If either button "D" (Temperature adjustment button "-") or button "E" (Temperature adjustment button "+") is pressed to adjust the temperature of fridge, the indicator "g" (Super-Cool function) will flash with a prompt sound to indicate that this operation cannot be carried out.
In the state of Super-cool function, the Auto-set function cannot be turned on at the same time due to different control modes. When you choose one function that conflicts with another function, the original function will automatically exit.
This refrigerator has human sensor function. The control panel, handle lamp and projection lamp will automatically light up if user approaches the refrigerator. Under unlocked state, hold the button "G" (Super-cool mode selector) for 3 seconds, the buzzer rings once, then the human sensor function will be turned off. The human sensor function can likewise be turned on with same operation.
Super-Freeze function (Super-Frz)
- When the display screen is unlocked, press the button "H" (Super-Freeze selector), the buzzer rings once, the indicator "h" (Super-Freeze function) illuminates, and then the Super-Freeze function will be turned on.
- When the indicator "h" (Super-Freeze function) illuminates, press the button "H" (Super-Freeze selector), the buzzer rings once, the indicator "h" (Super-Freeze function) goes off, and then the Super-Freeze function will be turned off.
- After the Super-Freeze function is turned on, the refrigerator will automatically turn off the function when it has lasted for more than 50 hours. If you want to exit manually, you can press the button "H" (Super-Freeze selector) to turn it off.

flowchart
graph LR
    A["Indicator off"] --> B["Super-Frz. Press 1 time"]
    B --> C["Indicator on"]
    C --> D["Super-Frz. Press 1 time"]
    D --> E["Indicator off"]

Notice
Under Super-Freeze state, the freezer temperature cannot be adjusted. If either button "D" (Temperature adjustment button "-") or button "E" (Temperature adjustment button "+") is pressed to adjust the temperature of freezer, the indicator "h" (Super-Freeze function) will flash with a prompt sound to indicate that this operation cannot be carried out.
Super-Freeze function is designed to keep nutrition value of frozen food, it will be freeze food in the shortest time. If large quantities of frozen food are to be frozen at one time, Meanwhile, Super-Freeze function should be set 24h in advance, to make the freezer low temperature and put food in. At this time, the freezing speed of the freezer is improved, food can be frozen quickly, the nutrition of food is effectively kept, and the storage becomes quite convenient.
In the state of Super-Freezer function, the Auto-set function cannot be turned on at the same time due to different control modes. When you choose one function that conflicts with another function, the original function will automatically exit.
Auto Set mode
- When the display screen is unlocked, press the button "A" (Auto Set mode selector), the buzzer rings once, the indicator "a" (Auto Set mode) illuminates, and then the Auto Set function will be turned on.
- When the indicator "a" (Auto Set mode) illuminates, press the button "A" (Auto Set mode selector), the buzzer rings once, the indicator "a" (Auto Set mode) goes off, and then the Auto Set function will be turned off.

flowchart
graph LR
    A["Press 1 time\nAuto Set"] --> B["Indicator on Auto Set on"]
    B --> C["Press 1 time\nAuto Set"]
    C --> D["Indicator off Auto Set off"]

Notice
In Auto Set mode, the fridge or freeze temperature cannot be adjusted. If either button "D" (Temperature adjustment button "-" or button "E" (Temperature adjustment button "+" is pressed to adjust the temperature of fridge or freezer, the indicator "a" (Auto Set mode) will flash with a prompt sound to indicate that this operation cannot be carried out.
In Auto Set mode, due to different control methods, if the „Super-Cool“ or „Super-Freeze“ function is set, the indicator “a” (Auto Set mode) goes off, and then the Auto Set function will automatically exit.
In Auto Set mode, the temperature of the S-Zone can be manually adjusted according to the needs.
Holiday mode
Holiday mode is designed for not using the fridge for a long time. When the Holiday mode is turned on, the freezer is under normal control, and the temperature of fridge is automatically set to be 17^ C. The actual temperature is not higher than 17^ C, which prevents peculiar smell caused by overtemperature, and helps reduce energy consumption at the same time.
- When the display screen is unlocked, press the button "B" (Holiday mode selector), the buzzer rings once, the indicator "b" (Holiday mode) illuminates, and then the Holiday function will be turned on.
- When the indicator "b" (Holiday mode) illuminates, press the button "B" (Holiday mode selector), the buzzer rings once, the indicator "b" (Holiday mode) goes off, and then the Holiday function will be turned off.

flowchart
graph LR
    A["Press 1 time\nHoliday"] --> B["Indicator on Auto Set on"]
    B --> C["Press 1 time\nHoliday"]
    C --> D["Indicator off Auto Set off"]
- Under unlocked state, hold the button "B" (Holiday mode selector) for 3 seconds, the buzzer rings once, then the projection lamp will be turned off. The projection lamp function can likewise be turned with same operation.
Notice
- Under Holiday state, the fridge temperature cannot be adjusted. If either button "D" (Temperature adjustment button "-") or button "E" (Temperature adjustment button "+") is pressed to adjust the temperature of fridge, the indicator "b" (Holiday mode) will flash with a prompt sound to indicate that this operation cannot be carried out.
- Before using the Holiday function, please empty the fridge to prevent food goes bad in it. When the Holiday function is turned on, either "Auto Set" function "Fridge" function or "Super-Cool" function cannot be turned on at the same time.
- In Holiday function, the setting of "Fruit&Veg, Quick cool 0°C fresh" icons in Myzone will be switched off and the temperature of Myzone cannot be adjusted. The fridge compartment and Myzone will display in the previous setting once exiting the holiday function
My Zone drawer
- When the display screen is unlocked, press the button "C" (My Zone drawer selector), the buzzer rings once, the indicator "c1" (Fruit & Vegetable mode), the indicator "c2" (Quick Cool mode) and the indicator "c3" (0°C Fresh mode) will light up in sequence.
- When the indicator "c1" (Fruit & Vegetable mode) illuminates, press the button "C" (My Zone drawer selector), the buzzer rings once, the indicator "c1" (Fruit & Vegetable mode) goes off, and then the Fruit & Vegetable function will be turned off with the indicator "c2" (Quick Cool mode) illuminating.
- When the indicator "c2" (Quick Cool mode) illuminates, press the button "C" (My Zone drawer selector), the buzzer rings once, the indicator "c2" (Quick Cool mode) goes off, and then the Quick Cool function will be turned off with the indicator "c3" (0°C Fresh mode) illuminating.
- When the indicator "c3" (0°C Fresh mode) illuminates, press the button "C" (My Zone drawer selector), the buzzer rings once, the indicator "c3" (0°C Fresh mode) goes off, and then the 0°C Fresh function will be turned off with the indicator "c1" (Fruit & Vegetable mode) illuminating.

flowchart
graph LR
    A["Fruit&Veg."] --> B["My Zone"]
    B --> C["Quick Cool"]
    C --> D["My Zone"]
    D --> E["0°C Fresh"]
    F["Indicator on Function on"] --> G["Press 1 time"]
    H["Indicator on Function on"] --> I["Press 1 time"]
    J["Indicator on Function on"] --> K["Press 1 time"]
- Under unlocked state, hold the button "C" (My Zone drawer selector) for 3 seconds, the buzzer rings once, then the handle lamp will be turned off. The handle lamp can likewise be turned on with same operation.
Notice
When the refrigerator is connect to electricity for the first time, the Fruit & Vegetable function is automatically turned on.
When the "0 °C Fresh" or "Quick Cool" function is selected, the temperature in the Fridge room should be set to the intermediate temperature (5 °C) or lower to ensure the optimal storage environment.
Filter function
When the refrigerator operates for six months, the reminder indicator "i" (Filter Reset function) will light up to remind users to replace with a new filter. When filter is replaced, hold the button "I" (Filter Reset function selector) for 3 seconds to cancel the reminder, the timing will reset with buzzer ringing.

flowchart
graph LR
    A["Indicator on"] --> B["3Sec.Filter Reset"]
    B --> C["Hold for 3s Indicator off"]

Notice
The normal service life of filter is six months. It is recommended to replace the filter every six months.
Ice maker mode
- Under unlocked state, press the button "J" (Ice maker mode selector), the buzzer rings once, the indicator "j" (Ice maker mode) illuminates, and then the ice maker mode will be turned on.
- When the indicator "j" (Ice maker mode) illuminates, press the button "J" (Ice maker mode selector), the buzzer rings once, the indicator "j" (Ice maker mode) goes off, and then the ice maker mode will be turned off.

flowchart
graph LR
    A["Ice on/off\nPress 1 time"] --> B["Indicator on\nIce making function on"]
    B --> C["Ice on/off\nPress 1 time"] --> D["Indicator off\nIce making function off"]

Notice
When the ice maker mode is turned off, Ice on / off flashes when the user takes Cubed ice or Crushed ice, prompting the user that the ice maker function is off.
Water intake function
Under any state (locked or unlocked), press the button "K" (Water intake function selector), the buzzer rings once, the indicator "k" (Water intake function) illuminates, and then the water intake function will be turned on.
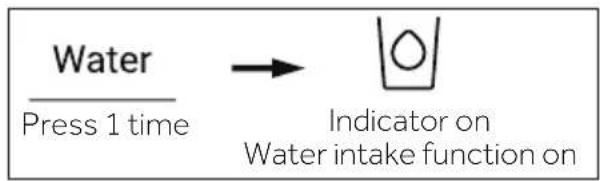
flowchart
graph LR
    A["Water\nPress 1 time"] --> B["Indicator on\nWater intake function on"]

Notice
- When the indicator "k" (Water intake function) illuminates, the indicator "l" (Cubed ice function) and the indicator "m" (Crushed ice function) go off. After the dispenser paddle is pressed, water will flow out of the intake port.
- When the water intake time reaches 150s, the refrigerator will beep and keep water until the time reaches 180s, the water will be cut off and the water valve will enter the 200s protection time, and then water intake can be carried out again.
- When the cumulative water intake time reaches 8min within 10min, the water valve enters the 200s protection time, and then water intake can be carried out again.
Cubed ice function
Under any state (locked or unlocked), press the button "L" (Cubed ice function selector), the buzzer rings once, the indicator "I" (Cubed ice function) illuminates, and then the Cubed ice function will be turned on.
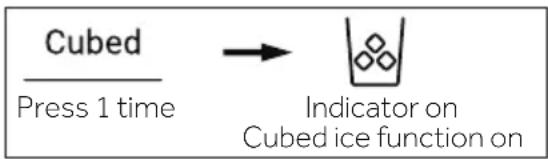
flowchart
graph LR
    A["Cubed\nPress 1 time"] --> B["Indicator on\nCubed ice function on"]

Notice
- When the indicator "l" (Cubed ice function) illuminates, the indicator "k" (Water intake function) and the indicator "m" (Crushed ice function) go off. After the micro-switch of distributor is pressed, cubed ice will flow out of the intake port.
- When the ice maker is switched on for the first time, the indicator "l" and the indicator "m" synchronously illuminate with memory of last state. When the ice maker is firstly connected to electricity to operate, the Cubed ice function is turned off by default.
- Press the micro-switch of dispenser, the light of it turns on with the cover of it open. Then, the motor of crushing ice starts to rotate anticlockwise to push ice cubes. Loosen the micro-switch of dispenser, the light of it goes off with the motor of crushing ice stopping, the cover of dispenser will close after 5 seconds.
- Under the state of Cubed ice, when Cubed ice time is longer than 50 seconds, there will be buzzer starting to alert (knocking) to notice users to shut it down. When the time reaches 1 minute, it is forced to stop Cubed ice, and it is effective when the switch is pressed next time.
- During Cubed ice, if the fridge door is opened, the motor that delivering ice will stop, with the cover of dispenser closed, light of dispenser off, and Cubed ice will be stopped.
- It is forbidden to get ice with the fridge door open.
Crushed ice function
Under any state (locked or unlocked), press the button "M" (Crushed ice function selector), the buzzer rings once, the indicator "m" (Crushed ice function) illuminates, and then the Crushed ice function will be turned on.
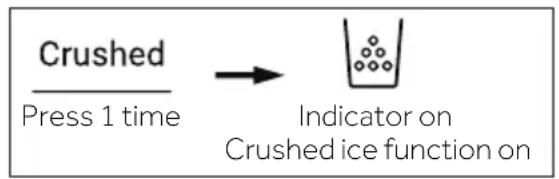
flowchart
graph LR
    A["Crushed Press 1 time"] --> B["Indicator on Crushed ice function on"]
Notice
- When the indicator "m" (Crushed ice function) illuminates, the indicator "k" (Water intake function) and the indicator "l" (Cubed ice function) go off. After the micro-switch of distributor is pressed, crushed ice will flow out of the intake port.
- Press the micro-switch of dispenser, the light of it turns on with the cover of it open. Then, the motor of crushing ice starts to rotate clockwise to push ice cubes. Loosen the micro-switch of dispenser, the light of it goes off with the motor of crushing ice stopping, the cover of dispenser will close after 5 seconds.
- Under the state of Crushed ice, when Crushed ice time is longer than 50 seconds, there will be buzzer starting to alert (knocking) to notice users to shut it down. When the time reaches 1 minute, it is forced to stop Crushed ice, and it is effective when the switch is pressed next time.
- During Crushed ice, if the fridge door is opened, the motor that delivering ice will stop, with the cover of dispenser closed, light of dispenser off, and Crushed ice will be stopped.
- It is forbidden to crush ice with the fridge door open.
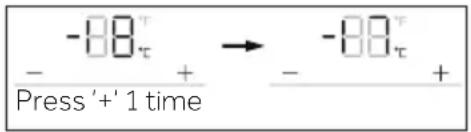
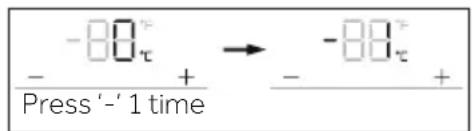
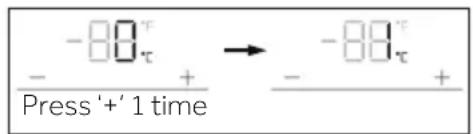
Switch between degrees Celsius and Fahrenheit
- Refrigerator factory sets degrees Celsius by default.
- When the display is unlocked, hold the button "H" (Super-Freeze selector) for 3s, the buzzer rings once, the indicator "e2" (Degrees Celsius) goes off, with the indicator "e1" (Degrees Fahrenheit) illuminating.

Indicator on

Super-Frz.


Hold for 3s
Indicator on
EPP function
Under unlocked state, continuously press the button "H" (Super-Freeze selector) and button "A" (Auto Set mode selector) 5 times (within 5 seconds), the buzzer rings once, then the EPP function will be turned off. The EPP function can likewise be turned on with same operation.
Door opening alarm
If any door is kept open too long or the door is not closed well, the refrigerator will raise beep alarm at set intervals to remind you to close the door in time.
Power off memory
The instantaneous working state of power off is remembered. After power on again, it still works according to the setting before power off.
Wifi-modus instellen
IN APP PAIRING PROCEDURE
Stap 1 • Download de hOn-app in de stores.


PRODUCT INFORMATION
How to activate Wi-Fi module:
- Touch key "A" on the Control panel for 3 seconds to activate the Wi-Fi module
•The Wi-Fi module is switched on ,the Wi-Fi icon starts to blink
- If the Fridge is enrolled but the Wi-Fi is off the icon will blink
- If the Fridge is enrolled and connected, the Wi-Fi icon is always on
•To reset the Wi-Fi, touch key "A" on the Control panel for 3 seconds
Ice maker instructions

WARNING!
▶ Connect to potable water supply only.
Connecting the water line must only be installed by a qualified plumber and in accordance with local legislation and regulations governing water quality.

Notice
This water line installation is not covered by the appliance warranty.
Connecting water to the appliance
- Remove the rubber plug (1) from the water inlet valve.
- Firmly push the water tube onto the water inlet valve and tighten up the collar nut. This water pipe needs to be cut from the middle and used, and the other section is used as a spare part.
Connecting to the water tap
This feature is only available on some models.
- Push the water tube into the hole of the tap connector supplied in the accessories. The pipe should be held firmly whilst the connector is pushed onto the pipe.
- Ensure that the rubber washer is fitted to the inside of the tap connector before screwing it onto the tap.
▶ A separate connector or adaptor may need to be purchased if your tap fitting does not match the thread size of the connector provided.
Checking the Water Connection
This feature is only available on some models.
▶ Turn on the water supply and switch on the appliance. Carefully check all fittings for possible leaks due to poorly fitted hoses.
▶ Press and hold the 3Sec.Filter Reset button for three seconds. The new water filter has been activated.
- Place a cup under the water dispenser to verify that water is flowing through the appliance.
▶ Check the connecting tube and joints for leaks once again.


natural_image
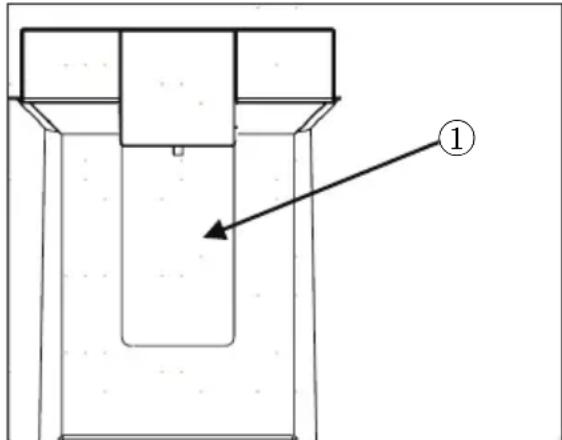
Diagram of a mechanical component with a black arrow pointing to a shaft (no text or symbols)Ice and water dispenser
Before using the ice and water dispenser

CAUTION!
- Keep children away from the dispenser to prevent children playing with or damaging the controls.

CAUTION!
- Throw away the first few batches of ice (about 20 cubes and 7 cups of water). This is also necessary if the appliance has not been used for a long time.
▶ Clean the water dispensing system if they have not been used for 48 hours. Flush the water system connected to a water supply if water has not been drawn for 5 days.
▶ To clean the water dispensing system, flush the water through the dispenser about 5 minutes and throw away the first few batches of ice.
▶ Do not use a thin crystal cup or chinaware when dispensing water or ice.

Notice
▶ If you open the freezer door while water is being dispensed, the water dispensing will stop.
▶ If you open the fridge door while water, cubed ice or crushed ice is being dispensed, dispensing will be paused. When you close the door, the selected item will continue to be dispensed.
▶ If the cup rim is small, water may splash out of the glass or miss it completely.
▶ Use a cup with a rim of over 68 mm in diameter when dispensing water, cubed ice or crushed ice.
When the ice maker produces smaller ice cubes, or the cubes become lumped together, the amount of water supplied to the ice maker may be low due to insufficient water in the water tank. If ice is not used frequently or the freezer set temperature is too warm, it may also lump together.
▶ It is normal for milky / cloudy water to be dispensed after replacing the water filter. This air in the water will eventually clear and is safe to drink during this transition.
Using the ice and water dispenser
Press the dispenser selection button repeatedly until the light above the indicator that you want illuminates.
Press the dispenser paddle (1) with a glass or other container to dispense cubed ice, water or crushed ice.
Cleaning the dispenser
Cleaning the ice and water outlet
Wipe the water outlet (1) or ice outlet (2) frequently with a clean cloth as it may get dirty easily.

Notice
Lint from a cloth may adhere to the outlets.
Cleaning the dispenser tray
Wipe the entire area with a damp cloth. The dispenser tray may become wet easily due to spilled ice or water.

natural_image
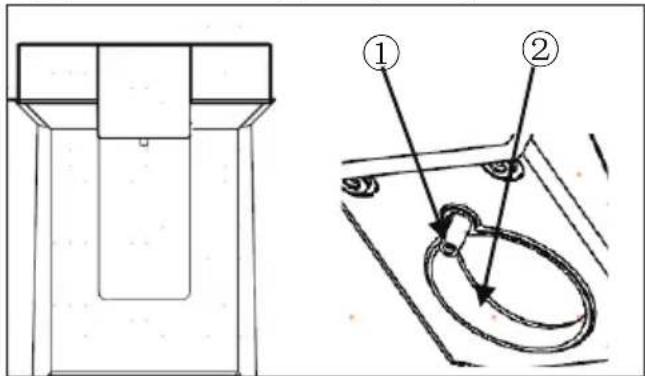
Simple line drawing of a mechanical device with no text or symbolsAutomatic icemaker
This feature is only available on some models.
This feature may vary depending on model purchased.
Before using the in-door icemaker
This feature is only available on some models.
The icemaker produces ice normally when approximately 48 hours have passed after the appliance is initially installed.
▶ If the ice bin is completely filled with ice, ice production will stop.
▶ Sound of ice dropping into the ice bin is normal.
If ice cubes are stored in the ice bin for a long period of time, they may clump together and may not be separated easily. In such a case, empty the ice bin and allow fresh ice to be made.

CAUTION!
It is normal for milky or cloudy water to be dispensed after replacing the water filter. This air in the water will clear eventually and is safe to drink.
The first ice and water dispensed may include particles or odour from the water supply line or the water tank.
If discolored ice is dispensed, check the water tank and the water supply for a possible source. Do not use the ice or water until the problem is corrected.
▶ Do not touch the ice outlet or the automatic icemaker with your hand or a tool.
▶ Dispense ice into a glass before filling it with water or other beverages. Splashing will occur if ice is dispensed into a glass that already contains liquid.
▶ Never use a glass that is exceptionally narrow or deep. Ice may jam in the ice passage, affecting the performance of the appliance.
- Keep the glass at a proper distance from the ice outlet. A glass held too close to the outlet may prevent ice from dispensing.
▶ Dispose of the ice inside the ice bin if you go on vacation or if an extended power outage occurs. Water from melting ice may drop from the dispenser onto the floor.
In-door icemaker
The automatic icemaker can automatically make 100-190 cubes, within a 24-hour period if conditions are favorable. This amount may vary according to the environment (ambient temperature around the appliance, frequency of the door being opened, amount of food stored in the appliance, etc.).
(1) Auto Shutoff (feeler arm)
natural_image
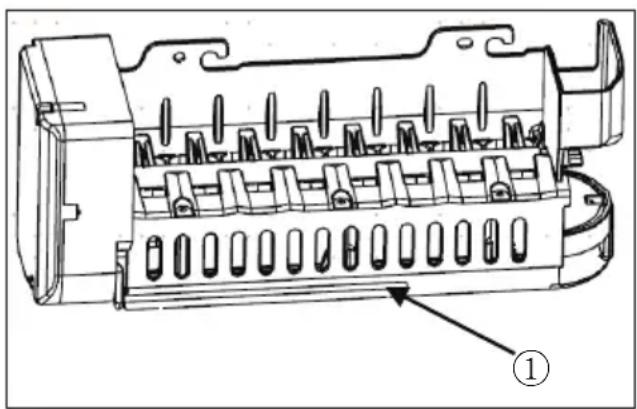
Technical line drawing of a mechanical component with internal channels and mounting holes (no text or symbols)Removing/Refitting the ice storage bin
The ice dispensing chute may become blocked with frost if only crushed ice is used. Remove the frost that accumulates by removing the ice bin and clearing the passage with a rubber spatula. Dispensing cubed ice periodically can also help prevent frost buildup.
- Gently pull the handle to open the ice compartment.
- To remove the in-door ice bin, grip the front handle, slightly lift the lower part, and slowly pull out the bin as shown.
- Refit the in-door ice bin in the reverse sequence of their removal.


CAUTION!
Do not touch the automatic icemaker's mechanical parts with your hand or any mechanical implement. Doing so may cause serious injury or damage to the appliance.
▶ Do not disassemble, repair or alter the automatic icemaker. These tasks should only be done by a service technician.
▶ Keep children away from the dispenser.
▶ When refitting the ice bin, ensure that it is placed correctly.

WARNING!
Do not put this ice box in water or sprinkle it! If you need to clean this ice box. please wipe it with wet soft cloth.
Water filter
Before replacing the water filter

WARNING!
▶ Do not allow children to have access to small parts during the installation of this product.
▶ Do not use with water that is microbiologically unsafe or of unknown quality without adequate disinfection before or after the system. Systems certified for cyst reduction may be used on disinfected water that may contain filterable cysts.

Notice
▶ While the testing was performed under standard laboratory conditions, actual performance may vary.
It is essential that the manufacturer's recommended installation, maintenance and filter replacement requirements be carried out for the product to perform as advertised.

UTION!
Do not install if water pressure exceeds 827 kPa. If your water pressure exceeds 827 kPa, you must install a pressure limiting valve. Contact a plumbing professional if you are uncertain how to check your water pressure.
Do not install where water hammer conditions may occur. If water hammer conditions exist, you must install a water hammer arrester. Contact a plumbing professional if you are
▶ uncertain how to check for this condition.
Do not install on hot water supply lines. The maximum operating water temperature of this filter system is 37.8 °C.
▶ Protect filter from freezing. Drain filter when temperatures drop below 4.4 °C.
The disposable filter cartridge MUST be replaced every 6 months, at the rated capacity or if a noticeable reduction in flow rate occurs.
▶ Where a backflow prevention device is installed on a water system, a device for controlling pressure due to thermal expansion must be installed.
▶ Ensure all tubing and fittings are secure and free of leaks.
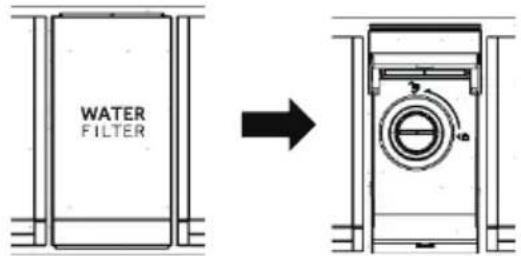
Replacing the water filter
The filter must be changed every 6 months or when the water filter indicator on the control panel lights turns on or the water dispenser output decreases.
To purchase a replacement water filter:
- Use replacement cartridge: HRXWF,
- Visit your local dealer or distributor. For further assistance, visit our website at www.haierspares.eu

Notice
▶ Replacing the water filter causes a small amount of water (around 1 oz. or 25 cc) to drain.
Wrap a cloth around the front end of the water filter cover to collect any leaking water. Hold the water filter upright, once it is removed, to prevent any remaining water from spilling out of the water filter.
- Uplift the water filter cover.
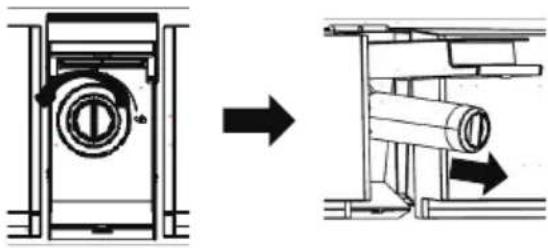
- Remove the disposable water filter.
- Replace with a new water filter. Insert the new filter into the filter head and rotate it clockwise until the arrow on the new filter lines up with the arrow on the filter head. Swing the filter back into the compartment.
-
Close the water filter cover.
-
natural_image
Technical diagram showing a mechanical assembly before and after transformation (no text or symbols)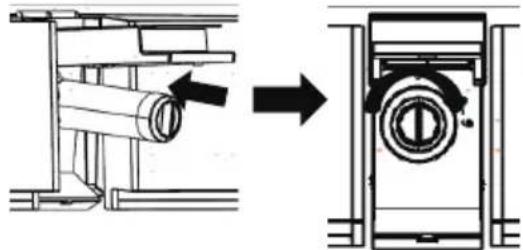
natural_image
Technical diagram showing a mechanical assembly before and after transformation, with no visible text or symbols.4.
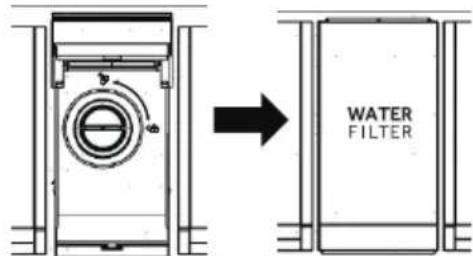
- Press and hold the 3Sec.Filter Reset button for 3 seconds.
- Dispense water for approximately 5 minutes to remove trapped air and contaminants.

CAUTION!
▶ Failure to replace filters when required or using non Haier authorised water filters can cause the filter cartridge to leak and result in property damage.
Water Filter
Model: Haier HRXWF
▶ System certified by IAPMO R&T against NSF/ANSI Standards 42, 53, 401 and P473 for the reduction of claims specified on the performance data sheet and at iapmort.org.
▶ Actual performance may vary with local water conditions.
Application Guidelines/Water Supply Parameters
Service Flow: 0.5 gpm (1.89 lpm)
Water Supply: Potable Water
Water Pressure: 25-120 psi (172-827 kPa)
Water Temperature: 33°F-100°F (0.6°C-38°C)
Capacity: 170 gallons (643.5 liter)
It is essential that the manufacturer's recommended installation, maintenance and filter replacement requirements be carried out for the product to perform as advertised. See Installation Manual for Warranty information.

Notice
While the testing was performed under standard laboratory conditions, actual performance may vary. Replacement Cartridge: HRXWF For estimated costs of replacement elements please visit our website at www.haierspares.eu.

WARNING!
▶ To reduce the risk associated with ingestion of contaminants:
Do not use with water that is microbiologically unsafe or of unknown quality without adequate disinfection before and after the system. Systems certified for cyst reduction may be used on disinfected water that may contain filterable cysts.

Notice
To reduce the risk of water leakage or flooding, and to ensure optimal filter performance:
▶ Read and follow use instructions before installation and use of this system.
▶ Installation and use MUST comply with all state and local plumbing codes.
Do not install if water pressure exceeds 120 psi (827 kPa). If your water pressure exceeds 80 psi (552 kPa), you must install a pressure-limiting valve. Contact a plumbing professional if you are uncertain how to check your water pressure.
Do not install where water hammer conditions may occur. If water hammer conditions exist you must install a water hammer arrester. Contact a plumbing professional if you are uncertain how to check for this condition.
▶ Do not install on hot water supply lines. The maximum operating water temperature of this filter system is 1 00^ F ( 38^ C).
▶ Protect filter from freezing. Drain filter when temperatures drop below 33^ F ( 0.6^ C).
▶ Change the disposable filter cartridge every six months or sooner if you observe a noticeable reduction in water flow rate.
▶ Failure to replace the disposable filter cartridge at recommended intervals may lead to reduced filter performance and cracks in the filter housing, causing water leakage or flooding.
This System has been tested according to NSF/ANSI 42, 53, 401 and P473 for the reduction of the substances listed below. The concentration of the indicated substances in water entering the system was reduced to a concentration less than or equal to the permissible limit for water leaving the system, as specified in NSF/ANSI 42, 53, 401 and P473.
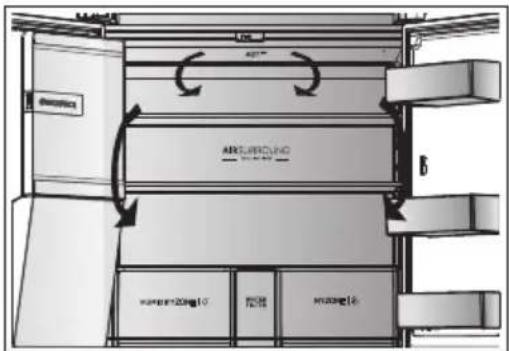
Multi-air-flow
The refrigerator is equipped with a multi-air-flow system, with which cool air flows are located on every shelf level. This helps to maintain a uniform temperature to ensure that your food is kept fresher for longer.
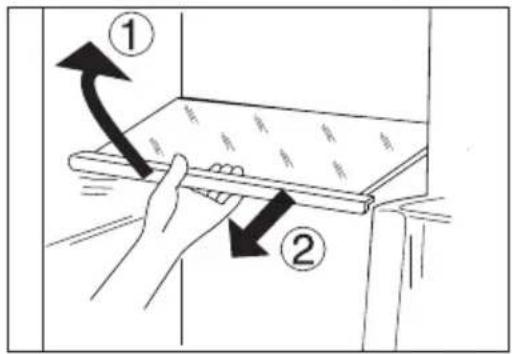
Adjustable shelves
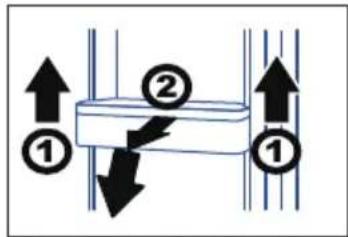
The height of the shelves can be adjusted to fit your storage needs.
- To relocate a shelf, remove it first by uplifting its front edge (1) and pulling it out (2).
- To reinstall it, put it on the lugs on both sides and push it to the most rearward position until the rear of the shelf is fixed inside the slots in the sides

Notice:
Ensure that all ends of a shelf are level.
My Zone drawer
In this compartment the humidity level is lower than fridge compartment. This drawer is suitable to store fresh foods, quick cool foods, and fruits and vegetables.
Humidity box drawer
In this compartment the humidity level is around 90%. It is controlled automatically by the system and is suitable to store fruits, vegetables, salads etc.
MYZONE | Ⓤ
HUMIDITYZONE | 0°

Notice:
▶ Do not remove the plastic cover inside the two zones. They maintain the humidity.
▶ Cold-sensitive fruits like pineapple, avocado, bananas, grapefruits are not recommended to be stored in the
▶ Humidity level may be less than 90% with small amounts of vegetables, hence, large amounts of vegetables are preferred.

natural_image
Architectural floor plan diagram showing room layouts and structural elements (no text or labels)My Zone XL compartment
The appliance is equipped with a My Zone XL compartment. Depending on the purpose desired temperature can be chosen by degree. Setting temperature can be adjusted between -5^ and +5^ .
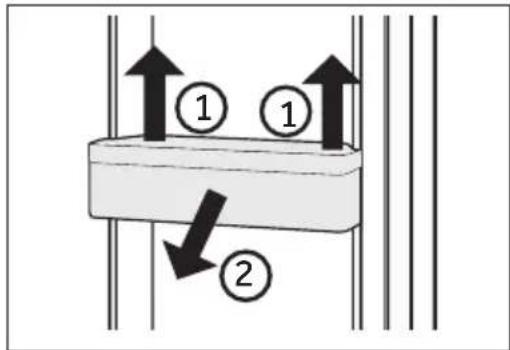
Removable door racks/bottle holder
The door racks can be removed for cleaning:
Place hands on each side of the rack, lift it upwards (1) and pull it out (2).
In order to insert the door rack, the above steps are carried out in reverse order.
OPTIONAL: OK-temperature indicator
The OK-temperature indicator can be used to determine temperatures below +4°C. Gradually reduce the temperature if the sign does not indicate "OK".
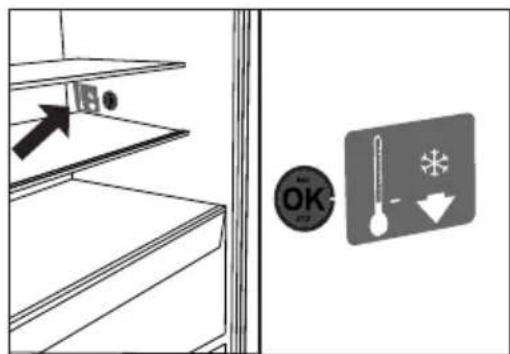

Notice:
When the appliance is switched on, it may take up to 12 hours for the correct temperatures to be reached.
Removable My Zone XL drawer
To remove the drawer out, pull out to the maximum extent (1), lift and remove (2).
In order to insert the drawer, the above steps are carried out in reverse order.
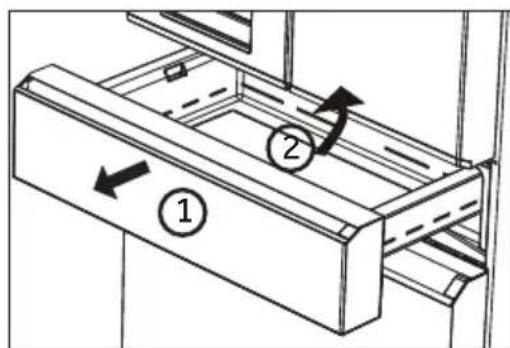
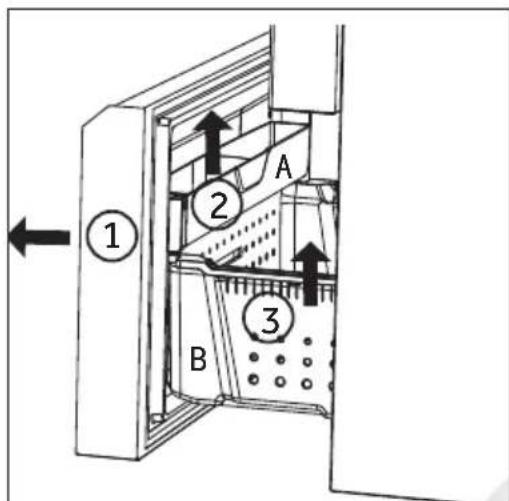
Removable freezer drawer
- Pull out to the freezer drawer to maximum extent.
-
Remove the bottle holder(A) on the freezing door (there is a fixed bayonet on the right side of the bottle holder. Press the fixed bayonet to take out the bottle holder).
-
Lift the drawer(B) until it is separated from the support block, push it into the freezer and tilt it to take out.
In order to insert the freezing tray and drawer, the above steps are carried out in reverse order.
The Light
The LED interior light comes on when the door is opened. The performance of the lights is not affected by any of the appliances other settings.
Energy saving tips
▶ Make sure the appliance is properly ventilated (see INSTALLATION).
- Do not install the appliance in direct sunlight or in the near of heat sources (e.g. stoves, heaters).
- Avoid unnecessarily low temperature in the appliance. The energy consumption increases the lower the temperature in the appliance is set.
▶ Functions like POWER-FREEZE consume more energy.
▶ Allow warm food to cool down before placing it in the appliance.
▶ Open the appliance door as little and as briefly as possible.
▶ Do not overfill the appliance to avoid obstructing the air flow.
- Avoid air within the food packaging.
- Keep door seals clean so that the door always closes correctly.
▶ Defreeze frozen food in the fridge storage compartment.
The most energy-saving configuration requires the appliance keep drawers, food box and shelves on factory-fresh condition, and food should be places as far as possible without blocking the air outlet of the duct.

WARNING!
Disconnect the appliance from the power supply before cleaning.
Cleaning
Clean the appliance when only little or no food is stored.
The appliance should be cleaned every four weeks for good maintenance and to prevent bad stored food odors.

WARNING!
▶ Do not clean the appliance with hard brushes, wire brushes, detergent powder, petrol, amyl acetate, acetone and similar organic solutions, acid or alkaline solutions. Please clean with special refrigerator detergent to avoid damage.
▶ Do not spray or flush the appliance during cleaning.
▶ Do not use water spray or steam to clean the appliance.
▶ Do not clean the cold glass shelves with hot water. Sudden temperature change may cause the glass to break.
▶ Do not touch the inside surface of the freezer storage compartment, especially with wet hands, as your hands may freeze onto the surface.
▶ In case of heating check the condition of frozen goods.
natural_image
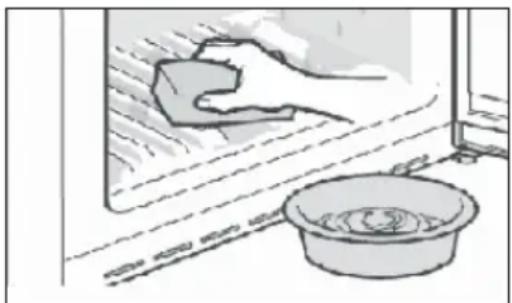
Illustration of a hand cleaning a window with a soap block and a basin (no text or symbols)▶ Always keep the door gasket clean.
▶ Clean the inside and housing of the appliance with a sponge dampened in warm water and neutral detergent.
-
Please scrub the interior and exterior of the refrigerator, including door sealing, door rack, glass shelves, boxes and so on, with a soft towel or sponge dipped in warm water (you may add neutral detergent into the warm water).
-
If there is liquid spilled, remove all the contaminated parts, directly rinse with the flow water, dry and place it back into the fridge.
- If there is spilled cream (such as the cream, melting ice cream), please remove all the contaminated parts, put into the warm water with about 40 °C for some time, then rinse with the flow water, dry and place it back into the fridge.
- In case some small part or component gets stuck inside of the fridge (between shelves or drawers), use small soft brush to release it. If you could not reach the part, please contact Haier service
▶ Rinse and dry with soft cloth.
▶ Do not clean any of the parts of the appliance in a dishwasher.
- Allow at least 5 minutes before restarting the appliance as frequent starting may damage the compressor.
Defrosting
The defrosting of the fridge and the freezer compartment are done automatically; no manual operation is needed.
Replacing the LED-lamps

WARNING!
Do not replace the LED lamp yourself, it must only be replaced by either the manufacturer or the authorised service agent.
The lamps adopts LED as its light source, featuring low energy consumption and long service life. If there is any abnormality, please contact the customer service. See CUSTOMER SERVICE.
flowchart
graph TD
    A["LED"] <--> B["LED"]
Replaceable (LED only) light source by a professional.
This product contains a light source of energy efficiency class G.
| Compartment Voltage Energy efficiency class Model | |||
| Fridge back lamp 12V | G | ||
| Freezer 12V | G | HFW7918EIMP | |
| My Zone XL | 12V | G | HFW7918EIMB |
| HFW7918EIMP(UK) | |||
| Handle lamp 12V | G | ||
| Projection lamp 12V | G | ||
Non-use for a longer period
If the appliance is not used for an extended period of time, and you will not use the Holiday-function for the refrigerator:
▶ Take out the food.
▶ Unplug the power cord.
▶ Clean the appliance as described above.
- Keep the doors open to prevent the creation of bad odours inside.

Notice
Turn the appliance off only if strictly necessary.
Moving the appliance
- Remove all food and unplug the appliance.
- Secure shelves and other moveable parts in the fridge and the freezer with adhesive tape.
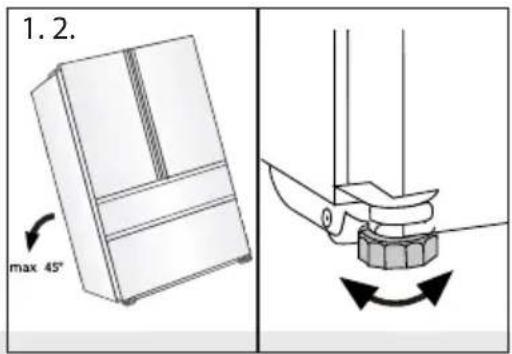
- Do not tilt the refrigerator more than 45^ to avoid damaging the refrigerating system.

WARNING!
▶ Do not lift the appliance by its handles.
Never place the appliance horizontally on the ground.
Many occurring problems could be solved by yourself without specific expertise. In case of a problem please check all shown possibilities and follow below instructions before you contact an after sales service. See CUSTOMER SERVICE.

WARNING!
▶ Before maintenance, deactivate the appliance and disconnect the mains plug from the mains socket.
Electrical equipment should be serviced only by qualified electrical experts, because improper repairs can cause considerable consequential damages.
▶ A damaged supply should only be replaced by the manufacturer, its service agent or similarly qualified persons in order to avoid a hazard.
Problem Possible Cause Possible Solution
| The compressor does not work. | ·Mains plug is not connected in the mains socket.·The appliance is in the defrosting cycle | ·Connect the mains plug.·This is normal for an automatic defrosting |
| The appliance runs frequently or runs for a too long period of time. | ·The indoor or outdoor temperature is too high.·The appliance has been off power for a period of time.·A door of the appliance is not tightly closed.·The door has been opened too frequently or for too long.·The temperature setting for the freezer compartment is too low.·The door gasket is dirty, worn, cracked or mismatched.·The required air circulation is not guaranteed. | ·In this case, it is normal for the appliance to run longer.·Normally, it takes 8 to 12 hours for the appliance to cool down completely.·Close the door/drawer and ensure the appliance is located on a level ground and there is no food or container jarring the door.·Do not open the door/drawer too frequently.·Set the temperature higher until a satisfactory refrigerator temperature is obtained. It takes 24 hours for the refrigerator temperature to become stable.·Clean the door/drawer gasket or replace them by the customer service.·Ensure adequate ventilation. |
| The inside of the refrigerator is dirty and/or smells. | ·The inside of the refrigerator needs cleaning.·Food of strong odour is stored in the refrigerator. | ·Clean the inside of the refrigerator.·Wrap the food thoroughly.. |
| The appliance makes abnormal sounds. | ·The appliance is not located on level ground.·The appliance touches some object around it. | ·Adjust the feet to level the appliance.·Remove objects around the appliance. |
Troubleshooting
| Problem Possible Cause | Possible Solution | |
| It is not cold enough inside the appliance. | ·The temperature is set too high.·Too warm goods has been stored.·Too much food has been stored at one time.·The goods are too close to each other.·A door/drawer of the appliance is not tightly closed.·The door/drawer has been opened too frequently or for too long. | ·Reset the temperature.·Always cool down goods before storing them.·Always store small quantities of food.·Leave a gap between several foods allowing air flowing.·Close the door/drawer.·Do not open the door/drawer too frequently. |
| It is too cold inside the appliance. | ·The temperature is set too low.·The Super-Frz/Super-Coolfunction is activated or is running too long. | ·Reset the temperature.·Switch off the Super-Frz/Super-Cool function |
| Moisture formation on the inside of the refrigerator compartment. | ·The climate is too warm and too-damp.·A door/drawer of the appliance is not tightly closed.·The door/drawer has been opened too frequently or for too long.·Food containers or liquids are left open. | ·Increase the temperature.·Close the door/drawer.·Do not open the door/drawer too frequently.·Let hot foods cool to room temperature and cover foods and liquids. |
| Moisture accumulates on the refrigerators outside surface or between the doors/door and drawer. | ·The climate is too warm and too damp.·The door is not closed tightly. The cold air in the appliance and the warm air outside it condensates. | ·This is normal in damp climate and will change when the humidity decreases.·Ensure that he door/drawer is tightly shut. |
| Strong ice and frost in the freezer compartment. | ·The goods were not adequately packaged.·A door/drawer of the appliance is not tightly closed.·The door/drawer has been opened too frequently or for too long.·The door/drawer gasket is dirty, worn, cracked or mismatched.·Something on the inside prevents the door/drawer to close properly. | ·Always pack the goods well.·Close the door/drawer.·Do not open the door/drawer too frequently.·Clean the door/drawer gasket or replace them by new ones.·Reposition the shelves, door racks, or internal containers to allow the door/drawer to close. |
| The sides of the cabinet and door strip get warm. | ···This is normal. | |
| The appliance makes abnormal sounds. | · The appliance is not located on level ground.· The appliance touches some object around it. | · Adjust the feet to level the appliance.· Remove objects around the appliance. |
| A slight sound is to be heard similar to that of flowing water. | · - · This is normal. | |
| You will hear an alarm beep. | · The fridge storage compartment door is open. | · Close the door. |
| You will hear a faint hum. | · The anti-condensation system is working | · This prevents condensation and is normal |
| The interior lighting or cooling system does not work. | · Mains plug is not connected in the mains socket.· The power supply is not intact.· The LED-lamp is out of order. | · Connect the mains plug.· Check the electrical supply to the room. Call the local electricity company!· Please call the service for changing the lamp. |
| Water leaking or dripping from the water dispenser spout. | · The water tank is not installed correctly· The water dispenser spout is not screwed tight to the tank.· The white silicon O ring is missing from the water spout. | · Refit the water tank into the fridge door, ensure it is pushed fully into the door.· The water spout is screwed in firmly to the water tank.· Check the water spout has a white silicon O ring at the tank end before fitting the water spout to the water tank. |
Troubleshooting
| Problem Possible Cause | Possible Solution | |
| The automatic ice-maker does not produce ice or produces a small amount of ice. | ·Do not connect the water supply pipe to the appliance and open the supply valve.·The water supply hose bent.·Dispensed a large amount of ice recently.·Ice maker function not on.·Open the appliance door frequently.·The appliance door do not completely closed. | ·Connect the water supply pipe to the appliance and open the supply valve completely.·Straighten the water supply pipe.·It takes approximately 24 hours to produce more ice in the automatic icemaker. Please wait.·Turn “Ice on/off” on.·If you open the appliance door frequently, cold air will escape, lowering the speed of ice production. Do not open and close the appliance door frequently.·Close the appliance door completely. |
| Ice is not dispensed. | ·Cubed or Crushed function is not selected.·The ice path blocked. | ·In the control panel, select the modes for cubed ice and crushed ice alternately to dispense the ice.·Check the ice and clean the ice path regularly. |
| Water does not come out. | ·The supply valve may be turned off.·The water dispenser tank may be empty.·The water supply hose bent.·Use unfiltered water.·Water filter clogged or filter not installed.·Water in reservoir is frozen because the controls are set too cold. | ·Open the water supply valve.·Fill the water dispenser tank.·Straighten the water supply pipe.·Replace the water filter in advance.·Replace the water filter .·Set the refrigerator control to a warmer setting and wait 24 hours. If the water does not dispense after 24 hours, call for service. |
| Water is leaking from dispenser. | ·Air may be present in the water line system, causing water to drip after being dispensed. | ·Dispense water for at least 3 minutes to remove air from system. |
| Water tastes strange. | ·The purified water or cold water not been used for an extended period of time.·An expired filter is used. | ·Dispense water for at least 3 minutes .·Replace the water filter . |
To contact the technical assistance, visit our website: https://corporate.haier-europe.com/en/Under the section "website", choose the brand of your product and your country. You will be redirected to the specific website where you can find the telephone number and form to contact the technical assistance.
Power interruption
In the event of a power cut, food should remain safely cold for about 5 hours. Follow these tips during a prolonged power interruption, especially in summer:
▶ Open the door/drawer as few times as possible.
▶ Do not put additional food into the appliance during a power interruption.
If prior notice of a power interruption is given and the interruption duration is longer than 5 hours, make some ice and put it in a container in the top of the refrigerator compartment.
▶ An inspection of the goods is required immediately after the interruption.
As temperature in the refrigerator will rise during a power interruption or other failure, the storage period and edible quality of food will be reduced. Any food that defrosts should be either consumed, or cooked and refrozen (where suitable) soon afterwards in order to prevent health risks.
Memory function during power interruption
After restoration of power the appliance continues with the settings that were set before the power failure.
Unpacking

WARNING!
▶ The appliance is heavy. Always handle with at least two persons.
- Keep all packaging materials out of children's reach and dispose them in an environmentally friendly manner.
▶ Take the appliance out of the packaging.
▶ Remove all packaging materials.
Environmental conditions
The room temperature should always be between 10^ C and 38^ C, since it can influence the temperature inside the appliance and its energy consumption. Do not install the appliance near other heat-emitting appliances (ovens, refrigerators) without isolation.
Space requirement
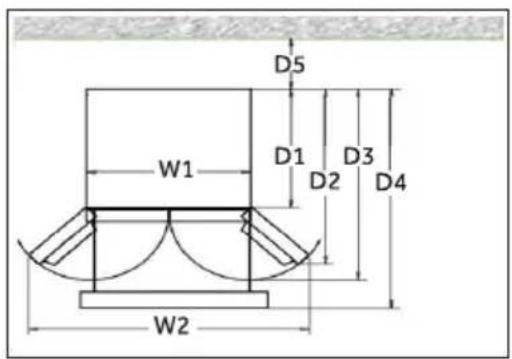
Required space when door is opened:
$$ W 1 = 9 0 5 \mathrm{mm} $$
$$ \mathrm{W} 2 = 1 5 2 8 \mathrm{mm} $$
$$ D 1 = 6 2 0 \mathrm{mm} D 4 = 1 0 2 4 \mathrm{mm} (\text { S Door }) $$
$$ D 2 = 1 0 2 4 \mathrm{mm} / 1 1 1 8 \mathrm{mm} (\text { F Door }) $$
$$ \mathrm{D} 3 = 1 1 0 6 \mathrm{mm} \mathrm{D} 5 = 1 0 0 \mathrm{mm} $$
Ventilaton cross-section
To achieve sufficient ventilation of the appliance for safety reasons, the information of the required ventilation cross sections must be observed.
Aigning the appliance
The appliance should be placed on a flat and solid surface.
- Tilt the refrigerator slightly backwards.
- Set the feet to the desired level.
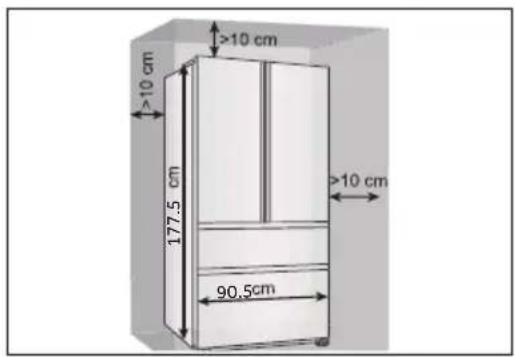
Make sure the distance to the wall on the hinge side is at least 10 cm for the door to open properly.

Notice:
For a free standing appliance: this refrigerating appliance is not intended to be used as a built-in appliance
natural_image
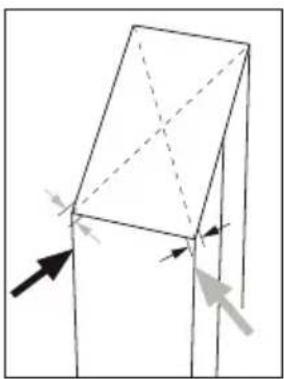
Pure geometric diagram of a 3D rectangular prism with dashed diagonals and arrows indicating direction (no text or symbols)- The stability can be checked by alternately bumping on the diagonals. The slightly swaying should be the same in both directions. Otherwise the frame can warp; possible leaking door seals are the result. A low tendency to the rear facilitates the closing of the doors.
flowchart
graph TD
    A["Top Block"] --> B["Left Block"]
    B --> C["Right Block"]
    C --> D["Bottom Block"]
    D --> E["Left Block"]
    E --> F["Right Block"]
    style A fill:#f9f,stroke:#333
    style B fill:#ccf,stroke:#333
    style C fill:#cfc,stroke:#333
    style D fill:#fcc,stroke:#333
    style E fill:#ffc,stroke:#333
    style F fill:#cff,stroke:#333
Fine tuning of the doors
If the doors are not in one level, this mismatch can be remedied by following:
Using adjustable foot/adjustable hinge
Rotate the adjustable foot or adjustable hinge according to the direction of arrow to turn up or down the foot. Adjustable hinges can be fine tuned with a 6mm Allen wrench.
Contact after-sale service if needed.

Notice:
In the future use of refrigerator, doors uneven phenomenon may occur to the weight of stored food. Then please adjust according to the above methods.
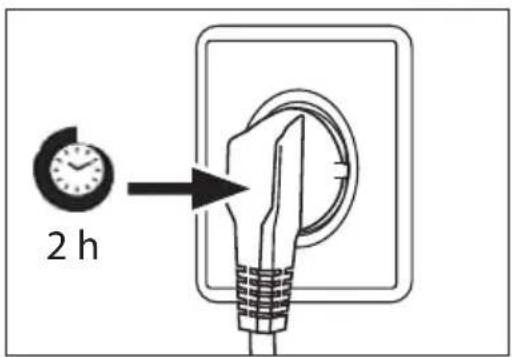
Waiting time
To the maintenance-free lubrication oil is located in the capsule of the compressor. This oil can get through the closed pipe system during slanting transport. Before connecting the appliance to the power supply you have to wait at least 2 hours so that the oil runs back into the capsule.
Electrical connection
Before each connection check if:
▶ power supply, socket and fusing are appropriate to the rating plate.
▶ the power socket is earthed and no multi-plug or extension.
▶ the power plug and socket are strictly according.
Connect the plug to a properly installed household socket.

NING!
To avoid risks a damaged power cord must be replaced by the customer service (see warranty card).
Ice and Water and Automatic Ice models
- Your Ice and Water and Automatic Ice refrigerator must be installed by a qualified plumber or Haier trained and supported service technician as incorrect plumbing can lead to water leaks.
▶ Haier appliances does not accept responsibility for damage (including water damage) caused by faulty installation or plumbing.

Notice:
Remove the door bins from position A and install in position B before first using.
▶ Holding the front edge of the bins with one hand and taping the bottom of the bins alternately in the direction of arrow 1 with the other hand. After the bins are out of the door body, rotate forward and downward in the direction of arrow 2 to take it out and install it in position B.
natural_image
Technical line drawing of a multi-level container or storage unit with labeled sections A and B, showing internal compartments and no readable text or symbols.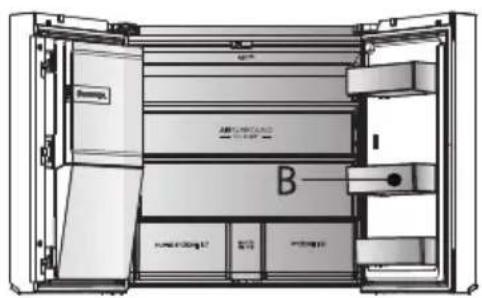

RNING!
▶ Only connect to drinking water supply. The water filter only filters impurities in the water and makes ice clean and hygienic. It cannot sterilize or destroy germs or other harmful substances.
▶ Too high water pressure in the hose can damage the appliance. Install a pressure reducer when the water pressure in the hose exceeds 0.6 MPa.
▶ Before connection, check whether the water is clean and clear.
Product fiche according to regulation EU No. 2019/2016
| Brand Haier | |
| Model name / identifier | HFW7918EIMP HFW7918EIMB HFW7918EIMP(UK) |
| Category of the model | Refrigerator-freezer |
| Energy efficiency class | E |
| Annual energy consumption(kWh/year)(1) 357 | |
| Total volume(L) 601 | |
| Volume refrigerator(L) 323 | |
| Volume freezer(L) 186 | |
| Volume variable temperature compartment(L) | 80 |
| Volume Zero-Star compartment(L) | 12 |
| Star rating |  |
| Temperature of other compartments>14°C | Non applicable |
| Frost-free system | Yes |
| Freezing capacity(kg/24h) | 9 |
| Climate rating(2) | SN-N-ST |
| Noise emission class and airborne acoustical noise emissions(db(A) re 1pW) | B(35) |
| Temperature rise time (h) | 9 |
| Ice making capacity | 1.4 kg/24h |
| Type of appliance | freestanding |
| Others | With icemaker in door |
Explanations: • Yes, featured
(1) Based on the results of the standards conformance test over 24 hours. The actual consumption depends on the use and the location of the appliance.
(2) Climate rating SN: This appliance is intended for use in an ambient temperature of between +10°C and +32°C
Climate rating N: This appliance is intended for use in an ambient temperature of between +16°C and +32°C
Climate rating ST: This appliance is intended for use in an ambient temperature of between +16°C and +38°C
Climate rating T: This appliance is intended for use in an ambient temperature of between +16°C and +43°C
Additional technical data
| Voltage / Frequency 220-240V ~/ 50Hz | |
| Input current (A) | 2 |
| Main fuse (A) | 16 |
| Coolant R600a | |
| Dimensions (H/W/D in mm) | 1775 / 908 / 750 |
We recommend our Haier Customer Service and the use of original spare parts.
If you have a problem with your appliance, please first check section TROUBLESHOOTING.
If you cannot find a solution there, please contact
▶ your local dealer or
▶ our European Call Service-Center (see listed phone numbers below) or
▶ the Service & Support area at www.haier.com where you can activate the service
▶ claim and also find FAQs.
To contact our Service, ensure that you have the following data available. The information can be found on the rating plate.
Model ____
Serial No. ____
Also check the Warranty Card supplied with the product in case of warranty.
| European Call Service-Center | ||
| Country* | Phone number Costs | |
| Haier Italy (IT) | 199 100 912 | |
| Haier Spain (ES) | 902 509 123 | |
| Haier Germany (DE) | 0180 5 39 39 99 • 14 Ct/Min Landline• max 42 Ct/Min Mobile | |
| Haier Austria (AT) | 0820 001 205 • 14,53 Ct/Min Landline• max 20 Ct/Min all others | |
| Haier United Kingdom (UK) | 0333 003 8122 | |
| Haier France (FR) | 0980 406 409 | |
* For other countries please refer to www.haier.com
Haier Europe Trading S.r.l
Branch UK
Westgate House, Westgate, Ealing
London, W5 1YY
*Duration of the guarantee of the refrigerating appliance:
Minimum guarantee is: 2 years for EU Countries, 3 years for Turkey, 1 year for UK, 1 year for Russia, 3 years for Sweden, 2 years for Serbia, 5 years for Norway, 1 year for Morocco, 6 months for Algeria, Tunisia no legal warranty required.
*The period of spare parts for the repair of the appliance:
Thermostats, temperature sensors, printed circuit boards and light sources are available for a minimum period of seven years after placing the last unit of the model on the market.
Door handles, door hinges, trays and baskets for a minimum period of seven years and door gaskets for a minimum period of 10 year, after placing the last unit of the model on the market.
*For further information about the product, please consult https://eprel.ec.europe.eu/ or scan the QR on the energy label supplied with the appliance.

natural_image
Abstract geometric composition with four gray triangular shapes radiating from a central white mark (no text or symbols)2022 Version A
Haier
Benutzerhandbuch
natural_image
Symbol of a trash bin crossed with no visible text or labelsEntsorgung

PRODUKTINFORMATIONEN
natural_image
Diagram of a mechanical component with a pointed tip and arrow indicating direction (no text or symbols)
Hinweis
natural_image
Simple line drawing of a mechanical or architectural component with no text or symbolsnatural_image
Technical line drawing of a mechanical component with internal channels and mounting holes (no text or symbols)natural_image
Diagram of an open electrical enclosure with a curved arrow indicating a motion or change, no text or symbols present.
VORSICHT!
natural_image
Architectural floor plan diagram showing room layouts and structural elements (no text or labels)My Zone XL-Fach
OPTIONAL: OK-Temperaturanzeige

Hinweis
Beleuchtung
natural_image
Illustration of a hand cleaning a window with a washing machine and a bowl nearby (no text or symbols)natural_image
Pure geometric diagram of a 3D rectangular prism with internal diagonals and directional arrows, no text or symbols present.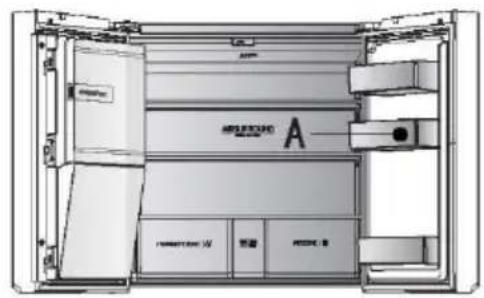

WARNUNG!
Westgate House, Westgate, Ealing
London, W5 1YY
natural_image
Abstract geometric composition with four gray angular shapes arranged symmetrically (no text or symbols)2022 Fassung A
Haier
Manual de usuario
natural_image
Symbol of a trash bin crossed with no text or labels, representing waste sorting or disposal (no text present)Eliminación

Aviso
natural_image
Diagram of a mechanical component with a pointed tip and arrow indicating direction (no text or symbols)
Aviso
natural_image
Simple line drawing of a 3D object with a rectangular frame and a small curved object inside (no text or symbols)natural_image
Technical line drawing of a mechanical component with internal channels and mounting holes (no text or symbols)natural_image
Diagram of an open electrical enclosure with a curved arrow indicating a component (no text or symbols present)
¡PRECAUCIÓN!
Estantes ajustables
natural_image
Architectural floor plan diagram showing room layouts and structural elements (no text or labels)Compartimento My Zone XL

Aviso
Luz
natural_image
Illustration of a hand cleaning a window with a soap block and a basin (no text or symbols)natural_image
Pure geometric diagram of a 3D rectangular prism with dashed diagonals and arrows indicating direction (no text or symbols)flowchart
graph TD
    A["Top Section"] --> B["Bottom Section"]
    B --> C["Top Section with Black Box, White Box, and Grey Box"]
    C --> D["Top Section with Black Box, White Box, and Grey Box"]
    D --> E["Bottom Section with Black Box, White Box, and Grey Box"]
    E --> F["Top Section with Black Box, White Box, and Grey Box"]
    F --> G["Top Section with Black Box, White Box, and Grey Box"]
    G --> H["Top Section with Black Box, White Box, and Grey Box"]
    H --> I["Top Section with Black Box, White Box, and Grey Box"]
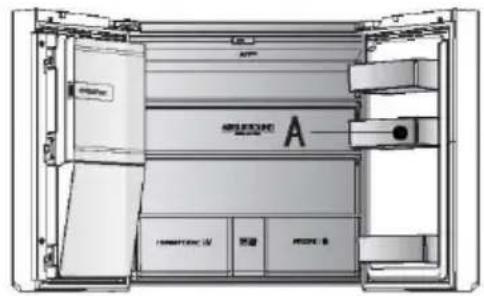

ADVERTENCIA
Westgate House, Westgate, Ealing
Londres, W5 1YY
natural_image
Abstract geometric composition with four gray angular shapes radiating from a central white mark (no text or symbols)2022 versión A
Haier
natural_image
Symbol of a trash bin crossed with no text or labels, representing waste sorting or restriction (no text present)Fonction Crushed ice
INFORMATIONS SUR LE PRODUIT
natural_image
Diagram of a mechanical component with a black arrow pointing to a shaft (no text or symbols)natural_image
Technical line drawing of a mechanical component with a labeled arrow (no text or symbols present)
Remarque
natural_image
Simple line drawing of a mechanical or architectural component with no text or symbolsnatural_image
Technical line drawing of a mechanical component with internal channels and mounting holes (no text or symbols)natural_image
Diagram of an open electrical enclosure with a curved arrow indicating a component (no text or symbols present)
ATTENTION!
Clayettes réglables
natural_image
Architectural floor plan diagram showing room layouts and structural elements (no text or labels)Compartiment My Zone XL

Remarque
La lumière
natural_image
Illustration of a hand cleaning a window with a soap block and a basin (no text or symbols)natural_image
Pure geometric diagram of a 3D rectangular prism with internal diagonals and directional arrows, no text or symbols present.
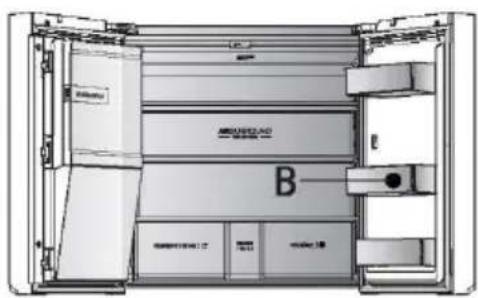

AVERTISSEMENT!
Westgate House, Westgate, Ealing
Londres, W5 1YY
natural_image
Abstract geometric composition with four gray angular shapes arranged symmetrically (no text or symbols)2022 version A
Haier

Manuale dell'utente
Frigorifero- Congelatore
HFW7918EIMP
HFW7918EIMB
HFW7918EIMP(UK)
natural_image
Symbol of a trash bin crossed with no text or labels, representing waste sorting or restriction (no text present)Smaltimento
B: Comparto My Zone XL
16 Cassetto My Zone XL
chemical
Electrochemical reaction diagram showing -88°C and -100°C with Premere + 1 volta
Avviso
natural_image
Diagram of a mechanical component with a pointed tip and arrow indicating direction (no text or symbols)
Avviso
natural_image
Simple line drawing of a mechanical or architectural component with no text or symbolsnatural_image
Technical line drawing of a mechanical component with internal channels and mounting holes (no text or symbols)natural_image
Diagram of an open electrical enclosure with a curved arrow indicating a motion or movement (no text or symbols present)
ATTENZIONE!
Ripiani regolabili
natural_image
Architectural floor plan diagram showing room layout and structural elements (no text or labels)Comparto My Zone XL

Avviso
Illuminazione
natural_image
Illustration of a hand cleaning a kitchen with a soap block and a bowl (no text or symbols)natural_image
Pure geometric diagram of a 3D rectangular prism with internal diagonals and directional arrows, no text or symbols present.
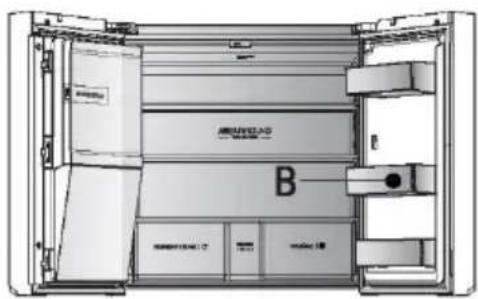
Westgate House, Westgate, Ealing
London, W5 1YY
natural_image
Abstract geometric composition with four gray triangular shapes radiating from a central white mark (no text or symbols)2022 Versione A
Haier

natural_image
Symbol of a trash bin crossed with no text or labels, representing waste sorting or disposal (no text present)WAÄRSCHUWING: vul alleen met drinkwater.
B: My Zone XL-compartiment
- My Zone XL-lade
C: Vriezergedeelte
- Vriezerlamp
- Schuifplateau
- Deurrek
- Vriezerlade
Bedieningspaneel (HFW7918EIMP/HFW7918EIMB/HFW7918EIMP(VK))
Toetsen:
PRODUCTINFORMATIE
De wifimodule inschakelen:
natural_image
Diagram of a mechanical component with a black arrow pointing to a shaft (no text or symbols)De dispenser reinigen

Let op
natural_image
Simple line drawing of a 3D object with a rectangular frame and a small irregular shape inside (no text or symbols)natural_image
Technical line drawing of a mechanical component with multiple slots and a numbered label (1), no readable text or symbols present.Verstelbare planken
natural_image
Architectural floor plan showing room layout with furniture and structural elements (no text or labels)My Zone XL-compartiment
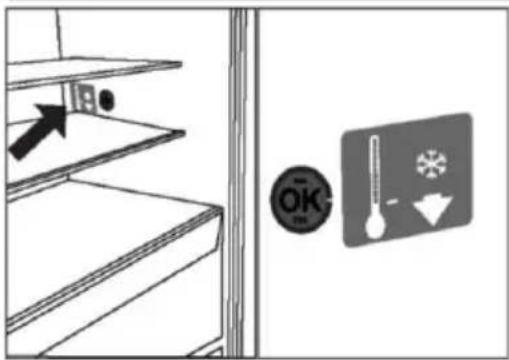

Let op:
Uitneembare vriezerlade
De verlichting
natural_image
Illustration of a hand cleaning a window with a soap block and a basin (no text or symbols)natural_image
Pure geometric diagram of a 3D rectangular prism with internal diagonals and directional arrows, no text or symbols present.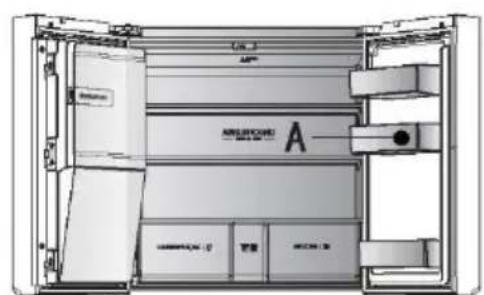
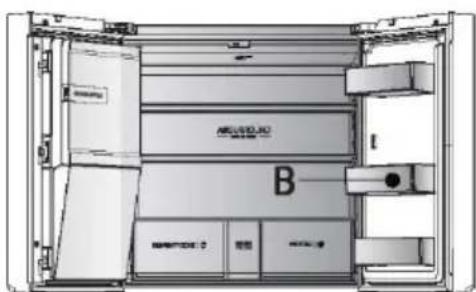
WAARSCHUWING!
Westgate House, Westgate, Ealing
natural_image
Abstract geometric composition with four gray triangular shapes arranged symmetrically (no text or symbols)2022 Versie A
Haier

Brugervejledning
Køle-fryseskab
HFW7918EIMP
HFW7918EIMB
HFW7918EIMP(UK)
natural_image
Symbol of a trash bin crossed with no text or labelsBortskaffelse
FREMGANGSMÅDE VED PARRING I APP
Trin 1

- Download hOn-appen i butikkerne.


Trin 2
Opret en konto i hOn-appen til at logge ind, hvis du har en konto.

Trin 3
PRODUKTINFORMATION
Tilslutning til vandhanen
natural_image
Diagram of a mechanical component with a pointed tip and arrow indicating direction (no text or symbols)natural_image
Technical line drawing of a mechanical component with a numbered arrow indicating direction (no text or symbols present)
Bemærk
natural_image
Simple line drawing of a 3D printer or printer with a base tray and top cover (no text or symbols)Automatisk ismaskine
natural_image
Technical line drawing of a mechanical component with internal channels and mounting holes (no text or symbols)FORSIGTIG!
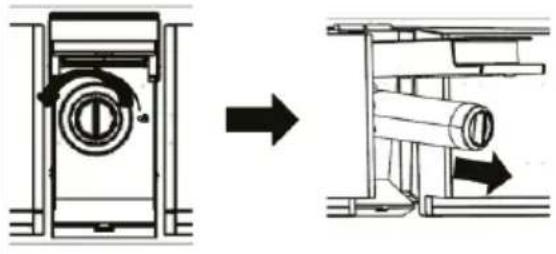
natural_image
Technical diagram showing a mechanical assembly before and after transformation, with no visible text or symbols.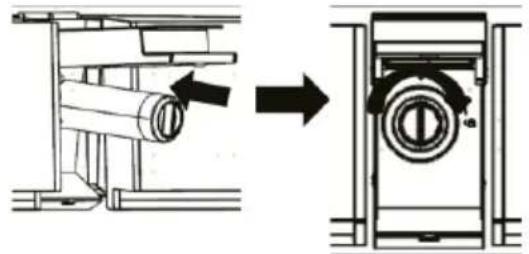
natural_image
Technical diagram showing a mechanical assembly before and after transformation, with no visible text or symbols.4.
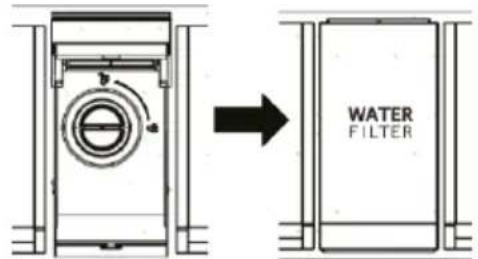
- Tryk og hold knappen 3Sec.Filter Reset nede i 3 sekunder.
- Dispensér vand i cirka 5 minutter for at fjerne indespærret luft og forurenende stoffer.

FORSIGTIG!
Justerbare hylder
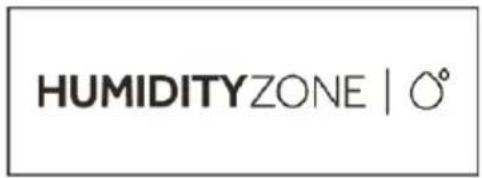

Bemærk
natural_image
Architectural floor plan diagram showing room layouts and structural elements (no text or labels)My Zone XL rum

Bemærk
Aftagelig fryseskuffe
natural_image
Illustration of a hand cleaning a window with a soap block and a basin (no text or symbols)flowchart
graph TD
    A["LED"] <--> B["LED"]
natural_image
Pure geometric diagram of a 3D rectangular prism with dashed diagonals and arrows indicating direction (no text or symbols)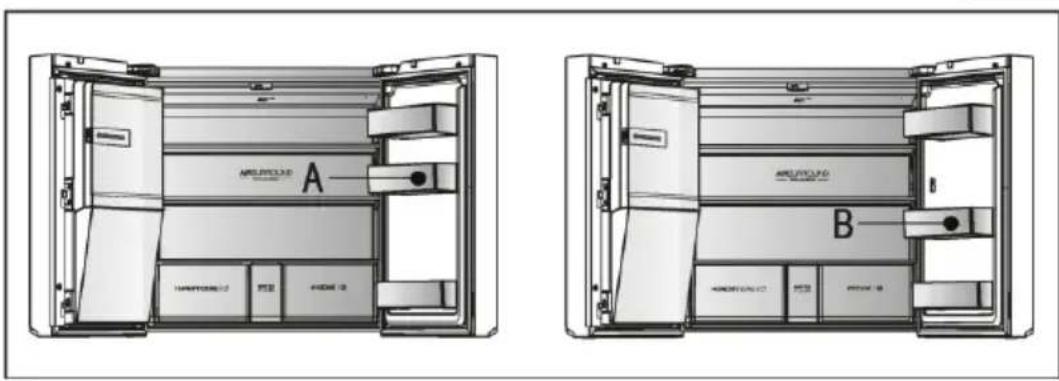
ADVARSEL!
Westgate House, Westgate, Ealing
London, W5 1YY
natural_image
Abstract geometric composition with four overlapping gray shapes radiating from a central white mark (no text or symbols)2022 version A
Haier

Käyttöopas
Jääkaappi-pakastin
HFW7918EIMP
HFW7918EIMB
HFW7918EIMP(UK)
natural_image
Symbol of a trash bin crossed with no text or numbers, representing waste sorting or restriction (no text present)Hävittäminen

Huomautus

Huomautus
Vaihe 2
Vaihe 3
TUOTETIEDOT
Wi-Fi-moduulin aktivointi:
natural_image
Diagram of a mechanical component with a pointed tip and arrow indicating direction (no text or symbols)natural_image
Pure technical diagram of a mechanical component with no text or symbols
Huomautus
natural_image
Simple line drawing of a 3D object with a rectangular frame and a small object inside (no text or symbols)natural_image
Technical line drawing of a mechanical component with internal channels and mounting holes (no text or symbols)
HUOMIO!

natural_image
Technical diagram showing a mechanical assembly before and after transformation, with no visible text or symbols.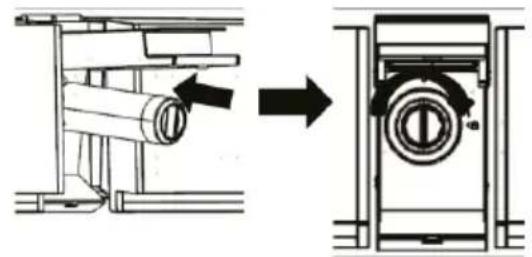
natural_image
Technical diagram showing a mechanical assembly before and after transformation, with no visible text or symbols.4.

Säädettävät hyllyt
natural_image
Architectural floor plan diagram showing room layouts and structural elements (no text or labels)My Zone XL -osasto

Huomautus
natural_image
Illustration of a hand cleaning a window with a soap block and a basin (no text or symbols)flowchart
graph TD
    A["LED"] <--> B["LED"]
natural_image
Pure geometric diagram of a 3D rectangular prism with dashed diagonals and arrows indicating direction (no text or symbols)
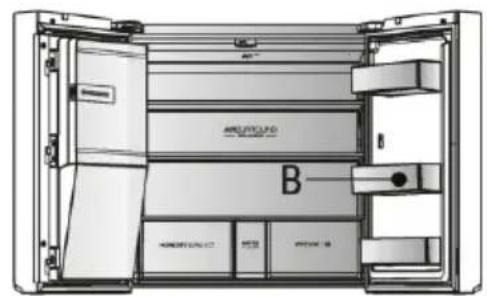

VAROITUS!
natural_image
Abstract geometric composition with four gray angular shapes radiating from a central white cross (no text or symbols)2022 Versio A
Haier
Brukerhåndbok
Kjøleskap-fryser
HFW7918EIMP
HFW7918EIMB
HFW7918EIMP(UK)
Takk for at du kjøpte et Haier-produkt.
natural_image
Symbol of a trash bin crossed with no text or labels, representing waste sorting or restriction (no text present)Kassering
- Trykk på knappen "E" (temperaturjusteringsknapp "+") hver gang, summeren ringer én gang, innstilt temperatur på fryseren økes med 1. Frysetemperaturen vil vises i sekvensen "-24°C -> -23°C -> -22°C -> -21°C -> -20°C -> -19°C -> -18°C -> -17°C -> -16°C -> -15°C -> -14°C".
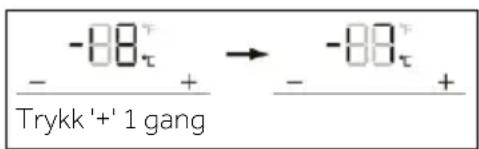

Obs
Trinn 2
Opprett en konto i appen for pålogging som du har en konto.
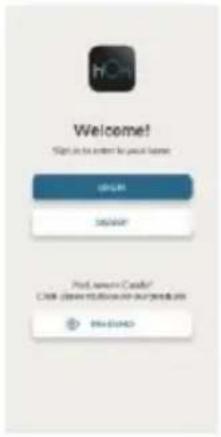
Trinn 3
PRODUKTINFORMASJON
Slik aktiverer du Wi-Fi-modulen:
natural_image
Diagram of a mechanical component with an arrow indicating direction, no text or symbols present
Obs
natural_image
Simple line drawing of a 3D printer or printer with a base tray and top frame (no text or symbols)Automatisk ismaskin
natural_image
Technical line drawing of a mechanical component with internal channels and mounting holes (no text or symbols)
FORSIKTIGHET!
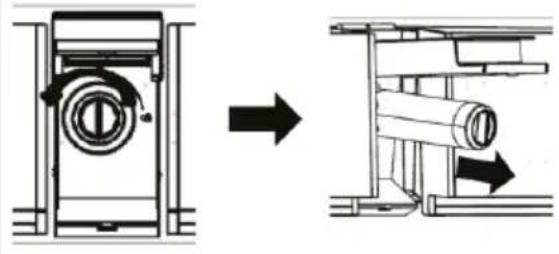
natural_image
Technical diagram showing a mechanical assembly before and after transformation, with no visible text or symbols.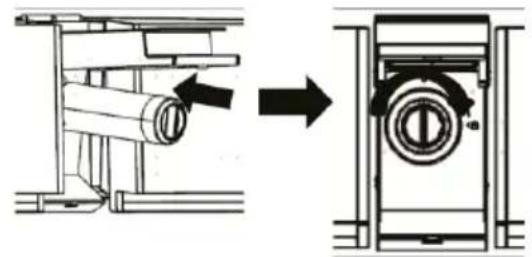
natural_image
Technical diagram showing a mechanical assembly before and after transformation, with no visible text or symbols.4.
Justerbare hyller
natural_image
Architectural floor plan showing room layout with furniture and structural elements (no text or labels)My Zone XL-rom

Obs
Avtakbar fryseskuff
natural_image
Illustration of a hand cleaning a window with a soap block and a basin (no text or symbols)▶ Hold alltid dørpakningen ren.
flowchart
graph TD
    A["LED"] <--> B["LED"]
natural_image
Pure geometric diagram of a 3D rectangular prism with dashed diagonals and arrows indicating direction (no text or symbols)


ADVARSEL!
natural_image
Abstract geometric composition with four gray triangular shapes radiating from a central white cross (no text or symbols)2022 Versjon A
Haier

Bruksanvisning
Kyl- och frysskåp
HFW7918EIMP
HFW7918EIMB
HFW7918EIMP(UK)
natural_image
Symbol of a trash bin crossed with no text or labels, representing waste sorting or restriction (no text present)Bortskaffande
chemical
Reaction diagram showing -80τ and -88τ with tryck 1 gäng labelSteg 2
PRODUKTINFORMATION
natural_image
Diagram of a mechanical component with a pointed tip and arrow indicating direction (no text or symbols)natural_image
Technical line drawing of a mechanical component with a numbered arrow indicating direction (no text or symbols present)
Uppmärksamma
natural_image
Simple line drawing of a 3D object with a rectangular frame and a small object inside (no text or symbols)Automatisk ismaskin
natural_image
Technical line drawing of a mechanical component with internal slots and mounting brackets (no text or symbols)
FÖRSIKTIGHET!
natural_image
Technical diagram showing a mechanical assembly before and after transformation, with no visible text or symbols.
4.
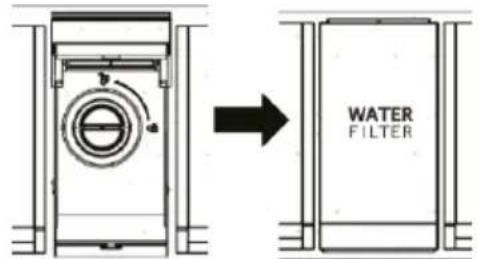
Justerbara hyllor
natural_image
Architectural floor plan diagram showing room layouts and structural elements (no text or labels)My Zone XL-fack

Uppmärksamma
Avtagbar fryslåda
natural_image
Illustration of a hand cleaning a window with a soap block and a basin (no text or symbols)flowchart
graph TD
    A["LED"] <--> B["LED"]
natural_image
Pure geometric diagram of a 3D rectangular prism with dashed diagonals and arrows indicating direction (no text or symbols)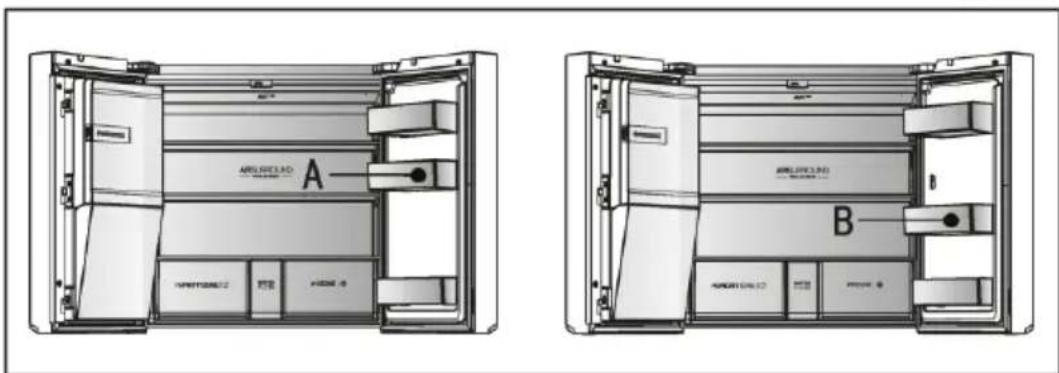

WARNING!
natural_image
Abstract geometric composition with four gray angular shapes radiating from a central white mark (no text or symbols)2022 version A
Haier

Chladnička-mraznička
HFW7918EIMP
HFW7918EIMB
HFW7918EIMP(UK)
natural_image
Symbol of a trash bin crossed with no text or labelsPOSTUP PÁROVÁNÍ S APLIKACÍ
Krok 1

Krok 2
Krok 3
INFORMACE O VÝROBKU
Jak aktivovat modul Wi-Fi:
natural_image
Diagram of a mechanical component with a black arrow pointing to a shaft (no text or symbols)Čištění dávkovače
Upozornění
natural_image
Simple line drawing of a rectangular frame with a U-shaped top and a small object inside (no text or symbols)natural_image
Technical line drawing of a mechanical component with internal slots and housing (no text or symbols)natural_image
Diagram of an open electrical enclosure with a curved arrow indicating a component (no text or symbols present)
POZOR!
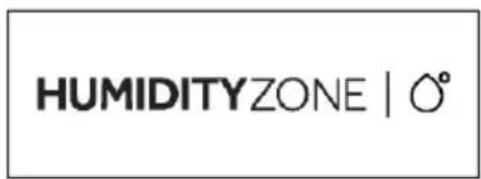

Upozornění:
natural_image
Architectural floor plan diagram showing room layouts and structural elements (no text or labels)Prostor My Zone XL
VOLITELNÉ VYBAVENÍ:

Upozornění:
Světlo
natural_image
Illustration of a hand cleaning a window with a soap block and a basin (no text or symbols)natural_image
Pure geometric diagram of a 3D rectangular prism with internal diagonals and directional arrows, no text or symbols present.Modely Ice and Water a Automatic Ice


VAROVÁNÍ!
Westgate House, Westgate, Ealing
London, W5 1YY
natural_image
Abstract geometric composition with four gray triangular shapes arranged symmetrically (no text or symbols)Verze A 2022
Haier

Návod na použitie
Chladnička s mrazničkou
HFW7918EIMP
HFW7918EIMB
HFW7918EIMP(UK)
natural_image
Symbol of a trash bin crossed with no text or labelsA: Chladiaci priestor
chemical
Chemical reaction diagram showing reduction of -80° to -89° with Raz stlačte notation- Stláčajte tlačidlo „E“ (tlačidlo regulácie teploty „+“), pri každom stlačení zaznie bzučiak a nastavená teplota mrazničky sa zvýši o 1 stupeň. Teplota mrazničky sa bude zobrazovat’ v sekvencii „-24°C > -23°C > -22°C > -21°C > -20°C > -19°C > -18°C > -17°C > -16°C > -15°C > -14°C“.
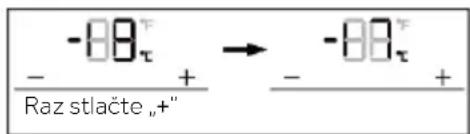
chemical
Chemical reaction diagram showing reduction of -88τ to -88τ with raz stlačte +''
Poznámka
chemical
Chemical reaction diagram showing reduction of 80° to -80° with Raz stlačte notationchemical
Chemical reaction diagram showing reduction of 80°C to -80°C with Raz stlačte and + charge
Poznámka
INFORMÁCIE O PRODUKTE
Ako aktivovat' modul Wi-Fi:
Pripojenie k vodovodnému kohútiku
natural_image
Diagram of a mechanical component with a directional arrow indicating process (no text or symbols)Čistenie dávkovača

Poznámka
natural_image
Simple line drawing of a mechanical or architectural component with no text or symbolsnatural_image
Technical line drawing of a mechanical component with internal channels and mounting holes (no text or symbols)natural_image
Diagram of an open electrical enclosure with a curved arrow indicating a component (no text or symbols present)
POZOR!
natural_image
Architectural floor plan diagram showing room layouts and structural elements (no text or labels)Priehradka My Zone XL
VOLITEL'NÉ: kontrolka teploty OK

Poznámka:
Osvetlenie
natural_image
Illustration of a hand cleaning a window with a soap block and a basin (no text or symbols)natural_image
Pure geometric diagram of a 3D rectangular prism with internal diagonals and arrows indicating direction (no text or symbols)

VAROVANIE!
Westgate House, Westgate, Ealing
London, W5 1YY
natural_image
Abstract geometric composition with four gray triangular shapes arranged symmetrically (no text or symbols)2022 Verzia A
Haier
Kasutusjuhend
Külmik-sügavkülmik
HFW7918EIMP
HFW7918EIMB
HFW7918EIMP(UK)
Aitäh, et ostsite Haieri toote.
natural_image
Symbol of a trash bin crossed with no text or labelsB: My Zone XL kamber
16 My Zone XL sahtel
chemical
Chemical reaction diagram showing reduction of 80° to -80° with Vajutage reagent
Märkus.
TOOTEINFO
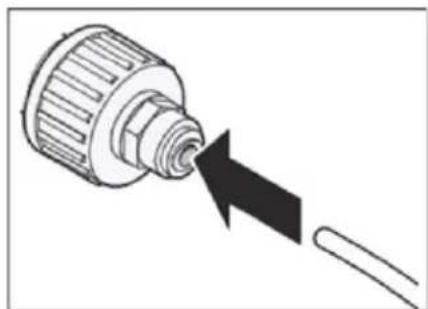
natural_image
Diagram of a mechanical component with a pointed tip and arrow indicating direction (no text or symbols)Jää- ja veedosaator
natural_image
Technical line drawing of a mechanical component with a labeled arrow (no text or symbols present)
Märkus.
natural_image
Simple line drawing of a mechanical component or bracket with no text or symbolsAutomaatne jäämasin
natural_image
Technical line drawing of a mechanical component with internal channels and mounting holes (no text or symbols)natural_image
Diagram of an open electrical enclosure with a curved arrow indicating rotation or movement (no text or symbols present)
ETTEVAATUST!

natural_image
Technical diagram showing a mechanical assembly before and after transformation, with no visible text or symbols.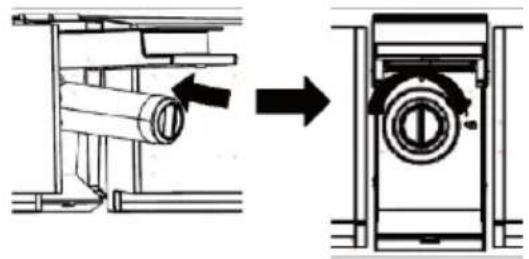
natural_image
Technical diagram showing a mechanical assembly before and after transformation, with no visible text or symbols.4.
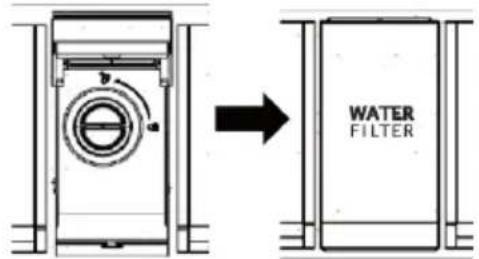
flowchart
graph TD
    A["Interior Room"] --> B["Building Section 1"]
    B --> C["Building Section 2"]
    C --> D["Building Section 3"]
    D --> E["Building Section 4"]
    E --> F["Building Section 5"]
    F --> G["Building Section 6"]
    G --> H["Building Section 7"]
    H --> I["Building Section 8"]
    I --> J["Building Section 9"]
    J --> K["Building Section 10"]
    K --> L["Building Section 11"]
    L --> M["Building Section 12"]
    M --> N["Building Section 13"]
    N --> O["Building Section 14"]
    O --> P["Building Section 15"]
    P --> Q["Building Section 16"]
    Q --> R["Building Section 17"]
    R --> S["Building Section 18"]
    S --> T["Building Section 19"]
    T --> U["Building Section 20"]
    U --> V["Building Section 21"]
    V --> W["Building Section 22"]
    W --> X["Building Section 23"]
    X --> Y["Building Section 24"]
    Y --> Z["Building Section 25"]
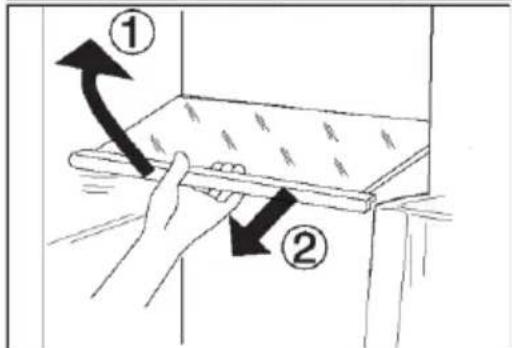
natural_image
Architectural floor plan diagram showing room layout and structural elements (no text or labels)My Zone XL kamber

Märkus.
Valgusti
natural_image
Illustration of a hand cleaning a window with a soap block and a basin (no text or symbols)flowchart
graph LR
    A["LED Light"] <--> B["Robot Icon"]
    B --> C["LED Light"]
natural_image
Pure geometric diagram of a 3D rectangular prism with dashed diagonals and arrows indicating direction (no text or symbols)

HOIATUS!
Westgate House, Westgate, Ealing
London, W5 1YY
* Külmutusseadme garantii kestus:
natural_image
Symbol of a trash bin crossed with diagonal lines, representing waste or discharge (no text or labels)Utilizavimas
2 veiksmas
GAMINIO INFORMACIJA

natural_image
Diagram of a mechanical component with a directional arrow indicating flow or movement (no text or symbols)Ledo ir vandens tiekimo jrenginys
Prieš naudojant ledo ir vandens tiekimo jrenginj
DÈMESIO!
Tiekimo jrenginio valymas
Ledo ir vandens tiekimo angos valymas

Pastaba
natural_image
Simple line drawing of a mechanical or architectural component with no text or symbolsAutomatinis ledo gaminimo aparatas
natural_image
Technical line drawing of a mechanical component with internal channels and mounting holes (no text or symbols)natural_image
Diagram of an open electrical enclosure with a curved arrow indicating rotation or movement (no text or symbols present)
DÈMESIO!
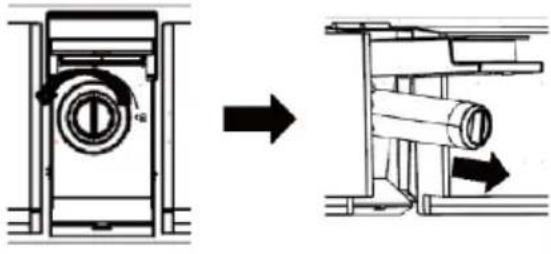
natural_image
Technical diagram showing a mechanical assembly before and after transformation, with no visible text or symbols.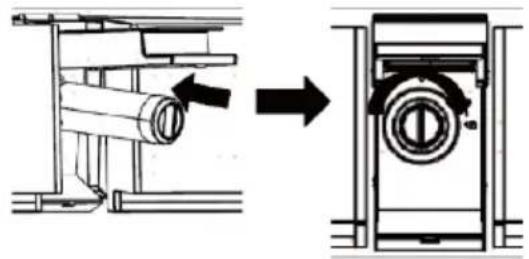
natural_image
Technical diagram showing a mechanical assembly before and after transformation, with no visible text or symbols.4.
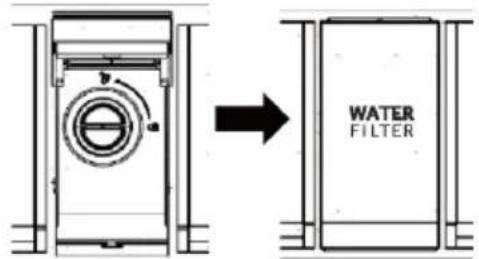
natural_image
Architectural floor plan diagram showing room layout and structural elements (no text or labels)„My Zone XL“ skyrius

Pastaba
Apšvietimas
natural_image
Illustration of a hand cleaning a window with a soap block and a basin (no text or symbols)flowchart
graph LR
    A["LED Light"] <--> B["Robot Icon"]
    B --> C["LED Light"]
natural_image
Pure geometric diagram of a 3D rectangular prism with internal diagonals and directional arrows, no text or symbols present.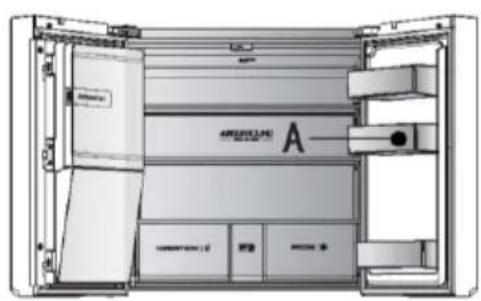
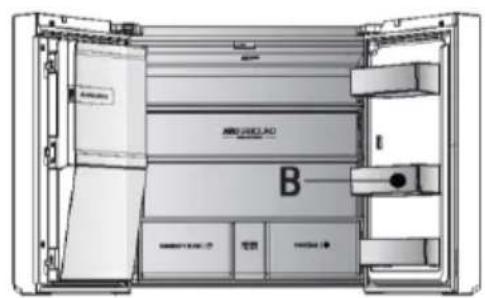
JSPĖJIMAS!
Westgate House, Westgate, Ealing
London, W5 1YY
natural_image
Abstract geometric composition with four gray triangular shapes radiating from a central point, no text or symbols present.2022 m. A versija
Haier
natural_image
Symbol of a trash bin crossed with no text or labelsUtilizācija
chemical
Chemical reaction diagram showing Nospiediet + 1 reizi with two products labeled -80τ and -80τchemical
Chemical reaction diagram showing deprotonation of Nospiediet with reizolium iodide
Piezīme

INFORMĀCIJA PAR PRODUKTU
Kā aktivizēt Wi-Fi moduli:

natural_image
Diagram of a mechanical component with a pointed tip and arrow indicating direction (no text or symbols)Ledus un üdens dozators
natural_image
Technical line drawing of a mechanical component with a labeled arrow (no text or symbols present)Dozatora tīrīšana

Piezīme
natural_image
Simple line drawing of a mechanical component or bracket with no text or symbolsnatural_image
Technical line drawing of a mechanical component with internal channels and mounting holes (no text or symbols)natural_image
Diagram of an open electrical enclosure with a curved arrow indicating rotation or movement (no text or symbols present)
UZMANĪBU!
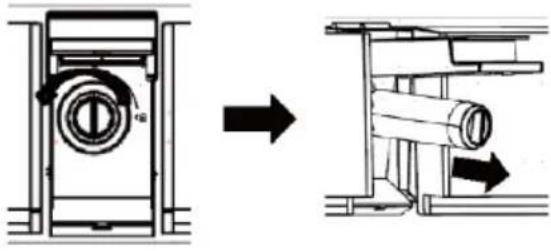
natural_image
Technical diagram showing a mechanical assembly before and after transformation (no text or symbols)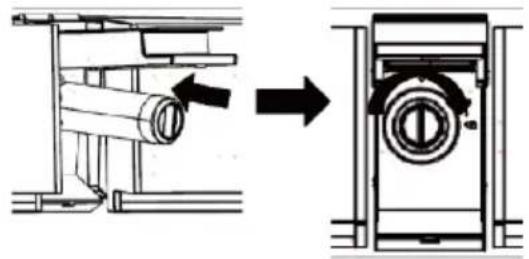
natural_image
Technical diagram showing a mechanical assembly before and after transformation, with no visible text or symbols.4.
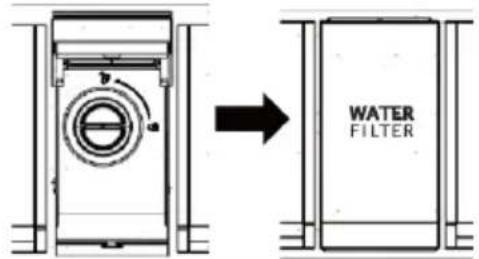
flowchart
graph TD
    A["Interior Room"] --> B["Building Section 1"]
    B --> C["Building Section 2"]
    C --> D["Building Section 3"]
    D --> E["Building Section 4"]
    E --> F["Building Section 5"]
    F --> G["Building Section 6"]
    G --> H["Building Section 7"]
    H --> I["Building Section 8"]
    I --> J["Building Section 9"]
    J --> K["Building Section 10"]
    K --> L["Building Section 11"]
    L --> M["Building Section 12"]
    M --> N["Building Section 13"]
    N --> O["Building Section 14"]
    O --> P["Building Section 15"]
    P --> Q["Building Section 16"]
    Q --> R["Building Section 17"]
    R --> S["Building Section 18"]
    S --> T["Building Section 19"]
    T --> U["Building Section 20"]
    U --> V["Building Section 21"]
    V --> W["Building Section 22"]
    W --> X["Building Section 23"]
    X --> Y["Building Section 24"]
    Y --> Z["Building Section 25"]
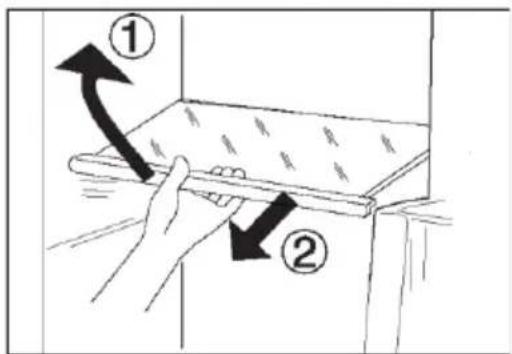
natural_image
Architectural floor plan diagram showing room layout and structural elements (no text or labels)Nodalijums My Zone XL
PAPILDIESPĒJA: OK temperatūras indikators

Piezīme
Apgaismojums
natural_image
Illustration of a hand cleaning a window with a soap block and a basin (no text or symbols)flowchart
graph LR
    A["LED Light"] <--> B["Robot Icon"]
    B --> C["LED Light"]
natural_image
Pure geometric diagram of a 3D rectangular prism with dashed diagonals and arrows indicating direction (no text or symbols)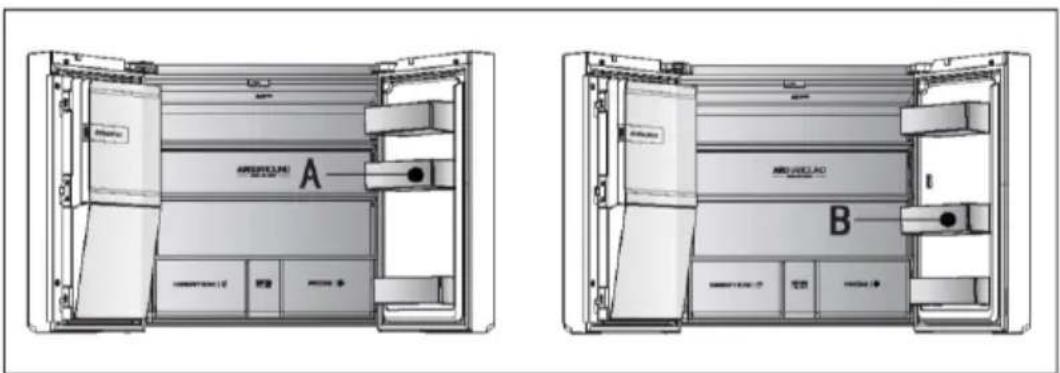

BRĪDINĀJUMS!
Westgate House, Westgate, Ealing
London, W5 1YY
natural_image
Abstract geometric composition with four gray triangular shapes radiating from a central point, no text or symbols present.- WARNING!
- Accessories
- Before first use
- RNING!
- Intended use
- Notice
- Model (HFW7918EIMP/HFW7918EIMB/HFW7918EIMP(UK))
- (With Icemaker in door)
- Control panel (HFW7918EIMP/HFW7918EIMB/HFW7918EIMP(UK))
- Buttons:
- Indicators:
- Sensor keys
- Switch on /of the appliance
- Lock/unlock panel
- Adjust the temperature
- Adjust the temperature for fridge
- Adjust the temperature for freezer
- Adjust the temperature for My Zone XL (S-Zone)
- Super-Cool function
- Super-Freeze function (Super-Frz)
- Auto Set mode
- Holiday mode
- My Zone drawer
- Filter function
- Ice maker mode
- Water intake function
- Cubed ice function
- Crushed ice function
- Switch between degrees Celsius and Fahrenheit
- EPP function
- Door opening alarm
- Power off memory
- Wifi-modus instellen
- PRODUCT INFORMATION
- Connecting water to the appliance
- Connecting to the water tap
- Checking the Water Connection
- CAUTION!
- Using the ice and water dispenser
- Cleaning the dispenser
- Cleaning the ice and water outlet
- Cleaning the dispenser tray
- Automatic icemaker
- Before using the in-door icemaker
- In-door icemaker
- Removing/Refitting the ice storage bin
- UTION!
- Replacing the water filter
- Water Filter
- Application Guidelines/Water Supply Parameters
- Multi-air-flow
- Adjustable shelves
- Notice:
- Humidity box drawer
- My Zone XL compartment
- Removable door racks/bottle holder
- OPTIONAL: OK-temperature indicator
- Removable My Zone XL drawer
- Removable freezer drawer
- The Light
- Energy saving tips
- Cleaning
- Defrosting
- Replacing the LED-lamps
- Non-use for a longer period
- Moving the appliance
- Troubleshooting
- Power interruption
- Memory function during power interruption
- Unpacking
- Environmental conditions
- Space requirement
- Ventilaton cross-section
- Aigning the appliance
- Fine tuning of the doors
- Using adjustable foot/adjustable hinge
- Waiting time
- Electrical connection
- NING!
- Ice and Water and Automatic Ice models
- Explanations: • Yes, featured
- Benutzerhandbuch
- Entsorgung
- PRODUKTINFORMATIONEN
- Hinweis
- VORSICHT!
- My Zone XL-Fach
- OPTIONAL: OK-Temperaturanzeige
- Beleuchtung
- WARNUNG!
- Haier
- Manual de usuario
- Eliminación
- Aviso
- ¡PRECAUCIÓN!
- Estantes ajustables
- Compartimento My Zone XL
- Luz
- ADVERTENCIA
- Fonction Crushed ice
- INFORMATIONS SUR LE PRODUIT
- Remarque
- ATTENTION!
- Clayettes réglables
- Compartiment My Zone XL
- La lumière
- AVERTISSEMENT!
- Manuale dell'utente
- Frigorifero- Congelatore
- Smaltimento
- B: Comparto My Zone XL
- Avviso
- ATTENZIONE!
- Ripiani regolabili
- Comparto My Zone XL
- Illuminazione
- B: My Zone XL-compartiment
- C: Vriezergedeelte
- Toetsen:
- PRODUCTINFORMATIE
- De dispenser reinigen
- Let op
- Verstelbare planken
- My Zone XL-compartiment
- Let op:
- Uitneembare vriezerlade
- De verlichting
- WAARSCHUWING!
- Brugervejledning
- Bortskaffelse
- PRODUKTINFORMATION
- Tilslutning til vandhanen
- Bemærk
- Automatisk ismaskine
- FORSIGTIG!
- Justerbare hylder
- My Zone XL rum
- Aftagelig fryseskuffe
- ADVARSEL!
- Käyttöopas
- Hävittäminen
- Huomautus
- TUOTETIEDOT
- HUOMIO!
- Säädettävät hyllyt
- My Zone XL -osasto
- VAROITUS!
- Brukerhåndbok
- Kassering
- Obs
- PRODUKTINFORMASJON
- Automatisk ismaskin
- FORSIKTIGHET!
- Justerbare hyller
- My Zone XL-rom
- Avtakbar fryseskuff
- Bruksanvisning
- Bortskaffande
- Uppmärksamma
- FÖRSIKTIGHET!
- Justerbara hyllor
- My Zone XL-fack
- Avtagbar fryslåda
- POSTUP PÁROVÁNÍ S APLIKACÍ
- INFORMACE O VÝROBKU
- Upozornění
- POZOR!
- Upozornění:
- Prostor My Zone XL
- Světlo
- Modely Ice and Water a Automatic Ice
- VAROVÁNÍ!
- Poznámka
- INFORMÁCIE O PRODUKTE
- Pripojenie k vodovodnému kohútiku
- Priehradka My Zone XL
- Poznámka:
- Osvetlenie
- VAROVANIE!
- Kasutusjuhend
- Märkus.
- TOOTEINFO
- Automaatne jäämasin
- ETTEVAATUST!
- My Zone XL kamber
- Valgusti
- HOIATUS!
- GAMINIO INFORMACIJA
- DÈMESIO!
- Pastaba
- „My Zone XL“ skyrius
- Apšvietimas
- JSPĖJIMAS!
- Piezīme
- INFORMĀCIJA PAR PRODUKTU
- Dozatora tīrīšana
- UZMANĪBU!
- Nodalijums My Zone XL
- Apgaismojums
- BRĪDINĀJUMS!
Brand : HAIER
Model : HFW7918EIMP
Category : Fridge