
AORUS 15X - Laptop GIGABYTE - Free user manual and instructions
Find the device manual for free AORUS 15X GIGABYTE in PDF.

| Product Type | Gaming Laptop |
| Brand | Gigabyte |
| Model | AORUS 15X |
| Power Supply | AC adapter: input 100-240 V~, 50/60 Hz; output 20 V, 14 A |
| Ports | 2\u00d7 USB 3.2 Type-A, 1\u00d7 Thunderbolt 4 (USB-C), 1\u00d7 HDMI 2.1, 1\u00d7 Mini DisplayPort 1.4, 1\u00d7 Ethernet RJ-45, 1\u00d7 3.5 mm audio combo jack, 1\u00d7 DC input |
| Display | 15.6-inch screen with ambient light sensor |
| Webcam | Built-in webcam with microphone |
| Keyboard | RGB backlit keyboard with function keys |
| Touchpad | Built-in touchpad |
| Wireless Connectivity | Built-in Wi-Fi and Bluetooth |
| Main Functions | AI mode, fan optimization, multiple display modes, screen lock |
| Safety | Do not remove the lithium battery; avoid temperatures above 45 \u00b0C; do not block ventilation; use a grounded outlet |
| Maintenance and Cleaning | Clean with a soft, dry cloth; do not use liquid or abrasive products |
| Restoration | Restore via F9 at startup: options Reset PC or Smart Recovery |
| Spare Parts and Repairability | Contact the nearest GIGABYTE repair center |
| Warranty | Refer to the warranty card or visit gigabyte.com/fr/Support/Laptop |
Frequently Asked Questions - AORUS 15X GIGABYTE
User questions about AORUS 15X GIGABYTE
0 question about this device. Answer the ones you know or ask your own.
Ask a new question about this device
Download the instructions for your Laptop in PDF format for free! Find your manual AORUS 15X - GIGABYTE and take your electronic device back in hand. On this page are published all the documents necessary for the use of your device. AORUS 15X by GIGABYTE.
USER MANUAL AORUS 15X GIGABYTE
natural_image
Line drawing of a laptop with a bird silhouette above its screen, showing front and side views (no text or symbols)ENEnglish003
AR العربية 009
BGБългарски 015
CSČeština 021
DE Deutsch 027
EL Ελληνικά 033
ES Español 039
ETEesti Keel 045
FR Français 051
HE 057
HU Magyar 063
JA 日本語 069
KO 한국어 076
text_image
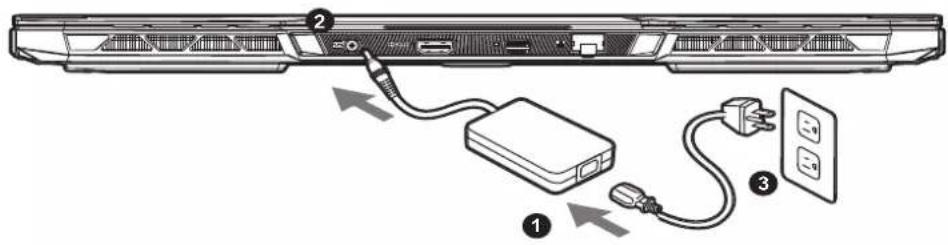
Diagram showing cable connection to a device with labeled components and cable routing steps1 Connect the power cord to the AC adapter.
2 Connect the AC adapter to the DC-in jack of the notebook.
3 Connect the power cord to the power outlet.
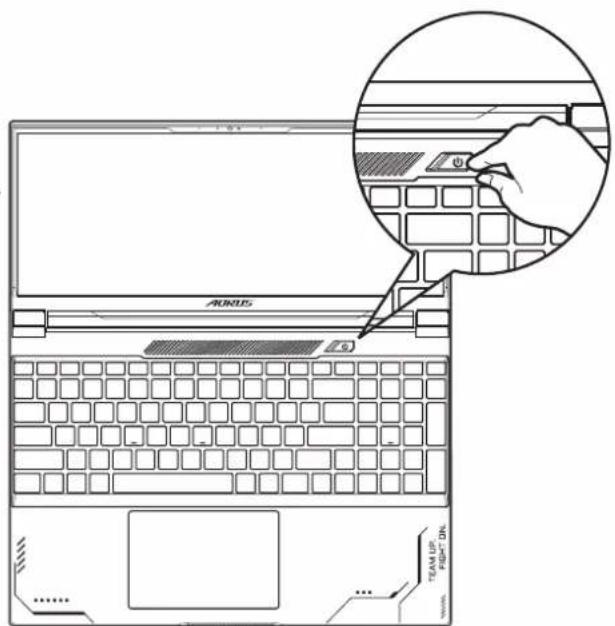
1-2. Switching on the Power
After you turn on the notebook for the very first time, do not turn it off until the operating system has been configured. Please note that the volume for the audio will not function until Windows® Setup has completed.
text_image
AORUS TEAM UP FIGHT DN
IMPORTANT:
- Ensure that your Notebook PC is connected to a grounded power adapter before turning it on for the first time.
- When using your Notebook PC on power adapter mode, the socket outlet must be near to the unit and easily accessible.
- Locate the input/output mark on your Notebook PC and ensure that it matches the input/output rating information on your power adapter. Some Notebook PC models may have multiple rating output currents based on the available SKU.
• Power adapter information: - Input voltage: 100-240Vac
- Input frequency: 50-60Hz
- Rating output voltage 20V, 14A
* Product specifications and product appearance may differ from country to country.
We recommend that you check with your local dealers for the specifications and appearance of the products available in your country.
* Although we endeavor to present the most accurate and comprehensive information at the time of publication, we reserve the right to make changes without prior notice.
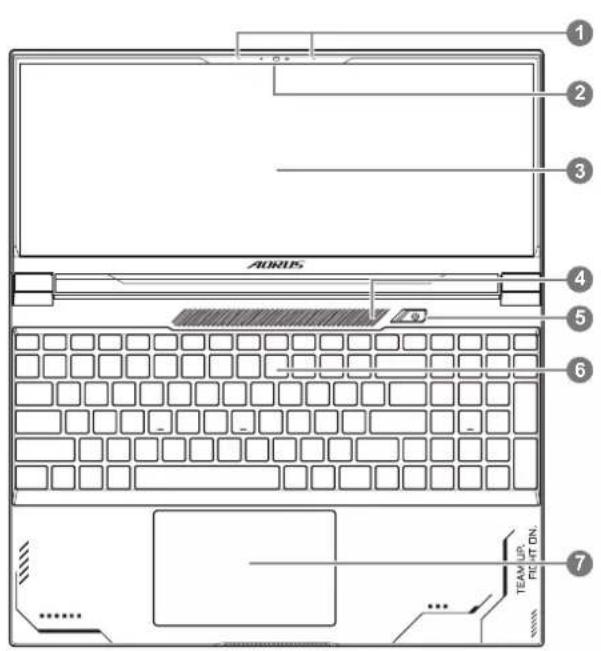
2. AORUS Notebook Tour
text_image
AURUS TEAM UP/ FT ON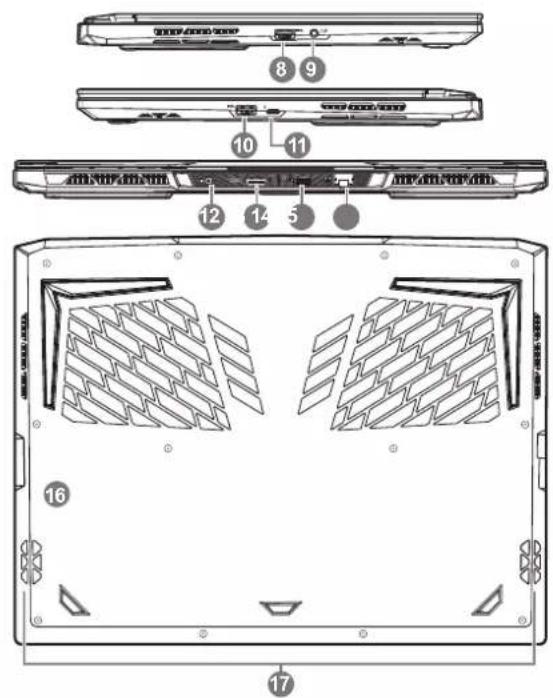
text_image
Technical diagram of a device rear panel with numbered components for identification1 Microphone
2 Webcam
3 Display Panel
4 Light Sensor Area*
5 Power Button
6 Keyboard
7 Touchpad
8 USB 3.2 Port (USB type-A)
9 Audio Combo Jack
10 USB 3.2 Port (USB type-A)
11 Thunderbolt 4 Port (USB type-C)
12 Power Input Port (DC)
13 HDMI 2.1 Port
14 Mini DisplayPort 1.4
15 Ethernet Port (LAN)
16 Battery Reset Hole**
17 Speaker
* The system will adjust the brightness of the screen automatically according to the ambient light, beware not to cover this area.
** Whenever the system hangs, please: (1) Power off the notebook; (2) Remove the AC power; (3) Use a straightened paperclip and insert it to this hole for 4 secs; (4) Waiting for 15 secs then connect the AC power; (5) Power on the notebook.
HDMI
The Adopted Trademarks HDMI, HDMI High-Definition Multimedia Interface, HDMI trade dress and the HDMI Logos are trademarks or registered trademarks of HDMI Licensing Administrator, Inc. in the United States and other countries.

IMPORTANT:
- Do not remove the built-in lithium battery.
For any service needs, please contact your local GIGABYTE Authorized Service Center. - Do not install the Notebook PC on a slant or a place prone to vibrations, or avoid using the Notebook PC in that location for a long time. This increases the risk that a malfunction or damage to the product will occur.
- Do not store and use Notebook PC in direct sunlight or the location where temperatures exceed 112°F (45°C) such as inside a vehicle. There is a danger of Lithium-ion battery expansion and aging.
- Do not use the Notebook PC in a badly ventilated location such as on bedding, on a pillow or cushion, etc, and do not use it in a location such as room with floor heating as it may cause the computer to overheat. Take care that the Notebook PC vents (on the side or the bottom) are not blocked especially in these environments. If the vents are blocked, it may be dangerous and cause the Notebook PC to overheat.
Hotkeys
The computer employs hotkeys or key combinations to access most of the computer's controls like screen brightness and volume output. To activate hotkeys, press and hold the
| Hotkey | Function Description | ||
| Fn+ESC |  | Maximize Fan Speed To increase the fan speed to 100%. | |
| Fn+F1 |  | Sleep Put the computer in Sleep mode. | |
| Fn+F2 |  | Wireless LAN | Enables / disable the Wireless LAN function. |
| Fn+F3 |  | Brightness Down Decrease the screen brightness. | |
| Fn+F4 |  | Brightness Up Increase the screen brightness. | |
| Fn+F5 |  | Display Toggle | Switch display output between the display screen, external monitor (if connected) and both. |
| Fn+F6 |  | Screen Display Lock Lock your PC or switch accounts. | |
| Fn+F7 |  | Speaker Toggle Turn the speaker on and off. | |
| Fn+F8 |  | Volume Down Decrease the sound volume. | |
| Fn+F9 |  | Volume Up Increase the sound volume. | |
| Fn+F10 |  | Touchpad Toggle Turn the internal touchpad on and off. | |
| Fn+F11 |  | Airplane Mode | Enable/disable the Airplane Mode function. |
| Fn+F12 |  | AI Mode AI Mode Switch. | |
| Fn+Space |  | Keyboard Backlight Toggle | Turn the keyboard backlight on and off. |
Recovery Guide
System recovery (Restore your laptop operating system)
When something is going wrong with the laptop operating system, the storage of the laptop has a hidden partition containing a full back up image of the operating system that can be used to restore the system to factory default settings.

Note
- If the storage has been switched or the partition deleted, the recovery option will no longer be available and a recovery service will be needed.
- The recovery function is only available on devices with O/S preinstalled. Devices with EFI SHELL do not have the recovery function.
Launch system recovery
The system recovery feature is preinstalled before the laptop is shipped from the factory. The option menu allows you to launch the Windows recovery tool to reinstall the operating system to factory default.
The brief introduction below will show you how to start the recovery tool and restore your system.

All ready to go
Make sure your PC is plugged in. This will take a few minutes.
Recovery Guide
1
Turn off and restart the laptop.
2

text_image
AORUS PressDuring the laptop turn on process, press and hold F9 key to launch the tool.
3
#
Choose "Troubleshoot" to enter the recovery settings.
( Also you can choose "Continue" to exit recovery system and continue to System for files or data backup. )

There are two options for system recovery
- Reset this PC -
You can choose to keep or remove your files and then reinstalls Windows without losing your files. - Smart Recovery -
Your PC settings will be restored to factory default settings.
Caution: All personal data and files will be lost.
4
#
Smart Recovery
The recovery will be activated and you will see the option buttons on the window. Click on "Yes" to start it.

Caution
- Once the "Recovery" is selected, your personal data and files will be deleted after the laptop starts restoring, and the operating system will be reset to factory default settings
- A progress indicator bar will show on the window when the recovery process is running. Please make sure the AC-adapter is plugged in and do not turn off the laptop.
After the system recovery is completed, you will see the option button on the window, please click on "Shutdown".
5

Advanced options

System Restore
Use a restore point recorded on your PC to restore Windows.

System Image Recovery
Recover Windows using a specific system image file.

Startup Repair
Fix problems that keep Windows from loading.

Command Prompt
Use the Command Prompt for advanced trobleshooting.

UEFI Firmware Settings
Change settings in your PC's UEFI firmware.

Startup Settings
Change Windows Startup behavior.
Appendix
■ Warranty & Service:
Warranty and service and related information please refer to the warranty card or GIGABYTE service website as the below link:
https://www.gigabyte.com/Support/Laptop
■ FAQ:
FAQ (Frequent Asked Questions) please refer to the below link:
https://www.gigabyte.com/Support/Faq

text_image
Diagram showing cable connection to a device with labeled parts and directional arrows indicating cable routing.text_image
Technical diagram of a computer monitor with labeled parts and internal compartments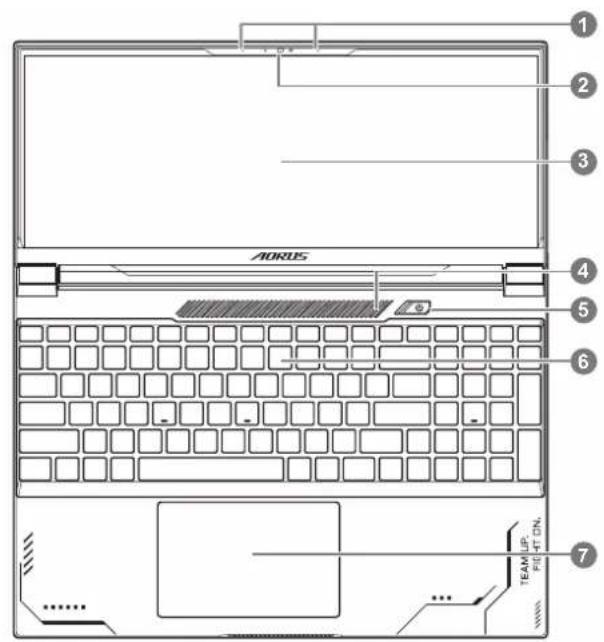
text_image
AORUS TEAM UP RIP + ON ...| الوظيفة الوصف | مفتاح التشفيل السريع | ||
.100% زيادة سراعة المروحة زيادة سراعة المروحة إلى  |  | Fn+F1 | |
| السكنون إدخال الكميبوتر في وضع السكون. |  | Fn+F2 | |
| تمكين وظيفة شبكة LAN Lighting LAN Lighting LAN Lighting LAN Lighting LAN Lighting LAN Lighting LAN Lighting LAN Lighting LAN Lighting LAN Lighting LAN Lighting LAN Lighting LAN Lighting LAN Lighting LAN Lighting LAN Lighting LAN Lighting LAN Lighting LAN Lighting LAN Lighting LAN Lighting LAN Lighting LAN Lighting LAN Lighting LAN Lighting LAN Lighting LAN Lighting LAN Lighting LAN Lighting LAN Lighting LAN Lighting LAN Lighting LAN Lighting LAN Lighting LAN Lighting LAN Lighting LAN Lighting LAN Lighting LAN Lighting LAN Lighting LAN Lighting LAN Lighting LAN Lighting LAN Lighting LAN Lighting LAN Lighting LAN Lighting LAN Lighting LAN Lighting LAN Lighting LAN lighting LAN Lighting LAN Lighting LAN Lighting LAN Lighting LAN Lighting LAN Lighting LAN Lighting LAN Lighting LAN Lighting LAN Lighting LAN Lighting LAN Lighting LAN Lighting LAN Lighting LAN Lighting LAN Lighting LAN Lighting LAN Lighting LAN Lighting LAN Lighting LAN Lighting LAN Lighting LAN Lighting LAN Lighting LAN Lighting LAN Lighting LAN Lighting LAN Lighting LAN Lighting LAN Lighting LAN Lighting LAN Lighting LAN Lighting LAN Lighting LAN Lighting LAN Lighting LAN Lighting LAN Lighting LAN Lighting LAN Lighting LAN Lighting LAN Lighting LAN Lighting LAN Lighting LAN Lighting LAN Lighting LAN Lighting LAN Lighting LAN Lighting LAN Light LAN Lighting LAN Lighting LAN Lighting LAN Lighting LAN Lighting LAN Lighting LAN Lighting LAN Lighting LAN Lighting LAN Lighting LAN Lighting LAN Lighting LAN Lighting LAN Lighting LAN Lighting LAN Lighting LAN Lighting LAN Lighting LAN Lighting LAN Lighting LAN Lighting LAN Lighting LAN Lighting LAN Lighting LAN Lighting LAN Lighting LAN Lighting LAN Lighting LAN Lighting LAN Lighting LAN Lighting LAN Lighting LAN Lighting LAN Lighting LAN Lighting LAN Lighting LAN Lighting LAN Lighting LAN Lighting LAN Lighting LAN Lighting LAN Lighting LAN Lighting LAN Lighting LAN Lighting LAN Lighting LAN Lighting LAN Lighting LAN Lighting LAN LPG Lighting LAN Lighting LAN Lighting LAN Lighting LAN Lighting LAN Lighting LAN Lighting LAN Lighting LAN Lighting LAN Lighting LAN Lighting LAN Lighting LAN Lighting LAN Lighting LAN Lighting LAN Lighting LAN Lighting LAN Lighting LAN Lighting LAN Lighting LAN Lighting LAN Lighting LAN Lighting LAN Lighting LAN Lighting LAN Lighting LAN Lighting LAN Lighting LAN Lighting LAN Lighting LAN Lighting LAN Lighting LAN Lighting LAN Lighting LAN Lighting LAN Lighting LAN Lighting LAN Lighting LAN Lighting LAN Lighting LAN Lighting LAN Lighting LAN Lighting LAN Lighting LAN Lighting LAN Lighting LAN Lighting LAN Lighting LAN Lighting LAN Lighting Lan Lighting LAN Lighting LAN Lighting LAN Lighting LAN Lighting LAN Lighting LAN Lighting LAN Lighting LAN Lighting LAN Lighting LAN Lighting LAN Lighting LAN Lighting LAN Lighting LAN Lighting LAN Lighting LAN Lighting LAN Lighting LAN Lighting LAN Lighting LAN Lighting LAN Lighting LAN Lighting LAN Lighting LAN Lighting LAN Lighting LAN Lighting LAN Lighting LAN Lighting LAN Lighting LAN Lighting LAN Lighting LAN Lighting LAN Lighting LAN Lighting LAN Lighting LAN Lighting LAN Lighting LAN Lighting LAN Lighting LAN Lighting LAN Lighting LAN Lighting LAN Lighting LAN Lighting LAN Lighting LAN Lighting LAN Lighting LAN Lighting LAN Lighting SAN Lighting LAN Lighting LAN Lighting LAN Lighting LAN Lighting LAN Lighting LAN Lighting LAN Lighting LAN Lighting LAN Lighting LAN Lighting LAN Lighting LAN Lighting LAN Lighting LAN Lighting LAN Lighting LAN Lighting LAN Lighting LAN Lighting LAN Lighting LAN Lighting LAN Lighting LAN Lighting LAN Lighting LAN Lighting LAN Lighting LAN Lighting LAN Lighting LAN Lighting LAN Lighting LAN Lighting LAN Lighting LAN Lighting LAN Lighting LAN Lighting LAN Lighting LAN Lighting LAN Lighting LAN Lighting LAN Lighting LAN Lighting LAN Lighting LAN Lighting LAN Lighting LAN Lighting LAN Lighting LAN Lighting LAN Lighting LAN Lighting LAN Lighting ANL Lighting LAN Lighting LAN Lighting LAN Lighting LAN Lighting LAN Lighting LAN Lighting LAN Lighting LAN Lighting LAN Lighting LAN Lighting LAN Lighting LAN Lighting LAN Lighting LAN Lighting LAN Lighting LAN Lighting LAN Lighting LAN Lighting LAN Lighting LAN Lighting LAN Lighting LAN Lighting LAN Lighting LAN Lighting LAN Lighting LAN Lighting LAN Lighting LAN Lighting LAN Lighting LAN Lighting LAN Lighting LAN Lighting LAN Lighting LAN Lighting LAN Lighting LAN Lighting LAN Lighting LAN Lighting LAN Lighting LAN Lighting LAN Lighting LAN Lighting LAN Lighting LAN Lighting LAN Lighting LAN Lighting LAN Lighting LAN Lighting LAN LightingANL Lighting LAN Lighting LAN Lighting LAN Lighting LAN Lighting LAN Lighting LAN Lighting LAN Lighting LAN Lighting LAN Lighting LAN Lighting LAN Lighting LAN Lighting LAN Lighting LAN Lighting LAN Lighting LAN Lighting LAN Lighting LAN Lighting LAN Lighting LAN Lighting LAN Lighting LAN Lighting LAN Lighting LAN Lighting LAN Lighting LAN Lighting LAN Lighting LAN Lighting LAN Lighting LAN Lighting LAN Lighting LAN Lighting LAN Lighting LAN Lighting LAN Lighting LAN Lighting LAN Lighting LAN Lighting LAN Lighting LAN Lighting LAN Lighting LAN Lighting LAN Lighting LAN Lighting LAN Lighting LAN Lighting LAN Lighting LAN Lighting LAN lighting/الياقاف Lighting LAN Lighting LAN Lighting LAN Lighting LAN Lighting LAN Lighting LAN Lighting LAN Lighting LAN Lighting LAN Lighting LAN Lighting LAN Lighting LAN Lighting LAN Lighting LAN Lighting LAN Lighting LAN Lighting LAN Lighting LAN Lighting LAN Lighting LAN Lighting LAN Lighting LAN Lighting LAN Lighting LAN Lighting LAN Lighting LAN Lighting LAN Lighting LAN Lighting LAN Lighting LAN Lighting LAN Lighting LAN Lighting LAN Lighting LAN Lighting LAN Lighting LAN Lighting LAN Lighting LAN Lighting LAN Lighting LAN Lighting LAN Lighting LAN Lighting LAN Lighting LAN Lighting LAN Lighting LAN Lighting LAN Lighting LAN Lighting LAN LightingLAN Lighting LAN Lighting LAN Lighting LAN Lighting LAN Lighting LAN Lighting LAN Lighting LAN Lighting LAN Lighting LAN Lighting LAN Lighting LAN Lighting LAN Lighting LAN Lighting LAN Lighting LAN Lighting LAN Lighting LAN Lighting LAN Lighting LAN Lighting LAN Lighting LAN Lighting LAN Lighting LAN Lighting LAN Lighting LAN Lighting LAN Lighting LAN Lighting LAN Lighting LAN Lighting LAN Lighting LAN Lighting LAN Lighting LAN Lighting LAN Lighting LAN Lighting LAN Lighting LAN Lighting LAN Lighting LAN Lighting LAN Lighting LAN Lighting LAN Lighting LAN Lighting LAN Lighting LAN Lighting LAN Lighting LAN Lighting LAN Lighting LAN Lighting NANL Lighting LAN Lighting LAN Lighting LAN Lighting LAN Lighting LAN Lighting LAN Lighting LAN Lighting LAN Lighting LAN Lighting LAN Lighting LAN Lighting LAN Lighting LAN Lighting LAN Lighting LAN Lighting LAN Lighting LAN Lighting LAN Lighting LAN Lighting LAN Lighting LAN Lighting LAN Lighting LAN Lighting LAN Lighting LAN Lighting LAN Lighting LAN Lighting LAN Lighting LAN Lighting LAN Lighting LAN Lighting LAN Lighting LAN Lighting LAN Lighting LAN Lighting LAN Lighting LAN Lighting LAN Lighting LAN Lighting LAN Lighting LAN Lighting LAN Lighting LAN Lighting LAN Lighting LAN Lighting LAN Lighting LAN Lighting LAN Lighting LANLight LAN Lighting LAN Lighting LAN Lighting LAN Lighting LAN Lighting LAN Lighting LAN Lighting LAN Lighting LAN Lighting LAN Lighting LAN Lighting LAN Lighting LAN Lighting LAN Lighting LAN Lighting LAN Lighting LAN Lighting LAN Lighting LAN Lighting LAN Lighting LAN Lighting LAN Lighting LAN Lighting LAN Lighting LAN Lighting LAN Lighting LAN Lighting LAN Lighting LAN Lighting LAN Lighting LAN Lighting LAN Lighting LAN Lighting LAN Lighting LAN Lighting LAN Lighting LAN Lighting LAN Lighting LAN Lighting LAN Lighting LAN Lighting LAN Lighting LAN Lighting LAN Lighting LAN Lighting LAN Lighting LAN Lighting LAN Lighting LAN Lighting LAN-Lituan-100% | [XXZC] | Fn+ESC | |
| Fn+F1 | ||
| Fn+F2 | ||
 | Fn+F3 | ||
 | Fn+F4 | ||
 | Fn+F5 | ||
 | Fn+F6 | ||
 | Fn+F7 | ||
 | Fn+F8 | ||
 | Fn+F9 | ||
 | Fn+F10 | ||
 | Fn+F11 | ||
 | Fn+F12 | ||
 | Fn+Space | ||
text_image
AORUS Press2
https://www.gigabyte.com/Support/Laptop
الأستلة الشانعة:
https://www.gigabyte.com/Support/Faq
text_image
Diagram showing cable connection to a device with labeled components and cable routing arrowstext_image
Technical diagram of a computer rear panel with numbered components for identificationtext_image
AORUS Presshttps://www.gigabyte.com/Support/Laptop
https://www.gigabyte.com/Support/Faq
text_image
Diagram showing cable connection to a device with labeled components and cable routing stepstext_image
Technical diagram of a computer rear panel with numbered components for identificationtext_image
AORUS Presshttps://www.gigabyte.com/Support/Laptop
■ FAQ:
https://www.gigabyte.com/Support/Faq
text_image
Diagram showing cable connection to a device with labeled components and cable routing stepstext_image
Technical diagram of a device rear panel with numbered components for identificationtext_image
AORUS Presstext_image
Diagram showing cable connection to a device with labeled components and cable routing stepstext_image
Technical diagram of a computer rear panel with numbered components for identificationtext_image
AORUS Presstext_image
Diagram showing cable connection to a device with labeled components and cable routing stepstext_image
Technical diagram of a device rear panel with numbered components for identificationtext_image
AORUS Presshttps://www.gigabyte.com/Support/Laptop
https://www.gigabyte.com/Support/Faq
text_image
Diagram showing cable connection to a device with labeled components and cable routing stepstext_image
Technical diagram of a device rear panel with numbered components for identification1 Mikrofon USB 3.2 Port (USB type-A)
2 Veebikaamera 11
3 Kuvaripaneel Toite Sisendpesa (DC)
4 Valgusanduri Piirkonda* 13
5 Toitenupp Mini Display Port 1.4
6 Klaviatuur Etherneti Port (LAN)
7 Puuteplaat Aku Lähtestusauk**
8 USB 3.2 Port (USB type-A) Kölar
9 Audio Ühendpesa
Thunderbolt 4 Port (USB type-C)
HDMI 2.1 Port

text_image
AORUS Presshttps://www.gigabyte.com/Support/Laptop
■ KKK:
https://www.gigabyte.com/Support/Faq
text_image
Diagram showing cable connection to a device with labeled components and cable routing stepstext_image
Technical diagram of a computer rear panel with numbered components for identificationtext_image
AORUS Press■ Foire Aux Questions:
https://www.gigabyte.com/Support/Faq
text_image
Diagram showing cable connection to a device with labeled parts and directional arrows indicating cable routing.text_image
AORUS θ TEAM UP FOR " ON"בַרְהָרִיָה.1-2
text_image
Technical diagram of a computer monitor with labeled parts and internal compartments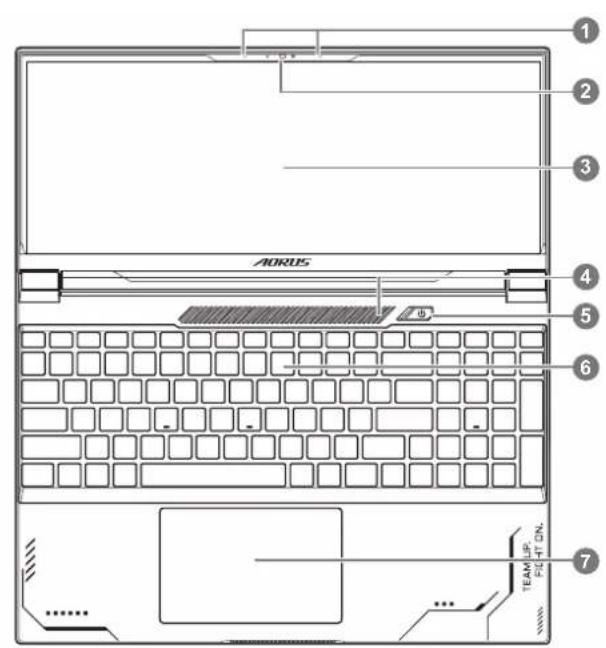
text_image
AORUS TEAM-5 RICHTON
text_image
AORUS Press2
https://www.gigabyte.com/Support/Laptop
:תָאַלְרָה בְּבָרִי
https://www.gigabyte.com/Support/Faq
text_image
Diagram showing cable connection to a device with labeled components and cable routing stepstext_image
Technical diagram of a device rear panel with numbered components for identificationtext_image
AORUS Presstext_image
Diagram showing cable connection to a device with labeled components and cable routing arrowstext_image
Technical diagram of a device rear panel with numbered components for identificationtext_image
AORUS Presshttps://www.gigabyte.com/jp/Support/Laptop
■よくある質問
text_image
Diagram showing cable connection to a device with labeled components and directional arrows indicating cable routing.text_image
Technical diagram of a device rear panel with numbered components for identificationtext_image
AORUS Presstext_image
Diagram showing cable connection to a device with labeled components and cable routing stepstext_image
Technical diagram of a device rear panel with numbered components for identificationtext_image
AORUS Presstext_image
Diagram showing cable connection to a device with labeled components and cable routing stepstext_image
Technical diagram of a device rear panel with numbered components for identificationtext_image
2 AORUS Presshttps://www.gigabyte.com/Support/Laptop
BUJ:
https://www.gigabyte.com/Support/Faq
text_image
Diagram showing cable connection to a device with labeled components and cable routing stepstext_image
Technical diagram of a computer rear panel with numbered components for identification1 Microfoon USB 3.2 Poort (USB type A)
2 Webcam 11 Thunderbolt 4 Poort (USB type C)
3 Beeldscherm Stroom Invoer Poort (DC)
4 Lichtsensorgebied* 13 HDMI 2.1 Poort HDMI™
5 Aan / Uit-knop Mini Beeldscherm Poort 1.4
6 Toetsenbord Ethernet Poort (LAN)
7 Touchpad Resetopening Batterij**
8 USB 3.2 Poort (USB type A) 17 Luidspreker
9 Audio Combo-aansluiting
text_image
AORUS Presshttps://www.gigabyte.com/Support/Laptop
https://www.gigabyte.com/Support/Faq
text_image
Diagram showing cable connection to a device with labeled parts and arrows indicating cable routingtext_image
Technical diagram of a device rear panel with numbered components for identificationtext_image
AORUS Presstext_image
Diagram showing cable connection to a device with labeled parts and connectionstext_image
Technical diagram of a computer monitor rear panel with numbered component labelstext_image
AORUS Presshttps://www.gigabyte.com/Support/Laptop
text_image
Diagram showing cable connection to a device with labeled components and cable routing stepstext_image
Technical diagram of a device rear panel with numbered components for identificationtext_image
AORUS Presshttps://www.gigabyte.com/Support/Laptop
■ ÎNTREBĂRI FRECVENTE:
https://www.gigabyte.com/Support/Faq
text_image
Diagram showing cable connection to a device with labeled components and cable routing stepstext_image
Technical diagram of a device rear panel with numbered components for identificationtext_image
AORUS Presstext_image
Diagram showing cable connection to a device with labeled components and power outlettext_image
Technical diagram of a device rear panel with numbered components for identificationtext_image
2 AORUS Presstext_image
Diagram showing cable connection to a device with labeled components and cable routing stepstext_image
Technical diagram of a computer rear panel with numbered components for identification1 Mikrofon USB 3.2 Port (USB tip A)
2Veb-kamera Thunderbolt 4 Port (USB tip C)
3Ekran
4Površina Senzora za Svetlo*
5Dugme za Napajanje HDMI 2.1 Port
6Tastatura Mini DisplayPort 1.4
7Tačped Mrežni Port (LAN)
8 USB 3.2 Port (USB tip A)
9Kombinovani Audio Priključak
12
16
Zvučnik
text_image
AORUS PressTokom procesa uključivanja laptopa, pritisnite i držite taster F9 da biste pokrenuli alatku.
3

Izaberite "Rešavanje problema" da biste ušli u postavke oporavka.
https://www.gigabyte.com/Support/Laptop
■ FAQ :
FAQ (Najčešća pitanja) – pogledajte vezu ispod:
https://www.gigabyte.com/Support/Faq
text_image
Diagram showing cable connection to a device with labeled components and cable routing stepstext_image
Technical diagram of a device rear panel with numbered components for identificationtext_image
AORUS Press啟動筆記型電腦後,
按著 F9 按鍵幾秒鐘以啟動還原工具。
3

text_image
Diagram showing cable connection to a device with labeled components and cable routing stepstext_image
Technical diagram of a computer rear panel with numbered components for identificationtext_image
AORUS Presshttps://www.gigabyte.com/Support/Laptop
■ SSS:
https://www.gigabyte.com/Support/Faq
text_image
Diagram showing cable connection to a device with labeled components and cable routing arrowstext_image
Technical diagram of a device rear panel with numbered components for identificationtext_image
AORUS Presshttps://www.gigabyte.com/Support/Laptop
■ ЧаПи:
https://www.gigabyte.com/Support/Faq