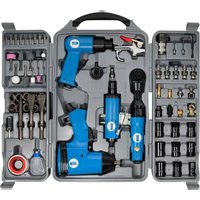
40401 - Compressor Güde - Free user manual and instructions
Find the device manual for free 40401 Güde in PDF.



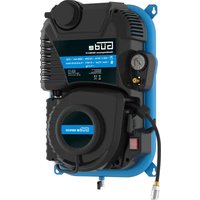
| Product type | Air compressor |
| Brand | Güde |
| Model | 40401 |
| Max. working pressure | 6 bars |
| Tank capacity | 24 L |
| Motor power | 1.5 kW |
| Air flow (suction) | 200 L/min |
| Power supply | 230 V / 50 Hz |
| Weight | 20 kg |
| Dimensions (L x W x H) | 50 x 40 x 40 cm |
| Main functions | Supply of compressed air for pneumatic tools (impact wrench, chipping hammer, air ratchet, grinder, etc.) |
| Maintenance and cleaning | Daily water drain, clean air filter once a week, use a water separator and oiler |
| Safety | Use a pressure reducing valve, do not exceed 6 bars, wear protective equipment, unplug before maintenance |
| Spare parts and repairability | Spare parts available via Güde after-sales service, warranty 12 months professional use, 24 months private use |
| Included in delivery | Air blow gun, air hammer, impact wrench, sharpener, air ratchet, inflation accessories, oil, Teflon tape, etc. |
| Recommended oil type | Special pneumatic oil |
| Noise level (at workplace) | ~93 dB(A) (depending on tool used) |
| Vibration | < 2.5 m/s² (impact wrench under load) |
Frequently Asked Questions - 40401 Güde
User questions about 40401 Güde
0 question about this device. Answer the ones you know or ask your own.
Ask a new question about this device
Download the instructions for your Compressor in PDF format for free! Find your manual 40401 - Güde and take your electronic device back in hand. On this page are published all the documents necessary for the use of your device. 40401 by Güde.
USER MANUAL 40401 Güde
natural_image
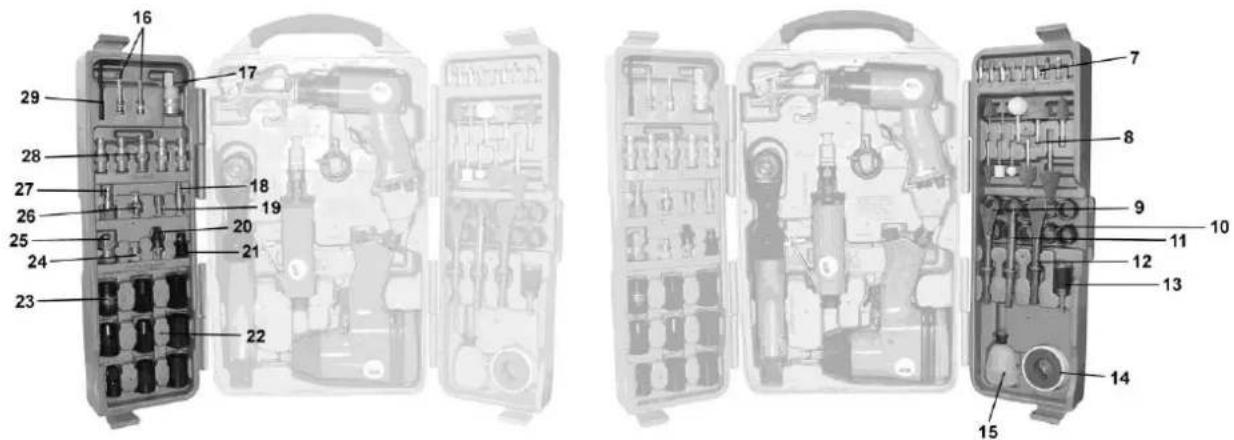
Exploded view of a mechanical tool kit with various components (no visible text or labels)71 TLG. 40401

| GB | Please read carefully the following Operating Instructions before putting the appliance into operation |
| A.V. 2 Any reprints, even partial, are subject to approval. Technical changes reserved.Illustrative pictures! Translation of original operating instructions. | |
| GB | Do you have any technical questions? Any claim? Do you need any spare parts or operating instructions?We will quickly help you and without needles bureaucracy at our web pages atwww.guede.comin the Servicing part. Please help us be able to help you. In order to identify your device in case of claim we need the serial No., product No. and year of production. All this data can be found on the type label. Please enter it here for future reference:Serial No.: Order No.: Year of production: |
| E-Mail: support@ts.guede.com | |
General
Dear Customer
Thank you for your confidence in our products and us. By buying a Güde product you have decided to buy a quality product that corresponds with the present safety standards.
Please read carefully the operational manual before you start using your tool. Once you have read and understood the manual, only then start using your tool. The manual includes important instructions that are necessary for safe and trouble free operation of your tool. Please store it near to the tool.
Operational and safety instructions
Pneumatic tools work with working pressure of different values. The recommended work pressure amounts to 6 bars for most machines when idle or when at standstill.
Higher pressure would result in shortening the service life of your machine due to heavy load.
Water in the compressed air inlet can damage the machine. Therefore it is necessary to remove the water from the compressor or piping on regular basis! The air filter should be cleaned at least once a week.
Güde pneumatic tools start up and maintenance

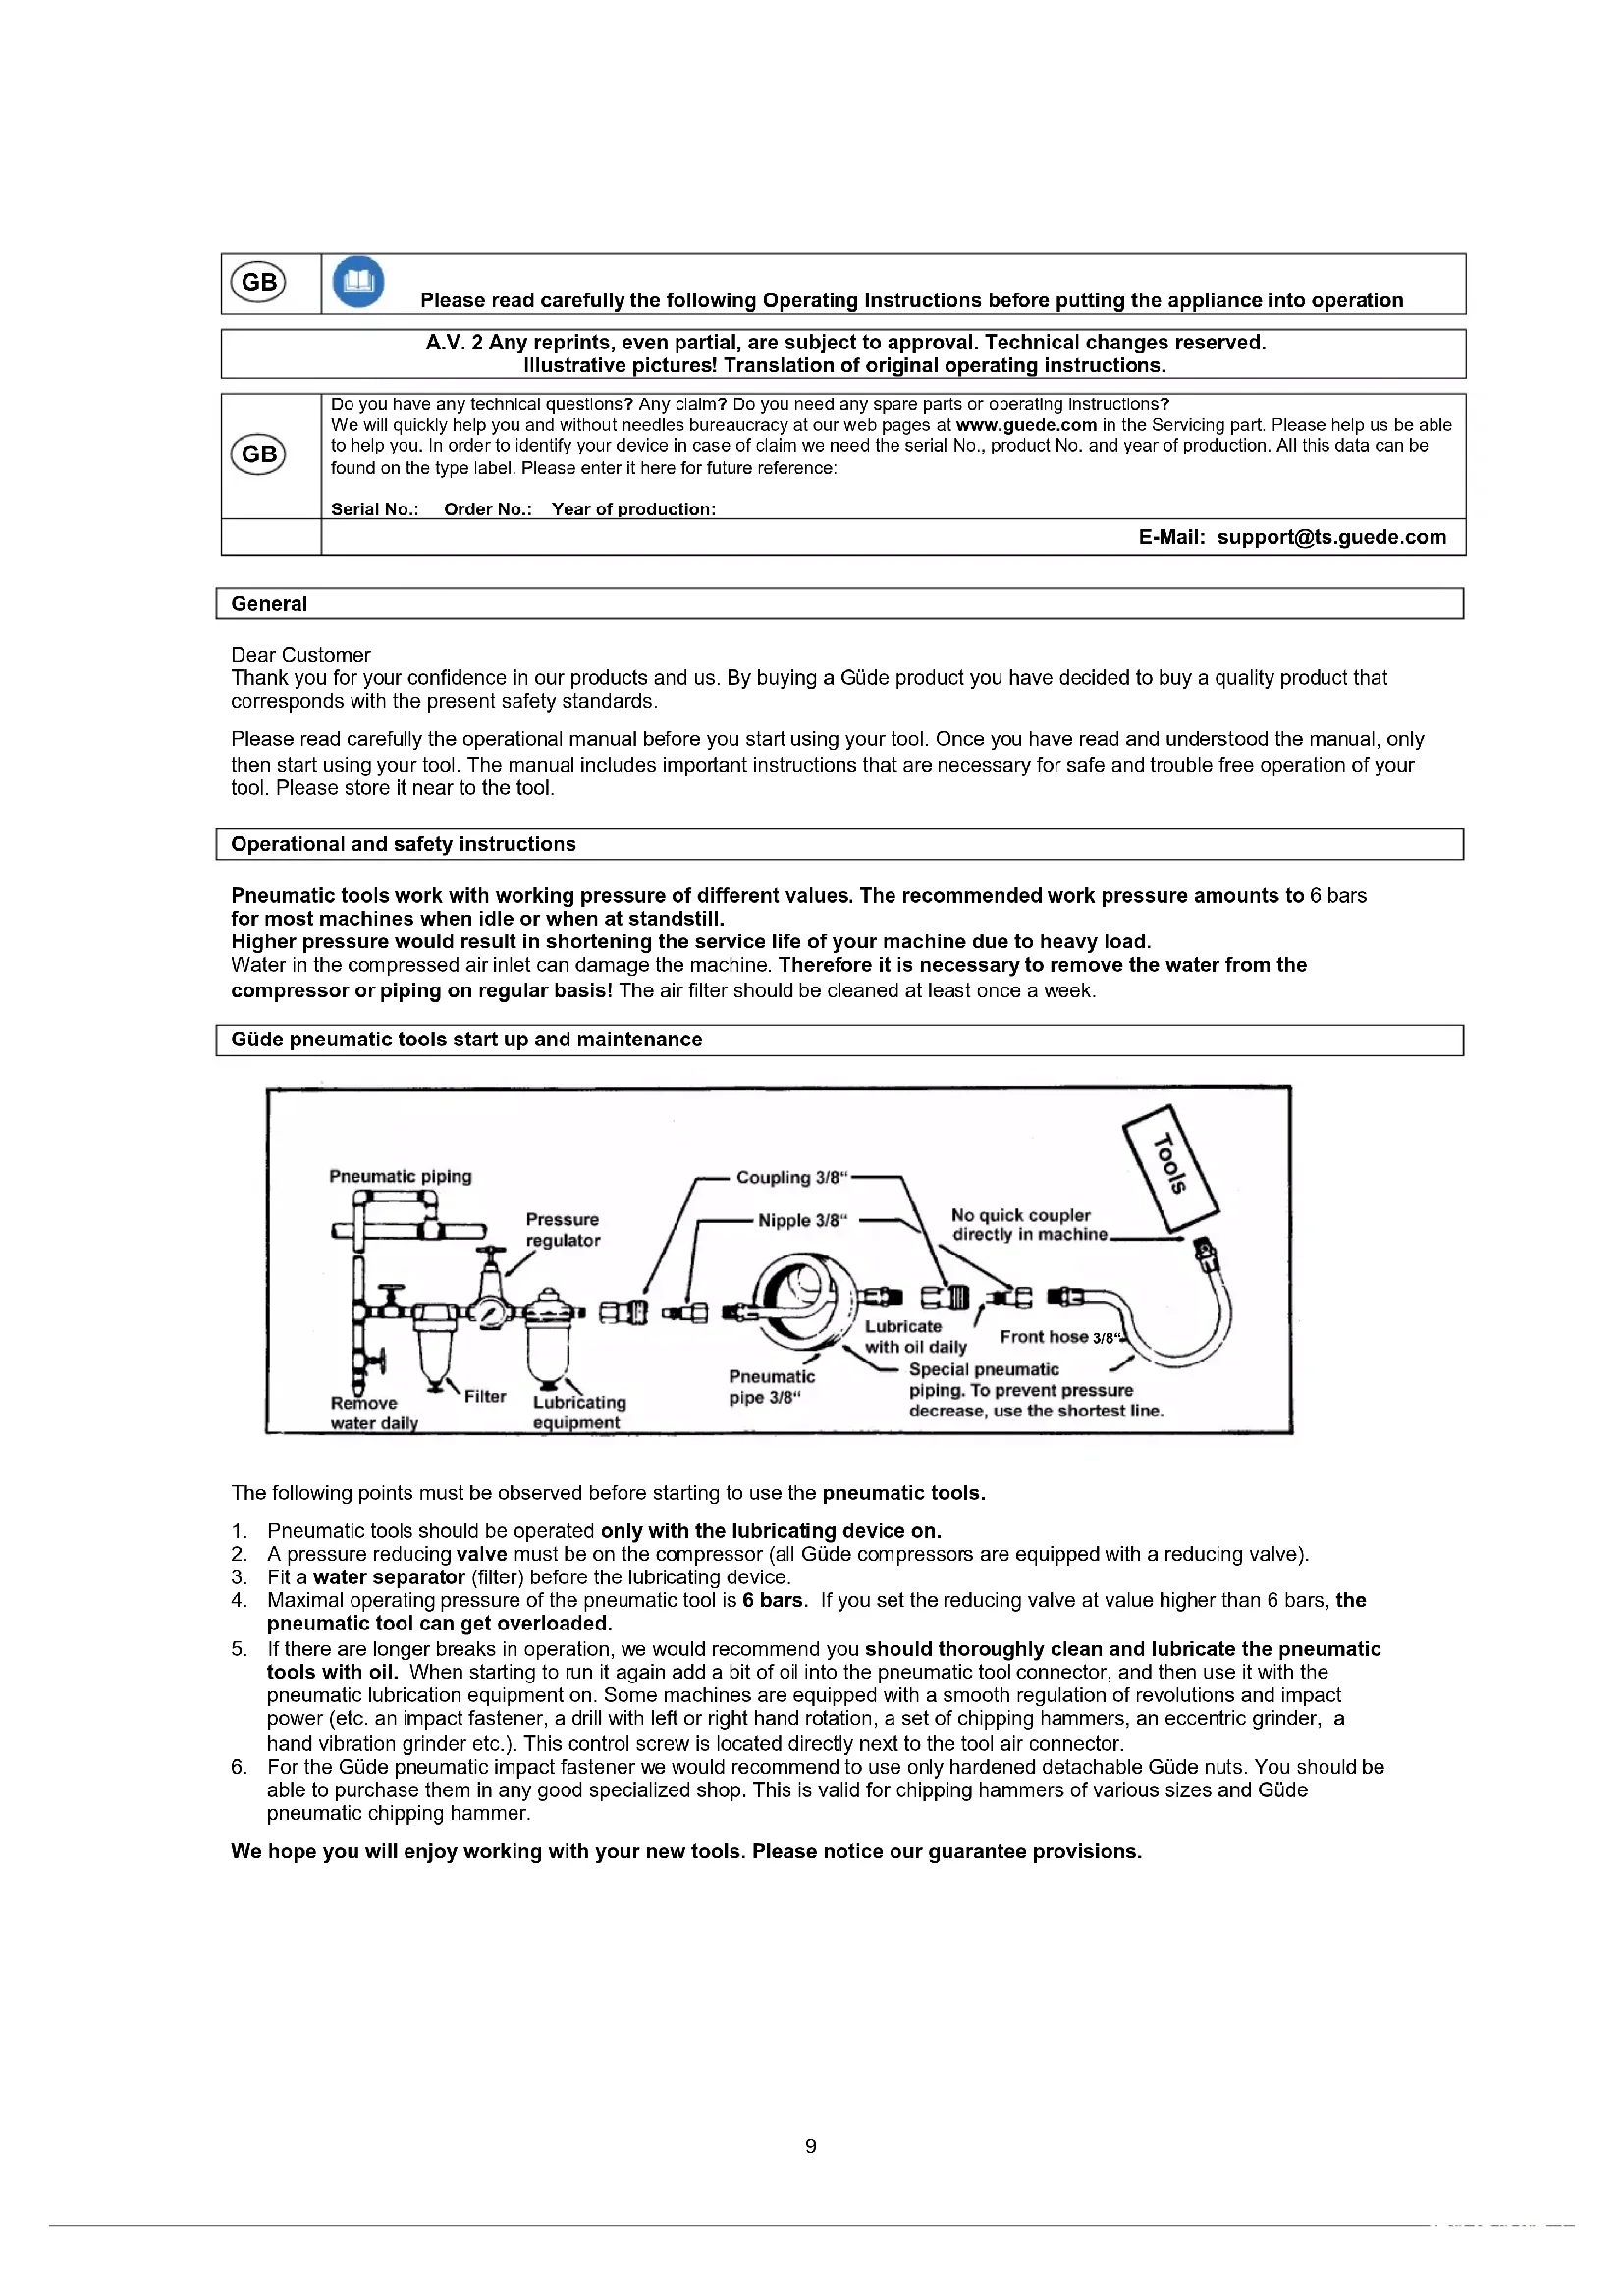
flowchart
graph LR
    A["Pneumatic piping"] --> B["Pressure regulator"]
    B --> C["Lubricating equipment"]
    C --> D["Coupling 3/8""]
    D --> E["Nipple 3/8""]
    E --> F["No quick coupler directly in machine"]
    F --> G["Front hose 3/8""]
    G --> H["Special pneumatic piping. To prevent pressure decrease, use the shortest line."]
    H --> I["Pneumatic pipe 3/8""]
    I --> J["Lubricate with oil daily"]
    J --> K["Tools"]
The following points must be observed before starting to use the pneumatic tools.
- Pneumatic tools should be operated only with the lubricating device on.
- A pressure reducing valve must be on the compressor (all Güde compressors are equipped with a reducing valve).
- Fit a water separator (filter) before the lubricating device.
- Maximal operating pressure of the pneumatic tool is 6 bars. If you set the reducing valve at value higher than 6 bars, the pneumatic tool can get overloaded.
- If there are longer breaks in operation, we would recommend you should thoroughly clean and lubricate the pneumatic tools with oil. When starting to run it again add a bit of oil into the pneumatic tool connector, and then use it with the pneumatic lubrication equipment on. Some machines are equipped with a smooth regulation of revolutions and impact power (etc. an impact fastener, a drill with left or right hand rotation, a set of chipping hammers, an eccentric grinder, a hand vibration grinder etc.). This control screw is located directly next to the tool air connector.
- For the Güde pneumatic impact fastener we would recommend to use only hardened detachable Güde nuts. You should be able to purchase them in any good specialized shop. This is valid for chipping hammers of various sizes and Güde pneumatic chipping hammer.
We hope you will enjoy working with your new tools. Please notice our guarantee provisions.
Tool set
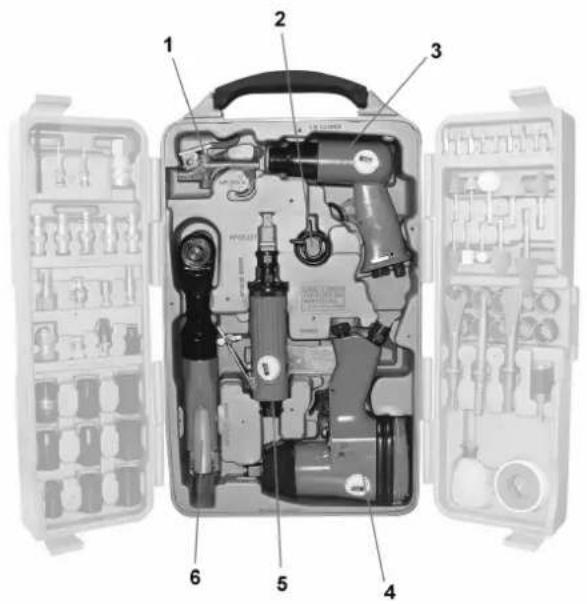

| 1 “Mini” pneumatic pistol 16 Ball inflating needle | ||
| 2 Chisel guard spring 17 Hose coupling 3/8” IG | ||
| 3 Chisel stabber 18 Exhaust nozzle | ||
| 4 Impact tightener 19 Air chamber refill adapter | ||
| 5 Rod grinder 20 Needle adapter | ||
| 6 Ratchet tightener 21 Bit adapter | ||
| 7 Range of bits 22 Nuts regular range | ||
| 8 Grinding pins (3 mm and 6 mm) 23 Adapter 3/8”/1/2” | ||
| 9 Cutting knife 24 Grinding pin tie | ||
| 10 Grinding rollers 25 Valve extension | ||
| 11 Pointed chisel 26 Air chamber refill adapter | ||
| 12 Cold chisel 27 Insert coupling 1/8” IG | ||
| 13 Grinding rollers clamp | 28 Range of insert couplings | |
| 14 Teplon tape | 29 Hexagon socket spanner | |
| 15 Bottle of oil | ||
Guarantee
A warranty period of 12 months applies to commercial use and 24 months apply to private use and commences on the day of purchase of the device.
Warranty applies exclusively to failures due to defective material or workmanship. An original sale slip with indication of date of sale must be presented in case of claiming for the warranty rights.
Warranty does not cover unprofessional use such as device overload, violent use, damage caused by third party or foreign materials, failure to comply with operations and assembly manual, and normal wear and tear.
Impact fastener
Technical data
| Capacity ~0,34 kw | |
| Max. torque for loosening 310 Nm | |
| Max. torque for fastening 250 Nm | |
| Revolutions | 8000 min ^-1 |
| Working capacity (max. thread size) M 16 | |
| Max. admissible working pressure 6 bar | |
| Acoustic pressure level 89 db (A) | |
| Vibration (loaded) < 2,5 m/sec ^2 | |
| Square clamp 12 inch | |
| Air consumption ca 6 l/sec. | |
| Recommended hose cross section, inner 9 mm | |
| Weight 2,3 kg | |
| Air consumption at max. fastening torque ca 350 l/min. | |
Air quality needed, air supply:
Clear air with oil mist. Use a maintenance unit with a filter reducing valve and an oil atomizer.
Adjusting working values:
Working pressure set on the pressure reducing valve is 6 bars.
Illustration
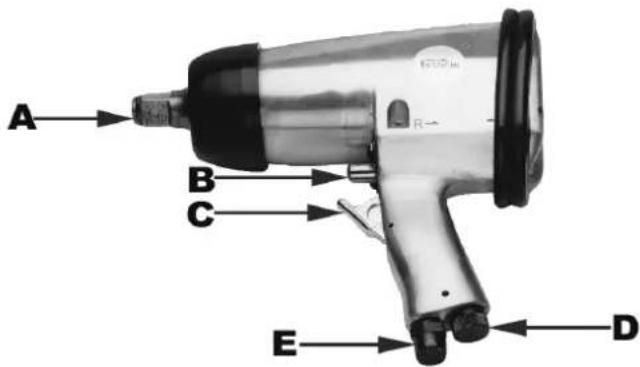
Item Description
A Square for nut fastening
(drive shaft)
B Lever for switching over from left to right
C Release lever
D Air regulator or tightening torque regulator
E Pneumatic connector
Using the tool for its purpose
The impact fastener is an easy-to-use pneumatic tool for craftsmen. It is suitable for fastening and loosening of screwed connections in cars (tyre fitting, dead chassis screws), for assembly belts or in agriculture.
Air escapes through the side outlet. Fitting a replacement is very easy and quick. Pneumatic connector is equipped with a quick coupling device. When fastening screws and nuts you should observe the necessary tightening torques. For tightening use the torque key.
Please observe the following directions:
When working with the impact fastener wear appropriate protective clothing.
Observe safety regulations.
Safety provisions
Protect yourself and your surroundings by preventing any accident risks.
- Impact fastener should not be used for any other purpose than it has been designed for.
- Pneumatic tools should be kept away from children.
- Work only once you are fully concentrating and feel rested.
- Use a coupling with a quick closing device for pneumatic connection.
- Working pressure should be set using the control valve.
- Do not use oxygen or gaseous fuel as energy supplies.
- Disconnect the machine from the compressed air supply before starting to repair a possible defect.
- Use only original spare parts.
- Don't let the machine run unloaded at full idle speed.
- Wear necessary protective clothing when working with impact fastener.
Start up
Screw the nipple, part of the delivery, into the pneumatic connection (item E) and fasten it with a Teflon tape. The fitting needed is slid into the square (item A). Set the right direction of revolution (item B) on the switching lever:
Pressing backwards (reverse) left hand operation = screw loosening
Pressing forwards (forward) right hand operation = screw tightening
Install the fitting into the screw knob. Press the trigger (item C). It is possible to control the air supply with the air control (item D).
Mark 9 = max. tightening torque (4)
Mark 0 = min. tightening torque (1)
A flexible pneumatic hose with a quick coupling device is used for the connection to the compressed air supply.
Maintenance
If you observe the following maintenance directions you will ensure a long service life of this quality product and a trouble free operation. During the maintenance always disconnect the compressed air supply. To ensure trouble free performance of your pneumatic tool, it is necessary to carry out everyday cleaning and regular lubrication. Use only special pneumatic oil.
a) Using oil atomiser
Comprehensive maintenance unit which consists of an oil atomiser and it is located in the compressor.
b) Using an oiling can installed into the piping
Install a lubricating device into the piping in an immediate vicinity of the tools (distance of about 50 cm), the lubricating device supplies the tools with a sufficient amount of oil. If the pneumatic machine is out of work for several days, you must use 5-10 drops of special tool oil for the pneumatic connector
c) Hand lubrication
If you do not have the maintenance unit or the lubricating device installed into the piping at your disposal, you must use 3-5 drops of special tool oil for the pneumatic connector before each start-up of the impact fastener. Pneumatic tools should be stored in dry rooms.
Chipping hammer
Never aim at yourself or other persons with the rotating machine end. Connect the machine to the air supply hose.
Technical data
| Connecting thread 1/4" | |
| Operational pressure 6 bar | |
| Air consumption 350 l/min. | |
| Impact number 3000/min. |
Maintenance
Maintenance can be done only by people with necessary qualifications.
If you observe the following maintenance directions you will ensure a long service life of this quality product and a trouble free operation. During the maintenance always disconnect the compressed air supply. To ensure trouble free performance of your pneumatic tool, it is necessary to carry out everyday cleaning and regular lubrication. Use only special pneumatic oil.
In terms of lubrication you have the following options:
a) Using oil atomiser
Comprehensive maintenance unit which consists of an oil atomiser and it is located in the compressor.
b) Using an oiling can installed into the piping
Install a lubricating device into the piping in an immediate vicinity of the tools (distance of about 50 cm), the lubricating device supplies the tools with a sufficient amount of oil. If the pneumatic machine is out of work for several days, you must use 5-10 drops of special tool oil for the pneumatic connector
c) Hand lubrication
If you do not have the maintenance unit or the lubricating device installed into the piping at your disposal, you must use 3-5 drops of special tool oil for the pneumatic connector before each start-up of the impact fastener. Pneumatic tools should be stored in dry rooms.
Attention:
Replace the spring occasionally (drawing of a dismantled tool - item 1)
Screwdriver with ratchet
Technical data
| Idle speed 160 rev./min | |
| Capacity 0,272 kW | |
| Max. loosening torque | 81 Nm |
| Working capacity (max. thread size) M 8 | |
| Max. admissible work pressure 6 bar | |
| Noise emission under DIN 45635 part 20 / 09.90 | |
| Acoustic performance level L WAI max. c | 103 dB (A) |
| Emission level for workplace L PAI max. | 93 dB (A) |
| Maximal level of measuring area impulse acoustic pressure L PAI max. 1m | 90 dB (A) |
| Vibrations (loaded) under DIN EN 28662 part 1 / 01.93 or E DIN ISO 8662 part 1 / 01.93 | 14,7 m/sec^2 |
| Square clamp 1⁄2 inch | |
| Air consumption ca 310 l/min | |
| Recommended inner hose cross section 6 mm | |
| Weight 1,24 kg |
Air quality needed: Clean with oil mist:
Compressor capacity: Compressor charging capacity: 180 l/min.
Corresponds to 1,5 kW.
Adjusting values for work:
Working pressure setting on the pressure reducing
valve or filter reducing valve 6 bars.
Illustration
Item Description
040 Release lever
170 Drive
390 Switching lever for right/left operation
430 Pneumatic nipple connector

Using the tool for its purpose
The screwdriver with ratchet is an easy-to-use pneumatic tool for craftsmen. It is very suitable for work on cars, motorcycles, agricultural equipment or assembly belts, in particular at hard to access places. To reach the maximal tightening torque it is not admissible to use any further manual tightening using the screwdriver. Air escapes through the front part of the machines. The pneumatic connector is equipped with a quick coupling device.
Safety provisions
Protect yourself and your surroundings by preventing any accident risks.
- Screwdriver with ratchet should not be used for any other purpose than it has been designed for.
- Don't touch rotating parts.
- Pneumatic tools should be kept away from children.
- Work only once you are fully concentrating and feel rested.
- Use a coupling with a quick closing device for pneumatic connection.
- Working pressure should be set using the control valve.
- Do not use oxygen or gaseous fuel as energy supplies.
- Disconnect the machine from the compressed air supply before starting to repair a possible defect.
- Use only original spare parts.
- Don't let the machine unloaded at full idle speed.
- Wear necessary protective clothing when working with screwdriver with fastener.
Start up
A sliding nipple which is a part of the delivery (item 403) should be screwed into the reducing nipple. Use a ring spanner or a fork wrench. Attention: Thread is to be fastened with a Teflon tape.
Slide the requested socket wrench fitting on the drive (item 170). Connect the air hose to the sliding nipple using a quick coupling device. Fit the socket wrench fitting to the loosened or tightened nut or screw. Set the required direction of revolution on the control lever (item 390) and press the release lever (item 040).
Maintenance
If you observe the following maintenance directions you will ensure a long service life of this quality product and a trouble free operation. During the maintenance always disconnect the compressed air supply. To ensure trouble free performance of your pneumatic tool, it is necessary to carry out everyday cleaning and regular lubrication. Use only special pneumatic oil.
d) Using oil atomiser
Comprehensive maintenance unit which consists of an oil atomiser and it is located in the compressor.
e) Using an oiling can installed into the piping
Install a lubricating device into the piping in an immediate vicinity of the tools (distance of about 50 cm), the lubricating device supplies the tools with a sufficient amount of oil. If the pneumatic machine is out of work for several days, you must use 5-10 drops of special tool oil for the pneumatic connector
f) Hand lubrication
If you do not have the maintenance unit or the lubricating device installed into the piping at your disposal, you must use 3-5 drops of special tool oil for the pneumatic connector before each start-up of the impact fastener. Pneumatic tools should be stored in dry rooms.
Direct grinder
Never aim at yourself or other persons with the rotating machine end. Connect the machine to the air supply hose.
Technical data
| Connecting thread 1/4" | |
| Operational pressure 6 bar | |
| Air consumption app. 350 l/min. | |
| Revolutions 22000 rpm |
Maintenance
Maintenance can be done only by people with necessary qualifications.
If you observe the following maintenance directions you will ensure a long service life of this quality product and a trouble free operation. During the maintenance always disconnect the compressed air supply. To ensure trouble free performance of your pneumatic tool, it is necessary to carry out everyday cleaning and regular lubrication. Use only special pneumatic oil.
In terms of lubrication you have the following options:
a) Using oil atomiser
Comprehensive maintenance unit which consists of an oil atomiser and it is located in the compressor.
b) Using an oiling can installed into the piping
Install a lubricating device into the piping in an immediate vicinity of the tools (distance of about 50 cm), the lubricating device supplies the tools with a sufficient amount of oil. If the pneumatic machine is out of work for several days, you must use 5-10 drops of special tool oil for the pneumatic connector
c) Hand lubrication
If you do not have the maintenance unit or the lubricating device installed into the piping at your disposal, you must use 3-5 drops of special tool oil for the pneumatic connector before each start-up of the impact fastener. Pneumatic tools should be stored in dry rooms.


Indications techniques
Indications techniques
Indications techniques
Indications techniques



- General
- Dear Customer
- Operational and safety instructions
- Tool set
- Guarantee
- Impact fastener
- Illustration
- Item Description
- Using the tool for its purpose
- Safety provisions
- Start up
- Maintenance
- a) Using oil atomiser
- b) Using an oiling can installed into the piping
- c) Hand lubrication
- Chipping hammer
- Attention:
- Screwdriver with ratchet
- d) Using oil atomiser
- e) Using an oiling can installed into the piping
- f) Hand lubrication
- Direct grinder
Brand : Güde
Model : 40401
Category : Compressor