Comfortcook 99364 - Food Processor TREBS - Free user manual and instructions
Find the device manual for free Comfortcook 99364 TREBS in PDF.
User questions about Comfortcook 99364 TREBS
0 question about this device. Answer the ones you know or ask your own.
Ask a new question about this device
Download the instructions for your Food Processor in PDF format for free! Find your manual Comfortcook 99364 - TREBS and take your electronic device back in hand. On this page are published all the documents necessary for the use of your device. Comfortcook 99364 by TREBS.
USER MANUAL Comfortcook 99364 TREBS
natural_image
Modern kitchen setup with air fryer, cutlery, and food items on a wooden table (no visible text or symbols)INTRODUCTIE VAN HET APPARAAT
text_image
Technical diagram of an air fryer with labeled parts including air fryer, air fryer, and heaterFig. 1 + Fig. 3
natural_image
Line drawing of a mechanical tool or plunger with multiple blades and a central handle (no text or symbols)10
natural_image
Simple line drawing of a Y-shaped pipe or tube with two ends (no text or symbols)11
natural_image
Pure diagram of multiple vertical lines with rounded ends, no text or symbols present
9
natural_image
Interior view of a black air fryer oven with a roasted chicken on the door (no visible text or symbols)
natural_image
Person using a black air fryer to spread a roasted chicken into a tray (no text or symbols visible)natural_image
Interior view of a black air fryer with open lid showing interior food arrangement (no visible text or symbols)
natural_image
Close-up of a black air fryer with a hand holding a tray, containing a photo of skewers and food being cooked (no visible text or symbols)natural_image
Technical line drawing of a car rear panel showing internal components and directional arrows (no text or symbols)natural_image
Three-step diagram showing hand inserting a component into a device, with no visible text or symbols.text_image
Control panel interface with icons for food, food, fish, seafood, and smart foods including a speed limit indicatorFig.4

HET APPARAAT OPBERGEN
When using electrical appliances, basic safety precautions should always be followed including the following:
- Read all instrucons and save these for further noce.
- Do not touch hot surfaces.
- To protect against electric shock do not immerse cord, plugs, or base in water or other liquid.
- WARNING: This electrical appliance contains a heang funcon. Surfaces, also dierent than the functional surfaces, can develop high temperatures. Since temperatures are dierently perceived by dierent persons, this equipment shall be used with CAUTION. The equipment shall be touch only at intended handles and gripping surfaces, and use heat protecon like gloves or similar. Surfaces other than intended gripping surfaces shall get sufficiently me to the cool down before geng touched.
- Unplug from the outlet when not in use and before cleaning. Allow to cool before pung on or taking o parts.
- Type Y: If the supply cord is damaged, it must be replaced by the manufacturer, its service agent or similarly qualified persons in order to avoid a hazard.
- The use of accessory aachments not recommended by the appliance manufacturer may cause injuries.
- Do not use outdoors
- Do not let the cord hang over an edge, table or counter nor touch hot surfaces.
- Do not place on or near a hot gas or electric burner, or in a heated oven.
- Extreme cauon must be used when moving an appliance containing hot oil or other hot liquids.
- Always each the plug to the appliance rst, then plug the cord in the wall outlet. To disconnect, turn any control to "o," then remove plug from wall outlet.
- Do not use the appliance for other purposes than intended use.
- This appliance can be used by children aged from 8 years and above and persons with reduced physical, sensory or mental capabilities or lack of experience and knowledge if they have been given supervision or instrucon concerning use of the appliance in a safe way and understand the hazards involved. Children shall not play with the appliance. Cleaning and user maintenance shall not be made by children unless they are older than 8 and supervised.
- Keep the appliance and its cord out of reach of children less than 8 years.
- The appliance is not intended to be operated by means of an external mer or separate remote-control system.
-
This appliance is intended to be used in a household and similar applicaons such as:
-
sta kitchen areas in shops, oces and other working environments;
- farm houses;
- by clients in hotels, motels and other residential type environments;
- bed and breakfast type environments.
Danger
- Never immerse the housing, which contains electrical components and the heang elements, in water or rinsing under the tap
- Avoid any liquid entering the appliance to prevent electric shock or short-circuit.
- Do not cover the air inlet and the air outlet when the appliance is working.
- Filling the pan with oil may cause a re hazard.
- Don't touch the inside of the appliance while it is operang.
Warning
- Check if the voltage indicated on the appliance is the local mains voltage.
- Do not use the appliance if there is any damage on the plug, mains cord or other parts.
- Do not go to any unauthorized person to replace or x a damaged main cord.
- Keep the mains cord away from hot surfaces.
- Do not plug in the appliance or operate the control display panel with wet hands.
- Do not place the appliance against a wall or against other appliances. Leave at least 10cm free space on the back and sides and 10cm free space above the appliance.
- Do not place anything on top of the appliance.
- Do not use the appliance for any other purpose than described in this manual.
- Do not let the appliance operate unaended.
- During hot air frying, hot steam is released through the air outlet openings, and keep your hands and face at a safe distance from the steam and from the air outlet openings. Also be careful of hot steam and air when you remove the pan from the appliance.
- Any accessible surfaces may become hot during use (Fig.2)
- Immediately unplug the appliance if you see dark smoke coming out of the appliance. Wait for the smoke emission to stop before you remove the plug from the appliance.
Cauon
- Ensure the appliance is placed on a horizontal, even and stable surface.
- This appliance is designed for household use only. It may also be suitable to be safely used in environments such as sta kitchens, farms, motels, and other non-residenal environments.
- If the appliance is used improperly or for professional or semi-professional purposes or if it is not used improperly or for professional or semi-professional purposes or it is not used according to the instrucons in the user manual, the guarantee becomes invalid and we could refuse any liability for damage caused.
- Always unplug the appliance while not using.
- The appliance needs approximately 60 minutes to cool down for handle or cleaning safely.
INTRODUCTION APPLIANCE
This mulfunconal Hot Airfryer Oven provides an easy and healthy way of preparing your favorite ingredients. By using hot technology air circulaon and a top grill, it is able to make numerous dishes. The best part is that the hot airfryer oven heats food at all direcons and most of the ingredients do not need any oil.
Before rst use
- Remove all packaging materials.
- Remove any sckers or labels from the appliance.
- Thoroughly clean the accessories to be used and the inside of the hot airfryer oven with hot water, some washing liquid and a non-abrasive sponge. Wipe inside and outside the appliance with a moist cloth.
This is an oil-free fryer that works on hot air, so not ll with oil or frying fat.
Preparing for use
- Place the appliance on a stable, horizontal and even surface.
- Do not place the appliance on non-heart-resistant surface.
- Do not put anything on top of the appliance, the airrow will be disrupted and aects the hot air frying result.
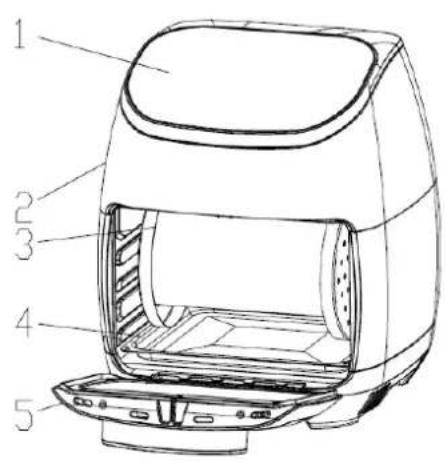
Parts of the hot airfryer oven (Fig.1+3)
- control display panel
- housing
- rotang basket (1x)
- oil drip tray (1x)
- door
- air outlet openings
- power cord
- air ow racks (3x)
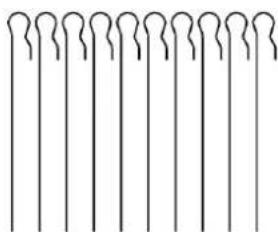
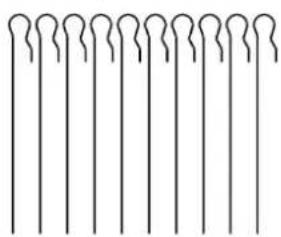
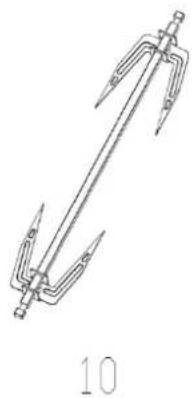
- BBQ skewer (10x,2x round plate L&R)
- rotang rosserie spit (1x)
- rack handle
text_image
Technical diagram of an air fryer with numbered parts labeled 1 to 5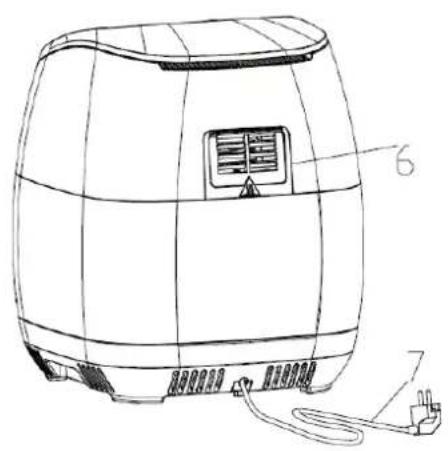
natural_image
Line drawing of a portable air fryer with labeled components (no text or symbols beyond labels)Fig.1

Fig.3
How to use the accessories of the mulfunconal hot airfryer oven
Part 3: rotang basket (1x)
Make sure the oil drip tray (part 4) is in place. Press the power/start-stop buon to turn on the hot airfryer oven and select one of the one-touch cooking presets to begin the cooking cycle. If seng manually, select me and temperature, the press the power/start-stop buon.
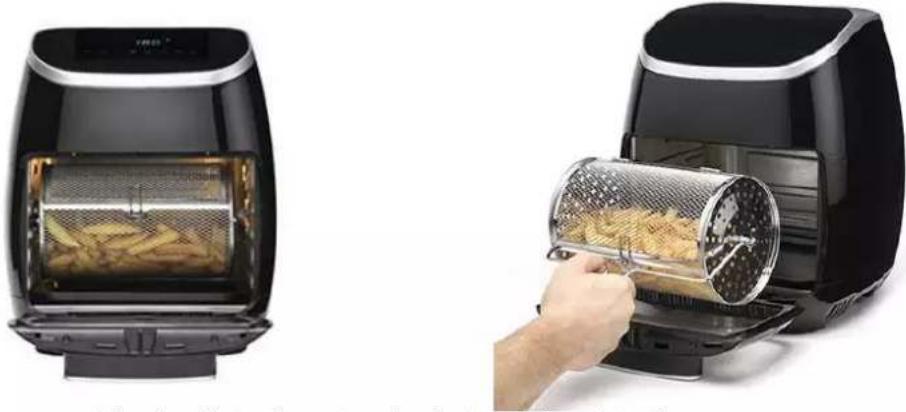
• Before heang, put the food into the rotang basket and place into the oven.
- Remove the food from the oven using the rack handle (part 11) or oven mis.
Let the hot airfryer oven run aer me has expired to cool o. The unit will automacally shut down.
The rotang basket is great for cooking roasted vegetables, nuts, potatoes, partyfood, frozen food, french fries, popcorn, shrimps and many other snacks.
Part 8: air ow racks (3x)
Make sure the oil drip tray (part 4) is in place. Press the power/start-stop buon to turn on the hot airfryer oven and select one of the one-touch cooking presets to begin the cooking cycle. If seng manually, select me and temperature, the press the power/start-stop buon.

• Before heang, arrange the food on the racks and place into the oven.
- Remove the food from the oven using oven mis.
Let the hot airfryer oven run aer me has expired to cool o. The unit will automacally shut down.
The air ow racks can be used for dehydrate food, to cook crispy snacks or to reheat food like for instance Pizza and much more.
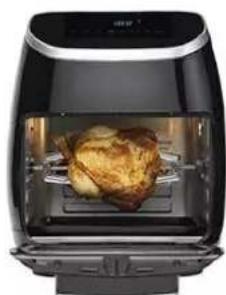
Part 10: rotang rosserie spit (1x)
Make sure the oil drip tray (part 4) is in place. Press the power/start-stop buon to turn on the hot airfryer oven and select one of the one-touch cooking presets to begin the cooking cycle. If seng manually, select me and temperature, the press the power/start-stop buon.
natural_image
Interior view of an air fryer oven with a roasted chicken on the tray (no visible text or symbols)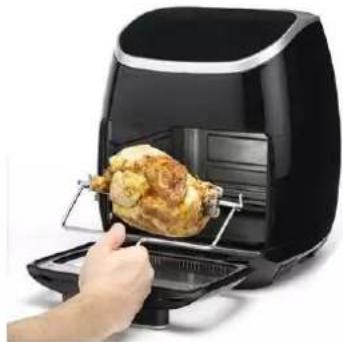
natural_image
Person using a black air fryer to spread a roasted chicken (no text or symbols visible)• Before heang, carefully poke the food onto the spit and place into the oven.
- Remove the food from the oven using the rack handle (part 11).
Let the hot airfryer oven run aer me has expired to cool o. The unit will automacally shut down.
The rotang rosserie spit will be used for roasts and whole chicken. Force the spit lengthwise through the meat and center. Slide the forks onto the spit from either end into the meat, then lock in place with the set screws. There are indentaons on the spit for the set screws. You can adjust the screws closer to the middle if needed but never put outward towards the ends.
Note: make sure the roast or chicken is not too large to rotate freely within the oven. Maximum chicken or roast is 1,5kg.
Part 9: BBQ skewers (10x)
Make sure the oil drip tray (part 4) is in place. Press the power/start-stop buon to turn on the hot airfryer oven and select one of the one-touch cooking presets to begin the cooking cycle. If seng manually, select me and temperature, the press the power/start-stop buon.

natural_image
Interior view of a black air fryer with open pan, showing food arrangement inside (no visible text or symbols)
natural_image
Close-up of a black air fryer with a hand holding a tray, containing a photo of its fried dish (no visible text or symbols)- Before heang, carefully poke the skewers through the food and insert the skewer racks making sure they are evenly spaced.
- Remove the food from the oven using the rack handle (part 11) or oven mis.
Let the hot airfryer oven run aer me has expired to cool o. The unit will automacally shut down.
The BBQ skewers are great for kabab recipes, other kind of meat, sh or even veggies.
Part 9: door
The door can be removed for cleaning
Note: pick and place as follows

Installaon: the sha on the door is aligned with the hole on the base and inserted at the angle of the above gure.

Disassembly: the door opens about 70 degrees, push the push buon in the direcon of the arrow, as shown above, then pull the door down to force it apart.
Using the control display panel
This oil-free hot airfryer oven can prepare a large range of ingredients. “The sengs” included helps you get to know the appliance.
- Connect the mains plug into an earthed wall socket.
- Open the door.
-
Put the food to be fried into the hot airfryer oven with the desired accessory.
-
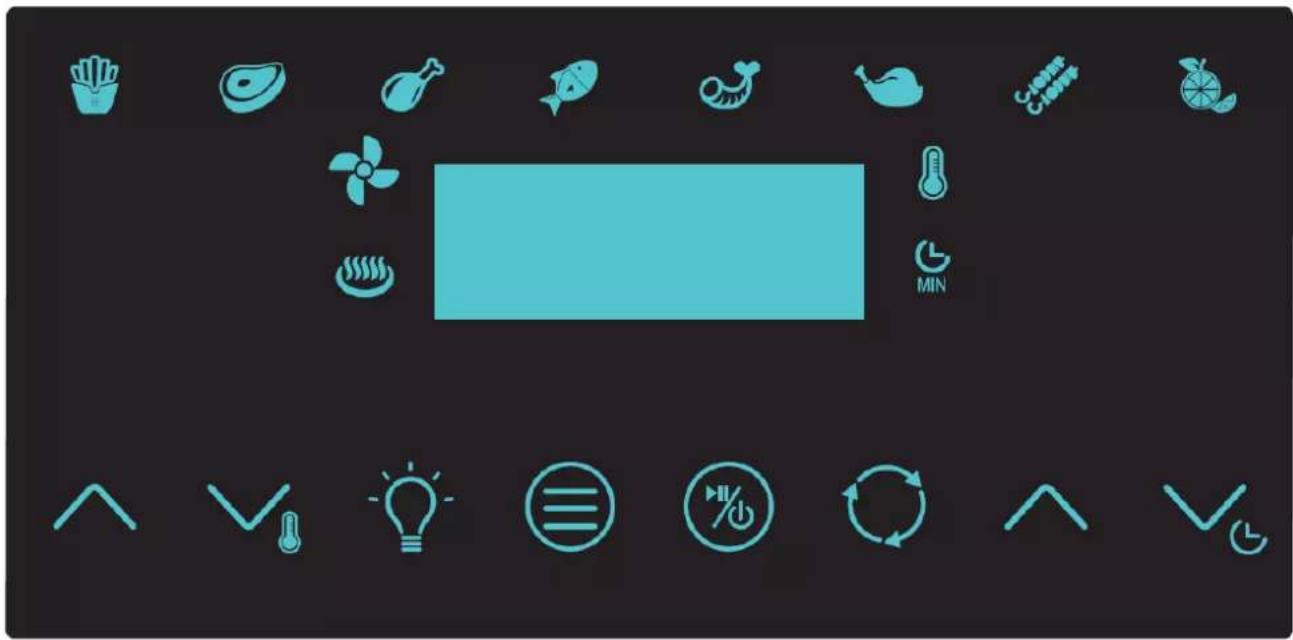
Close the door, all the indicator lights will ash for a second, and the is always on. (Fig.4)

press the “”buon: the mode light will be on
select the “Fries” menu, the “Fries” light will be on, and the screen will display “200” - “20”.
select the “Steak” menu, the “Steak” light will be on, and the screen will display “180”-“20”.
select the “☐” menu, the “Chicken” light will be on, and the screen will display “180” - “35.
select the "Fish" menu, the "Fish" light will be on, and the screen will display "180"-18"
select the “” menu, the “Shrimp” light will be on, and the screen will display “160” - “12”
select the “” menu, the “Roast Chicken” light will be on, and the screen will display “200” - “35”
select the “” menu, the “BBQ skewer” light will be on, and the screen will display “200” - “20”
select the “Dried Fruit” menu, the “Dried Fruit” light is on, the screen will display “40” - “04:00”
You can also reset the me and temperature according to the food: determine the required preparaon me


for the ingredients (see secon 'Sengs' in this chapter). Adjust the me by me " or decrease by 1 minute/me, with sound eect. Press and hold 2S for a long me and increase or decrease by 1 minute/me. 0-60 minutes.
Note: you can also adjust the me while the appliance is working.
Adjust the temperature by temperature " to 5°C, increase or decrease, accompanied by sound ects. Long press 2S, temperature is 5°C. Consecutive increase and decrease, min. 30-up to 200°C
Note: the temperature can be adjusted when the appliance is working.

Aer seng the me and temperature, press the "switch" button. The electric heang tube and the fan start to work, the power light stops ashing and will always be on. The temperature and me display indicators are constantly on, and the me starts counting down.

Note: during the operaon, press the "switch" buon, the fan
nd the electric heang tube are
suspended, the power light ashes for seconds. Press the "switch" buon again, and the fan and the electric heang tube enter the working state again. Aer the motor is energized, the fan light ashes for seconds, and when the heang tube is heated, the heang light is on. When not heated, it will be o.
During operaon, when the door opens; the screen and power light are o, and the heang tube and fan stop working; the light is o aer 3 minutes. Put ingredients into or onto the desired accessorize again and connue to work in the original state (the countdown is unchanged, with power-o memory funcon, the
memory me is 2 hours). Press the "rotang baket"
buon, the light ashes, the basket starts to
rotate, then press to stop, press the "illuminaon" but it goes out within one minute.

buon, the illuminaon "key ashes, the light is on,

The rotang basket buon is also used for the rotang rosserie spit and skewers
- At the end of the cooking program, the buzzer will sound 5 mes connuously, the me will display "00", and the screen and power light will ash. Open the door and take out the food with the rack handle or oven mis.
text_image
Control panel interface with icons for food, seafood, fish, seafood, and smart foods including a speed limit indicatorFig.4
Note: during the hot air frying process, the heang-up light comes on and goes out from me to me. This indicates that the heang element is switched on and o to maintain the set temperature.
Excess oil from the ingredients is collected on the boom of the Oil drip tray
Note: if you want the hot airfryer oven stop working, press and hold the "buon for 2 seconds. The hot airfryer oven will stop working.
- Check if the ingredients are ready.

If the ingredients are not baked good, please put the food back in the hot airfryer oven and close the door before seng the me for a few minutes.
Note: during the fried food, the food gets hot and the steam may escape from the hot airfryer oven. When a batch of ingredients is ready, the hot airfryer oven is instantly ready for another batch.
SETTINGS FOR YOUR INGREDIENTS
This table below will help you to select the basic sengs for the ingredients.
Note: keep in mind that these sengs are indicaons. As ingredients dier in origin, size, shape as well as brand, we cannot guarantee the best seng for your ingredients.
In the process of frying food, if the door is opened, the hot airfryer oven will stop working.
- Smaller ingredients usually require a slightly shorter preparaon me than larger ingredients.
- A larger amount of ingredients only requires a slightly longer preparaon me, a smaller amount of ingredients only requires a slightly shorter preparaon me.
- Add some oil to fresh potatoes for a crispy result. Fry your ingredients in the hot airfryer oven within a few minutes aer you added the oil.
- Do not prepare extremely greasy ingredients such as sausages in the hot airfryer oven.
- Snacks that can be prepared in a oven can also be prepared in the hot airfryer oven.
- The opmal amount for preparing crispy fries is 700 grams.
- Use pre-made dough to prepare lled snacks quickly and easily. Pre-made dough also requires a shorter preparaon me than home-made dough.
- Place a baking n or oven dish in the hot airfryer oven if you want to bake a cake or quiche or if you want to fry fragile ingredients or lled ingredients.
- You can also use the hot airfryer oven to reheat ingredients. To reheat ingredients, set the temperature to 150 °C for up to 10 minutes.
| Min-max Amount (g) | Time (min.) | Temperature (°C) | Extra informaon | |
| Potato & fries | ||||
| Thin frozen fries | 600-700 | 15-20 | 200 | |
| Thick frozen fries | 600-700 | 20-25 | 200 | |
| Potato gran | 800-1000 | 25-30 | 200 | |
| Meat & Poultry | ||||
| Steak | 500-800 | 10-15 | 180 | |
| Pork chops | 500-800 | 10-15 | 180 | |
| Hamburger | 400-800 | 10-15 | 180 | |
| Sausage roll | 400-800 | 13-15 | 200 | |
| Drumscks | 400-800 | 25-30 | 180 | |
| Chicken breast | 400-800 | 15-20 | 180 | |
| BBQ Skewer | 400-600 | 18-25 | 200 | |
| Chicken | 500-1000 | 30-40 | 200 | |
| Snacks | ||||
| Spring rolls | 500-800 | 8-10 | 200 | |
| Frozen chicken nuggets | 500-1000 | 6-10 | 200 | |
| Frozen sh ngers | 500-800 | 6-10 | 200 | |
| Frozen bread crumbed cheese snacks | 500-800 | 8-10 | 180 | |
| Stued vegetables | 400-800 | 10 | 160 | |
| dried fruit | 240 | 35 | Cut into thin slices of about 5mm, and evenly arrange the layers. It is best to keep a lile space in the middle to facilitate the circulaon of hot space. | |
| Baking | ||||
| Cake | 800 | 20-25 | 160 | |
| Quiche | 800 | 20-22 | 180 | |
| Muns | 800 | 15-18 | 200 | |
| Sweet snacks | 800 | 20 | 160 | |
CLEANING THE APPLIANCE
Clean the appliance aer every use.
Do not use metal kitchen utensils or abrasive cleaning materials to clean the oil drip tray, as this may damage the non-sck coang.
- Remove the mains plug from the wall socket and let the appliance cool down.
Note: open the door and let the hot airfryer oven cool faster
- Wipe the outside of the appliance with a moist cloth.
- Clean all accessorizes with hot water, some washing-up liquid and a non-abrasive sponge.
- You can use degreasing liquid to remove any remaining dirt.
- Clean the inside of the appliance with hot water and non-abrasive sponge.
STORAGE OF THE APPLIANCE
- Unplug the appliance and let it cool down.
- Make sure all parts are clean and dry.
TROUBLESHOOTING
| problem | Possible cause | Soluon |
| The hot airfryer oven does not work | The appliance is not plugged in. | Put the mains plug in an earthed wall socket. |
| You have not set the mer. | Touch the mer buon to the required preparaon me to switch on the appliance. | |
| The ingredients fried with the hot airfryer oven are not done. | The amount of ingredients is too big. | Put smaller batches of ingredients in the hot airfryer oven. Smaller batches are fried more evenly. |
| The set temperature is too low. | Touch the temperature buon to the required temperature seng. | |
| The preparaon me is too short. | Touch the mer buon to the required preparaon me. | |
| Fried snacks are not crispy when they come out of the hot airfryer oven. | You used a type of snacks meant to be prepared in a tradional deep fryer. | Use oven snacks or lightly brush some oil onto the snacks for a crispier result. |
| The pan sll contains grease residues from previous use. | White smoke is caused by grease heang up in the pan.Make sure you clean the pan properly aer each use. | |
| Fresh fries are fried unevenly in the hot airfryer oven. | You did not use the right potato type. | Use fresh potatoes and make sure they stay rm during frying. |
| You did not rinse the potato scks properly before you fried them. | Rinse the potato scks properly to remove starch from the outside of the scks. | |
| Fresh fries are not crispy when they come out of the hot airfryer oven. | The crispiness of the fries depends on the amount of oil and water in the fries. | Make sure you dry the potato scks properly before you add the oil. |
| Cut the potato scks smaller for a crispier result. | ||
| Add slightly more oil for a crispier result. |
GUIDELINES FOR PROTECTION OF THE ENVIRONMENT
This appliance should not be put into the domesc garbage at the end of its durability, but must be oered at a central point for the recycling of electric and electronic domesc appliances. This symbol on the appliance, instrucon manual and packaging puts
your aenon to this important issue. The materials used in this appliance can be recycled. By recycling used domesc appliances you contribute an important push to the protecon of our environment. Ask your local authorities for informaon regarding the point of recollecon.
Packaging
The packaging is 100% recyclable, return the packaging separated.
Product
This device is equipped with a mark according to the European Directive 2002/96/EC on Waste Electrical and Electronic Equipment (WEEE). By ensuring that this product will be correctly processed into waste, it will help prevent possible negative consequences for the environment and human health.
EC declaraon of conformity
This appliance is designed to come into contact with food and is designed in accordance with EC Directive 89/109/EEC. This device is designed, manufactured and marketed in accordance with the safety objectives of the Low Voltage Directive "No 2006/95/EC", the protecon requirements of the EMC Directive 2004/108/EC "Electromagnec Compatibility" and the requirement of Directive 93/68/EEC.
GUARENTEE
We provide a 24 month guarantee for this product, commencing from the date of sale, for faults which are aributable to producon or material faults.
- Your legal guarantee entitlements in accordance with § 439. BGB-E remain unacted by this.
- The guarantee does not include damages, which were incurred as a result of improper handling or use, as well as malfuncons which only have a minor effect on the function or the value of the device.
Consumables, transit damages, inasmuch as we are not responsible for these, as well as damages, which were incurred as a result of any repairs that were not performed by us, are also excluded from the guarantee entlements. - This device is designed for use in domesc situaons and has the appropriate performance levels.
- Any use in commercial situations is only covered under the guarantee to the extent that it would be comparable with the stresses of being used in a domestic situation. It is not intended for any additional, commercial use.
- In the event of jused complaints, we will repair the faulty device at our discretion or replace it with a trouble-free device.
- Any pending faults must be reported within 14 days of delivery. All further claims are excluded.
To enforce a guarantee claim, please contact us prior to returning the device (always provide us with proof of purchase).
TECHNICAL DETAILS
- Model: 99364 – Hot air fryer oven; 11 liter
- Voltage: 220-240V\~50/60Hz
- Waage: 2.000 Wa
– Capacity of basket: 3,5 liter - Adjustable temperature: 80°C—200°C
- Timer (30-60 min)
- Accessories: rotang basket (1x), oil drip tray (baking plate) (1x), air ow racks (3x), BBQ skewers (10x,2x round plate L&R), rotang rosserie spit (1x), rack handle (1x)
- Measurements appliance: 32x34x28 cm
SERVICE
If you have any further quesons about the product aer reading this manual, please contact the Trebs customer service:
Trebs BV
Thermiekstraat 1a, 6361 HB, Nuth, The Netherlands, Internet: www.trebs.nl
CE
Deutsch
text_image
Technical diagram of an air fryer with numbered parts labeled 1 to 5
natural_image
Line drawing of a modern air fryer with labeled components (no text or symbols on the device itself)Abb. 1 + 3
natural_image
Pure diagram of multiple parallel lines with rounded ends, no text or symbols present

9

natural_image
Technical line drawing of a grid-patterned plate and a multi-pronged tool (no text or symbols)10

natural_image
Simple line drawing of a Y-shaped pipe or tube with two ends (no text or symbols)11
natural_image
Interior view of a black air fryer with a glass pan containing food, no visible text or symbols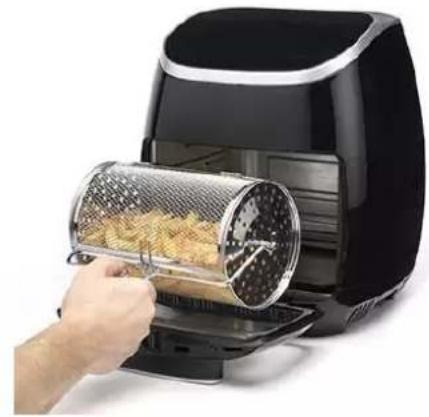
natural_image
Person using a black air fryer to remove food from a net (no text or symbols visible)natural_image
Black and white photo of a modern air fryer with extended food grilles (no visible text or symbols)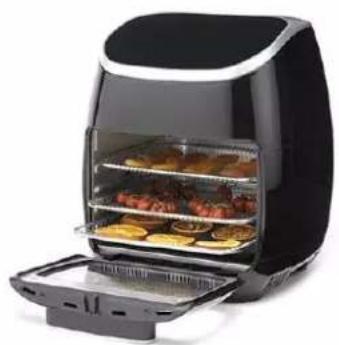
natural_image
Black air fryer oven with food display and tray (no visible text or symbols)natural_image
Exterior view of a modern air fryer with a roasted chicken inside (no text or symbols visible)
natural_image
Person using a black air fryer to spread a roasted chicken (no text or symbols visible)natural_image
Hand placing a cooking pan into an air fryer with food inside (no visible text or symbols)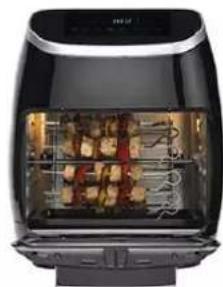
natural_image
Exterior view of a modern air fryer with open lid and interior display (no visible text or symbols)natural_image
Diagram of a device panel with arrows indicating ports or connections (no text or symbols present)
natural_image
Technical line drawing of a car rear bumper showing internal components and directional arrows (no text or symbols)natural_image
Hand pressing a component on a mechanical component (no text or symbols visible)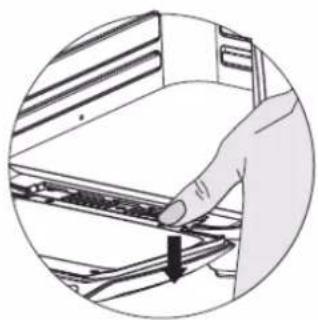
natural_image
Illustration of a hand inserting a component into a device (no text or symbols visible)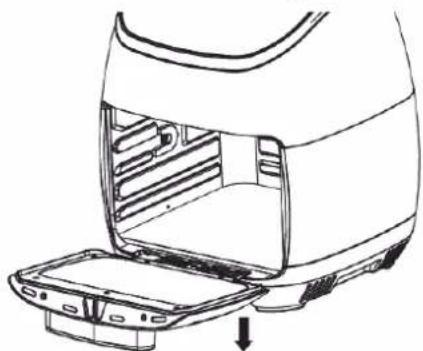
natural_image
Line drawing of a toaster oven with lid removed, showing internal structure and outlet (no text or symbols)text_image
Control panel interface with icons for food, seafood, fish, seafood, condiments, and kitchen toolsAbb. 4
text_image
Technical diagram of an air fryer with numbered parts labeled 1 to 5
natural_image
Line drawing of a modern air fryer with labeled components (no text or symbols on the device itself)Fig. 1
natural_image
Pure diagram of a row of identical wire ties without any text, numbers, or symbols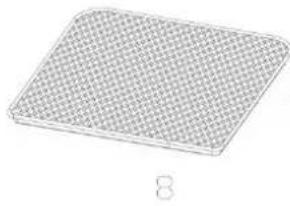
natural_image
Isometric view of a grid-patterned rectangular object with no text or symbols
natural_image
Technical line drawing of a mechanical lever or support structure (no text or symbols)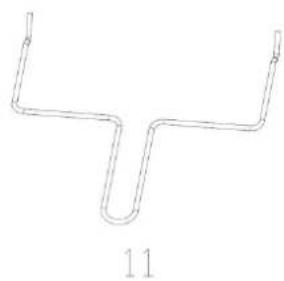
natural_image
Simple line drawing of a Y-shaped pipe or tube with no text or symbolsFig. 3
natural_image
Two black electric air fryers: one open with a pan, the other with a hand holding a net (no text or symbols visible)natural_image
Two black air fryers side by side: one with open lid showing internal food, the other with hand placing a griddle into a tray (no visible text or symbols)natural_image
Interior view of a black air fryer oven with a roasted chicken on the door (no visible text or symbols)
natural_image
Person using a black air fryer to spread a roasted chicken into a tray (no text or symbols visible)natural_image
Interior view of a black air fryer oven with open pan containing various food items (no visible text or labels)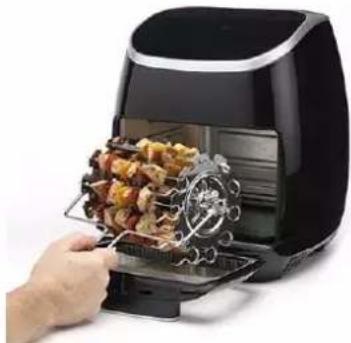
natural_image
Close-up of a black air fryer with a hand holding a tray containing cooked meat, no visible text or symbols.natural_image
Diagram of a mechanical component with arrows indicating direction (no text or symbols)
natural_image
Technical line drawing of a car interior showing the door, vent, and side panels (no text or symbols)natural_image
Close-up of a hand pressing down on a mechanical component (no text or symbols visible)
natural_image
Illustration of a hand inserting a component into a rack (no text or symbols visible)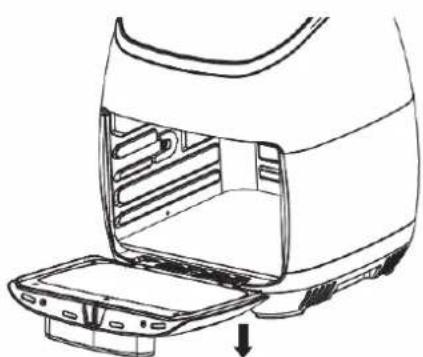
natural_image
Line drawing of a door handle with internal compartments and a downward arrow indicating a component (no text or symbols)text_image
Toolbar interface with icons for food, cooking, fish, seafood, and kitchen toolsFig. 4