Comfortjuicer 99349 - Food Processor TREBS - Free user manual and instructions
Find the device manual for free Comfortjuicer 99349 TREBS in PDF.
User questions about Comfortjuicer 99349 TREBS
0 question about this device. Answer the ones you know or ask your own.
Ask a new question about this device
Download the instructions for your Food Processor in PDF format for free! Find your manual Comfortjuicer 99349 - TREBS and take your electronic device back in hand. On this page are published all the documents necessary for the use of your device. Comfortjuicer 99349 by TREBS.
USER MANUAL Comfortjuicer 99349 TREBS
Comfortjuicer Model 99349
natural_image
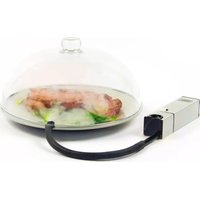
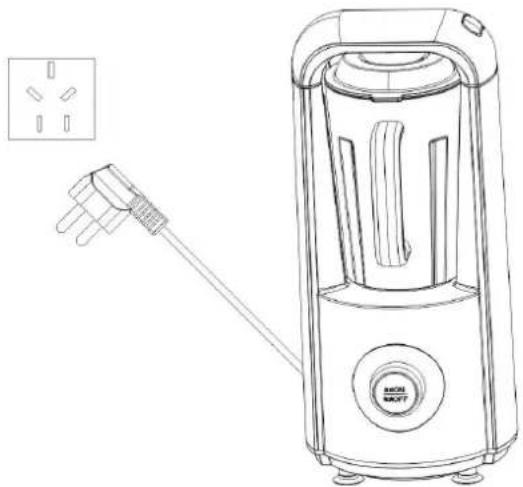
Black and white kitchen blender with a glass lid, control knob, and fruit toppings (no visible text or symbols on the device itself)Handleiding vacuum blender Manual vacuum blender Bedienungsanleitung Vakuum Blender Mode d'emploi vacuum blender
Index
Nederlands....3
Englisch ....13
Deutsch 23
Français ....33
Nederlands
BELANGRIJKE VEILIGHEIDSVOORSCHRIFTEN
text_image
Technical diagram of a portable air conditioner with numbered parts labeled 1 through 7text_image
Exploded view diagram of a blender with numbered parts for identification
text_image
Technical diagram of a device with numbered parts for identificationtext_image
Technical diagram showing exploded and assembled views of a blender with labeled parts and directional arrowsnatural_image
Line drawing of a device with two views: top shows internal structure, bottom shows close-up of a component (no text or symbols)natural_image
Line drawing of a portable electric heater with a power outlet, showing internal circuit lines and terminal blocks (no text or symbols)flowchart
graph LR
    A["Blender with lid"] --> B["Adder into blender"]
    B --> C["Transfer to blender with lid"]
    C --> D["Adder to blender with lid"]
    D --> E["Transfer to blender with lid"]
    E --> F["Adder to final container with lid"]
natural_image
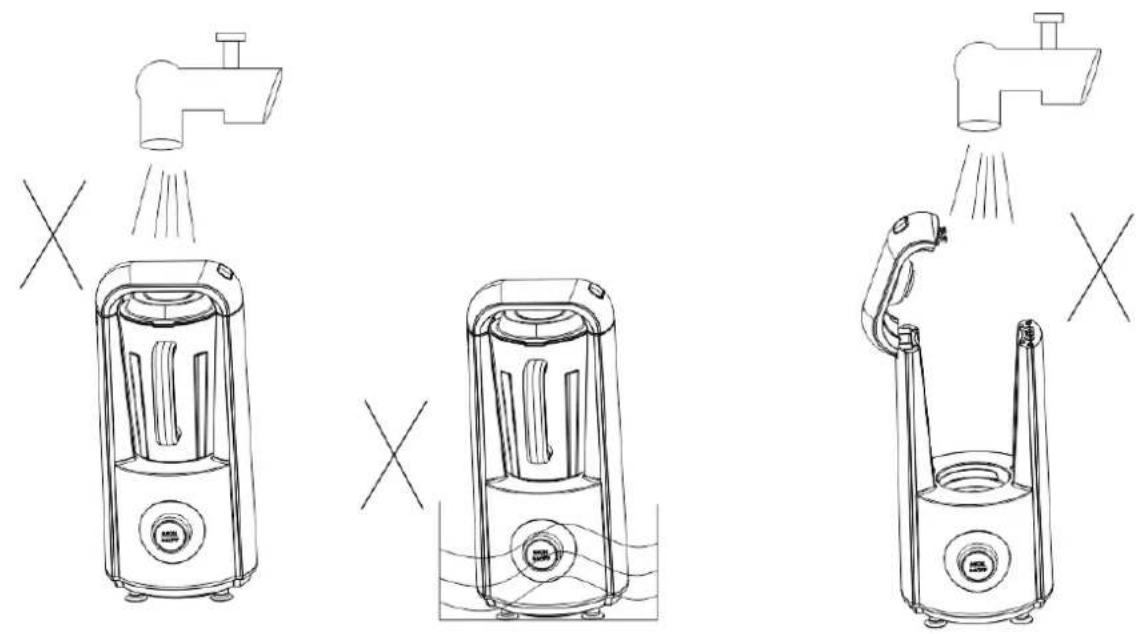
Line drawings of three different household appliances with shower effects, no text or symbols presentIMPORTANT SAFETY INSTRUCTIONS
When using electrical appliances, basic safety precautions should always be followed including the following:
- Read all instrucons before using.
- To protect against risk of electrical shock, do not put the main body (motor) in water or any liquid.
- Children should be supervised to ensure that they to do not play with the appliance.
- Do not operate any appliance with damaged cord or plug or aer the appliance malfuncon, or is dropped or damaged in any manner. Return the appliance to the nearest authorized service facility for examinaon, repair or electrical or mechanical adjustment.
- If the supply cord is damaged, it must be replaced by the manufacturer, its service agent or similarly qualified persons in order to avoid a hazard.
- Unplug from the outlet when not in use, before assembling or taking o parts and before cleaning.
- Avoid contact of moving parts.
- Do not use aachments not recommended or sold by the manufacturer as it may lead to re, electric shock or injury.
- Always ensure you switch the juicer to the o posion and the motor has stopped completely before disassembling.
- Do not use outdoors, household use only.
- Do not use the appliance for other than intended purpose.
- Li the appliance not on the lid.
- This appliance is not intended for use by persons (including children) with reduced physical, sensory or mental capabilities, or lack of experience and knowledge, unless they have been given supervision or instrucon concerning use of the appliance by a person responsible for their safety.
- Switch o the appliance and disconnect from supply before changing accessories or approaching parts that move in use.
- In order to avoid a hazard due to inadvertent reseng of the thermal cutout, this appliance must not be supplied through an external switching device, such as mer, or connected to a circuit that is regularly switched on and o by the ulity.
text_image
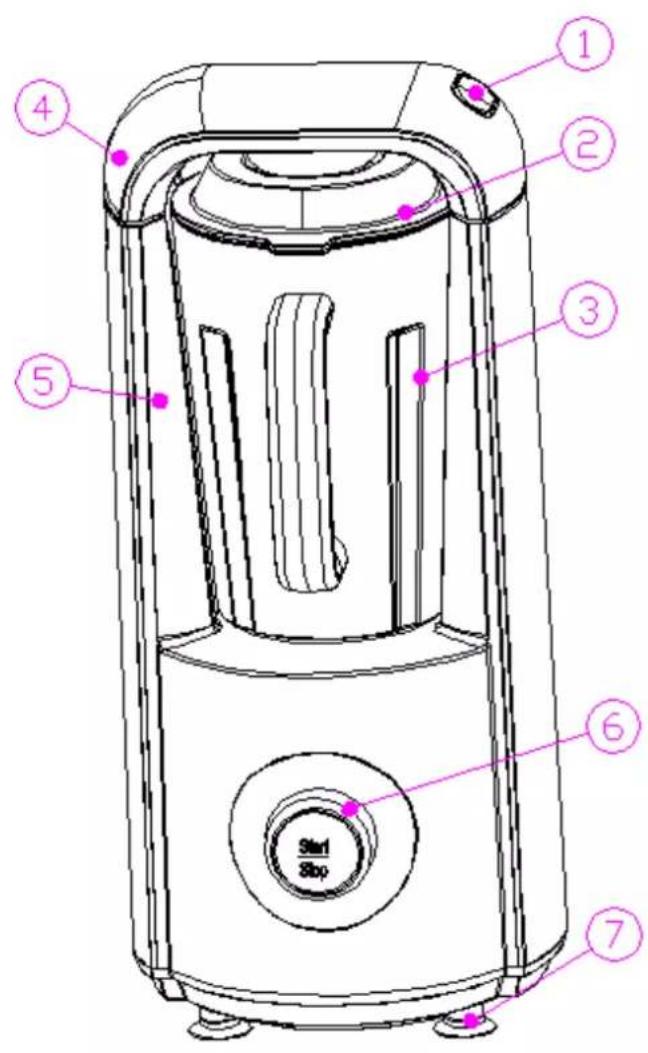
Technical diagram of a portable air purifier with numbered components and labeled parts- Safety Switch
- Lid
- Juicing Jar
- Flip
- Main body
- Control switch
- Rubber feet
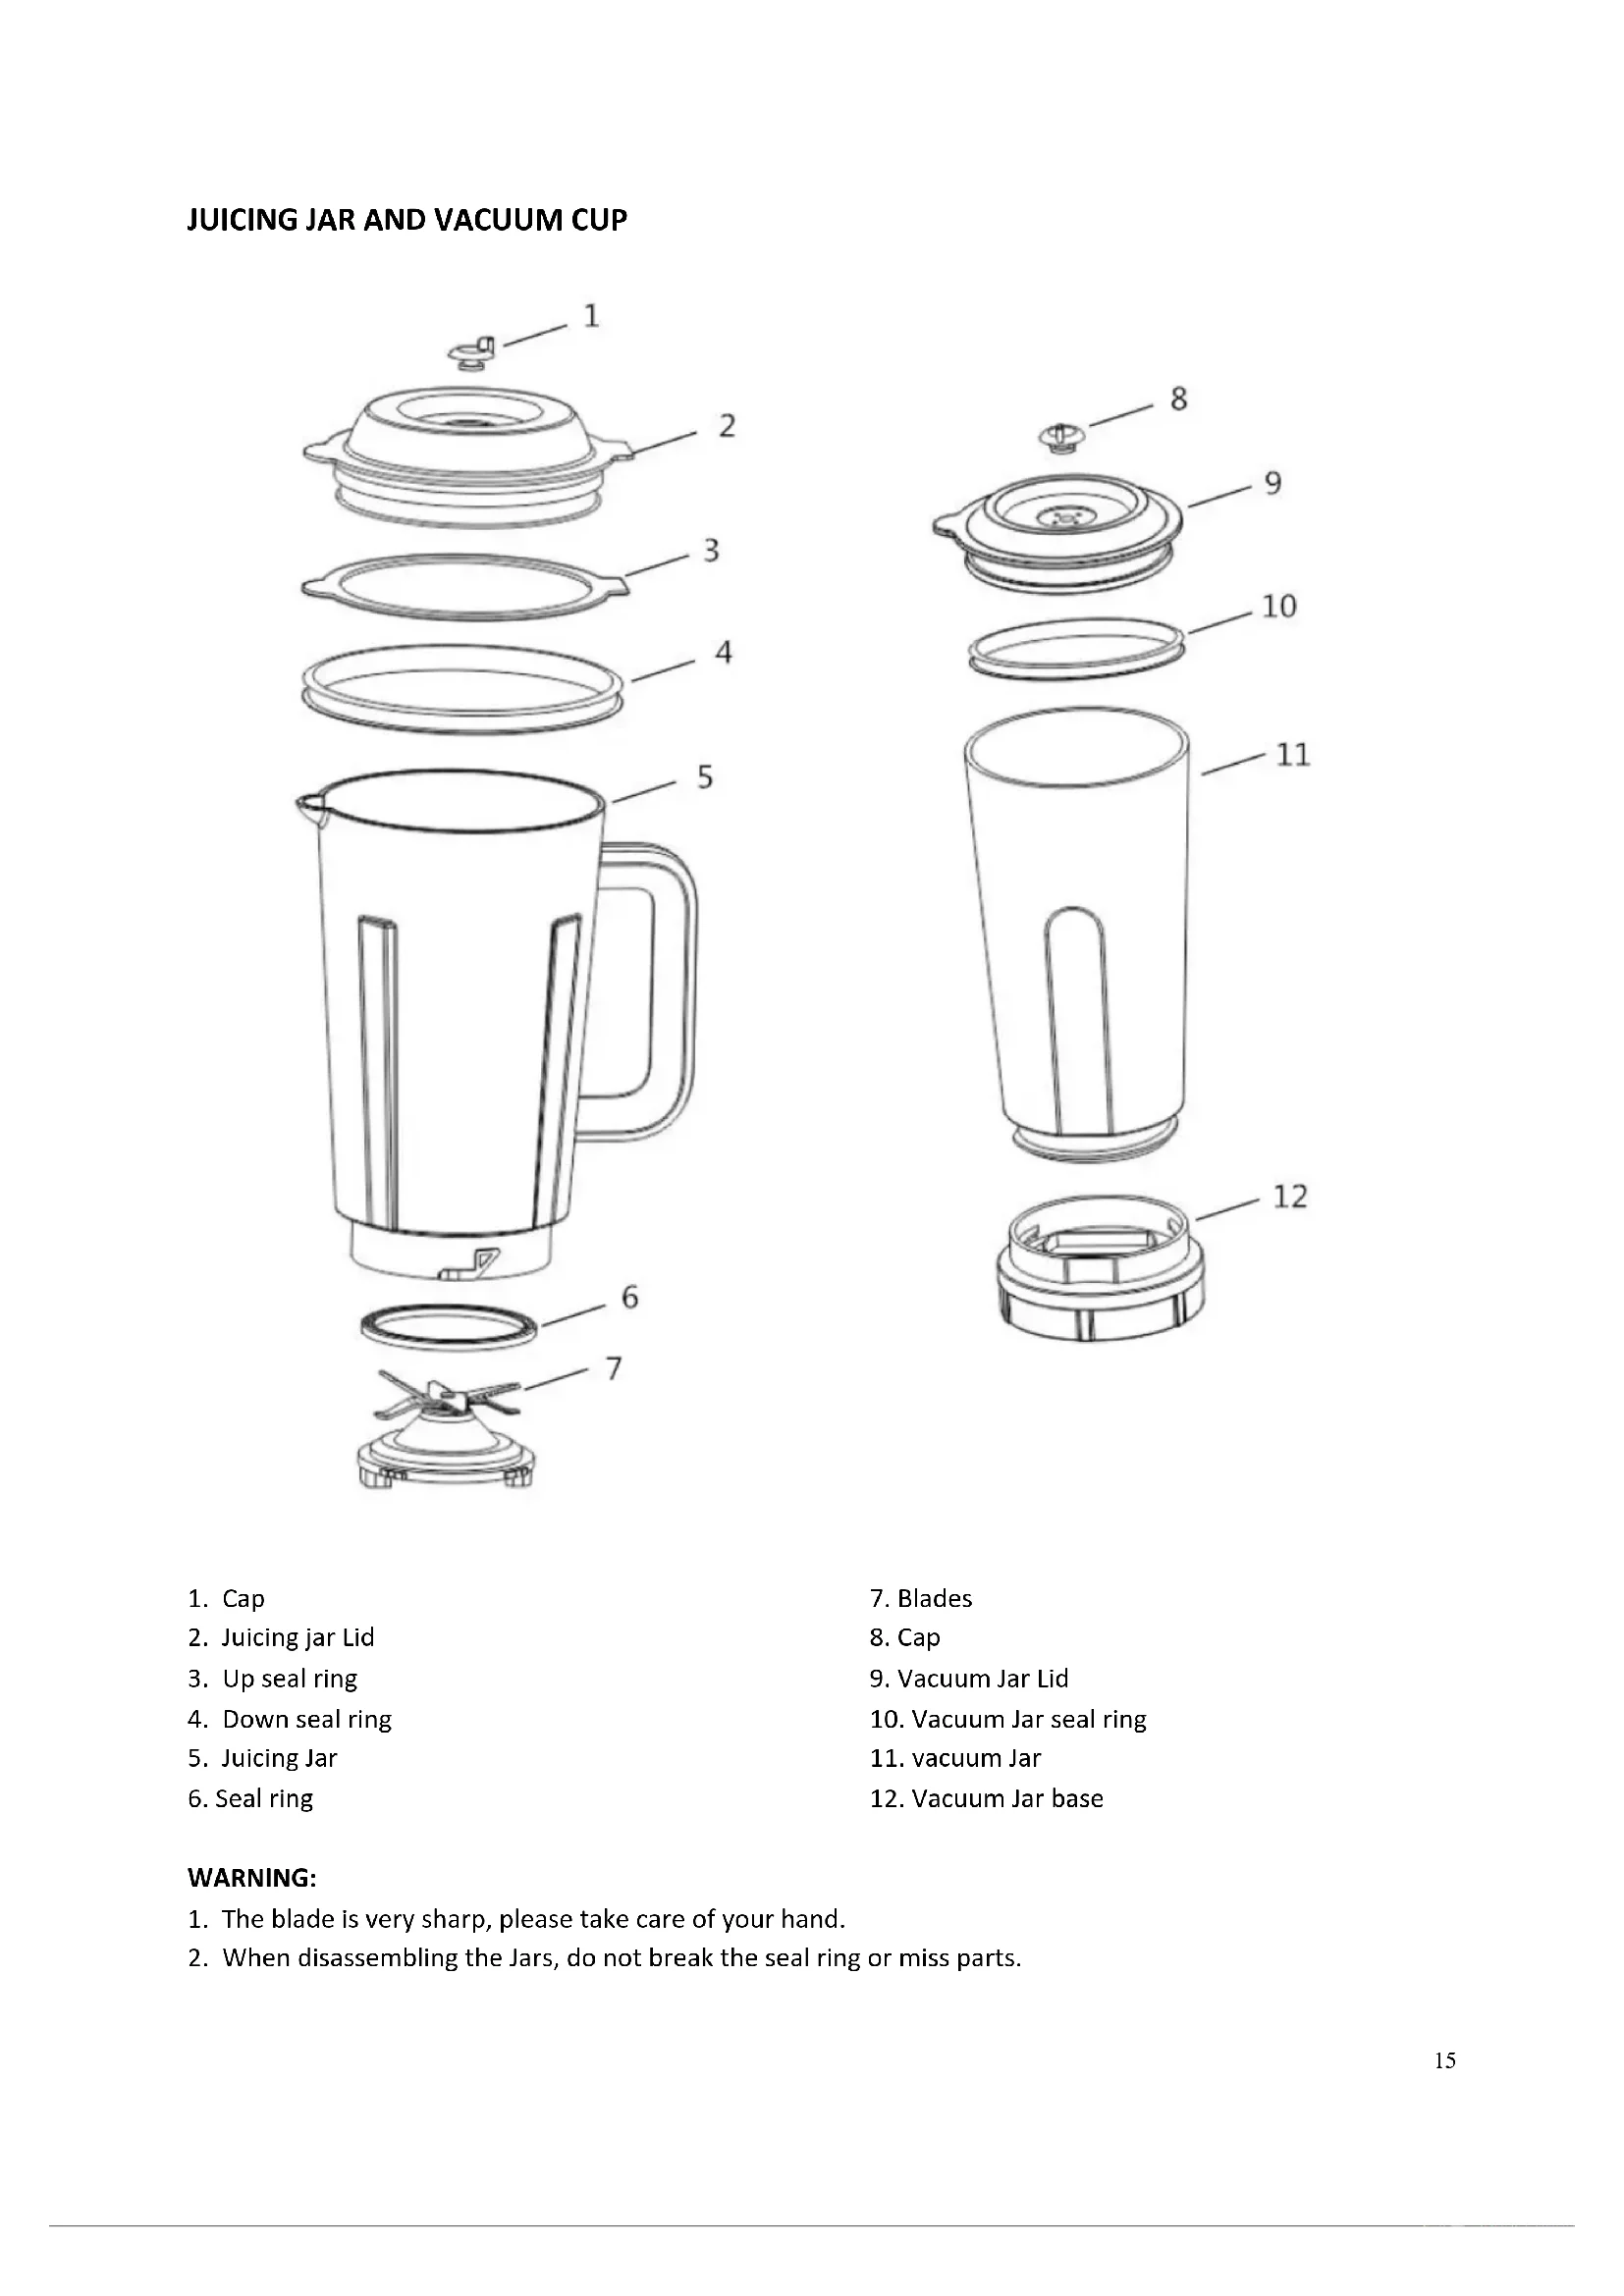
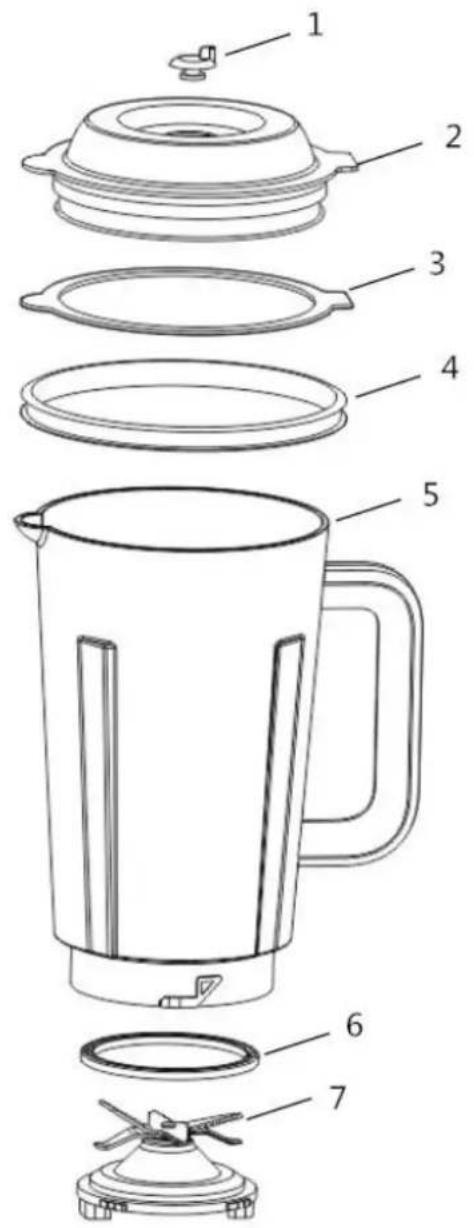
JUICING JAR AND VACUUM CUP
text_image
Exploded view diagram of a kitchen blender with numbered parts for identification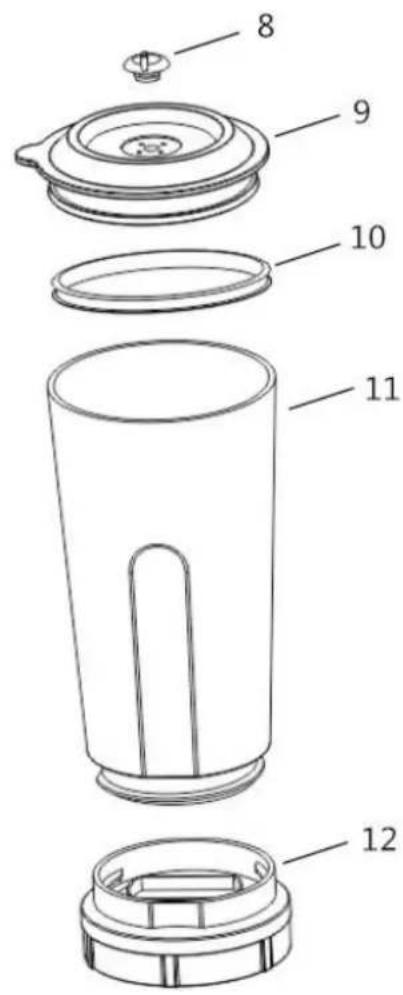
text_image
Technical diagram of a device with numbered parts for identification- Cap
- Juicing jar Lid
- Up seal ring
- Down seal ring
- Juicing Jar
-
Seal ring
-
Blades
- Cap
- Vacuum Jar Lid
- Vacuum Jar seal ring
- vacuum Jar
- Vacuum Jar base
WARNING:
- The blade is very sharp, please take care of your hand.
- When disassembling the Jars, do not break the seal ring or miss parts.
WORKING AND DISPLAY

flowchart
graph TD
    A["Start/Stop"] --> B["V Blend"]
    A --> C["Low"]
    A --> D["Pulse"]
    A --> E["Vacuum"]
    A --> F["High"]
    style A fill:#f9f,stroke:#333
    style B fill:#ccf,stroke:#333
    style C fill:#ccf,stroke:#333
    style D fill:#ccf,stroke:#333
    style E fill:#ccf,stroke:#333
    style F fill:#ccf,stroke:#333
- Vacuum: Take out the air from the jars; ingredients will expand by which mixing will be more evenly which will preserve a smooth and so texture, it ensures a maximum preservaons of nutrients, oxidaon will be prevented, longer retenon of freshness of ingredients, vivid taste and color will remain.
- High: Chop tough material with high speed.
- V-Blend: Vacuum plus Chop; rst the air will be taken out from the jar and then it will blend.
- Low: Chop so material or make smoothies.
- Pulse: Keep pressing 'Start/Stop', it's working.
- Start/Stop: Turn to the wheel of 'Start/Stop' to the menu you prefer, and press the 'Start/Stop' button to start or stop the machine.
WARINING:
- Correct assemble the jars before juicing or vacuuming.
- It's forbidden to open the lid/ip before the blades stop.
- Never operate the jars when the machine is working.
- Never juice empty.
- Never overll with food.
- Never connue juicing more than 3 minutes.
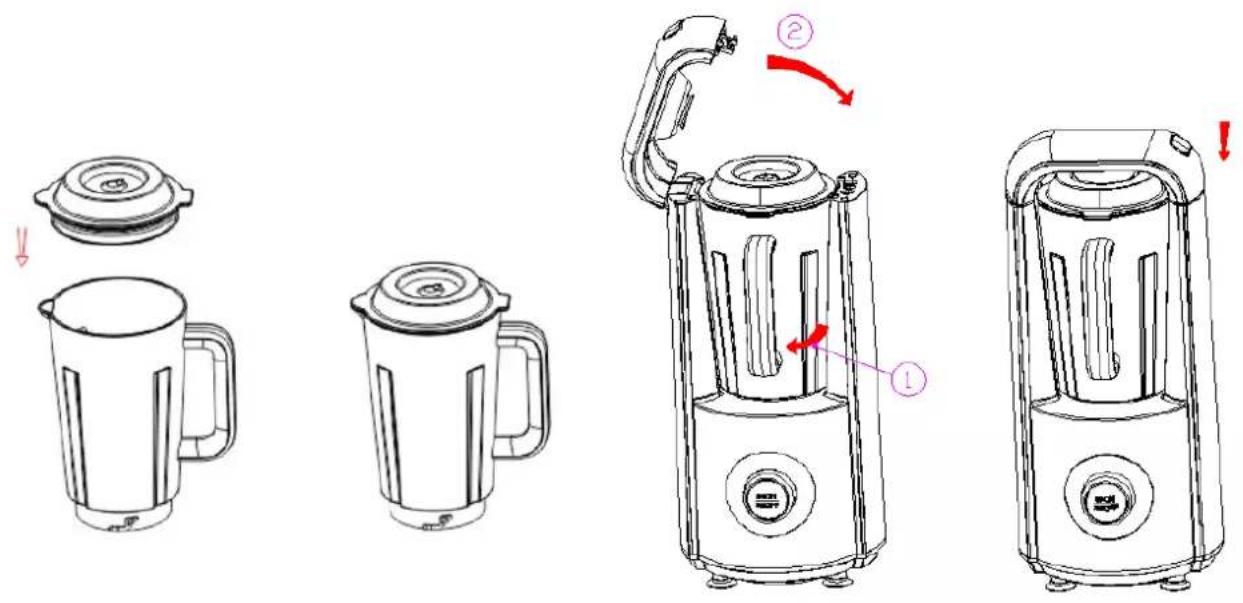
HOW TO START
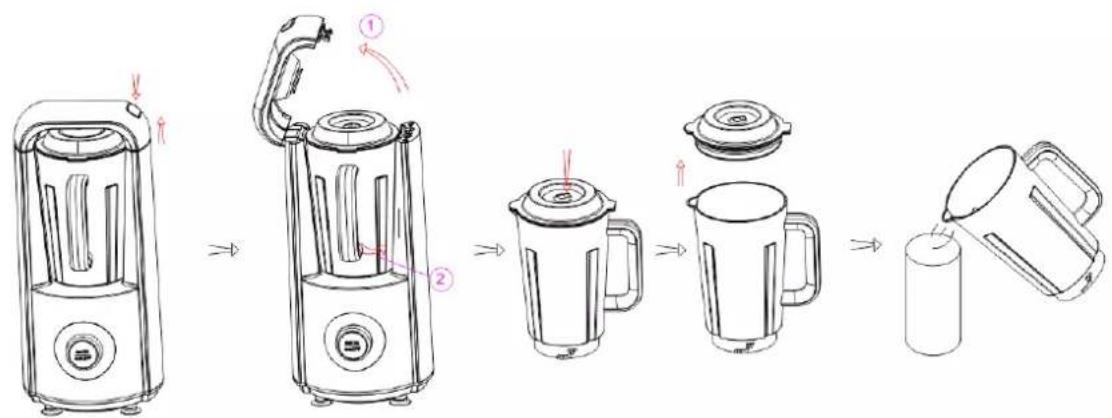
- Press the Safety switch to open the ip, twist the jar with the handle and take it out from the machine, open the lid and wash the jar before using, put the food into the jar (do not overll, use max. 1250 ml), then cover the lid carefully.
MARK: the cap of the jar should be at right posion, or else it will be leakage during vacuum.
text_image
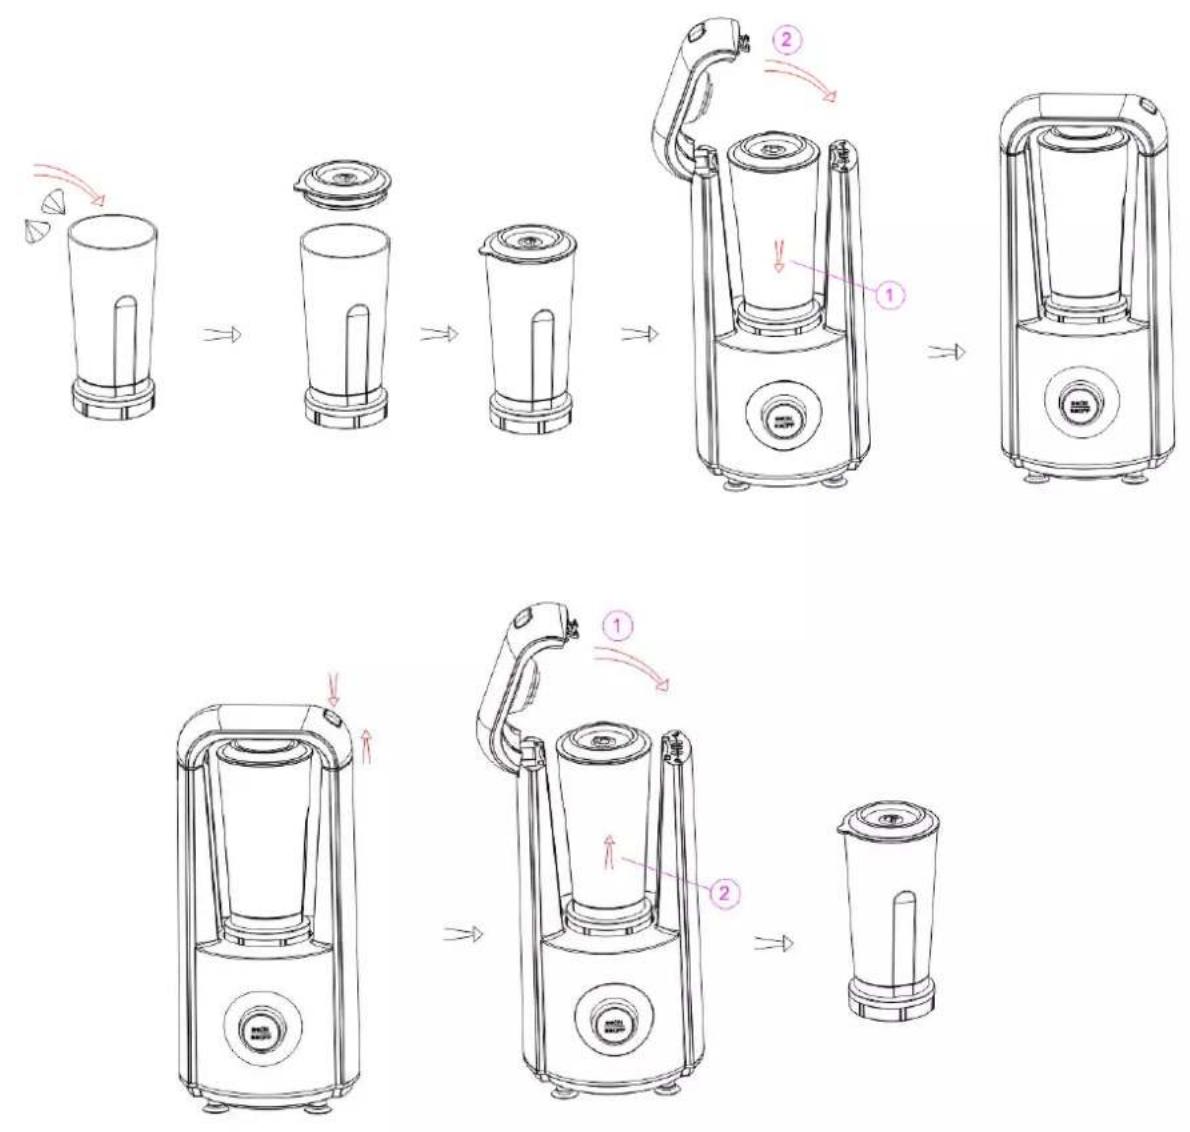
Technical diagram showing four-step cooking process of a blender with labeled parts and directional arrows- Place the juicing jar back to the main body, twist it until the handle point clicks to the 'lock' symbol. And then close the ip.
natural_image
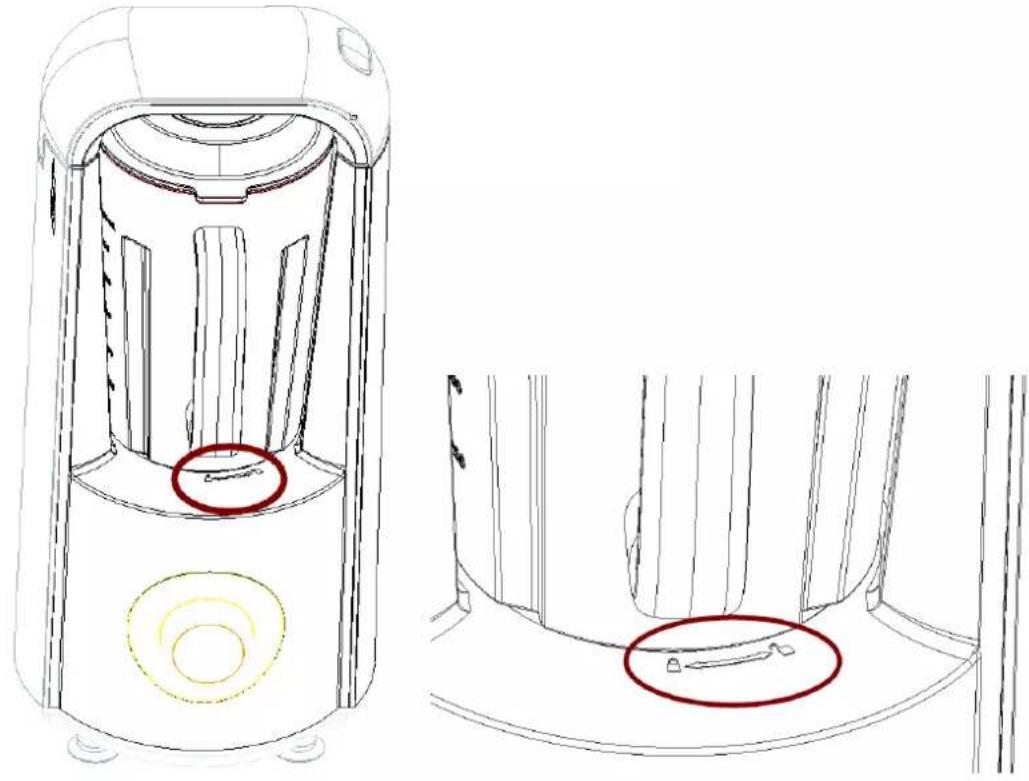
Technical line drawing of a device interior with two views (top and side), no text or symbols present.- Plug in; all lights of the panel will switch on. Make sure the lights are all in white color (If they are all ash red, it means the ip is not at the right posion, then please open it and re-close).
natural_image
Line drawing of a portable electric shaver with a power outlet, showing internal components and wiring (no text or symbols)- Turn the wheel of 'start/stop' to choose the menu you prefer, then press 'Start/Stop' to run it.
Note: 1/ If you want to stop the machine immediately, just press 'Start/Stop' again.
2/ When at 'Pulse' posion, you should keep press 'Start/Stop' to run the machine, and when your nger remove, it will stop immediately.
3/ If you turn the wheel of the 'Start/Stop' but the 'Vacuum lights' keep ashing, and machine sounds 'Be-be-be', it means the juicing jar is not installed at the right posion. You should re-install the juicing jar again and make sure the jar handle must in line with the 'Lock' symbol.
4/ If you didn't operate the machine more than 5 min aer plug in, the machine will start 'Energy save' mode, press the 'Start/Stop' to acvate it.
- Aer nishing the juicing, press the safety switch to release the ip, twist the juicing jar unl the handle points to the 'Unlock' symbol. Take out the juicing jar, li the cap to release the vacuum (or else you can't open the lid), and you can open the lid easily and enjoying you juice!
Tips:
In order to protect the machine, the menu will set a circle. When one circle nished it will stop, if you juicing tough food materials, we suggest you to run 'High' menu once more in order to chop the materials completely.
flowchart
graph LR
    A["Blender with lid"] --> B["Adder into blender"]
    B --> C["Transfer to blender with lid"]
    C --> D["Adder into blender with lid"]
    D --> E["Adder to blender with lid"]
    E --> F["Adder to blender with lid"]
    F --> G["Adder to blender with lid"]
- If you want to store the juice or some other liquid, please put the liquid into the vacuum jar, assemble it and put it into the machine and close the ip. When the 'Vacuum' light ashes, press the 'Start/Stop' buon to take out the air from the vacuum jar. The vacuum will be nished when the machine stops.
CLEANING
- Wash the jars and blades and wipe them dry, pay aenon to your ngers because of the sharp blades.
- Do not use the steel wool, abrasive or corrosive liquid detergent (gasoline or acetone) to clean the machine.
- Store the appliance on a clean, dry place and avoid direct sunlight.
Warning:
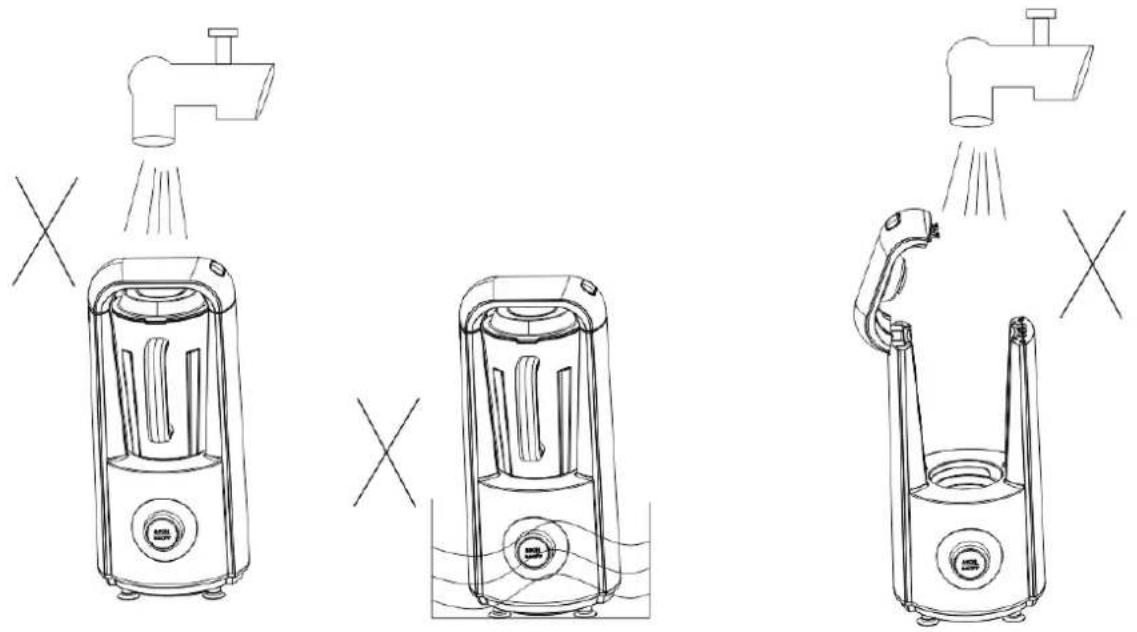
- Please pull out the plug and cut o the power before cleaning.
- Wipe the main body and jar with a so cloth, never put the main body into the water or any liquid.
- Never let any liquid come into the main body.
| Problem | Possible Causes | What To Do |
| No light | Machine is not plugged in | Check the machine is plugged in |
| All light in red color | The ip is not closed | Open and close the ip again. |
| Turn the wheel, but cannot choose the menu. Machine sounds ‘Be-be-be’ | The juicing or vacuum jar is not installed at the right posion | Re-install the juicing jar again, make sure the handle of it is pointed to the ‘Lock’ Symbol. |
| Motor has stopped | Might be 1 cycle nished | Press ‘Start/Stop’ again to run the machine. |
| Leaking from juicing jar. | 1.The jar cover will not install in place2.The cap or seal ring is broken | 1.Ensure the jar and main body assemble well2.Ensure all parts of the jar are install well3.Ensure the seal ring or cap is well. |
| Cannot vacuum | 1.The cap, blade and lid are not installed in place2.The cap, blade and lid are broken3.The ip is not covered well | 1.Ensure the seal ring is well.2.Ensure all parts of the jar are install well3.Close the ip. |
DISPOSAL OF THE OLD DEVICE

Old electric and electronic devices frequently sll contain valuable materials. However, they also contain damaging substances, which were necessary for their funconality and safety. If these were put in the non-recyclable waste or were handled incorrectly,
they could be detrimental to human health and the environment. Therefore, do not put your old device into the non-recyclable waste under any circumstances.
PLEASE NOTE
- Uulize the collecon point, established in your town, to return and recycle old electric and electronic devices. If necessary, contact your town hall, local refuse collecon service or your dealer for informaon.
- Ensure that your old device is stored safely away from children until it is taken away.
GUARENTEE
• We provide a 24 month guarantee for this product, commencing from the date of sale, for faults
• which are attributable to producon or material faults.
- The guarantee does not include damages, which were incurred as a result of improper handling or use, as well as malfuncons which only have a minor eect on the funcon or the value of the device. Consumables, transit damages, inasmuch as we are not responsible for these, as well as damages, which were incurred as a result of
any repairs that were not performed by us, are also excluded from the guarantee entlements.
• This device is designed for use in domesc situaons and has the appropriate performance levels.
- Any use in commercial situations is only covered under the guarantee to the extent that it would be comparable with the stresses of being used in a domestic situation. It is not intended for any additional, commercial use.
- In the event of jused complaints, we will repair the faulty device at our discretion or replace it with a trouble-free device. Please always go back to the store you bought the product.
Any pending faults must be reported within 14 days of delivery to the store you bought the product. All further claims are excluded.
To enforce a guarantee claim, please contact your store prior to returning the device (always provide us with proof of purchase).
TECHNICAL DETAILS
| Device | Vacuum blender |
| Model | 99349 |
| Mains data | 220-240V~50/60Hz |
| Power consumpon | 800 W |
| RPM highest | 26000 +/- 10% |
| RPM lowest | 21000 +/- 10% |
| 96 dB |
SERVICE
If you have any further quesons about the product aer reading this manual, please contact the Trebs customer service.
Trebs BV
Thermiekstraat 1a
6361 HB Nuth
Nederland
text_image
Technical diagram of a portable air conditioner with numbered parts labeled 1 through 7text_image
Exploded view diagram of a kitchen blender with numbered parts for identification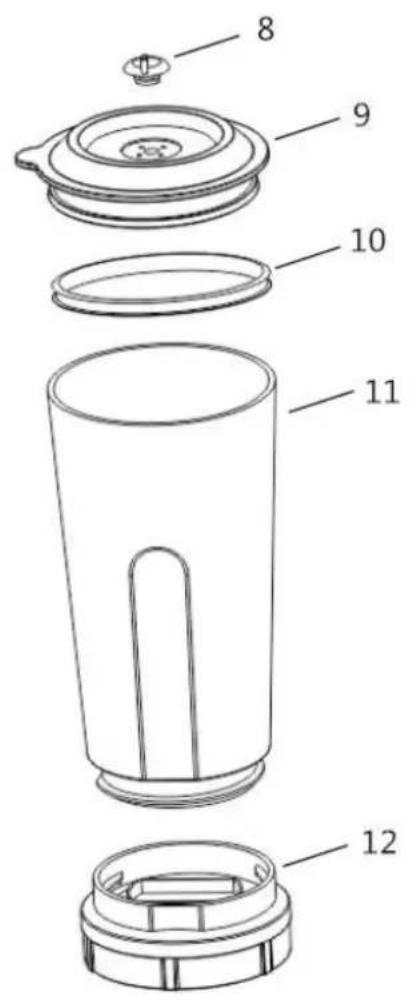
text_image
Technical diagram of a device with numbered parts for identificationtext_image
Technical line drawing showing exploded and assembled views of a blender with labeled parts and directional arrowsnatural_image
Technical line drawing of a device with two views: top shows internal structure, bottom shows close-up of a component (no text or symbols)natural_image
Line drawing of a portable electric heater with a power plug, shown from an exploded view (no text or symbols)flowchart
graph LR
    A["Blender with lid"] --> B["Adder into blender"]
    B --> C["Transfer to blender with lid"]
    C --> D["Adder to blender with lid"]
    D --> E["Transfer to blender with lid"]
    E --> F["Adder to final container with lid"]
natural_image
Line drawings of three different household appliances with shower effects, no text or symbols presenttext_image
Technical diagram of a portable air conditioner with numbered parts labeled 1 through 7text_image
Exploded view diagram of a blender with numbered parts for identificationtext_image
Technical diagram of a device with numbered parts for identificationtext_image
Technical line drawings of a blender with labeled parts and directional arrows indicating process steps.natural_image
Line drawing of a portable air purifier with two views showing internal components and a close-up of the interior (no text or symbols)natural_image
Line drawing of a portable electric heater with a power outlet and plug, no text or symbols presentflowchart
graph LR
    A["Blender with lid"] --> B["Adder into blender"]
    B --> C["Adder into blender with lid, second step"]
    C --> D["Adder into blender with lid, first step"]
    D --> E["Adder into blender with lid, second step"]
    E --> F["Adder into blender with lid, second step"]
    F --> G["Adder into blender with lid, second step"]
text_image
Technical line drawing of a blender with labeled parts and directional arrows indicating motionNETTOYAGE