CSC623 - Steam cleaner Montiss - Free user manual and instructions
Find the device manual for free CSC623 Montiss in PDF.
| Product type | Steam mop cleaner |
| Brand | Montiss |
| Model | CSC623 |
| Power supply | 230 V ~ 50 Hz |
| Power | 1300 W |
| Water tank capacity | 350 ml |
| Continuous steam output | 23 g/min |
| Preheat time | 25 seconds |
| Steam autonomy | 15 minutes |
| Protection rating | IPX4 |
| Included accessories | Microfiber pad, sliding element, measuring cup |
| Pad material | Machine-washable microfiber |
| Warranty | 24 months |
| Intended use | Hard floors, tile, sealed floors |
| Surfaces not recommended | Leather, waxed furniture, delicate fabrics, porous surfaces |
| Maintenance | Regular descaling with white vinegar |
| Safety | Overpressure protection, shutdown in case of overheating |
Frequently Asked Questions - CSC623 Montiss
User questions about CSC623 Montiss
0 question about this device. Answer the ones you know or ask your own.
Ask a new question about this device
Download the instructions for your Steam cleaner in PDF format for free! Find your manual CSC623 - Montiss and take your electronic device back in hand. On this page are published all the documents necessary for the use of your device. CSC623 by Montiss.
USER MANUAL CSC623 Montiss
natural_image
Black vacuum cleaner with white handle and base (no visible text or symbols)Gebruiksaanwijzing
User manual
Bedienungsanleitung
Mode d'emploi
Index
Nederlands ....3
Deutsch....15
English....28
Français....40
Nederlands
VEILIGHEIDSINSTRUCTIES
natural_image
Two identical mechanical device diagrams showing a vertical rod with arrows indicating motion or force direction (no text or symbols)De stoomkop bevesgen:
natural_image
Diagram showing a mechanical component being lifted by a tool, with no visible text or symbols.
natural_image
Simple line drawing of a mechanical device with a lever and base, no text or symbols presentnatural_image
Simple line drawing of a device with a handle and base, showing an arrow pointing to a separate component (no text or symbols)Bediening:
- De watertank vullen:
natural_image
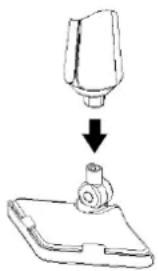
Two identical mechanical devices with lever arms and directional arrows indicating movement (no text or symbols)Dampopf befesgen:
natural_image
Simple line drawing of a mechanical component with a downward arrow indicating process (no text or symbols)
natural_image
Simple line drawing of a mechanical device with a lever and base, no text or symbols presentnatural_image
Diagram showing a device being processed into a tray, with an arrow indicating the process (no text or symbols present)Bedienung:
- Wassertank füllen:
natural_image
Simple line drawing of a mechanical component with an arrow pointing to a circular feature (no text or symbols)SCHRITT 2
natural_image
Technical line drawing of a mechanical clamp or bracket assembly (no text or symbols)SCHRITT 3
WARNING: Read all safety warnings and all instrucons. Failure to follow the warnings and instrucons listed below may result in electric shock, re and/or serious injury.
Warning: When using electrical appliances, basics safety precautions, including the following, should always be followed to reduce the risk of re, electric shock, personal injury and material damage.
- Read all of this manual carefully before using the appliance.
- The intended use is described in this manual. The use of any accessory or aachment or the performance of any operaon with this appliance other than those recommended in this instrucon manual may present a risk of personal injury.
- Retain this manual for future reference.
Using your appliance
- Do not direct steam at people, animals, electrical appliances or electrical outlets.
- Do not expose to rain.
- Do not immerse the appliance in the water.
- Do not leave the appliance unattended. Keep children away from unit while in use.
- Do not leave the appliance connected to an electrical outlet when not in use.
- Never pull the power cord to disconnect the appliance from the socket. Keep the appliance cord away from heat, oil and sharp edges.
- Do not handle steam cleaner with wet hands.
- Do not pull or carry by cord, use cord as a handle, close door on cord, pull cord around sharp corners or expose cord to heated surfaces.
- Do not use appliance in an enclosed space lled with vapor given off by oil-base paint thinner, some moth-proong substances, ammable dust, or other explosive or toxic vapors.
- Do not use on leather, wax polished furniture or oors, synthec fabrics, velvet or other delicate, steam-sensitive materials.
- Do not use on any unsealed hard oor surfaces. Additionally, on surfaces that have been treated with wax or some no-wax oors, the sheen may be removed by the heat and steam acon. It is always recommended to test an isolated area of the surface to be cleaned before proceeding. We also recommend end that you check the use and care instrucons from the oor manufacturer.
- Never put de-scaling, aromac, alcoholic or detergent products into the steam mop, as this may damage it or make it unsafe for use.
- If the circuit breaker acvates while using the steam funcon, disconnue product use immediately and contact the customer support center.(Beware of the risk of electrical shock.)
- The appliance emits very hot steam to sanitize the area of use. This means that the steam head and cleaning pads get very hot during use.
-
! Cauon: Always wear suitable shoes when using your steam mop and when changing the accessories on your steam mop. Do not wear slippers or open-toed footwear.
-
The lid may become hot during use.
- Care should be taken when using this appliance. DO NOT touch any parts which may become hot during use.
- Do not use when micro-ber cleaning pad not install correct.
Safety of others:
- This appliance is not intended for use by persons(including children) with reduced physical, sensory or mental capabilities, or lack of experience and knowledge, unless they have been given supervision or instrucon concerning the use of the appliances by a person responsible for their safety.
• Children should be supervised to ensure that they do not play with the appliance.
Safety guidelines-denions:
It is important for you to read and understand this manual. The informaon it contains relates to protecng YOUR SAFETY and PREVENTING PROBLEMS. The symbols below are used to help you recognize this informaon.
- ! DANGER: Indicates an imminently hazardous situaon which, if not avoided, will result in death or serious injury.
- ! WARNING: Indicates a potentially hazardous situation which, if not avoided, could result in death or serious injury.
- ! CAUTION: Indicates a potentially hazardous situation which, if not avoided, may result in minor or moderate injury.
- NOTICE: Used without the safety alert symbol indicates a potentially hazardous situation which, if not avoided, may result in property damage.
Residual risks:
- Additional residual risks may arise when using the tool which may not be included in the enclosed safety warnings. These risks can arise from misuse, prolonged use, etc.
- Even with the application of the relevant safety regulations and the implementation of safety devices, certain residual risks cannot be avoided. These include
- Injuries caused by touching any moving parts.
- Injuries caused by touching any hot parts.
- Injuries caused when changing any parts or accessories.
- Injuries caused by prolonged use of the appliance. When using any appliance for prolonged periods ensure you take regular breaks.
THE PRODUCT
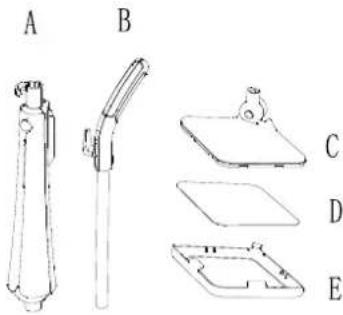
Standard features
A Main Body
B Handle
C Steam Head
D Microber Pad
E Carpet Gilder
F Measuring Cup
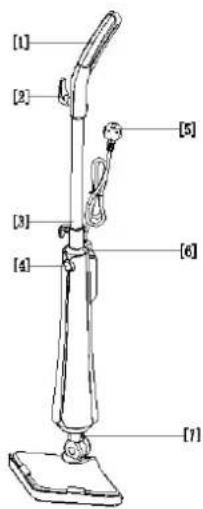
Product components
1 Handle
2 Cord Holder
3 Hand Bar
4 Power Switch
5 Power Cord
6 Water Tank Iler
7 Steam Head Spindle
natural_image
Technical line drawings of mechanical components labeled A, B, C, D, E (no text or symbols on parts)F
text_image
[1] [2] [3] [4] [5] [6] [7]THE USE
Funcon:
- Detachable handle
- Connuous steam output (up to 5 minutes connuously working, steam averaged): 23g/min
• Steam output me: 15 minutes
• Red and blue light, warm-up and work instrucons
• Pressure relief protecon, keeping the pressure in the heang unit constant
• The angle of the rotaon axis in the cleaner is greater
Assembly:
NOTE: Each steam mop is 100% tested in the factory to ensure product performance and safety. When assembling your new steam mop for the rst me you may noce water residue inside of the unit.
! WARNING: Before aempng any of the following operaons, make sure that the appliance is switched o and unplugged and that the appliance is cold and contains lile or no water.
Aaching the handle:
- Slid the handle bar with the handle into the main body until it clicks into place
- The handle can be removed from the steam mop body for easy storage by pressing the Handle tube buon

text_image
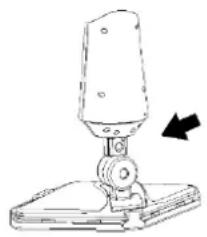
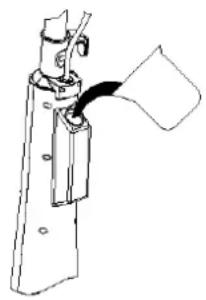
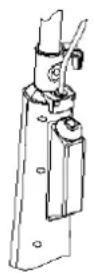
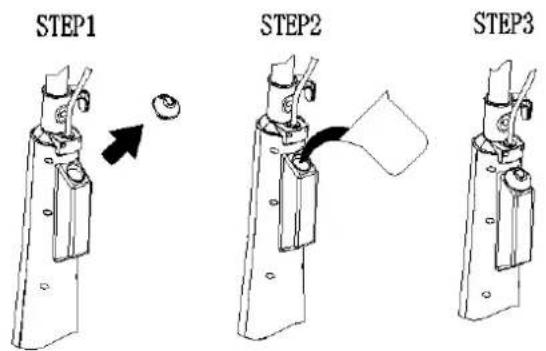
STEP1 STEP2Aaching the steam head:
- Slide the boom end of the main body into the steam head until the steam head spindle clicks into place
- The steam head can be removed from the main body by pressing the salient point on the steam head spindle
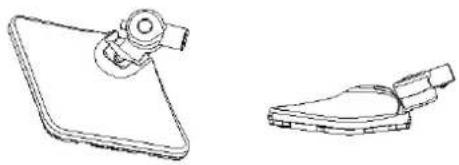
Aaching a cleaning pad:
- As barb design at the boom of the steam head, only place a micro-ber cleaning pad to the steam head, they can bond hard
- Place the front of your shoe onto the cleaning pad, remove the tab and press down rmly
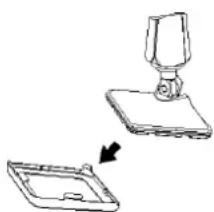
Aaching carpet gilder:
- Press the micro-ber cleaning pad E on the main body, to the carpet gilder by vercal pressure, unl it clicks into place
- Place the front of your shoes onto the cleaning pad E removal tab and press down rmly, the carpet gilder will remove from the steam head.
natural_image
Simple line drawing of a mechanical component with a downward arrow indicating process (no text or symbols)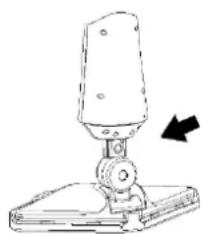
natural_image
Simple line drawing of a mechanical device with a lever and base, no text or symbols present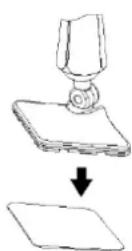
natural_image
Diagram showing a mechanical assembly with a bracket and a base component, no text or symbols presentOperaon:
- Filling the water tank:
Open the tank plug, II 350ml water and cover the plug;
text_image
STEP1 STEP2 STEP3- Plug in the appliance to a grounded outlet;
- Press the power switch; the indicator lights will turn red, it indicates preheang. If the lights do not illuminate, please check the "troubleshoong" secon for more details;
- The appliance warm-up me is 25 seconds, aer the compleon of preheang, the indicator light will turn to be blue, the appliance begins to work;
NOTICE: If power failure in the middle of the warm-up or power-o aer the warm-up is complete, turn the power supply on again, according to the interval of the power is turned on again, the appliance may repeat the above warm-up operaon.
- When normal cleaning, the steam head has a big rotary angle, not only clean corners but also can clean lower space.
natural_image
Line drawings of a flat plate and a pair of shoes (no text or symbols)Cleaning:
Ensure that the product must power o before cleaning.
Empty the water tank aer using every me and cleaning the water tank.
How to decalcify the water tank interior:
To clean calcium deposits that builds up inside the water tank, add one or two tablespoons of white vinegar to the water tank and then shake the contents. Several hours later, then pour away the water and clean the water.
Cauon: do not immerse the appliance in the water.
Cleaning procedure to remove scale:
If your steam mop outputs steam is more slowly than usual or no steam , you may need toremove lime scale. Lime scale can develop over me on the metal parts and greatly aectthe mop performance. It is necessary to remove lime scale on regular basis every 25-50
mes you use a full tank of water or at least once a month, especially in areas with hard water.
The frequency of lime scale removal depends upon the hardness of your tap water and how oen you use the steam mop.
By using cleaning soluon:
- Prepare a soluon of 1/3 white vinegar and 2/3 tap water and add to the water tank.
- Secure the appliance in the xed posion and be away from the oor and other objects and surface. Plug in and press the power switch, it will be producing steam unit the vinegar/water soluon run out.
- Repeat the above procedure as many mes unit a normal steam ow rate is achieved.
- Fill the water tank with fresh water to clean.
- Fill the water tank with fresh water and release the steam through the system unit; the water tank is empty.
Storage:
- Aer the steamer is used, turn the power o and then unplug the power cord.
- Take out the water tank, and empty the residual water in the tank and clean the external surface with a dry cloth. Unl the steam mop cools down, clean the appliances.
- Remove the cleaning pad and wash it so that it will be ready for next use.
- Store the product in a protected, dry area. Keep the water funnel and measuring cup for future use.
- Keep out of reach of children.
WARNING
Don't leave the appliance during the lime scale removal process and/or while in use.
NOTICE:
Perform a test cleaning on a suitable isolated area aer each lime scale removal to ensure that there is no debris le in the system.
This product contains no serviceable parts. Do not try to repair it by yourself. Any servicing that requires disassembly other than cleaning must be performed by a qualified appliance repair technician.
ALL servicing should be done by an authorized service representave.
Cleaning and storage the microber pad:
• Machine washable on "warm" seng. Always use a mild detergent.
- For best care results, lay at to dry.
- IMPORTANT : Allow the steamer to fully cool down before performing any maintenance or troublesomeng checks.
- IMPORTANT : Never use bleach or fabric soener when washing the microber cleaning pad.
NOTICE: Aer cleaning, take out the water tank before cut o the power, and then let the product work for a while, unl there is no steam. It can make pipe without water, good to store.
TROUBLESHOOTING
USE THE TROUBLESHOOTING GUIDE AS A FIRST STEP TO RESOLVE ANY PROBLEMS, YOU MAY BE MEETING UNDER USING.
All servicing should be done by an authorized service representave.
!WARNING!: TO REDUCE RISK OF PERSONAL INJURY-UNPLUG STEAMER BEFORE SERVICING AND ALLOW TO COOL
| PROBLEM | POSSIBLE REASON | POSSIBLE SOLUTION |
| Reduced steam or no steam | Water tank may be empty | Fill water into the water tank |
| Steam nozzle may be blocked | Clean steam nozzle | |
| There is no power to the unit | Make sure unit is plugged in | |
| Didn't press power buon | Press power buon | |
| Unit will not turn on | Blown fuse or breaker | Replace fuse or reset breaker in home |
| Power cord not plugged in | Plug cord into a working circuit | |
| Internal fuse is blown | Contact with customer service |
DISPOSAL OF YOUR OLD APPLIANCE
Used material for parts and packing all comply with Rohs requirement:
Heavy metal limited data: Pb+Cd+Hg+Cr+6<100ppm
Bromic endure burning limited data: PBBs+PBDEs<1000ppm

Environment
Meaning of crossed -out wheeled dustbin:
Do not dispose of electrical appliances as unsorted municipal waste, use separate collecon facilities.
Contact your local government for informaon regarding the collecon systems available.
If electrical appliances are disposed of in landlls or dumps, hazardous substances can leak into the groundwater and get into the food chain, damaging your health and well-being.
When replacing old appliances with new ones, the retailer is legally obligated to take back. Your old appliance for disposals at least free of charge.
TECHNICAL DETAILS
- Rated voltage: 230V
• Rated frequency: 50Hz
• Output power: 1300W (+5%, -10%)
• Water tank capacity: 350mL - Waterproof level: IPX4
Monss is a registered brand name of:
Trebs BV
Thermiekstraat 1a
6361HB Nuth
The Netherlands
www.trebs.nl
GUARANTEE
This guarantee covers your device for a period of 24 months from the date of purchase for service and replacement of parts, on the condition that you have used the device correctly as described in the user manual. This guarantee does not exclude naonal legislaon that may exist in the country of purchase in regards to warranty regulaons.
When you make a claim under this guarantee, you must submit the original invoice or receipt with clear menon of the date of purchase, name of retailer and the descripon and model number of the device. You are advised to keep these documents in a safe place.
This device is intended for domesc use only. Damage and/or malfuncons as the result of industrial or commercial use are excluded from the warranty.
The guarantee for this device expires if:
- The original invoice or receipt has in one way or another been changed or made illegible;
- The model or serial number on the device has been changed, removed, deleted or made illegible;
- Repairs have been executed by unauthorized repair workshops or persons who are not authorized to do so;
- The damage is the result of an external cause, such as re damage, water damage, transport damage, atmospheric discharges, insucient or improper maintenance;
- The device has been operated in another country than for which originally designed, approved, released and produced, as well as defects occurred as the result of such modicaons;
- The device has not been used according to the guidelines and direcons in the user manual supplied with the device.
Accessories and parts of the product that are susceptible to wear and tear are not included in this guarantee. Should you wish to reorder these, please visit www.trebs.nl
In the unlikely event your device is not funconing well or shows any defect, please contact your retailer. To avoid any inconvenience, we advise you to read the user manual carefully before contacting them.
Francais
natural_image
Two identical line drawings of a cylindrical mechanical device with a pointed tip and a curved handle, shown from different angles (no text or symbols)Fixaon du diuseur :
natural_image
Diagram showing a mechanical component being lifted by a tool, with no visible text or symbols.