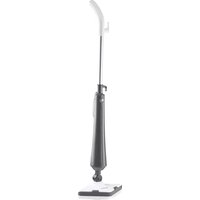
CSC5623M - Steam cleaner Montiss - Free user manual and instructions
Find the device manual for free CSC5623M Montiss in PDF.
| Product type | Steam cleaner |
| Brand | Montiss |
| Model | CSC5623M |
| Rated power | 1400 W |
| Maximum power | 1600 W |
| Rated voltage | 220-240 V~ |
| Rated frequency | 50 Hz |
| Tank capacity | 1 L |
| Heating time | Approximately 11 minutes |
| Protection | Thermostat, thermal fuse, automatic shut-off on overheat |
| Included accessories | Floor nozzle, floor brush, round brushes (plastic and metal), window squeegee, deflected jet nozzle, fabric nozzle, extensions, adapter, measuring cup, funnel |
| Safety | Child lock (zero volt system), pressurized tank |
| Use | Household |
| Maintenance | Cleaning with damp cloth; descaling by shaking water in tank |
| Warranty | 24 months |
Frequently Asked Questions - CSC5623M Montiss
User questions about CSC5623M Montiss
0 question about this device. Answer the ones you know or ask your own.
Ask a new question about this device
Download the instructions for your Steam cleaner in PDF format for free! Find your manual CSC5623M - Montiss and take your electronic device back in hand. On this page are published all the documents necessary for the use of your device. CSC5623M by Montiss.
USER MANUAL CSC5623M Montiss
Watertankisunderpressure.
Keepthebuttonpressedtoallowthesteamto
Pulltheplugfromthewallsocket.
Allowthedevicetocouldnforfiveminutes

Achtung:
Description of the parts 17
Safety instructions 17
Operation and function 19
seirosseccs 12
After use 24
Power cable winding-system 24
Cleaning and maintenance 25
Disposal of your old appliance 25
kathcet 52
Warranty 26
Warranty 72
INHALTSANGABE
ArticleNumber: CSC5623M
Articlelomschrijving: Montiss Heavy Duty Steam Cleaner
Winkel van aankoop:
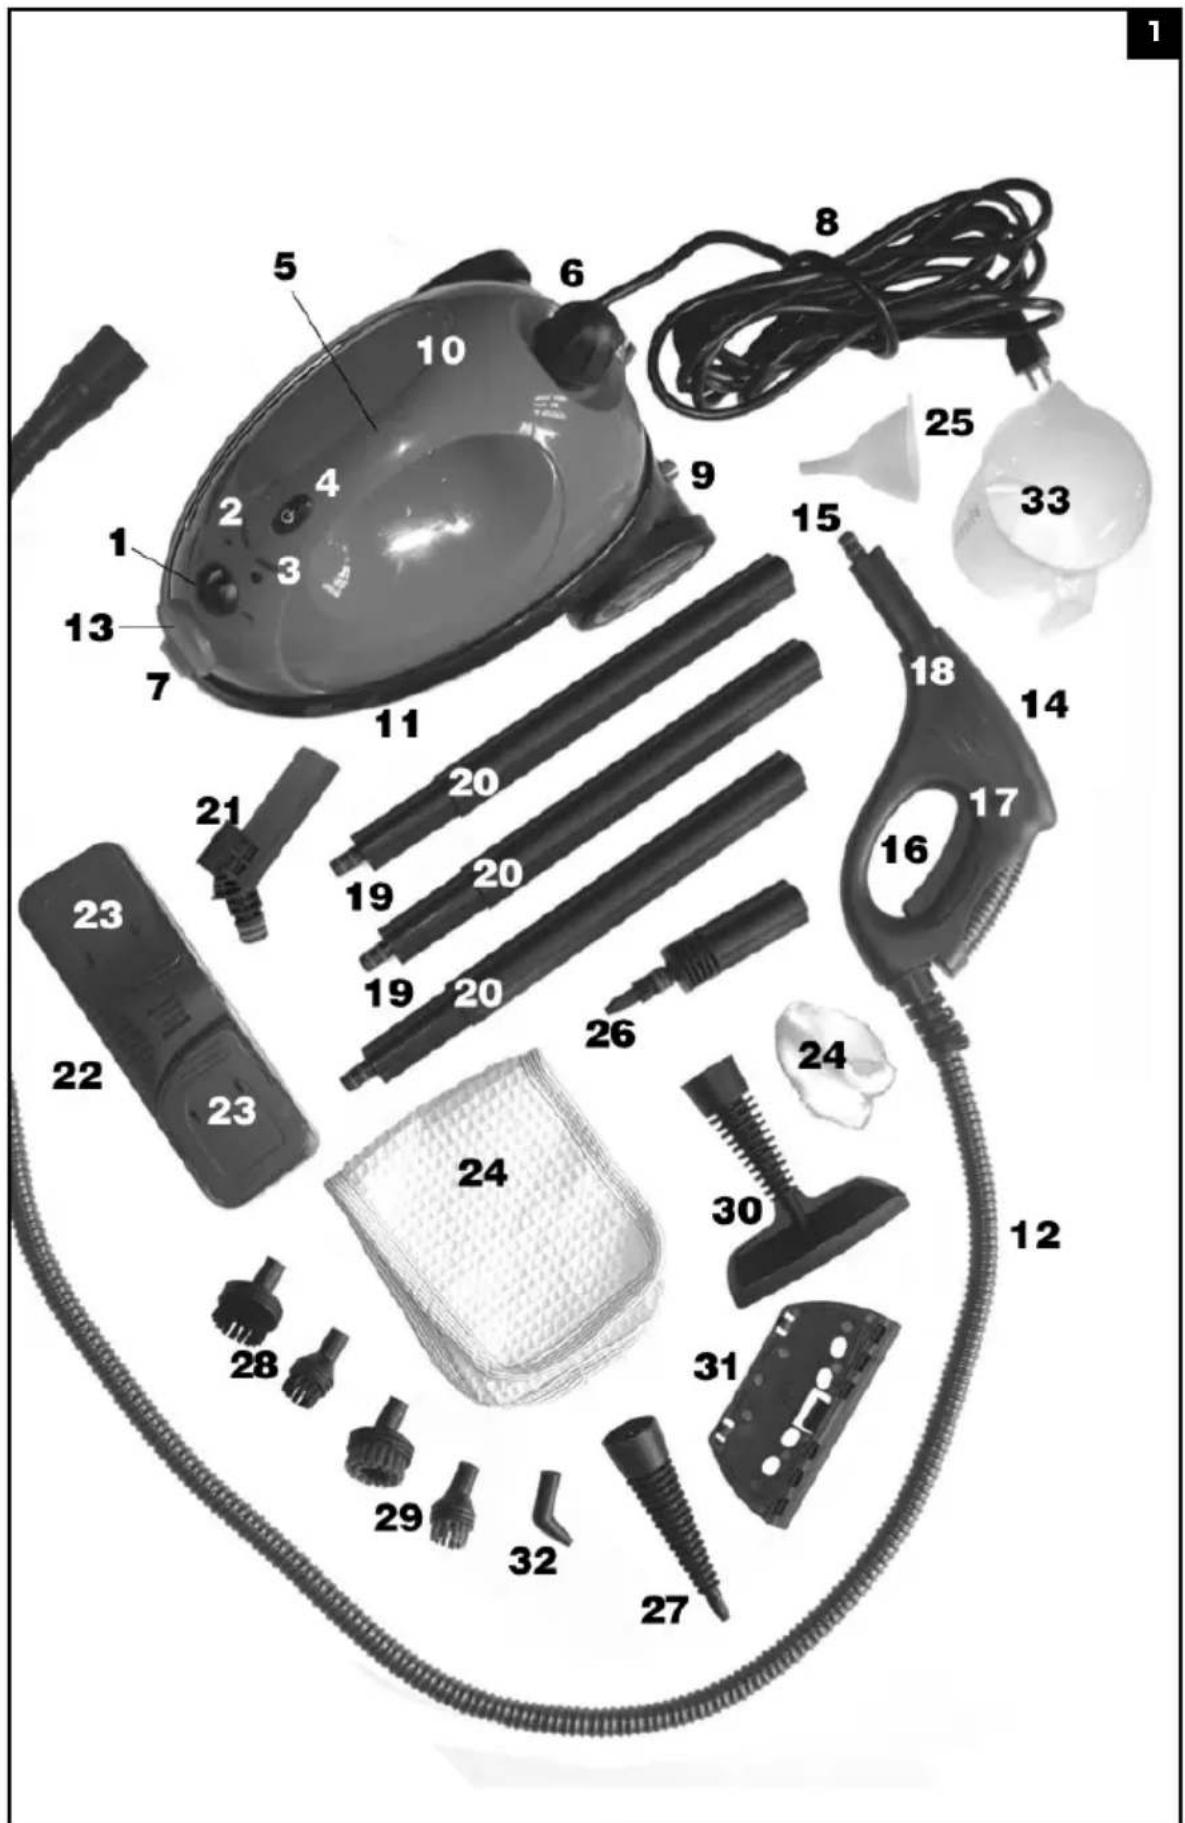
- Steam-output indicator
- Power indicator light (red)
- Steam ready light, (yellow)
- On/off switch
- Carrying handle
- Tank lid
- Canister latch
- Power cord and plug
- Storage button
- Steam tank
- Canister unit
- Steam hose
- Steam socket lid
- Steam gun
- Connection nozzle
- Steam trigger
- Safety Lock
- Attachment release button
- Extension tubes (3)
- Release buttons
- Floor head connection fitting
- Floor head
- Cloth clips
- Cleaning cloths - the large one fits the floor brush and the small one fits the 2-in-1 combination attachment for cleaning upholstery and clothing.
- Funnel
- Attachment adaptor
- Concentration nozzle
- Round brushes (plastic bristles)
- Round brush (metal bristles)
- 2-in-1 combination attachment
- Window attachment
- Jet nozzle attachment
- Measuring cup
SAFETY INSTRUCTIONS
- Before connecting the cleaner to the power supply, first check that the voltage specified on the rating label matches that of your power supply.
- Do not leave the appliance unattended when connected to the mains.
- Keep this appliance out of the reach of children. Close supervision is necessary when the appliance is near children. Never allow children to use this appliance.
- Store the cleaner safely out of reach of children.
- Never allow children to play with the plastic packaging.
-
The cleaner is equipped with a thermostat and a thermal safety device as protection against overheating.
-
Check the cleaner, power supply cable and accessories regularly for damage. Do not use this cleaner if it or its accessories have been damaged.
-
Do not attempt to repair the cleaner yourself.
-
Use only the original accessories.
-
Before replacing accessories, always switch off the cleaner and remove the plug from the socket.
-
The accessories will become hot during use - allow them to cool down before replacement.
-
The container is under pressure. The tank lid must not be opened during use.
-
The cleaner should not be tilted at an angle of more than 45^ during use.
-
Never immerse the cleaner in water or other fluids.
-
Ensure that the cleaner does not operate on an empty tank.
-
Never fill the tank with anything but cold water.
-
When refilling the tank with water, always switch off the cleaner and allow to cool down before unscrewing the lid.
-
Do not let the tank overflow. Never fill with more than the specified amount of water. Please use the measuring cup supplied with the cleaner.
-
Ensure that the lid of the water tank is firmly and properly closed, as described in these instructions.
-
Never fill the cleaner with products containing air fresheners, stain-remover or alcohol, since such materials will damage the cleaner or pose a danger to the user.
-
The housing will heat up during use - this is quite normal.
-
Carry the cleaner only by the handle.
-
Do not touch any hot parts of the cleaner.
-
Never attempt to clean clothes which are still being worn.
-
It is quite normal for water to drip from the nozzle occasionally. This is simply steam that has condensed back to water at the nozzle.
-
The force and heat of the steam may damage certain materials. Some fabrics may react to the temperature of the steam. For example: unpainted wood or leather can be bleached by the action of steam; glossy plastic can be dulled by steam; acrylic fibre, velvet and linen
-
Never direct the steam jet at other persons, animals, electrical equipment or power connections (e.g. into a refrigerator, oven pipes etc...).
-
Exposure to hot steam can cause scalding! Before opening the tank lid to refill the tank, release steam pressure by pressing the steam switch on the steam gun, or allow the cleaner to cool down completely.
-
DO NOT handle or operate steamer with wet hands and follow electrical safety precautions at all times, i.e., never operate without shoes.
-
DO NOT use without the tank lid in place.
Attention: before cleaning surfaces and textiles, first check whether these are suitable for steam cleaning. If you are not sure, carry out a test first on an inconspicuous area. Do not hold the steam concentrated on a single spot for too long.
Attention: the manufacturer accepts no liability for damage or injury to objects, materials, persons or animals as a result of improper use of steam or improper use of the cleaner. Please see the User Manual for recommendations.
Over-heating protection
The device is equipped with protection against overheating. The cleaner will switch-off automatically when the temperature becomes too high, in order to prevent over-heating. In this event, please remove the plug from the socket immediately. Allow the cleaner to cool down for 30 minutes before resuming work.
Filling the water tank (Illustration 2)
Always ensure that the plug of the unit is removed from the socket before filling or refilling the steam cleaner with water. Remove the lid of the water tank by pressing it down and turning anti-clockwise. Fill the tank with 1 litre of water using the funnel and measuring cup. Replace the lid and close it tightly by turning in the clockwise direction. The water tank should be emptied after use. Allow the inside of the water tank to dry before replacing the cover.
Refilling the water tank
If the water tank needs to be refilled during use, first switch the cleaner off and remove the plug from the socket. Before opening the tank cover, release the pressure by pressing the steam switch on the steam gun, or allow the cleaner to cool down completely. The water tank can then be refilled as follows. Remove the lid of the water tank by pressing it down and turning anti-clockwise. Fill the tank with 1 litre of water using the funnel and measuring cup. Replace the lid and close it tightly by turning in the clockwise direction.
Even after a cooling down period of 5 minutes, the remaining water in the tank and the tank lid will still be hot. Always take care when removing the tank lid, since hot steam may be emitted and the thread on the cover can still cause burns. The filter opening of the steam cleaner must never be opened during use (CONTAINER UNDER PRESSURE).
Attention: never fill the tank with anything but cold water. The use of any other fluids can be dangerous and can lead to damage of the heating element. The use of distilled water is recommended particularly in areas with hard water in order to prevent the build-up of scale. Otherwise, use boiled water in order to prolong the working life of the steam cleaner.
Power indicator light / On/Off switch
When the water tank has been filled, insert the plug into the socket. Switch the unit on by pressing the on/off switch to ON. The power indicator light (red) should light up to indicate the steam cleaner has power.
Steam Ready Light
The steam ready light (yellow) will come on. The operating temperature will be reached in about 11 minutes at which point the steam ready light switches off. The unit is now ready for use. In order to avoid injury, the steam cleaner should be switched off during breaks or pauses during work by pressing the on/off switch to OFF If you leave the room, please switch the cleaner off, and remove the plug from the socket (by pulling on the plug and not on the power supply cable).

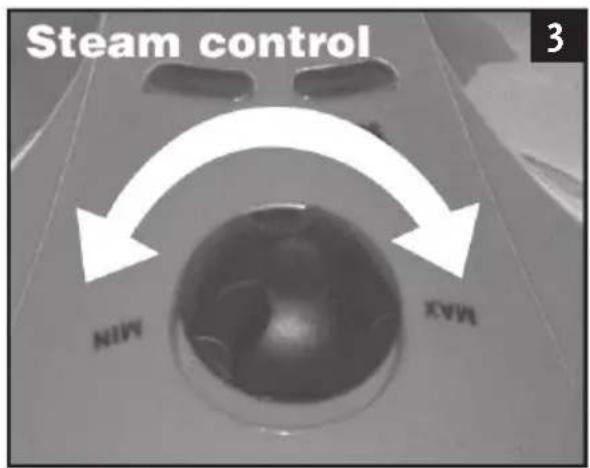

Steam-output indicator (Illustration 3)
With the steam-output indicator you can determine the steam emission. It is possible to set the output of steam between MIN (minimum); no steam and MAX (maximum).
Should no steam be emitted from the unit during use, then check:
-
The setting of the steam-output indicator.
-
If the unit has been switched on and has reached the selected temperature.
- If the steam output has been locked (see "Safety Lock")
- If all the connecting pieces have been properly assembled.
- If the steam hose has been properly attached to the unit.
Should the above-mentioned check not result to release of steam, please switch the device off and pull the plug from the wall socket. Let the device cool down completely and then check if there is water in the tank. If not, please fill the unit as described at the header "filling the water tank".
Should there be sufficient water in the tank, please start using the device once more. If there is still no steam coming from the unit, then please contact us.
USE OF ACCESSORIES
Steam Gun (Illustration 4)
Before you can start using the device, please ensure the steam hose has been connected to the unit correctly. You can also do this after you have fixed accessories to the steam gun. Pull down the lid of the steam socket at the front and insert the hose in a proper manner by lining up the 4 ridges. Push the two pieces well into each other.
The cleaner is ready for use when the yellow steam ready switches off. Ensure that the safety lock on the steam gun is off. When you press the trigger on the steam gun, steam will be emitted from the nozzle. Direct the steam gun at a cloth first, until the steam is emitted evenly. Now keep the trigger pressed, and direct the steam jet at the surface to be cleaned, removing the dirt by moving the steam jet to and fro over the surface. The steam jet will stop as soon as you release the steam trigger.
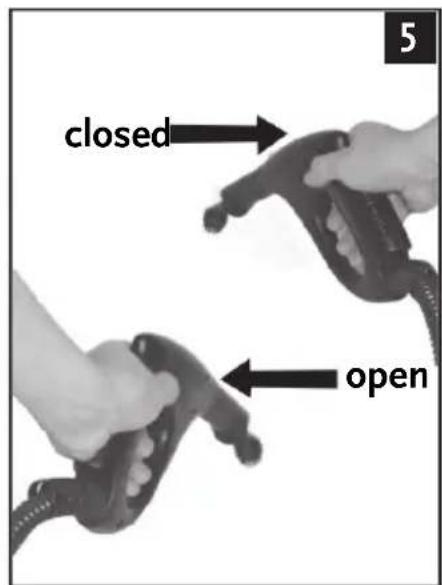
Safety Lock (Illustration 5)
When the safety lock is pushed to the forward position, the steam switch cannot be pressed. Push the lock to the rear position to release the steam switch.
In order to ensure safe use, even in case of accidental contact with liquids, the steam gun is isolated from the electrical power supply (zero-volt system).
When cleaning surfaces with the steam gun, wipe the surface dry afterward using a micro-fibre or cotton cloth if necessary; this will also remove any excess moisture for thorough cleaning. In order to control the steam output and cleaning power at the surface, move the steam gun closer to or further away from the surface. Do not hold the steam gun concentrated for too long on a single spot.
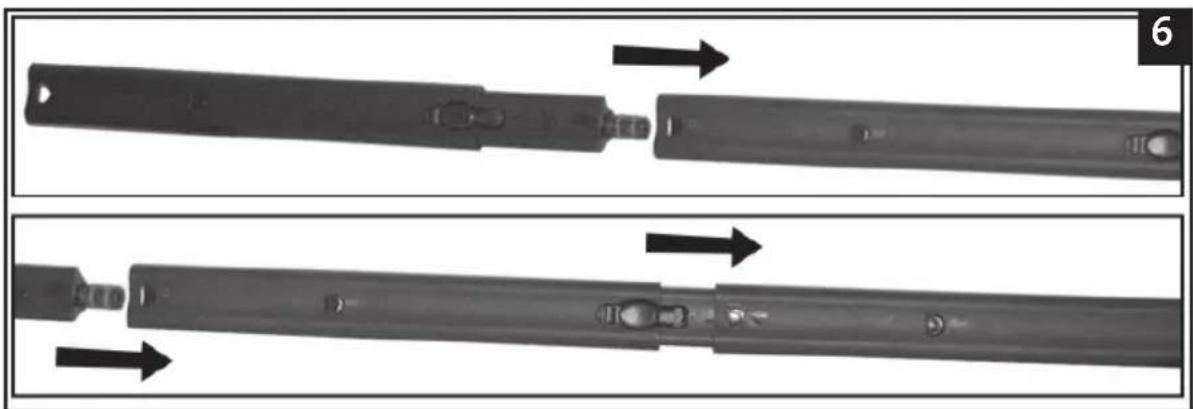
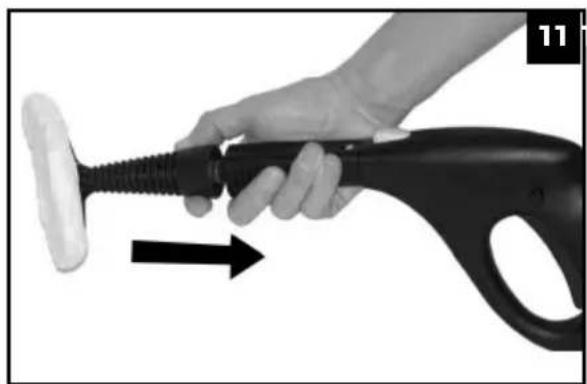
Extension tubes (Illustration 6)
Depending on the task in hand, you can fit one, two or three extension tubes. Push the extension tube onto the connection nozzle as far as it will go until you hear it click into place. Then attach the floor head.
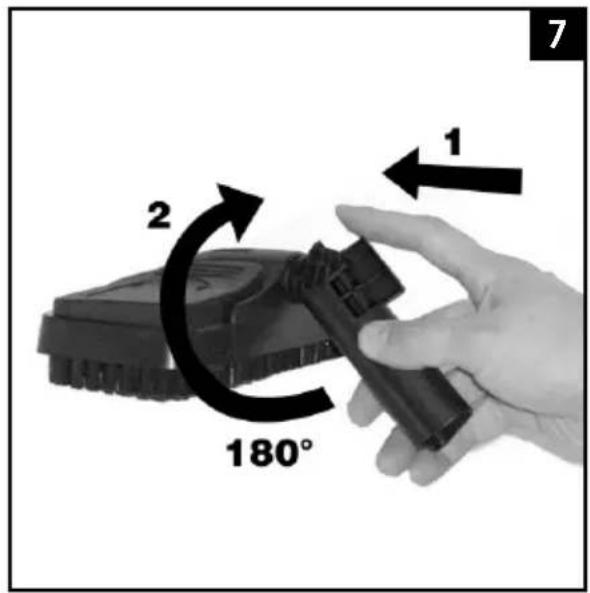

Floor Head
The floor head is supplied with a separate connection fitting. To use the floor head, push the connection fitting onto the rear side of the floor head and turn it 180 degrees upwards. This has to be done only once. The floor head is now fully assembled. (Illustration 7)
The floor head is used for the cleaning of large washable wall and floor areas. The floor head can be used either with or without a floor cloth.
Sensitive surfaces (wood, linoleum etc.) should always be cleaned using the cloth supplied. Place the floor head on the cleaning cloth and pull the cloth under the clips at both sides. The cleaning effect of a floor cloth can be improved by turning and changing the cloth regularly. To clean very dirty areas, move the floor head over the surface more slowly in order to increase the cleaning action of the steam.
Attention: the device is not suitable for cleaning unsealed wooden floors, soft plastics or wooden furniture.
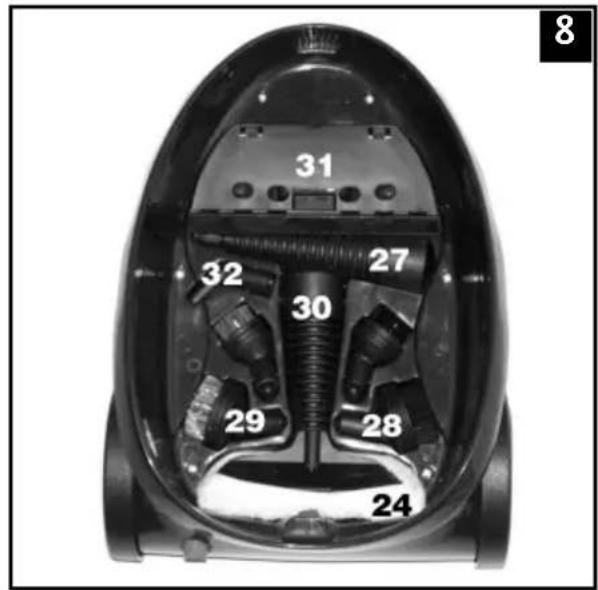
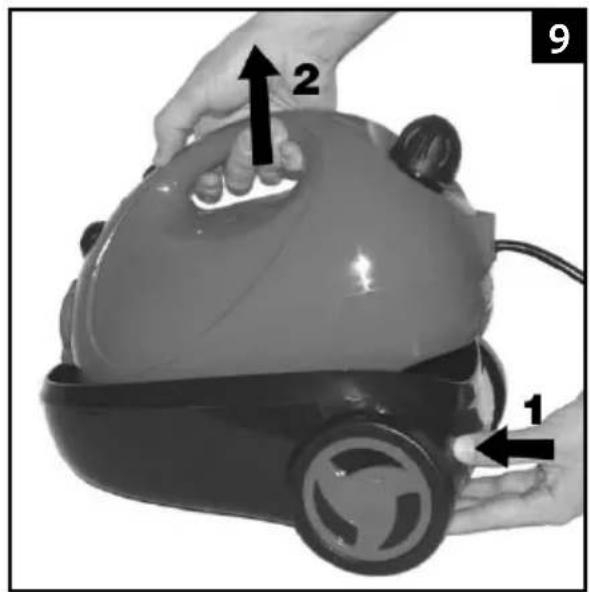
Integrated storage compartment (Illustration 8)
All the accessories are conveniently stored in the housing of the unit. To reach the accessories, you must place the unit on a flat surface. Lift the upper part of the unit, using the carrying handle, while you press the storage button with your other hand. To replace the upper part on to the device, place it straight on the bottom part and you press until it locks audibly. (Illustration 9)
Attachment adapter (Illustration 10)
Push the attachment adapter as far as it will go onto the connection nozzle of the steam gun until you hear it click. The attachment adapter remains locked in position. The attachment adapter can be removed again by pressing the release button and pulling the adapter off.
Concentration nozzle
The concentration nozzle is pushed directly onto the attachment adapter until it clicks into place. It can be used with various fittings (jet nozzle attachment, brush attachments, 2-in-1 combination attachment), depending on the task in hand The concentration nozzle can be used with various fittings for cleaning: inaccessible areas such as corners, joints, blinds, radiators, toilet bowls, taps, stainless steel, windows, mirrors, enameled surfaces, stain removal.
Jet nozzle attachment
The jet nozzle attachment can be fitted directly to the concentration nozzle. The jet nozzle attachment is fitted by pushing and twisting, and removed by pulling and twisting.
Brush attachment
The brush attachment can be fitted directly to the concentration nozzle. Choose the right brush attachment (plastic or metal bristles) for the task at hand. The brush attachment is fitted by pushing and twisting, and removed by pulling and twisting.
2-in-1 combination attachment
The rectangular shaped steam head can be fitted directly onto the concentration nozzle. The head is fitted by pushing and twisting and removed by pulling and twisting. It can be used either with or without the cotton cover, depending on cleaning requirements. It is perfect for the care and cleaning of cushions, carpets, car seats, bathrooms and kitchens.
Window attachment - Push the window attachment onto the head until you hear it click into place. You can now fit the window attachment to the concentration nozzle by pushing it into place, and remove it by pulling it off after the work has been completed. Perfect for cleaning windows, mirrors, ceramic tiles and surfaces and other non-porous, smooth surfaces. Apply the steam evenly to the glass surface from a distance of about 20 cm. Then switch the steam off and wipe the moisture off the glass from top to bottom in strips using the rubber squeezegee. Wipe the rubber squeezegee and the lower edge of the window dry after every strip.
Attention: glass surfaces can be shattered by the sudden application of excessive heat. Before cleaning such glass surfaces with the steam-cleaner, warm them up by applying steam to the surface from a distance of 20 - 25cm . Continue by applying steam from a distance of 10 - 15cm . Remove the plug from the socket before fitting or changing accessories. The accessories will become hot during use – allow them to cool down before replacement.
AFTER USE
Switch the cleaner off and remove the plug from the socket. Wait until the cleaner has cooled down completely. Empty the water tank. Allow the inside of the water tank to dry out before replacing the lid. Store the unit in a dry area safely out of the reach of children.
Attention: before opening the lid to empty the tank, release the steam pressure by pressing the steam trigger on the steam gun, or allow the cleaner to cool down completely.
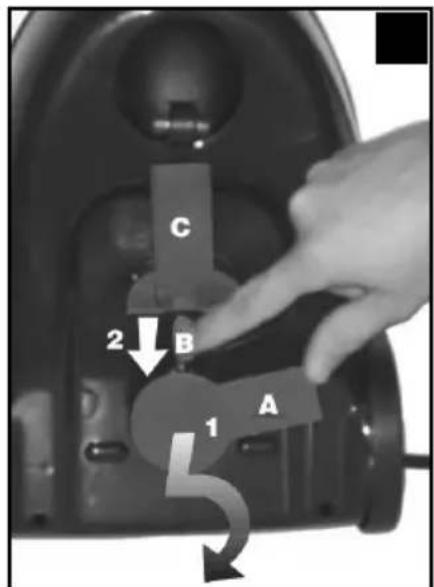
POWER CABLE WINDING-SYSTEM (Illustration 12)
located at the bottom of the device)
To wind up the power cable at the bottom of the device, you must press the middle of the round circle at the bottom of the device. (A) Then lift it up and turn it 180 degrees. Underneath you will notice a small lever. (B) Slide this down, in the direction of the wheels. (C) With both edges firmly in position you will be able to fully wind the power cord around this. To restore everything to the original state you repeat the above-mentioned steps in reverse order.
CLEANING AND MAINTENANCE
Rinsing out the water tank
To clean the water tank, we recommend that you fill it with water, close the cover and shake the unit vigorously. This will release any lime-scale deposits that have collected on the bottom of the tank. Pour the water out while holding the cleaner upside down to rinse out any scale deposits.
Descending
In order to grant your cleaner a long life you should descale your appliance once every six months. Fill the tank with 1L of 50^ hot water and ad one or two descaling tablets. Pour the water out after 30 minutes and rinse out any scale deposits.
Cleaning
Cleaning and maintenance work on the cleaner must only be carried out when the plug has been removed from the socket. Allow the steam cleaner to cool down completely before putting it away or carrying out any cleaning. Clean the steam-cleaner and accessories only with a slightly damp cloth.
DISPOSAL OF YOUR APPLIANCE:
- When this crossed-out wheeled bin symbol is attached to a product it means the product is covered by the European Directive 2002/96/EC.
- All electrical and electronic products should be disposed of separately from the municipal waste stream via designated collection facilities appointed by the government or the local authorities.
- The correct disposal of your appliance will help prevent potential negative consequences for the environment and human health.
- For more detailed information about disposal of your appliance, please contact your city office, waste disposal service or the shop where you purchased the product.

TECHNICAL DETAILS
Model number CSC5623M
Power 1400W nominal 1600W maximum
Voltage 220-240V
Frequency 50Hz
Max. capacity 1 litre
Montiss is a registered brand name of :
Van Den Berg Products BV
I|zerwerf10-12
6641 TK Beuringen
The Netherlands
www.vdbergproducts.com
WARRANTY
This warranty covers your unit for a period of 24 months from the date of purchase for service and replacement of parts, on the condition that you have used the machine correctly as described in the user manual. This warranty does not exclude national legislation that may exist in the country of purchase in regards to warranty regulations.
When you make a claim under this warranty, you must submit the original invoice or receipt with clear mention of the date of purchase, name of retailer and the description and model number of the appliance. You are advised to keep these documents in a safe place. Usual wear and tear is excluded from this guarantee. For the purchase of additional floor cloths, please visit www.mappa.nl.
This device is intended for domestic use only. Damage and / or malfunctions as the result of industrial or commercial use are excluded from the warranty.
The warranty for this appliances expires if:
-
The original invoice or receipt has in one way or another been changed or made illegible.
-
The model or serial number on the product has been changed, removed, deleted or made illegible.
-
Repairs have been executed by unauthorized repair workshops or persons who are not authorized to do so.
-
The damage is the result of an external cause, such as fire damage, water damage, transport damage, atmospheric discharges, insufficient or improper maintenance;
-
The appliance has been operated in another country than for which originally designed, approved, released and produced, as well as defects occurred as the result of such modifications.
-
The appliance has not been used according to the guidelines and directions in the user manual supplied with the product.
In the unlikely event your appliance is not functioning well or shows any defect, please contact your retailer. To avoid any inconvenience, we advise you to read the user manual carefully before contacting them.
WARRANTY
Please note we only accept warranties that have been filled out clearly and completely. Kindly check and ensure all details are filled out in the form below in order for use to attend to your complaint as soon as possible.
THE PRODUCT:
Article number: CSC5623M
Article description: Montiss Heavy Duty Steam Cleaner
Place of purchase:
Date of purchase (as per proof of purchase):
YOUR CONTACT DETAILS:
Name:
Address:
Postal code:
City:
Telephone:
E-mail:
DESCRIPTION OF THE PROBLEM
Please note we only accept warranties that have been filled out clearly and completely. Kindly check and ensure all details are filled out in the form below in order for use to attend to your complaint as soon as possible.
You can send this form, together with the proof of purchase, to:
Van den Berg Products BV
Afdeling Service
IJzerwerf 10-12
NL-6641 TK Beuningen
The Netherlands
Or fax it to: +31 24 - 345 44 29
Accessories and parts of the product that are susceptible to wear and tear are not included in this guarantee. Should you wish to reorder these, please visit www.muppa.nl.
PLEASE NOTE THAT ALL WARRANTYES NEED TO BE ACCOMPANIED BY A VALID PROOF OF PURCHASE IN ORDER TO BE CONSIDERED.
Vanden Berg Products BV
I|zerwerf10-12
6641 TK Beuringen
Niederlande
www.vdbergproducts.com
GARANTIEBEWEIS
ArticleNumber: CSC5623M