GHS48 - Projection screen Duronic - Free user manual and instructions
Find the device manual for free GHS48 Duronic in PDF.
| Product Type | Hydroponic Growing System |
| Brand | Duronic |
| Model | GHS48 |
| Number of Plants | 8 |
| Water Tank Capacity | 3.5 L |
| Dimensions (L × W × H) | 389 × 215 × 395 mm |
| Weight | 3.5 kg |
| Power Supply | Input 100-240 V~ 50/60 Hz, output 24 V |
| Power | 30 W |
| LED Light Type | Specific spectrum for plant growth |
| Light Cycles | Normal (14h on/10h off), Short (12h/12h), Long (16h/8h), Continuous 24h |
| Water Level Alarm | Yes, audible beep when level is low |
| Water Pump Included | Yes |
| Included Accessories | 8 seed kits (baskets and sponges), 2 nutrient bottles (A and B), adapter, pump, tool box |
| Operating Temperature | -15 °C to 55 °C |
| Maintenance and Cleaning | Unplug before cleaning; use a dry cloth; do not immerse |
| Safety | Indoor use only; avoid direct sunlight and humidity; do not repair yourself |
| Warranty | 1 year (Shine-Mart Ltd) |
| Spare Parts and Repairability | Contact Duronic customer service for spare parts |
| General Information | Imported by Shine-Mart Ltd, RM3 8SB; European plug with 3 A fuse |
Frequently Asked Questions - GHS48 Duronic
User questions about GHS48 Duronic
0 question about this device. Answer the ones you know or ask your own.
Ask a new question about this device
Download the instructions for your Projection screen in PDF format for free! Find your manual GHS48 - Duronic and take your electronic device back in hand. On this page are published all the documents necessary for the use of your device. GHS48 by Duronic.
USER MANUAL GHS48 Duronic
Creative Consumer Electronics
natural_image
Product setup of a plant food center with green leafy plants and a wooden control panel (no visible text or symbols on the plant itself)GHS48 - Grow Light Hydroponic System
PLEASE READ ALL THE INSTRUCTIONS BEFORE USE

duronic.com

duronic

@duronicmedia

Duronic

@duronicmedia
DURONIC
Contents
English Manual 5
PLEASE READ THIS MANUAL CAREFULLY AND RETAIN FOR FUTURE REFERENCE
- For indoor household/domestic use only. Do not use outdoors.
- Do not operate this appliance if the power cable or plug is damaged. If either is damaged return it to Duronic for service or repair by professional technician.
- Avoid placing the Hydroponic System in direct sunlight.
- Keep the light and electronic components away from moisture.
- If any water is spilled or splashed over any electrical part, thoroughly dry all cables and any parts that have gotten wet.
- When not using this grow box, store in a safe place. Do not place heavy things on top of it.
- Do not use in the presence of corrosive gas – use in a well-ventilated room.
- Please ensure the mains power supply is 220-240V / 50Hz.
- Never try to replace parts and repair the lamp by yourself.
- When adding or emptying water, ensure your hands are dry before attempting to reconnect the power adapter into the mains socket.
- Plant nutrient solution should be stored safely out of the reach of children.
- Do not consume the plant solution. If you accidentally consume some, please seek medical advice.
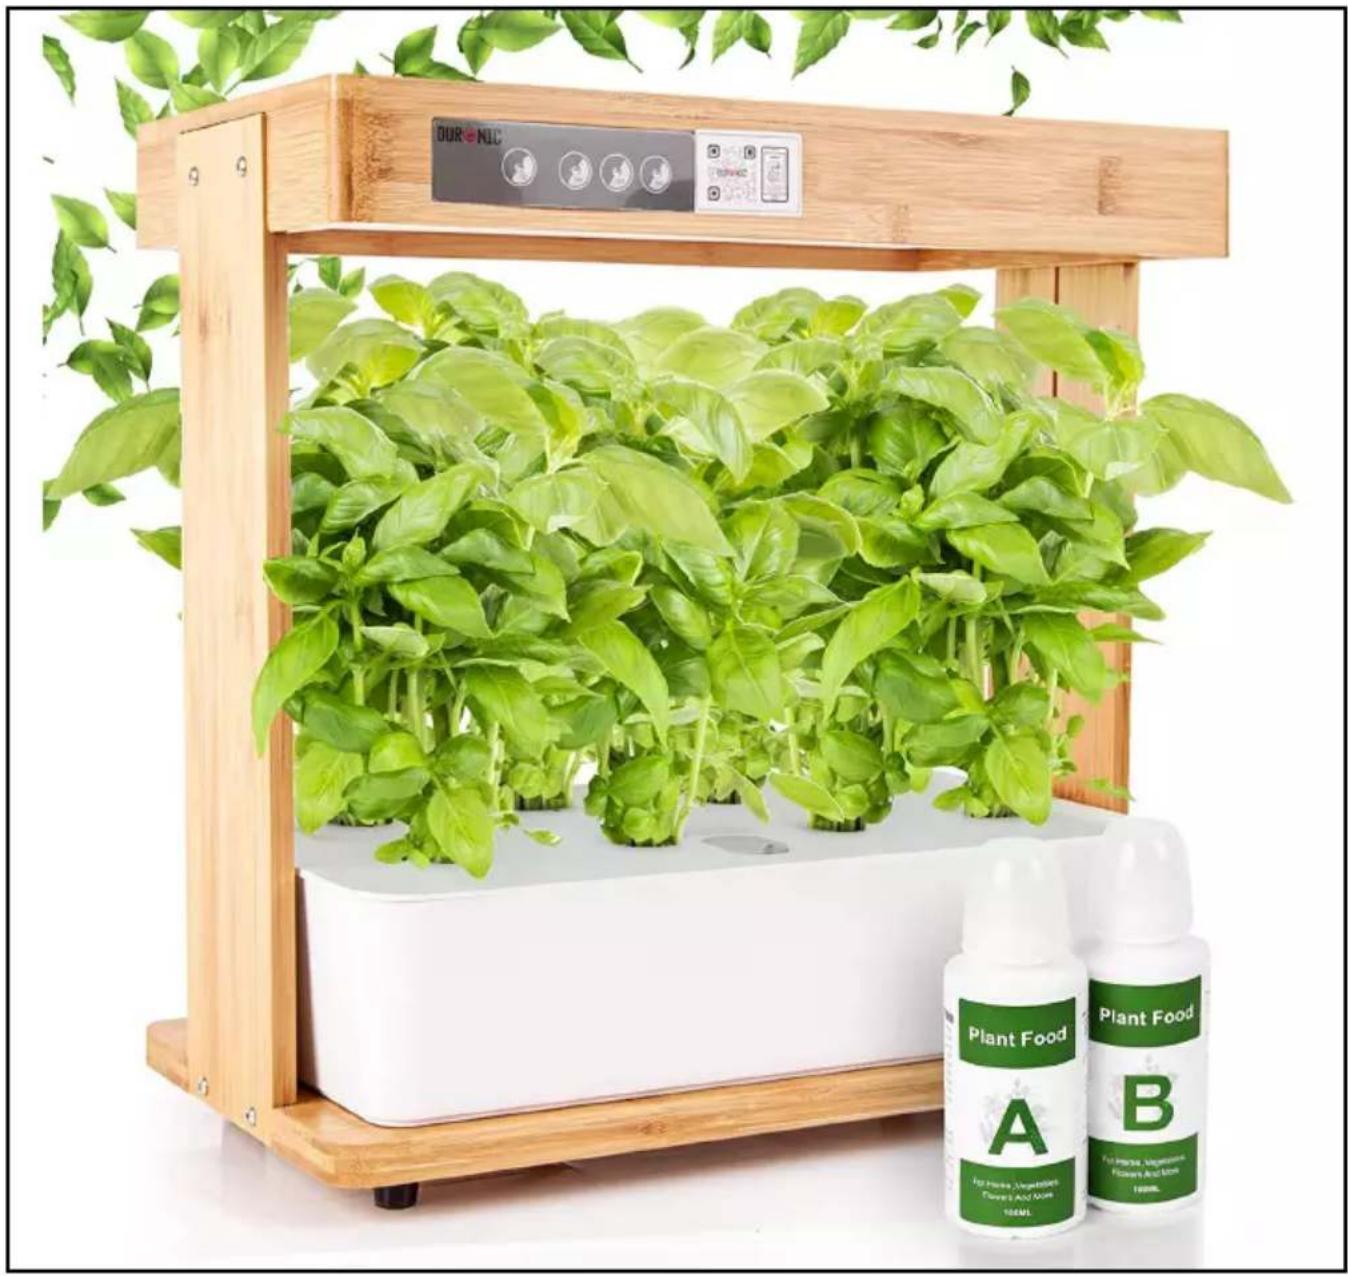
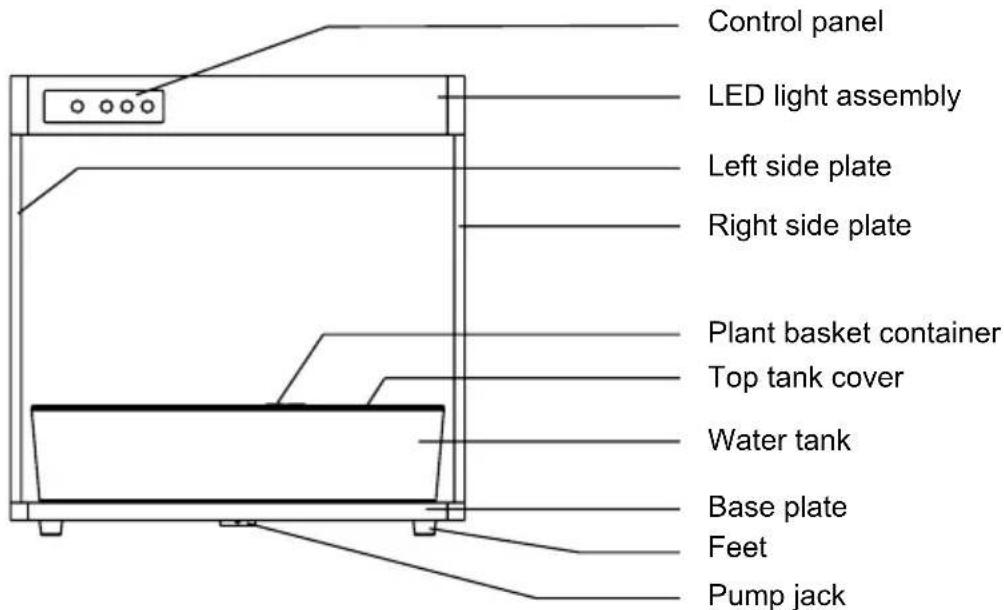
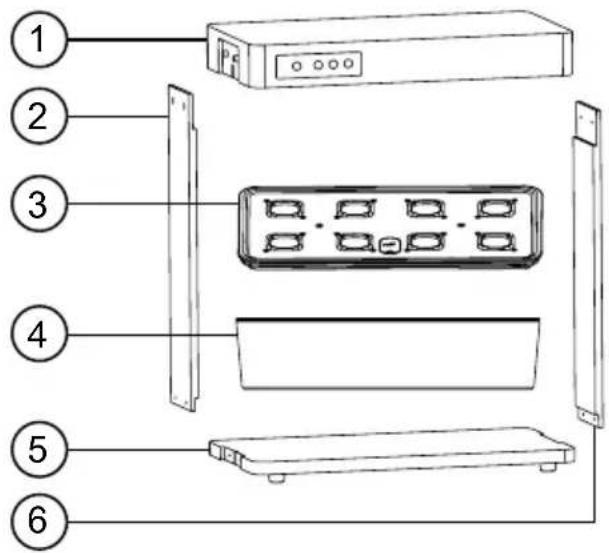
GHS48 Grow Box Components
Before using your grow box, please check that you have everything you need:

- LED light assembly
- Left side plate
- Top cover of tank
- Tank
- Baseplate
- Right side plate

1 power adapter, 1 water pump
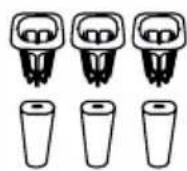
8x Seed pod kit (Baskets & Cones)
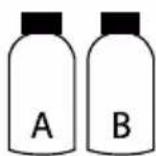
Two bottles of plant food: Nutrients A & Nutrients B

A tool pack
Specifications
| Model Number GHS48 | |
| Item Type Grow Light Hydroponic System | |
| Number of Plants 8 | |
| Water Tank Capacity 3.5L | |
| Rated Voltage Input: 100V-240V/50-60HZOutput: 24V | |
| Power 30W | |
| LED Light Specific Spectrum | |
| Dimensions 389×215×395 mm 15.31×8.46×15.55inch | |
| Weight 3.5kg | |
| Working Temperature -15°~ 55° | |
Key Prompts and What They Mean
- When the power adapter is plugged into the grow light system and switched on at the mains socket, the system will sound a long "beep" to indicate it is ready to work.
- After the machine runs for several days, the water level in the tank will naturally fall. When the water level is no longer sufficient for the plants to grow, the machine will sound a long "beep" to let you know. If this happens, please refill the tank to the correct amount. Once you have done this the alarm will automatically stop beeping.
- When the system is working normally with the light on, a shorter "beep" will sound when you press any button. If the mode is being changed, the light brightness will correspond accordingly.
-
If a button on the panel is pressed when the machine is turn on and the light is off, the machine will make a short "beep" sound. If it does not make a beep when a button is pressed, it is likely that the system is not switched on properly. If this occurs, try the following:
-
Check if the machine is connected to the mains power supply.
- If the machine is connected to power but in a dormant standby state, press the power button to test it. When the power button is pressed in the dormant state, the light will go off after 3 blinks.
Hydroponic System Components
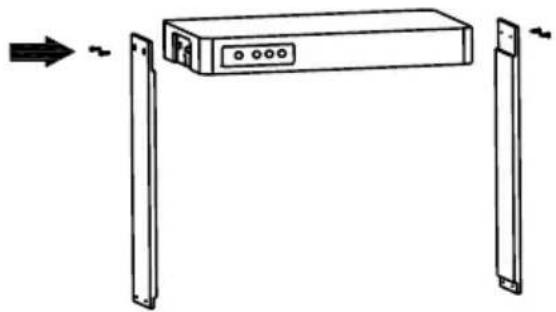
Set Up Instructions
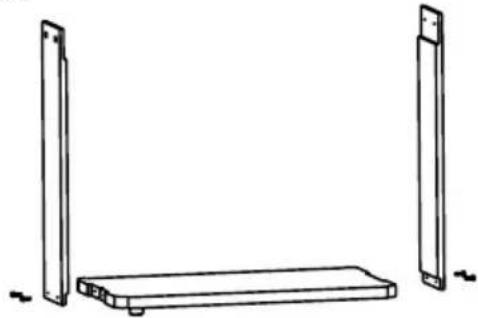
- Attach the two side panels by screwing them into the LED light assembly. Ensure that the panel with the groove on the inside is fixed on the left side (closest to control panel).
natural_image
Simple line drawing of a device with two vertical supports and an open box, no text or symbols present.- Place the base plate onto the bottom of the panels and secure in place with the screws. Make sure the black cable is in the right position. Then attach the feet to the base plate.

natural_image
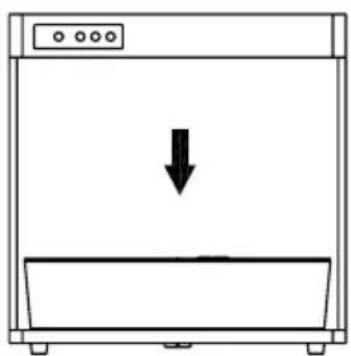
Simple line drawing of a rectangular shelf with two vertical supports, no text or symbols present- Turn the unit the correct way up and stand on a flat surface. Place the water tank on the unit.
natural_image
Simple line drawing of a kitchen appliance with a downward arrow indicating compression or cooling (no text or symbols)- Lay the LED light assembly upside down on a flat surface and plug in the black power cable into the jack. Then thread the black cable into the groove on the side panel towards the base.

natural_image
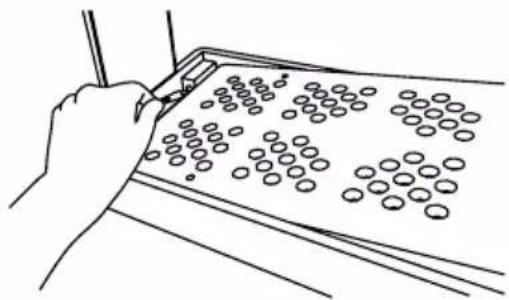
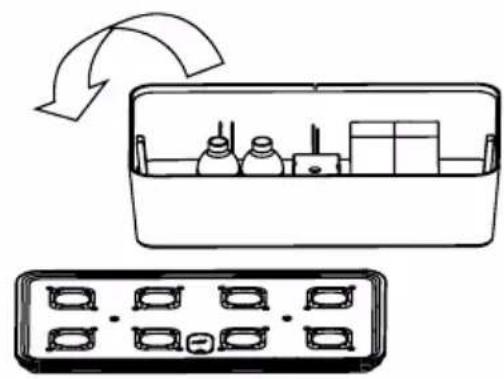
Line drawing of a hand using a pen to draw a grid of circular objects on a board (no text or symbols)- Prepare the water tank by opening up and taking out the accessories inside.

natural_image
Diagram showing a box with internal components and a separate grid-like device (no text or symbols)- Insert the white pump power cable into the base plate jack. Then plug in the power adapter into the LED assembly jack.

natural_image
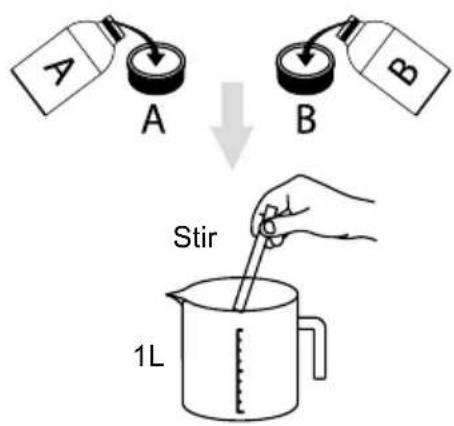
Line drawing of a hand inserting a device into a tray with a grid and cable (no text or symbols)Preparing the Nutrient Solution
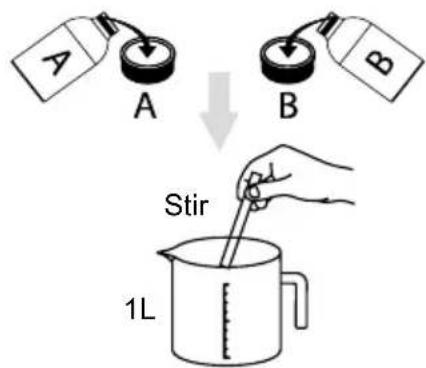
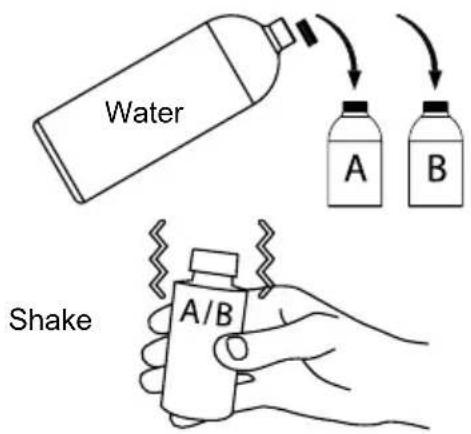
- Fill bottle 'A' with water, put the lid on and shake to fully mix the contents until fully dissolved. Repeat the same with bottle 'B'.

- Using the measuring caps, add 5ml of each solution to 1 litre of water. Stir or shake well to combine it all together.
Planting Instructions
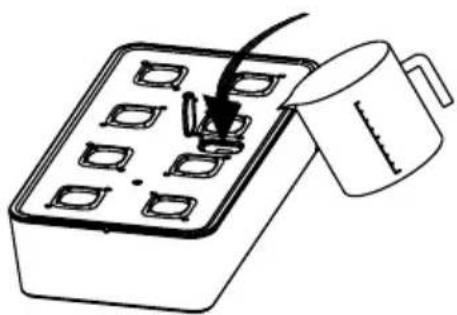
- Prepare the nutrient solution as shown above.
- Remove the grow box lid and pour the mixed solution into the plant pot. Place the plant pot lid back on top.
natural_image
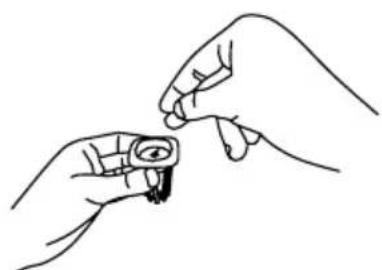
Simple line drawing of a container with internal compartments and a measuring cup (no text or symbols)- Soak the seeds in warm water for about an hour before planting. Place a sponge into each basket. Sow the seeds properly in each plant basket, then place the baskets into the spaces on the grow box lid.
natural_image
Line drawing of two hands holding a small object with an eye symbol (no text or symbols present)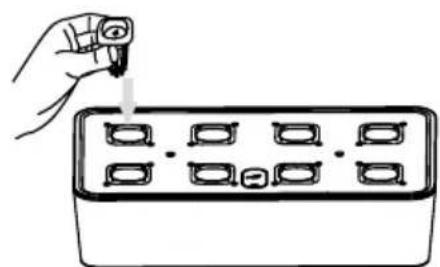
natural_image
Hand inserting a plug into a grid of six small components inside a rectangular container (no text or symbols)Using the Control Panel

Power button
Press this button it will sound a “beep” and the system will be switched on into ‘standby mode’.

NORMAL CYCLE: 14 hours on / 10 hours off
Press this button and the system will be switched on. It will sound a “beep” and run in ‘normal cycle’ mode. This means the LED light panel will light up for 14 hours. It will then switch off for 10 hours. The following day it will repeat this pattern: 14hrs on / 10hrs off.
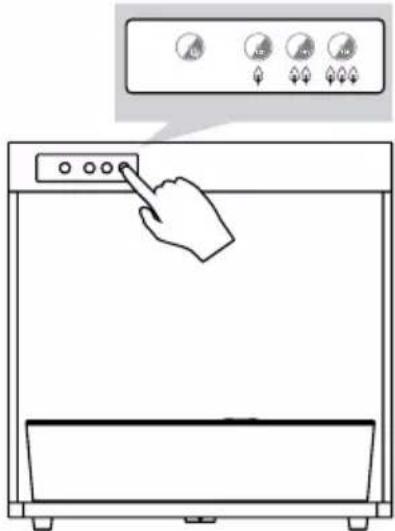

SHORT CYCLE: 12 hours on / 12 hours off
If you press this button, the system will sound a “beep” and enter the ‘short cycle’ mode. The LED panel on the top will reduce the intensity of the light and will start a cycle of 12 hours on / 12 hours off.

LONG CYCLE: 16 hours on / 8 hours off
If you press this button, the system will sound a “beep” and enter ‘long cycle’ mode. The LED panel on the top will increase the intensity of the light and will start a cycle of 16 hours on / 8 hours off.
24 Hour Light-On Setting
If you wish to keep the light working all day long (for a whole 24 hours), hold the power button down for 3 seconds.
The light will blink 3 times, then the whole system and lights will switch on and stay on for 24 hours. After this time elapses, the system will automatically revert back to ‘standby mode’.
If you activate this 24-hour light mode while the lamp is currently working, it will keep the lamp lit constantly until the end of the programmed cycle and then revert back to the mode you had been using previously.
Setting the Mode
From the moment the system is connected and switched on at the plug, the power button will luminate and the lamp will be in 'standby mode'.
When you select a mode, it will turn on the lamp and activate a 24-hour clock to coincide with the cycle of the mode you have chosen. Depending on the time you first selected the mode, this will be the same time that the light turns on every day thereafter.
For instance, if you select the ‘normal mode’ at 10am for the first use, the system will run the cycle of 14 hours lights on and then 10 hours lights off. It will then automatically turn back on at 10am the following day, and the cycle will continue for as long as desired until the unit is either turned off into ‘standby mode’ or switched off at the plug.
Care and Maintenance
Before cleaning ensure the lamp is unplugged from the mains socket.
Do not submerge this lamp in water or any other liquid. Do not use corrosive cleaning products on it.
To clean, simply use a dry cloth to dust and clean the lamp.
Storing the Nutrient Mixture
- The dry unmixed nutrient particles have a storage life of 2 years if kept in an unopened bottle in a cool dry place away from direct sunlight.
- The mixed nutrient mix (with water already added) has a storage life of 5 months if stored away from sunlight.
DURONIC
Warranty
1 Year Guarantee from Shine-Mart Ltd, Trademark owners of Duronic Products. NOTE: THESE STATEMENTS DO NOT AFFECT YOUR STATUTORY RIGHTS AS A CONSUMER
This product has been manufactured under the strictest or quality control procedures, and using the highest quality of materials, to ensure excellent performance and reliability. It will give very good and long lasting service, provided it is properly used and maintained. The product is guaranteed for 1 years from the date of original purchase. If any defect arises due to a faulty materials or poor workmanship, the faulty product must be returned to the original place of purchase. Refund or replacement is at the discretion of that company.
Duronic Products are offered with a 1 year guarantee under the following conditions:
- The product must be returned to the retailer with original proof of purchase.
- The product must be installed and used in accordance with the instructions contained in this operating manual.
- It must be used only for domestic purposes.
- It does not cover wear and tear, malicious damage, misuse, neglect, inexpert repairs or consumable parts.
- Shine-Mart Ltd has no responsibilities for accidental or consequential loss or damage.
- Shine-Mart Ltd are not liable to carry out any type of servicing work, under the guarantee
- Valid in the UK only
This product is fitted with CE:1363 plug and fuse Imported by Shine-Mart Ltd, RM3 8SB

Information on waste Disposal for Consumers of
Electrical & Electronic Equipment.
This mark on a product and/or accompanying documents indicates that when it is to be disposed of, it must be treated as Waste Electrical & Electronic Equipment, (WEEE).
Any WEEE marked products must not be mixed with general household waste, but kept separate for the treatment, recovery and recycling of the materials used.
For proper treatment, recovery and recycling; please take all WEEE marked waste to your Local Authority Civic waste site, where it will be accepted free of charge.
If customers dispose of Waste Electrical & Electronic Equipment correctly, they will be helping to save valuable resources and preventing any potential negative effects upon human health and the environment, of any hazardous materials that the waste may contain.
Follow Us

- Asslenthraièces
LED
natural_image
Simple line drawing of a device with two vertical supports and a rectangular box, no text or symbols present.natural_image
Line drawing of a rectangular shelf with two vertical supports and one horizontal shelf, no text or symbols present.natural_image
Simple line drawing of a kitchen appliance with a downward arrow indicating compression or cooling (no text or symbols)natural_image
Line drawing of a hand holding a pen writing on a sheet of circular objects (no text or symbols present)natural_image
Diagram showing a box with internal components and a separate panel with six slots, no text or symbols present.natural_image
Line drawing of a hand operating a 3D printer with a tray and cable (no text or symbols)Préparer la s nutritiveolution
natural_image
Simple line drawing of a container with square holes and a measuring cup pouring liquid (no text or symbols)natural_image
Line drawing of two hands holding a small object, possibly a tool or device, with no visible text or symbols.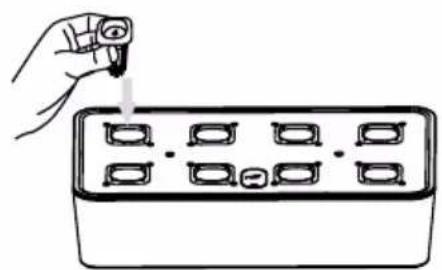
natural_image
Hand inserting a plug into a rectangular device with multiple ports (no text or symbols visible)DURONIC
natural_image
Simple line drawing of a device with two vertical supports and an open box, no text or symbols present.natural_image
Line drawing of a hand using a pen to draw a grid of circular objects on a board (no text or symbols)natural_image
Simple line drawing of two vertical supports with a horizontal base, no text or symbols presentnatural_image
Diagram showing a box with internal components and a separate grid-like device (no text or symbols)natural_image
Simple line drawing of a kitchen appliance with a downward arrow indicating compression or cooling (no text or symbols)natural_image
Line drawing of a hand inserting a component into a device with a grid panel (no text or symbols)natural_image
Simple line drawing of a container with internal compartments and a lid, no text or symbols presentnatural_image
Line drawing of two hands holding a small object with an eye symbol (no text or symbols present)
natural_image
Hand inserting a plug into a grid of six small components inside a rectangular container (no text or symbols)Systemsteuerung

Ein/Aus Schalter

natural_image
Simple line drawing of a device with two vertical supports and a rectangular box, no text or symbols present.natural_image
Line drawing of two vertical metal supports with a flat base, no text or symbols presentnatural_image
Simple line drawing of a kitchen appliance with a downward arrow indicating compression or cooling (no text or symbols)natural_image
Line drawing of a hand using a pen to draw circular objects on a board (no text or symbols)natural_image
Diagram showing a box with internal components and a separate grid of six rectangular units, no text or symbols present.natural_image
Line drawing of a hand inserting a device into a device with a grid panel (no text or symbols)natural_image
Simple line drawing of a container with slots and a measuring cup (no text or symbols)natural_image
Line drawing of two hands holding a small object with an eye symbol (no text or symbols present)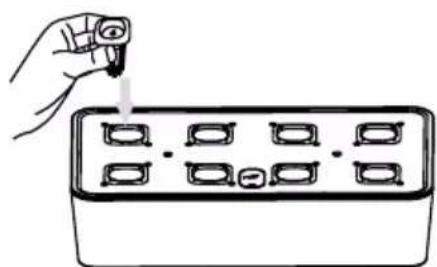
natural_image
Hand inserting a small object into a rectangular tray with six small square indentations (no text or symbols)DURONIC
Panel de control

Botón de encendido
Ajustar los ciclos
natural_image
Technical line drawing of a mechanical device with no visible text or symbolsnatural_image
Simple line drawing of a device with two vertical supports and an open box, no text or symbols present.natural_image
Simple line drawing of two vertical supports with a horizontal base, no text or symbols presentnatural_image
Simple line drawing of a kitchen appliance with a downward arrow indicating compression or cooling (no text or symbols)natural_image
Line drawing of a hand using a pen to draw circular indentations on a board (no text or symbols)natural_image
Diagram showing a box with internal components and a separate grid-like device (no text or symbols)natural_image
Line drawing of a hand inserting a device into a tray with a small component (no text or symbols)natural_image
Simple line drawing of a container with internal compartments and a measuring cup (no text or symbols)natural_image
Line drawing of two hands holding a small object with an eye symbol (no text or symbols present)
natural_image
Hand inserting a plug into a grid of six small components inside a rectangular container (no text or symbols)
CICLO CORTO: 12 ore on / 12 ore off
natural_image
Simple line drawing of a device with two vertical supports and an open box, no text or symbols present.natural_image
Simple line drawing of a rectangular shelf with two vertical supports (no text or symbols)natural_image
Simple line drawing of a kitchen appliance with a downward arrow indicating compression or cooling (no text or symbols)natural_image
Line drawing of a hand using a pen to draw circular objects on a board (no text or symbols)natural_image
Diagram showing a box with internal components and a separate grid of six rectangular units, no text or symbols present.natural_image
Line drawing of a hand inserting a device into a tray with a battery (no text or symbols)- Prepare the nutrient solution as shown above.

natural_image
Simple line drawing of a container with internal compartments and a measuring cup (no text or symbols)natural_image
Line drawing of two hands holding a small object, possibly a tool or device, with no visible text or symbols.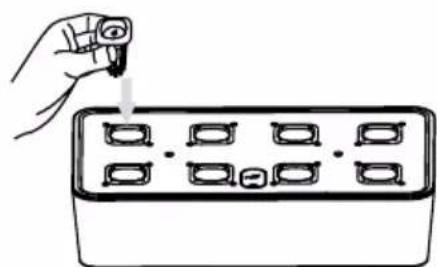
natural_image
Hand inserting a small component into a grid of six small rectangular objects (no text or symbols visible)
PLEASE READ THIS MANUAL CAREFULLY AND RETAIN FOR FUTURE REFERENCE
- For indoor household/domestic use only. Do not use outdoors.
- Do not operate this appliance if the power cable or plug is damaged. If either is damaged return it to Duronic for service or repair by professional technician.
- Avoid placing the Hydroponic System in direct sunlight.
- Keep the light and electronic components away from moisture.
- If any water is spilled or splashed over any electrical part, thoroughly dry all cables and any parts that have gotten wet.
- When not using this grow box, store in a safe place. Do not place heavy things on top of it.
- Do not use in the presence of corrosive gas – use in a well-ventilated room.
- Please ensure the mains power supply is 220-240V / 50Hz.
- Never try to replace parts and repair the lamp by yourself.
- When adding or emptying water, ensure your hands are dry before attempting to reconnect the power adapter into the mains socket.
- Plant nutrient solution should be stored safely out of the reach of children.
- Do not consume the plant solution. If you accidentally consume some, please seek medical advice.
GHS48 Grow Box Components
Before using your grow box, please check that you have everything you need:
- LED light assembly
- Left side plate
- Top cover of tank
- Tank
- Baseplate
- Right side plate
1 power adapter, 1 water pump

8x Seed pod kit (Baskets & Cones)

Two bottles of plant food: Nutrients A & Nutrients B

A tool pack
Specifications
| Model Number GHS48 | |
| Item Type Grow Light Hydroponic System | |
| Number of Plants 8 | |
| Water Tank Capacity 3.5L | |
| Rated Voltage Input: 100V-240V/50-60HZOutput: 24V | |
| Power 30W | |
| LED Light Specific Spectrum | |
| Dimensions 389×215×395 mm 15.31×8.46×15.55inch | |
| Weight 3.5kg | |
| Working Temperature -15°~ 55° | |
Key Prompts and What They Mean
- When the power adapter is plugged into the grow light system and switched on at the mains socket, the system will sound a long "beep" to indicate it is ready to work.
- After the machine runs for several days, the water level in the tank will naturally fall. When the water level is no longer sufficient for the plants to grow, the machine will sound a long "beep" to let you know. If this happens, please refill the tank to the correct amount. Once you have done this the alarm will automatically stop beeping.
- When the system is working normally with the light on, a shorter "beep" will sound when you press any button. If the mode is being changed, the light brightness will correspond accordingly.
- If a button on the panel is pressed when the machine is turn on and the light is off, the machine will make a short "beep" sound. If it does not make a beep when a button is pressed, it is likely that the system is not switched on properly. If this occurs, try the following:
- Check if the machine is connected to the mains power supply.
- If the machine is connected to power but in a dormant standby state, press the power button to test it. When the power button is pressed in the dormant state, the light will go off after 3 blinks.
Hydroponic System Components

Set Up Instructions
- Attach the two side panels by screwing them into the LED light assembly. Ensure that the panel with the groove on the inside is fixed on the left side (closest to control panel).

natural_image
Simple line drawing of a device with two vertical supports and an open box, no text or symbols present.- Place the base plate onto the bottom of the panels and secure in place with the screws. Make sure the black cable is in the right position. Then attach the feet to the base plate.
natural_image
Simple line drawing of a rectangular shelf with two vertical supports, no text or symbols present- Turn the unit the correct way up and stand on a flat surface. Place the water tank on the unit.

natural_image
Simple line drawing of a kitchen appliance with a downward arrow indicating compression or cooling (no text or symbols)- Lay the LED light assembly upside down on a flat surface and plug in the black power cable into the jack. Then thread the black cable into the groove on the side panel towards the base.
natural_image
Line drawing of a hand using a pen to draw a grid of circular objects on a board (no text or symbols)- Prepare the water tank by opening up and taking out the accessories inside.
natural_image
Diagram showing a box with internal components and a separate grid-like device (no text or symbols)- Insert the white pump power cable into the base plate jack. Then plug in the power adapter into the LED assembly jack.

natural_image
Line drawing of a hand inserting a device into a tray with a grid and cable (no text or symbols)Preparing the Nutrient Solution
- Fill bottle 'A' with water, put the lid on and shake to fully mix the contents until fully dissolved. Repeat the same with bottle 'B'.
- Using the measuring caps, add 5ml of each solution to 1 litre of water. Stir or shake well to combine it all together.

Planting Instructions
- Prepare the nutrient solution as shown above.

- Remove the grow box lid and pour the mixed solution into the plant pot. Place the plant pot lid back on top.

natural_image
Simple line drawing of a container with internal compartments and a measuring cup (no text or symbols)- Soak the seeds in warm water for about an hour before planting. Place a sponge into each basket. Sow the seeds properly in each plant basket, then place the baskets into the spaces on the grow box lid.

natural_image
Line drawing of two hands holding a small object with an eye symbol (no text or symbols present)
natural_image
Hand inserting a plug into a grid of six small components (no text or symbols visible)Using the Control Panel

Power button
Press this button it will sound a "beep" and the system will be switched on into 'standby mode'.

NORMAL CYCLE: 14 hours on / 10 hours off
Press this button and the system will be switched on. It will sound a "beep" and run in 'normal cycle' mode. This means the LED light panel will light up for 14 hours. It will then switch off for 10 hours. The following day it will repeat this pattern: 14hrs on / 10hrs off.


SHORT CYCLE: 12 hours on / 12 hours off
If you press this button, the system will sound a “beep” and enter the ‘short cycle’ mode. The LED panel on the top will reduce the intensity of the light and will start a cycle of 12 hours on / 12 hours off.

LONG CYCLE: 16 hours on / 8 hours off
If you press this button, the system will sound a “beep” and enter ‘long cycle’ mode. The LED panel on the top will increase the intensity of the light and will start a cycle of 16 hours on / 8 hours off.
24 Hour Light-On Setting
If you wish to keep the light working all day long (for a whole 24 hours), hold the power button down for 3 seconds.
The light will blink 3 times, then the whole system and lights will switch on and stay on for 24 hours. After this time elapses, the system will automatically revert back to ‘standby mode’.
If you activate this 24-hour light mode while the lamp is currently working, it will keep the lamp lit constantly until the end of the programmed cycle and then revert back to the mode you had been using previously.
Setting the Mode
From the moment the system is connected and switched on at the plug, the power button will luminate and the lamp will be in 'standby mode'.
When you select a mode, it will turn on the lamp and activate a 24-hour clock to coincide with the cycle of the mode you have chosen. Depending on the time you first selected the mode, this will be the same time that the light turns on every day thereafter.
For instance, if you select the ‘normal mode’ at 10am for the first use, the system will run the cycle of 14 hours lights on and then 10 hours lights off. It will then automatically turn back on at 10am the following day, and the cycle will continue for as long as desired until the unit is either turned off into ‘standby mode’ or switched off at the plug.
Care and Maintenance
Before cleaning ensure the lamp is unplugged from the mains socket.
Do not submerge this lamp in water or any other liquid. Do not use corrosive cleaning products on it.
To clean, simply use a dry cloth to dust and clean the lamp.
Storing the Nutrient Mixture
- The dry unmixed nutrient particles have a storage life of 2 years if kept in an unopened bottle in a cool dry place away from direct sunlight.
- The mixed nutrient mix (with water already added) has a storage life of 5 months if stored away from sunlight.
DURONIC
GARANTI BELGESI
natural_image
Technical line drawing of a mechanical device with no visible text or symbolsInvoerpaneel
Led lamp installatie
natural_image
Simple line drawing of a device with two vertical supports and an open box, no text or symbols present.natural_image
Simple line drawing of two vertical supports with a horizontal base, no text or symbols presentnatural_image
Simple line drawing of a kitchen appliance with a downward arrow indicating compression or cooling (no text or symbols)natural_image
Line drawing of a hand using a pen to draw a tray with circular objects (no text or symbols)natural_image
Diagram showing a box with internal components and a separate grid-like device (no text or symbols)natural_image
Line drawing of a hand inserting a device into a tray with a small component (no text or symbols)natural_image
Line drawing of two hands holding a small object with an eye symbol (no text or symbols present)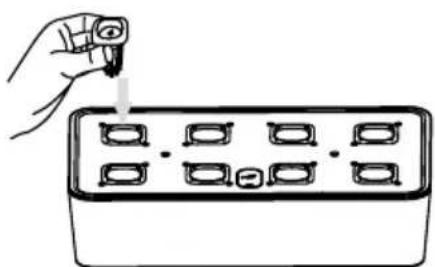
natural_image
Hand inserting a small object into a rectangular tray with six compartments (no text or symbols)