VC24 - Vacuum Cleaner Duronic - Free user manual and instructions
Find the device manual for free VC24 Duronic in PDF.
| Product type | Stick / handheld cordless vacuum |
| Brand | Duronic |
| Model | VC24 |
| Dimensions | 37.5 x 15 x 20 cm |
| Weight | 2.5 kg |
| Dust container capacity | 0.8 L |
| Charging cable length | 120 cm |
| Power | 220 W |
| Voltage | 220-240 V |
| Energy class | A |
| Battery type | Rechargeable lithium-ion 25.9 V / 2200 mAh |
| Battery capacity | 56.98 Wh |
| Charging time | 4.5 hours |
| Number of speeds | 3 (low, medium, high) |
| Suction pressure (max.) | 24 kPa |
| Airflow | 22 dm³/s |
| Noise level (max.) | 78 dB |
| Filters | Washable HEPA filter + mesh filter |
| Motorized brush roller | Removable and washable |
| Included accessories | Crevice tool, small brush, cleaning tool, wall mount |
| Battery indicator | Yes (percentage) |
| Obstruction indicator | Yes |
| Usage | Indoor domestic use only |
| Warranty | 1 year |
| Replaceable parts | Battery, filters, brush roller |
Frequently Asked Questions - VC24 Duronic
User questions about VC24 Duronic
0 question about this device. Answer the ones you know or ask your own.
Ask a new question about this device
Download the instructions for your Vacuum Cleaner in PDF format for free! Find your manual VC24 - Duronic and take your electronic device back in hand. On this page are published all the documents necessary for the use of your device. VC24 by Duronic.
USER MANUAL VC24 Duronic
Creative Consumer Products
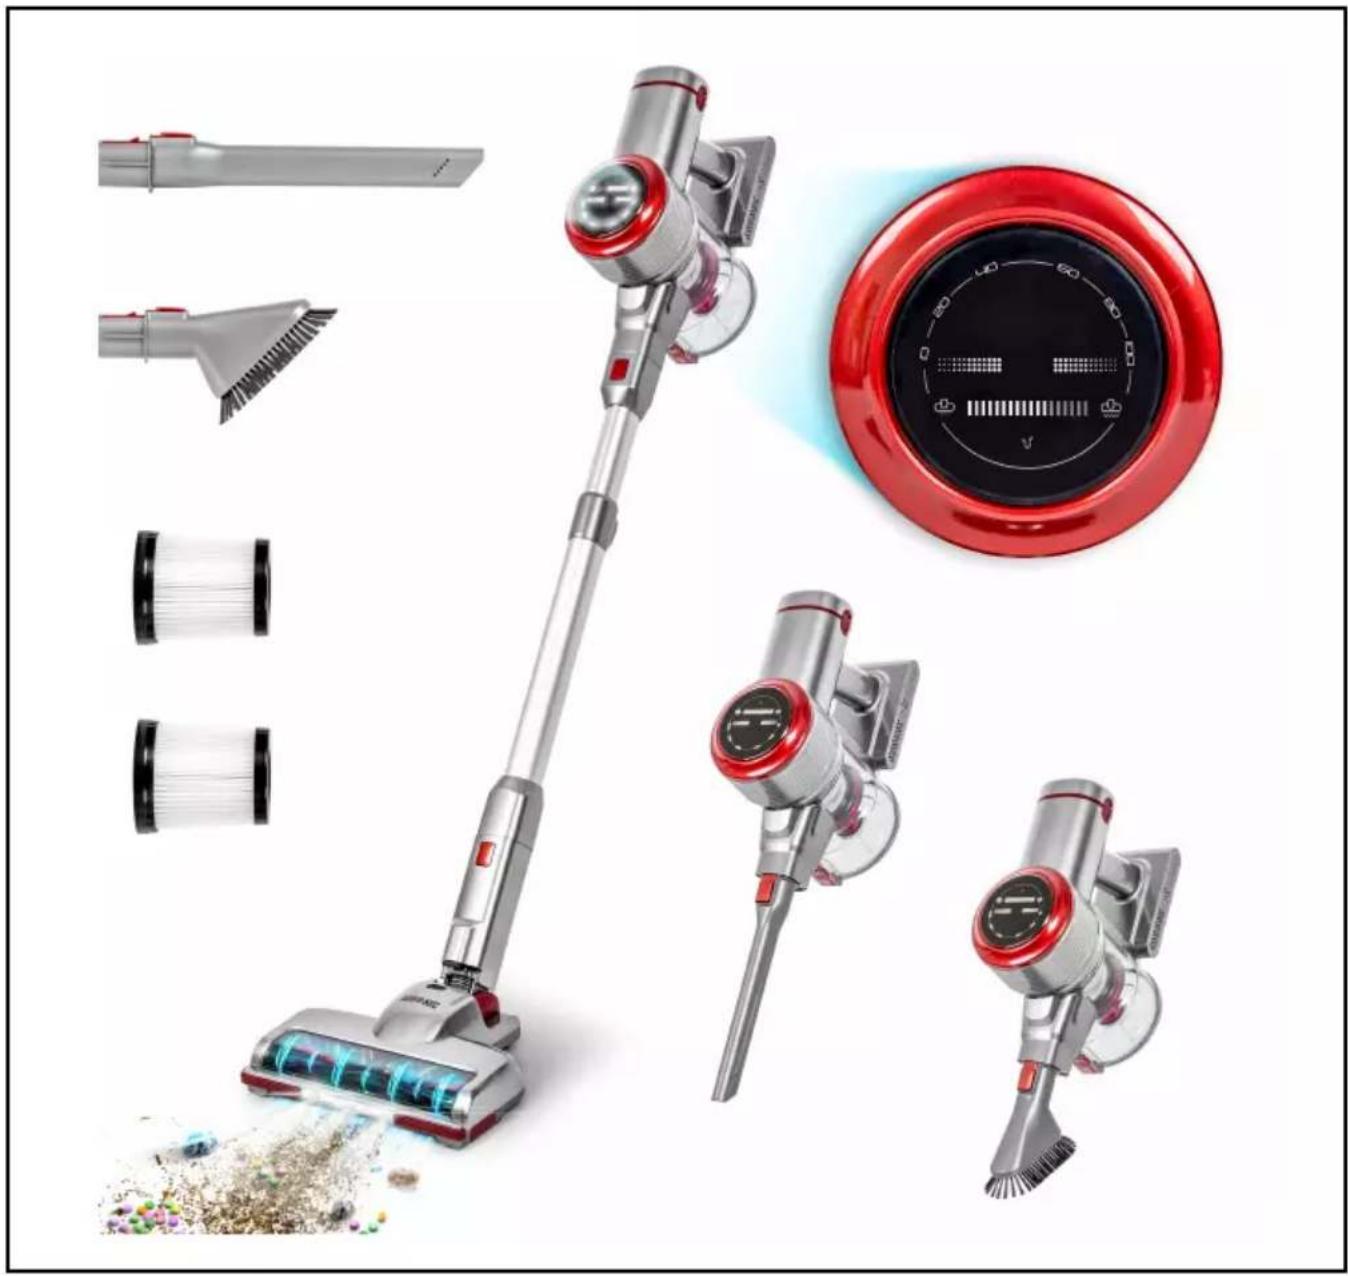
natural_image
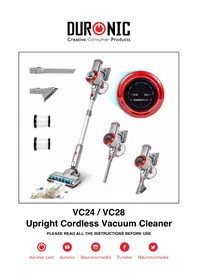
Product lineup of a red and silver RV air cleaner with attached fan, showing external tools and component details (no text or symbols visible)VC24 / VC28
Upright Cordless Vacuum Cleaner
PLEASE READ ALL THE INSTRUCTIONS BEFORE USE

duronic.com

duronic

@duronicmedia

Duronic

@duronicmedia
Contents
English Manual 3
Features and Specifications
| Model Number | VC24 (vacuum + 1 battery pack) |
| VC28 (vacuum + 2 battery packs) | |
| VC2SB (spare battery pack) | |
| Dimensions 37.5x15x20cm | |
| Weight | 2.5kg |
| Dust Container Capacity | 0.8L |
| Cable Length 120cm/47in | |
| Power 220W | |
| Voltage 220-240V | |
| Energy Rating A | |
| Battery 25.9V/2200mAh | |
| Charging Period 4.5 hours | |
| Input 31V/500mA | |
| RPM 80000 RPM | |
| Vacuum Pressure | 24kpa (high speed)18kpa (mid speed)7kpa (low speed) |
| Airflow 22dm3/s | |
| Decibels | 78db (high speed)74db (mid speed)72db (low speed) |
| Speed Settings 3 speeds | |
| Battery Pack Information | |
| Size H 61mm, ø18.55 | |
| Weight 315g (45.0g/cell) | |
| No. of Cells 7 | |
| Watt Hours | 56.98Wh (8.14Wh/cell) |
| Lithium Content | 94.5g (13.5g/cell) |
DURONIC
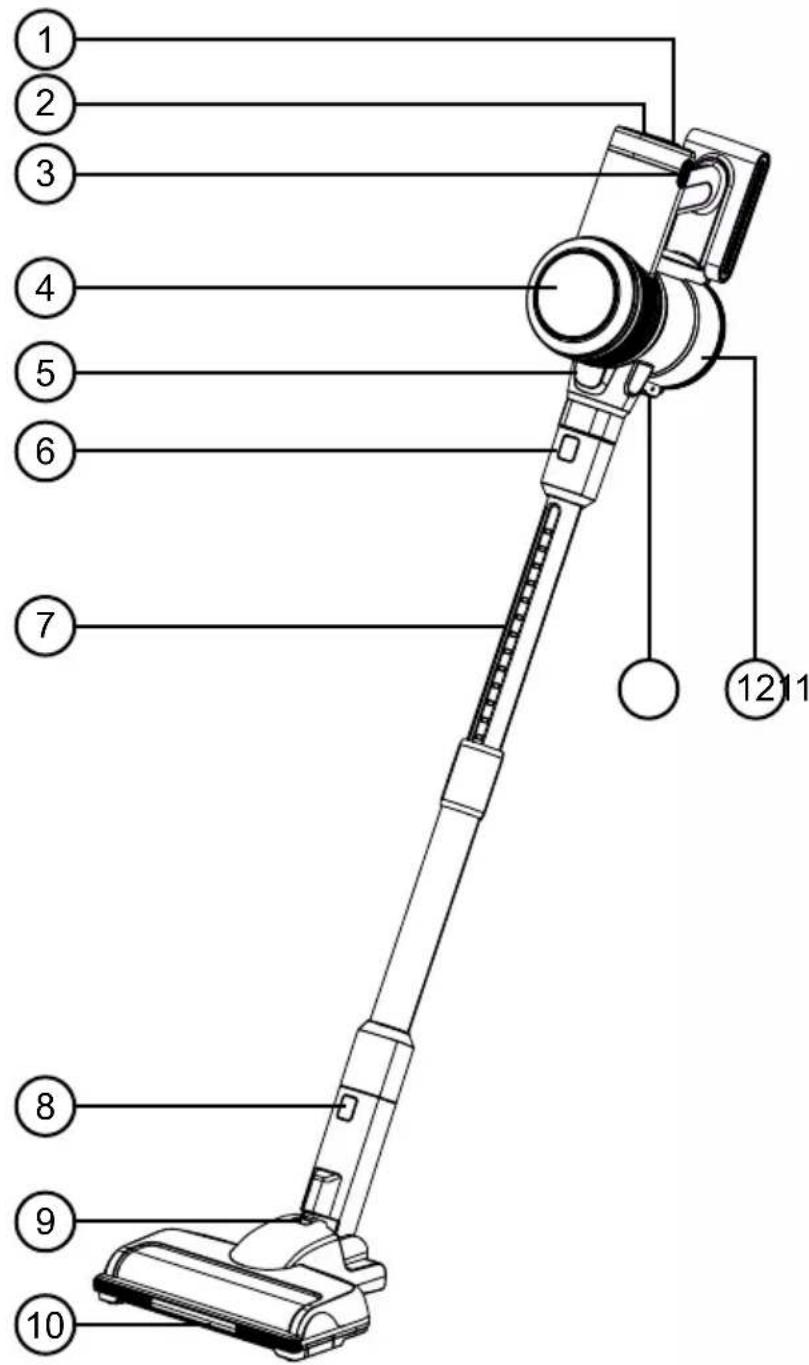
Components
text_image
1 2 3 4 5 6 7 8 9 10 12 11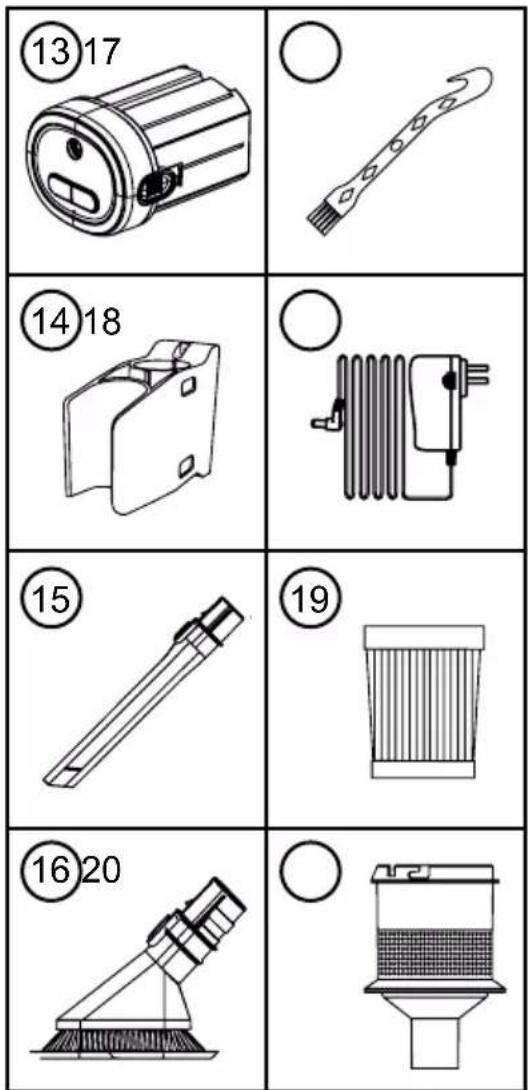
text_image
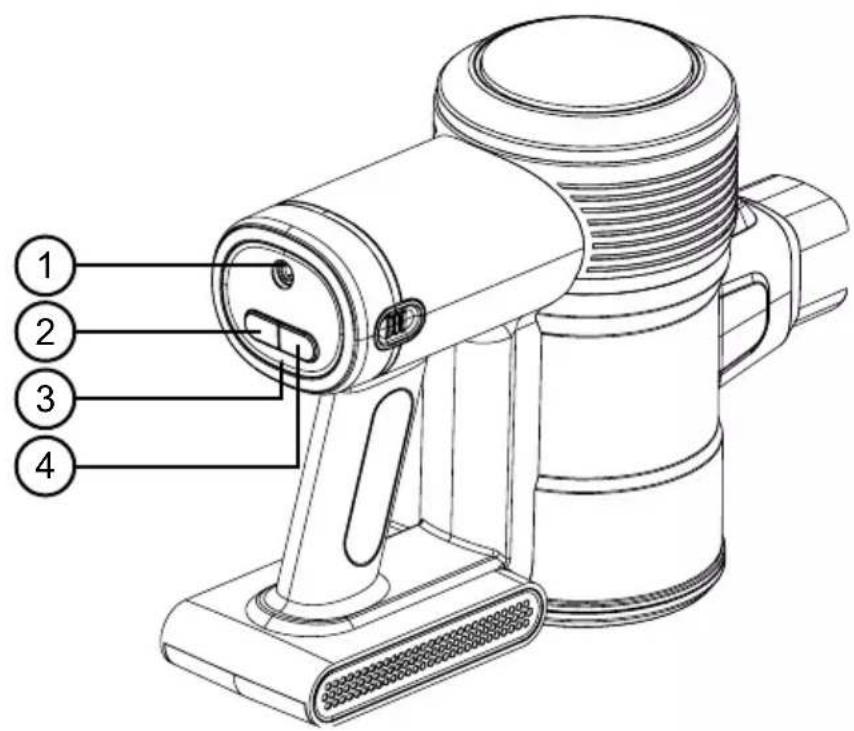
⑬17 ⑭18 ⑮ ⑯20- Power switch
- Speed button
- Battery pack release button
- Indicator panel
- Motor unit
- Metal tube release button
- Metal telescopic tube
- Brush release button
- Support lock
-
Floor brush
-
Dust container release button
- Dust container
- Battery pack
- Wall mount
- Crevice tool
- Short brush head
- Cleaning tool
- Power adapter
- HEPA filter
DURONIC
Indicator Panel

text_image
1 20 40 60 80 100 0 2 3 4- Power / battery (charge percentage) indicator
- Low speed indicator
- Blockage indicator
- High speed indicator
Battery Pack Panel
text_image
Technical diagram of a portable device with numbered parts labeled 1 to 4- Charging cable port
- On/Off button
- Charging indicator
- Speed button
DURONIC
Safety Information
PLEASE READ THIS MANUAL CAREFULLY AND RETAIN FOR FUTURE REFERENCE
- This appliance is for indoor/household use only. Do not use outdoors.
- This appliance is not designed for commercial or industrial use; it is for household use only.
- This appliance is not intended for use by persons (including children) with reduced physical, sensory or mental capabilities, or lack of experience and knowledge unless they have been given supervision or instruction concerning the use of the appliance by a person responsible for their safety.
- Children should be closely supervised at all times to ensure that they do not play with the appliance.
- Do not operate this appliance if the power cable or plug is damaged. If either is damaged, return it to Duronic for service or repair by a professional technician.
- Never try to replace the parts and repair the unit by yourself. Do not modify the appliance in any way that is not described in the instructions for use. The appliance contains live parts. Repairs may only be carried out by Duronic, using original spare parts and accessories.
- If an extension lead/cable is needed to reach the appliance to a mains power socket that is too far away out of reach of the appliance's accompanying cable, please ensure that:
- the marked electrical rating of the extension lead is at least as great as the electrical rating of the appliance.
- the extension lead is of the grounded type.
- no other appliance is plugged into the same extension lead.
- the extension cable is safely positioned to avoid it being pulled on by children or animals or being tripped over.
DURONIC
Safety Information (continued)
- Do not cover the air inlet or the air outlet vent openings while the appliance is operating.
• Always turn off the vacuum cleaner before unplugging from the outlet.
- Unplug from the mains plug outlet when not in use.
- Never disconnect the plug by pulling on the power cable. You should always hold the plug with your hand and pull to disconnect.
• To protect against the risk of electric shock, do not immerse any part of the main motor unit in water or other liquids.
- Keep hair, loose clothing, fingers and all parts of your body away from the suction opening.
- Do not put any objects into the openings.
- Do not use to pick up flammable or combustible liquids such as gasoline or use in areas where they may be present.
- Only use this vacuum cleaner on a dry surface. Do not vacuum up any moisture or fluid of any kind.
- Do not pick up anything that is burning or smoking such as cigarettes, matches or hot ashes.
- Do not use on concrete, tarmac, or any other rough surfaces.
- Do not use on artificial grass.
• Take extra care when using the vacuum cleaner on staircases.
- Do not use the vacuum cleaner without the dust container filter in place.
- Do not use the vacuum cleaner when it is blocked. Keep the appliance free of dust, lint, hair and anything else that may reduce airflow.
- Unplug the charger when not in use for extended periods.
- Do not wrap the charging cable around the charger when storing.
DURONIC
Safety Information (continued)
- Unplug the charger and disconnect the battery from the appliance before carrying out any cleaning or user maintenance.
- Do not install, charge or use this appliance outdoors.
- Do not use on wet surfaces and do not expose to moisture, rain or snow.
- Use on dry floors and areas ONLY. Do not use it outdoors or on wet surfaces.
- When removing or replacing the motorised brush roller, be careful not to switch on the vacuum until the brush roller has been reassembled and locked back into place

WARNING - FIRE HAZARD:
Do not apply any fragrance or scented product to the filter(s) of this appliance. The chemicals in such products are known to be flammable and can cause the appliance to catch fire.
Battery Safety
- Only use the battery and charging cable supplied by Duronic for the VC24/VC28. A charger that is suitable for one type of battery pack may create a risk of fire when used with another battery pack.
- Do not modify the charger in any way; it has been designed for a specific voltage. Always check that the mains voltage is the same as that stated on the rating label.
- The battery pack is a sealed unit and, under normal circumstances, poses no safety concerns. In the unlikely event that liquid leaks from the battery, do not touch the liquid as it may cause burns or irritation, and you should observe the following precautions:
- Skin contact – can cause irritation. If you get any battery liquid on your hands, wash them with soap and water.
DURONIC
Battery Safety (continued)
- Inhalation – can cause respiratory irritation. Open a window or step outside to get some fresh air and then seek medical advice.
- Eye contact – can cause irritation. If any fluid comes into contact with your eyes, immediately flush your eyes thoroughly with water for at least 15 minutes. Seek medical attention.
- Disposal – wear protective gloves to handle the battery pack and dispose of it immediately, following local refuse guidance or regulations.
- Do not use a battery pack that is damaged or modified. Damaged or modified batteries may exhibit unpredictable behaviour resulting in fire, explosion or risk of injury. Do not shorten/short-circuit the battery terminals.
- The battery pack used in this appliance may present a risk of fire or chemical burn if mistreated.
- Do not place the battery pack on or near a cooker or any other hot surface.
- Do not expose the battery pack to fire or excessive temperatures. Exposure to fire or temperatures above 140^ F (60°C) may cause explosion.
- When the battery pack is not in use, keep it away from paper clips, coins, keys, nails, screws or other small metal objects that could make a connection from one terminal to another.

WARNING - FIRE HAZARD:
Do not place this appliance on or near a cooker or any other hot surface and do not incinerate this appliance even if it is severely damaged. The battery might catch fire or explode.
DURONIC
Introduction
The VC24 / VC28 vacuum cleaner is a lightweight cordless upright electric floor cleaner that is perfect for cleaning all around the home.
Cordless by design, this vacuum has a wide range of manoeuvrability and enables you to clean both upstairs and downstairs without having to worry about annoying trailing power cables. It can convert from an upright cleaner into a compact handheld vacuum which is ideal for cleaning the car or areas you need to get up close to.
Using the attachments provided you can clean not just the floors but also high-up spots, shelves, in-between seats on the sofa or in gaps behind furniture.
Before First Use
Assemble the vacuum

natural_image
Technical illustration of a mechanical assembly with directional arrows indicating motion (no text or symbols)1) Attach the metal telescopic tube (7) to the motor unit (5).
2) Attach the floor brush (10) to the metal telescopic tube.
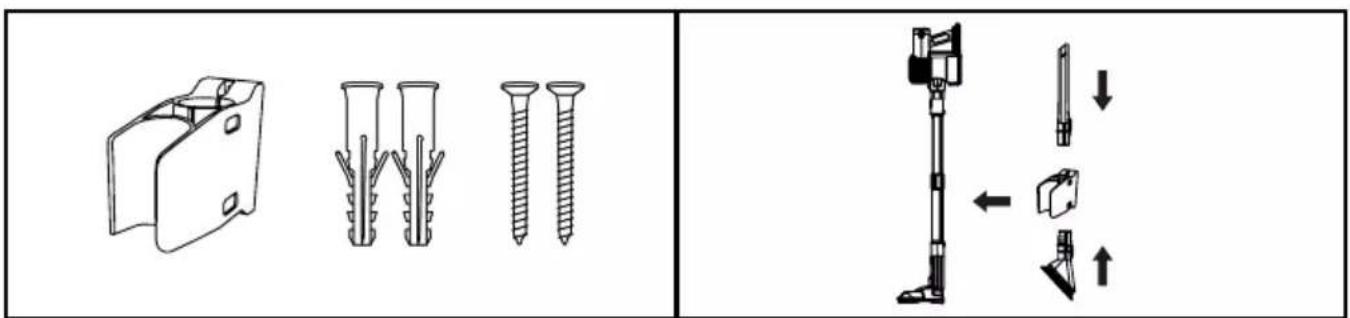
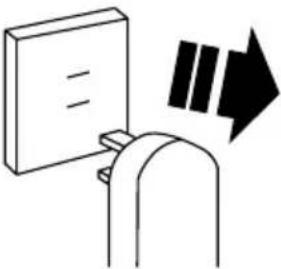
Install the wall mount
text_image
Technical diagram showing assembly of plastic components with exploded view and assembled detail view1) Attach the wall bracket (14) to the wall using the fixings provided.
2) To attach the vacuum to the bracket, simply press and click the pole into place on the bracket.
DURONIC
The Attachments
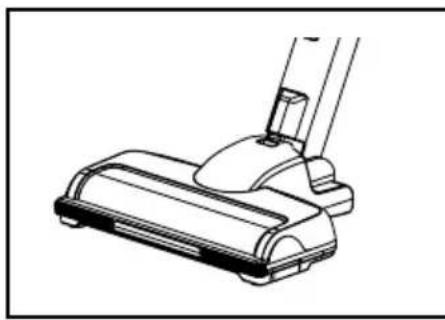
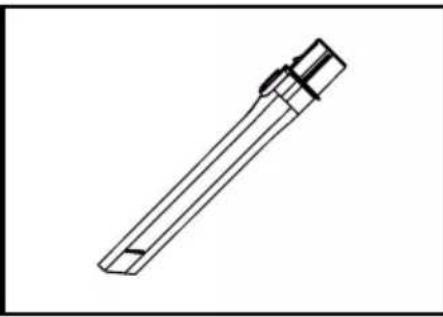
Floor Brush Crevice Tool Small Brush Head
natural_image
Line drawing of a vacuum cleaner blade assembly (no text or symbols)For cleaning both carpeted and hard flooring.
natural_image
Technical line drawing of a mechanical tool or component (no text or symbols)For cleaning smaller spaces or hard-to-reach spots.
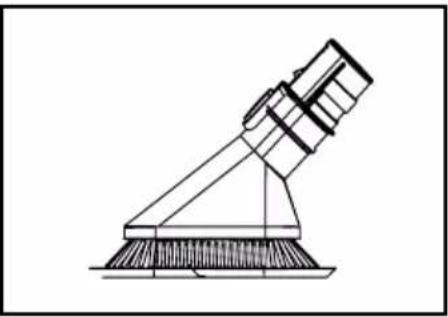
natural_image
Technical line drawing of a mechanical device with a triangular support and base (no text or symbols)For cleaning surfaces, particularly dusty surfaces and edges.
How to Use
This vacuum can be used in two ways: as an upright stick vacuum which is controlled by the long pole handle, or as a portable handheld vacuum.
To use as an upright vacuum To use as a handheld vacuum
natural_image
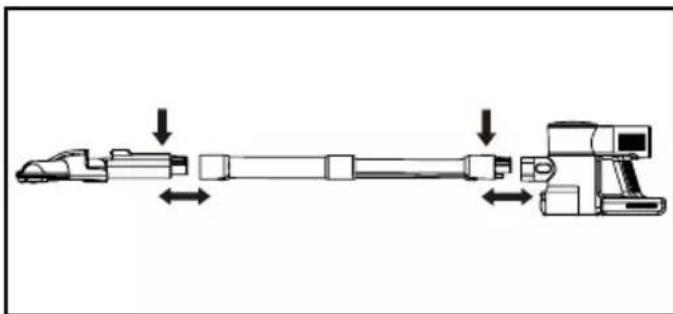
Diagram of a mechanical assembly with directional arrows indicating movement or force (no text or symbols present)Attach the telescopic tube to the motor unit, then attach the floor brush. Both parts should click into place.
natural_image
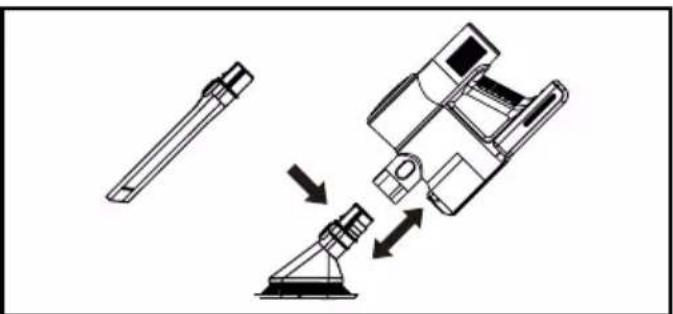
Diagram of a vacuum cleaner's internal structure with directional arrows indicating motion (no text or symbols)Attach the telescopic tube to the motor unit, then attach the small brush or crevice tool to the other end of the tube.
Alternatively, the brush or crevice tool can attach directly to the motor unit.
DURONIC
Using the Vacuum
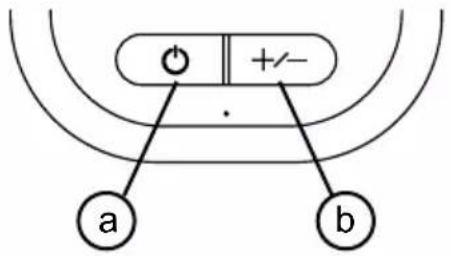
To switch on the vacuum, press the On/Off button (a).
To adjust the speed, press the Speed button (b).
There are 3 speeds to choose from: low, medium and high.
To stop the vacuum, press the On/Off button (a).
text_image
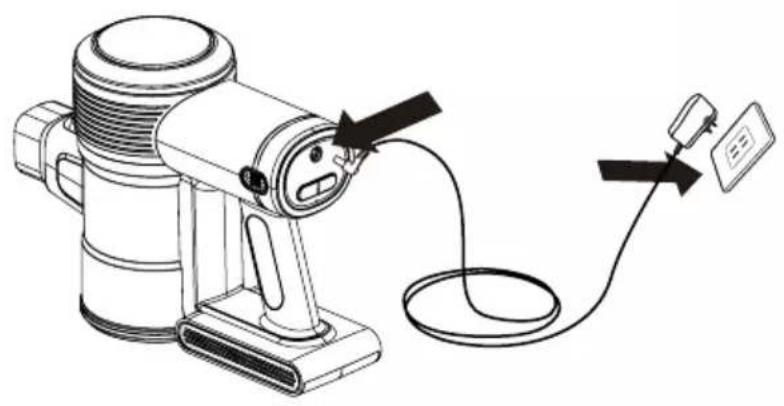
a b +/-Recharging the Battery
When the power/battery indicator flashes for seconds and turns off, this indicates that the power has been used up.
To recharge the battery (13), plug the charging power adapter (18) into a plug socked and then into battery pack. A green light will start to flash – this indicates that the battery is charging. When the power indicator stops flashing and stays on constantly instead, this means the battery is fully charged.
The battery on this vacuum can be charged in two ways:
On the wall mounted dock
natural_image
Line drawing of a portable electric heater connected to a cable and a sensor device (no text or symbols present)
natural_image
Line drawing of a vacuum cleaner with attached electrical outlet (no text or symbols)DURONIC
Recharging the Battery (continued)
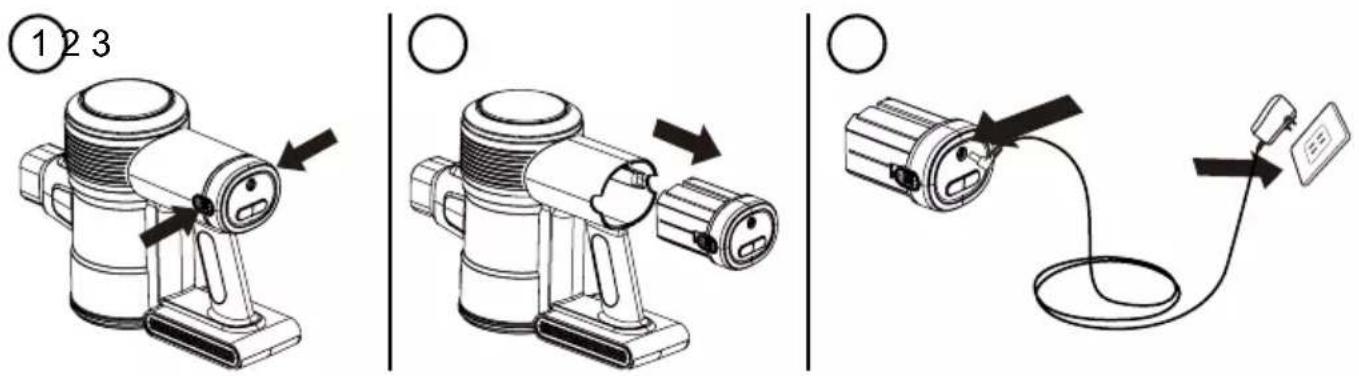
Removing the battery to charge separately
text_image
① 2 3 ○ ○Cleaning and Maintenance
Emptying the Dust Container
- Remove the telescopic tube (7) and any attachments from the motor unit body (20).
- Holding the vacuum motor unit over a bin, press down on the Dust Container Release button (11) to open the dust container (12). The lid will pop open and the contents will be released into the bin.
- Gently close the lid until it clicks into place.
- Re-attach the telescopic tube back onto the motor unit.
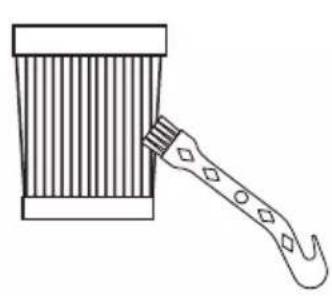
Cleaning or Changing the Filter
Cleaning and changing the filters (19+20) will improve the performance of the vacuum cleaner. In order to do so, please refer to the following steps:
-
Remove the dust container from the motor unit (5). Inside the dust container you will find the HEPA filter inside the Mesh Filter. Remove both filters from the dust container.
-
Gently tap out any dust from the filters into a bin.
-
Use the Cleaning Tool (17) to dust away any remaining build-up on the filters.
DURONIC
Cleaning and Maintenance (continued)
- The fabric HEPA filter can also be rinsed under water and then left to air dry.
- Once the HEPA filter is fully dry, replace the filter back into mesh filter, and then back into the dust container.
Note: Do not use a washing machine to clean the dust filter, or a hair dryer to dry the filter.
natural_image
Line drawing of a hammer striking a striped object (no text or symbols)
natural_image
Line drawing of a cleaning or cleaning tool applying material to a container (no text or symbols)Clearing Blockages
If your vacuum has a blockage, the blockage indicator will light up.
Ensure that the vacuum is not plugged in or switched on before looking for blockages.
Be careful not to switch it on during the unblocking process and be aware of any sharp objects that could be stuck in the vacuum.
Cleaning the Whole Vacuum
If the body of the main unit or handle needs to be cleaned, use a damp well-wrung cloth to wipe over the surface. Then use a dry cloth to dry the surface.

CAUTION:
Do not immerse any part of the vacuum main unit in water or any other liquid.
Cleaning and Maintenance (continued)
Removing and Cleaning the Floor Brush
 1. Unplug the vacuum from power supply. 1. Unplug the vacuum from power supply. | 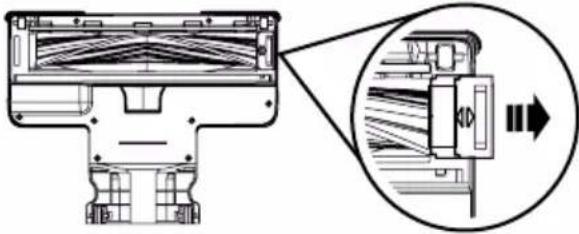 2. Slide the brush lock outwards to the unlocked position. 2. Slide the brush lock outwards to the unlocked position. |
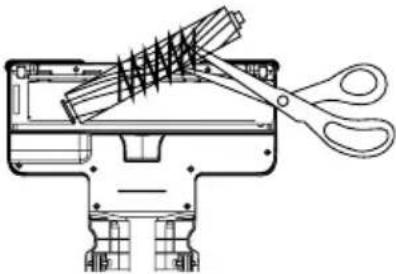 3. Lift the roller out and clean the hair or any other foreign matter from the roller brush. 3. Lift the roller out and clean the hair or any other foreign matter from the roller brush. | 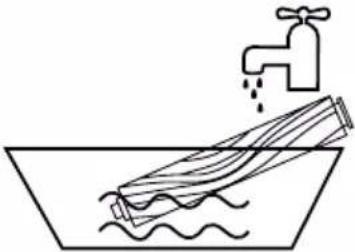 4. Wash the roller brush with water. 4. Wash the roller brush with water. |
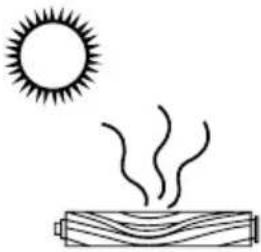  5. Leave the roller brush to air dry for at least 24 hours. 5. Leave the roller brush to air dry for at least 24 hours. | 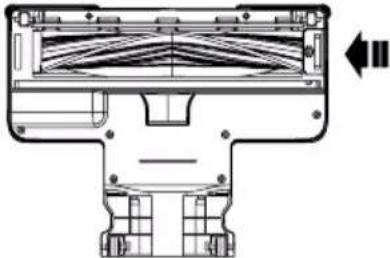 6. Install the roller brush back into the floor brush assembly. Slide the lock inwards until it is locked into place. 6. Install the roller brush back into the floor brush assembly. Slide the lock inwards until it is locked into place. |
Troubleshooting
| Problems | Possible Solutions |
| It is not cleaning or picking up well | Empty the dust container.Checked dust container is correctly assembled.Check the filters are correctly fitted.Clean the filters. |
| The vacuum stops or doesn’t work | Charge battery.Clean the filter.Check battery is installed properly . |
| The battery did not charge | Check connections with power cable.Check wall socket. |
| The powered floor brush didn’t work | Make sure dust container is assembled correctly & locked in place.Make sure the floor brush and metal extension tube are connected tightly.Check if the brush is blocked or not. |
DURONIC
Warranty
1 Year Guarantee from Shine-Mart Ltd, Trademark owners of Duronic Products. NOTE: THESE STATEMENTS DO NOT AFFECT YOUR STATUTORY RIGHTS AS A CONSUMER
This product has been manufactured under the strictest or quality control procedures, and using the highest quality of materials, to ensure excellent performance and reliability. It will give very good and long lasting service, provided it is properly used and maintained. The product is guaranteed for 1 years from the date of original purchase. If any defect arises due to a faulty materials or poor workmanship, the faulty product must be returned to the original place of purchase. Refund or replacement is at the discretion of that company.
Duronic Products are offered with a 1 year guarantee under the following conditions:
- The product must be returned to the retailer with original proof of purchase.
- The product must be in stalled and used in accordance with the instructions contained in this operating manual.
- It must be used only for domestic purposes.
- It does not cover wear and tear, malicious damage, misuse, neglect, inexpert repairs or consumable parts.
- Shine-Mart Ltd has no responsibilities for accidental or consequential loss or damage.
- Shine-Mart Ltd are not liable to carry out any type of servicing work, under the guarantee
- Valid in the UK only
This product is fitted with CE: 1363 plug and fuse Imported by Shine-Mart Ltd, RM3 8 SB

Information on waste Disposal for Consumers of Electrical & Electronic Equipment.
This mark on a product and/or accompanying documents indicates that when it is to be disposed of, it must be treated as Waste Electrical & Electronic Equipment, (WEEE).
Any WEE E marked products must not be mixed with general household waste, but kept separate for the treatment, recovery and recycling of the materials used.
For proper treatment, recovery and e cycling; please take all WEEE marked waste to your Local Authority Civic waste site, where it will be accepted free of charge.
If custo mers dispose of Waste Electrical & Electronic Equipment correctly, they will be helping to save valuable resources and preventing any potential negative effects upon human health and the environment, of any hazardous materials that the waste may contain.
Follow Us


text_image
Technical diagram of a portable device with numbered parts labeled 1 to 4natural_image
Technical line drawing showing a mechanical assembly with directional arrows indicating movement (no text or symbols present)text_image
Technical diagram showing assembly of screw fasteners and a mechanical clamp mechanism with directional arrows indicating movement.natural_image
Line drawing of a vacuum cleaner blade assembly (no text or symbols)natural_image
Technical line drawing of a mechanical tool or component (no text or symbols)natural_image
Line drawing of a mechanical device with a lever and base (no text or symbols)natural_image
Diagram of a mechanical assembly with directional arrows indicating movement or force (no text or symbols present)natural_image
Diagram showing a vacuum cleaner lifting a device with directional arrows indicating motion (no text or symbols)natural_image
Line drawing of a portable electric heater connected to a cable and a sensor device (no text or symbols present)
natural_image
Line drawing of a vacuum cleaner with attached electrical outlet (no text or symbols)DURONIC
natural_image
Line drawing of a hammer striking a striped object (no text or symbols)
natural_image
Line drawing of a cleaning or cleaning tool applying material to a container (no text or symbols)Retirez les obstructions
text_image
Technical diagram of a portable device with numbered parts labeled 1 to 4natural_image
Technical line drawing showing a mechanical assembly with directional arrows indicating movement (no text or symbols present)text_image
Technical diagram showing assembly of plastic components with exploded view and assembled detail viewnatural_image
Line drawing of a vacuum cleaner blade assembly (no text or symbols)natural_image
Line drawing of a mechanical tool or component with a flanged shaft and handle (no text or symbols)natural_image
Technical line drawing of a mechanical device with a lever and base (no text or symbols)natural_image
Diagram of a mechanical assembly with directional arrows indicating movement or force (no text or symbols present)natural_image
Diagram of a vacuum cleaner with lever mechanism and mechanical components (no text or symbols)natural_image
Line drawing of a portable electric heater connected to a cable and a sensor (no text or symbols)
natural_image
Line drawing of a vacuum cleaner with attached power outlet and cable (no text or symbols)DURONIC
natural_image
Line drawing of a brush applying material to a striped cup (no text or symbols)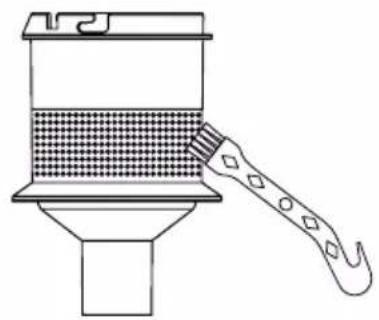
natural_image
Line drawing of a brush applying material to a container (no text or symbols)text_image
Technical diagram of a portable device with numbered parts labeled 1 to 4natural_image
Technical line drawing showing a mechanical assembly with directional arrows indicating movement (no text or symbols present)text_image
Technical diagram showing assembly of screw fasteners and a mechanical clamp mechanism with directional arrows indicating movement.natural_image
Line drawing of a vacuum cleaner blade assembly (no text or symbols)natural_image
Technical line drawing of a mechanical tool or component (no text or symbols)natural_image
Line drawing of a mechanical device with a lever and base (no text or symbols)Para limpiar superficies, especialmente superficies polvorientas y bordes.
Modo de empleo
natural_image
Diagram of a mechanical assembly with directional arrows indicating movement or force (no text or symbols present)natural_image
Diagram of a vacuum cleaner's internal structure with directional arrows indicating motion (no text or symbols)natural_image
Line drawing of a portable electric heater connected to a cable and a sensor device (no text or symbols present)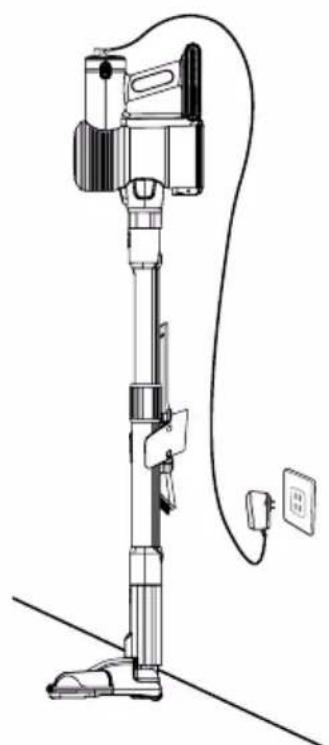
natural_image
Line drawing of a vacuum cleaner with attached power outlet and cable (no text or symbols)DURONIC
natural_image
Line drawing of a hammer striking a striped object (no text or symbols)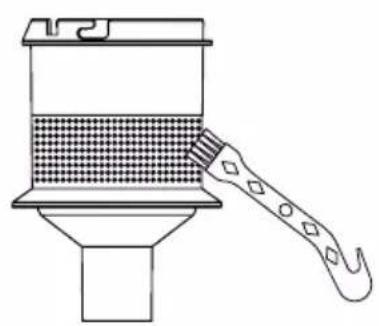
natural_image
Line drawing of a cleaning or cleaning tool applying material to a container (no text or symbols)text_image
Technical diagram of a portable device with numbered parts labeled 1 to 4natural_image
Technical illustration of a mechanical assembly with directional arrows indicating motion (no text or symbols)text_image
Technical diagram showing assembly of plastic components with exploded views and assembly steps, including pin alignment and adjustment arrows.natural_image
Line drawing of a vacuum cleaner blade assembly (no text or symbols)natural_image
Technical line drawing of a mechanical tool or component (no text or symbols)natural_image
Line drawing of a mechanical device with a triangular support and base (no text or symbols)natural_image
Diagram of a mechanical assembly with directional arrows indicating movement or force (no text or symbols present)natural_image
Diagram of a vacuum cleaner's internal structure with lever mechanism (no text or labels)natural_image
Line drawing of a portable electric heater connected to a cable and a sensor device (no text or symbols present)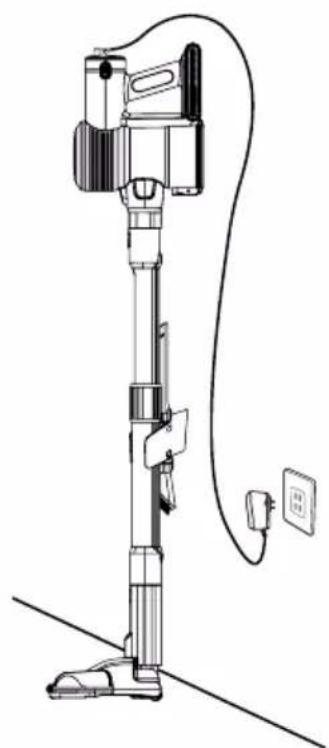
natural_image
Line drawing of a vacuum cleaner with attached power outlet and cable (no text or symbols)DURONIC
natural_image
Line drawing of a hammer striking a striped object (no text or symbols)
natural_image
Line drawing of a cleaning or cleaning tool applying material to a container (no text or symbols)text_image
Technical diagram of a portable device with numbered parts labeled 1 to 4natural_image
Technical line drawing showing a mechanical assembly with directional arrows indicating movement (no text or symbols present)text_image
Technical diagram showing assembly of two types of screw fasteners with accompanying mechanical assembly diagrams.natural_image
Line drawing of a vacuum cleaner blade assembly (no text or symbols)natural_image
Technical line drawing of a mechanical tool or component (no text or symbols)natural_image
Line drawing of a mechanical device with a triangular support and base (no text or symbols)natural_image
Diagram of a mechanical assembly with directional arrows indicating movement or force (no text or symbols present)natural_image
Diagram showing a vacuum cleaner lifting a device with directional arrows indicating motion (no text or symbols)natural_image
Line drawing of a portable electric heater connected to a cable and a sensor device (no text or symbols present)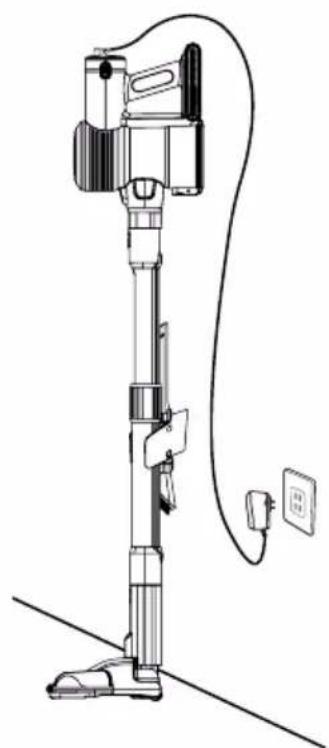
natural_image
Line drawing of a vacuum cleaner with attached electrical outlet (no text or symbols)DURONIC
text_image
Diagram showing three steps of a device operation: press, switch, and cable connection with labeled parts.natural_image
Line drawing of a hammer striking a striped object (no text or symbols)
natural_image
Line drawing of a cleaning or cleaning tool applying material to a container (no text or symbols)Usuwanie zatorów
text_image
Technical diagram of a portable device with numbered parts labeled 1 to 4natural_image
Technical line drawing showing a mechanical assembly with directional arrows indicating movement (no text or symbols present)text_image
Technical diagram showing assembly of plastic components with exploded views and assembly stepsnatural_image
Line drawing of a vacuum cleaner blade assembly (no text or symbols)natural_image
Technical line drawing of a mechanical tool or component (no text or symbols)natural_image
Line drawing of a mechanical device with a lever and base (no text or symbols)natural_image
Diagram of a mechanical assembly with directional arrows indicating movement or force (no text or symbols present)natural_image
Technical line drawing of a mechanical device with lever and base components (no text or symbols)natural_image
Line drawing of a portable electric heater connected to a power outlet via cable (no text or symbols)
natural_image
Line drawing of a vacuum cleaner with attached electrical outlet (no text or symbols)DURONIC
natural_image
Line drawing of a hammer striking a striped object (no text or symbols)
natural_image
Line drawing of a cleaning or cleaning tool applying material to a container (no text or symbols)text_image
Technical diagram of a portable refrigerator with numbered parts labeled 1 to 4WAARSCHUWING - BRANDGEVAAR:
WAARSCHUWING - BRANDGEVAAR:
natural_image
Technical line drawing showing a mechanical assembly with directional arrows indicating movement (no text or symbols present)text_image
Technical diagram showing assembly of plastic components with exploded views and assembly stepsnatural_image
Line drawing of a vacuum cleaner blade assembly (no text or symbols)natural_image
Line drawing of a mechanical tool or component with a flanged tip and handle (no text or symbols)natural_image
Technical line drawing of a mechanical device with a tripod base and tripod support (no text or symbols)natural_image
Diagram of a mechanical assembly with directional arrows indicating movement or force (no text or symbols present)natural_image
Technical line drawing of a mechanical device with lever and base components, showing motion arrows (no text or symbols)natural_image
Line drawing of a portable electric heater connected to a cable with a power outlet (no text or symbols)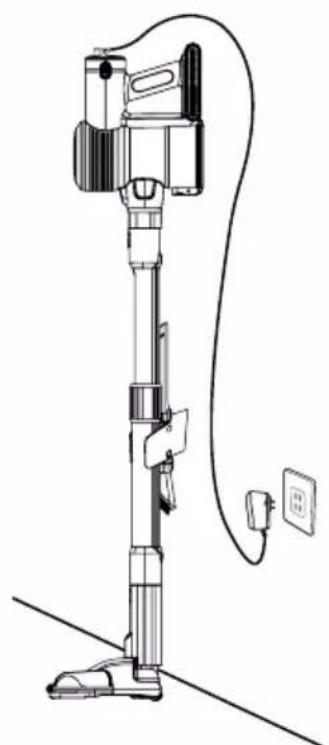
natural_image
Line drawing of a vacuum cleaner with attached power outlet and cable (no text or symbols)DURONIC
natural_image
Line drawing of a hammer striking a striped object (no text or symbols)
natural_image
Line drawing of a cleaning or cleaning tool applying material to a container (no text or symbols)text_image
Technical diagram of a portable device with numbered parts labeled 1 to 4- Do not cover the air inlet or the air outlet vent openings while the appliance is operating.
natural_image
Technical line drawing showing a mechanical assembly with directional arrows indicating movement (no text or symbols present)text_image
Technical diagram showing assembly of screw fasteners and a mechanical clamp mechanism with directional arrows indicating movement.natural_image
Line drawing of a vacuum cleaner blade assembly (no text or symbols)natural_image
Line drawing of a mechanical tool or component with a flanged shaft and handle (no text or symbols)natural_image
Line drawing of a mechanical device with a lever and base (no text or symbols)natural_image
Diagram of a mechanical assembly with directional arrows indicating movement or force (no text or symbols present)natural_image
Technical line drawing of a mechanical device with three components and directional arrows indicating motion (no text or symbols)natural_image
Line drawing of a portable electric heater connected to a cable and a sensor device (no text or symbols present)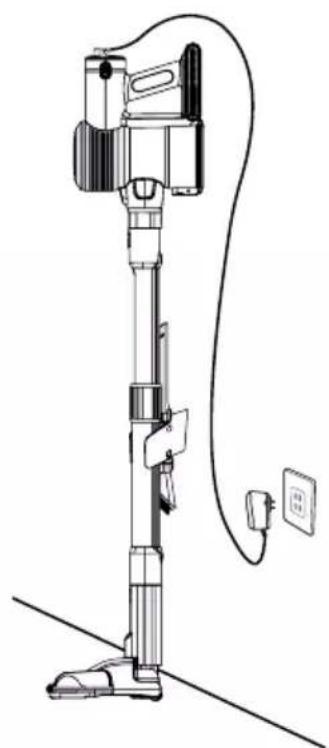
natural_image
Line drawing of a vacuum cleaner with attached electrical outlet (no text or symbols)DURONIC
text_image
Diagram showing three steps of a device operation: press, switch, and cable connection with labeled parts.natural_image
Line drawing of a hammer striking a striped object (no text or symbols)