VC9 - Vacuum Cleaner Duronic - Free user manual and instructions
Find the device manual for free VC9 Duronic in PDF.
| Brand | Duronic |
| Model | VC9 |
| Product type | Stick vacuum / handheld vacuum 2-in-1 |
| Use | Household, indoor |
| Dust container capacity | 800 ml |
| Dimensions (H × W × D) | 104.5 × 14.5 × 26 cm |
| Weight | Approx 2.5 kg (estimated) |
| Power | 600 W |
| Input voltage | 220-240 V, 50-60 Hz |
| Filter type | Washable HEPA filter |
| Included accessories | Floor brush, crevice tool |
| Main functions | Conversion to handheld vacuum, powerful suction, multi-task cleaning |
| Care and cleaning | Empty the container, wash the filter with water (air dry), wipe the body with a damp cloth |
| Safety | Do not vacuum liquids, do not immerse, keep away from children, unplug before maintenance |
| Spare parts and repairability | Container, filter, brush, crevice tool, tube; repairs by professional only |
| Warranty | 1 year (Shine-Mart Ltd / Duronic) |
| Manufacturer / Importer | Shine-Mart Ltd, RM3 8SB, United Kingdom |
Frequently Asked Questions - VC9 Duronic
User questions about VC9 Duronic
0 question about this device. Answer the ones you know or ask your own.
Ask a new question about this device
Download the instructions for your Vacuum Cleaner in PDF format for free! Find your manual VC9 - Duronic and take your electronic device back in hand. On this page are published all the documents necessary for the use of your device. VC9 by Duronic.
USER MANUAL VC9 Duronic
Creative Consumer Products
natural_image
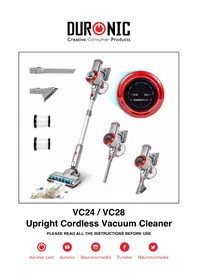
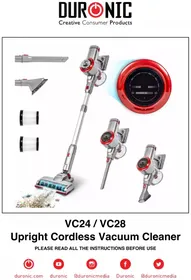
Product line drawing of a DURONIC vacuum cleaner with extended blades and control panel (no text or symbols)VC9
Upright Vacuum Cleaner
PLEASE READ ALL THE INSTRUCTIONS BEFORE USE

duronic.com

duronic

@duronicmedia

Duronic

@duronicmedia
Contents
English Manual 4
Features and Specifications
| Model Number | Capacity Dimensions Power Voltage | |||
| VC9 800ml | 104.5x14.5x26cm41.1x5.7x10.2in | 600W | 220-240V50-60Hz | |
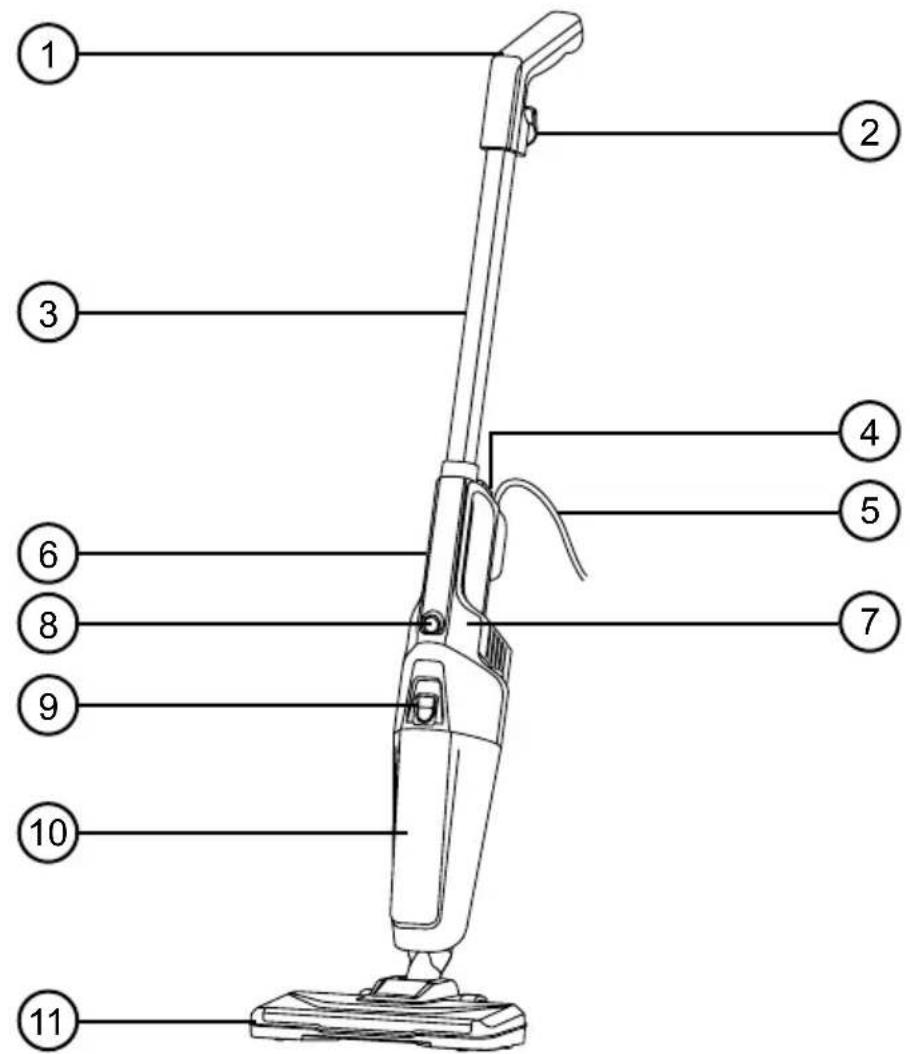
Components
text_image
1 2 3 4 5 6 7 8 9 10 11
natural_image
Simple line drawing of a conical lamp with a circular label showing number 12 (no text or symbols on the lamp itself)
text_image
13
text_image
14- Handle
- Cable storage hook
- Extension pole
- Main body release button
- Power cable
- Main body handle
-
Main body
-
Power switch
- Dust container release button
- Dust container
- Floor brush
- HEPA filter
- Crevice Tool
- Cleaning brush
DURONIC
Safety Information
PLEASE READ THIS MANUAL CAREFULLY AND RETAIN FOR FUTURE REFERENCE
- This appliance is for indoor/household use only. Do not use outdoors.
- This appliance is not designed for commercial or industrial use; it is for household use only.
- This appliance is not intended for use by persons (including children) with reduced physical, sensory or mental capabilities, or lack of experience and knowledge unless they have been given supervision or instruction concerning the use of the appliance by a person responsible for their safety.
- Children should be closely supervised at all times to ensure that they do not play with the appliance.
- Do not operate this appliance if the power cable or plug is damaged. If either is damaged, return it to Duronic for service or repair by a professional technician.
- Never try to replace the parts and repair the unit by yourself. Do not modify the appliance in any way that is not described in the instructions for use. The appliance contains live parts. Repairs may only be carried out by Duronic, using original spare parts and accessories.
- If an extension lead/cable is needed to reach the appliance to a mains power socket that is too far away out of reach of the appliance's accompanying cable, please ensure that:
- the marked electrical rating of the extension lead is at least as great as the electrical rating of the appliance.
- the extension lead is of the grounded type.
- no other appliance is plugged into the same extension lead.
- the extension cable is safely positioned to avoid it being pulled on by children or animals or being tripped over.
DURONIC
Safety Information (continued)
- Do not cover the air inlet or the air outlet vent openings while the appliance is operating.
• Always turn off the vacuum cleaner before unplugging from the outlet.
- Unplug from the mains plug outlet when not in use.
- Never disconnect the plug by pulling on the power cable. You should always hold the plug with your hand and pull to disconnect.
- To protect against the risk of electric shock, do not immerse any part of the main motor unit in water or other liquids.
- Keep hair, loose clothing, fingers and all parts of your body away from the suction opening.
- Do not put any objects into the openings.
- Do not use to pick up flammable or combustible liquids such as gasoline or use in areas where they may be present.
- Only use this vacuum cleaner on a dry surface. Do not vacuum up any moisture or fluid of any kind.
- Do not pick up anything that is burning or smoking such as cigarettes, matches or hot ashes.
• Take extra care when using the vacuum cleaner on staircases.
- Do not use the vacuum cleaner without the dust container filter in place.
- Do not use the vacuum cleaner when it is blocked. Keep the appliance free of dust, lint, hair and anything else that may reduce air flow.
DURONIC
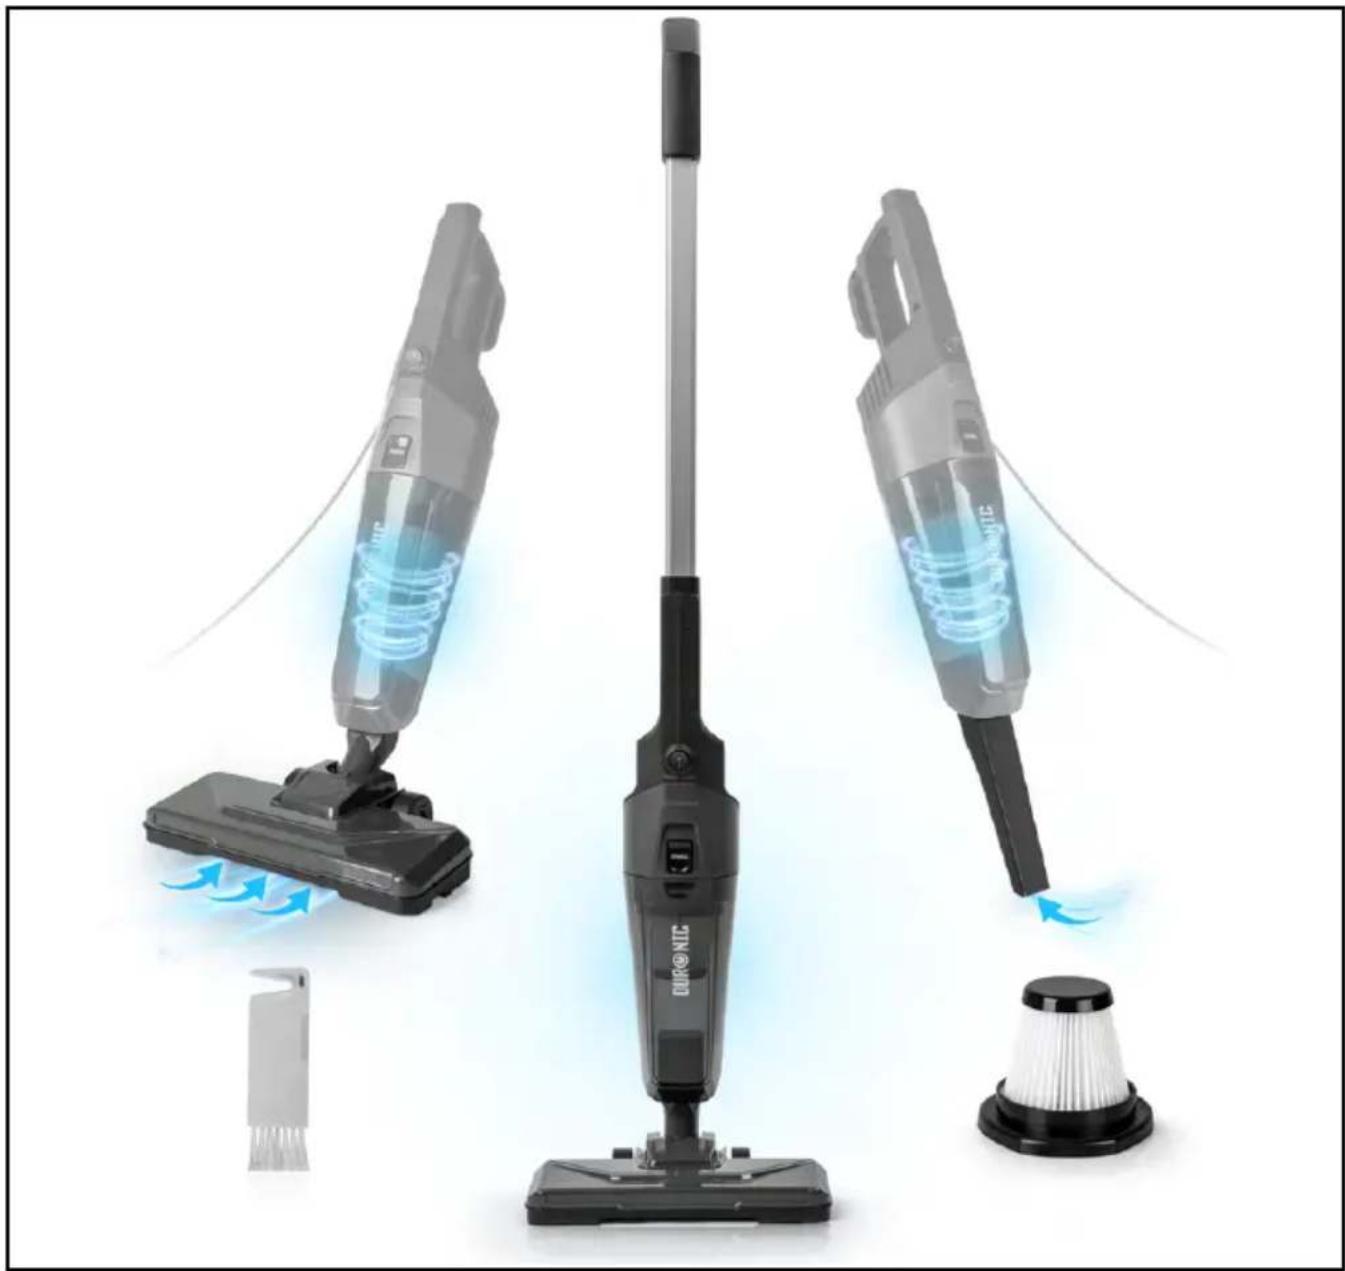
Introduction
The VC9 vacuum cleaner is a lightweight upright electric cleaner that is perfect for cleaning small-medium spaces. At the touch of a button the VC9 can convert from an upright stick vacuum into a handheld vac in just a matter of seconds making it perfect for cleaning up the home.
Before First Use
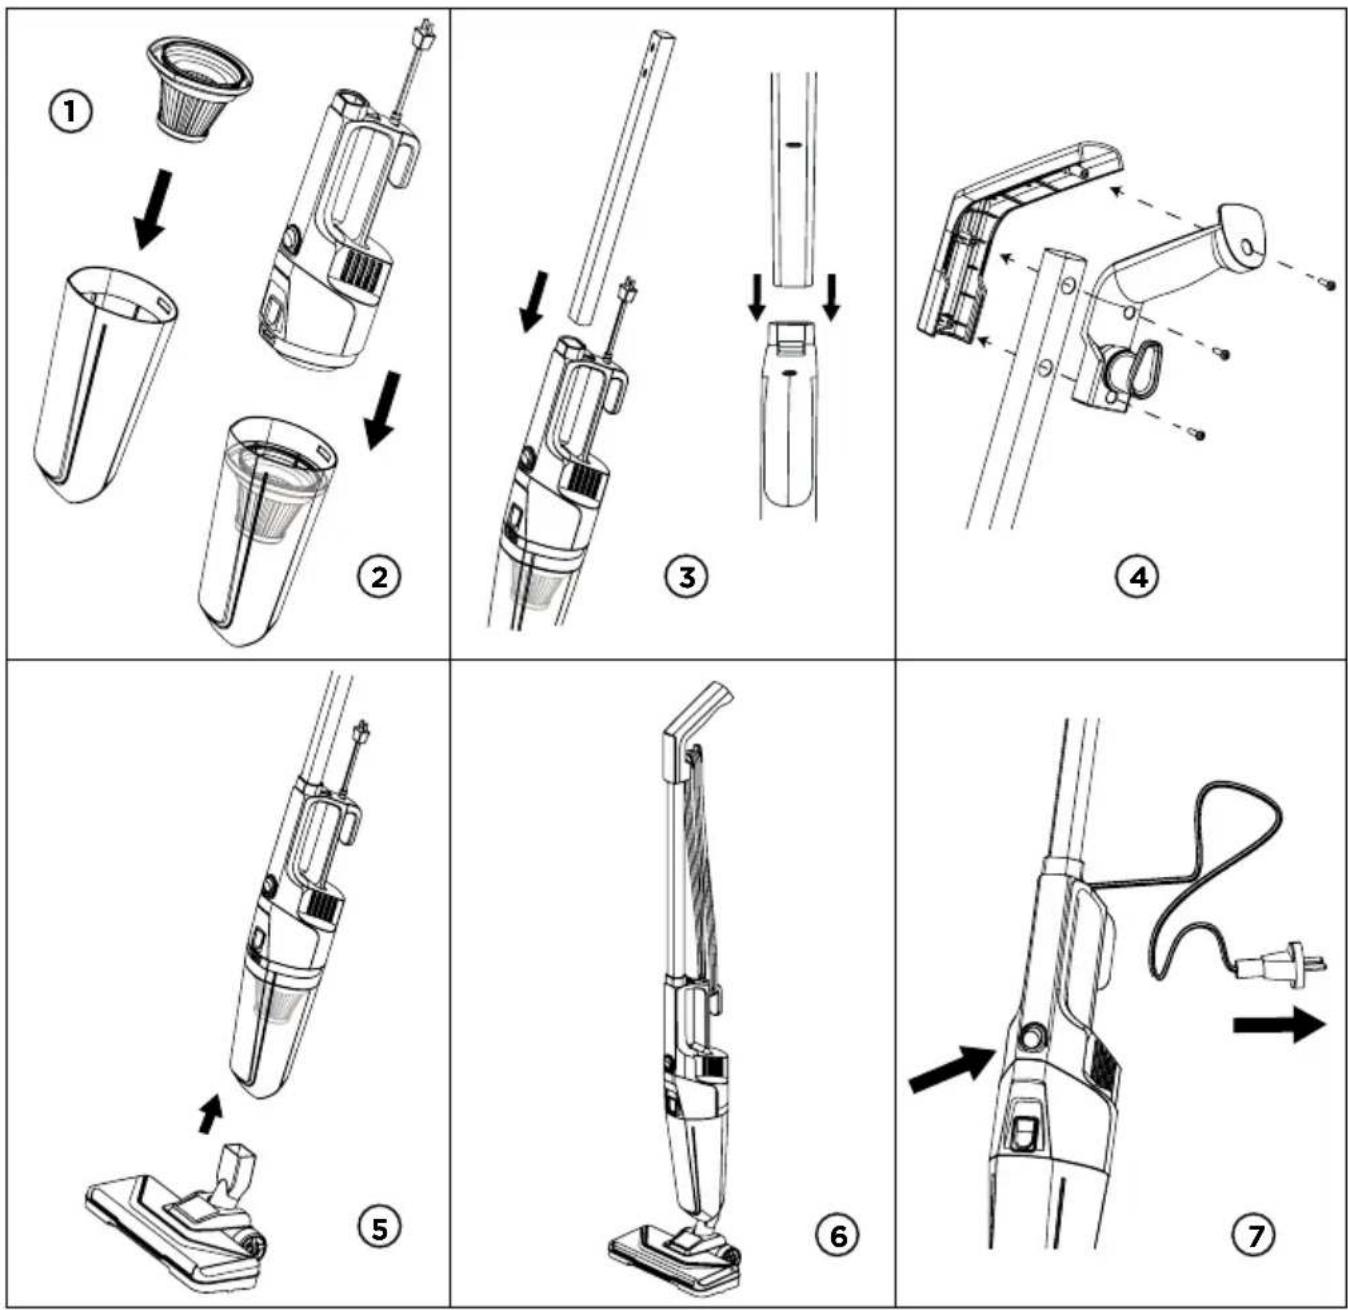
flowchart
graph TD
    A["① Clean Air Filter"] --> B["② Air Filter"]
    B --> C["③ Air Strip"]
    C --> D["④ Inspection"]
    D --> E["⑤ Inspection"]
    E --> F["⑥ Inspection"]
    F --> G["⑦ Final Inspection"]
DURONIC
The Attachments
The VC9 comes with 2 attachments or tools: a floor brush and a crevice tool.
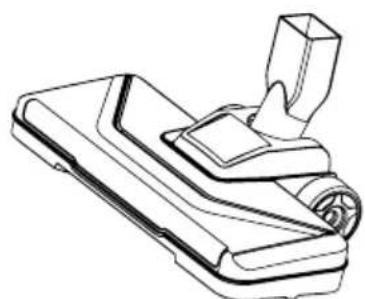
natural_image
Technical line drawing of a mechanical component with no visible text or symbolsThe floor brush is for all kinds of floorings, including carpeted, wooden or tiled floors.
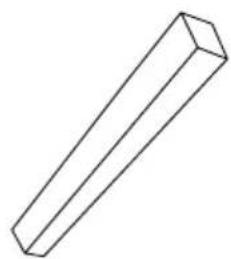
natural_image
Simple line drawing of a 3D rectangular prism (no text or symbols)The crevice tool is for cleaning in smaller spaces, such as behind radiators, in corners or along skirting boards, between cushions on the sofa or in any other small hard-to-reach spots.
How to Use
The VC9 can be used in two ways: as an upright stick vacuum which is controlled by the long pole handle, or as a portable handheld vacuum which is held with the integrated handle on the main body.
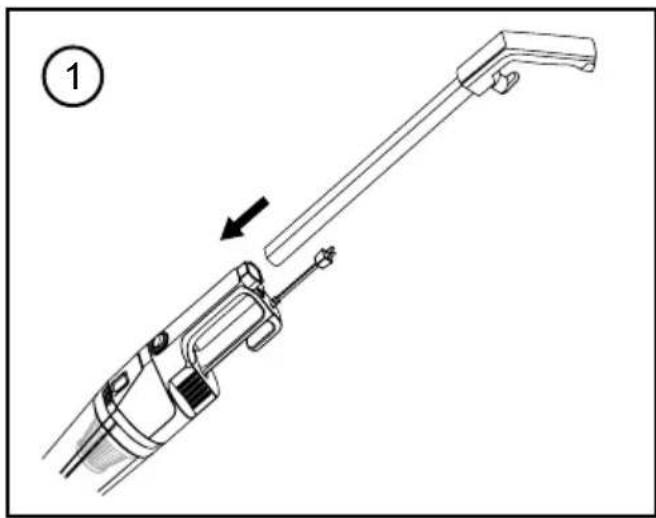
To use as an upright vacuum:
natural_image
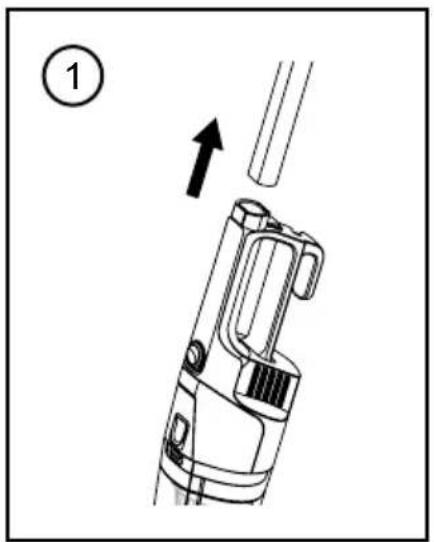
Technical line drawing of a mechanical device with an arrow indicating assembly or motion (no text or symbols present)Attach the handle assembly to the Main Body of the vacuum. Ensure the notches are aligned and it makes a "click" sound when it is inserted fully in place.
natural_image
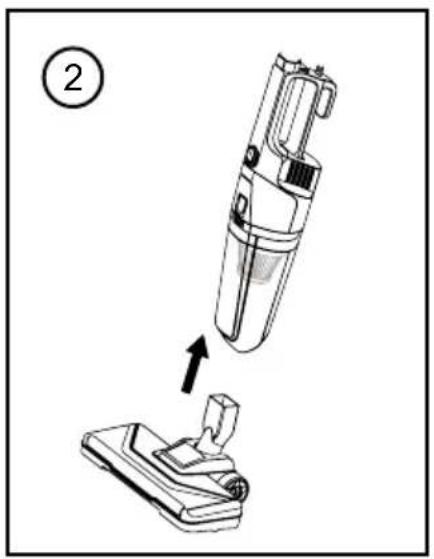
Diagram of a vacuum cleaner being inserted into a base, showing the device's internal structure and motion direction (no text or symbols)Attach the Floor Brush(11) onto the bottom of the Main Body.
text_image
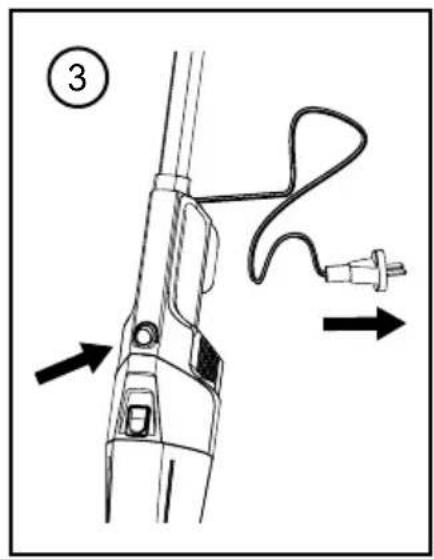
Technical diagram of a hairdryer with labeled parts and directional arrows indicating motion or assembly.Plug the cable in to the mains plug socket.
You can now use the vacuum simply by pressing the Power Switch(8)
natural_image
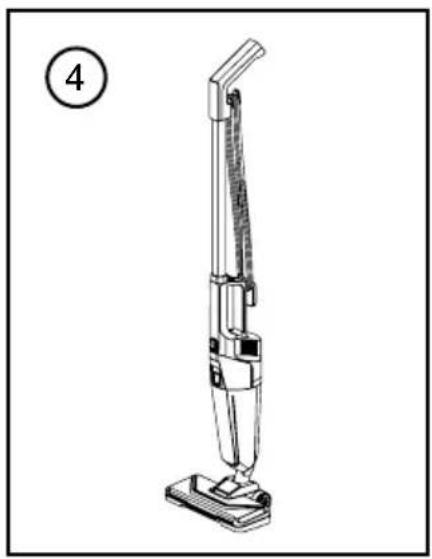
Line drawing of a vacuum cleaner with a numbered label (4) in the top-left corner, no text or symbols on the device itself.When you have finished vacuuming, stand the vacuum upright and wind the power cable around the cable management hooks.
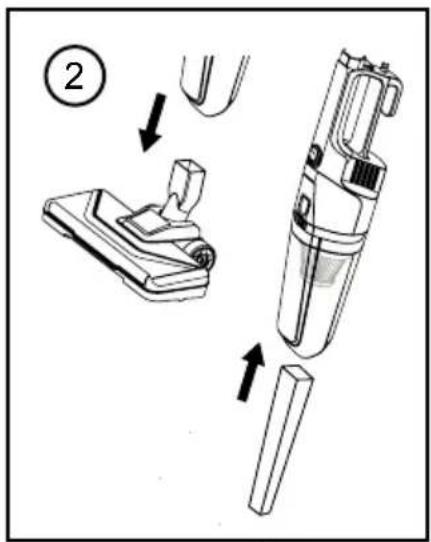
To use as an handheld vacuum:
natural_image
Diagram of a mechanical device with an upward arrow indicating motion or force (no text or symbols present)Remove the handle assembly to the Main Body of the vacuum by pressing the Main Body Release Button(4).
text_image
Diagram showing a vacuum cleaner with labeled parts and directional arrows indicating assembly stepsGently pull off the floor brush. Attach the Crevice Tool(13) to the Main Body instead.

text_image
Diagram of a hairdryer with labeled parts and directional arrows indicating motion or forcePlug the cable in to the mains plug socket.
You can now use the vacuum simply by pressing the Power Switch(8)
DURONIC
Cleaning and Maintenance
Emptying the Dust Container
- Press down on the Dust Container Release Button(9).
- Pull out the Dust Container(10) and empty it into a bin.
- Re-attach the dust container back into the main unit.
Cleaning or Changing the Filter
Cleaning and changing the filter will improve the performance of the vacuum cleaner. In order to do so, please refer to the following steps:
- Remove the dust container and the Filter(12). Gently tap out any dust from the filter into a bin.
- Wash the filter under running water from the tap, then let it air dry.
- Once it is fully dry, replace the filter back into the dust container.
Note: Do not use a washing machine to clean the dust filter, or a hair dryer to dry the filter.
No Cleaning the Whole Vacuum
If the body of the main unit or handle needs to be cleaned, use a damp well-wrung cloth to wipe over the surface. Then use a dry cloth to dry the surface.

CAUTION:
do not immerse any part of the vacuum main unit in water or any other liquid.
DURONIC
Warranty
1 Year Guarantee from Shine-Mart Ltd, Trademark owners of Duronic Products. NOTE: THESE STATEMENTS DO NOT AFFECT YOUR STATUTORY RIGHTS AS A CONSUMER
This product has been manufactured under the strictest or quality control procedures, and using the highest quality of materials, to ensure excellent performance and reliability. It will give very good and long lasting service, provided it is properly used and maintained. The product is guaranteed for 1 years from the date of original purchase. If any defect arises due to a faulty materials or poor workmanship, the faulty product must be returned to the original place of purchase. Refund or replacement is at the discretion of that company. Duronic Products are offered with a 1 year guarantee under the following conditions:
- The product must be returned to the retailer with original proof of purchase.
- The product must be installed and used in accordance with the instructions contained in this operating manual.
- It must be used only for domestic purposes.
- It does not cover wear and tear, malicious damage, misuse, neglect, inexpert repairs or consumable parts.
- Shine-Mart Ltd has no responsibilities for accidental or consequential loss or damage.
- Shine-Mart Ltd are not liable to carry out any type of servicing work, under the guarantee
- Valid in the UK only
This product is fitted with CE:1363 plug and fuse Imported by Shine-Mart Ltd, RM3 8SB

Information on waste Disposal for Consumers of Electrical & Electronic Equipment.
This mark on a product and/or accompanying documents indicates that when it is to be disposed of, it must be treated as Waste Electrical & Electronic Equipment, (WEEE).
Any WEEE marked products must not be mixed with general household waste, but kept separate for the treatment, recovery and recycling of the materials used.
For proper treatment, recovery and recycling; please take all WEEE marked waste to your Local Authority Civic waste site, where it will be accepted free of charge.
If customers dispose of Waste Electrical & Electronic Equipment correctly, they will be helping to save valuable resources and preventing any potential negative effects upon human health and the environment, of any hazardous materials that the waste may contain.
Follow Us


natural_image
Simple line drawing of a conical lamp with a circular top label showing number 12 (no text or symbols on the lamp itself)
text_image
13
text_image
14natural_image
Line drawing of a mechanical component with a handle and base plate (no text or symbols)natural_image
Simple line drawing of a 3D rectangular prism (no text or symbols)natural_image
Technical line drawing of a mechanical device with an arrow indicating assembly or motion (no text or symbols present)natural_image
Diagram of a vacuum cleaner being inserted into a base, showing the device's internal structure and assembly (no text or symbols present)text_image
Technical diagram showing a hairdryer tool with labeled parts and directional arrows indicating motion or assembly.natural_image
Line drawing of a vacuum cleaner with a numbered label (4) in the top-left corner, no text or symbols on the device itself.natural_image
Diagram of a handheld device with an upward arrow indicating motion or force (no text or symbols present)text_image
Diagram showing a vacuum cleaner with labeled parts and directional arrows indicating assembly stepsnatural_image
Technical line drawing of a handheld device with cable and connector, showing directional arrows (no text or symbols)natural_image
Simple line drawing of a conical lamp with a circular label showing number 12 (no text or symbols on the lamp itself)
text_image
13
text_image
14flowchart
graph TD
    A["①: Disassembly of a vacuum cleaner"] --> B["②: Disassembly of a vacuum cleaner"]
    B --> C["③: Insert vacuum cleaner"]
    C --> D["④: Assembly of a vacuum cleaner"]
    D --> E["⑤: Final assembly with handbag"]
    E --> F["⑥: Final assembly with handbag and plug"]
    F --> G["⑦: Final assembly with plug and plug, plus handle"]
DURONIC
Die Anhänge
natural_image
Technical line drawing of a mechanical component with no visible text or symbolsnatural_image
Simple line drawing of a 3D rectangular prism (no text or symbols)natural_image
Technical line drawing of a mechanical device with an arrow indicating assembly or motion (no text or symbols present)natural_image
Diagram of a vacuum cleaner being inserted into a base component, showing the device's internal structure and assembly (no text or symbols present)text_image
Technical diagram of a hairdryer with labeled parts and directional arrows indicating motion or assembly.natural_image
Line drawing of a vacuum cleaner with a numbered label (4) in the top-left corner, no text or symbols on the device itself.natural_image
Diagram of a handheld device with an upward arrow indicating motion or force (no text or symbols present)text_image
Diagram showing a vacuum cleaner with labeled parts and directional arrows indicating assembly stepsnatural_image
Technical line drawing of a handheld device with cable and connector, showing directional arrows (no text or symbols)natural_image
Simple line drawing of a conical lamp with a circular label showing number 12 (no text or symbols on the lamp itself)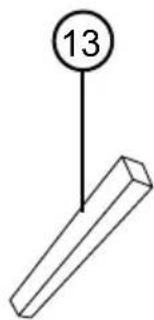
text_image
13
text_image
14natural_image
Line drawing of a mechanical component with a handle and base plate (no text or symbols)natural_image
Simple line drawing of a 3D rectangular prism (no text or symbols)natural_image
Technical line drawing of a mechanical device with an arrow indicating assembly or motion (no text or symbols present)natural_image
Diagram of a vacuum cleaner being inserted into a base component, showing the brush and handle (no text or symbols present)text_image
Technical diagram of a hairdryer with labeled parts and directional arrows indicating motion or assembly.natural_image
Line drawing of a vacuum cleaner with a numbered label (4) in the top-left corner, no text or symbols on the device itself.natural_image
Diagram of a handheld device with an upward arrow indicating motion or force (no text or symbols present)text_image
Diagram showing a vacuum cleaner with labeled parts and directional arrows indicating assembly stepsnatural_image
Technical line drawing of a handheld device with cable and connector, showing directional arrows (no text or symbols)natural_image
Simple line drawing of a conical lamp with a circular label showing number 12 (no text or symbols on the lamp itself)
text_image
13
text_image
14natural_image
Technical line drawing of a mechanical component with no visible text or symbolsnatural_image
Simple line drawing of a 3D rectangular prism (no text or symbols)natural_image
Technical line drawing of a mechanical device with an arrow indicating assembly or motion (no text or symbols present)natural_image
Diagram of a vacuum cleaner being inserted into a base, showing the device's internal structure and assembly (no text or symbols present)text_image
Technical diagram of a hairdryer with labeled parts and directional arrows indicating motion or assembly.natural_image
Line drawing of a vacuum cleaner with a numbered label (4) in the top-left corner, no text or symbols on the device itself.natural_image
Diagram of a handheld device with an upward arrow indicating motion or force (no text or symbols present)text_image
Diagram showing a vacuum cleaner with labeled parts and directional arrows indicating assembly stepsnatural_image
Technical line drawing of a handheld device with cable and connector, showing directional arrows (no text or symbols)natural_image
Simple line drawing of a conical lamp with a circular label showing number 12 (no text or symbols on the lamp itself)
text_image
13
text_image
14flowchart
graph TD
    A["①: Disassembly of a vacuum cleaner"] --> B["②: Disassembly of a vacuum cleaner"]
    B --> C["③: Insert vacuum cleaner"]
    C --> D["④: Assembly of a vacuum cleaner"]
    D --> E["⑤: Final assembly with handbag"]
    E --> F["⑥: Final assembly with handlebar and plug"]
    F --> G["⑦: Final assembly with plug and cable"]
DURONIC
Akcesoria
natural_image
Line drawing of a mechanical component with a handle and base plate (no text or symbols)natural_image
Simple line drawing of a 3D rectangular prism (no text or symbols)natural_image
Technical line drawing of a mechanical device with an arrow indicating assembly or motion (no text or symbols present)natural_image
Diagram of a vacuum cleaner being inserted into a base, showing the device's internal structure and assembly (no text or symbols present)text_image
Technical diagram showing a hairdryer tool with labeled parts and directional arrows indicating motion or assembly.natural_image
Line drawing of a vacuum cleaner with a numbered label (4) in the top-left corner, no text or symbols on the device itself.natural_image
Diagram of a mechanical device with an upward arrow indicating motion or force (no text or symbols present)text_image
Diagram showing a vacuum cleaner with labeled parts and directional arrows indicating assembly stepstext_image
Diagram of a hairdryer with labeled parts and directional arrows indicating motion or forceFeatures and Specifications
| Model | Kapasite | Boyutlar | Güç | Voltaj |
| VC9 | 800ml | 104.5x14.5x26cm41.1x5.7x10.2in | 600W | 220-240V50-60Hz |
Parçalar

text_image
1 2 3 4 5 6 7 8 9 10 11
natural_image
Simple line drawing of a conical lamp with a circular label showing number 12 (no text or symbols on the lamp itself)
text_image
13
text_image
14flowchart
graph TD
    A["①: Disassembly of a vacuum cleaner"] --> B["②: Disassembly of a vacuum cleaner"]
    B --> C["③: Insert vacuum cleaner"]
    C --> D["④: Assembly of a vacuum cleaner"]
    D --> E["⑤: Final assembly with handbag"]
    E --> F["⑥: Final assembly with handbag and plug"]
    F --> G["⑦: Final assembly with plug and plug, plus handle"]
DURONIC
Eklentiler
natural_image
Line drawing of a mechanical component with a handle and base plate (no text or symbols)natural_image
Simple line drawing of a 3D rectangular prism (no text or symbols)natural_image
Technical line drawing of a mechanical device with an arrow indicating assembly or motion (no text or symbols present)natural_image
Diagram of a vacuum cleaner being inserted into a base, showing the device's internal structure and assembly (no text or symbols present)text_image
Technical diagram showing a hairdryer tool with labeled parts and directional arrows indicating motion or assembly.natural_image
Line drawing of a vacuum cleaner with a numbered label (4) in the top-left corner, no text or symbols on the device itself.natural_image
Diagram of a mechanical device with an arrow indicating upward motion, no text or symbols presenttext_image
Diagram showing a vacuum cleaner's internal components and assembly process, labeled with step number ②natural_image
Technical line drawing of a handheld electric shaver with cable and plug, showing motion arrows (no text or symbols)Features and Specifications
| Model Nummer | Capaciteit | Dimensies Voltagemogen | ||
| VC9 | 800ml | 104.5x14.5x26cm41.1x5.7x10.2in | 600W | 220-240V50-60Hz |
Componenten

text_image
1 2 3 4 5 6 7 8 9 10 11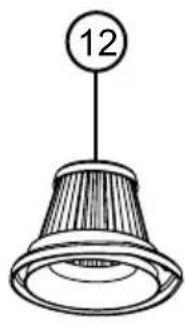
natural_image
Simple line drawing of a conical lamp with a circular label showing number 12 (no text or symbols on the lamp itself)
text_image
13
text_image
14natural_image
Technical line drawing of a mechanical component or bracket (no text or symbols)natural_image
Simple line drawing of a 3D rectangular prism (no text or symbols)natural_image
Technical line drawing of a mechanical device with an arrow indicating assembly or motion (no text or symbols present)natural_image
Diagram of a vacuum cleaner being inserted into a base, showing the device's internal structure and motion direction (no text or symbols)text_image
Technical diagram of a hairdryer with labeled parts and directional arrows indicating motion or assembly.natural_image
Line drawing of a vacuum cleaner with a numbered label (4) in the top-left corner, no text or symbols on the device itself.natural_image
Diagram of a handheld device with an upward arrow indicating motion or force (no text or symbols present)text_image
Diagram showing a vacuum cleaner with labeled parts and directional arrows indicating assembly stepstext_image
Diagram of a hairdryer with labeled parts and directional arrows indicating motion or forcenatural_image
Simple line drawing of a conical lamp with a circular label showing number 12 (no text or symbols on the lamp itself)
text_image
13
text_image
14natural_image
Line drawing of a mechanical component with a handle and base plate (no text or symbols)natural_image
Simple line drawing of a 3D rectangular prism (no text or symbols)natural_image
Technical line drawing of a mechanical device with an arrow indicating assembly or motion (no text or symbols present)natural_image
Diagram of a vacuum cleaner being inserted into a base, showing the device's internal structure and assembly (no text or symbols present)text_image
Technical diagram showing a hairdryer tool with labeled parts and directional arrows indicating motion or assembly.natural_image
Line drawing of a vacuum cleaner with a numbered label (4) in the top-left corner, no text or symbols on the device itself.natural_image
Diagram of a mechanical device with an arrow indicating upward motion, no text or symbols presenttext_image
Diagram showing a vacuum cleaner's internal components and assembly process, labeled with step number 2natural_image
Technical line drawing of a handheld electric shaver with cable and plug, showing motion arrows (no text or symbols)Anslut kabeln till nätuttaget.
strömbrytaren(8)