
OM60 - Deep fryer Duronic - Free user manual and instructions
Find the device manual for free OM60 Duronic in PDF.
| Product Type | Electric omelette pan |
| Brand | Duronic |
| Model | OM60 |
| Power | 600 W |
| Voltage | 220-240 V / 50 Hz |
| Capacity | 2 omelettes (4 eggs) |
| Plate Material | Non-stick |
| Removable Plates | Yes, for easy cleaning |
| Indicator Light | Indicates appliance is heating |
| Preheating | About 3 minutes |
| Cooking Time | 2 to 3 minutes per omelette |
| Handle | Thermally insulated |
| Safety | Automatic shut-off? Not specified; use with gloves |
| Care and Cleaning | Plates washable with soapy water; do not immerse appliance; avoid metal utensils |
| Warranty | 1 year |
| Use | Domestic use only |
| Color | Not specified (usually black or stainless steel) |
Frequently Asked Questions - OM60 Duronic
User questions about OM60 Duronic
0 question about this device. Answer the ones you know or ask your own.
Ask a new question about this device
Download the instructions for your Deep fryer in PDF format for free! Find your manual OM60 - Duronic and take your electronic device back in hand. On this page are published all the documents necessary for the use of your device. OM60 by Duronic.
USER MANUAL OM60 Duronic
Creative Consumer Electronics
natural_image
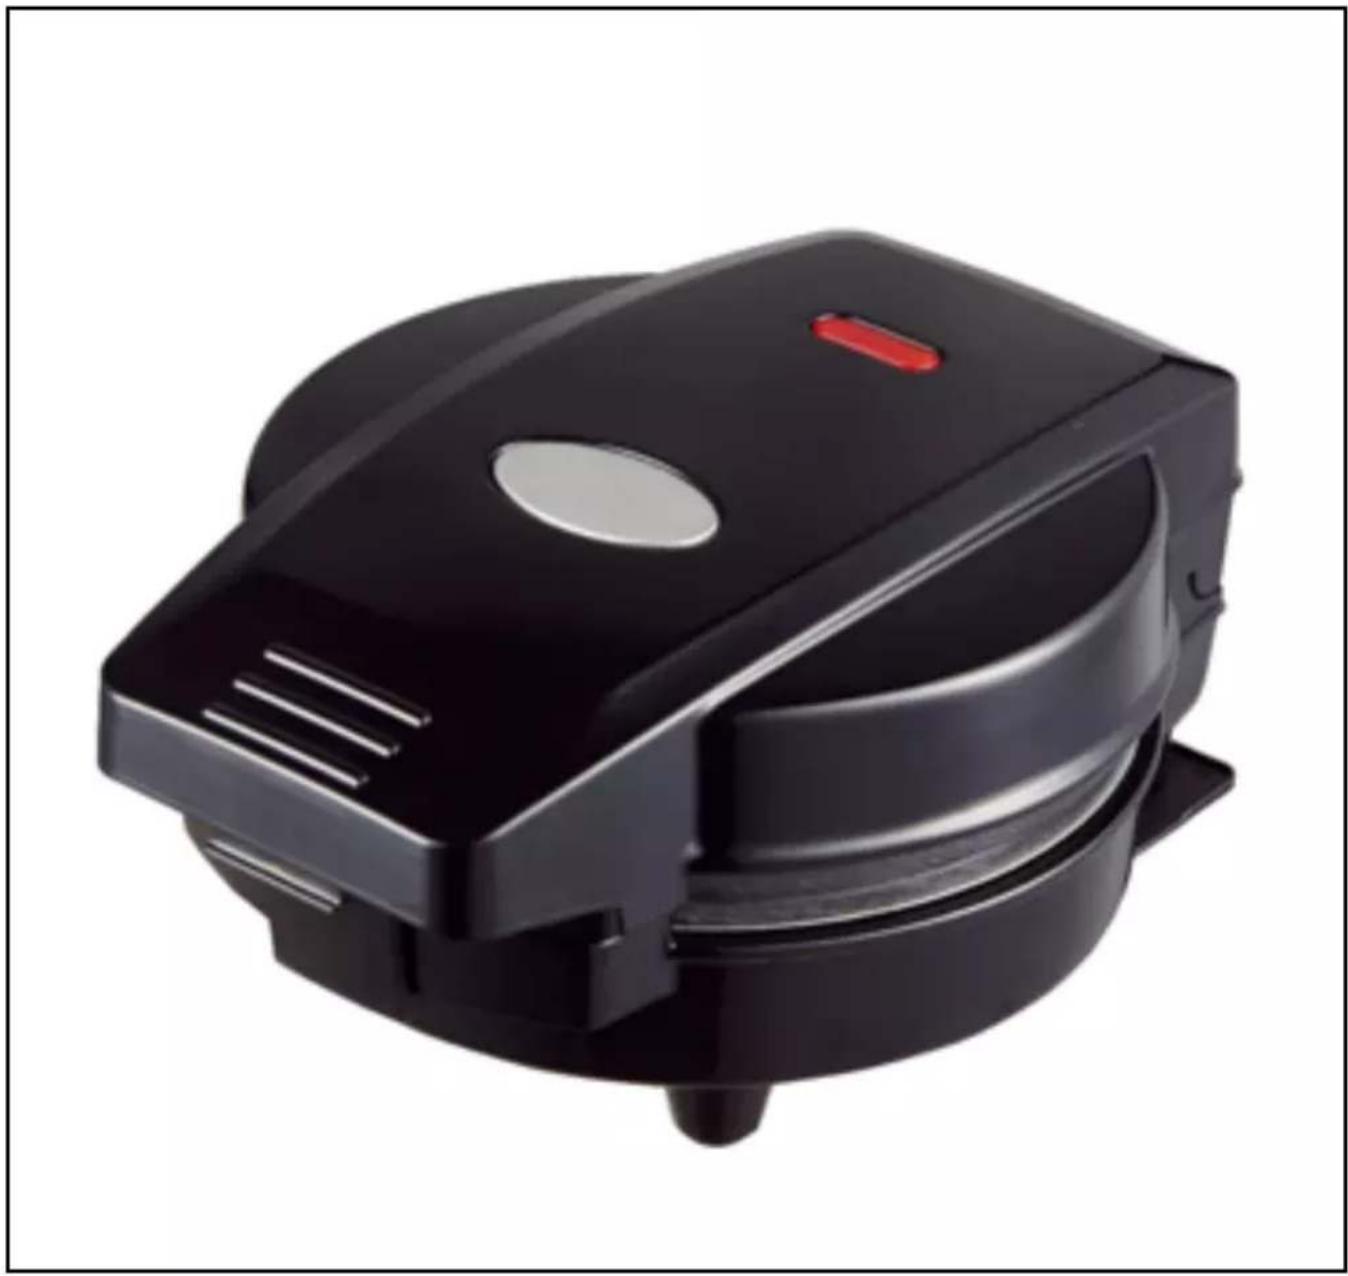
Black and white photo of a smart grater with a red button, no visible text or symbolsOM60 - Omelette Maker
PLEASE READ ALL THE INSTRUCTIONS BEFORE USE

duronic.com

duronic

@duronicmedia

Duronic

@duronicmedia
DURONIC
Contents
English Manual 4
• This appliance is for indoor/household use only. Do not use outdoors.
- The OM60 Omelette Maker is only for domestic use, it is not for commercial use.
- This appliance is not intended for use by persons (including children) with reduced physical, sensory or mental capabilities, or lack of experience and knowledge, unless they have been given supervision or instruction concerning use of the appliance by a person responsible for their safety.
- Do not operate this appliance if the power cable or plug is damaged. If either is damaged, return it to Duronic for service or repair by professional technician.
- Please ensure the mains power supply is 220-240V / 50Hz.
- Never try to replace the parts or repair the unit by yourself.
- To reduce the risk of electric shock, never operate this product near water, with wet hands, spill liquid on the appliance or submerge it in water or any other liquid.
- Do not use the unit near gas or other inflammable materials (such as benzene, paint thinner, sprays, etc.)
- Do not place an appliance on or near a hot gas or on a heated oven.
- Do not touch the cooking hotplates when hot. Use the handle to safely hold or move the Omelette Maker.
- Unplug from the mains power outlet when not in use and also before cleaning. Allow to cool down before putting on or taking off parts.
- Do not let the power cable hang over the edge of a table or counter, or touch a hot surface.
- Pay close attention to the appliance whilst in use, never leave it unattended.
- Do not use any accessories or attachments that did not come with the Omelette Maker, as this can pose a risk of injury or can damage the machine.
- Do not leave the appliance unattended when switched on.
- Do not use appliance for anything other than the intended use.
DURONIC
Safety Instructions (Continued)
• Always attach plug to appliance first, then plug the cable into the wall outlet. To disconnect, remove plug from wall outlet.
• This appliance is only to be operated in the closed position.
- When setting up your Omelette Maker, ensure that it is placed on a flat, even and dry surface.
- The appliance is not intended to be operated by means of an external timer or separate remote-control system.
- The temperature of the outside cover surfaces may be high when the appliance is operating.
PLEASE NOTE: You may notice a faint smoke or odour when first using the OM60 Omelette Maker. This is completely normal and should disappear after the first few uses.
DURONIC
Features and Specifications
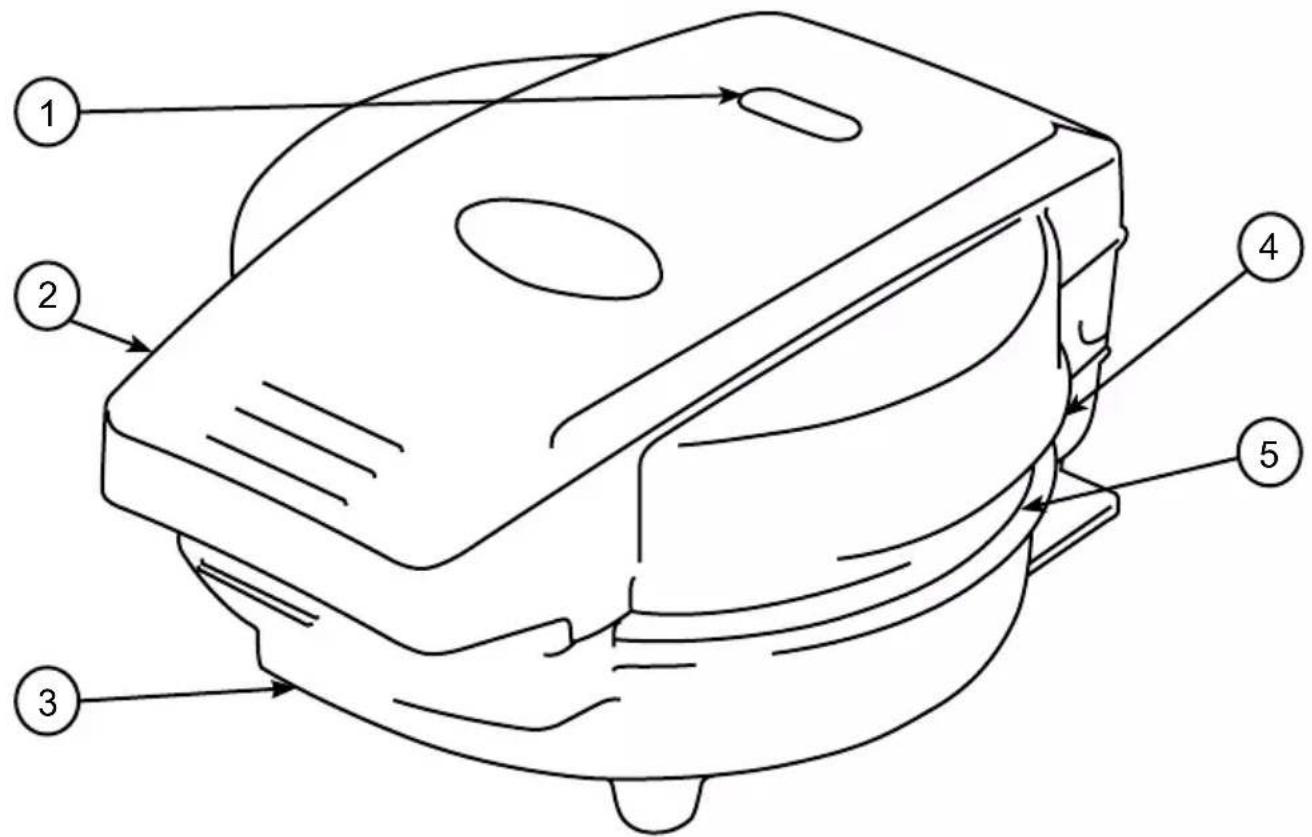
1) 'Ready' light indicator
4) Top cover
2) Handle
5) Cooking hotplates
3) Bottom cover
| MODEL POW | VER VOLTAGE RATING | |
| OM60 600W | 220-240V / 50Hz |
DURONIC
How to Use
FIRST USE
Unpack your OM60 Omelette Maker and set the packaging aside. Open the lid, clean the cooking surfaces thoroughly by wiping them with a damp sponge and dry the surfaces with a paper towel.
HOW TO MAKE OMELETTES
Plug the power cable into a mains outlet and allow the Omelette Maker to preheat while you prepare the eggs and other ingredients.
The indicator light will illuminate when the plug is connected to the mains outlet; it will stay on during preheating, then the indicator light will go off when appliance has heated up to the optimal temperature. It will take around 3 minutes to heat up, then the red light will turn off to indicate that the Omelette Maker is ready for use.
- Four large eggs will make two omelettes.
- Carefully pour the egg mixture into the hotplates (careful not to overfill) along with any other ingredients you wish to add to your omelette. If you are using vegetables or ingredients that require more cooking than the egg, cook these ingredients first in the hotplates for a couple of minutes before adding the egg mixture.
The hotplates are non-stick so you do not normally need to add anything to grease them. However, if you find your ingredients stick to the plates too much, you may need to wipe a very small amount of cooking oil with a pastry brush onto the hotplates.
-
Close the lid gently. Cook the egg mixture for around 2-3 minutes.
-
Remove the cooked omelettes from the hotplates with a plastic or wooden spatula. Be careful with your omelettes, as they will be quite hot. Allow to cool for a few minutes before enjoying.
If you wish to continue making omelettes, the next batch will cook more quickly as the hotplates will already be hot.
- Unplug the power cable after cooking, and allow the Omelette Maker to cool down before cleaning.

CAUTION:
• Cooking surface is hot; handle with care.
• Always use protective, heat-resistant, gloves or mitts when handing this product to avoid steam or other burns.
• Always remove the food from the omelette maker by using a plastic heatproof spatula or tongs.
Cleaning and Maintenance
Always unplug the Omelette Maker from power source and wait until it cools down before cleaning.
There is no need to take your Omelette Maker apart for cleaning after every use. Simply dry the hotplates with a paper towel to absorb excess oil. Brush away any crumbs from the grooves, and then wipe the hotplates with damp cloth and mild soap.
For a deeper clean, the hotplates can be removed and washed by hand in warm water and soap. Then dry with a towel. Only place the hotplates back in the machine once they are fully dry. To clean handles and other parts of the machine, use a damp (well wrung) cloth with mild soap.

CAUTION:
- Never immerse the machine in water.
- Avoid using sharp utensils, steel wool, metal scouring pads or abrasive cleaners as they will scratch the non-stick surface.
- Do not use cleansers or oven cleaners on the heating plates.
Basic Omelette Recipe
Makes two omelettes
INGREDIENTS:
- 4 large eggs
- Fresh or dried herbs – chives work particularly well
• Salt and pepper, according to taste
METHOD:
Plug in the Omelette Maker. Break the eggs into a measuring jug or bowl and beat well. Season with salt and pepper and then add the herbs. Stir well. Lightly oil the hotplates if needed. Pour the egg mixture into the hotplates dividing it in equal amounts . Close the lid by its handle. Leave to cook for 2-3 minutes.
Cheese & Bacon Omelette Recipe
Makes two omelettes
INGREDIENTS:
- 4 large eggs
- Handful of grated cheddar cheese
• 2-4 rashers of bacon, cut into small strips
• Salt and pepper, according to taste
METHOD:
Plug in the Omelette Maker. Break the eggs into a measuring jug or bowl and beat well. Season with salt and pepper and then add the cheese. Stir well. Lightly oil the cooking hotplates if needed. Add the sliced bacon, dividing it equally between the two hotplates and gently fry. Once the bacon is just about done, pour equal amounts of the egg mixture into each hotplate. Close the lid by its handle. Leave to cook for 2-3 minutes.
Tomato and Feta Omelette Recipe
Makes two omelettes
INGREDIENTS:
- 4 large eggs
- 50g of feta cheese, cut into small cubes
- 6 cherry tomatoes, sliced in half
• 2 spring onions, finely chopped - Salt and pepper, according to taste
METHOD:
Plug in the Omelette Maker. Break the eggs into a measuring jug or bowl and beat well. Season with salt and pepper and then add the cheese. Stir well. Lightly oil the hotplates. Add the sliced tomatoes, dividing it equally between the two hotplates and gently fry for 2 minutes. Pour equal amounts of the egg mixture into each hotplate. Close the lid by its handle. Leave to cook for 2-3 minutes.
DURONIC
Warranty
1 Year Guarantee from Shine-Mart Ltd, Trademark owners of Duronic Products. NOTE: THESE STATEMENTS DO NOT AFFECT YOUR STATUTORY RIGHTS AS A CONSUMER
This product has been manufactured under the strictest or quality control procedures, and using the highest quality of materials, to ensure excellent performance and reliability. It will give very good and long lasting service, provided it is properly used and maintained. The product is guaranteed for 1 years from the date of original purchase. If any defect arises due to a faulty materials or poor workmanship, the faulty product must be returned to the original place of purchase. Refund or replacement is at the discretion of that company.
Duronic Products are offered with a 1 year guarantee under the following conditions:
- The product must be returned to the retailer with original proof of purchase.
- The product must be installed and used in accordance with the instructions contained in this operating manual.
- It must be used only for domestic purposes.
- It does not cover wear and tear, malicious damage, misuse, neglect, inexpert repairs or consumable parts.
- Shine-Mart Ltd has no responsibilities for accidental or consequential loss or damage.
- Shine-Mart Ltd are not liable to carry out any type of servicing work, under the guarantee
- Valid in the UK only
This product is fitted with CE:1363 plug and fuse Imported by Shine-Mart Ltd, RM3 8SB

Information on waste Disposal for Consumers of
Electrical & Electronic Equipment.
This mark on a product and/or accompanying documents indicates that when it is to be disposed of, it must be treated as Waste
Electrical & Electronic Equipment, (WEEE).
Any WEEE marked products must not be mixed with general household waste, but kept separate for the treatment, recovery and recycling of the materials used.
For proper treatment, recovery and recycling; please take all WEEE marked
waste to your Local Authority Civic waste site,
where it will be accepted free of charge.
If customers dispose of Waste Electrical & Electronic Equipment correctly, they will be helping to save valuable resources and preventing any potential negative effects upon human health and the environment, of any hazardous materials that the waste may contain.
Follow Us

duronic.com

duronic

@duronicmedia

Duronic

@duronicmedia
1) Signal lumineux
1) Lampka gotowości
4) Górna pokrywka
2) Blokada rączk
5) Panele grzewcze
3) Dolna obudowa
| MODEL | MOC NAPIĘCIE |
| OM60 600 W | W 220-240V / 50 Hz |
DURONIC
Obstuga
PIERWSZE UŻYCIE


- OM60 - Omelette Maker
- Contents
- DURONIC
- Safety Instructions (Continued)
- Features and Specifications
- How to Use
- FIRST USE
- HOW TO MAKE OMELETTES
- CAUTION:
- Cleaning and Maintenance
- Basic Omelette Recipe
- INGREDIENTS:
- METHOD:
- Cheese & Bacon Omelette Recipe
- Tomato and Feta Omelette Recipe
- Warranty
- Follow Us
- Obstuga
- PIERWSZE UŻYCIE
Brand : Duronic
Model : OM60
Category : Deep fryer